How to make an Intro Video online [Step-By-Step Guide]
Arvind Kesh - April 18, 2023 - Leave your thoughts.
Where to start?
Now that you want to make an intro, there are two ways you can create an intro video using Animaker - 1. Use a template 2. Start from scratch The best part is, you can use all the powerful features in both methods. So, without further delay, let’s learn how to edit an intro video template.How to edit an Intro Video Template?
Editing a template from Animaker is pretty simple. You can even take a template and build on it to create your unique intro video in less than 5 minutes! Wanna learn how? Just follow these simple steps - Step 1: Choosing an Intro Template Step 2: Customizing the Intro Template Step 3: Adding your logo to the Intro Template Step 4: Downloading your Intro VideoStep 1: Choosing an Intro Template
Head over to Animaker’s Intro Maker and signup for an account, or log in to your Animaker account. As soon as you log in, you will find yourself on the dashboard. From there, just search for Intro on the “Search Bar” to go to the Intro template section -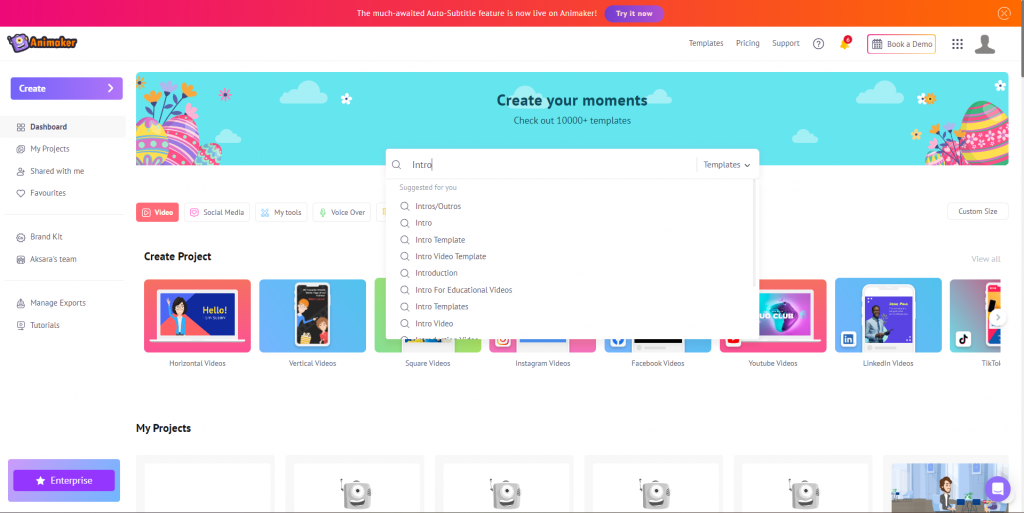 Here, you can choose a template from the massive list of intro templates. To preview an Intro template, simply hover your mouse over the template or use the ‘Preview’ button. To customize it, click on the ‘Use’ button.
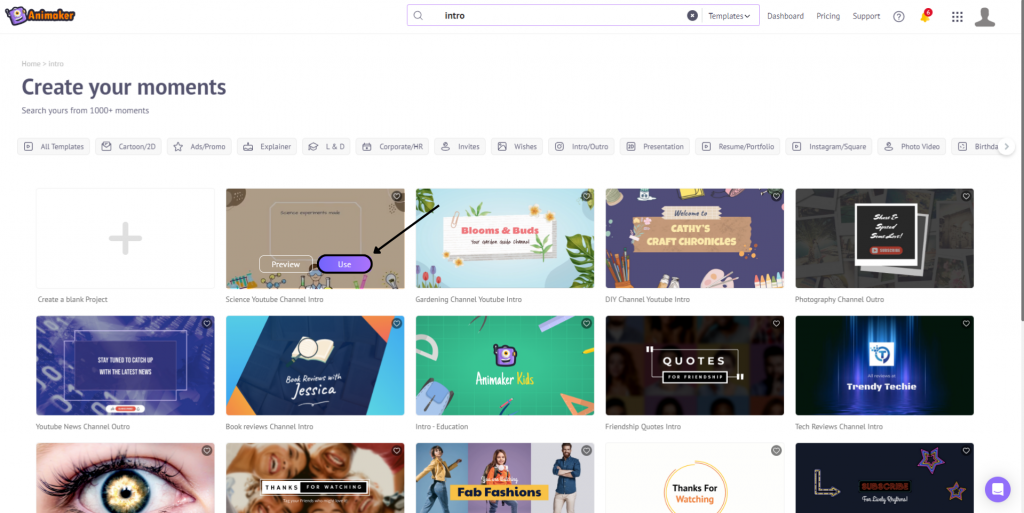 Once you click the “Use” button, the template will open in a new tab as a new project. This is what the screen looks like -
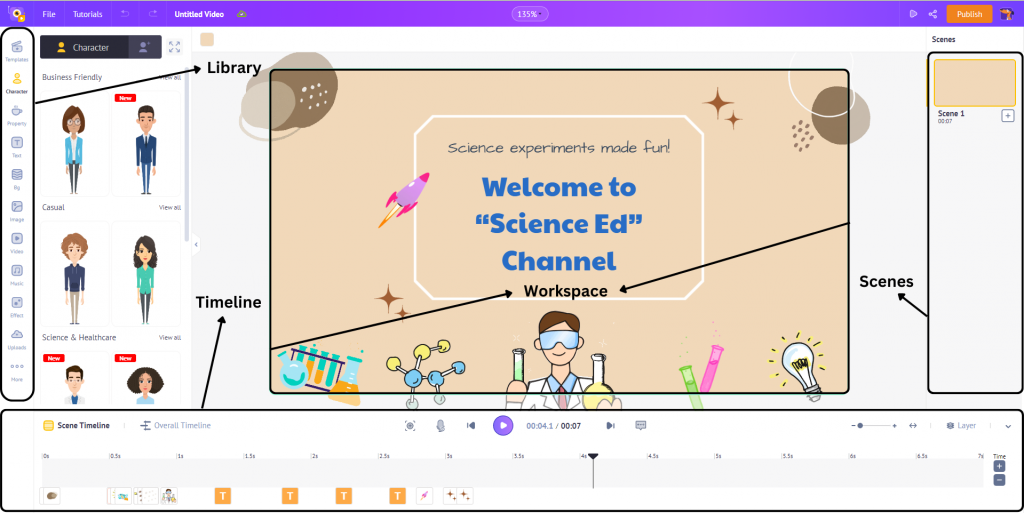 As you can see, there are 4 main sections you need to take a look at -
1. Workspace - It is the whitespace in the middle. This is the playground where you can create your intro video, add properties, create animations, and more.
2. Library - The menu on the left is the library. Here you can find different assets to take your intro video to the next level.
3. Scene - It is the menu to the right. This is where you can add, duplicate, and delete scenes and also add transition effects between scenes.
4. Timeline - It is the massive menu below your workspace. Here you can get a bird's eye view of the elements used in the intro and even adjust their timings.
As you can see, there are 4 main sections you need to take a look at -
1. Workspace - It is the whitespace in the middle. This is the playground where you can create your intro video, add properties, create animations, and more.
2. Library - The menu on the left is the library. Here you can find different assets to take your intro video to the next level.
3. Scene - It is the menu to the right. This is where you can add, duplicate, and delete scenes and also add transition effects between scenes.
4. Timeline - It is the massive menu below your workspace. Here you can get a bird's eye view of the elements used in the intro and even adjust their timings.
Step 2: Customizing the Intro Template
Now that you know how to navigate through the app, let’s see how you can customize the Intro Template. Let’s begin by customizing the background of the intro. To customize the background, simply click on the background. In the item menu, you will find the background color customization option where you can choose the background color. Additionally, you can use the color picker if you want to add custom colors. But wait the background is not limited to only colors. You can choose from various options like Colors, gradients, images, video backgrounds, and animated backgrounds. Next up, let’s customize the text of the intro template.
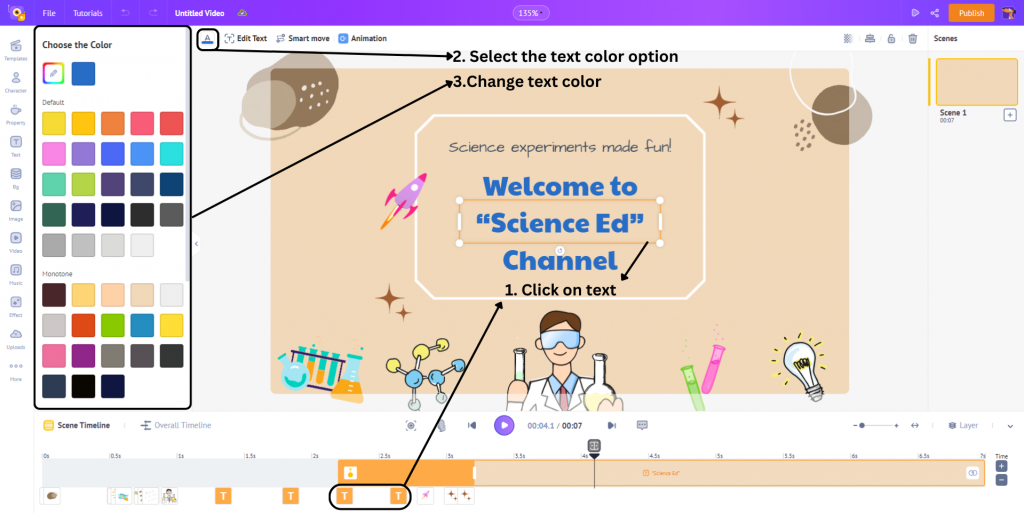
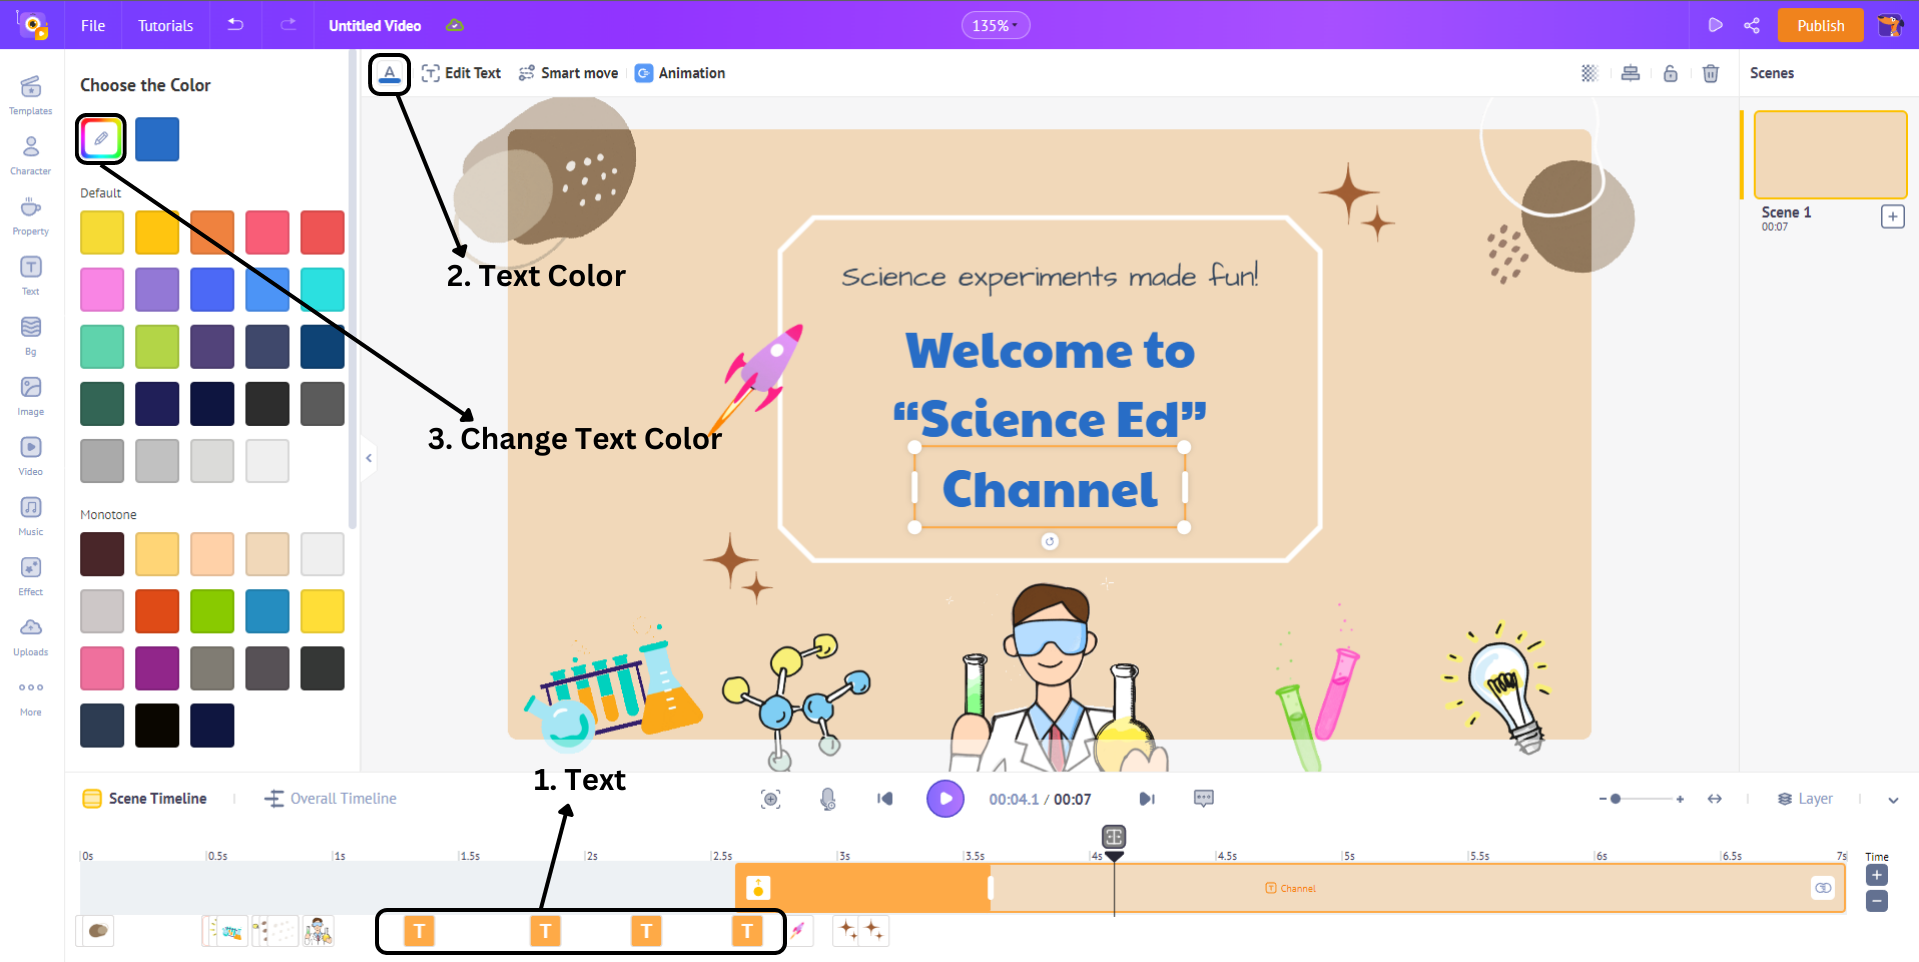
To change a font in the intro template, click on the text from the workspace or click on the text icon in the timeline. This opens the full-fledge text customization menu. Here, you get the freedom to choose from a massive list of font options or even upload your own.
You can also change the text style, alignment, and lots more. In any given template, you can simply click on the text to customize it and make it your own.
Next up, let’s customize the text of the intro template.
To change a font in the intro template, click on the text from the workspace or click on the text icon in the timeline. This opens the full-fledge text customization menu. Here, you get the freedom to choose from a massive list of font options or even upload your own.
You can also change the text style, alignment, and lots more. In any given template, you can simply click on the text to customize it and make it your own.
 Up next, let’s spice up the Intro template by customizing the elements.
A template is a combination of various elements like Properties, Text, and Special Effects. Here’s a screenshot of the different elements of a template in the timeline -
Up next, let’s spice up the Intro template by customizing the elements.
A template is a combination of various elements like Properties, Text, and Special Effects. Here’s a screenshot of the different elements of a template in the timeline -
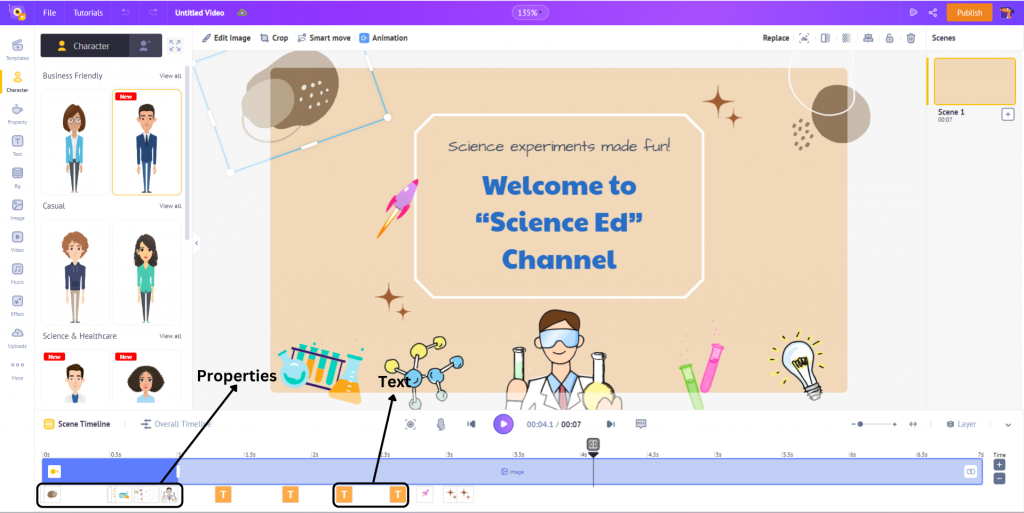 Each element of this template can be customized by clicking on the respective icon on the timeline, and customizing the color and other respective effects in the item menu.
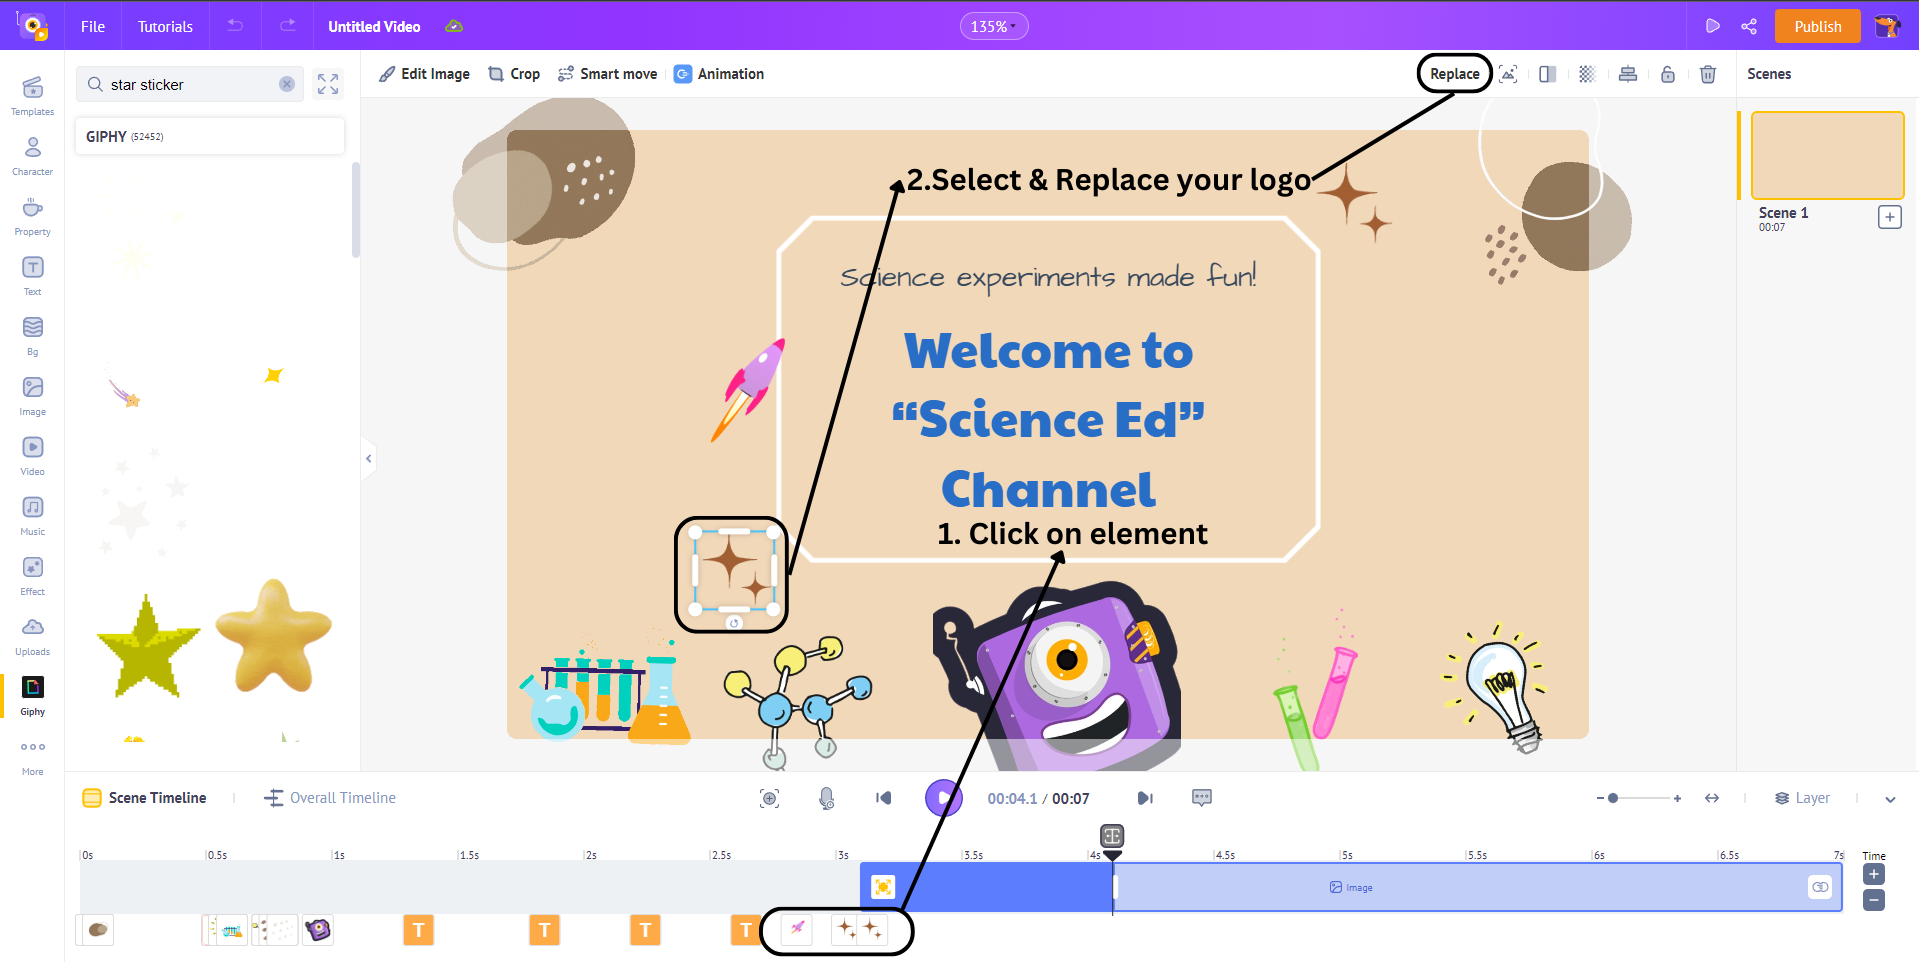
 To replace a property, click on the property in the timeline or your workspace. This opens the item menu. In the item menu, click “Replace,” and you can replace the property with anything you want.
Step 3: Adding your logo to the Intro Template
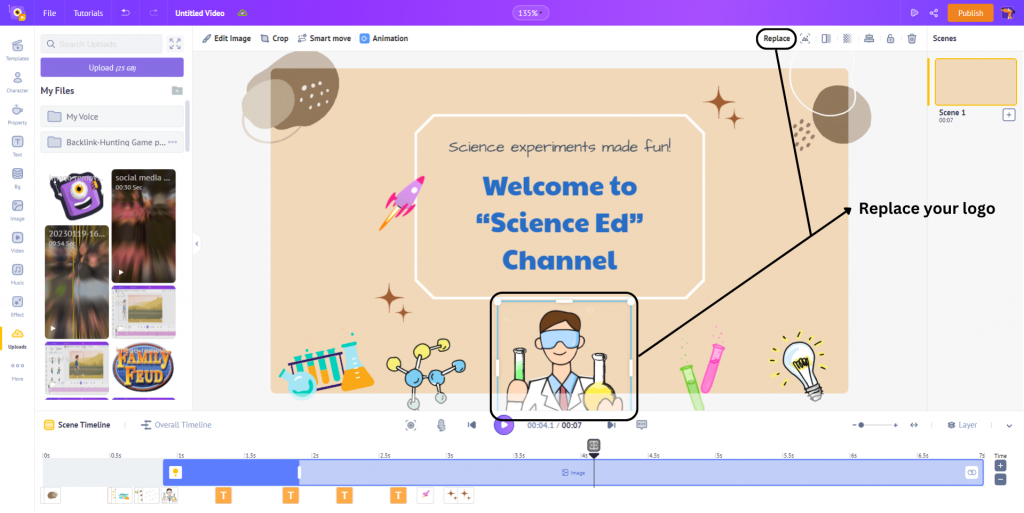
A Logo is one of the most important elements in an Intro Video. In our templates, we have used different logos. You can swap it with your logo using these simple steps. To add your logo, head over to the uploads section in the library and upload your logo from your computer.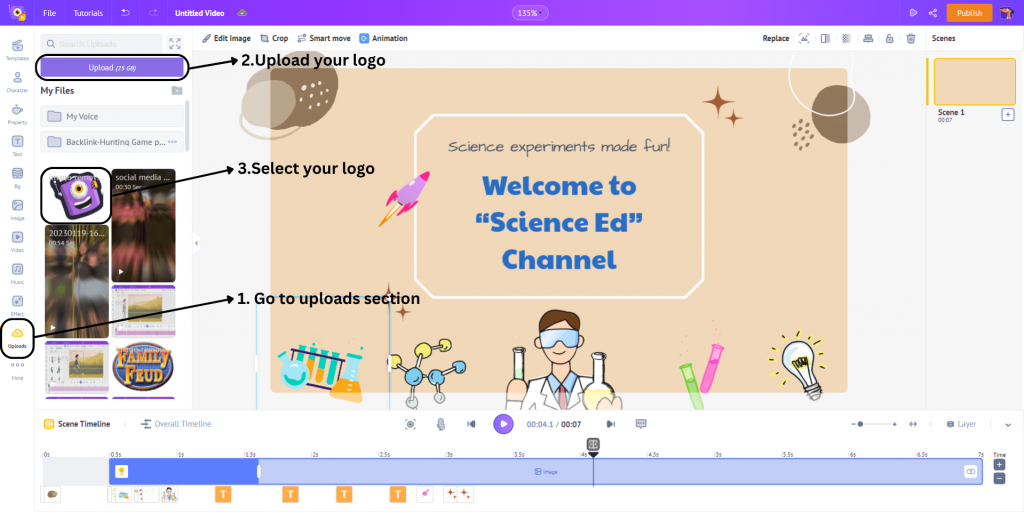 To replace the logo with your logo, you can use the “Replace” option from the Item menu. The menu appears when you click on the logo.
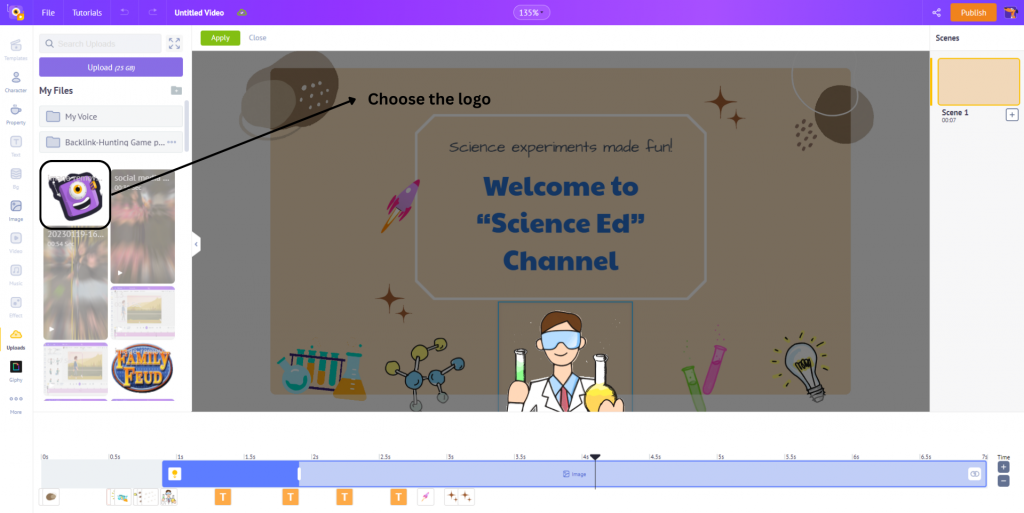
 Next up, you have to select your logo from the upload section.
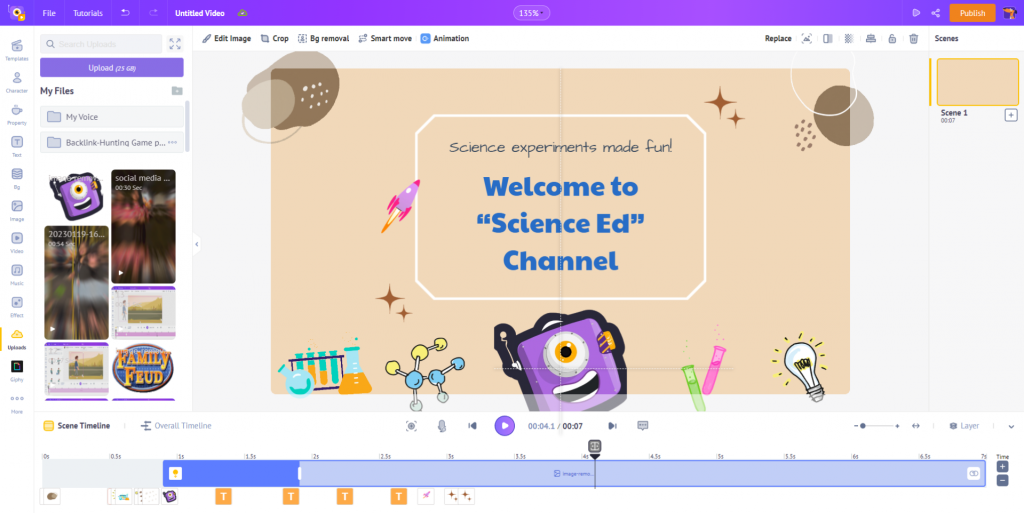
 Align your logo using the grid. You can easily center the logo with the help of the grid.
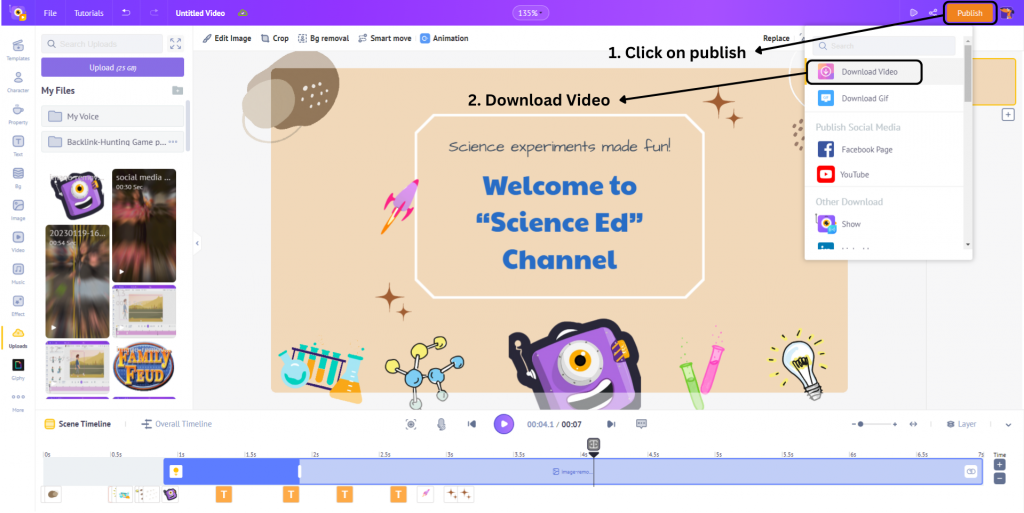
Step 4: Downloading your Intro Video
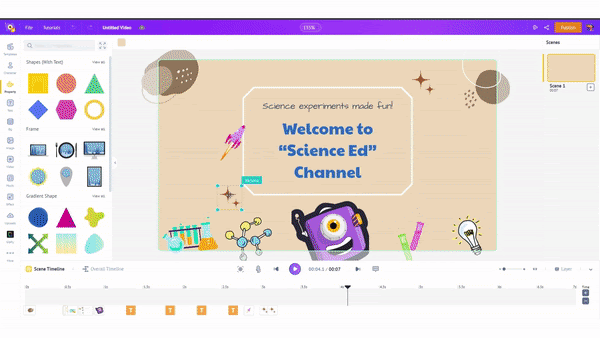
Once you are done customizing the intro video, you can preview the things you’ve made -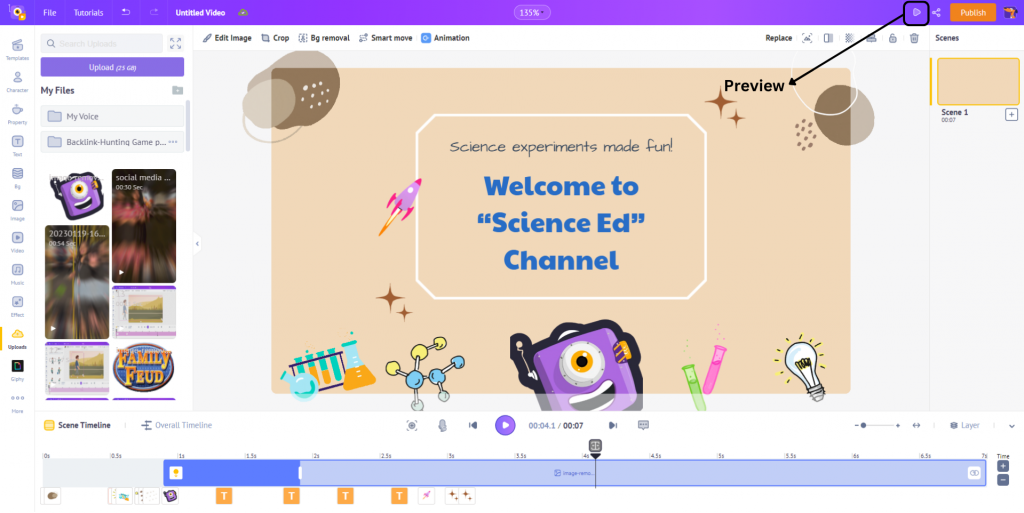 If everything looks fine, then you can export your intro video with a click of a button -
 Wasn’t that easy? If you want to explore your creative side, you can create your very own video intro from scratch. Here’s how you can do it -
How to create an intro video from scratch
If you plan to create your intro video from scratch, you might need to know more than just replacing logos, color, and text. So let’s see how you can create your Intro video from scratch using Animaker. Here are the steps to create an intro video from scratch: Step 1: Creating a new project Step 2: Adding a background Step 3: Uploading and animating a logo Step 4: Adding text to your intro Step 5: Preview and download your projectStep 1: Creating a new project
Head over to Animaker’s Intro Maker and signup for an account, or log in to your Animaker account. Once logged in to Animaker, you can create a new project from the dashboard by clicking Create > Create a video. Once you are inside the app, you can use the world’s most extensive animation library to create fantastic Intro videos. You can mix and match animation effects, props, GIFs, and more to create a unique video intro.
Now, let’s start by learning how to add a background to the intro video.
Once you are inside the app, you can use the world’s most extensive animation library to create fantastic Intro videos. You can mix and match animation effects, props, GIFs, and more to create a unique video intro.
Now, let’s start by learning how to add a background to the intro video.
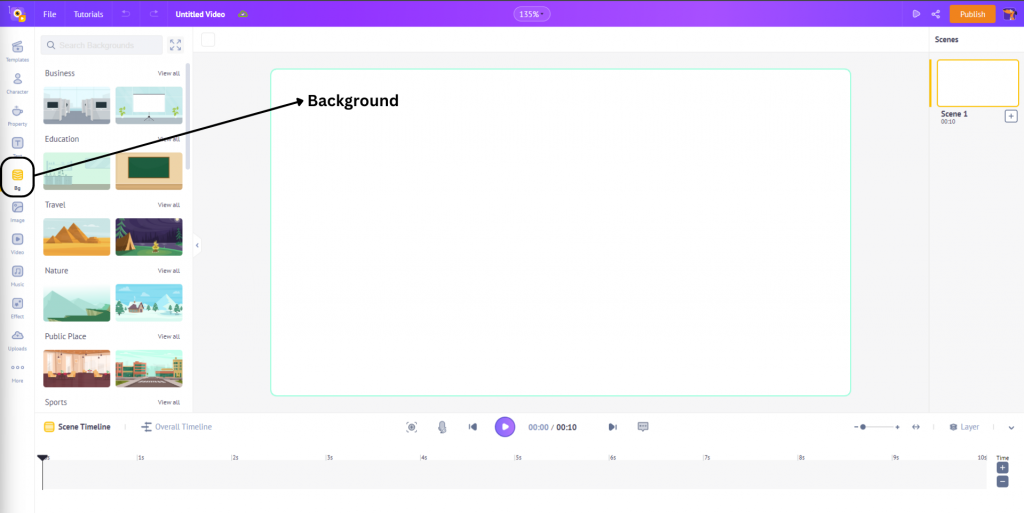
Step 2: Adding a background
Once you create a new project, you will see a screen just like this -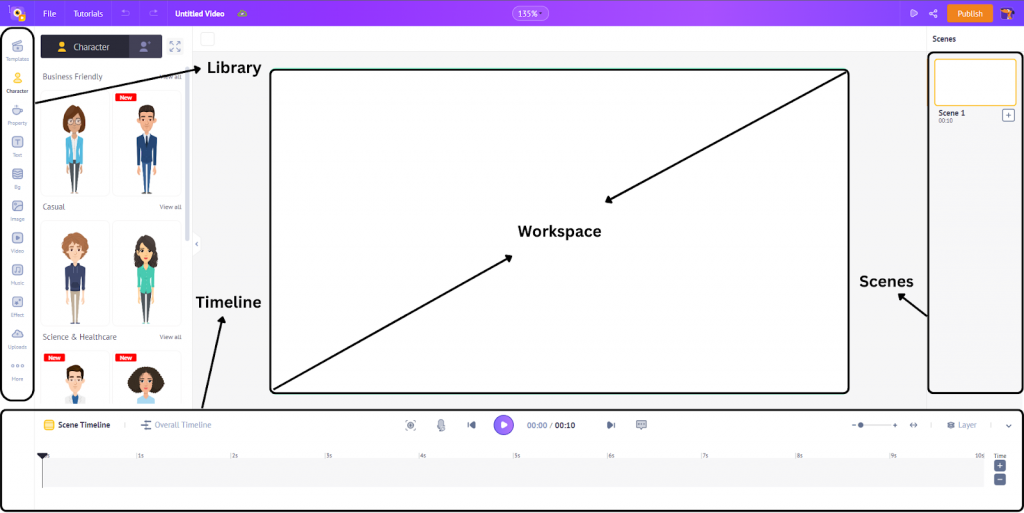 Go to the ‘BG’ section in the library to add a background that suits your video intro. Animaker’s background library has massive prebuilt backgrounds that are professionally made to suit every occasion.
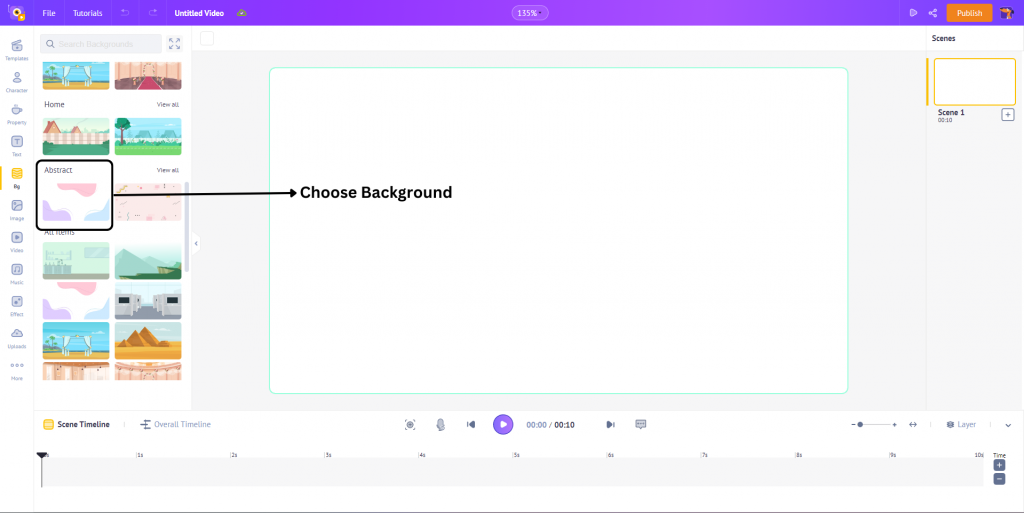
 For this tutorial, we will use this beautiful abstract background to make our intro video.
Step 3: Uploading and animating a logo
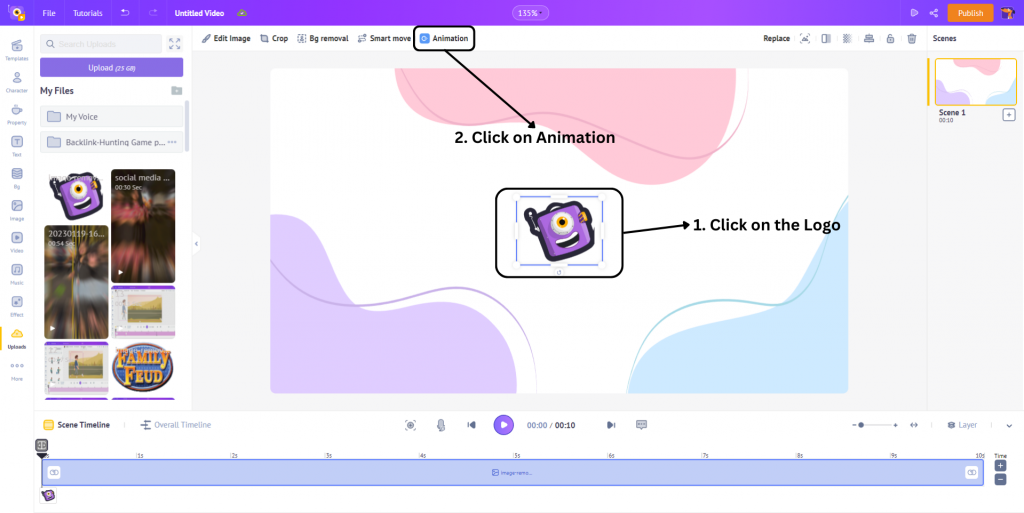
Now that you’ve added a background, let’s add a logo to your intro. To add a logo, head over to the uploads section in the library and upload your logo. Once it is uploaded, select it to add it to the workspace.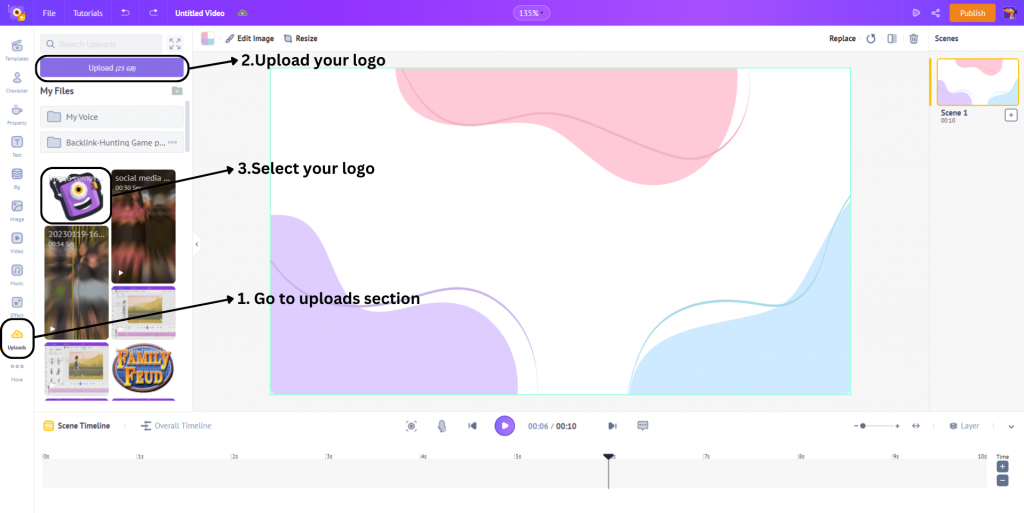 Once you’ve added your logo, it's time to give your logo some animation effects to spice things up. To add an animation, click on the logo and click on Animation in the Item menu.
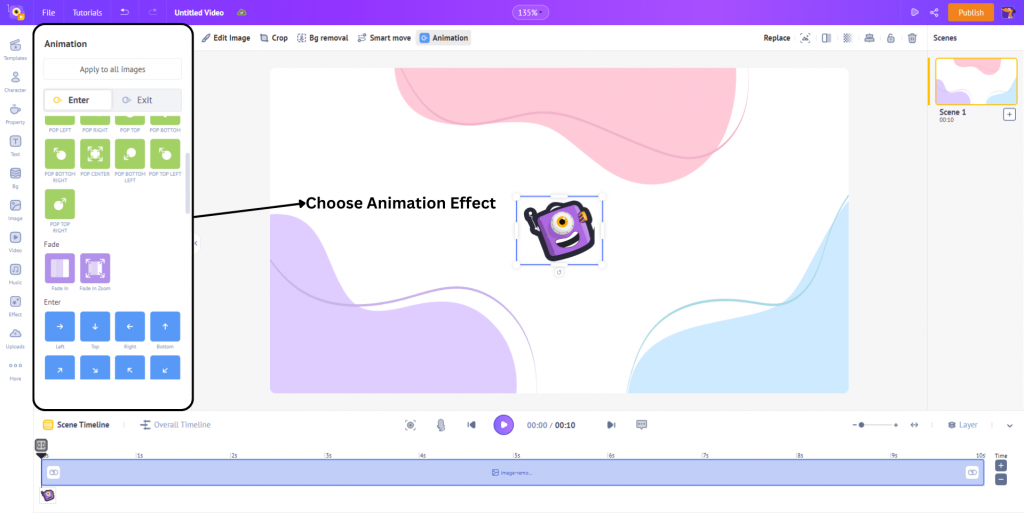
 In the Animation menu, you can find a massive list of animation effects for both entry animation and exit animation. We will use the “Fade in Zoom” animation for this example.
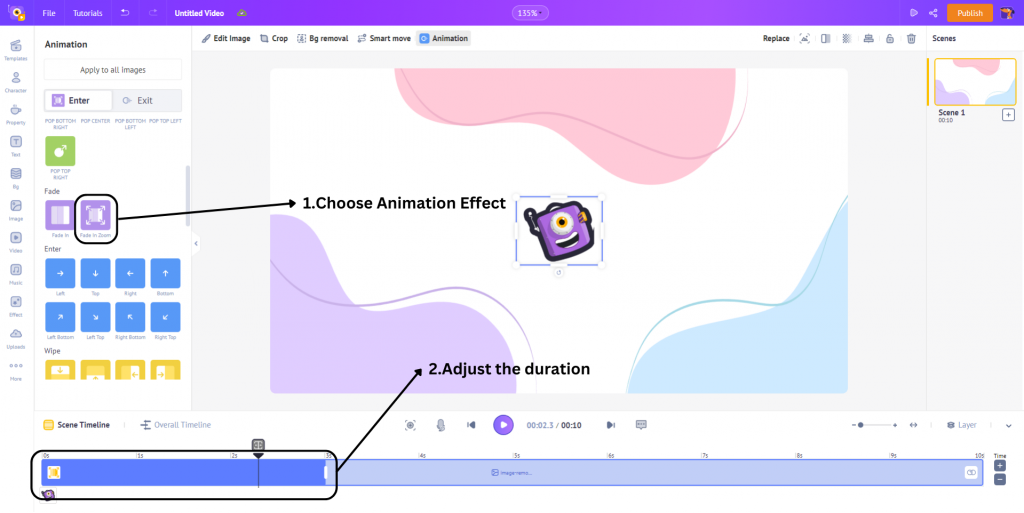
 Once you add the animation, you can adjust the duration of the animation in the timeline and customize it according to your needs.
In the timeline, you can see two colors, a dark shade of blue and a light shade of blue. The dark shade of blue represents the duration of the entry animation and the light shade of blue represents the overall duration of the logo. These durations can be increased or decreased by moving the end of the bars in or out.
Once you add the animation, you can adjust the duration of the animation in the timeline and customize it according to your needs.
In the timeline, you can see two colors, a dark shade of blue and a light shade of blue. The dark shade of blue represents the duration of the entry animation and the light shade of blue represents the overall duration of the logo. These durations can be increased or decreased by moving the end of the bars in or out.
Step 4: Adding text to your intro
Showcasing your brand name and the logo can help reach a wider audience and make the audience remember the brand. So, in this step, we will look at how to add text to your intro video. To do this, click on the text tab from the library and choose the type of text you want to add to your video. Or simply select a prebuilt text animation.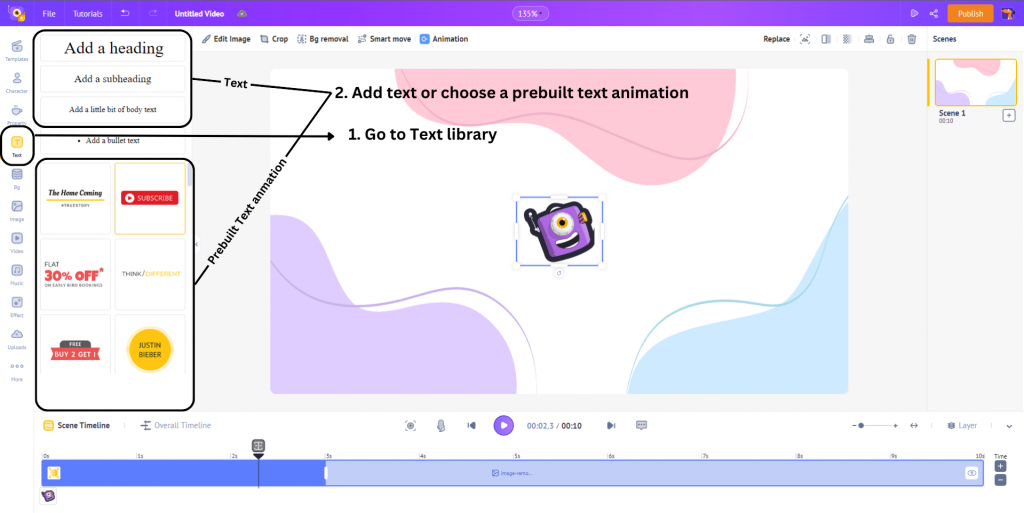 To do this, click on the text tab from the library and choose the type of text you want to add to your video. Or simply select a prebuilt text animation.
Similar to how you added animation to the logo, you can add animations to your text or simply choose a prebuilt text animation.
To do this, click on the text tab from the library and choose the type of text you want to add to your video. Or simply select a prebuilt text animation.
Similar to how you added animation to the logo, you can add animations to your text or simply choose a prebuilt text animation.
Step 5: Preview and download your project
Once you are done creating your own intro, it’s time to see how it looks. You can do that by previewing your video. If everything looks good, you can download it by clicking on Publish > Download video.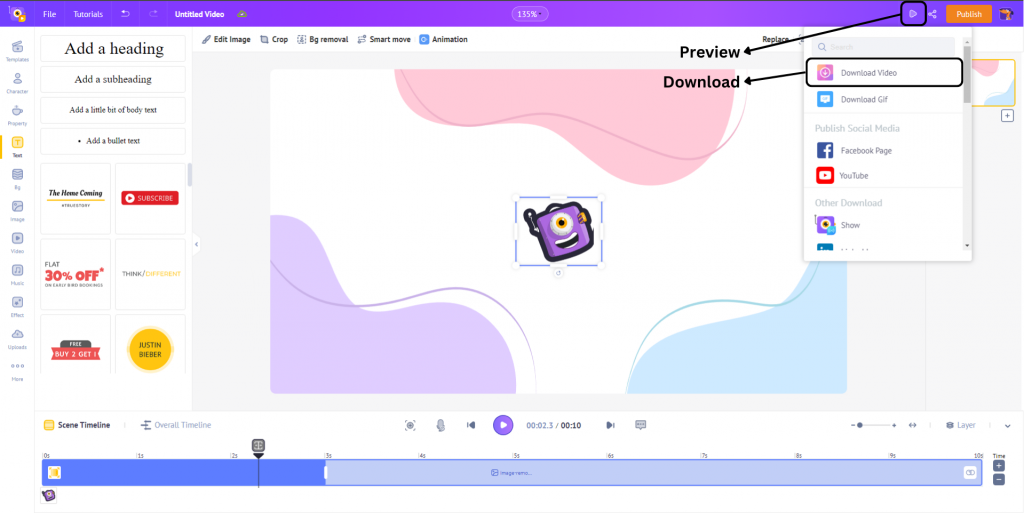 Wasn’t that simpler than you think?
Creating an intro with Animaker’s Intro Maker cannot get easier.
Intros are a crucial part of any piece of video content. They help you craft a compelling beginning to improve your video's engagement and keep your audience hooked to the video. You can make the intro even better by adding attention-grabbing hooks and providing a video teaser on what's to come. This drives the audience and sets the viewer on the stage for an engaging video.
So, when you plan on creating an intro, remember the importance of a strong intro. Then, take time to craft a perfect introduction video that will captivate and hook your audience to the video from the beginning.
Hope this article helped you understand intros and how to create an intro video by yourself using Animaker easily.
If you have any questions, please drop them in the comments below!
Wasn’t that simpler than you think?
Creating an intro with Animaker’s Intro Maker cannot get easier.
Intros are a crucial part of any piece of video content. They help you craft a compelling beginning to improve your video's engagement and keep your audience hooked to the video. You can make the intro even better by adding attention-grabbing hooks and providing a video teaser on what's to come. This drives the audience and sets the viewer on the stage for an engaging video.
So, when you plan on creating an intro, remember the importance of a strong intro. Then, take time to craft a perfect introduction video that will captivate and hook your audience to the video from the beginning.
Hope this article helped you understand intros and how to create an intro video by yourself using Animaker easily.
If you have any questions, please drop them in the comments below!