How to Make Animated Music Videos for free in under 15 mins? [With Animated Assets]
Joe Sundar Kishore - June 3, 2022 - Leave your thoughts.
- Step 1: Upload the Song
- Step 2: Adjust the Scene duration
- Step 3: Create a Custom Character
- Step 4: Add a background
- Step 5: Add text to the Scene
- Step 6: Add Camera effects
- Step 7: Add a New Scene
- Step 8: Animate the Character
- Step 9: Add Properties to the Scene
- Step 10: Animate the Properties
- Step 11: Download the Video
 This is the interface of the Animaker application.
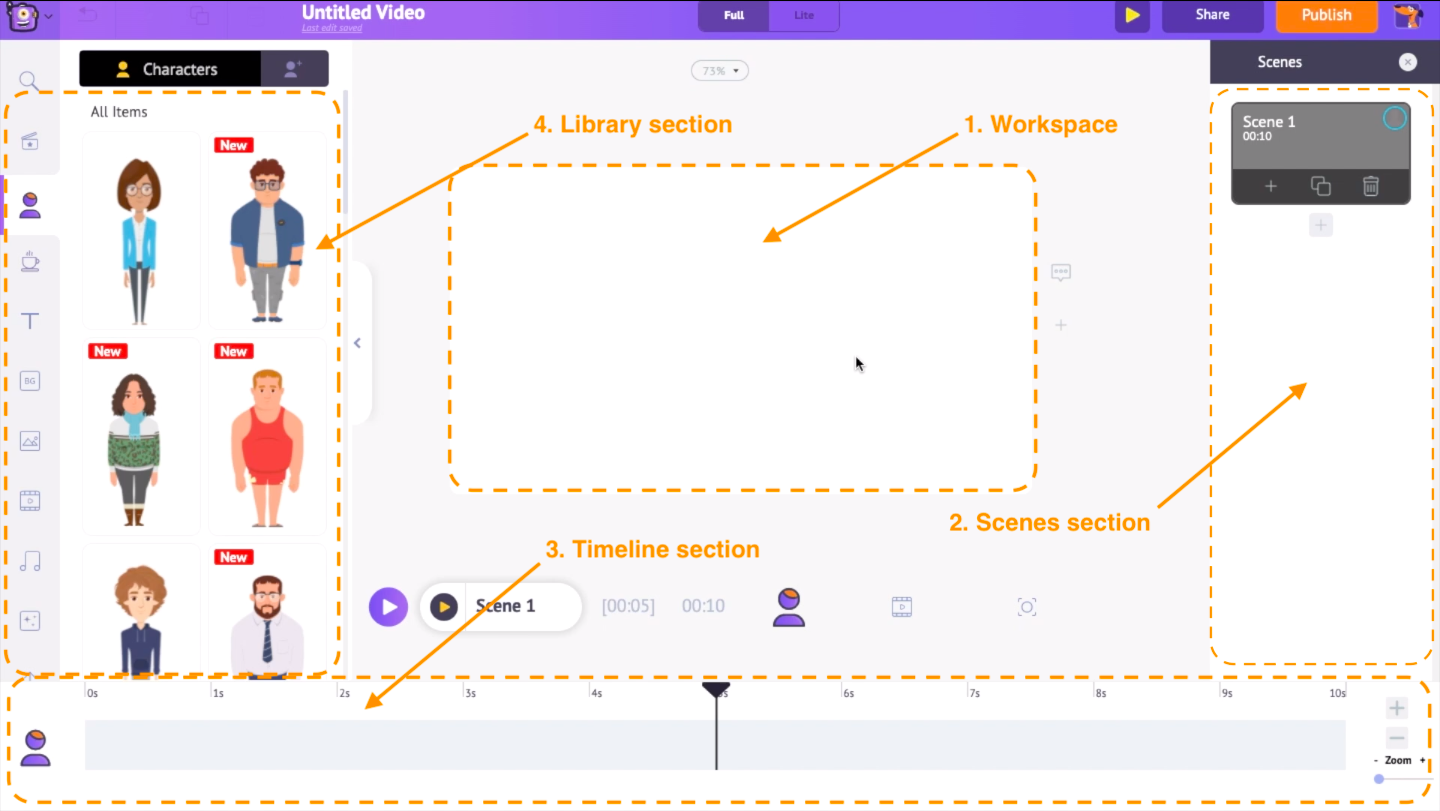 In the centre is the workspace. On the right-hand side is the scenes section. Scenes are similar to what you call slides in a presentation. Similar to how several slides combine to form a presentation, several scenes combine to form a video.
On the bottom, we have three different timelines. The first one is the animation timeline, the second one is the video and audio timeline, and the last one is the camera timeline.
Now that we are acquainted with the different sections in the Animaker application, it is time to jump into step 1 of creating that awesome music video.
In the centre is the workspace. On the right-hand side is the scenes section. Scenes are similar to what you call slides in a presentation. Similar to how several slides combine to form a presentation, several scenes combine to form a video.
On the bottom, we have three different timelines. The first one is the animation timeline, the second one is the video and audio timeline, and the last one is the camera timeline.
Now that we are acquainted with the different sections in the Animaker application, it is time to jump into step 1 of creating that awesome music video.
Step 1: Upload the Song
As the first step, let’s upload the song for which we want to create the animated video. Go to the upload section present at the bottom of the library and upload the music track. Now click on the uploaded track to add it to the project.
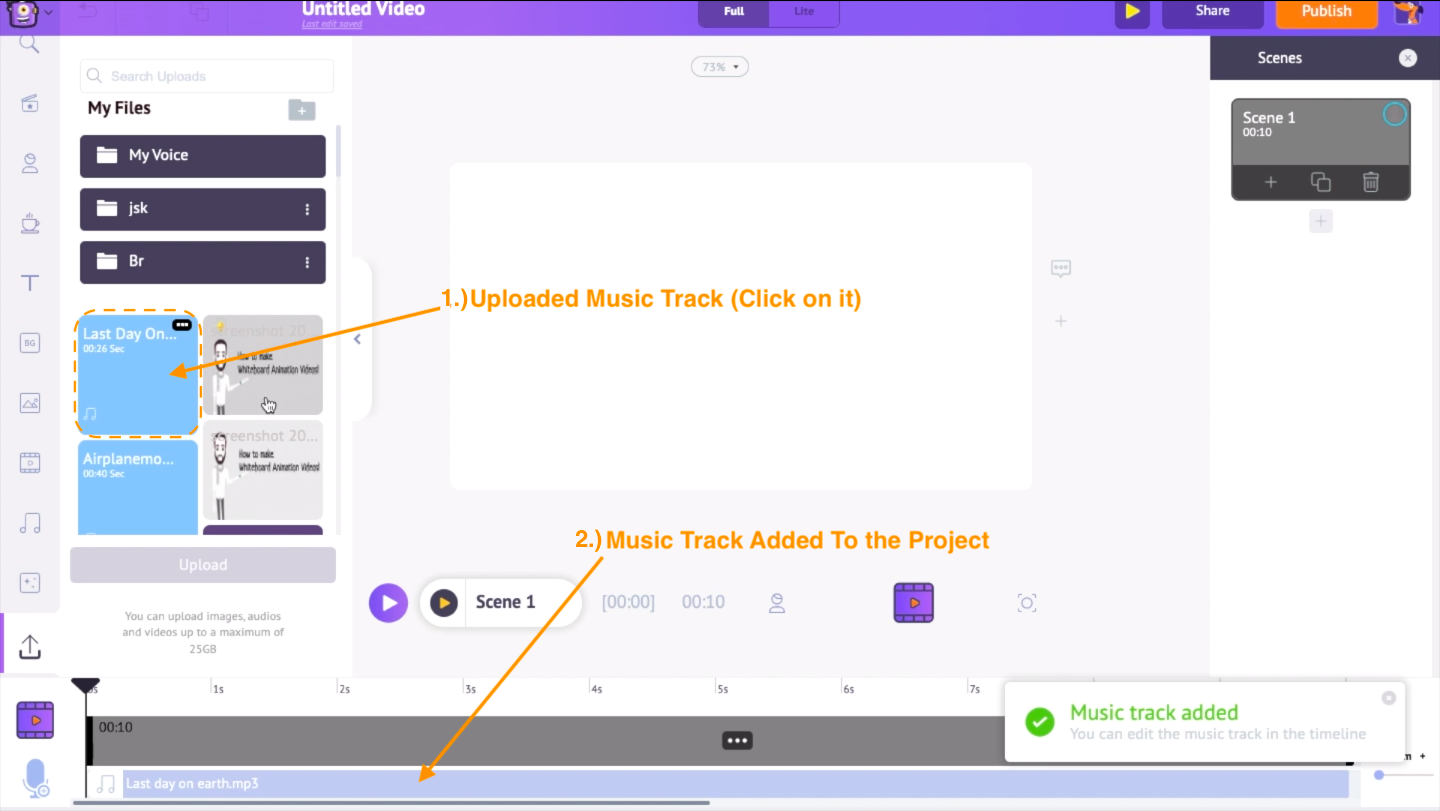 Also, make sure that you have the song's lyrics in a document. We can use this later to add the lyrics to the music video.
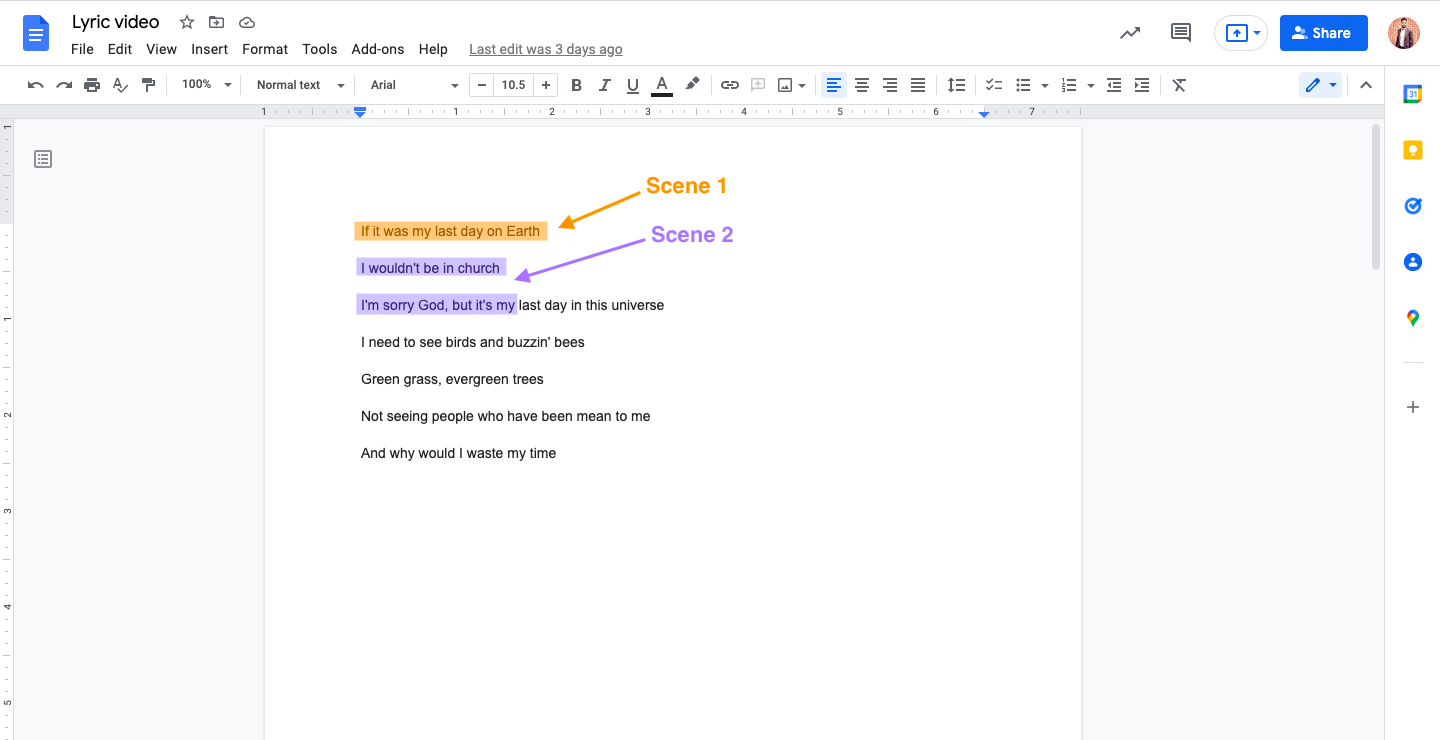
Now, we are going to break this song into smaller parts and create the video. For example, in the first scene, I want to create visuals for the words “If it was my last day on earth.” In the second scene, we will be creating the visual till the words ‘it’s my.’ Similarly, we will be breaking the lyrics into smaller parts and creating the visuals for it.
Also, make sure that you have the song's lyrics in a document. We can use this later to add the lyrics to the music video.
Now, we are going to break this song into smaller parts and create the video. For example, in the first scene, I want to create visuals for the words “If it was my last day on earth.” In the second scene, we will be creating the visual till the words ‘it’s my.’ Similarly, we will be breaking the lyrics into smaller parts and creating the visuals for it.
Step 2: Adjust the Scene duration
By default, the duration of a scene is 10 seconds in Animaker. But as I said earlier, we will create visuals till the word ‘earth’ in the first scene. So let’s hear the music and reduce the duration of the scene. To have a preview of a scene, use the Scene Preview option above the timeline. To increase or decrease the duration of a scene, use the + and - options present at the bottom of the library. Since the words "last day on earth" ends at 4 seconds, our first scene should also be 4 seconds in length. So let’s reduce the scene’s duration to 4 seconds by pressing the - option four times.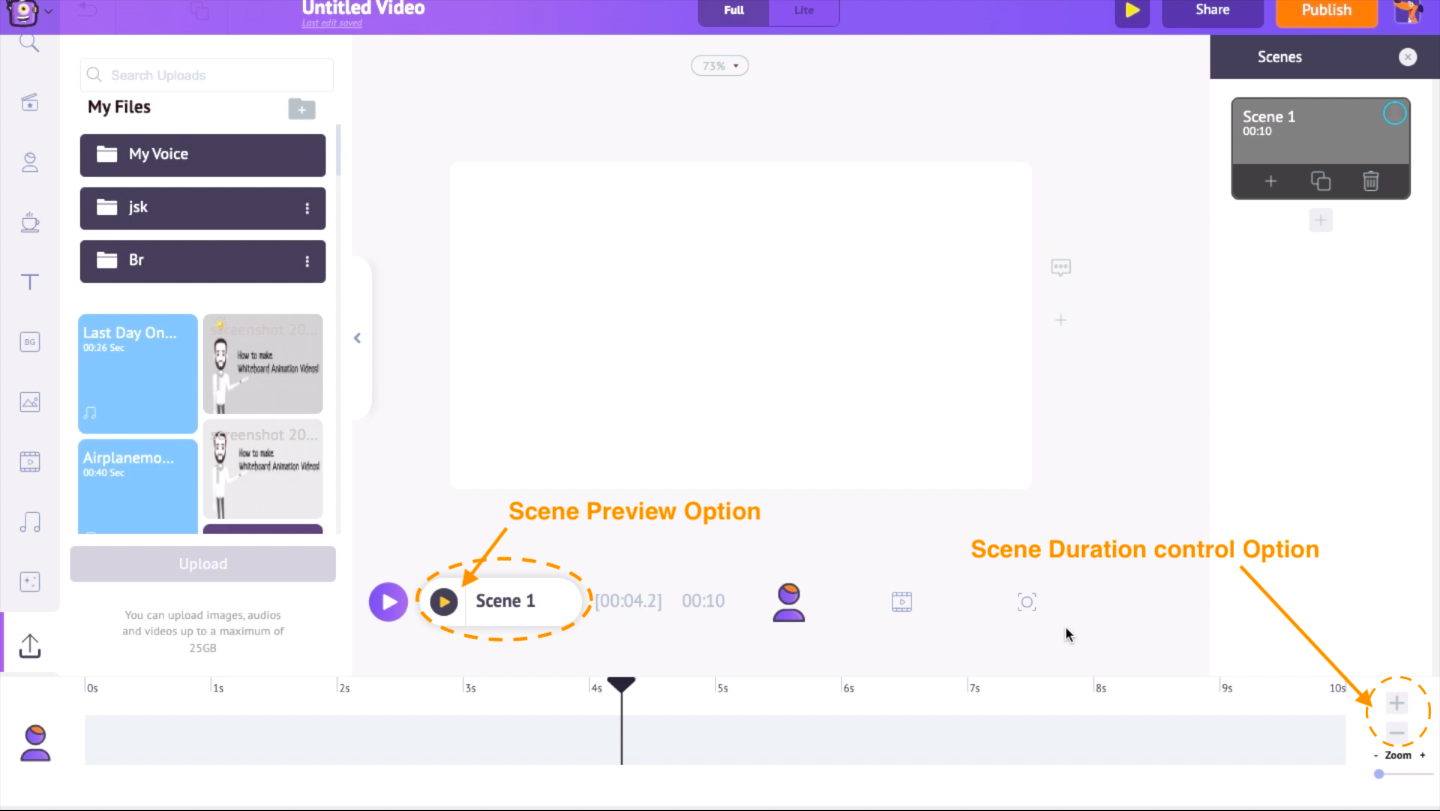 If you want to reduce the duration of a scene much more precisely, open the video and audio timeline, select the scene's edge, and drag it to the exact duration you want it to be.

Step 3: Create a Custom Character
As the next step, we are going to add a character to the scene. Go to the characters section in the library. You have two options to add a character. Either you can use a character from the library or build a custom character. To build a custom character, open the ‘My Characters’ section and click on the ‘Create Your Own’ option.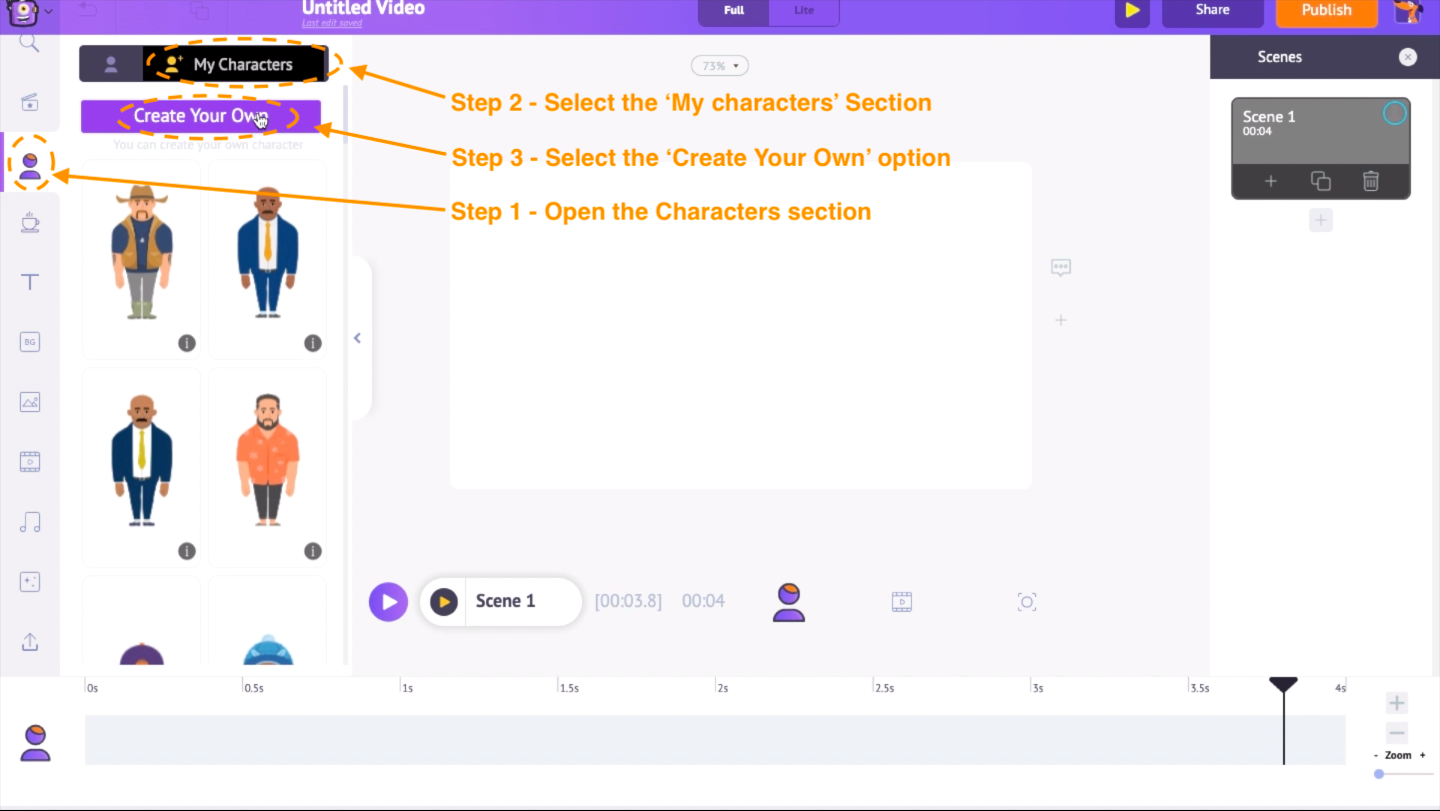 The character builder tool will open in a new window.
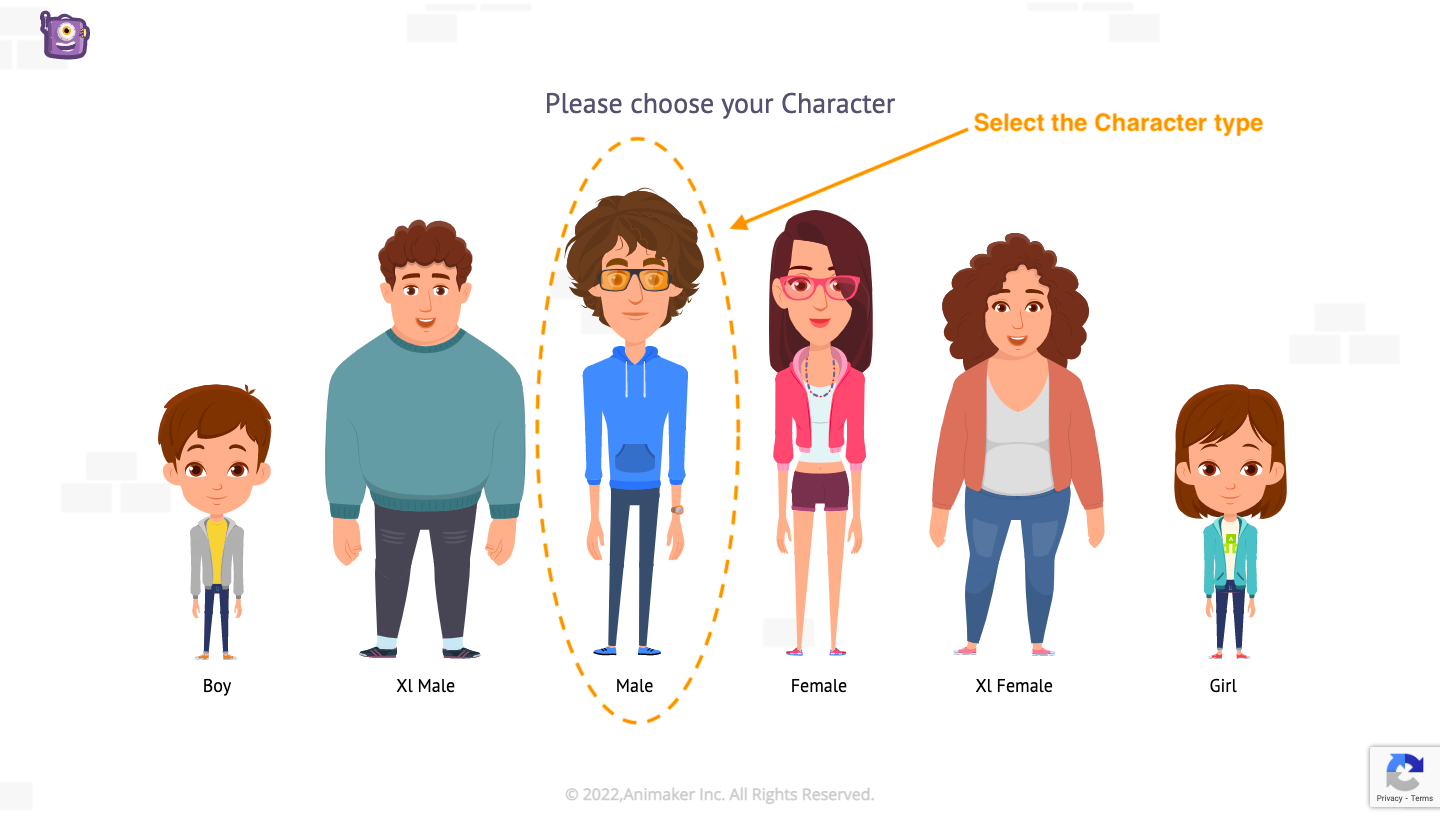
Select a type of character from the shown options.
The character builder tool will open in a new window.
Select a type of character from the shown options.
 Now start building after selecting one. You can customise every part of the body. You can create billions of unique characters.
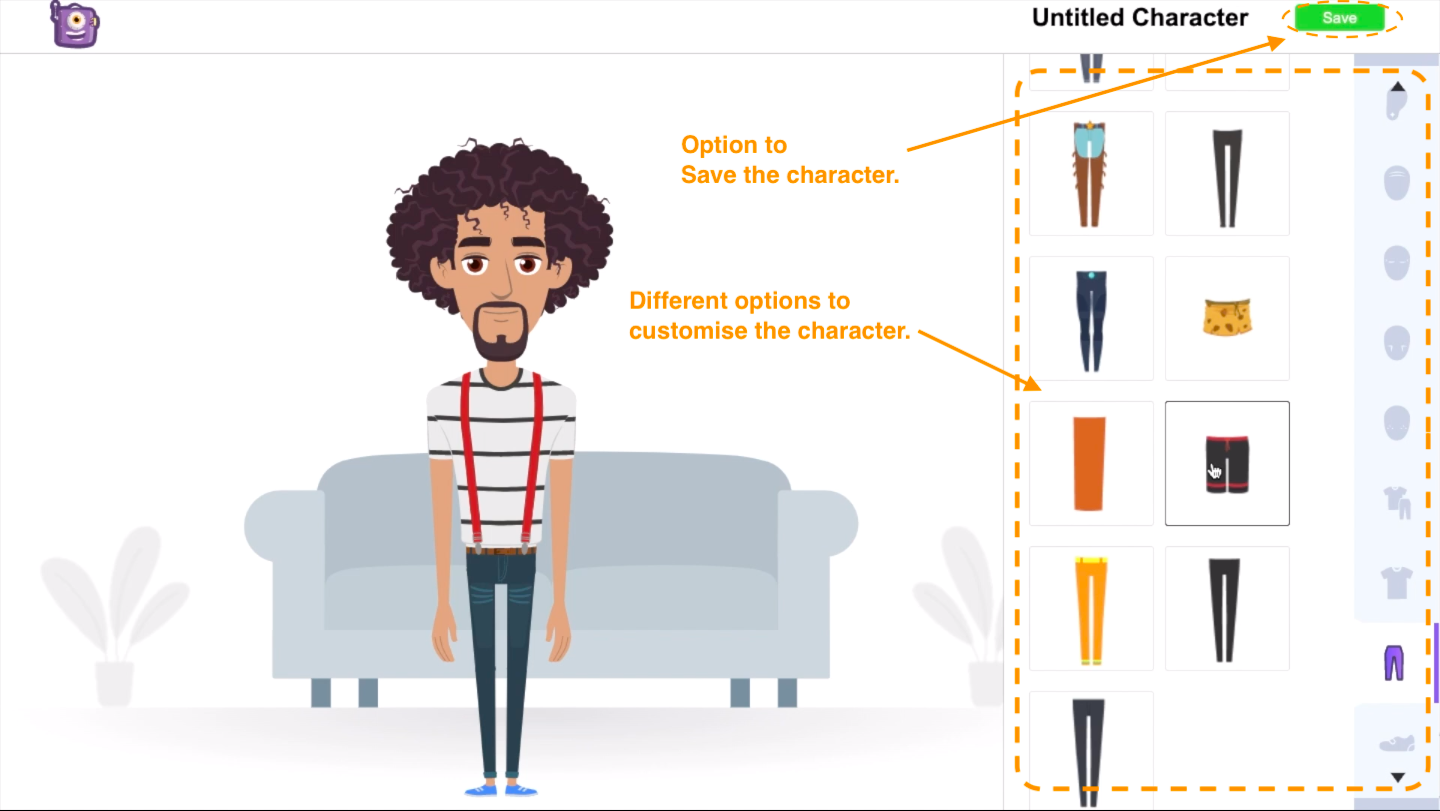 Once done, save the character using the save option at the top and get back to the project.
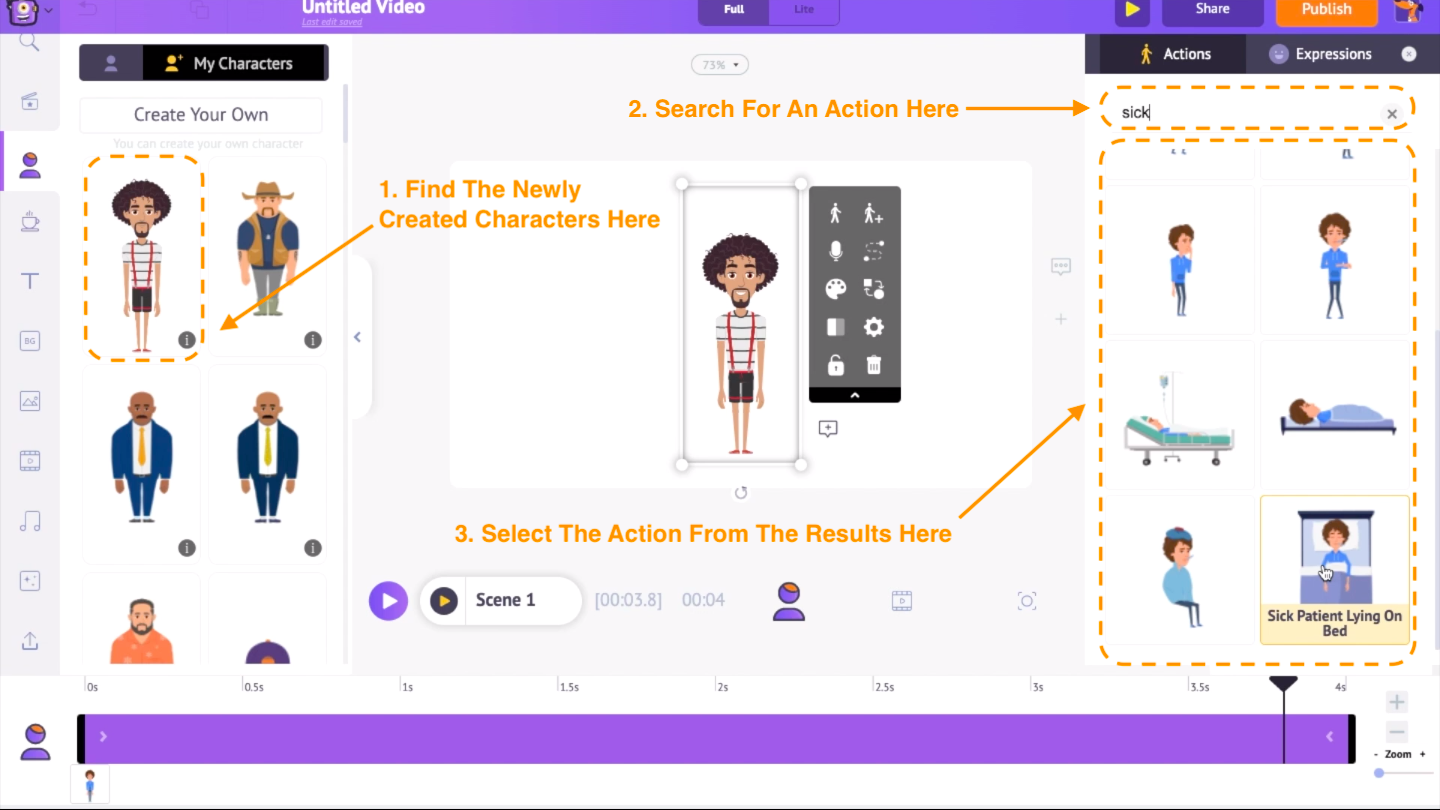
You can find the newly created character under the ‘My characters’ section. Click on the character to add it to the video. On the right-hand side, you can notice the actions tab. It has more than 500 actions that can be applied to that character.
I want him to look like he is admitted to the hospital and scared for his life so that the visual will match the lyric. So I am searching for the word ‘Sick’ and selecting this action where he is lying over a hospital bed.
Once done, save the character using the save option at the top and get back to the project.
You can find the newly created character under the ‘My characters’ section. Click on the character to add it to the video. On the right-hand side, you can notice the actions tab. It has more than 500 actions that can be applied to that character.
I want him to look like he is admitted to the hospital and scared for his life so that the visual will match the lyric. So I am searching for the word ‘Sick’ and selecting this action where he is lying over a hospital bed.
Step 4: Add a Background
As the next step, I want to add a background to the scene. Either you can add a background from the Backgrounds Section or the Images section of the library. We are going to use one of the images as the background. So let’s go to the images section. I want a background that looks like a ‘Tile floor’. So I am searching for the same words. Once you click on the image, it will get added to the workspace. Along with the image, you can see a set of options. This is called the item menu. Every element added to the workspace will have an item menu of its own. Let’s use the option ‘Set as background’ under the item menu to apply this image as background to the scene.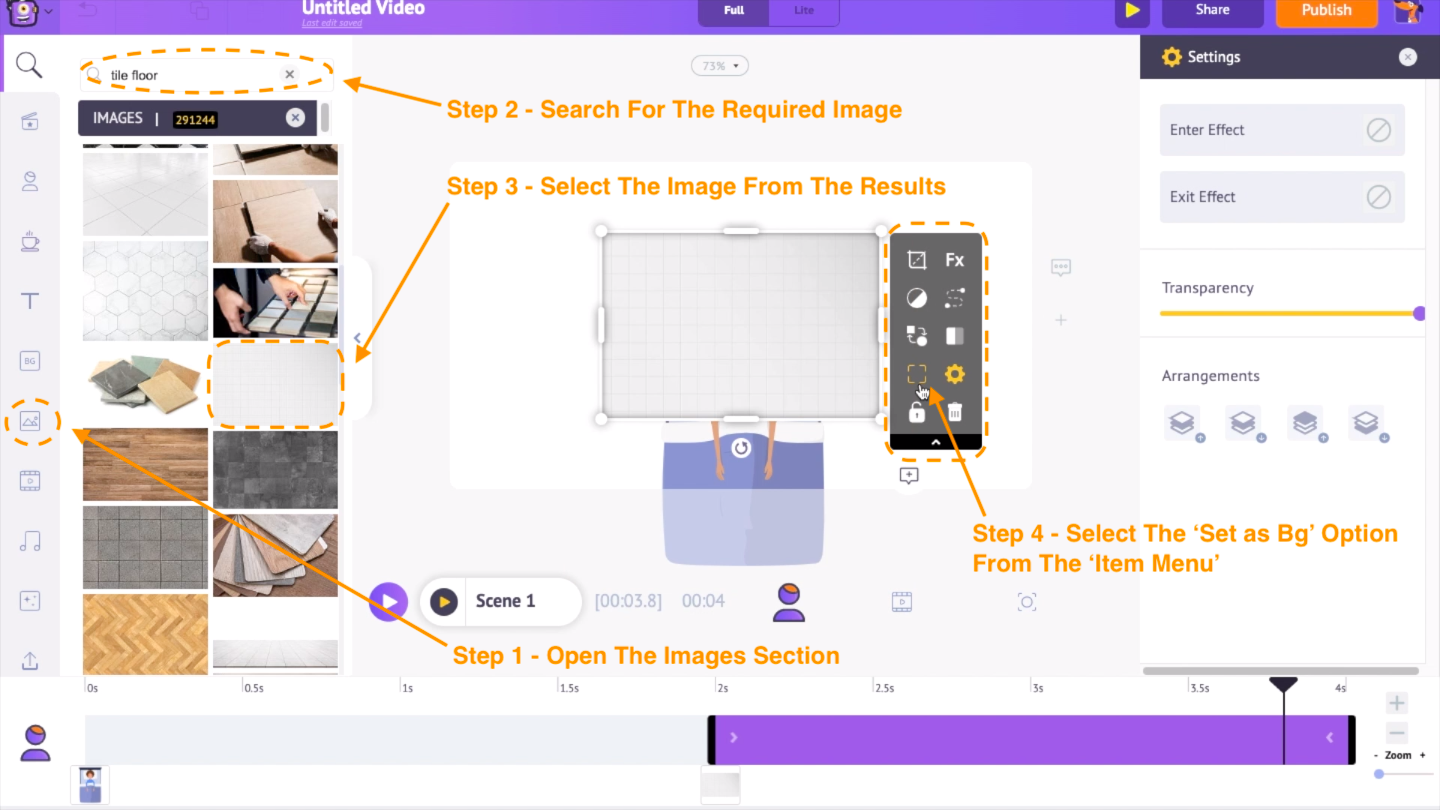
Step 5: Add Text to the Scene
To add text, go to the text section in the library and click on the text. Now type the text. I am going to copy and paste the lyrics inside the text box. On the right side, under the settings tab, you have options to edit the text. Let's change the font style, font size, and font color.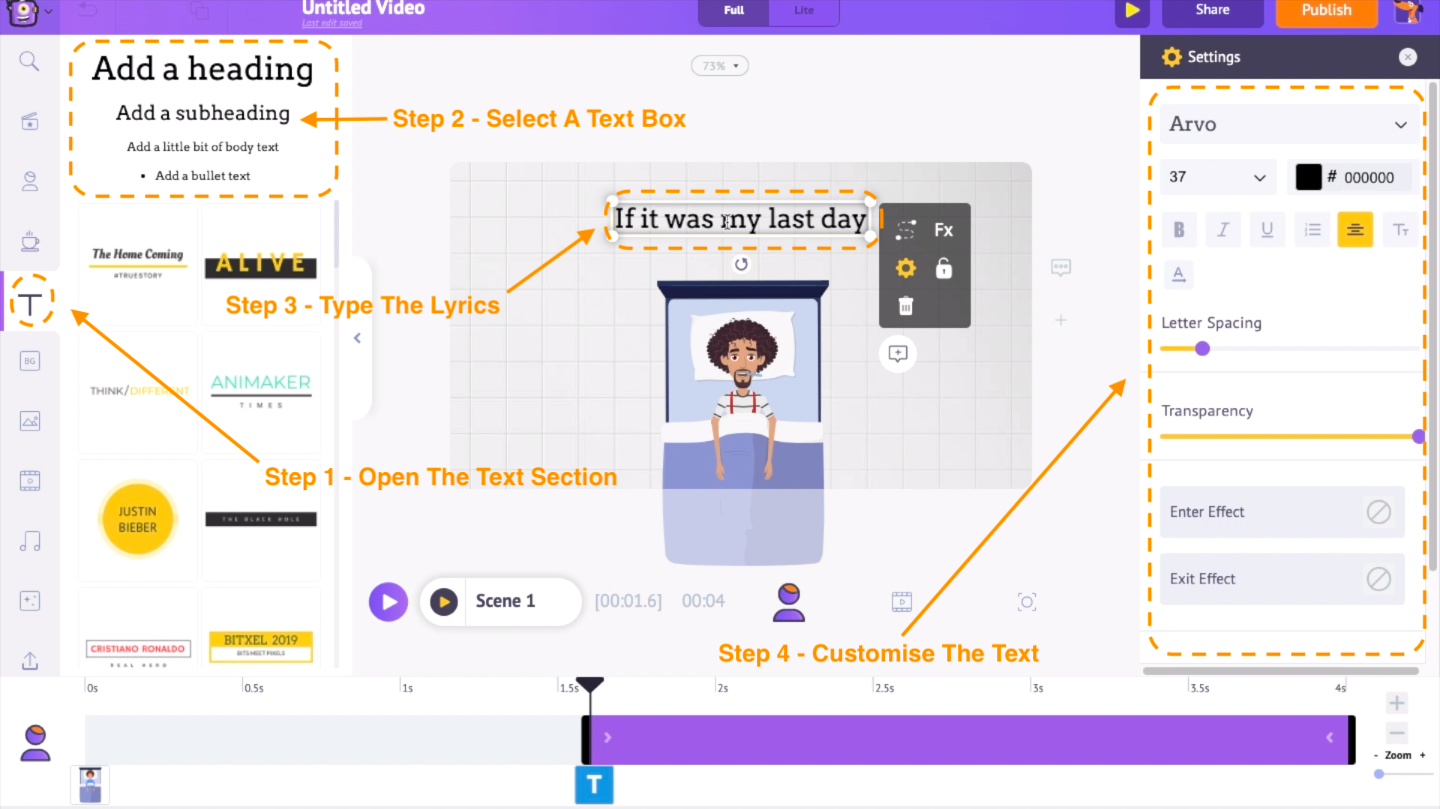 On the timeline, you can notice a purple-coloured bar. It indicates the duration for which this text is going to be visible. You can control the duration of the text using this bar. You can notice this bar for any element added to the workspace.
For example, I want this text to be visible for a specific duration. For that, I have to select and drag the edges of this bar and keep it between that particular duration.
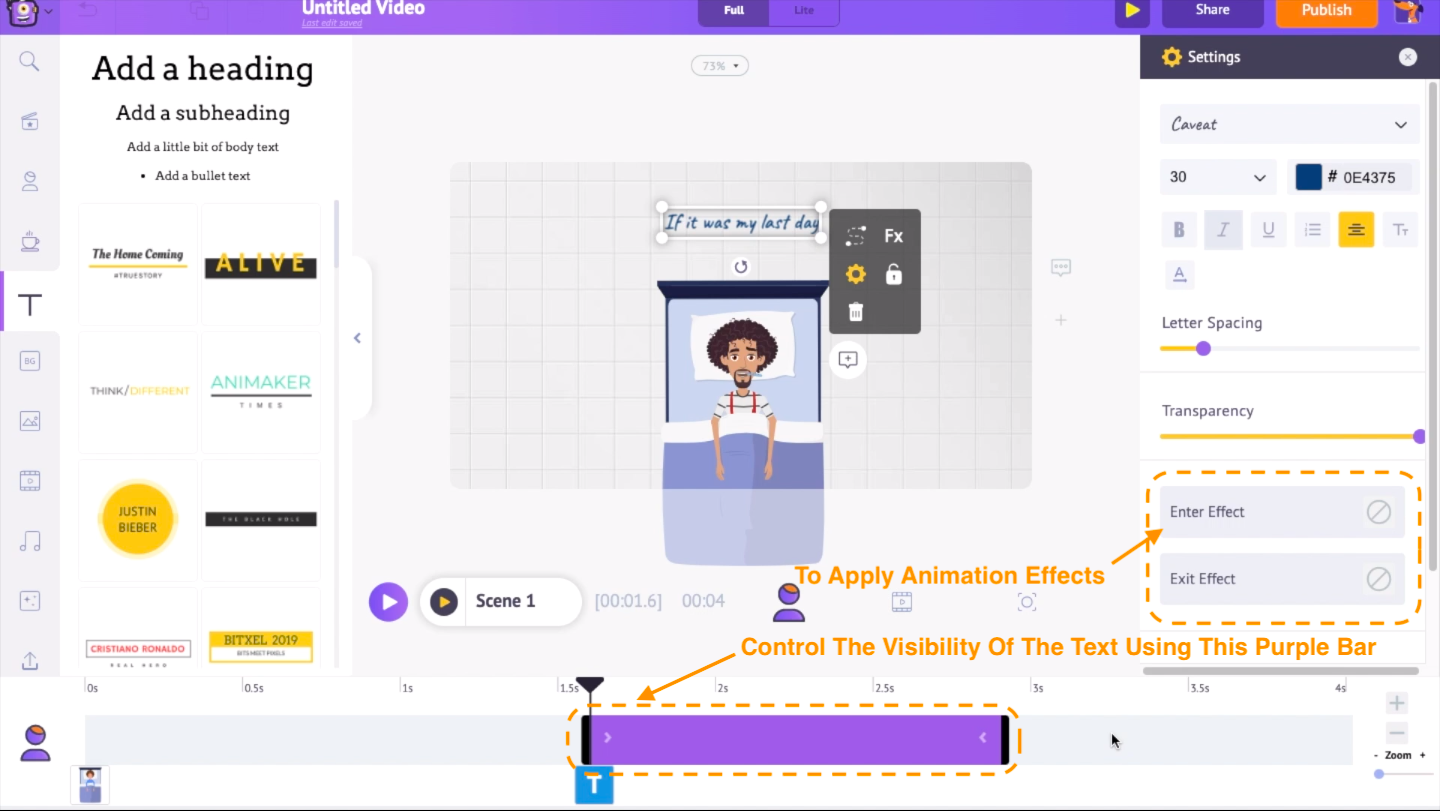
You can also add enter and exit animation effects to the text. To add enter animation effect, select the enter effect option present at the bottom of the settings tab. Now choose the effect you want.
On the timeline, you can notice a purple-coloured bar. It indicates the duration for which this text is going to be visible. You can control the duration of the text using this bar. You can notice this bar for any element added to the workspace.
For example, I want this text to be visible for a specific duration. For that, I have to select and drag the edges of this bar and keep it between that particular duration.
You can also add enter and exit animation effects to the text. To add enter animation effect, select the enter effect option present at the bottom of the settings tab. Now choose the effect you want.
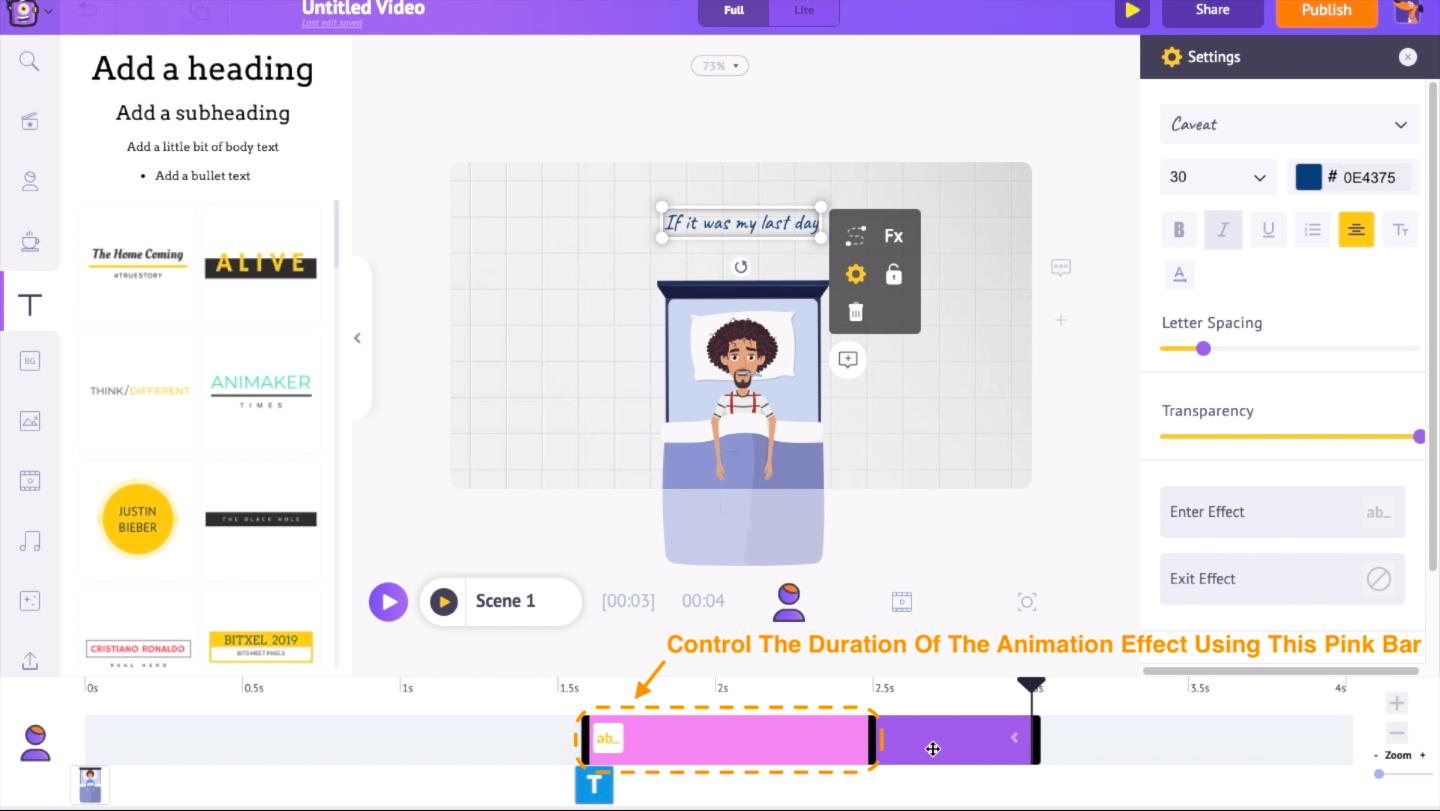
 On the timeline, you can notice a pink colour part. You can control the duration of the animation effect using this pink part of the timeline.
 Let’s add the second text to the scene. In the same way, I will add a new text box and add the other text that will appear in this scene.
Step 6: Add Camera effects
As the last step to this scene, let's add a camera effect. Switch to the camera timeline. If you click on the Yellow-colored icon present over the purple bar in the timeline, you will get two options named ‘Static Camera’ and ‘Dynamic Camera’. To apply effects, select the ‘Dynamic Camera’ option. On the timeline, you can see a pink color part. It indicates the duration of the camera effect used. Let me apply the effect throughout the scene by extending this pink part till end of the timline. Now adjust the camera’s position in the workspace and keep it where you want it to be focusing.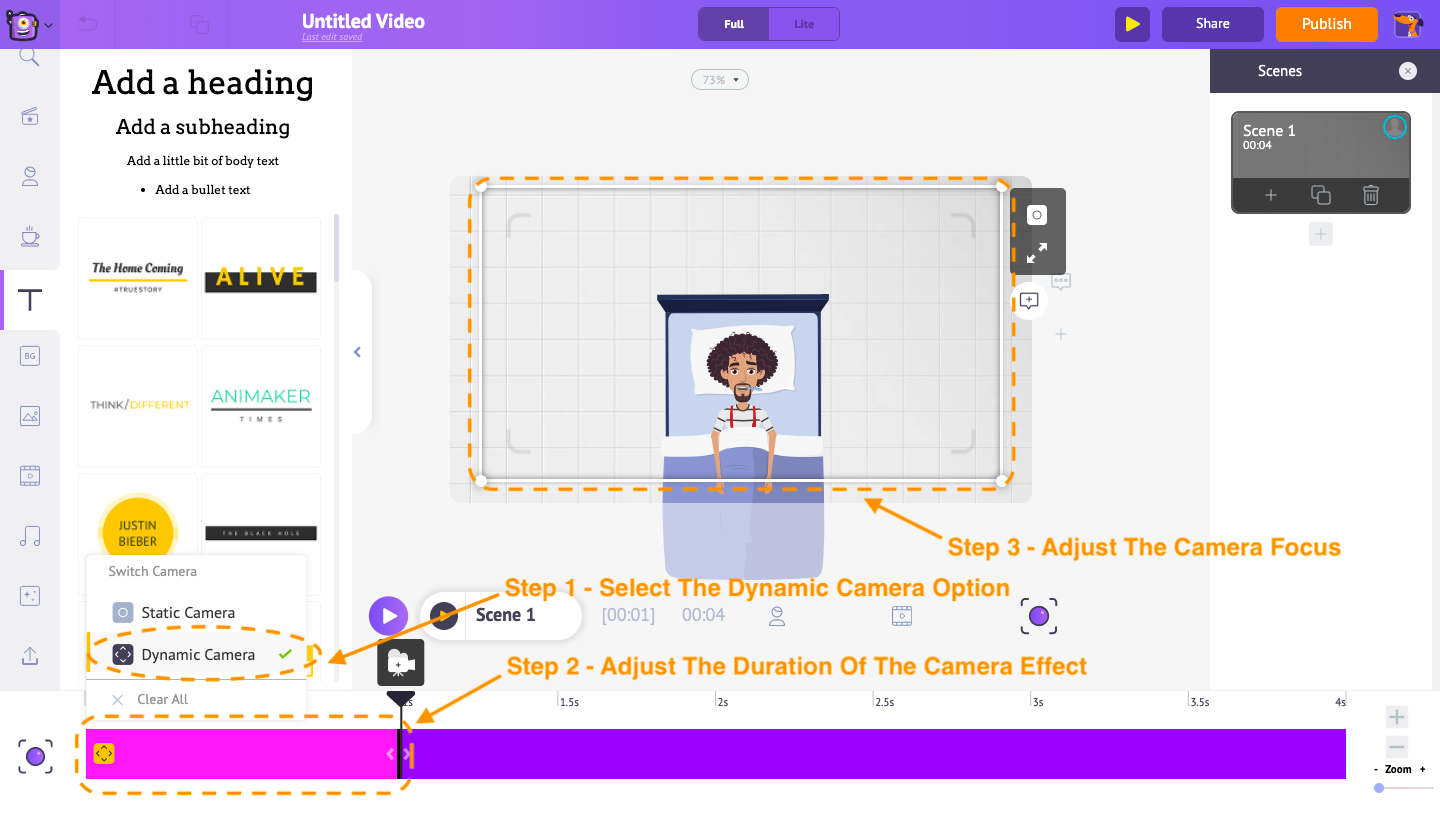 Let’s have a look at what we have created till now.
Step 7: Add a New Scene
To add a new scene, go to the scene’s section on the right-hand side and click on the add scene option.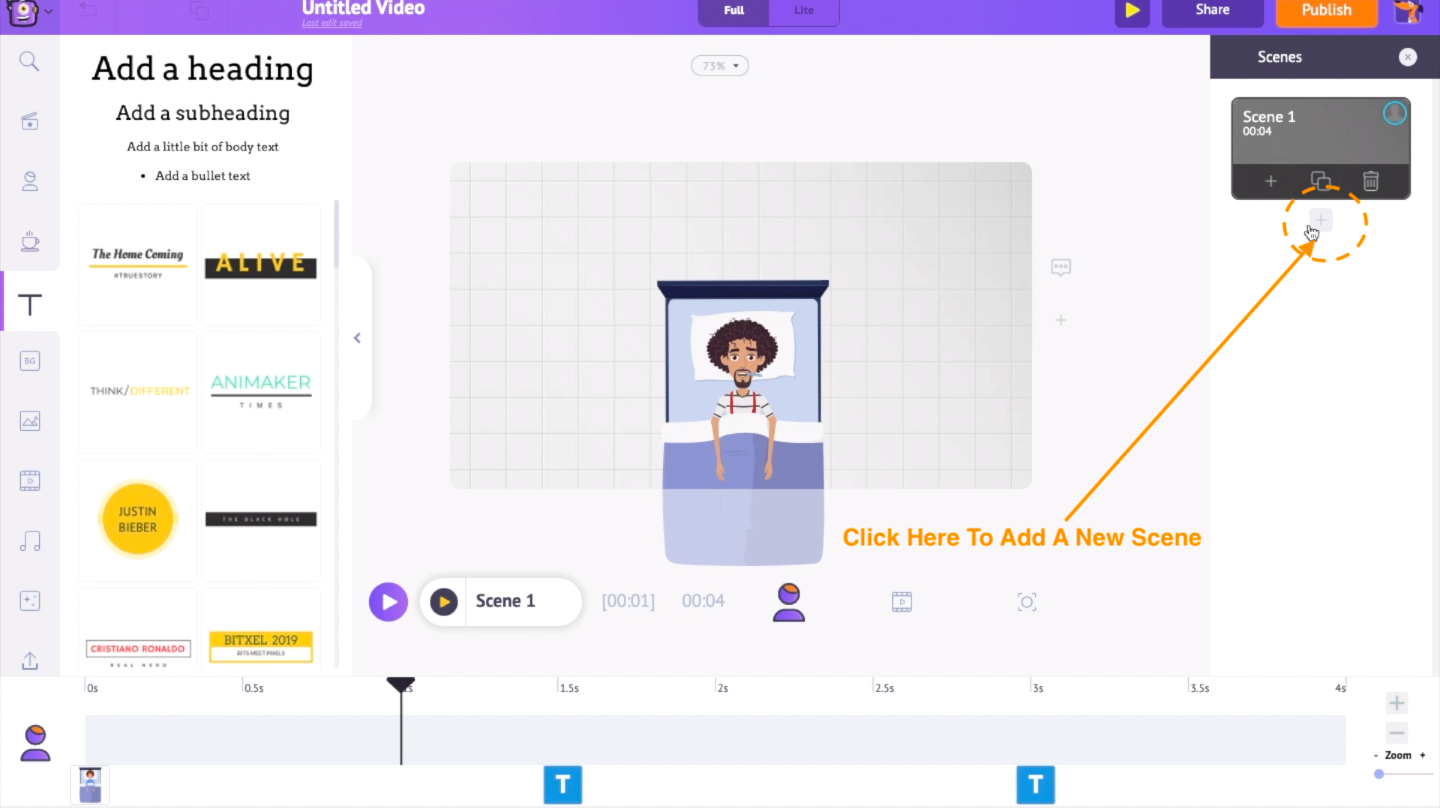 I will be reducing the duration of the scene to match the lyrics.
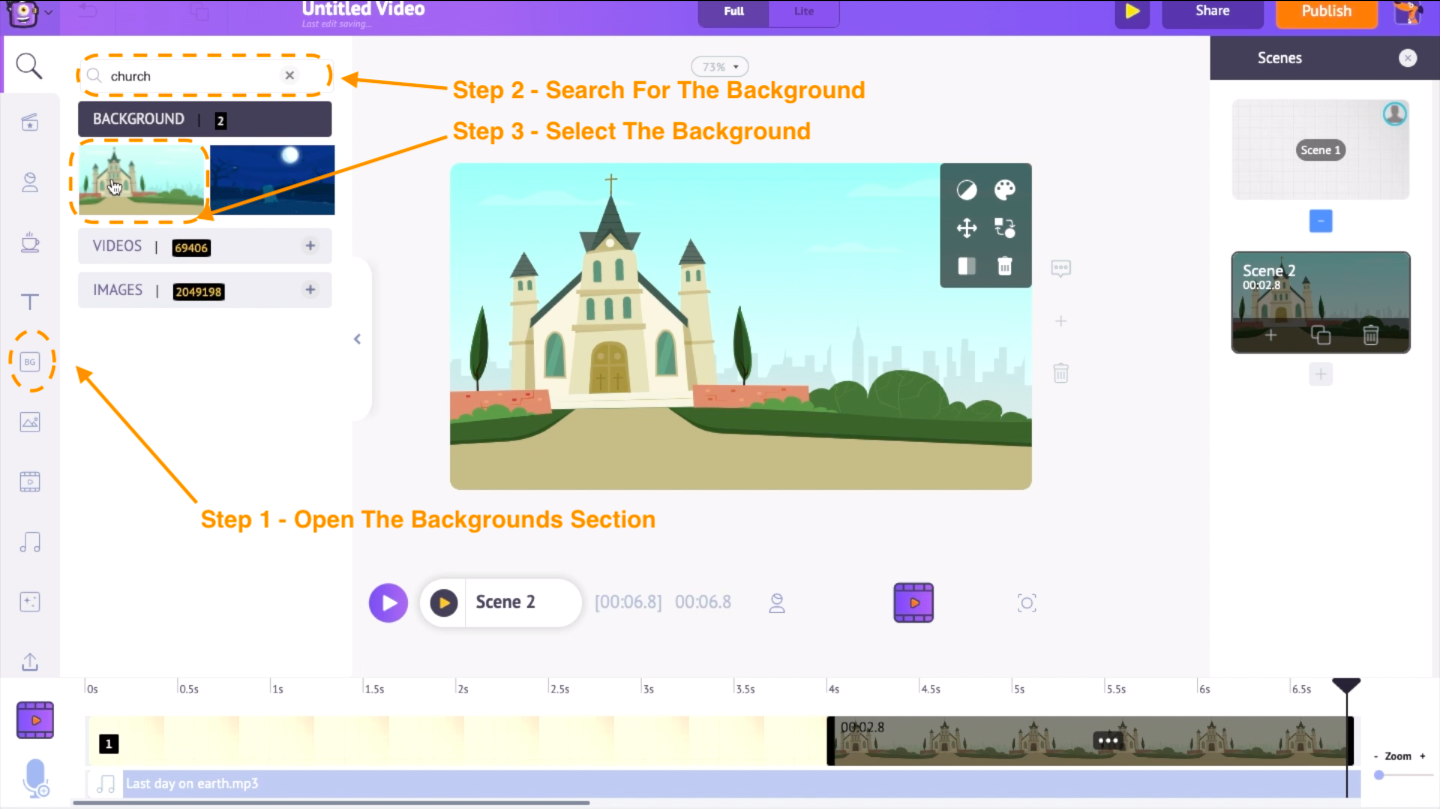
Let’s add the background to the scene. This time we are adding a background from the Backgrounds section of the library. I want a background that looks like a church. So I am using the search option to find the background. Unlike the images, when you select a background from the backgrounds section, it will automatically be applied as the background of the scene. So there is no need to use the ‘Set as BG’ option from the Item menu to apply it as the background.
I will be reducing the duration of the scene to match the lyrics.
Let’s add the background to the scene. This time we are adding a background from the Backgrounds section of the library. I want a background that looks like a church. So I am using the search option to find the background. Unlike the images, when you select a background from the backgrounds section, it will automatically be applied as the background of the scene. So there is no need to use the ‘Set as BG’ option from the Item menu to apply it as the background.
 I am using the same method used in the previous scene to add the text and the camera effect.
As the last step to this scene, let’s add the character. I want the character in this scene to be animated and run from one end to the other end of the workspace.
Let’s see how to do that.
I am using the same method used in the previous scene to add the text and the camera effect.
As the last step to this scene, let’s add the character. I want the character in this scene to be animated and run from one end to the other end of the workspace.
Let’s see how to do that.
Step 8: Animate the Character
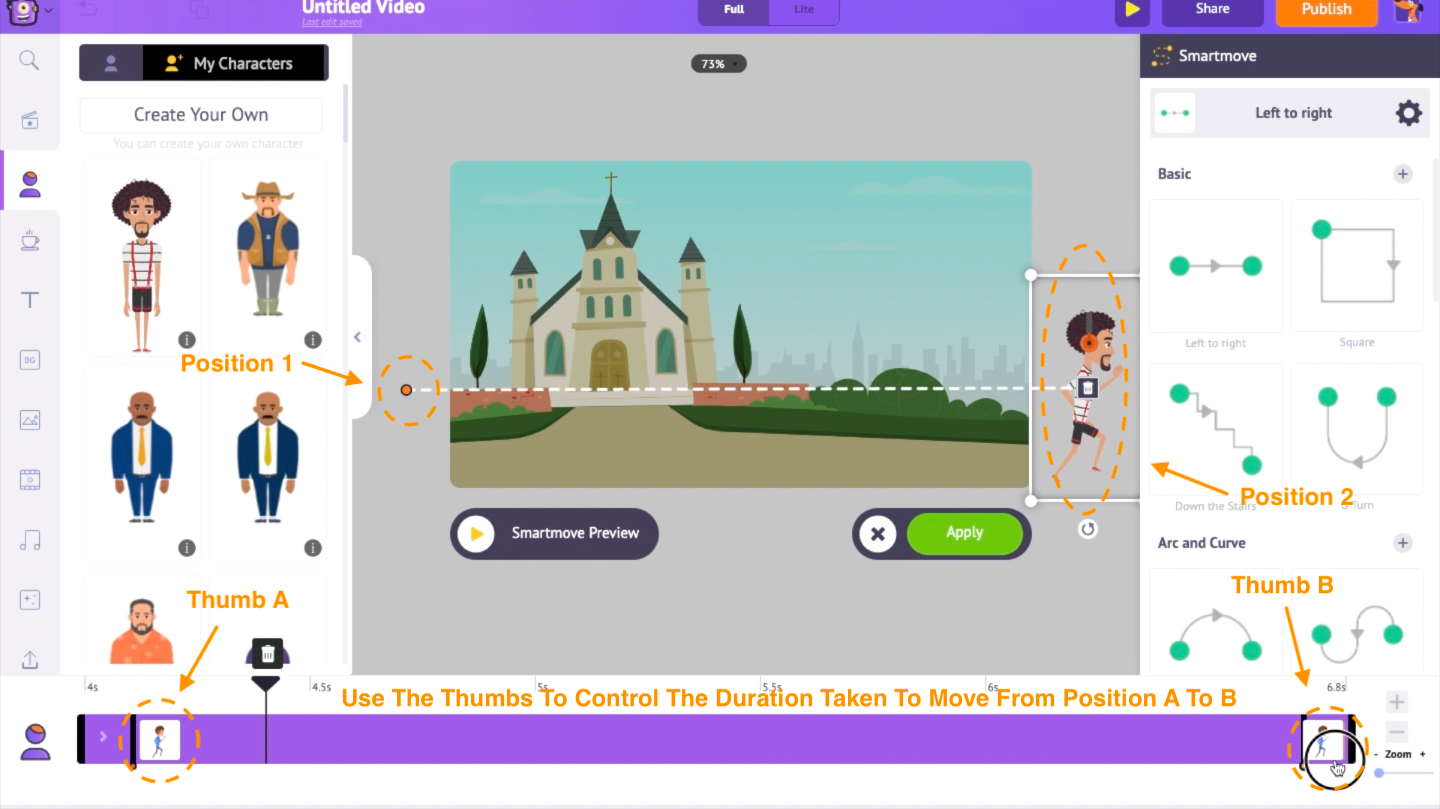
I am going to add the character from the characters section and select the running action. Right now, the character is moving in the same place. To make a character move between different points, we have to use the ‘Smart move’ option. You can find the smart move option under the item menu.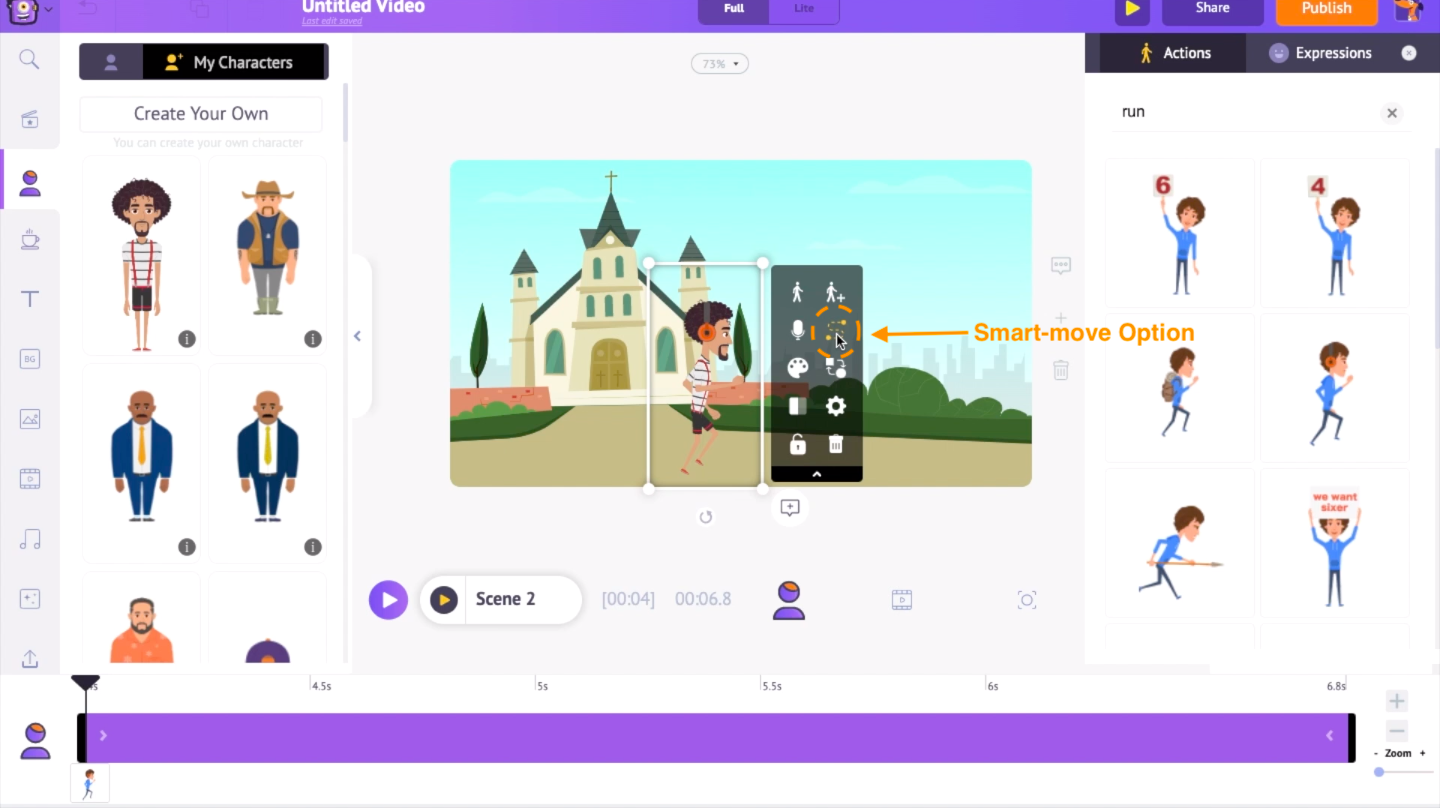 I want the character to enter the scene from the left and exit on the right-hand side. So I will keep the first position of the character on the left and the second on the right-hand side. So the character will be moving from position one to two.
On the timeline, you can notice two thumbs. They represent the time the character will take to move between the two points. Adjust its position on the timeline to make the movement look natural.
I want the character to enter the scene from the left and exit on the right-hand side. So I will keep the first position of the character on the left and the second on the right-hand side. So the character will be moving from position one to two.
On the timeline, you can notice two thumbs. They represent the time the character will take to move between the two points. Adjust its position on the timeline to make the movement look natural.
 Let’s preview the scene.
 Let’s move on to the next scene. Again this scene’s creation is very similar to the previous scenes. So I am going to follow the same steps and complete this scene.
Step 9: Add Properties to the Scene
This is how the current scene looks.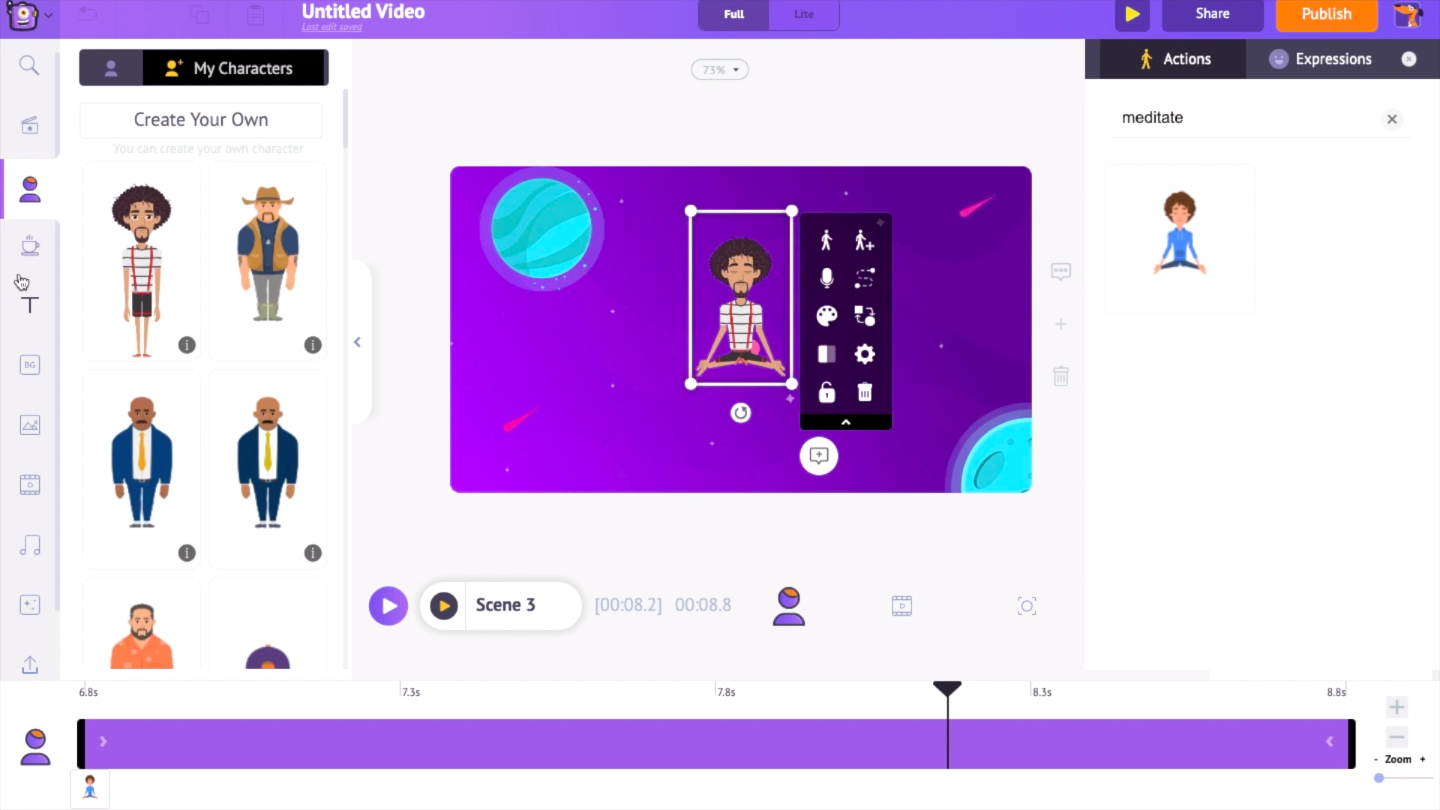 I want the character to look like meditating by sitting above the earth. This means we would need a property that looks like earth. Go to the properties section in the library and search for the word ‘earth.’ Now click on the object to add it to the workspace. Reduce its size and place it at the bottom of the character.
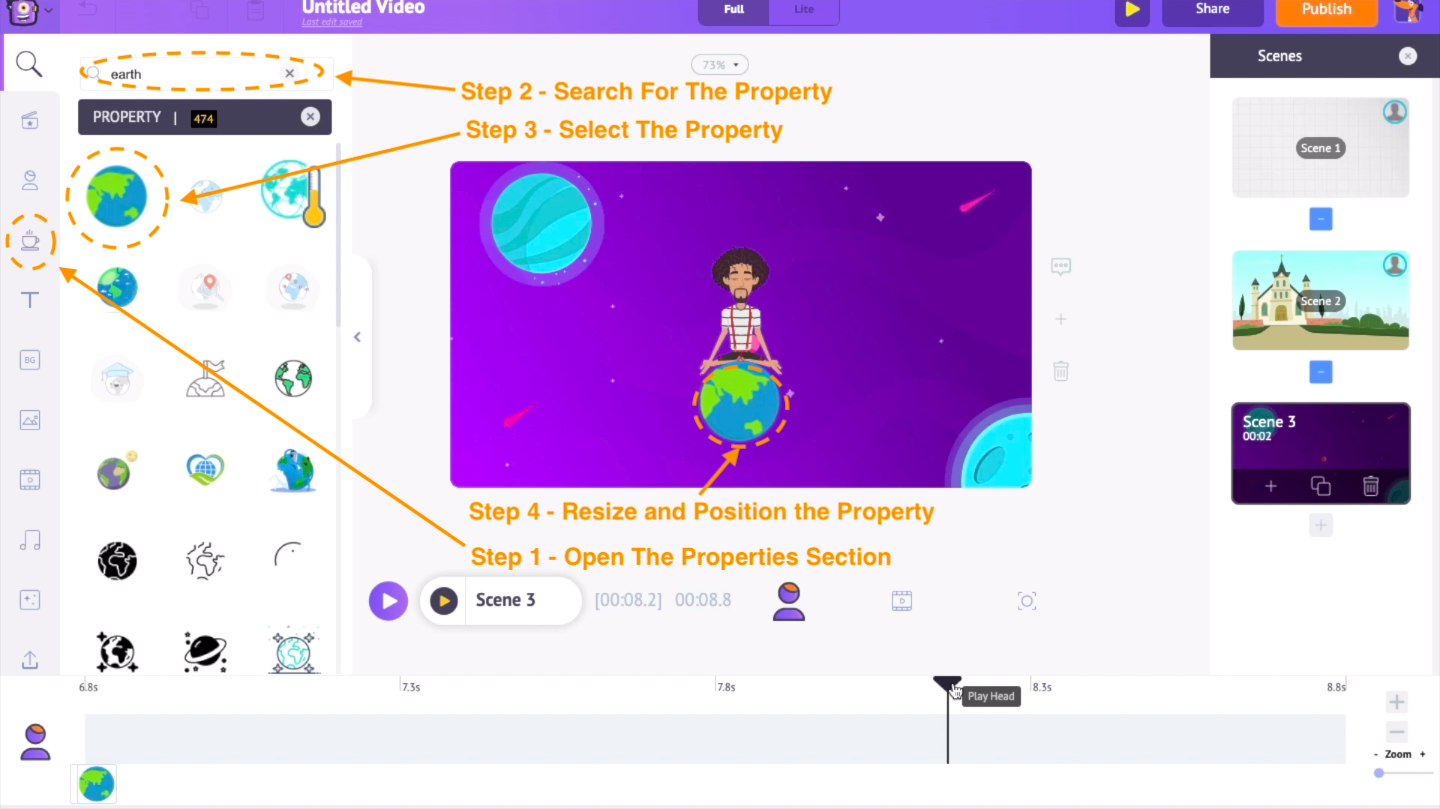 This is how you can use the different objects in the properties section to improve the scene.
As the final steps, let’s add the text and the camera effects.
I am going to create the next scene. All the steps in this scene are similar to scene number 2. Add a new scene, reduce the scene duration to match the lyrics, add a background, add the text, add the camera effect, add a character and animate it using the ‘Smart-move’ option.
This is how you can use the different objects in the properties section to improve the scene.
As the final steps, let’s add the text and the camera effects.
I am going to create the next scene. All the steps in this scene are similar to scene number 2. Add a new scene, reduce the scene duration to match the lyrics, add a background, add the text, add the camera effect, add a character and animate it using the ‘Smart-move’ option.
Step 10: Animate the Properties
So this is how this scene looks right now. I want the character to look like he is chasing a bee in this scene. So I am going to the properties section and searching for a bee.
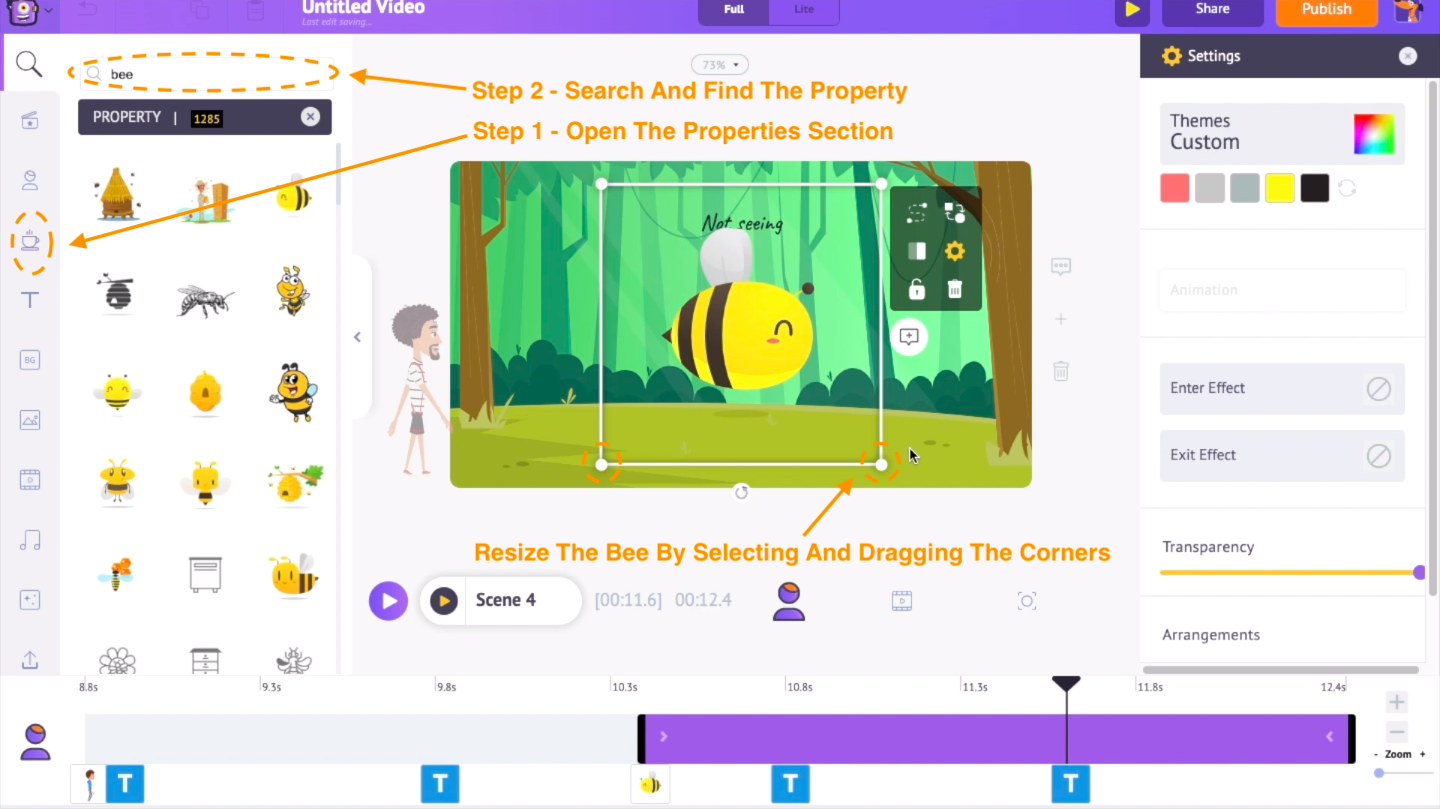 I want this bee to be flying. So let’s use the smart move and make it happen. Right now, the bee is moving on a straight path.
 It would be better if it moved in a curved path, right? To make that happen, keep the pointer over this dotted line. You can see that the color changes from white to orange. Now click and drag the path as you want the bee to be moving. Finally, give apply.
 So that is how you can make an object move in a curved path. Let’s have a preview of the scene.
 The creation of the last scene is very similar to the previous scenes. So I am going to repeat the same steps and complete the scene.
We have completed all the scenes.
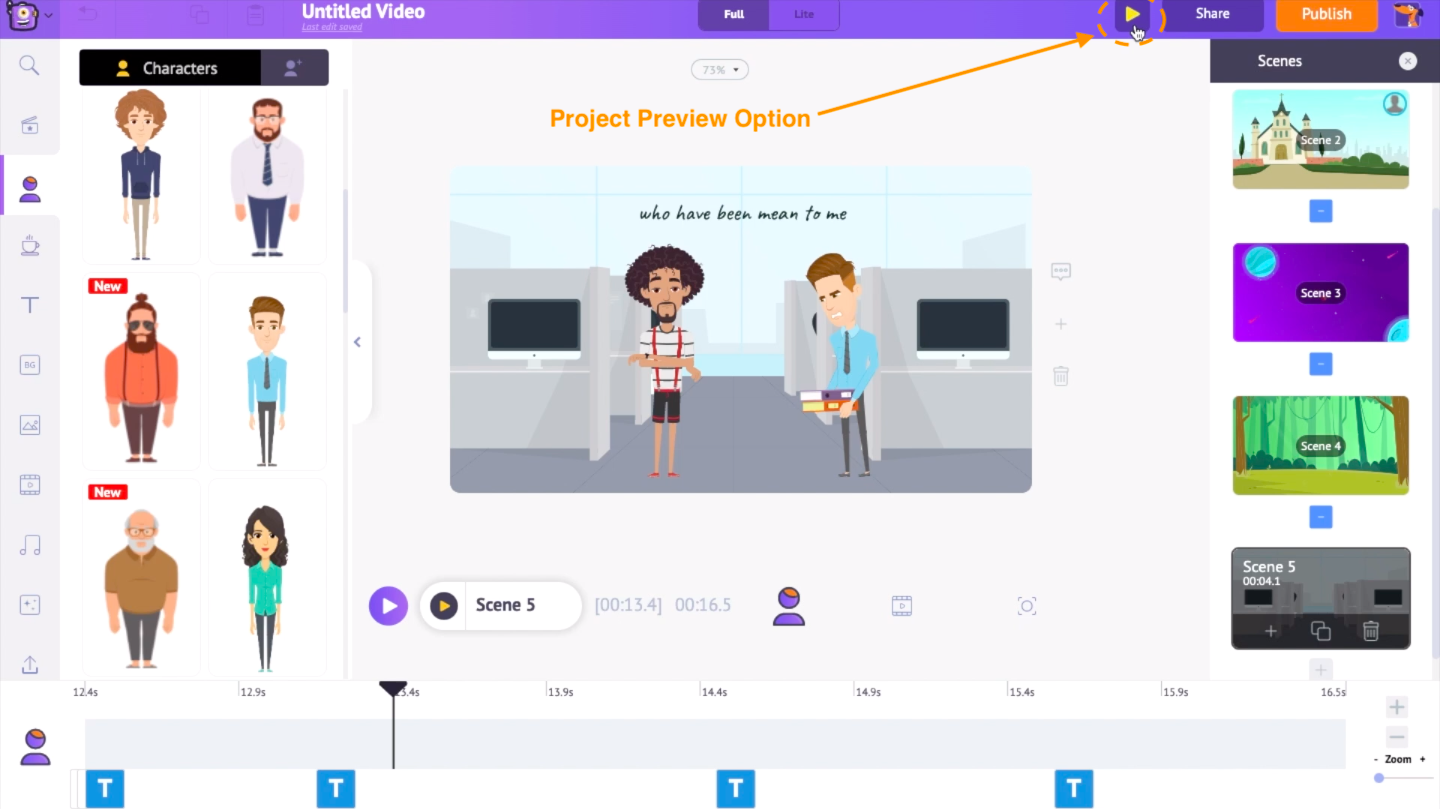
To have a preview of all the scenes together, use the preview option at the top.
The creation of the last scene is very similar to the previous scenes. So I am going to repeat the same steps and complete the scene.
We have completed all the scenes.
To have a preview of all the scenes together, use the preview option at the top.
Step 11: Download the Video
To download the video, go to the publish option at the top. Next, click on the download video option and download. You will be redirected to a new download page from where you can download the video to your PC/Laptop. That is how easy it is to create an animated music video using Animaker.
Want to take your creation even further? Add a dynamic music visualizer that syncs perfectly with your track’s beat, turning your video into a mesmerizing experience!
We hope that you would have found this article helpful. If you wish to learn more video-making hacks and ideas then please do follow us on our YouTube channel.
Now that you are ready and equipped to take on the world of music videos with your creativity, what are you waiting for?! Create your animated music video now!