How to create animated presentations [Easiest Way for 2023]

Guru - November 22, 2022 - Leave your thoughts. - Last Updated: February 16, 2024 11 min read
It's no secret that traditional presentations can get boring for the audience as they often include many sentences, subheadings, and images—and that's just the beginning.
You also don’t want it to look like a high school science project: all over-the-top formatting and an overwhelming amount of text.
So how can you make your presentation more engaging? Well, don’t worry anymore, we have got an alternative for you!
This is where animated presentations come in.

In this article, we have compiled the quickest and easiest steps to create an animated presentation using Animaker Deck.
Introduction to Animaker Deck
With Animaker Deck, you can create your own animated characters and use tons of pre-built templates, millions of stock assets, real-time collaboration, and more!
It can do everything that Powerpoint can do and much more!
If you want to ensure your presentation keeps people engaged and interested, it’s time to change things up a bit from the usual way of creating a presentation.
So why wait? Let’s jump right into the steps!
- Signing up with Animaker Deck
- Understanding the User Interface
- Ways to create an animated presentation in Animaker Deck
- Creating an animated presentation from scratch
- Creating an animated presentation from templates
- Previewing & Presenting the Slides
- Sharing your work-of-art
Signing up with Animaker Deck
Click here to log into Animaker if you're already a registered user. If you are new to Animaker, you can sign-up and create an account with Animaker Deck for free.
Understanding the User Interface
Before we start to create a presentation, let’s spend some time understanding the user interface of the Animaker Deck app.
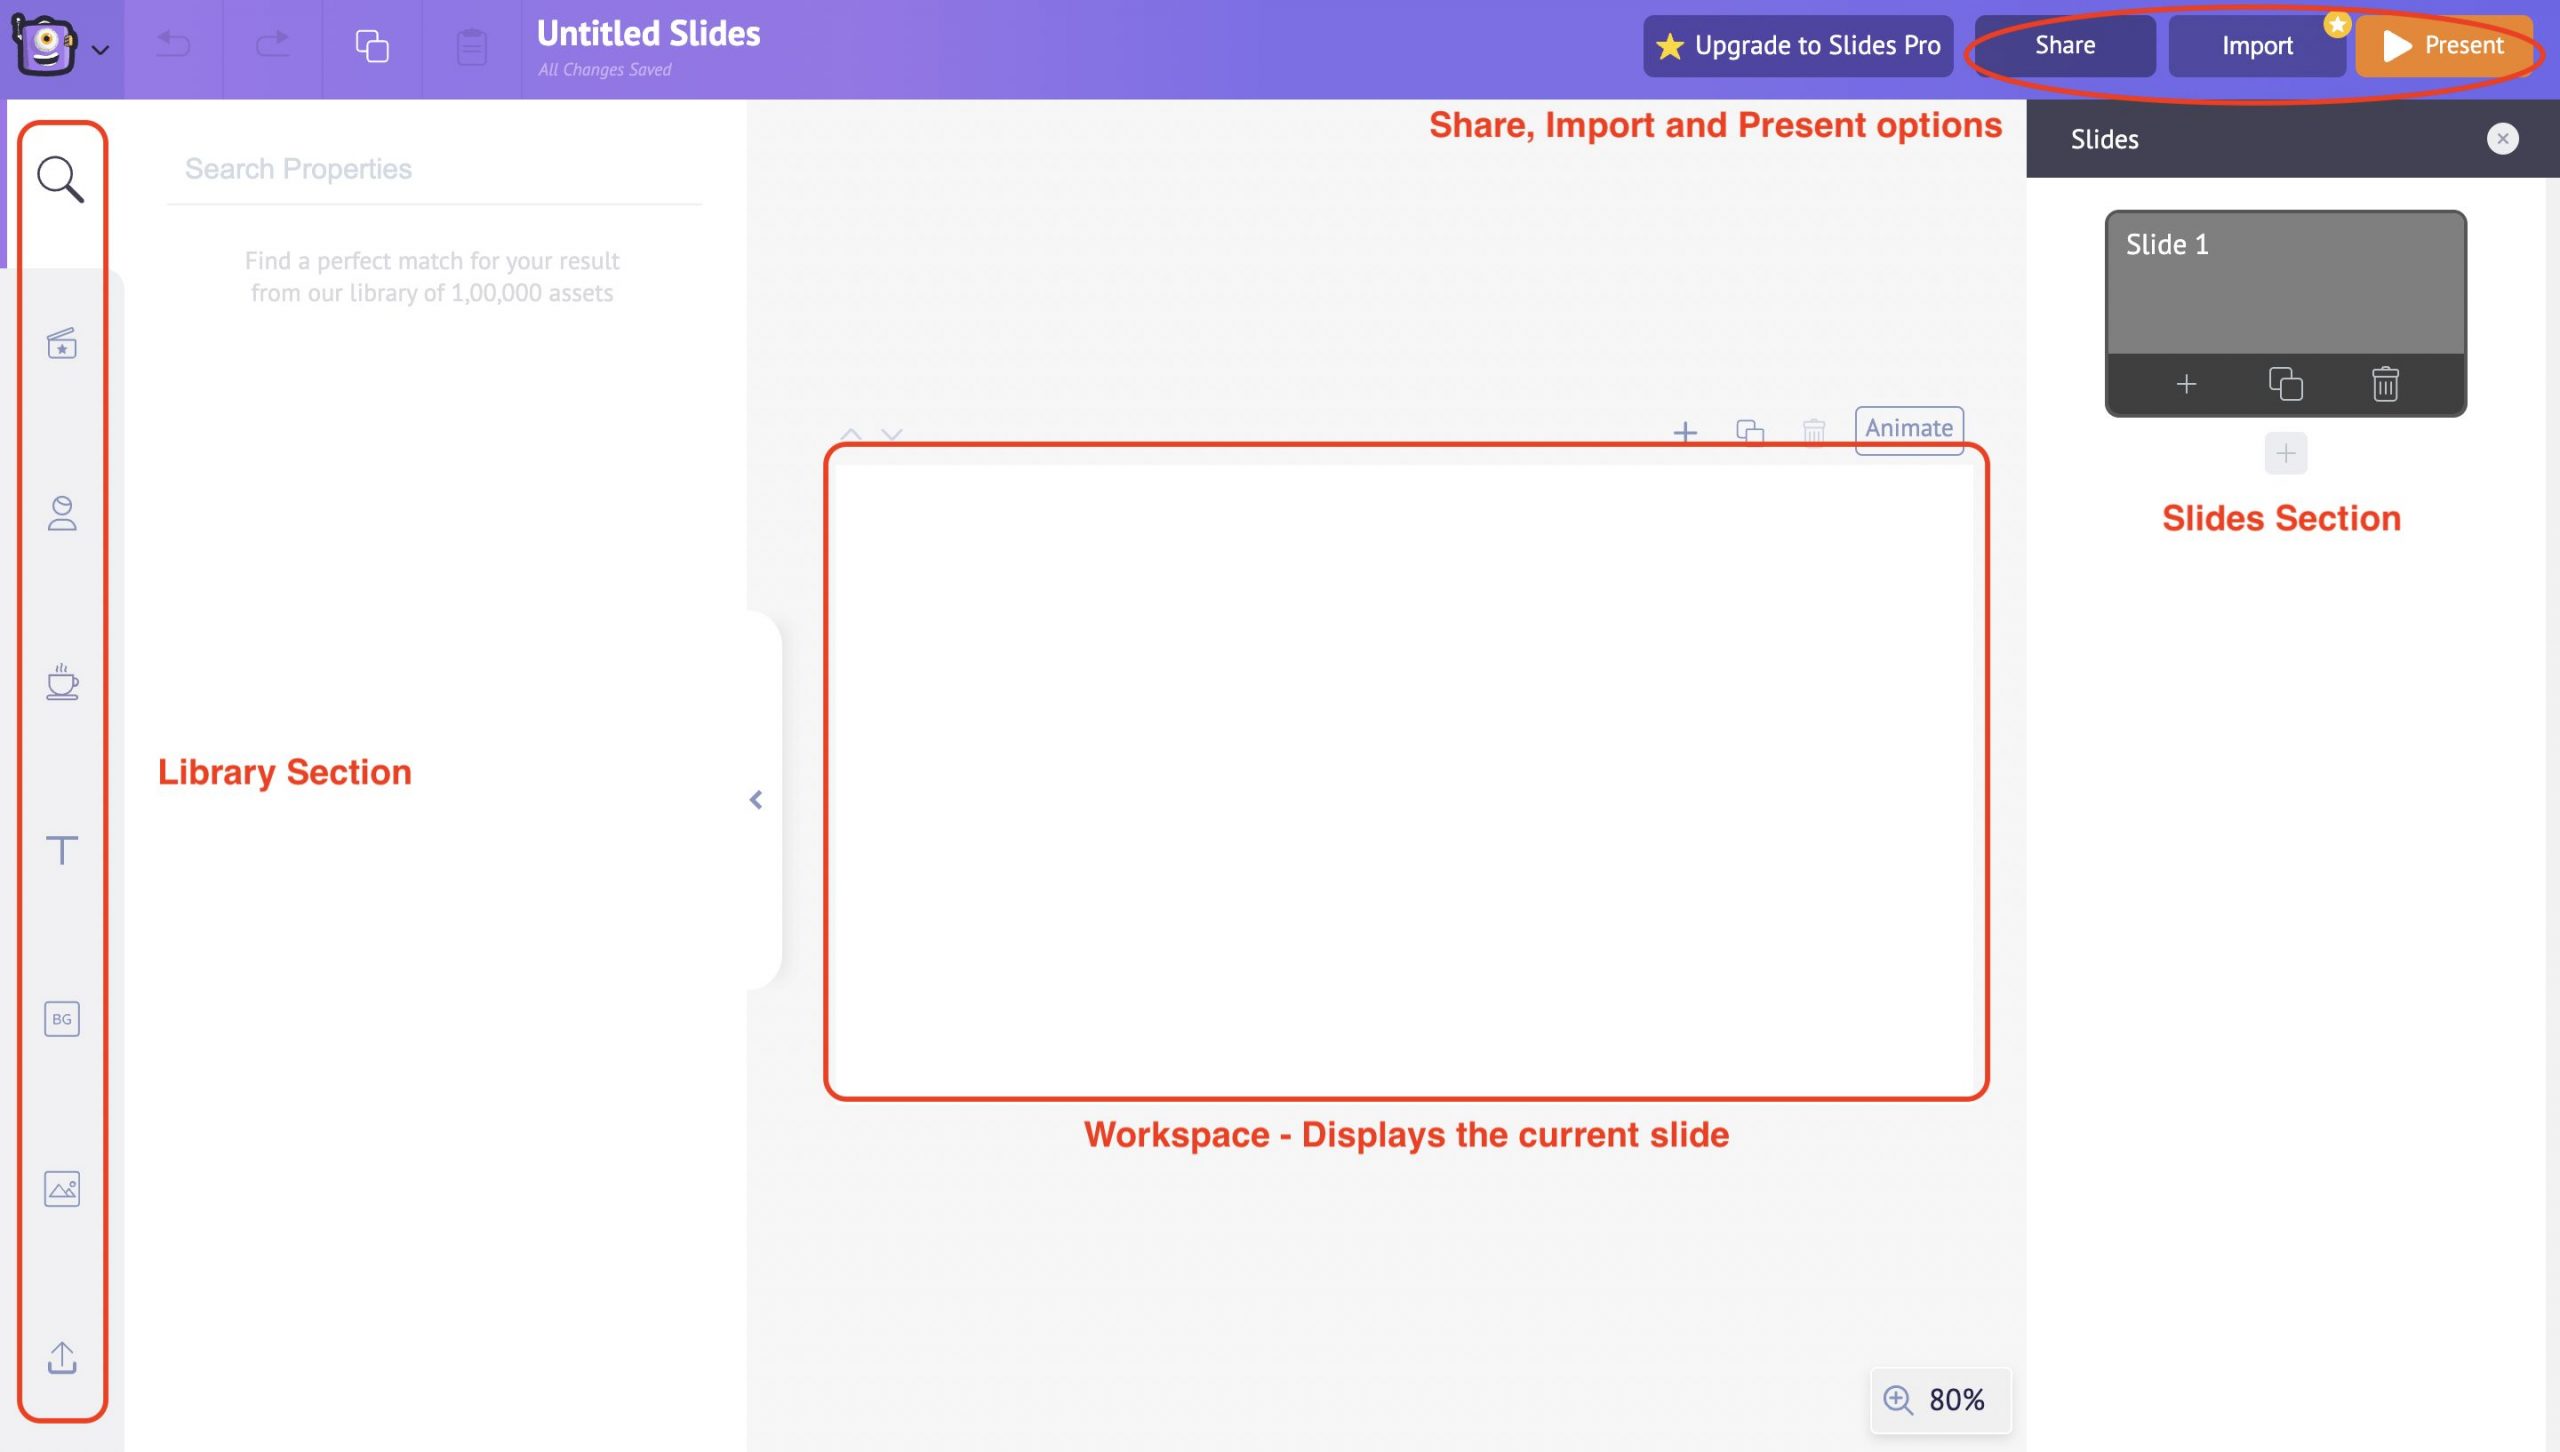
On the left side, we have the Library section. Under the library section, you can access the Templates, Characters, Properties, Text, Background, Images, and Upload features with a single click.
Moving on, to the right, we have the Slides section, where you can re-arrange the slides, duplicate the slides, delete the slides, and even make edits to the slides, such as transition effects.
In the center, we have a Workspace displaying the selected slide. Here you will add fonts, and images, change the background and other properties and make all the slides customizations.
And at the top, you will find options to Share, Import, and Present the slide deck.
We shall look into each option in depth in the upcoming steps.
Ways to create an animated presentation in Animaker Deck:
There are two ways to create an animated presentation in Animaker Deck
- Creating an animated presentation from scratch
2. Creating an animated presentation from templates
Let's get started right away!
Creating an animated presentation from scratch
One way of creating an animated presentation in Animaker Deck is from scratch on a blank canvas. Here’s what we will cover:
- Customizing the Background
- Introducing Characters
- Using Properties
- Adding Text
Customizing the Background
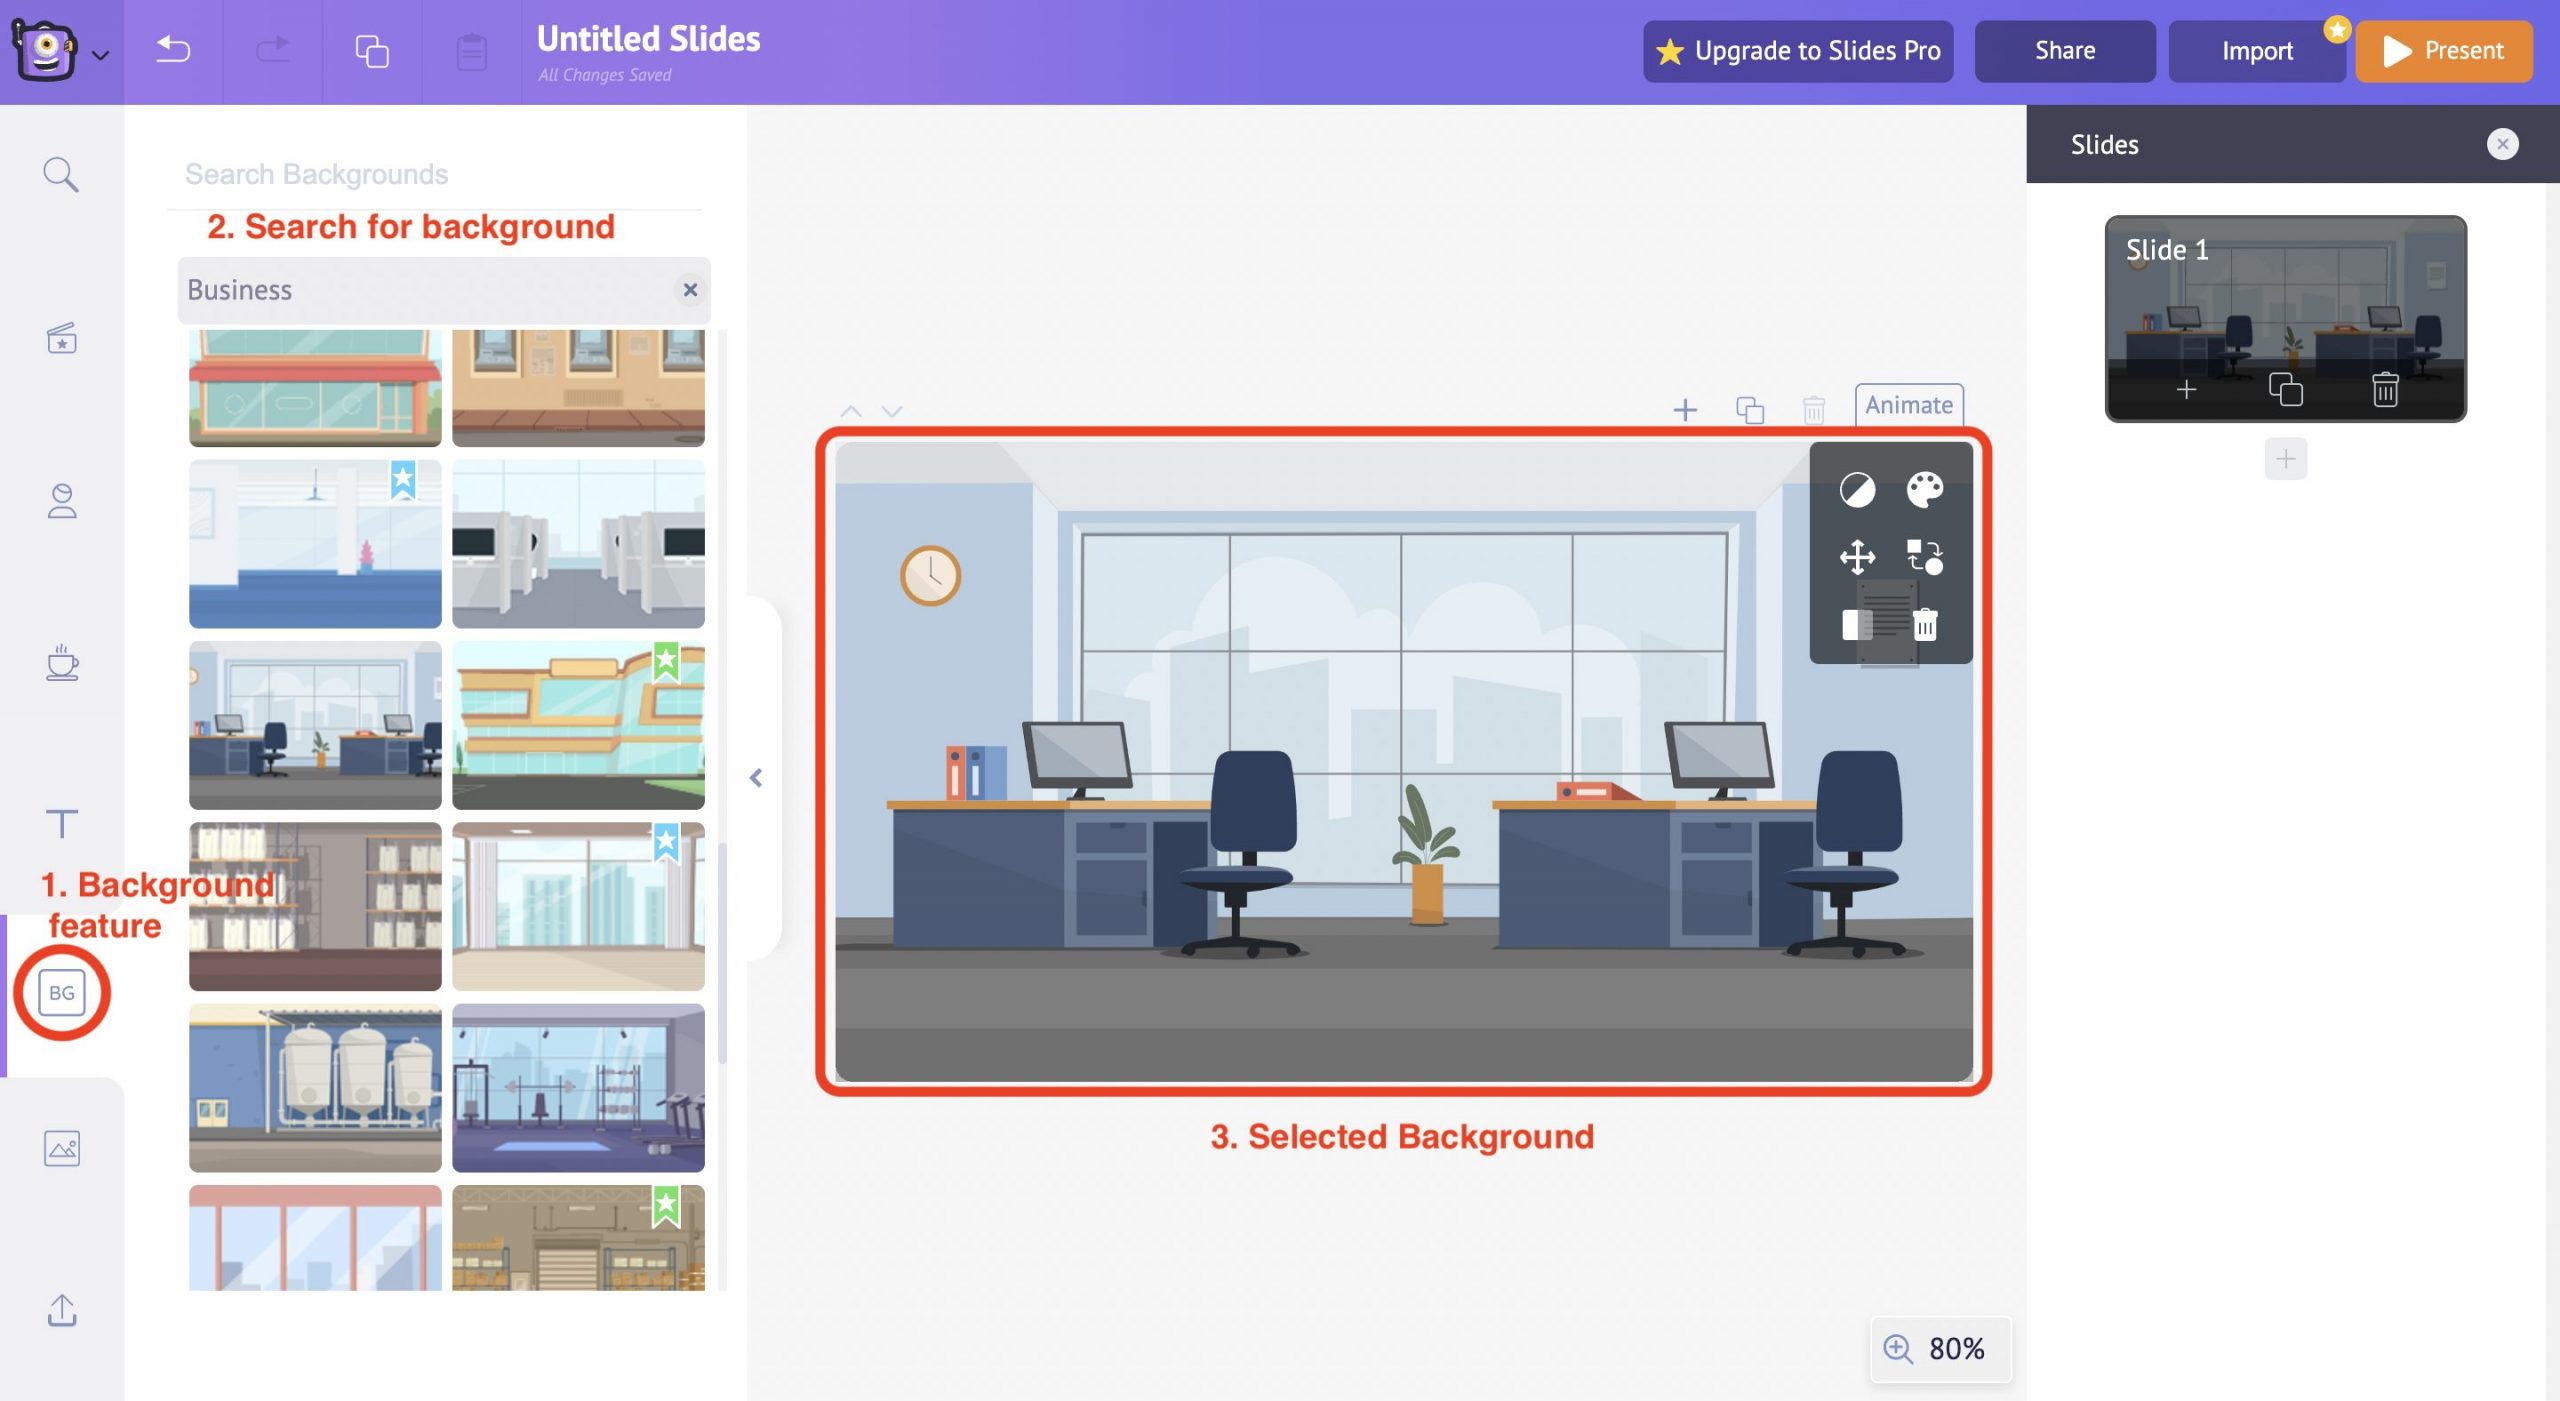
Using the Backgrounds feature, you can easily search and apply backgrounds according to your preferences.
The best part is that you can customize the background colors to match your slide style.
For instance, let’s say you want to create an intro slide for your business. First, choose a suitable background for your slide from the Library.
Once you find and select a suitable background, it will appear in the central workspace. Also, you will notice a few options pop up in the workspace. It is called an “item menu.”
You can customize the colors, add filters, swap elements, and resize and delete the elements in the slide from these options.
Introducing Characters
Do all the presentations you have made so far lack personality?
You can now infuse life into the slides with the help of Animated Characters.
With Animaker Deck, you can create your personalized characters or use the built-in characters from the Library section, whichever fits your scenario.
In this instance, let’s choose one from the built-in character library.
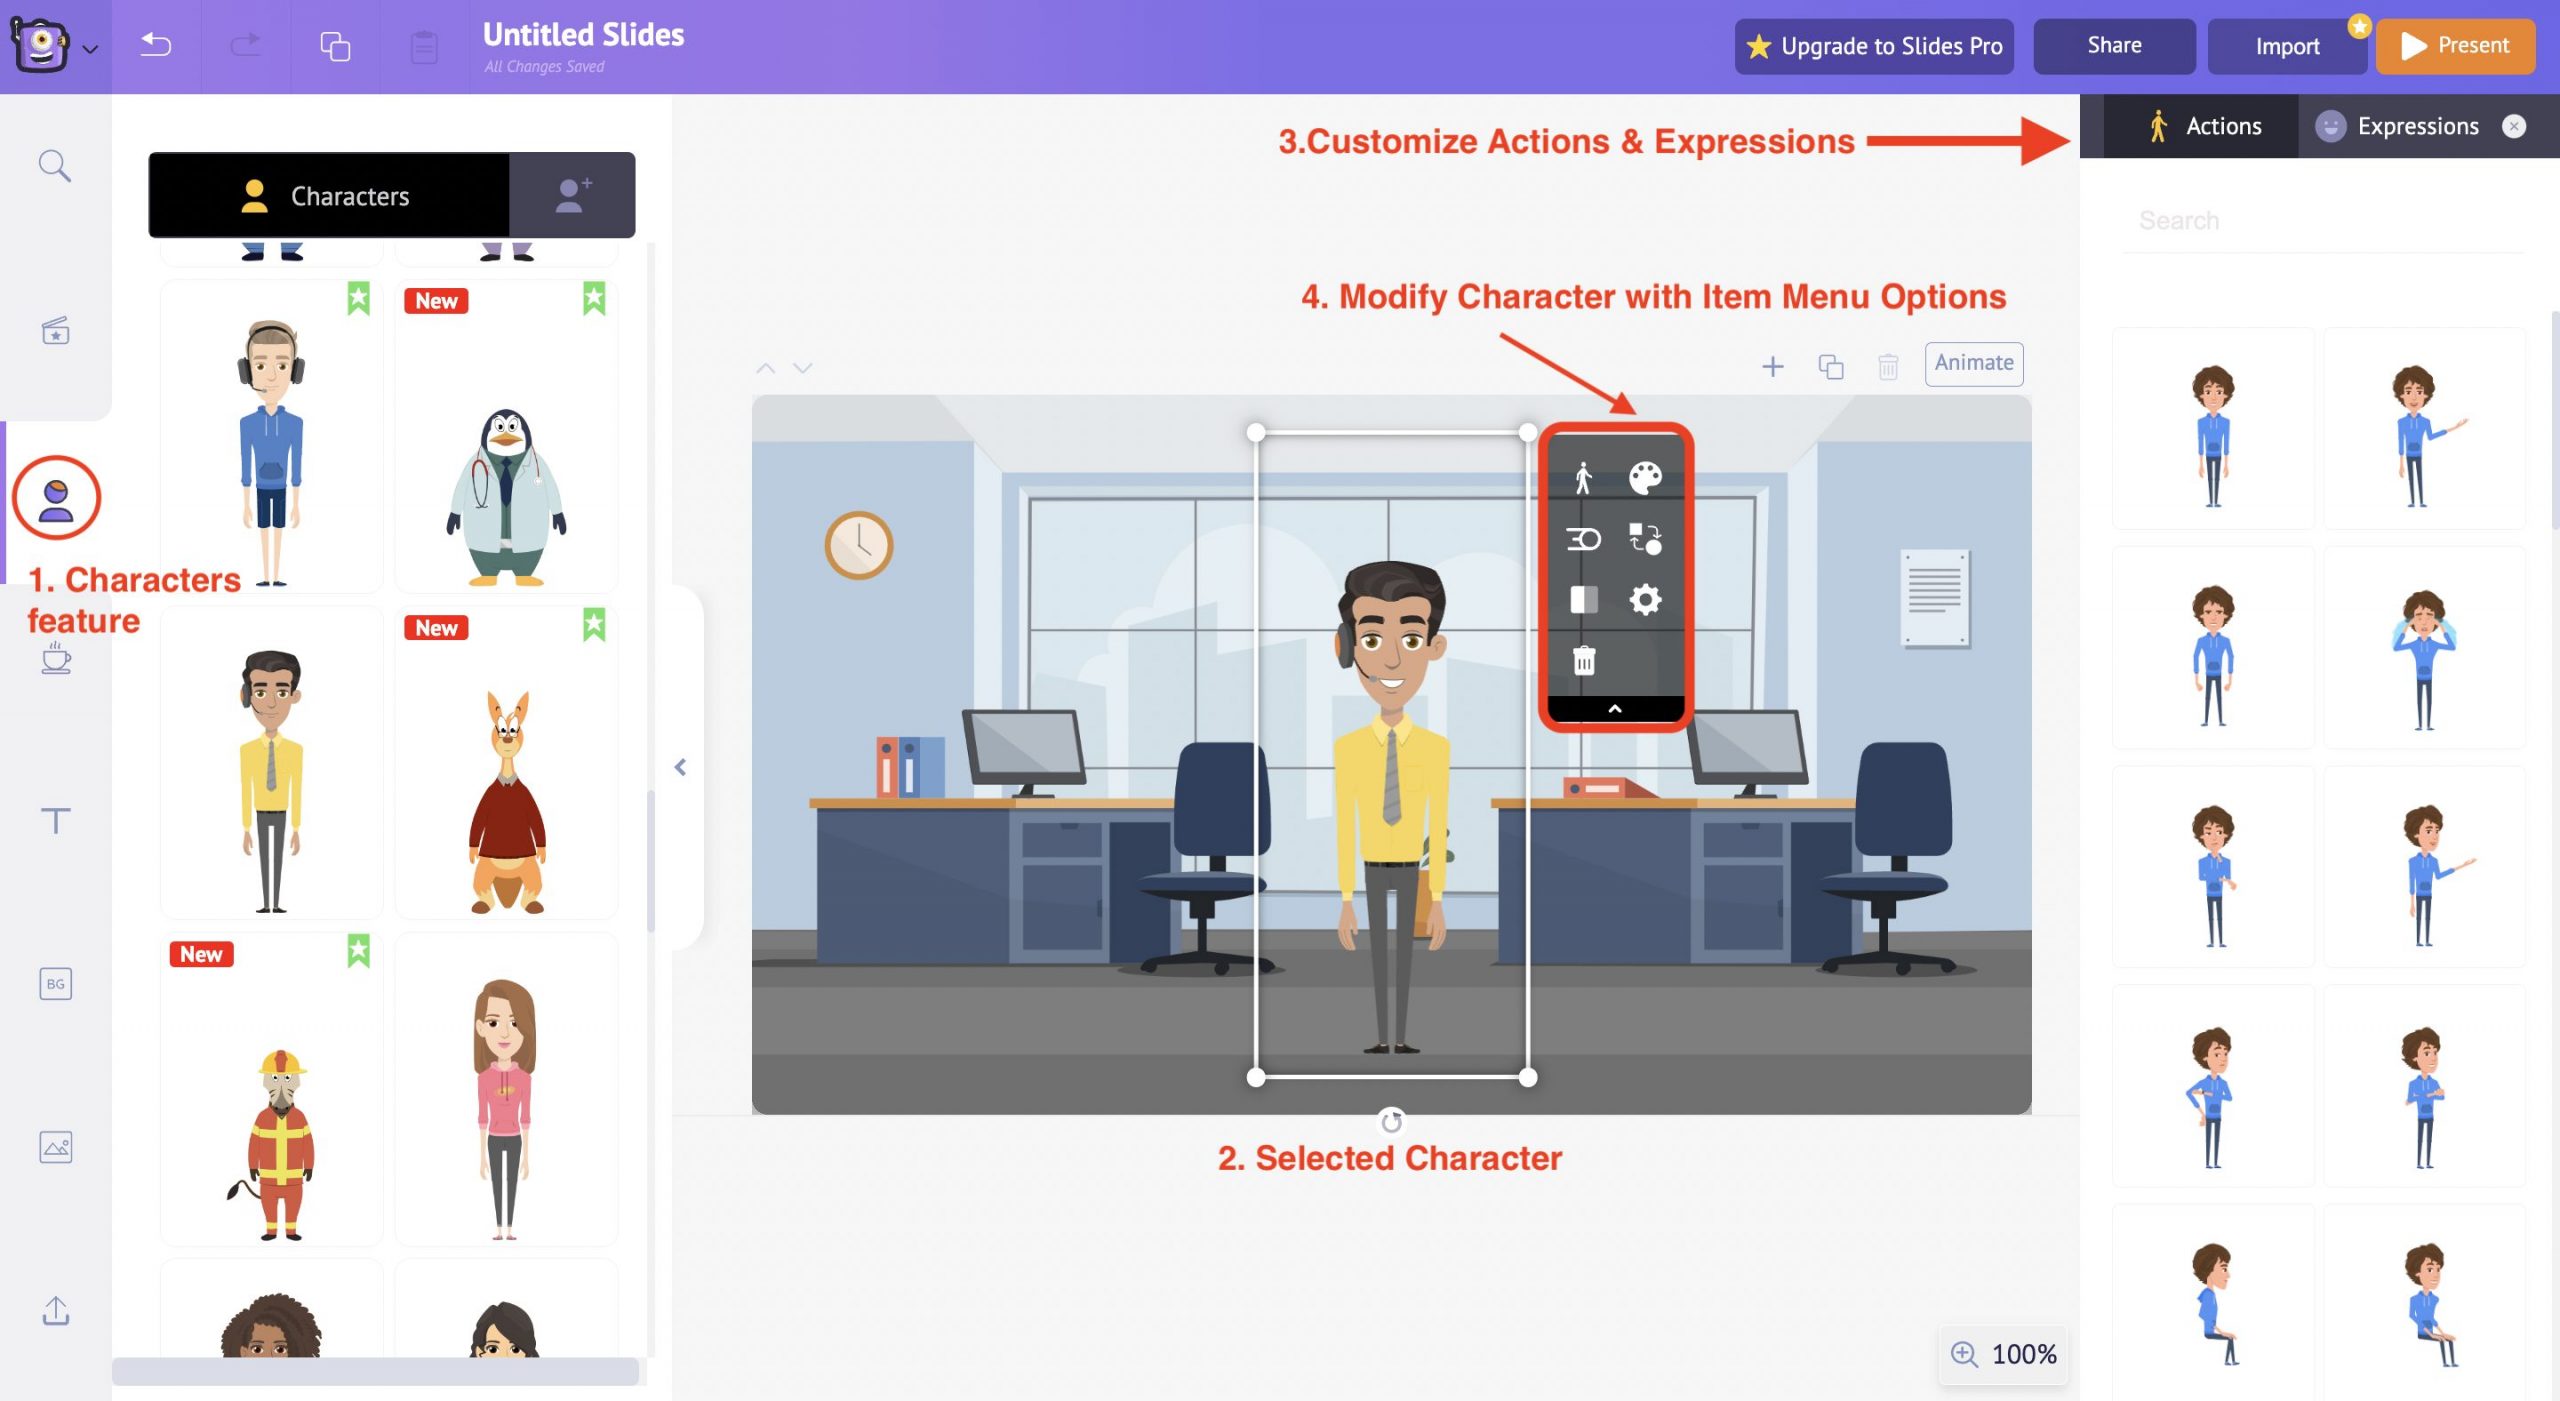
The selected character will appear in the slide, along with the item menu. Use the options in the item menu to customize the character per your preferences.
Also, you can find the Actions and Expressions section on the right side of the workspace. Apply a suitable action and expression to your character from the available options.
If you are not happy with the pre-built characters, you can even create and introduce your own custom characters into the slide deck.

Use the Create Your Avatar button under the Characters feature to create your own custom character.
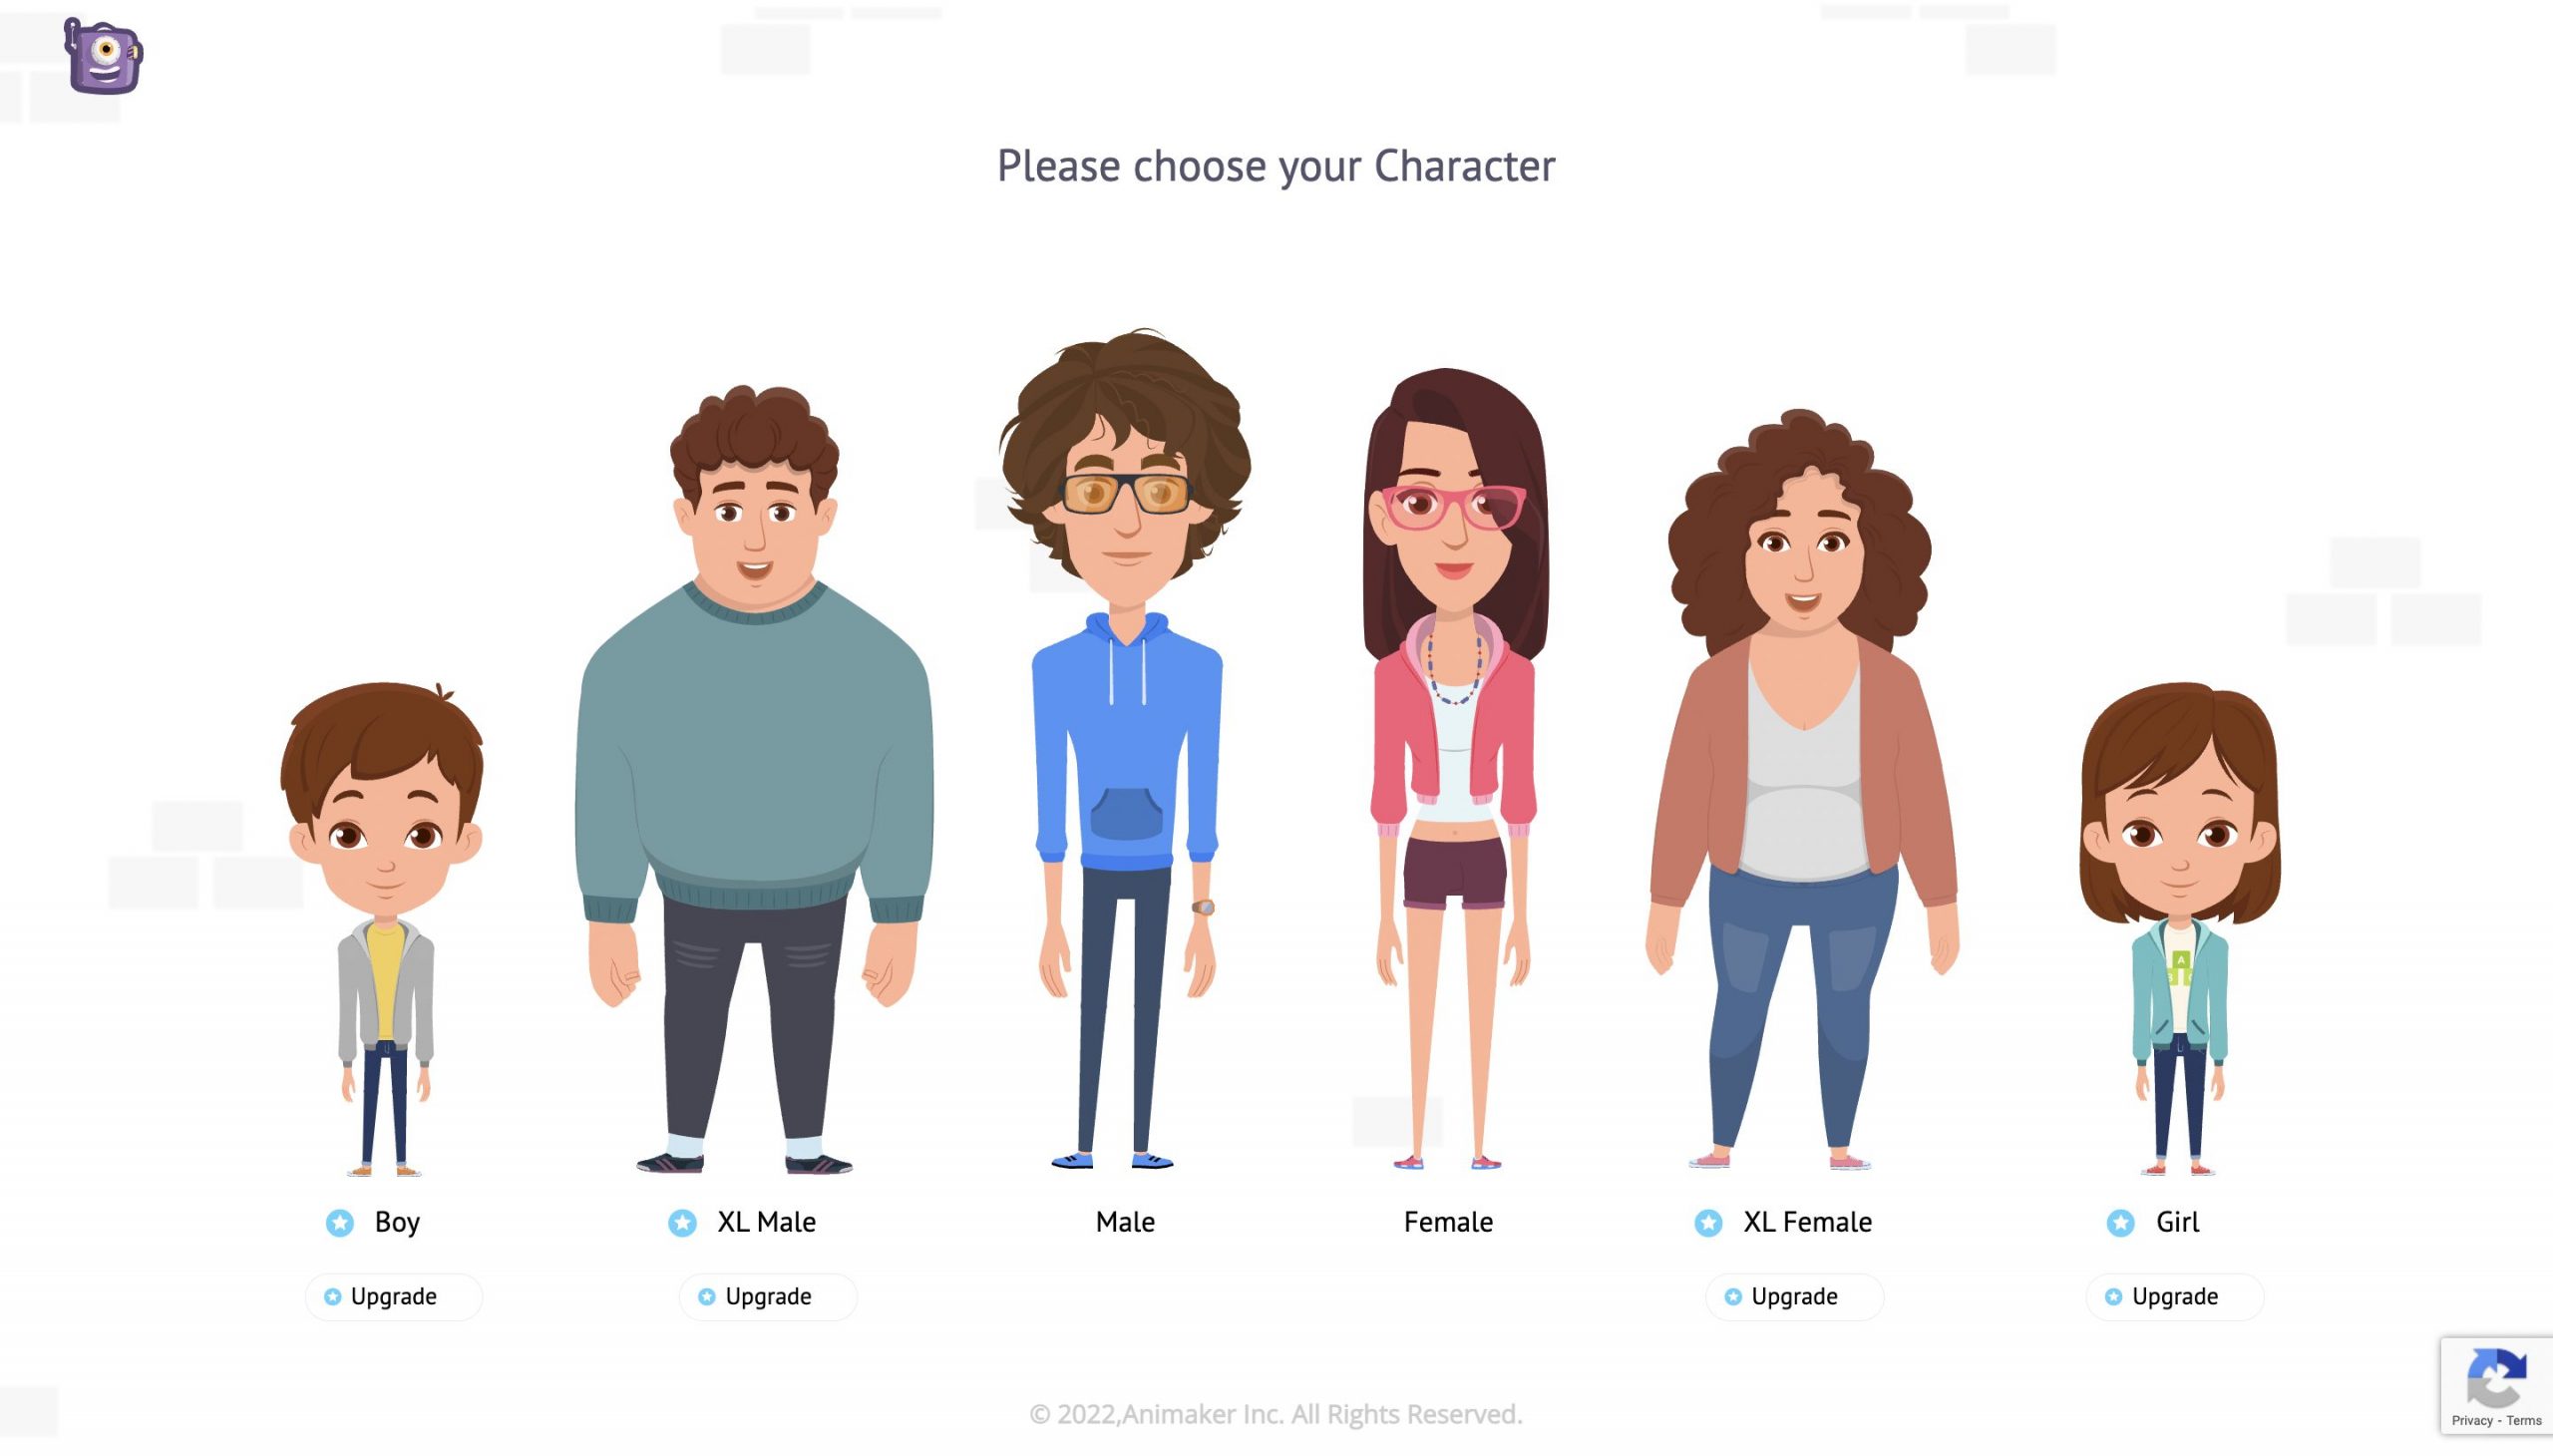
Animaker Deck offers you options to create a character between Young Adults and Children.
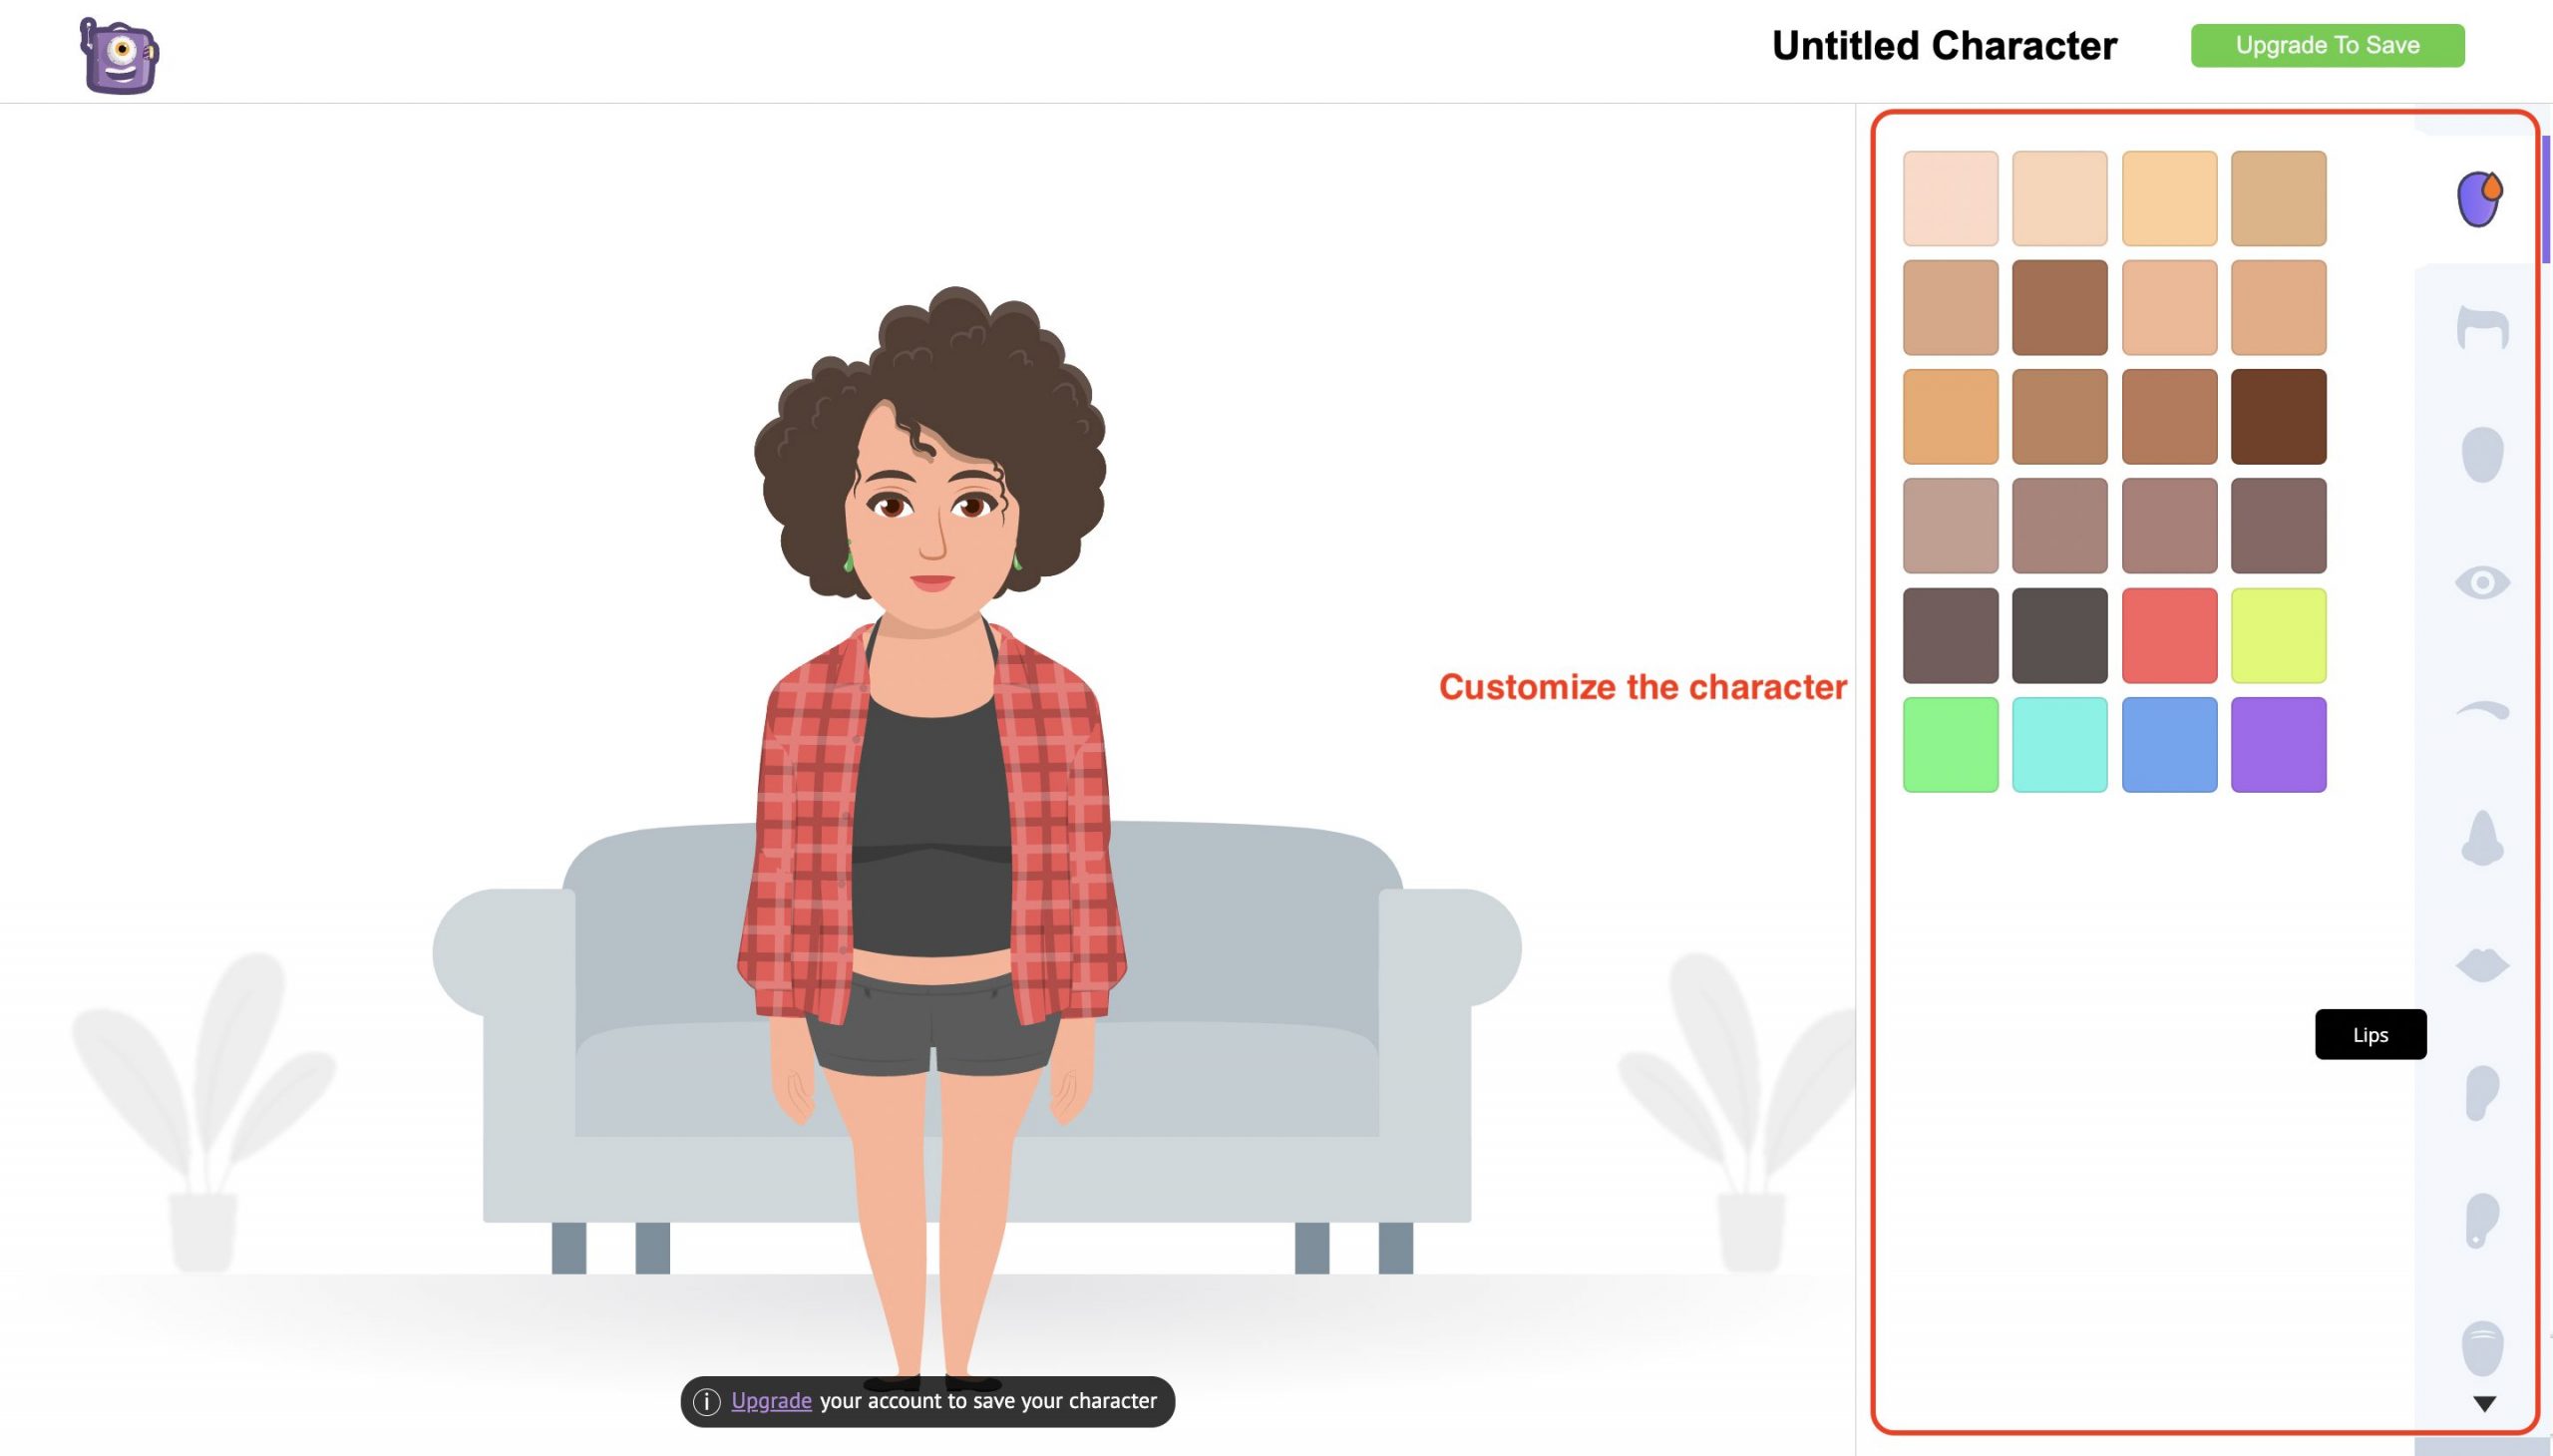
Pick the one as per your preference. Once you select the type, you will be taken to the character customization screen.
Here you can customize each and every aspect of your character, starting from head to toe.
This is the cherry on top of the Animaker Deck app. This way, you can introduce yourself as a character in your presentation as well.
Once you have finished the customizations, save your character and refresh the project. You can find the newly created character in the My Characters tab under the Character feature.
Using Properties
Animaker Deck is loaded with tons of Properties. Icons, Graphs, Charts, Numbers, Illustrations, or anything you name, are covered under the properties section.
Now, let’s add a speech bubble to the character. You can do this by searching for a speech bubble under the properties section in the library.
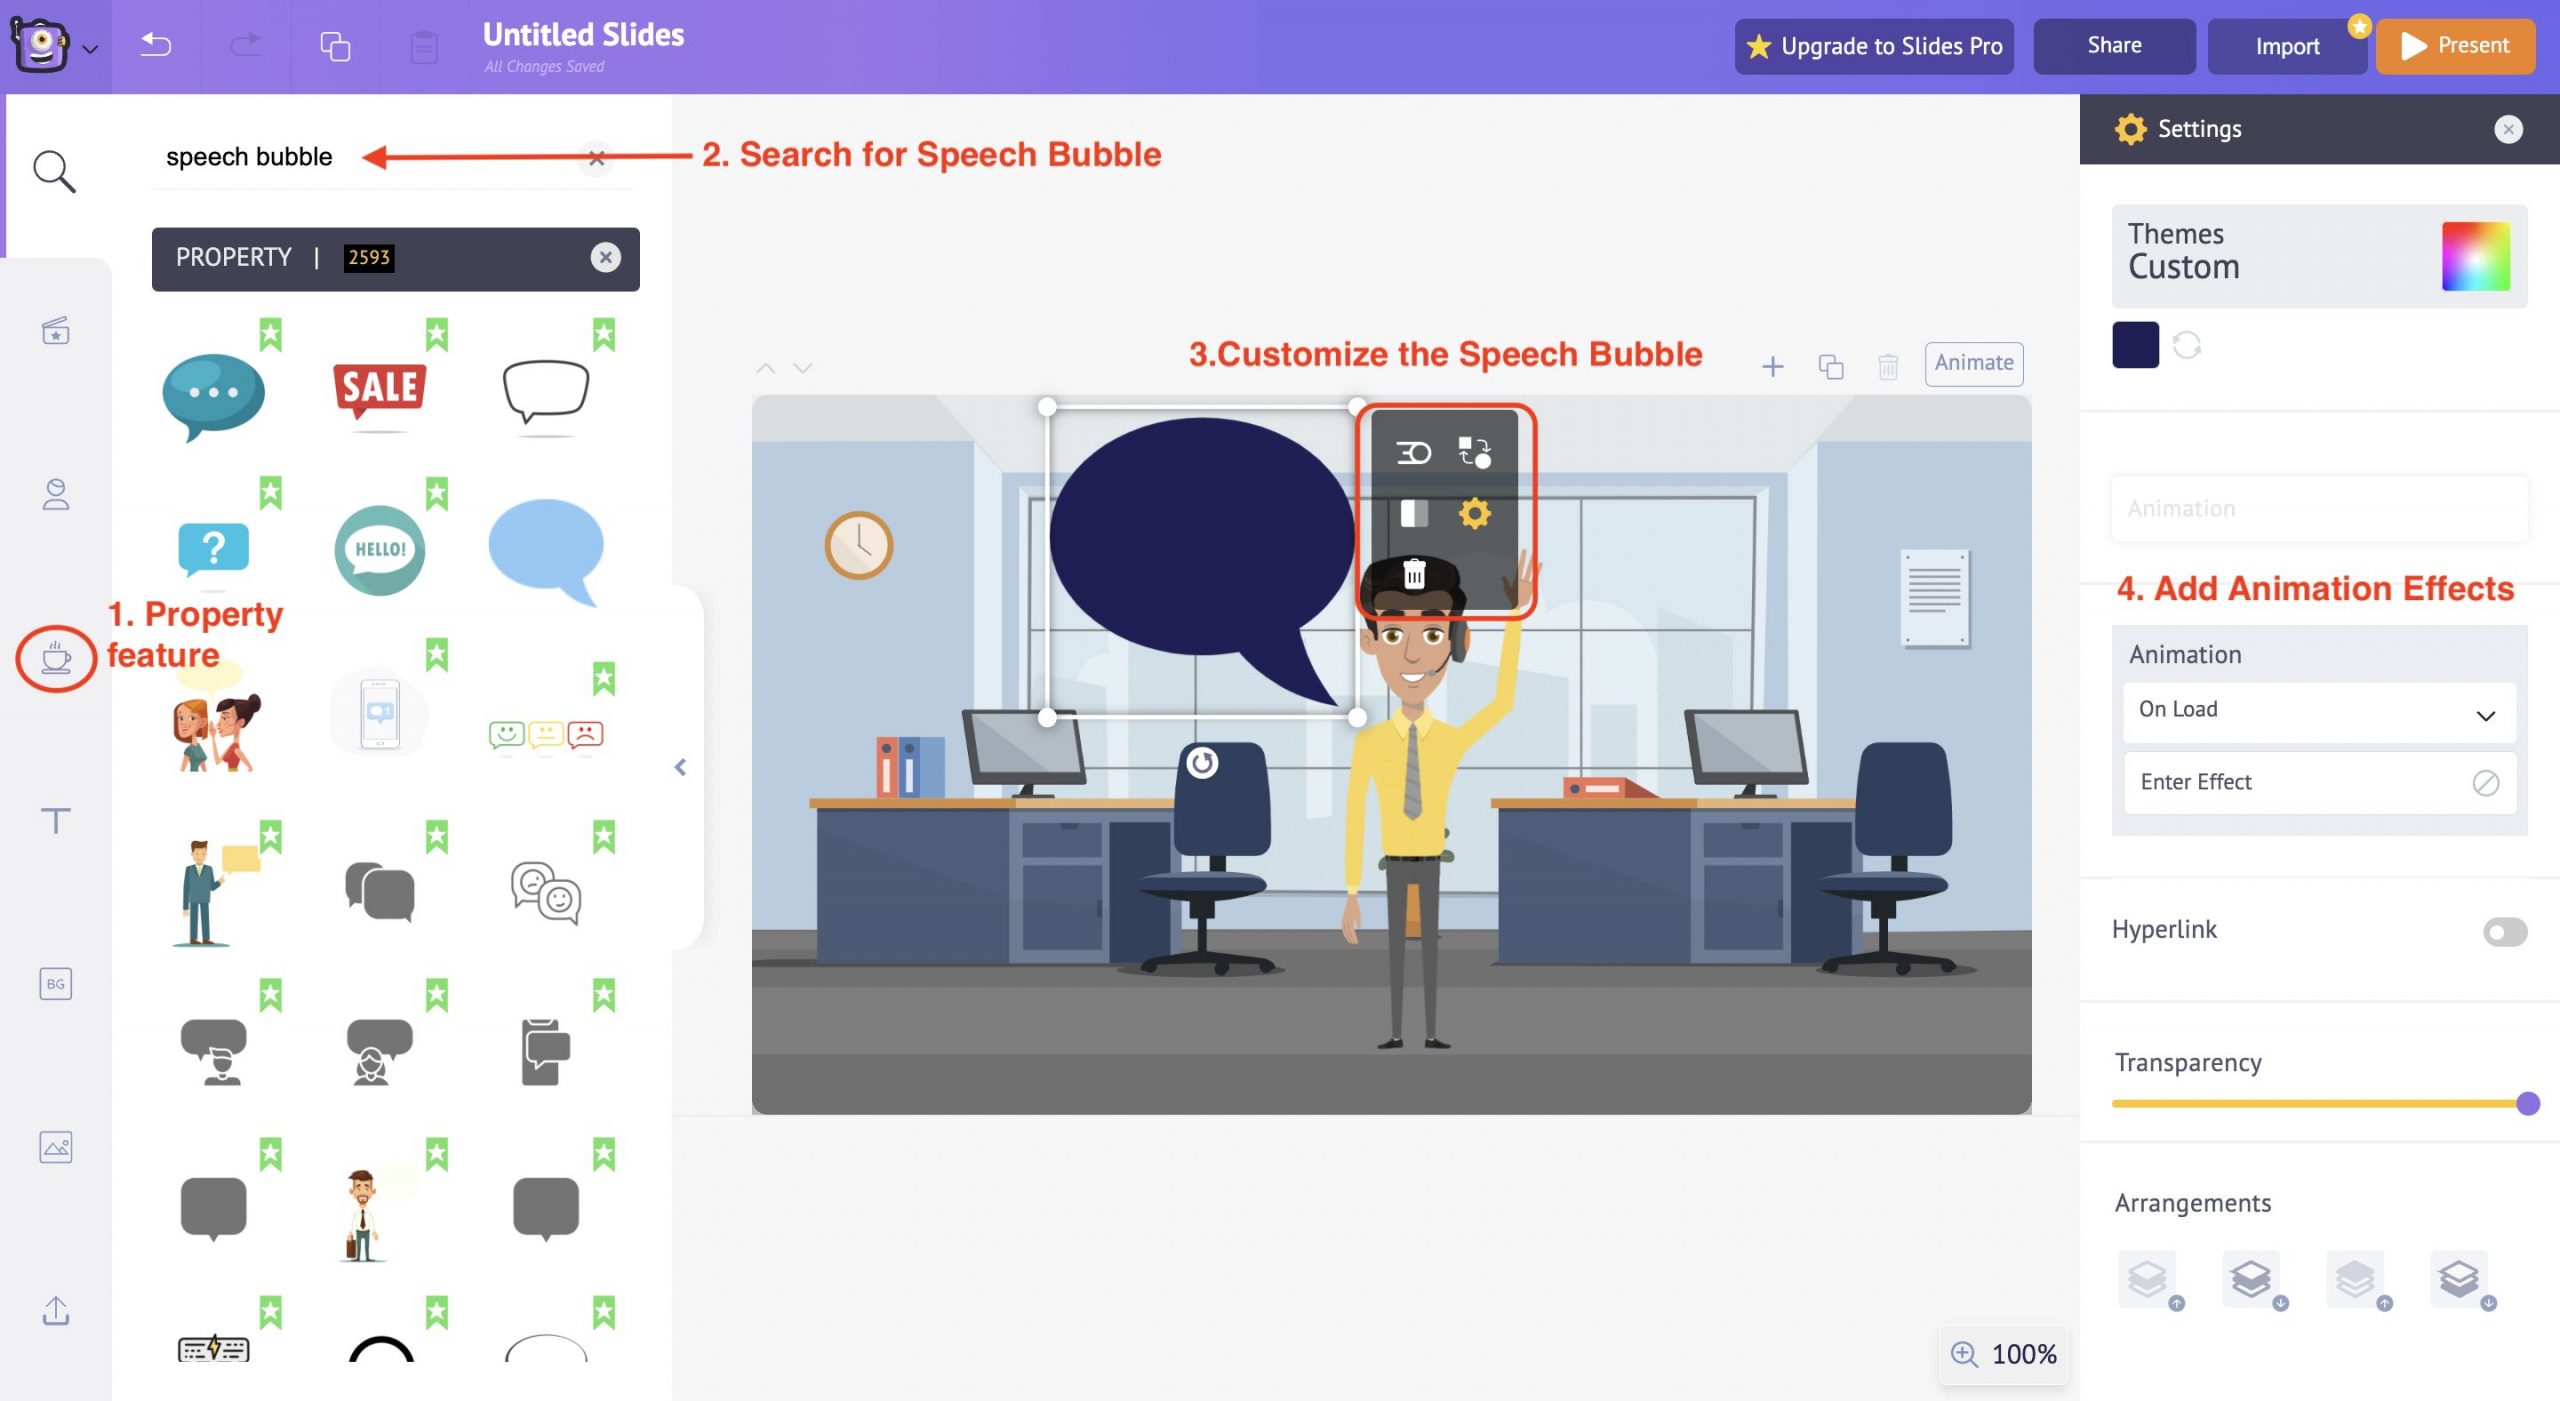
Once you select the speech bubble, it will appear in the workspace. Use the item menu options to customize the size and color.
You can also add animation effects to the speech bubble from the options available on the right side of the workspace.
Introducing entry and exit animations to the properties in the slide adds extra appeal to the presentation overall.
Adding Text
Using the Text feature, you can add text to your slides in two ways.
One is to choose and edit from the built-in text templates designed along with animation effects, and the second is to enter the text manually with text boxes.
Select a suitable text design from the Text feature under the library section.
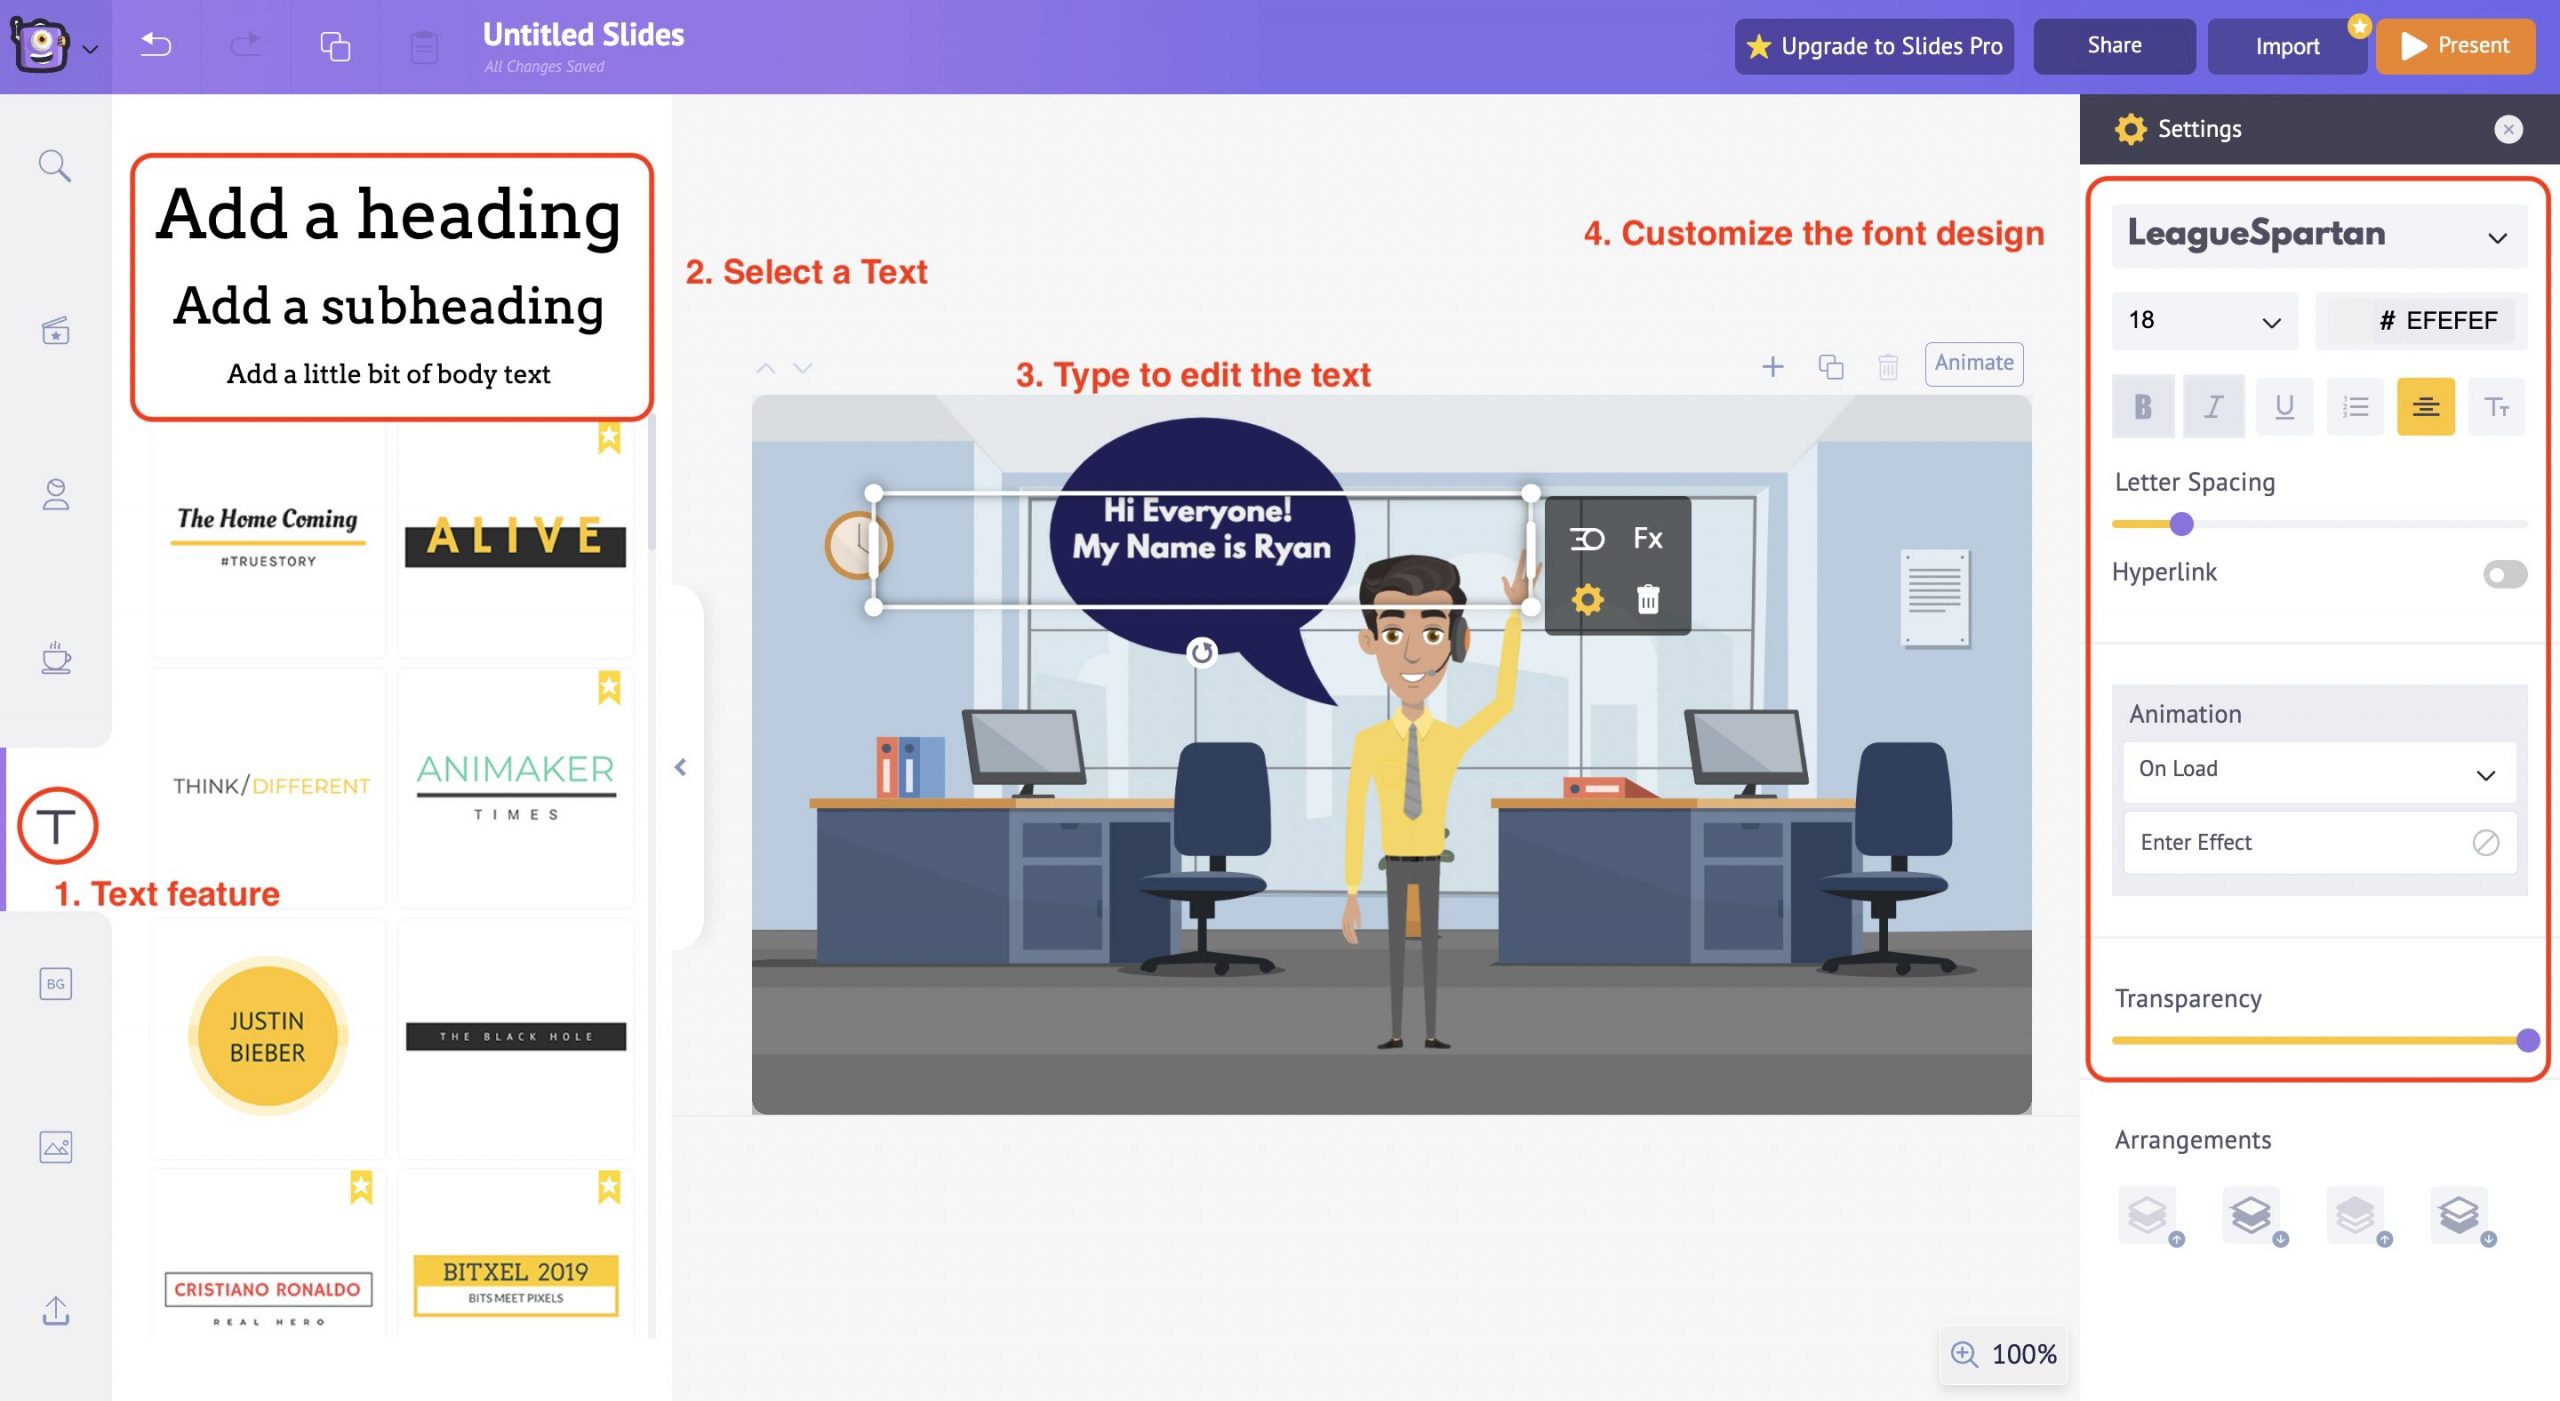
Once you select the text design, it will appear in the workspace; now, you can type in the required text and use the item menu options to customize the color, font style, size, and alignment and adjust the case sensitivity of the text.
In this instance, we have used the empty text box design and entered the text manually. You can also use the built-in text design templates and edit them accordingly.
Also, it is possible to add animation effects to the text just like we did to the properties earlier.
You can even adjust the transparency of the text by using the transparency slider beneath the animation effects on the right side of the workspace.
This way, Animaker Deck gives a complete customization option for the users to edit and change the slides according to everyone’s preferences.
Creating an animated presentation from templates
Another way of creating an animated presentation is from pre-built templates.
Here’s what we will cover:
- Selecting a template
- Editing the text
- Customizing the Character
- Editing the Background Images
Selecting a template
Animaker Deck offers more than 50 professionally designed templates to choose from.
Use these templates to inject fresh ideas into your static slides!
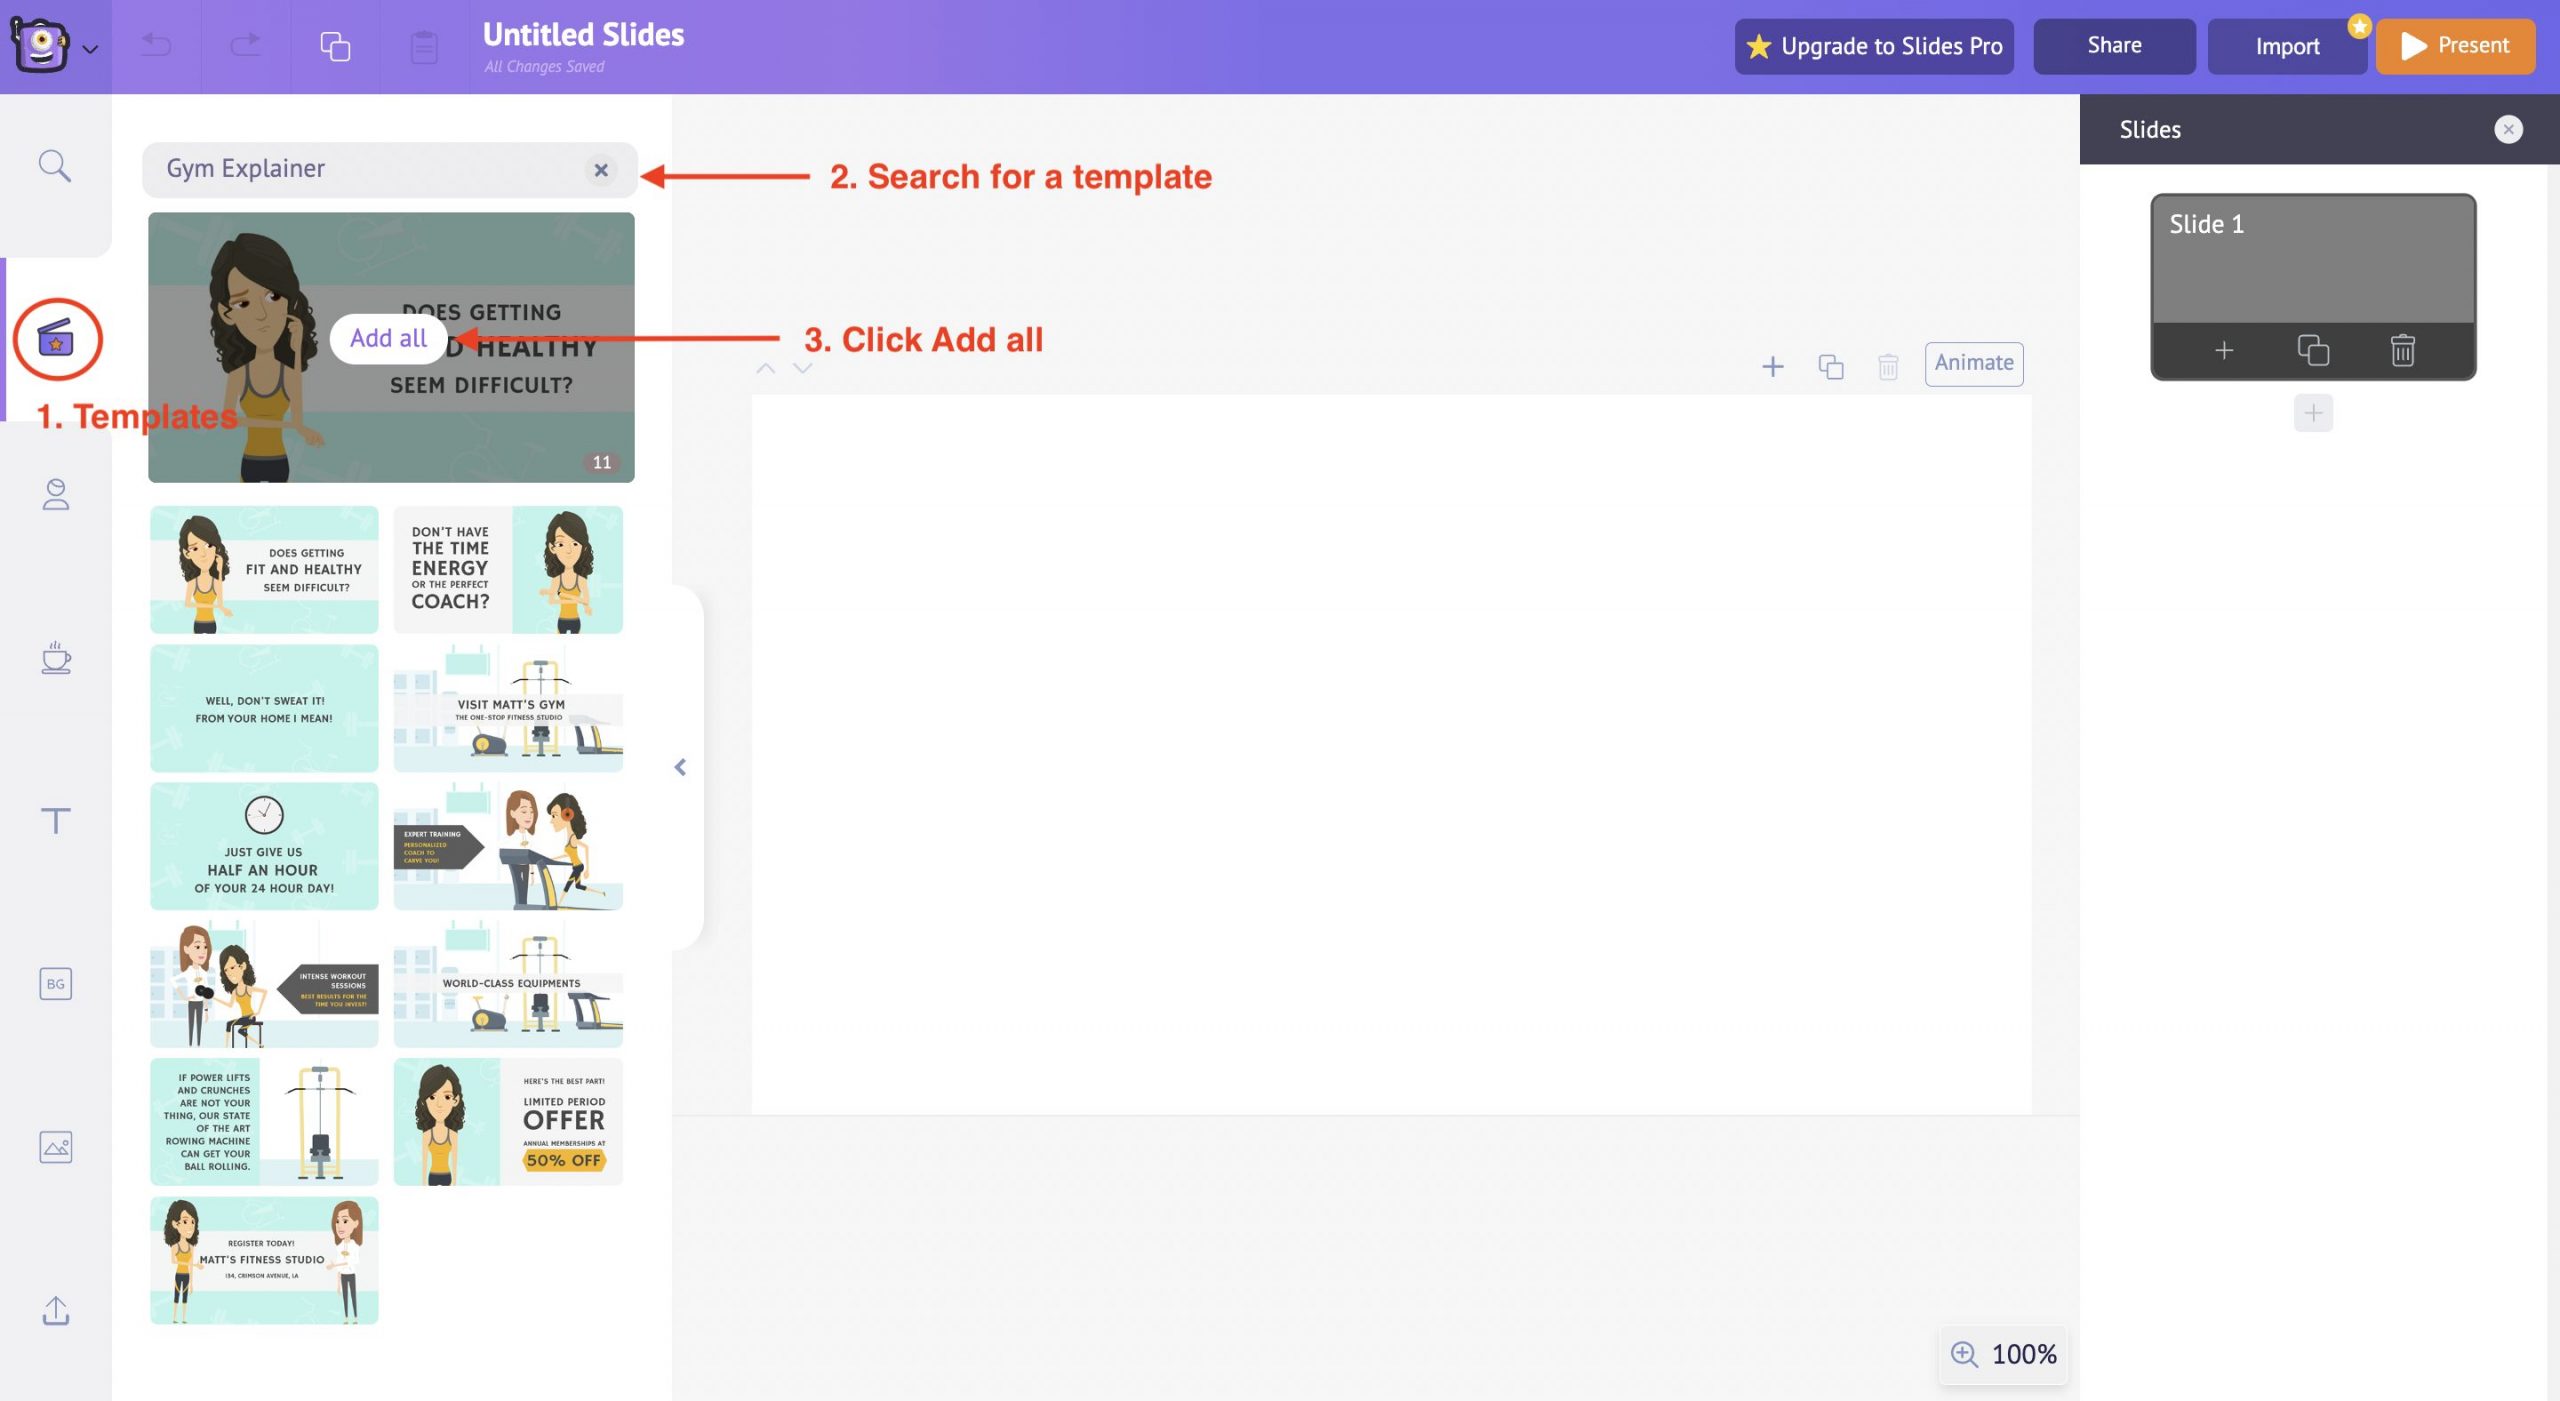
The templates feature is on the left side under the library section.
Go carefully through the different templates and select a suitable one for your use case. Then click Add all.
A pop-up window will appear, asking you to overwrite; click confirm to insert the template.
Once you have clicked the confirm button, all the slides will be inserted into the project.
Now the best part about creating an animated presentation from templates in Animaker Deck is that every aspect of the template is completely customizable. The three main aspects of the template that you can customize as per your preferences are
- Text
- Characters
- Background Images
Editing the Text
Select the Text that you want to edit. Then click on the Settings option from the item menu. You can find different options to customize the text on the right side.
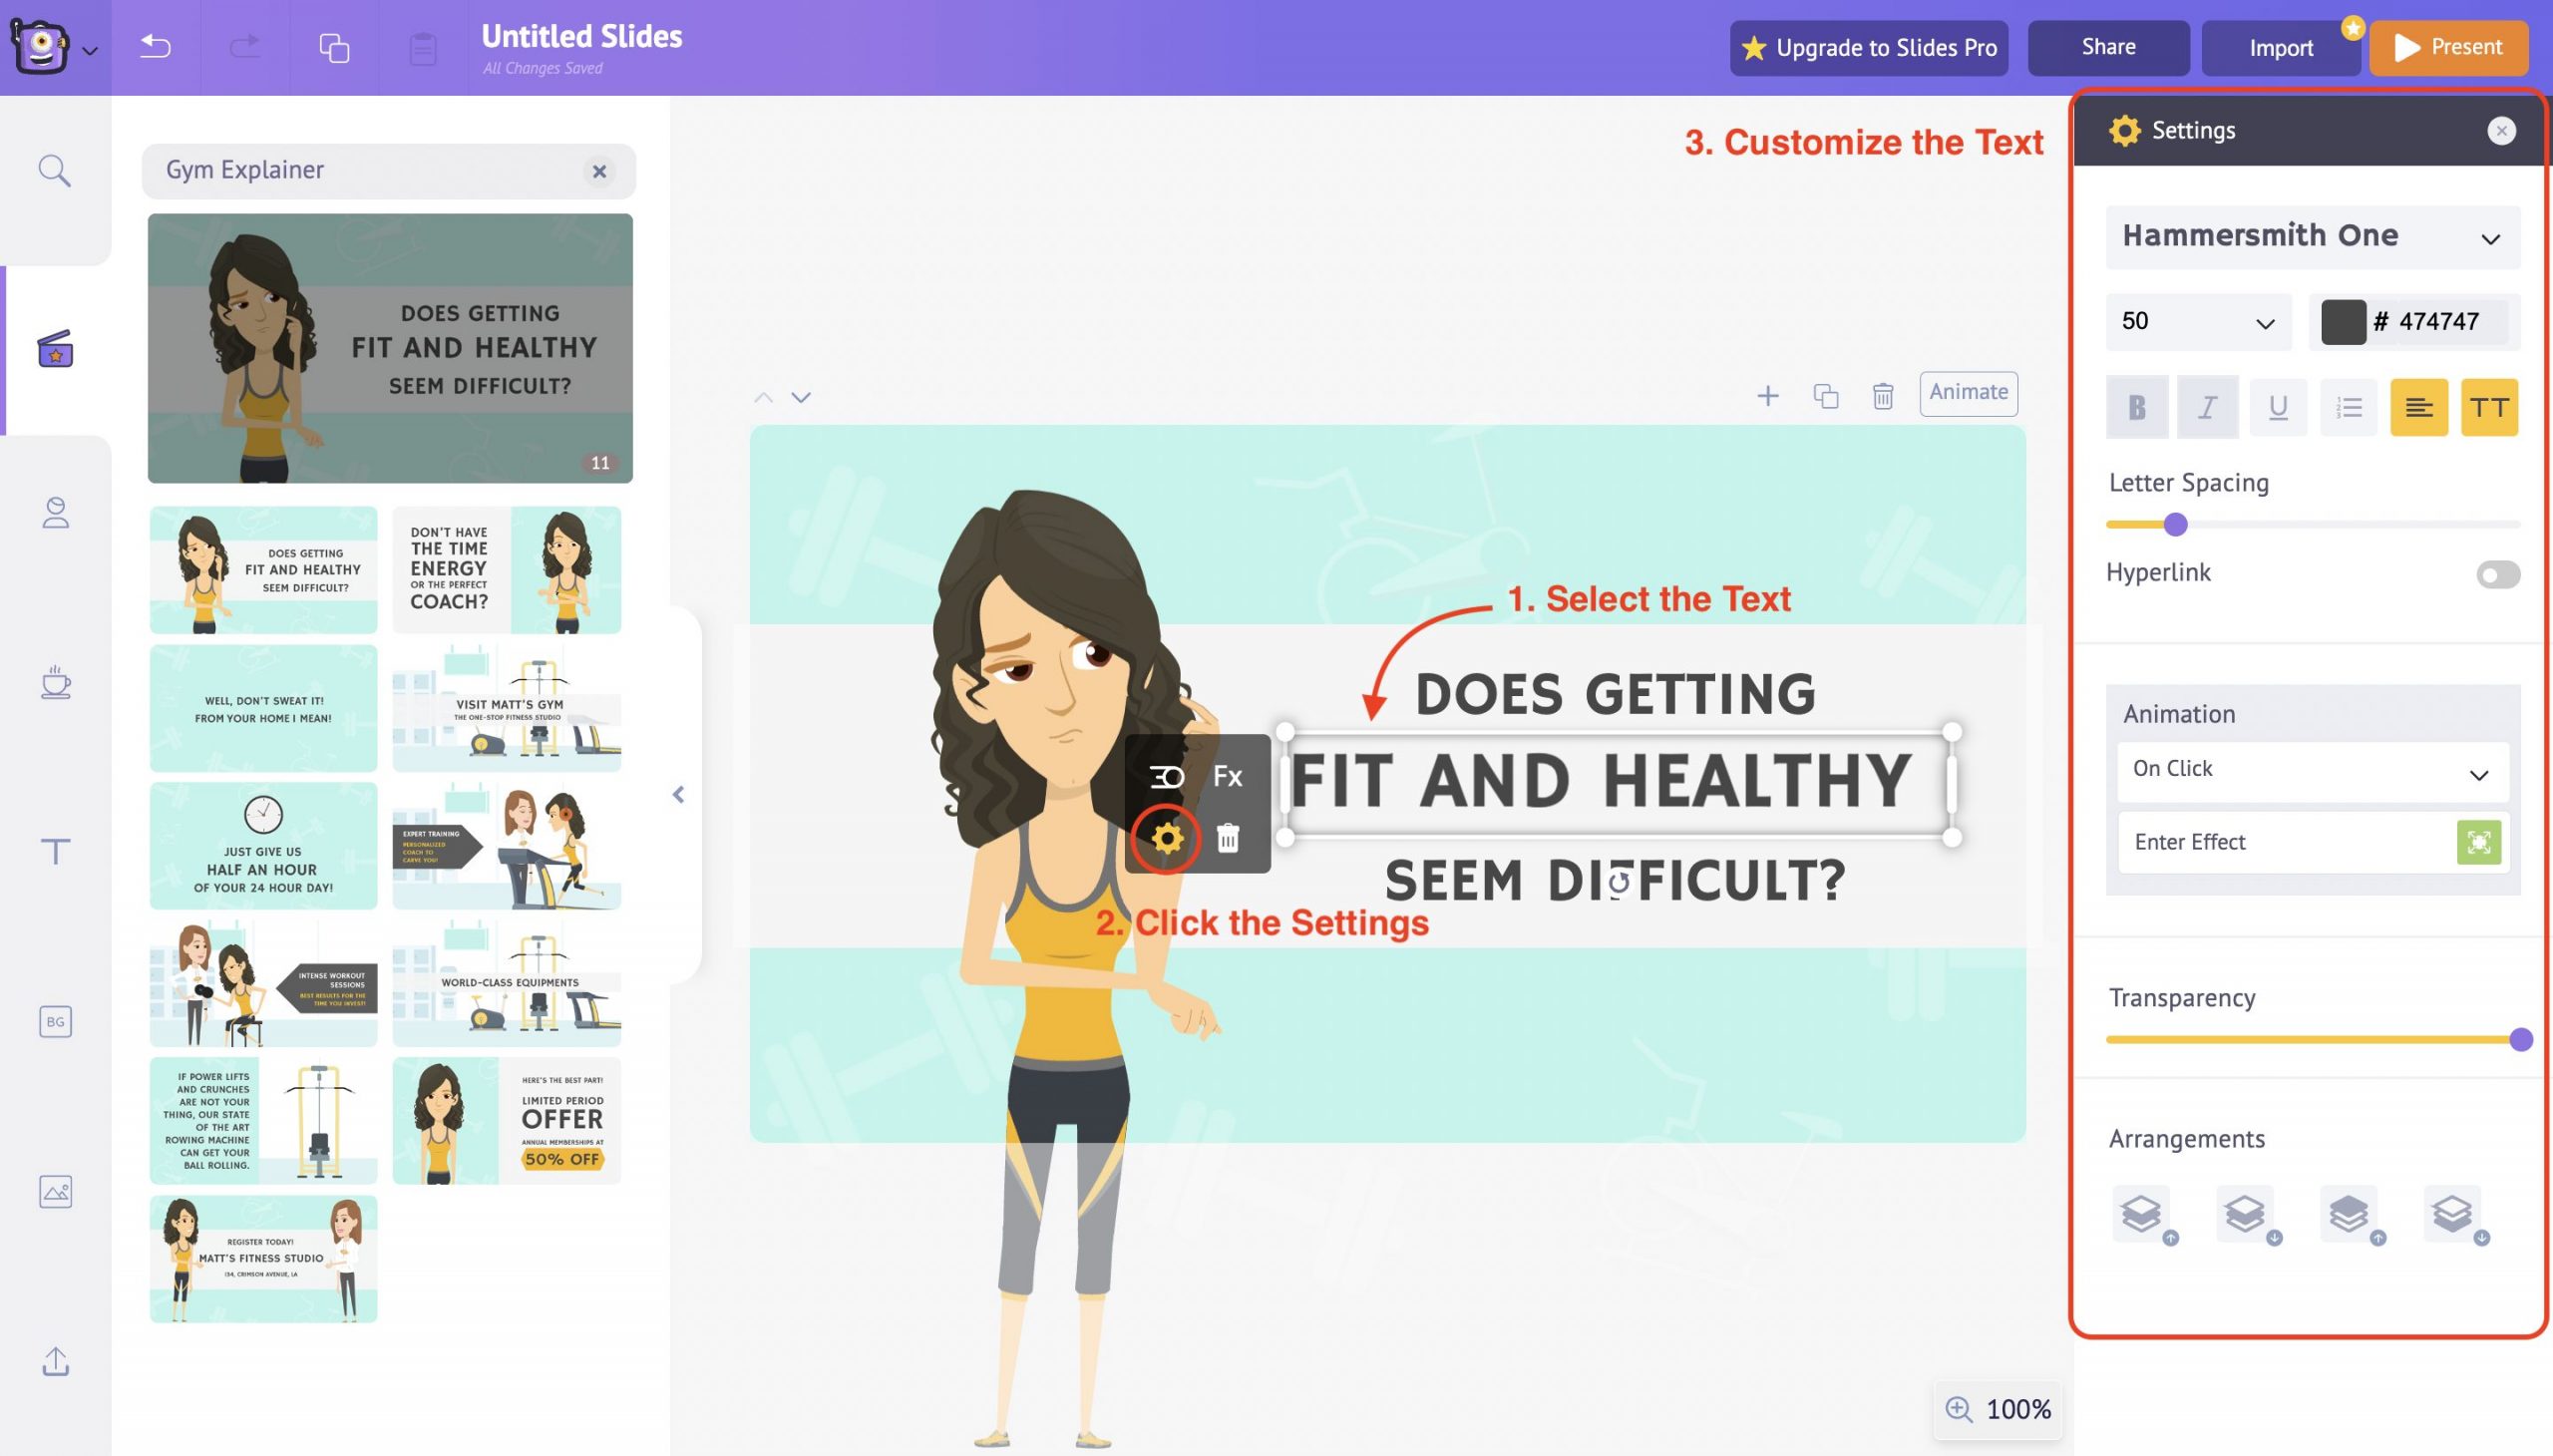
For instance, you can choose a different font, change the font’s color, and adjust the line spacing. You can also make the text a Hyperlink by toggling the Hyperlink button.
Use all these options to edit the text according to your preference.
Customizing the Character
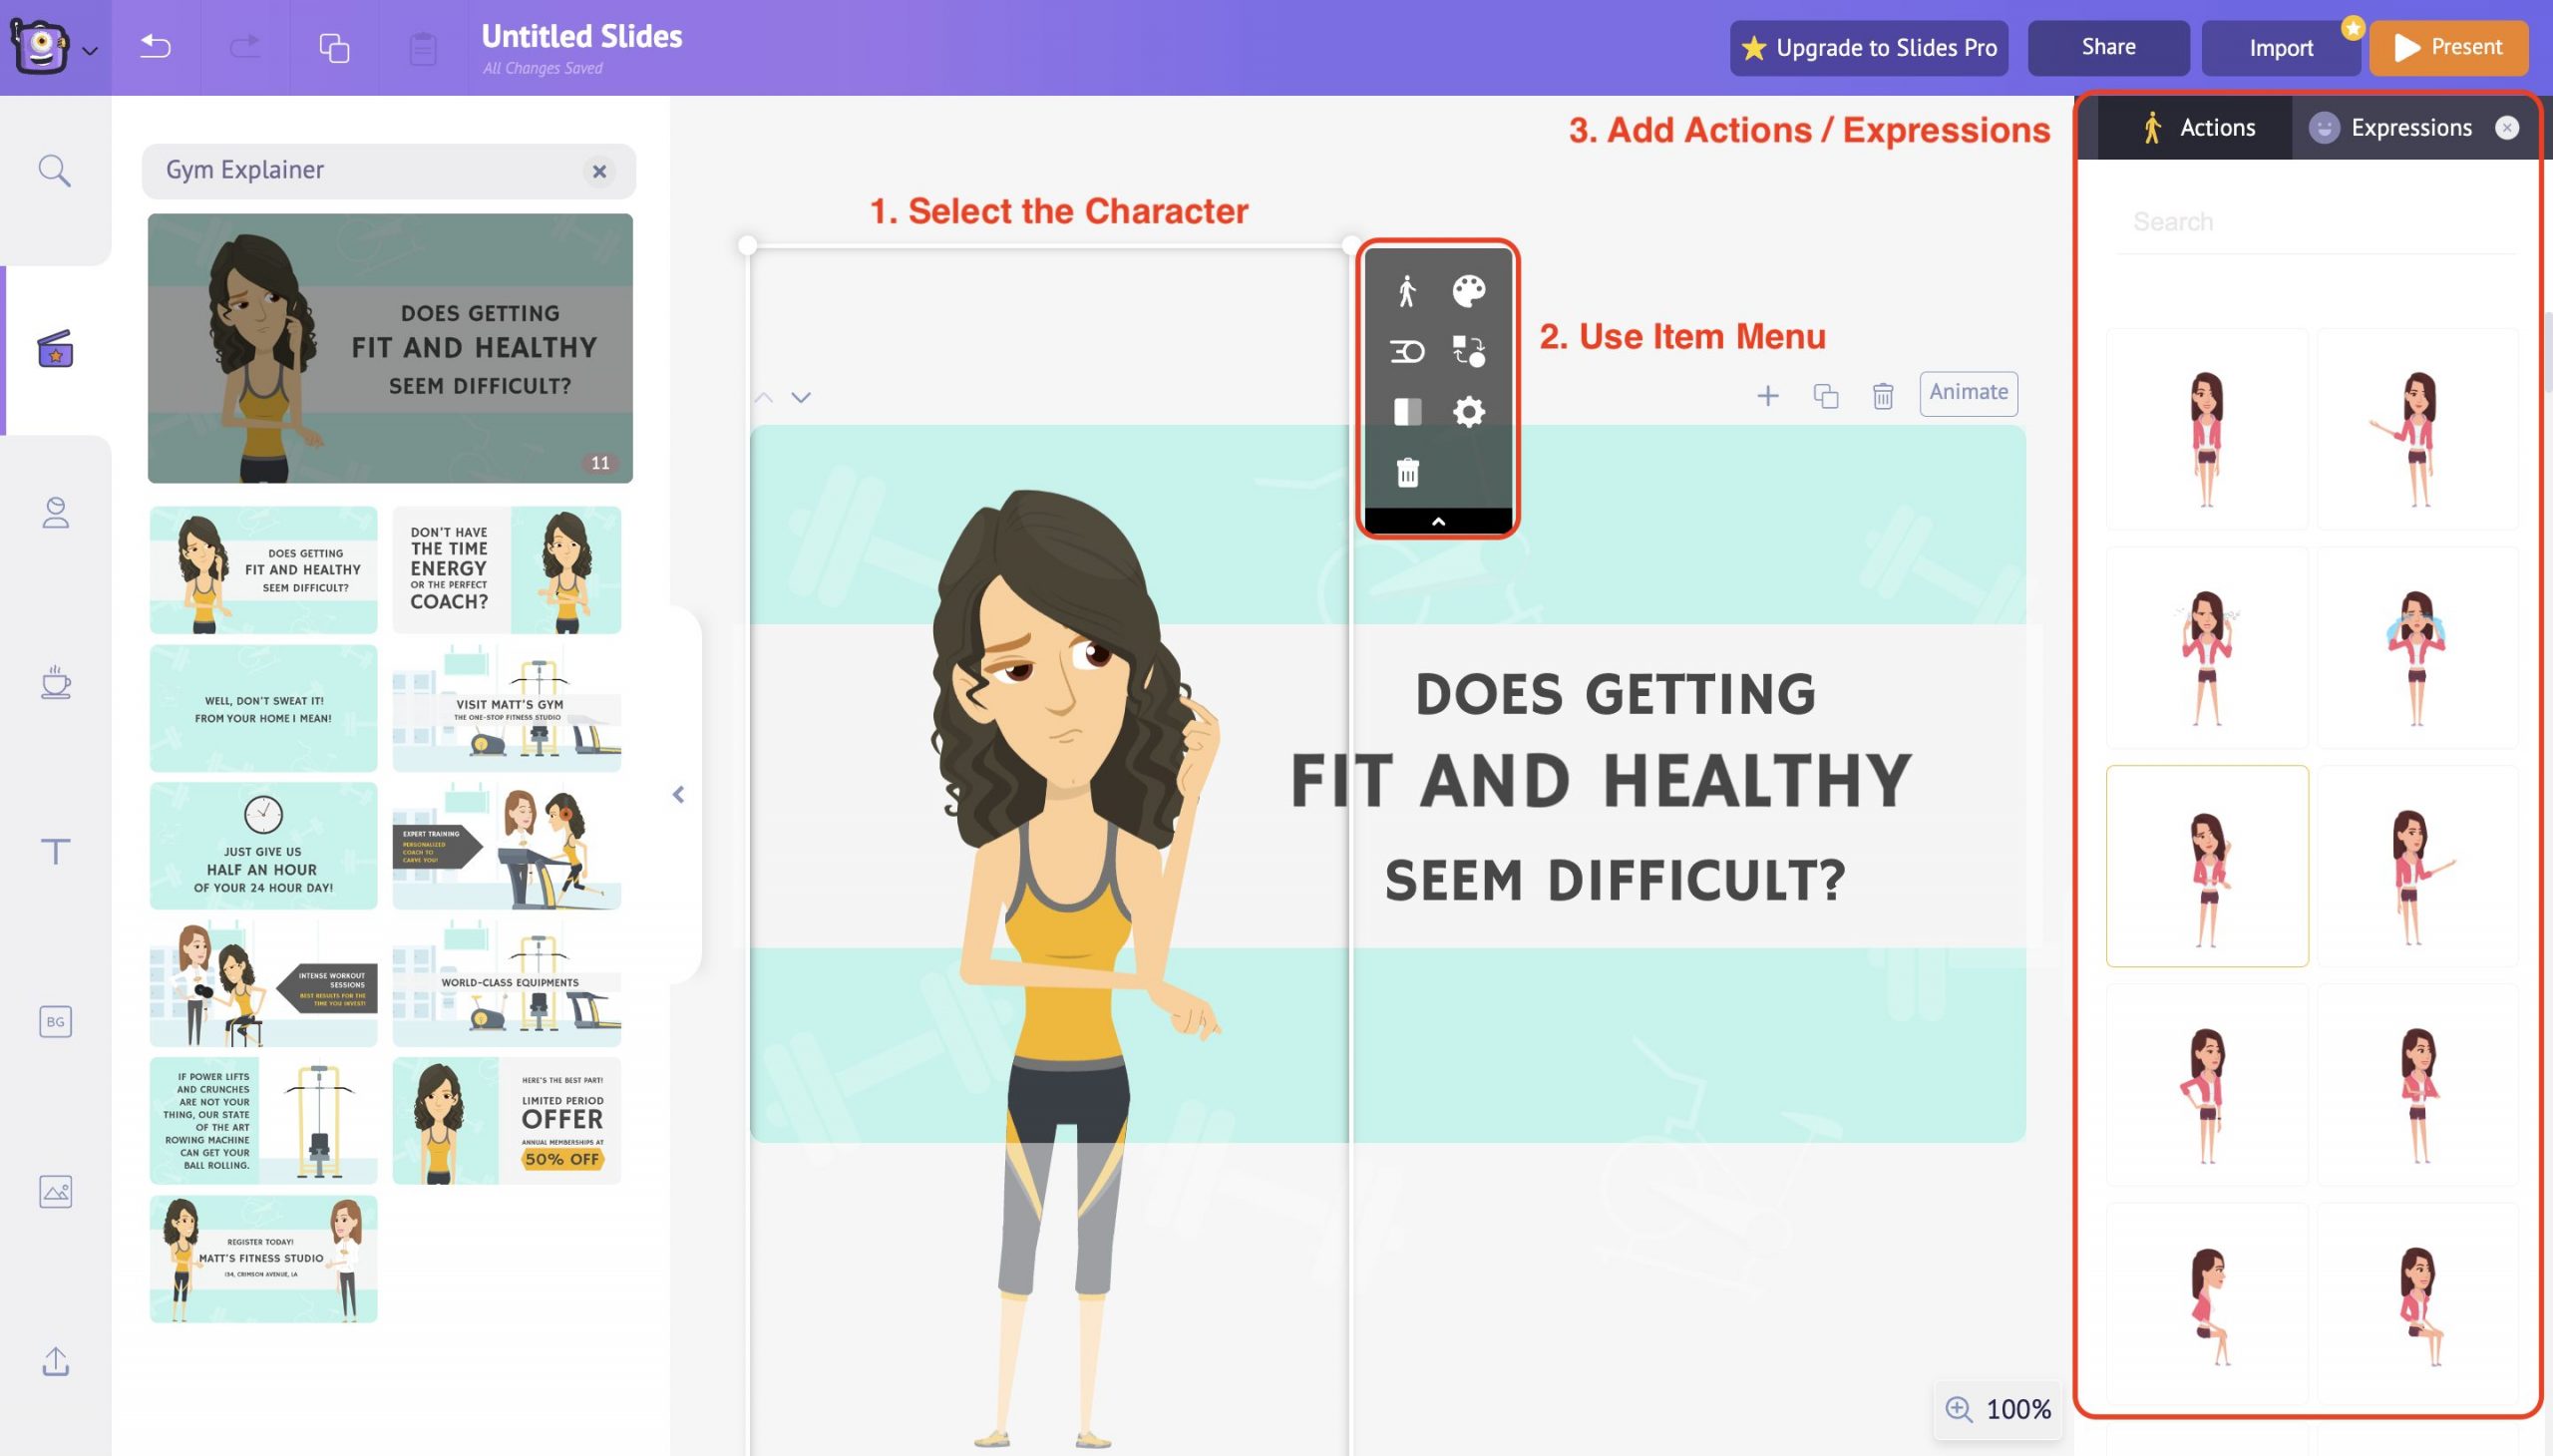
Select the Character and use the item menu to customize it. You can alter the color of the character and its attire as per your preference.
You can also introduce actions and expressions to the character and bring life to your presentation. Simply select an action under the action tab, and it will reflect in character immediately. It’s that easy to animate your characters.
Also you can even introduce your own custom characters into the slide deck.
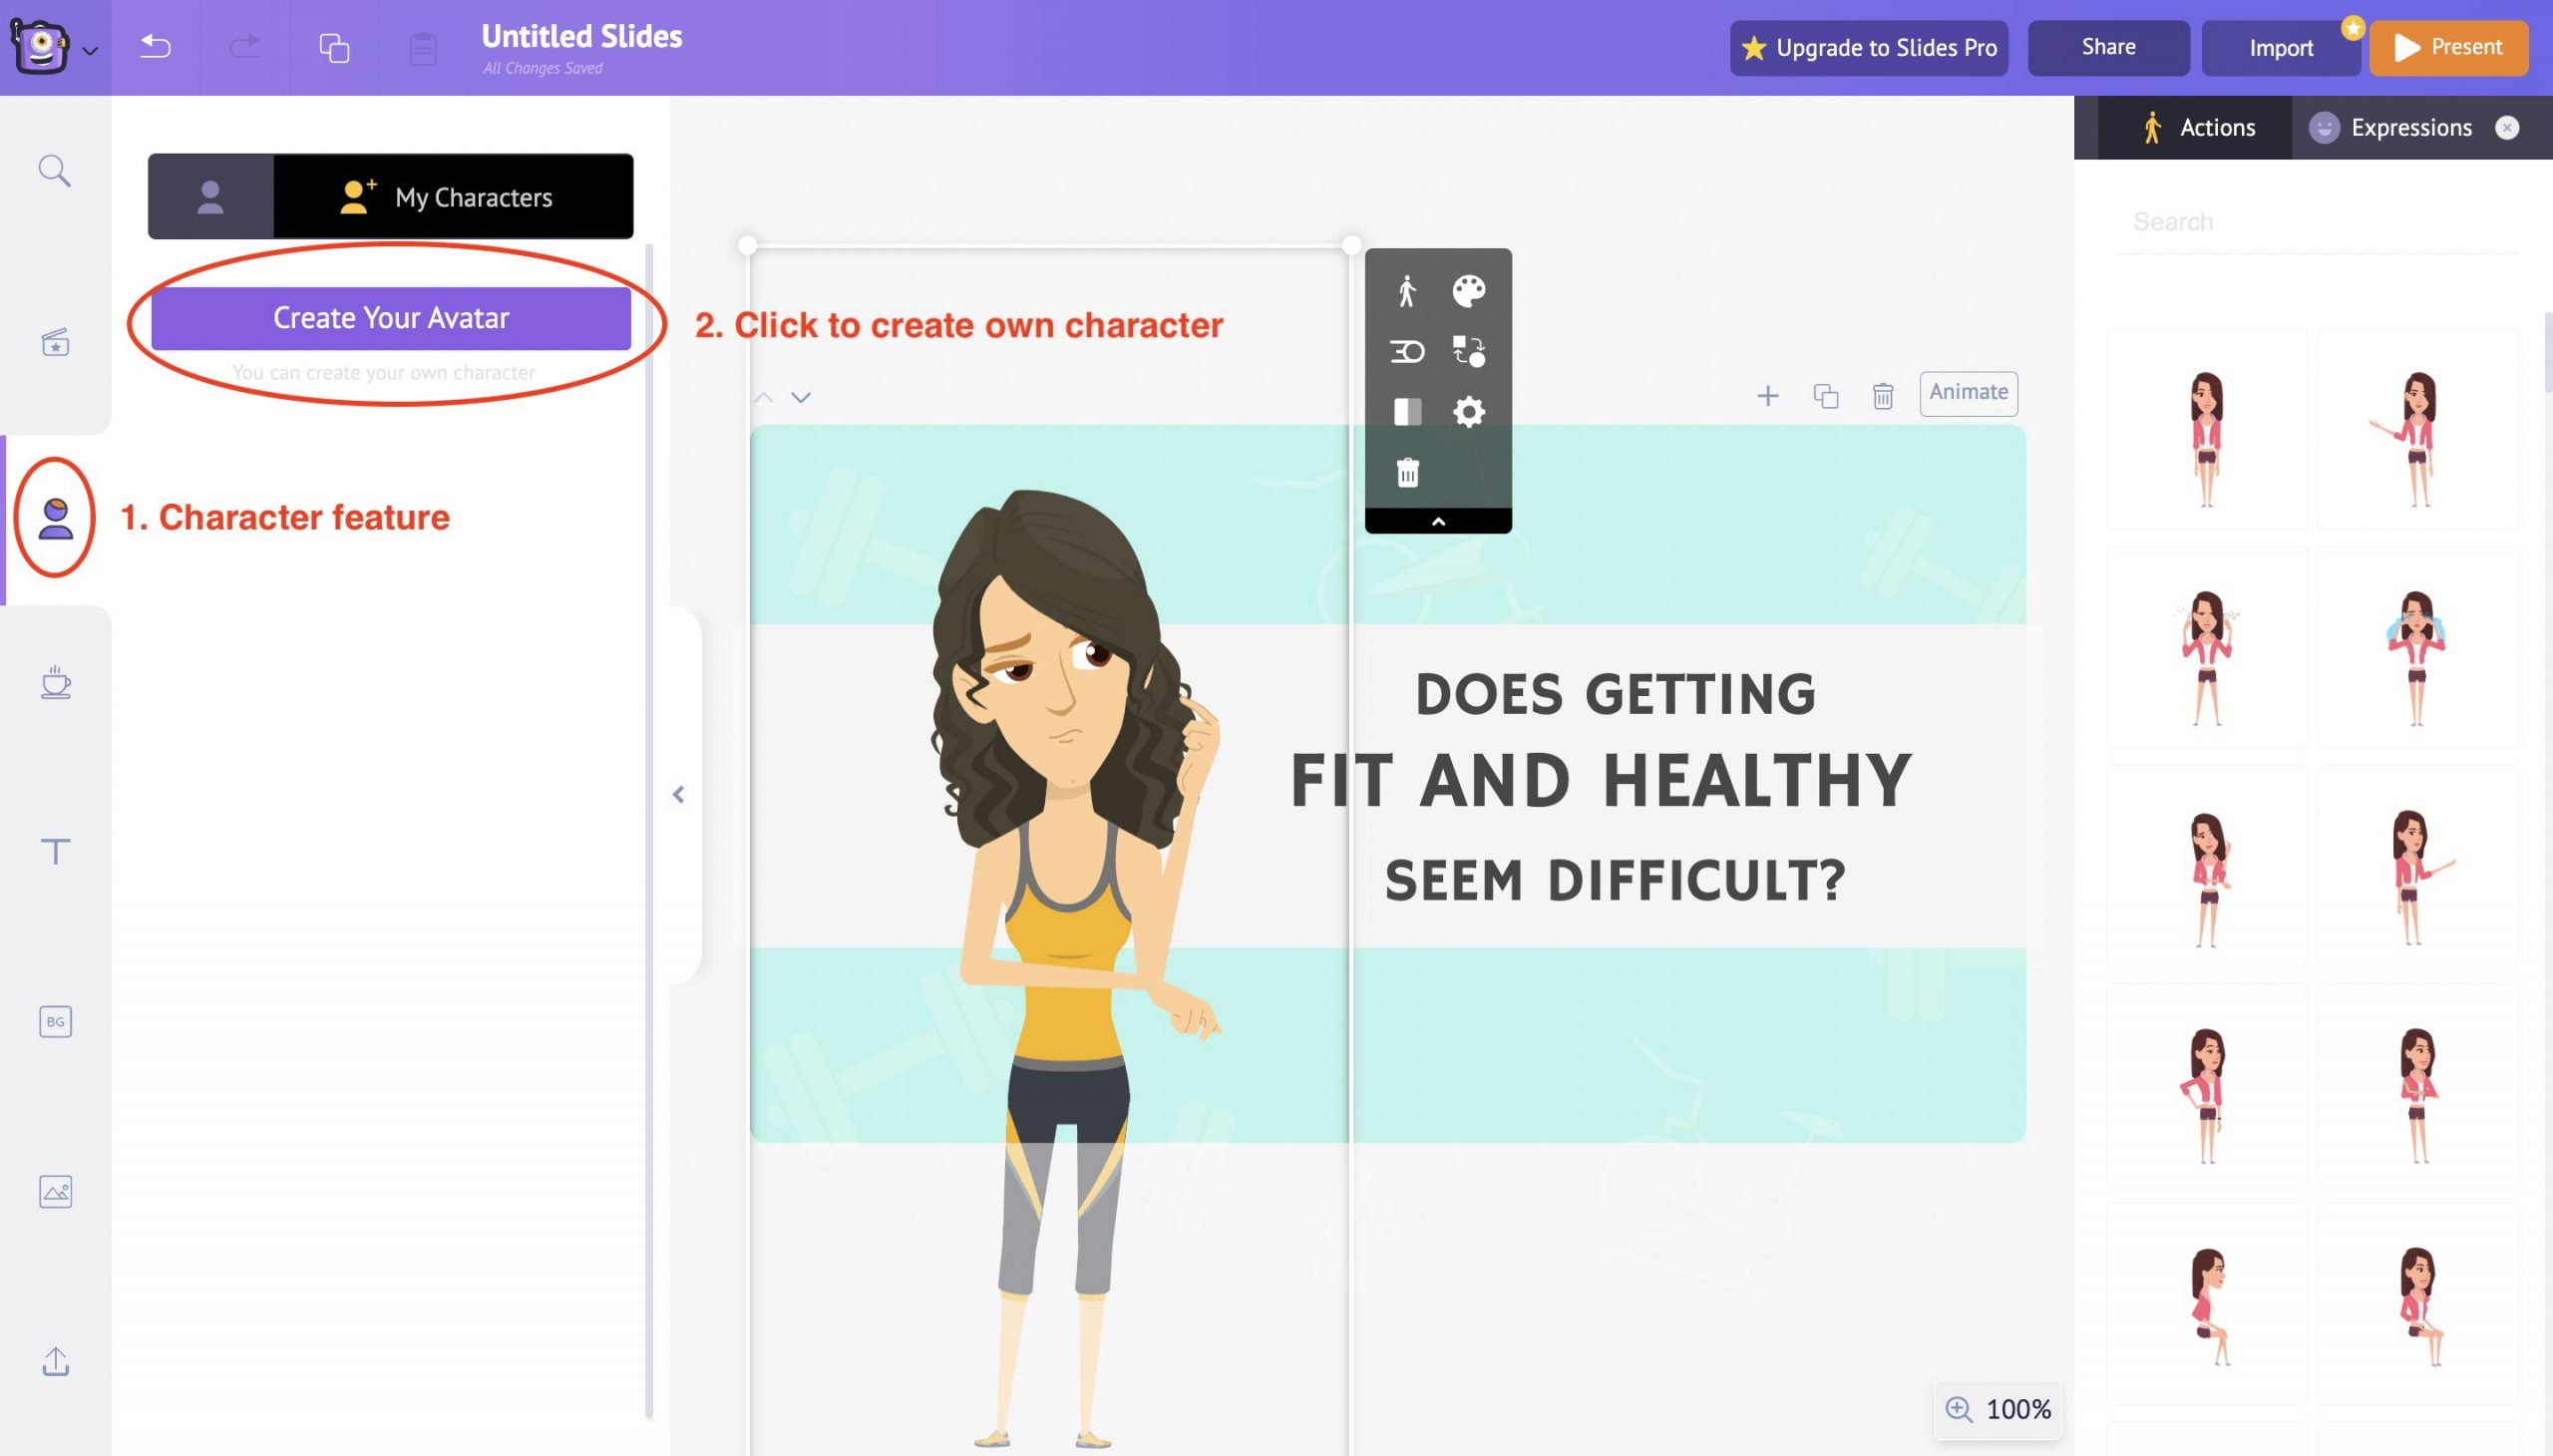
Use the Create Your Avatar button under the Characters feature to create your own custom character.
Animaker Deck offers you options to create a character between Young Adults and Children.
Pick the one as per your preference. Once you select the type, you will be taken to the character customization screen.
Here you can customize each and every aspect of your character, starting from head to toe.
This is the cherry on top of the Animaker Deck app. This way, you can introduce yourself as a character in your presentation as well.
Once you have finished the customizations, save your character and refresh the project. You can find the newly created character in the My Characters tab under the Character feature.
Editing the Background Images
Animaker Deck, in partnership with GIPHY, PEXELS & PIXABAY, provides access to thousands of quirky gifs and iconic images which can be used in your slides with a single click.
You have the flexibility to even customize the existing background image in the template as per your preference.
Select the Background image and use the Item Menu options to edit the elements present in the background image.
For instance, you can alter the color of the elements, resize them, group them together or delete them.
Also, you can introduce animation effects to the background image to lit up the presentation.
However, if you are still unhappy with the customizations, Animaker Deck has covered you with the Upload option.
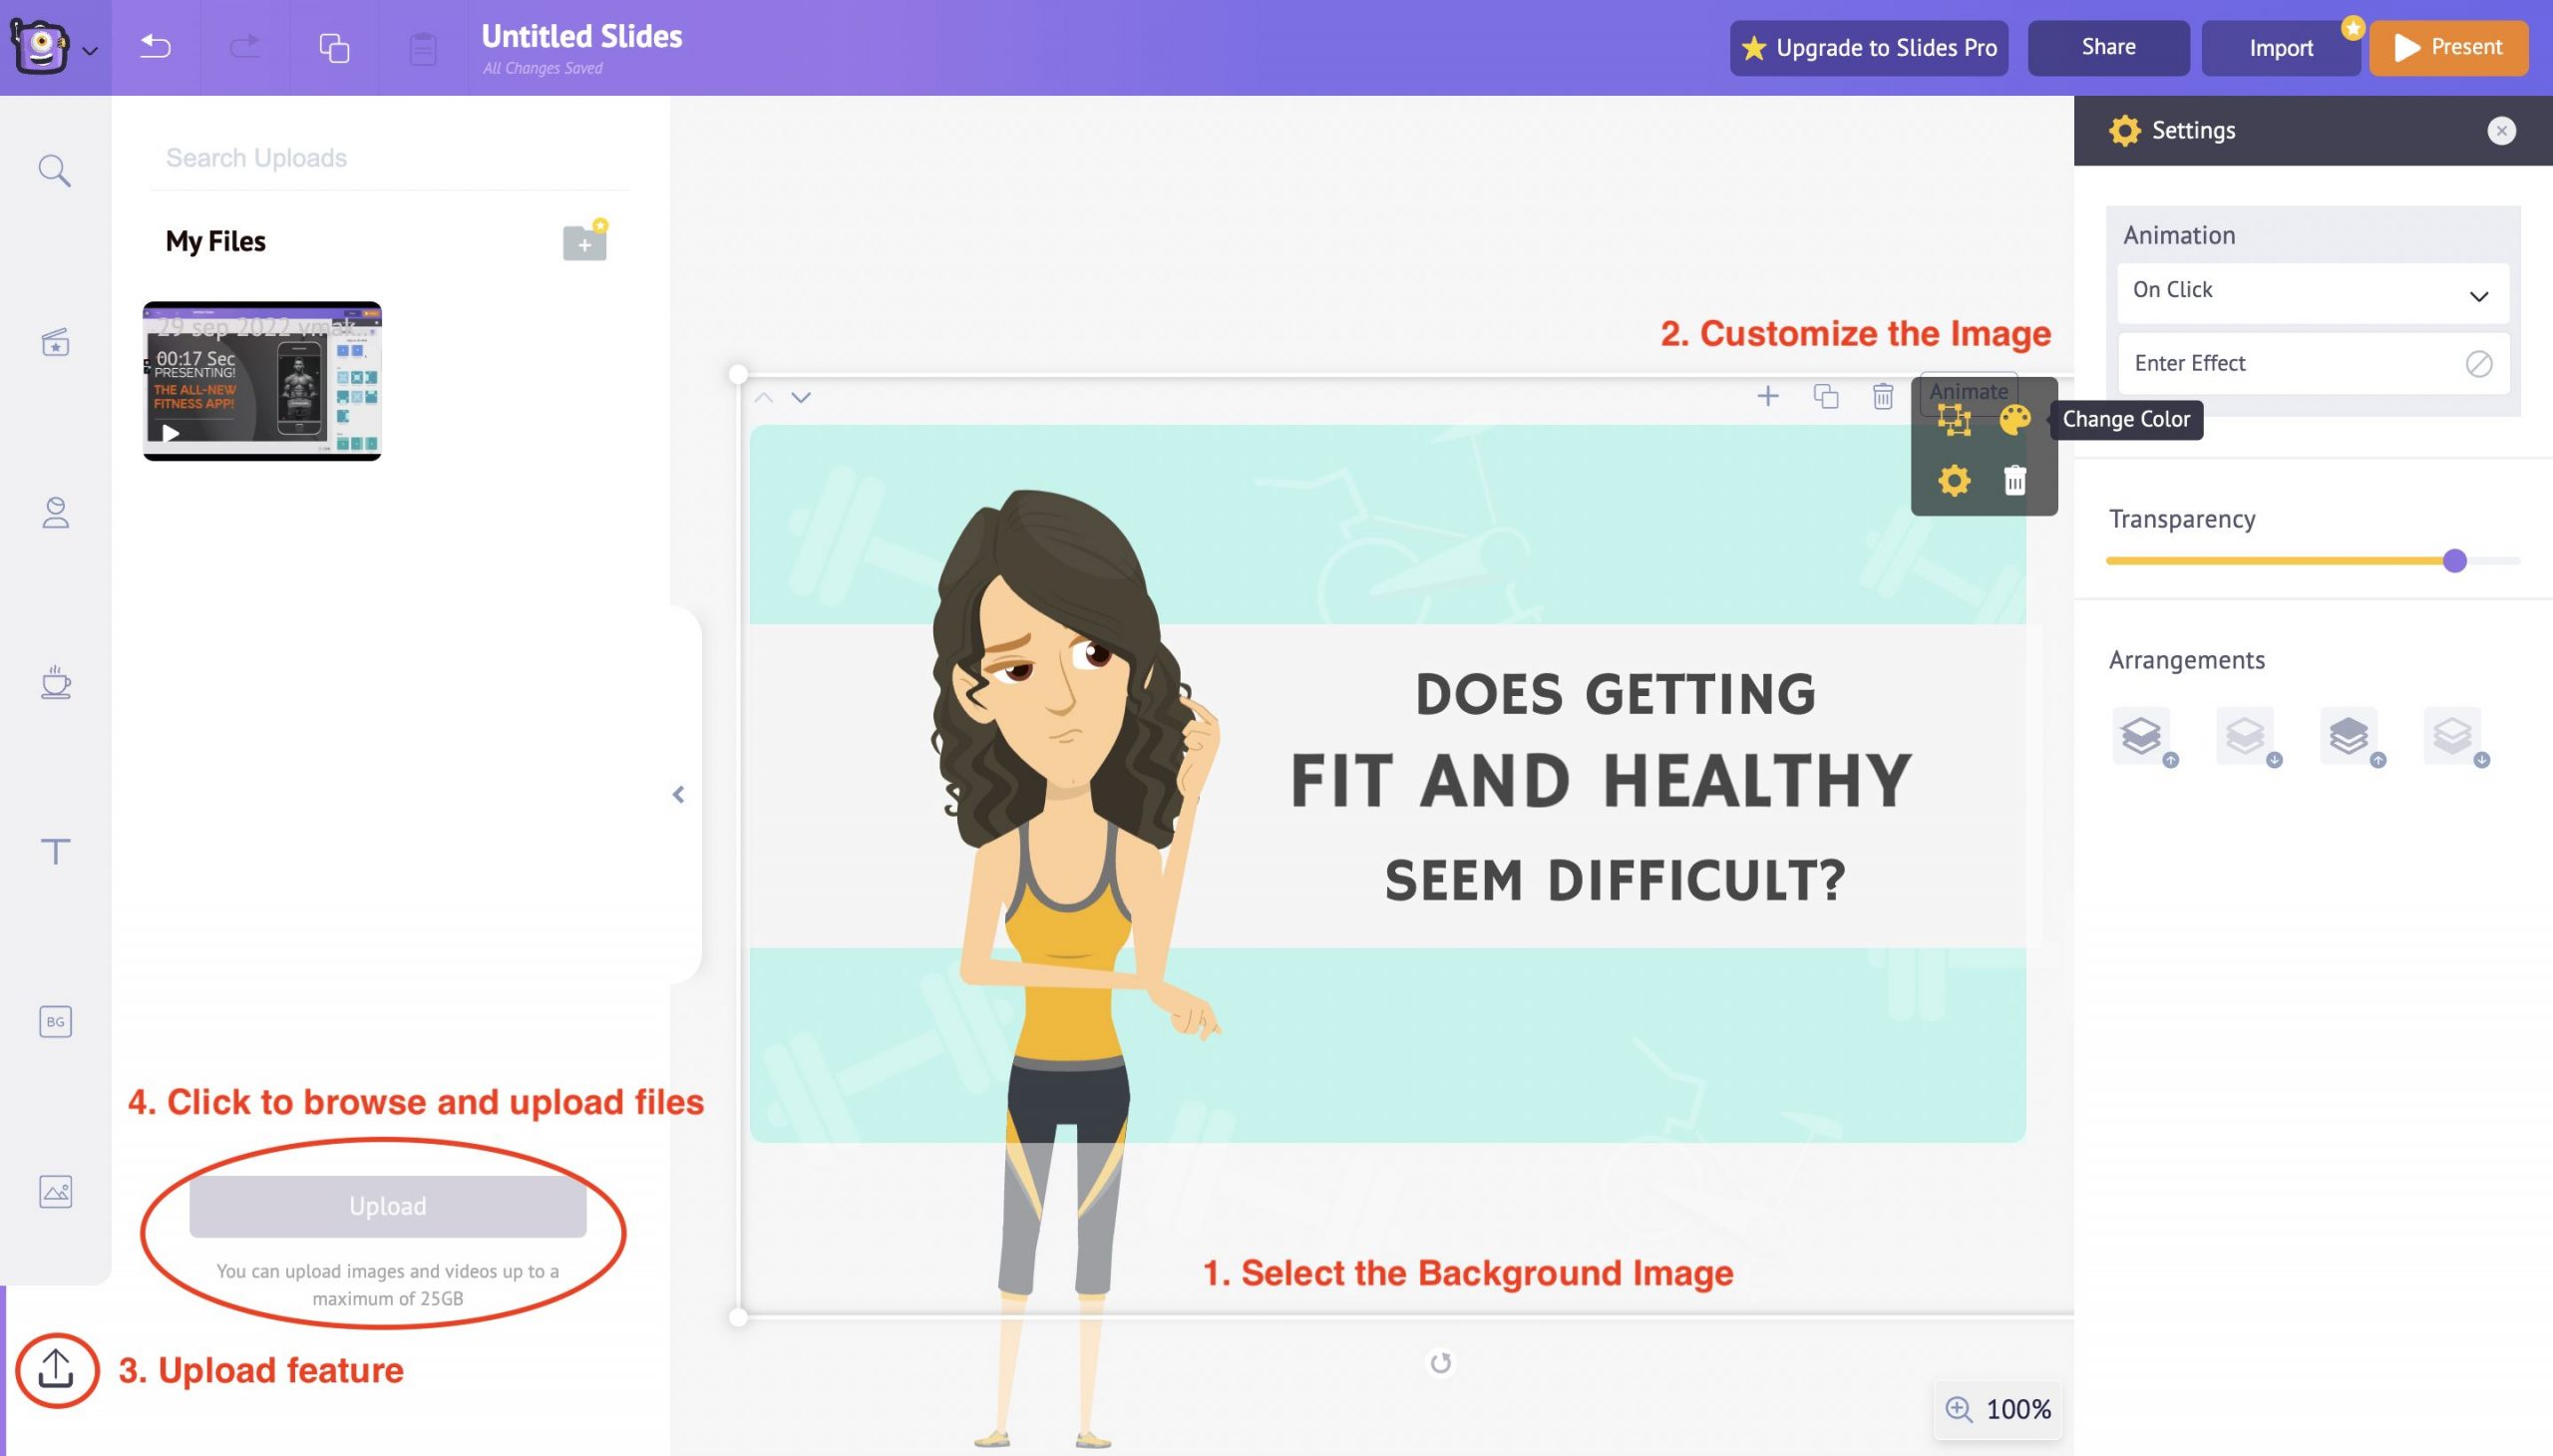
Animaker Deck offers up to 25 GB of storage space for you to upload your custom files onto the slide decks.
That’s some steal, right?

You can upload your own custom images and images into the slide decks by using the Upload feature in the library section.
Click on the Upload button to browse files from your local disc and upload them directly to your project.
Another simpler way of customizing your background is by playing around with the colors.
You can use solid colors as a background, or even better, you can use gradient colors matching your presentation style.
You can add up to five colors and create a gradient-style background on your own!
This way, you get complete control over the selected template and customize it as per your needs.
Once you’ve finished customizing the template, click on the present button to preview the entire presentation.
Previewing & Presenting the Slides
Once you have added the character, text, and properties and selected the suitable background, it’s time to preview how everything looks together when presented.
To do this, head to the Present option in the top menu. Clicking on the Present button will allow you to preview the slide in fullscreen.
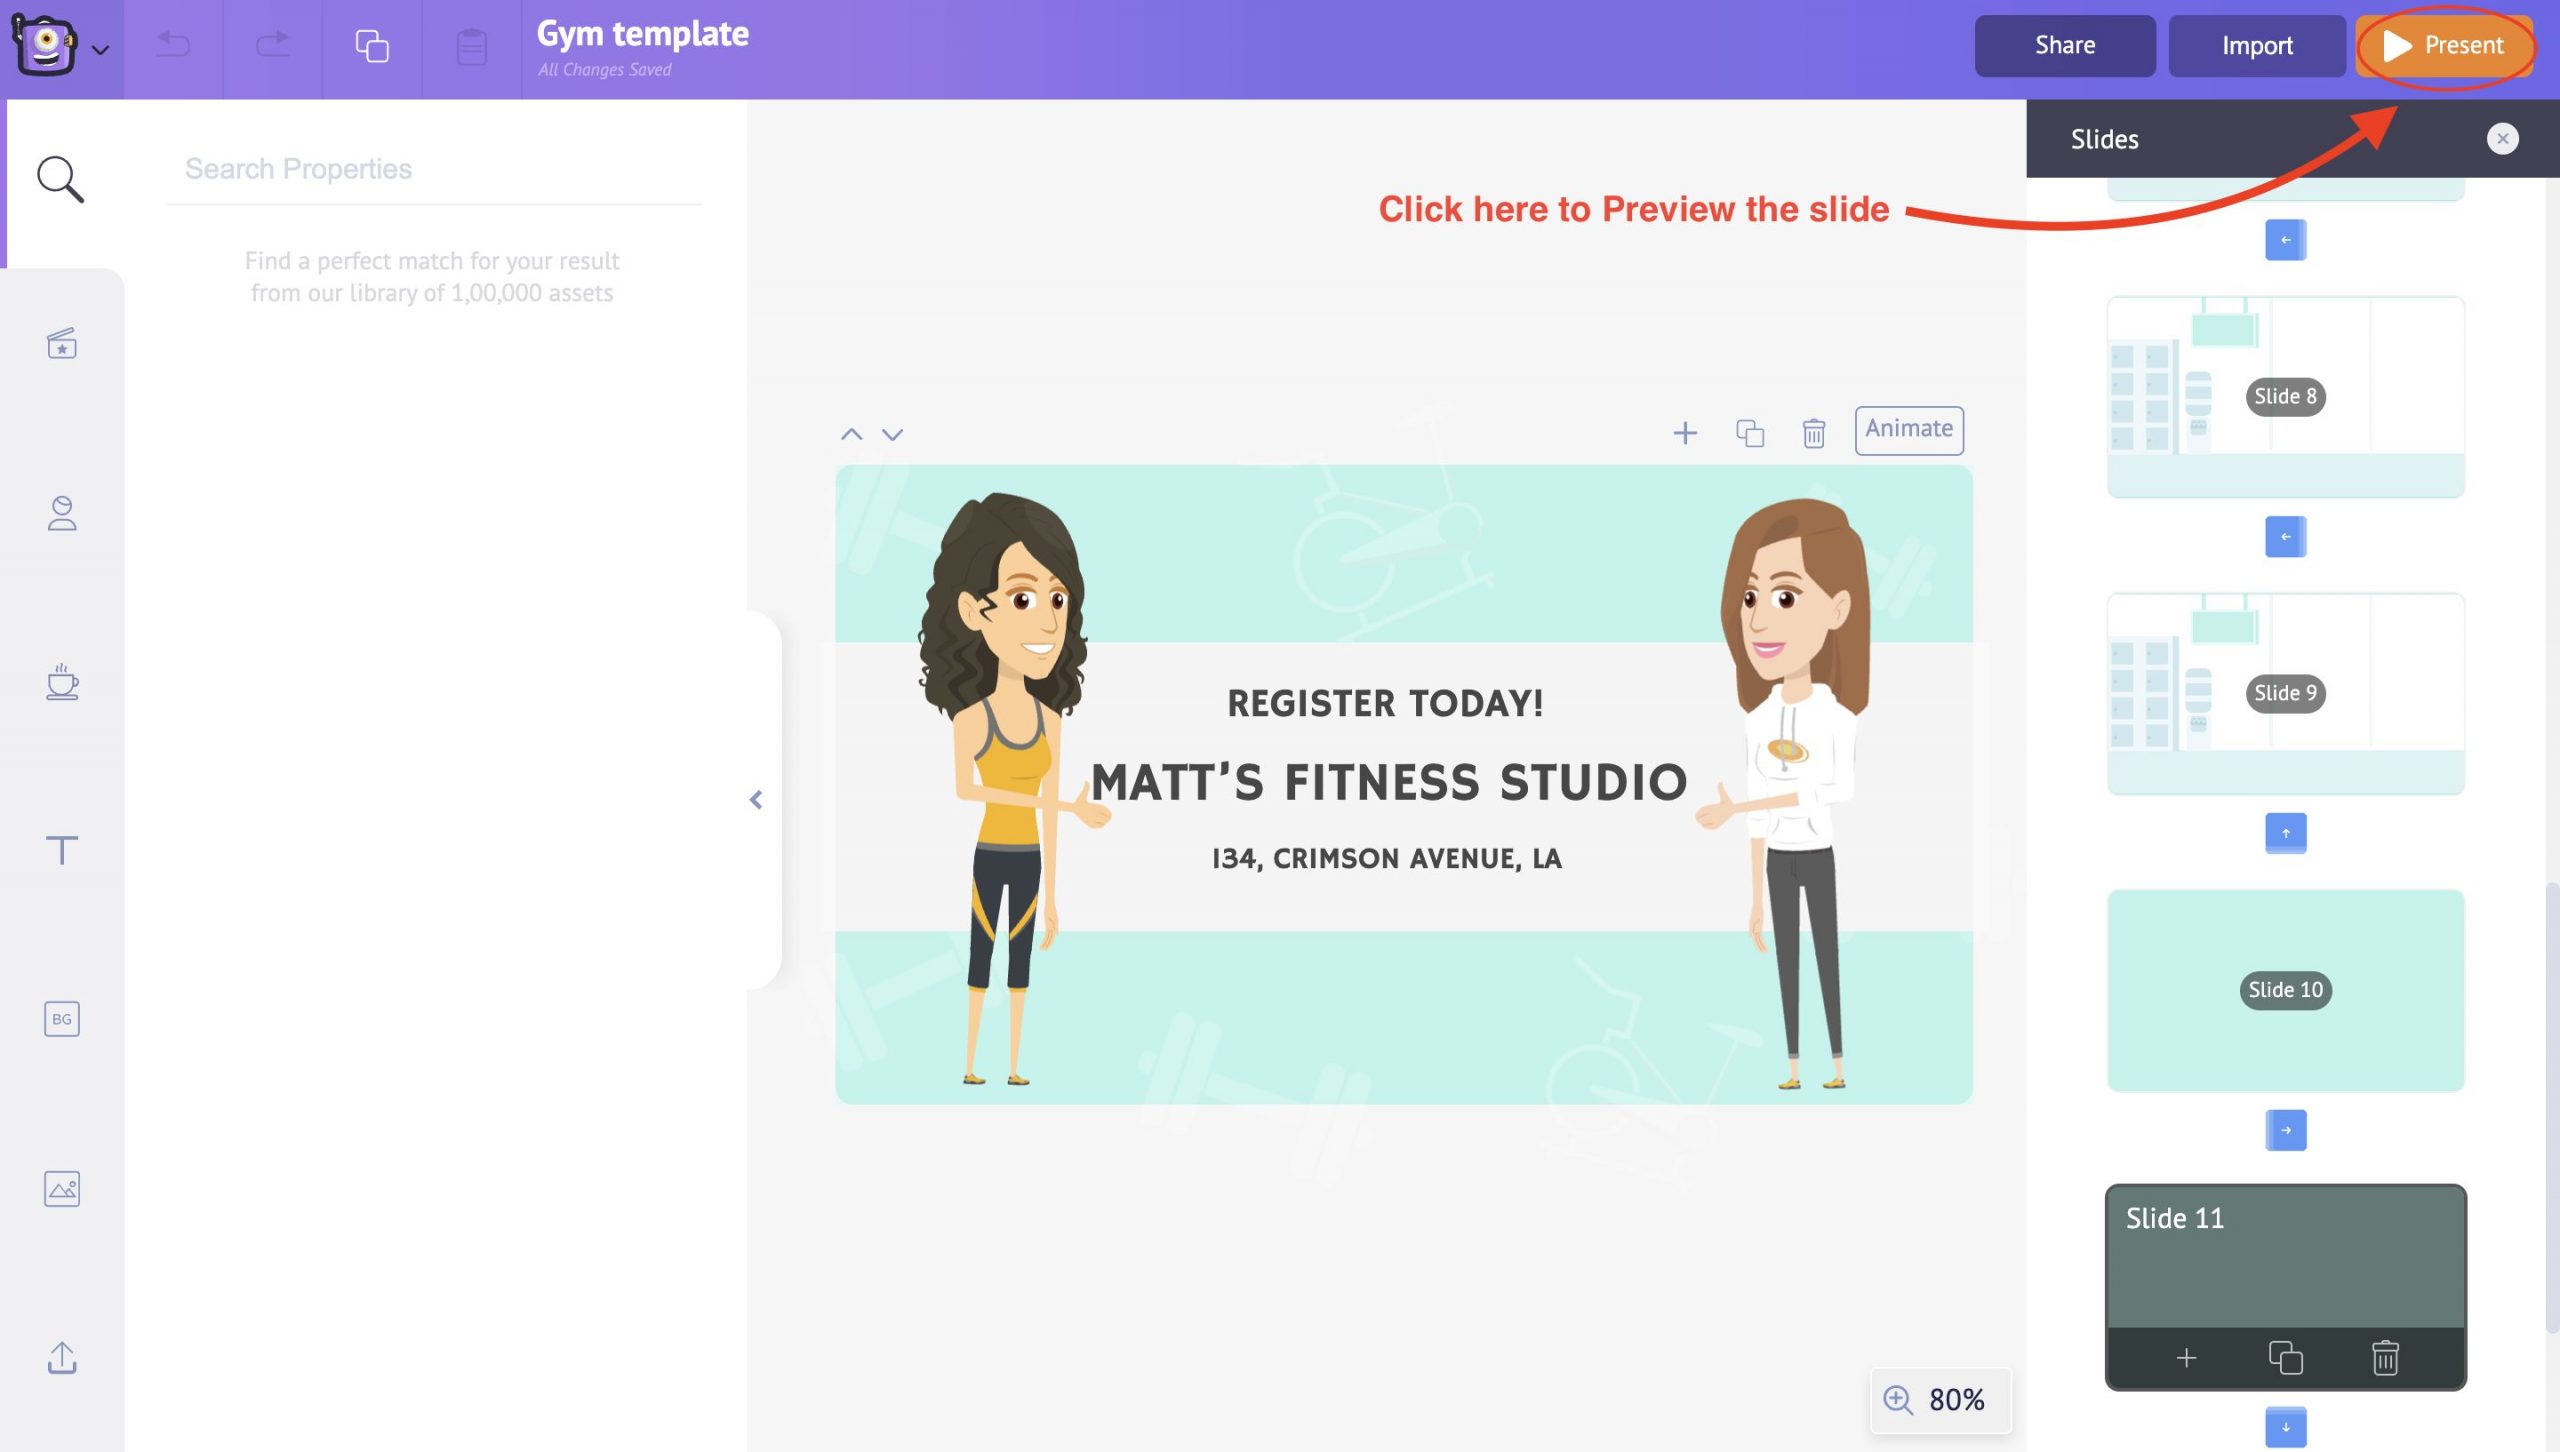
This way, you can check and alter the slide's contents accordingly. It’s that simple to create an animated presentation from scratch in Animaker Deck.
Similarly, you can add more slides and customize them according to your use cases.
Sharing your work-of-art
If you are working in a team, the next step is to get your presentation reviewed by your tea members. A collaborative review process can help elevate your presentation’s quality.
Use the Share button in the top right to share the presentation with your team. All you need to do is enter your colleagues' email addresses and choose between copy and edit links.
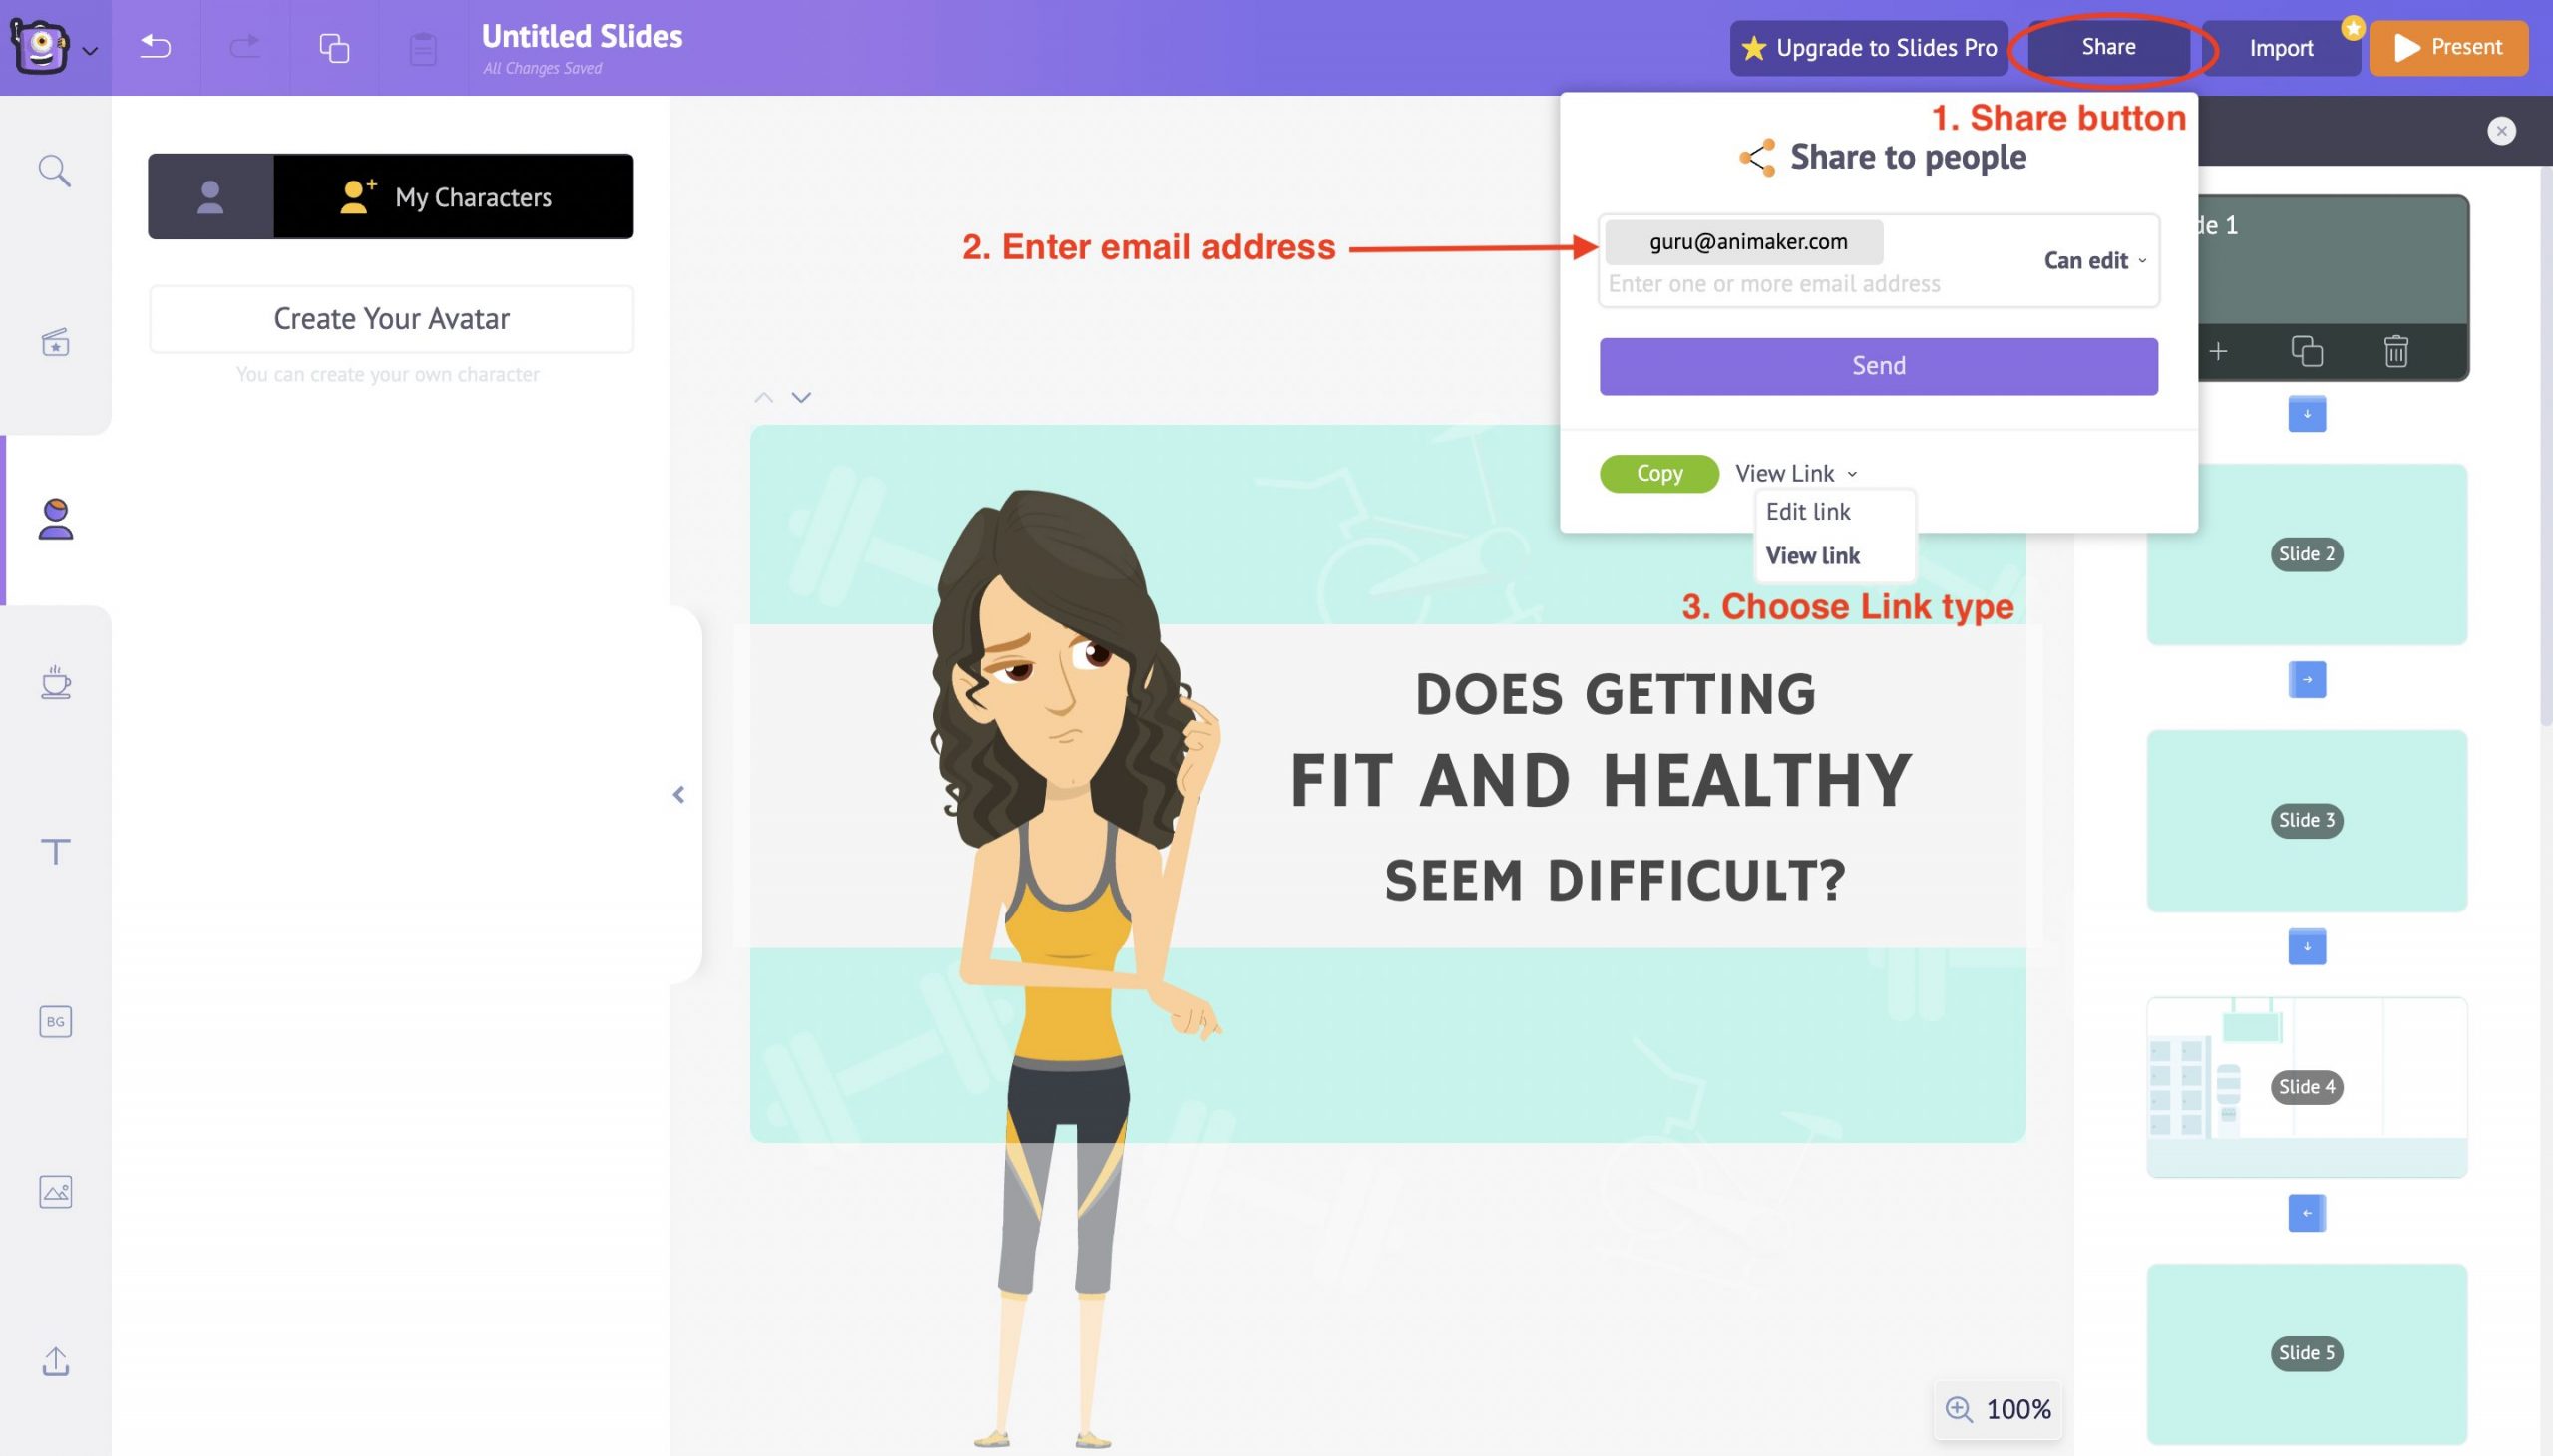
Animaker Deck makes it easy for you to collaborate with your entire team and edit your slide decks together in real-time.
Also, there’s an option to preview the created slide decks with the help of the Present button in the top right corner.
Use this present button to review all the changes, animations, and other transition effects made (if any) throughout the slide.
And that’s a wrap!👏

You have now successfully learned how to create kick-ass animated presentations in a jiffy.
With the advent of influential online presentation makers like Animaker Deck, creating professional-looking animated presentations has become easier and more affordable than ever before.
It is only the beginning! The world of presentations awaits you!
Get started and sweep your audiences right away!
[thrive_link color='purple' link='https://accounts.animaker.com/register/animaker/?trackId=zgvjaw7u9hsi8la&path=/moments/createTemplateDeckProject?templateId=blank' target='_blank' size='medium' align='aligncenter']Take me to Animaker Deck![/thrive_link]