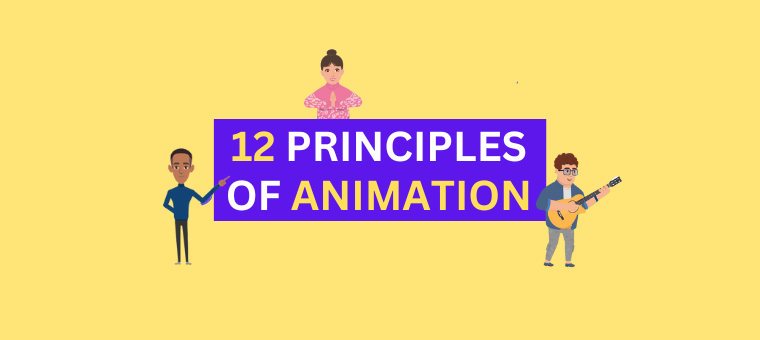
12 Principles of Animation Explained! [With Examples]

Shreshtra - October 31, 2023 - Leave your thoughts. 11 min read
When we think of animation, our mind immediately goes to Disney movies. They have been an integral part of our childhood and hold a special place in the hearts of many of us. Their captivating animations and fairytale stories have made our childhood memorable. Despite being founded a century ago, Disney still manages to charm people of all ages with their timeless creations.
For aspiring animators, it is important to note that certain fundamentals are necessary for making engaging animations that comply with the laws of physics.
These fundamentals of animation were introduced in the 1981 book “The Illusion of Life: Disney Animation,” by animators Ollie Johnston and Frank Thomas. They introduced the 12 principles of animation, which serve as a benchmark for animation techniques to this day, even though the process has evolved from traditional methods.
The 12 principles of animation are:
- Squash and Stretch
- Anticipation
- Staging
- Straight Ahead Action and Pose to Pose
- Follow Through and Overlapping Action
- Slow In and Slow Out
- Arc
- Secondary Action
- Timing
- Exaggeration
- Solid Drawing
- Appeal
So, let’s look at each principle one by one.
1. Squash and Stretch
The Squash and Stretch technique is used by animators to convey an object's weight, flexibility, and hardness.
For example, when there is an animation of an object falling, it gets flattened when it touches the ground and stretches out to maintain its volume. This shows that the object is flexible.
Similarly, with characters, their faces and bodies are stretched and compressed to express emotions.
Here’s an example of how the Squash and Stretch technique is used in The Lion King movie. Look at how Simba’s expressions are showcased using this technique when he tries a bug for the first time.
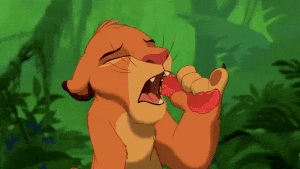
This technique makes the animation a bit more realistic by giving more depth and definition to your scene. However, it can be comical when it is exaggerated to a degree.
Here’s a video that shows the Squash and Stretch animation technique.
2. Anticipation
Anticipation in animation prepares the audience for what will happen next. It involves a small movement or action that precedes a larger one.
For instance, before a character jumps, they will often squat momentarily. This squatting motion is an example of anticipation in animation, as it signals to the audience that a jump is coming up.
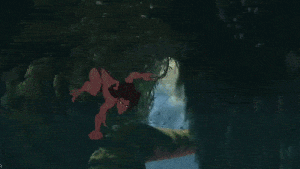
In this example, Tarzan creates an anticipation effect by squatting and jumping around high branches and vines.
This technique makes the animation realistic as it mimics how we move and act in real life, where small movements often precede our actions.
Here’s a video that shows the anticipation technique in animation.
3. Staging
Staging in Animation involves arranging characters, props, background, and camera perspective.
You might have noticed that in animation, a scene unfolds in a sequence and not all at once. This directs the viewer’s focus on one thing at a time.
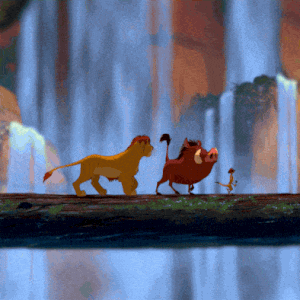
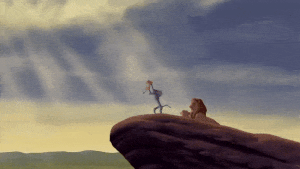
The below gif from The Lion King is a perfect example of it. The four characters on the stone ledge are the main focus. As the camera gradually zooms out, additional elements are brought into the frame. This allows the viewer to grasp the entire scene fully.
If too many simultaneous actions exist, the viewer's focus gets lost. So, good staging is crucial for successful storytelling.
Have a look at this video to know what a good staging is in more detail.
4. Straight Ahead Action and Pose to Pose
Drawing animations can be done in 2 ways - Straight Ahead Action and Pose to Pose.
Straight ahead action involves drawing an action frame by frame, creating a smooth flow of movement. This method requires starting with a drawing and then proceeding to draw sequentially, most of the time not knowing the last frame.
However, this approach is time-consuming as it requires many frames to be drawn for a single action.
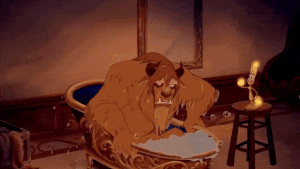
The example below uses the Straight Ahead technique. Here, the prince from the movie Beauty and the Beast, shakes off the water in a smooth manner.
On the other hand, Pose to Pose involves having a clear idea of the action. It requires drawing the first and last frames, creating the extreme poses, and then filling in the middle frames. As this method does not involve drawing a lot of filler frames, the movement is dramatic, and jump cuts can be created.
For this technique, let’s look at the example below. Pooh from Winnie the Pooh cartoon turns around in front of the mirror. Here, we can see that the filler frames are minimal.

Look at this video to visually understand the differences between these two methods.
5. Follow Through and Overlapping Action
Follow Through and Overlapping action are two important techniques used in animation to create realistic and fluid motion. These techniques involve parts of the character in motion even after the character has stopped.
For example, when a character wearing a cape runs and comes to a halt, the cape and the character’s hair continue to sway for a moment before they get pulled back to the character. Here, the cape follows through with the character’s motion. The tendency of the cape and hair to move at a different rate from the character depicts the overlapping action.
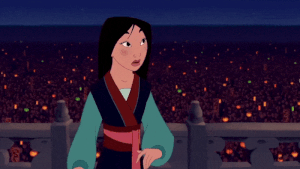
Here’s an example from the movie Mulan. The protagonist looks from side to side in disbelief. As she moves her head, her hair follows through and overlaps with her action.
By mimicking the natural flow of movement, this animation technique makes the motion appear more realistic.
You can watch this video to understand this animation technique better.
6. Slow In and Slow Out
In the practical world, objects take time to gain speed. They don’t change their speed from 0 to 100 instantly.
So, to create a more realistic effect, animators make the motion of characters start and end slowly with faster movement in between. This change in speed makes the movement more lifelike.
To achieve this effect, animators draw more frames near the action's beginning and end to create the impression of slow movement. They draw fewer frames in between to highlight speed.
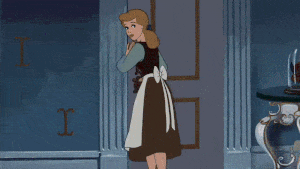
To understand this technique visually, look at the example below. Here, Cinderella moves slowly at the beginning and then gains speed before slowing down again. This creates a smooth flow in the movement, and it feels non-linear.
However, it is essential to use this technique where it doesn’t defy the laws of physics. For instance, it's impossible to use this technique to animate a falling leaf from a tree since the leaf’s movement will be solely dependent on wind.
Here is a video that shows this technique in more detail.
7. Arc
Arcs refers to the movement of an object or a character in curves rather than a straight line. We humans, move in curves. Even a simple movement, like turning our head, follows a curved path. Imagine turning your head in a straight line. It almost feels robotic and creepy.
So, to make the animation more realistic and natural, animators use this technique of curved trajectory motion. For example, when a character swings their sword, it is animated in a curved path rather than a straight line.
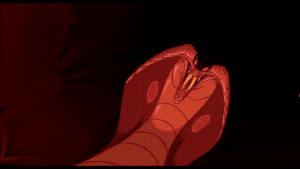
Here, Aladdin swings the sword at the snake in an arched motion, which makes the animation feel complete.
To see how arcs are used in animation, look at this video.
8. Secondary Action
Secondary action enhances the main action and provides more detail to the primary action. These secondary actions can be used to create a character's personality trait or to depict the character’s emotions.
For example, let’s say a character is eating a burger. This is the main action. But when they raise their eyebrows after the first bite, that is a secondary action that adds more detail to the scene. It shows that the character is surprised by the taste.
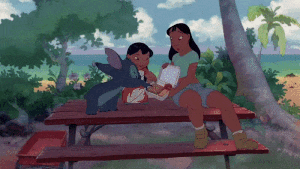
In this example, when denied snacks, Stitch becomes adorably angry. His ears moving back is the secondary action, which adds detail to this main action.
With this technique, however, it is essential to remember that the secondary action should only be added to enhance the main action and not remove the focus from it.
Look at this video to understand this secondary action in detail.
9. Timing
The term “Timing” refers to the speed of the scene, which is determined by the number of frames used. If more frames are used, the scene will appear to be slower. On the other hand, fewer frames will make the scene look quicker.
It is important to establish timing properly for each object in the animation with respect to the object’s size and weight. For instance, if a character is shown rolling a large ball, the timing will vary depending on the ball's weight.
If the ball is lighter, the character will take less time to move it so fewer frames will be required. On the contrary, if the ball is heavier, the character will take a longer time to move it, so more frames must be drawn.
Here, in the Aladdin movie climax, the Genies’ dancing is quick, which means fewer frames are used to make this action.
Here is a video that shows the timing technique in animation.
10. Exaggeration
Exaggeration animation is used to create a dramatic effect and enhance the storytelling.
This technique is applied to actions, expressions, and even poses to make them more impactful.
By exaggerating certain elements, animators can also add a comical effect to the animation. For example, extreme facial expressions after a character accidentally walks into a pole make the scene hilarious.
Let’s look at an example. Here, Goofy loses balance due to his rollerskates. The following actions are exaggerated to make it funny.

Look at this video to see how exaggerated actions are more effective.
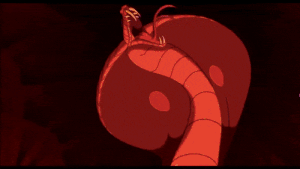
11. Solid Drawing
Solid Drawing is an essential technique in the animation industry. It involves giving characters weight and volume by drawing them in a proper shape as they would appear in a 3-dimensional space.
To achieve this, animators draw the character in several poses and angles, ensuring that the proportions remain consistent throughout the scenes.
In the movie The Little Mermaid, Ursula is floating in a twirl. Her body changes as she moves, giving her a 3D appearance.
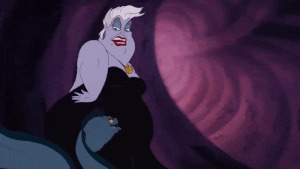
It is worth noting that animators Thomas and Ollie have advised against using “twins” - characters with symmetrical facial features as it creates mirrored visuals that can feel unrealistic.
To learn more about solid drawing, here is a helpful video.
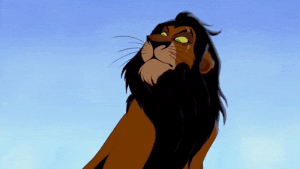
12. Appeal
Creating an appealing character is crucial to make it memorable and exciting to the audience. The term “appeal” doesn’t only refer to physical attractiveness but also to the character’s intriguing and charming traits.
The appeal is necessary for all characters that are vital to the video or movie. It is not just limited to heroes, as even villains deserve a strong appeal to add weight to their character.
For instance, Scar, the antagonist of The Lion King, is known for his distinct facial features. His green eyes and scar make a strong appeal, adding weight to the negative character.
This video shows how characters can become more appealing by adding unique features. Take a look.
***
The 12 principles of animation have been developed by traditional animators who have been in the industry for a long time.
These principles play an important role in helping animators create believable animations, even if they are exaggerated to some extent. It is crucial to create animations that are immersive to the audience.
Despite the rapid advancement in animation technology, these fundamental principles have remained relevant and valuable to budding animators.
In conclusion, the 12 principles of animation allow animators to create visually appealing and emotionally resonant animations, leaving a lasting impression on the audience.
Having learned the fundamentals of animation, it is now time to put these into practice. Head on over to Animaker’s 2D Animation Software. Apply these principles and create incredible animations!
If you want a guide to help you out with that, we've got you covered. Check out this video to learn how to animate using Animaker.
Have any questions or feedback? Feel free to add them in the comments below. We will be more than happy to help you out! :)