How to make an Explainer Video? [A Quick Guide]
Ever stumbled upon those awesome animated videos that effortlessly clarify complex stuff? You know, the kind that simplifies mind-boggling concepts in a few minutes?
Well, those gems are called explainer videos and are the superheroes of communication.
In a world where attention spans resemble speedy squirrels, explainer videos are the secret weapon to captivate, educate, and entertain. They're the magic potion that turns confusing ideas into crystal-clear revelations.
But hold up! Before you think, "Whoa, that's some Hollywood-level wizardry, I can't pull that off," let me tell you a little secret: crafting an explainer video isn't rocket science.
Sure, it involves a dash of creativity, a sprinkle of strategy, and a pinch of technical know-how, but fear not, my friend! We're diving into the behind-the-scenes magic to make it all clear and doable.
We're about to embark on a journey together, from nailing down your concept to choosing the right tools and animation styles that suit your vibe. We'll unravel the mystery behind creating those eye-catching, brain-pleasing videos that leave your audience nodding in agreement, saying, "Aha! I get it now!"
So, grab your creative cap, and let's decode the art of crafting standout explainer videos!
How to make an Explainer video?
Making an explainer video is simple but needs an excellent script. A script must answer all the golden “W”s - Who is your audience, what is your product, and why do they need to choose it?
At the end of the video, there should always be a “CTA” or call-to-action button that urges the viewers to take action. This action can either be buying your product or visiting your site.
Once the script is done, we can begin creating our explainer video. In this article, we shall explore two methods of creating an explainer video:
- Create an Explainer Video using Animaker’s Explainer Video Maker
- Create an Explainer Video from scratch
Choose one that suits you best, and let’s get started.
1. How to make an Explainer Video using Animaker’s Explainer Video Maker
Animaker’s Explainer Video Maker is an efficient tool to help you create professional-looking videos. With over 100 ready-to-use templates, you can create perfect videos that match your brand and style.
Step 2: Edit the elements in the template
Step 3: Preview and Download your video
Step 1: Choose a Template
To get started, simply visit Animaker’s Explainer Video Maker and click the button.
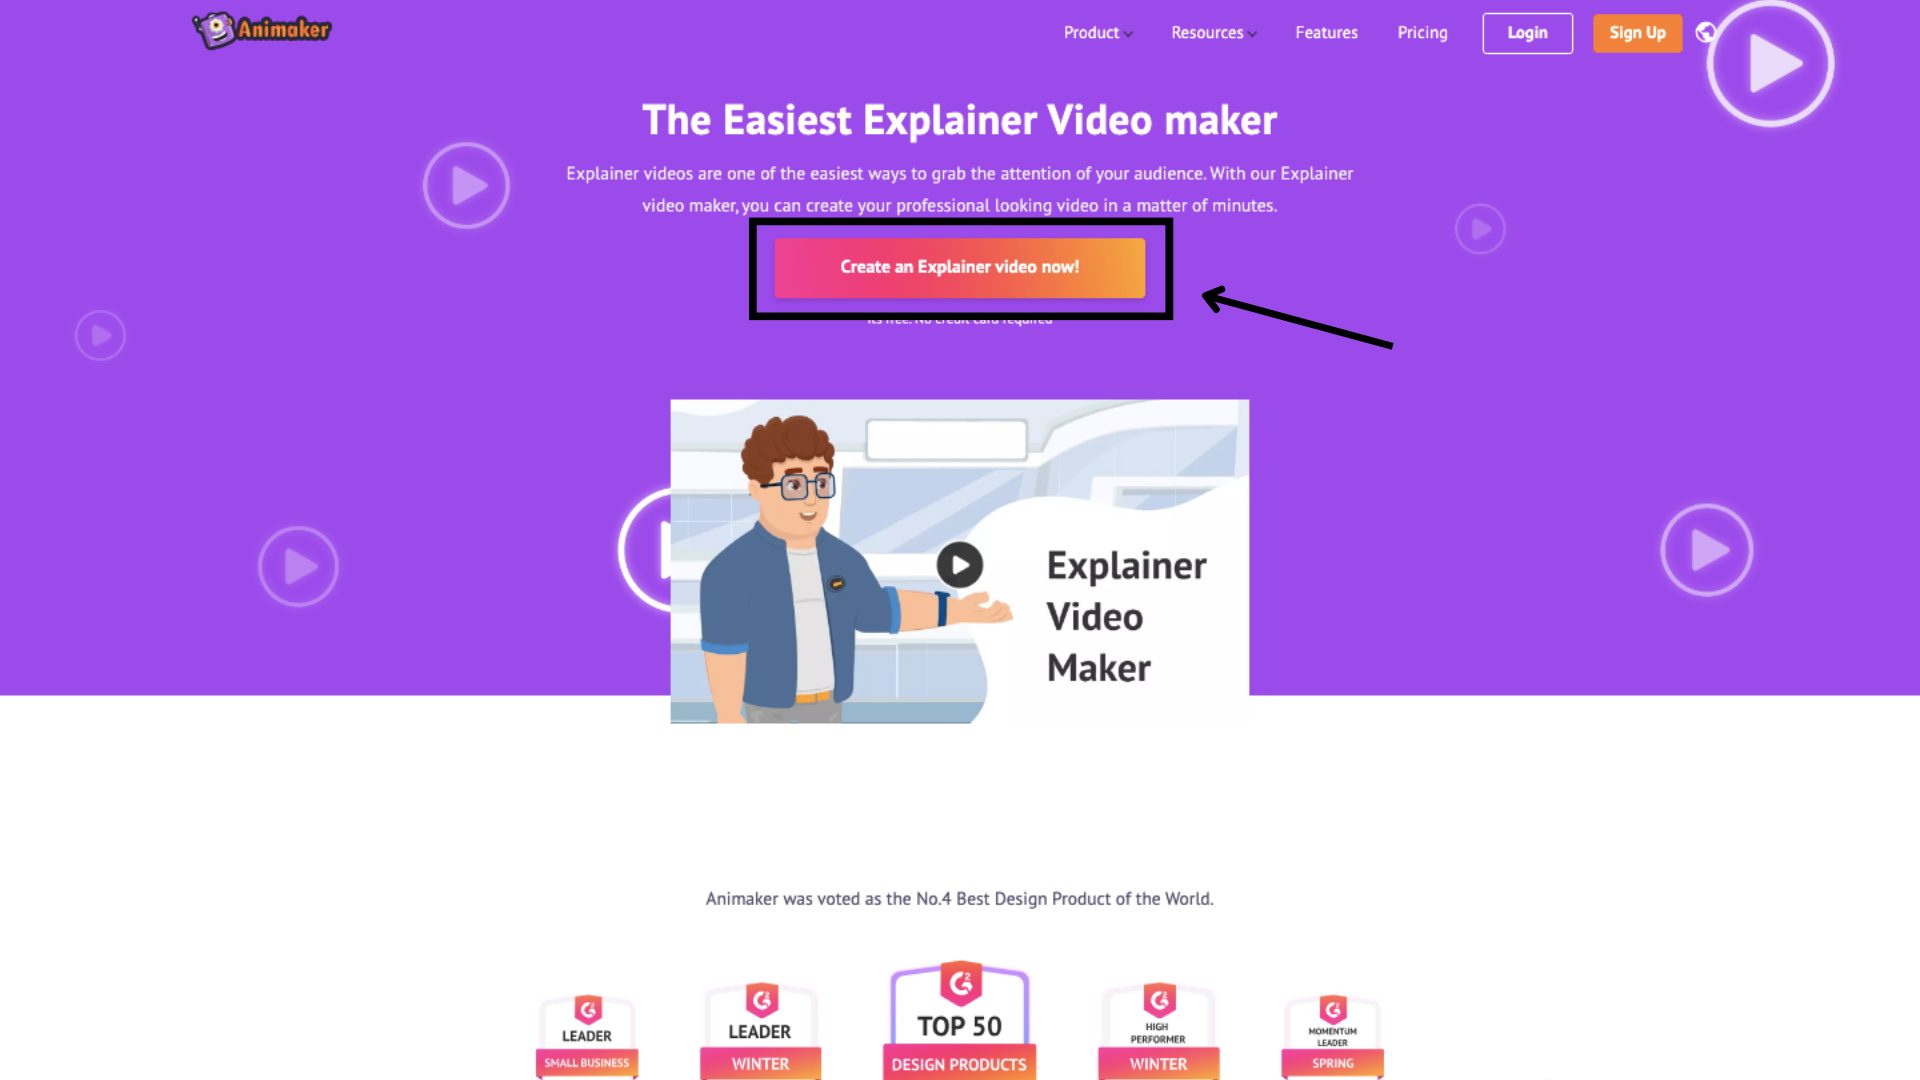
This will take you to the login page. Log in if you already have an account, or sign up if you’re new.
Once you’re logged in, you will be redirected to the dashboard. Here, click on the Templates tab.
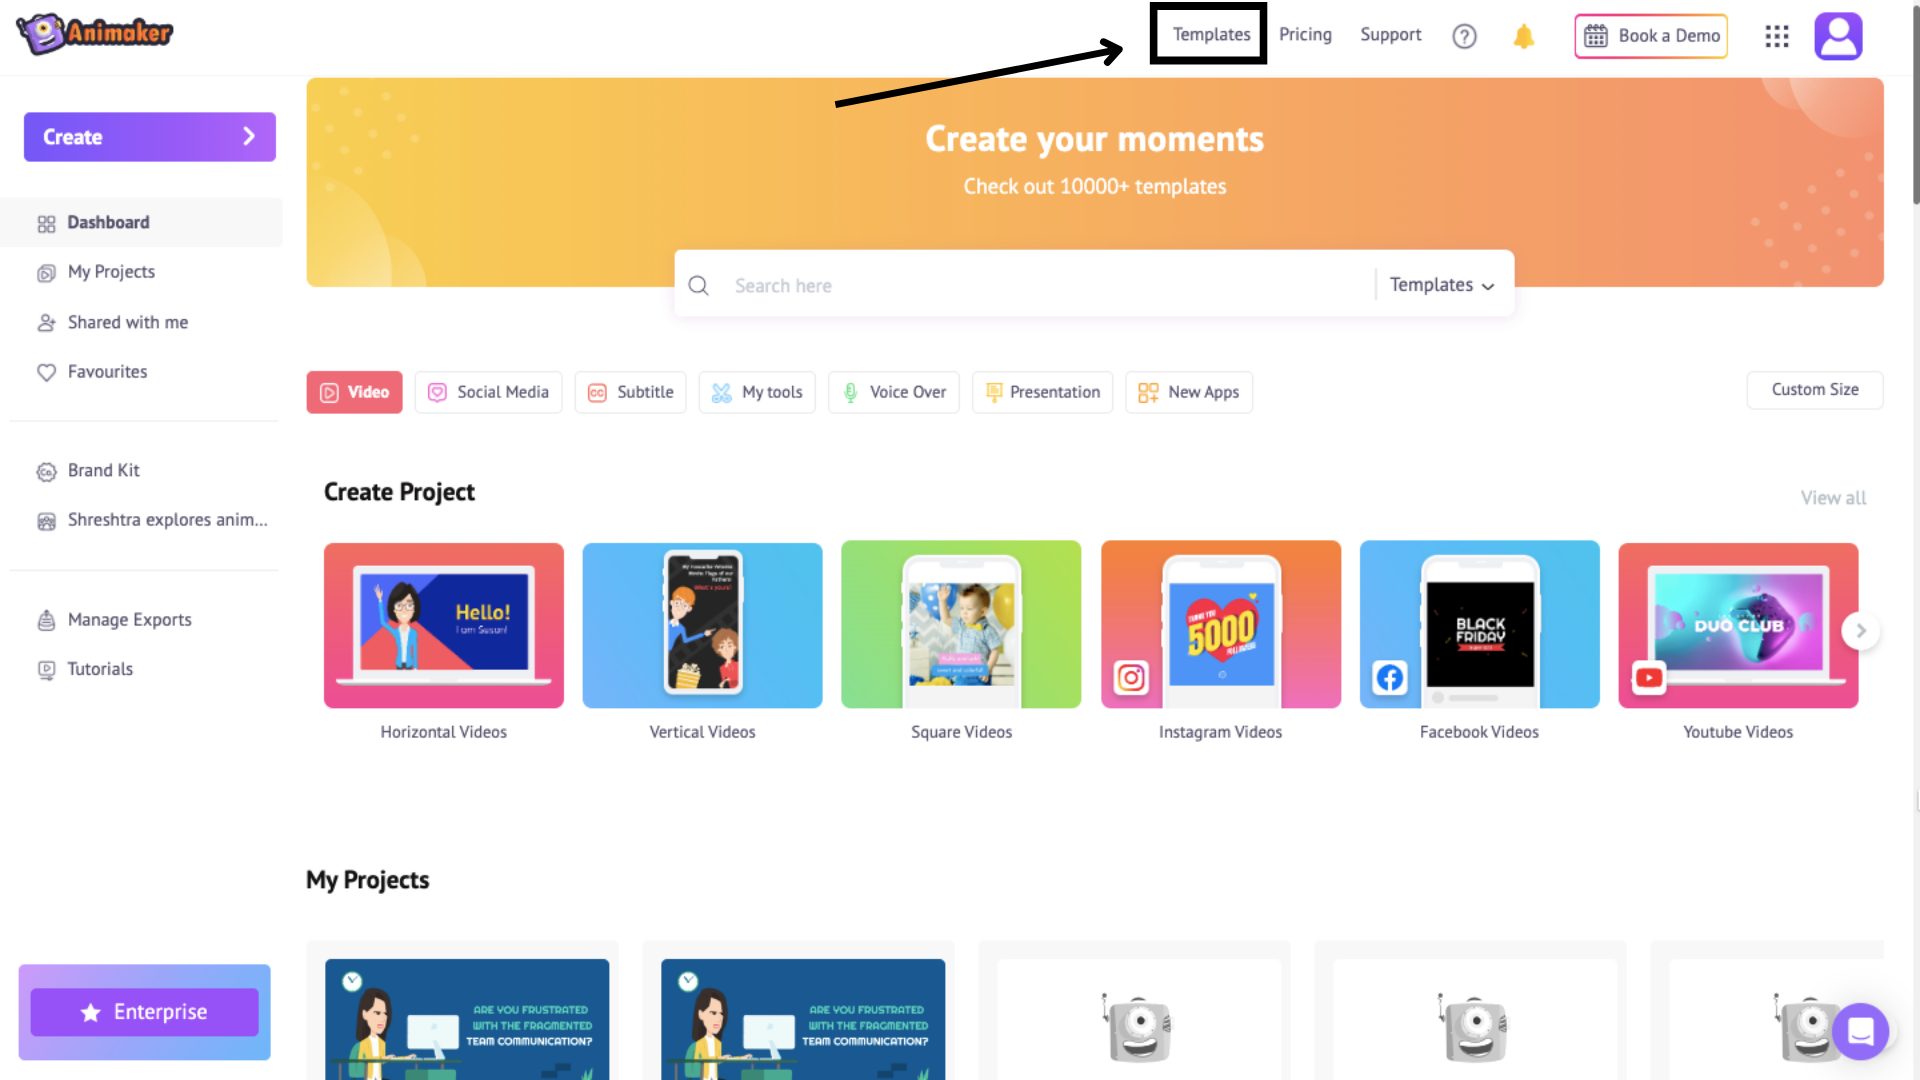
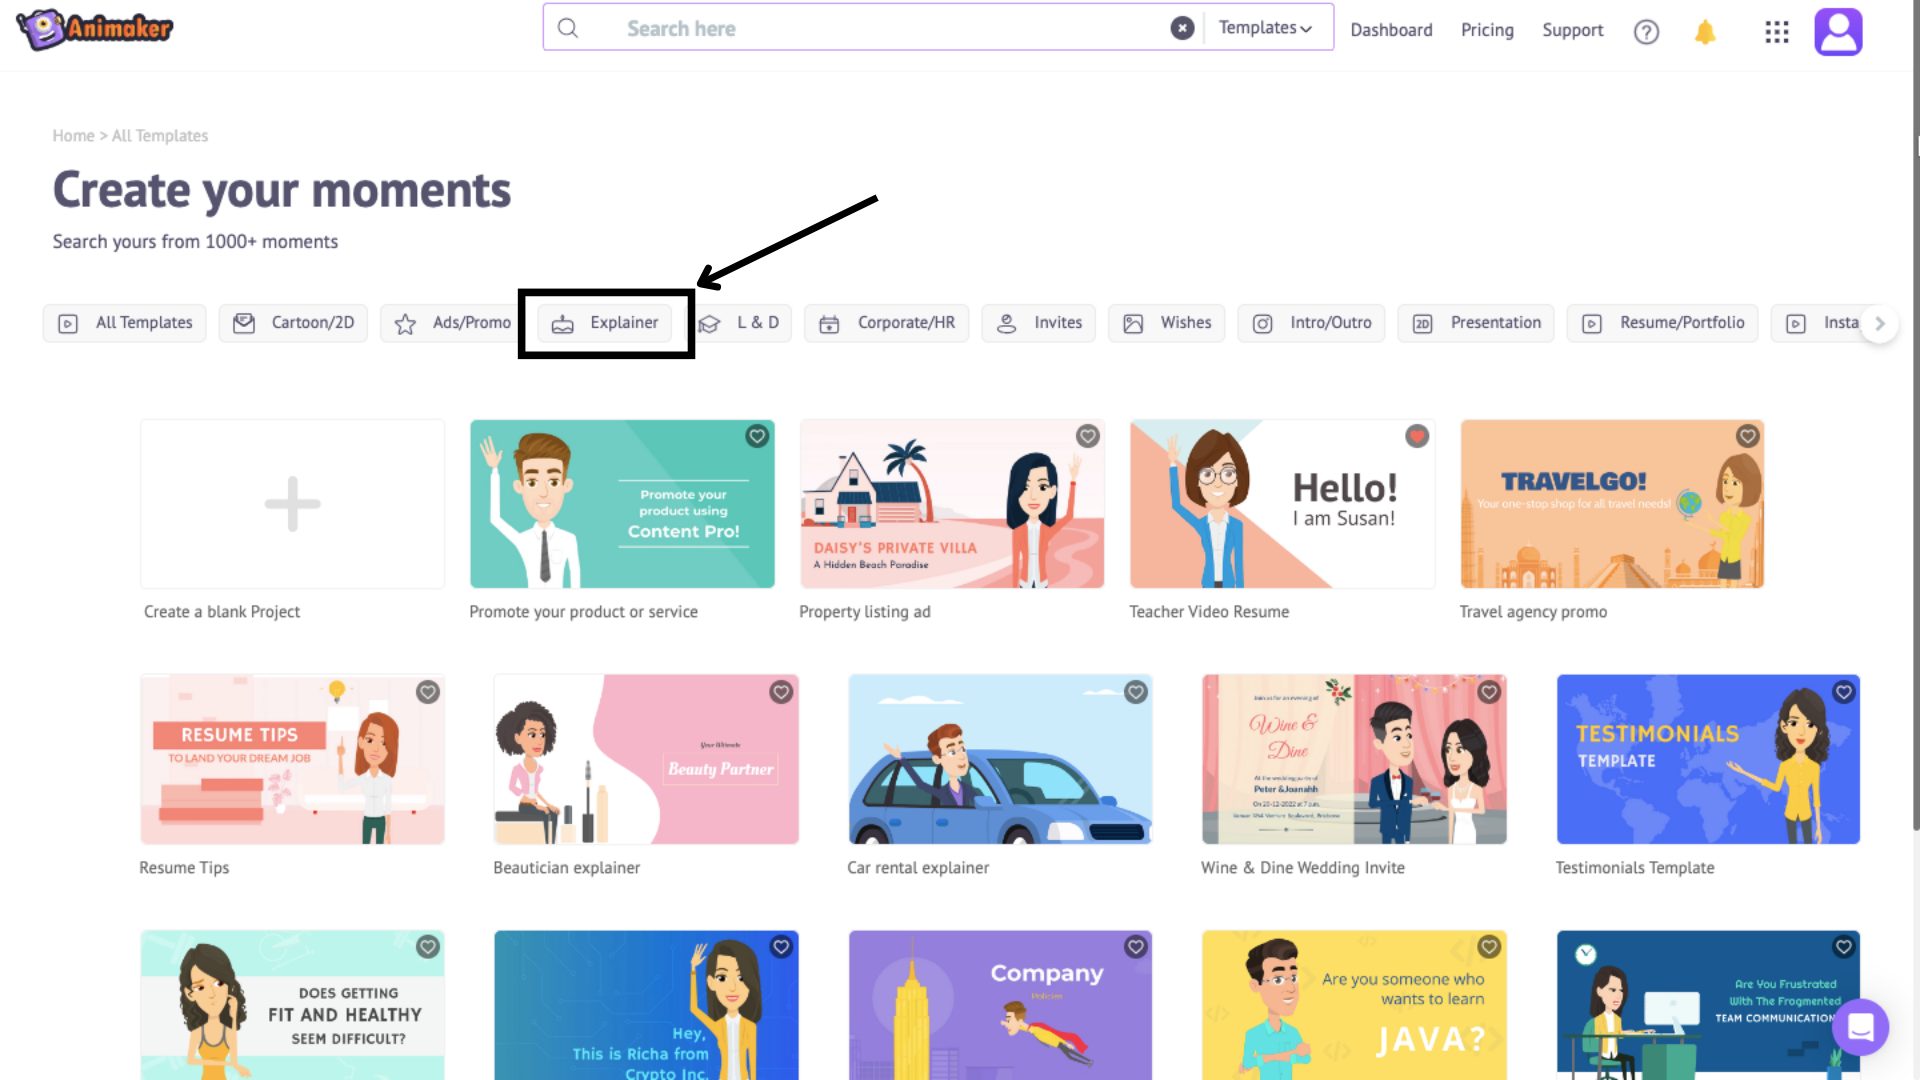
Now, click on the Explainer tab to access various Explainer video templates.
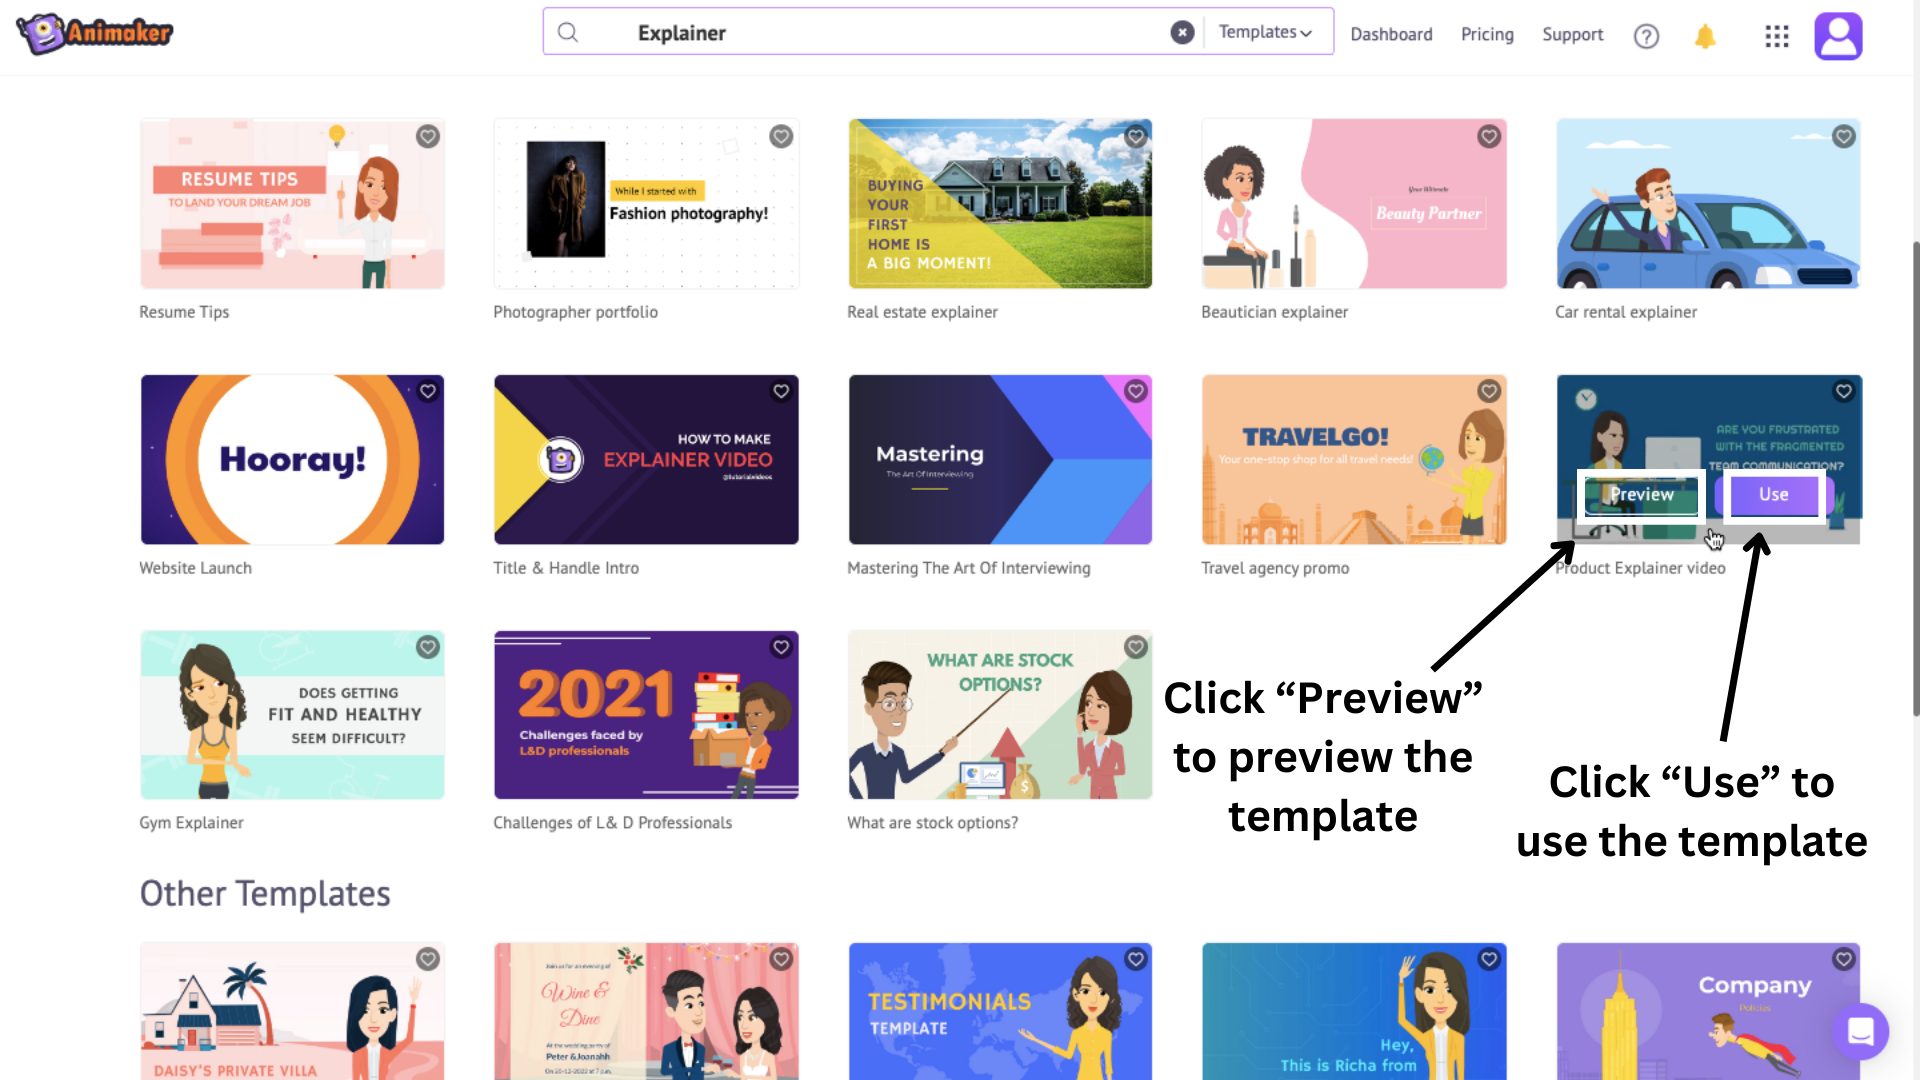
Hover over any template and click on Preview to see the template's style. Click on Use if you wish to use that template.
Once you have chosen a template, the project window will open.
Step 2: Edit the elements in the template
Before making changes to the template, let’s understand the interface better.
The workspace is in the center of the screen, where you can create and edit your video. Above the workspace is a menu bar with additional options and tools. Below the workspace is the timeline, where you can adjust your video and its assets with precision.
On the left is the Library, with millions of assets that you can add to your video, and the Scenes section on the right allows you to manage and organize your scenes.
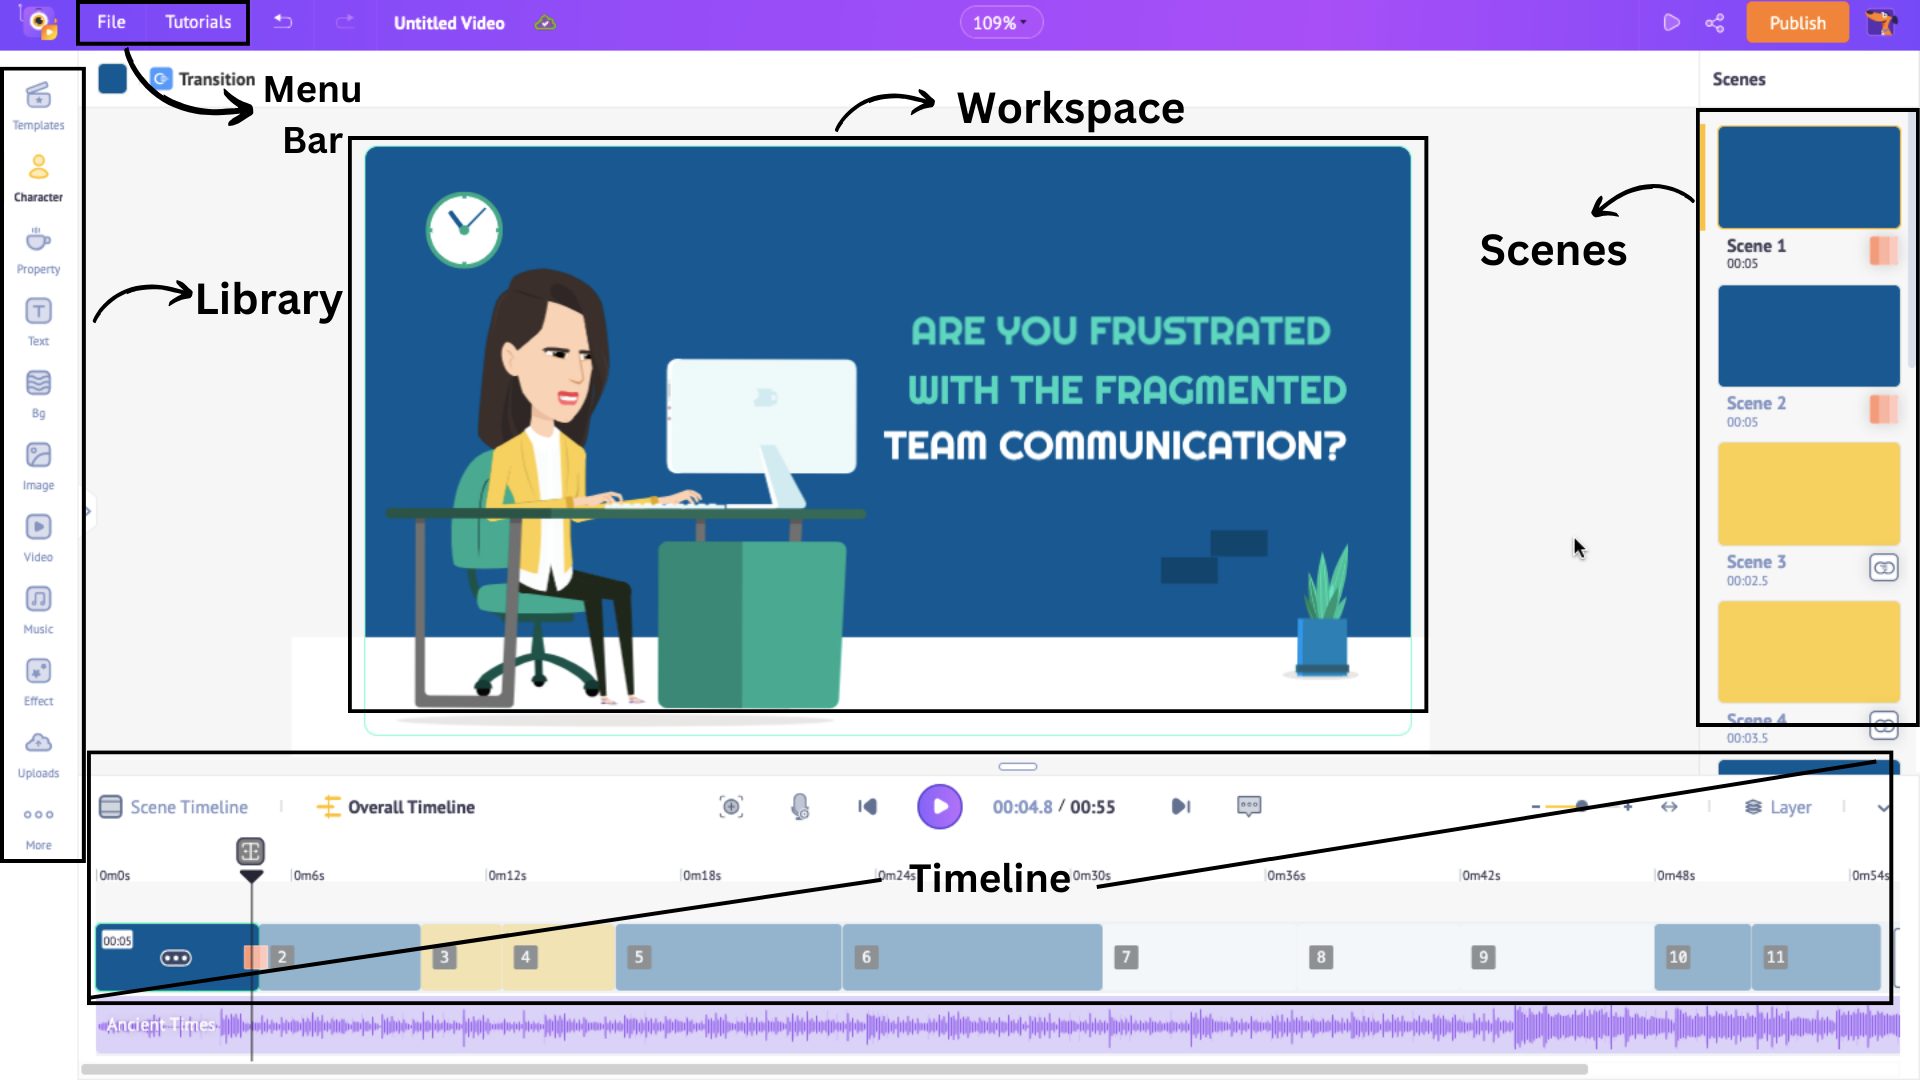
You can see that the template has everything from different scenes with text boxes and properties to added music and animations.
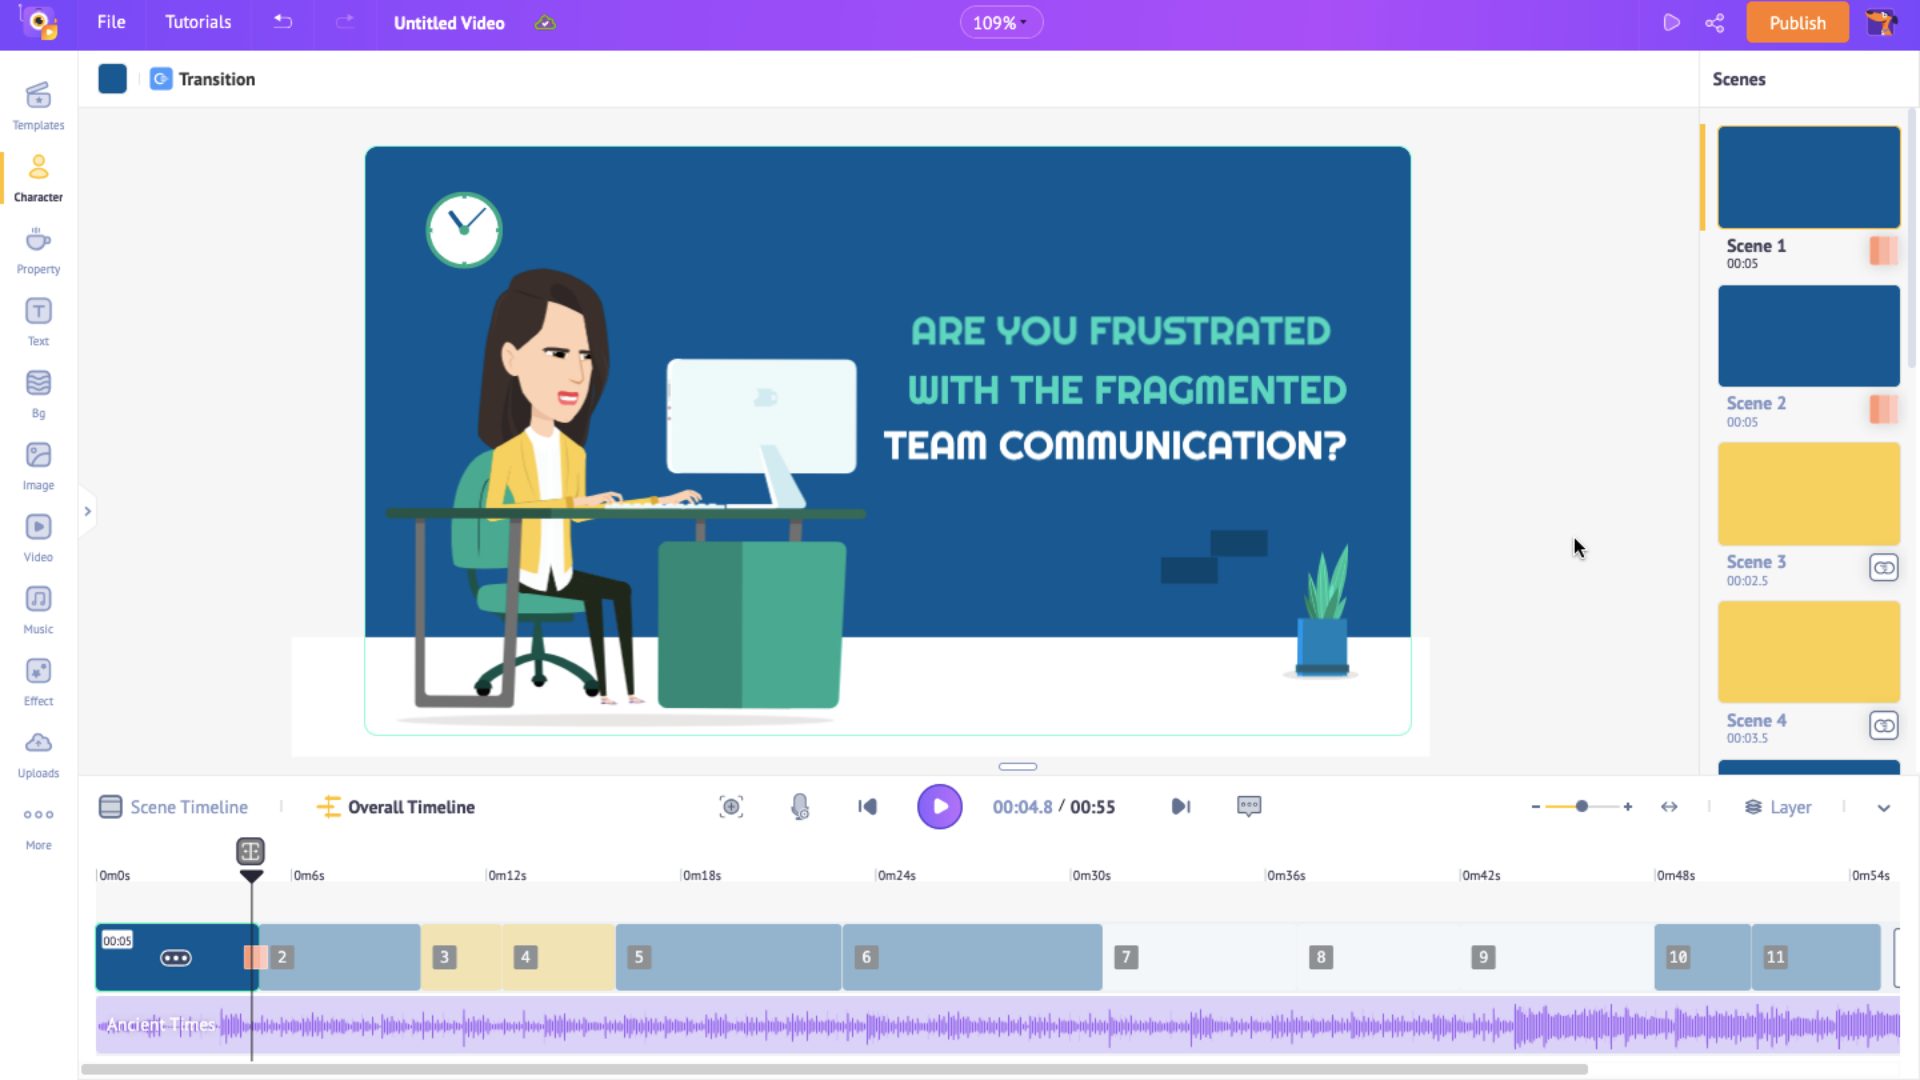
You can edit each of these elements and alter this template to your liking.
Let’s see how to do it!
1. Character
In the template that I chose, the first scene has a distressed character typing away on the computer. If the character and its action go well with your video script, then you can keep it that way.
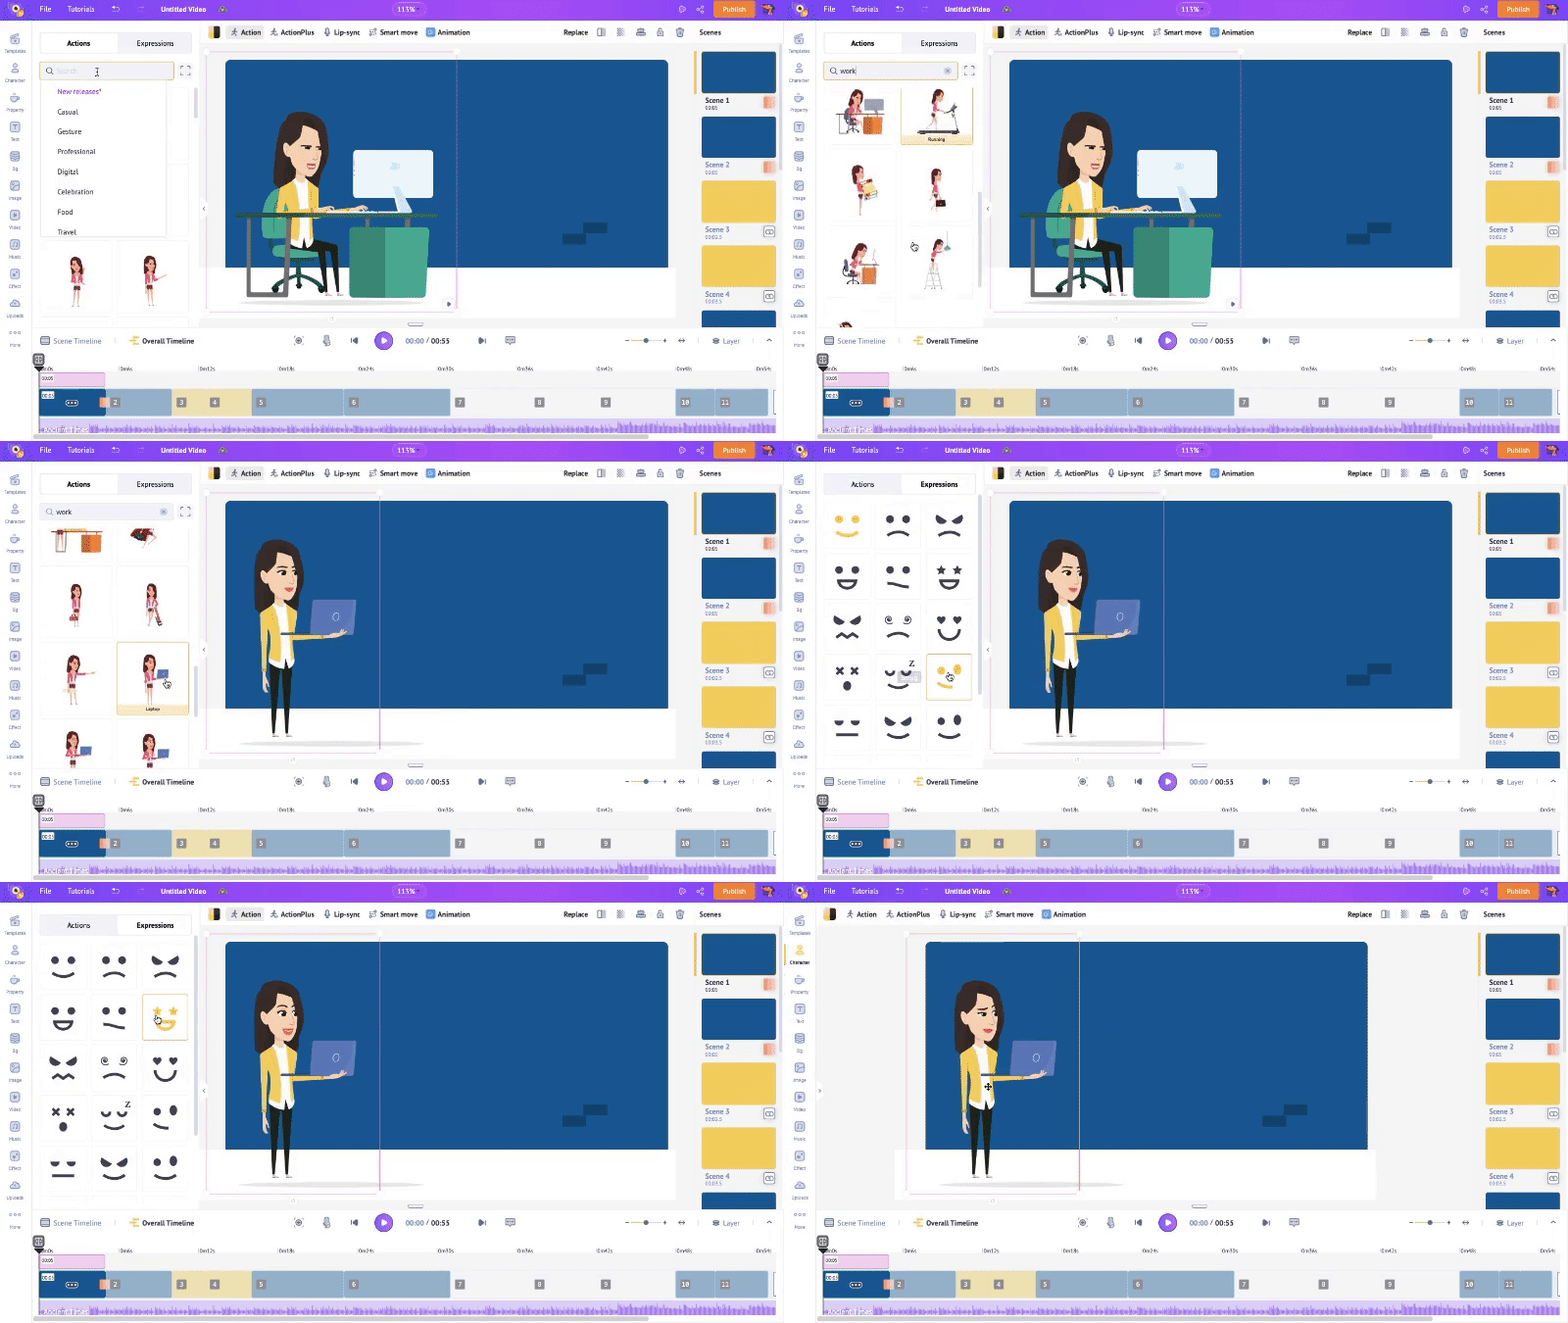
Suppose you want the same character but a different action. Click on the character, and you will see the actions and expressions panel open on the side.
Select an action by browsing through the list or searching for a particular action in the search bar. You can also change the character’s expressions by clicking on the Expressions tab.
Talk about detailing!
But, if you want to explore different character options, click on the character and click on Replace. This will open the Character library on the left with thousands of characters. Choose a character and click on Apply.
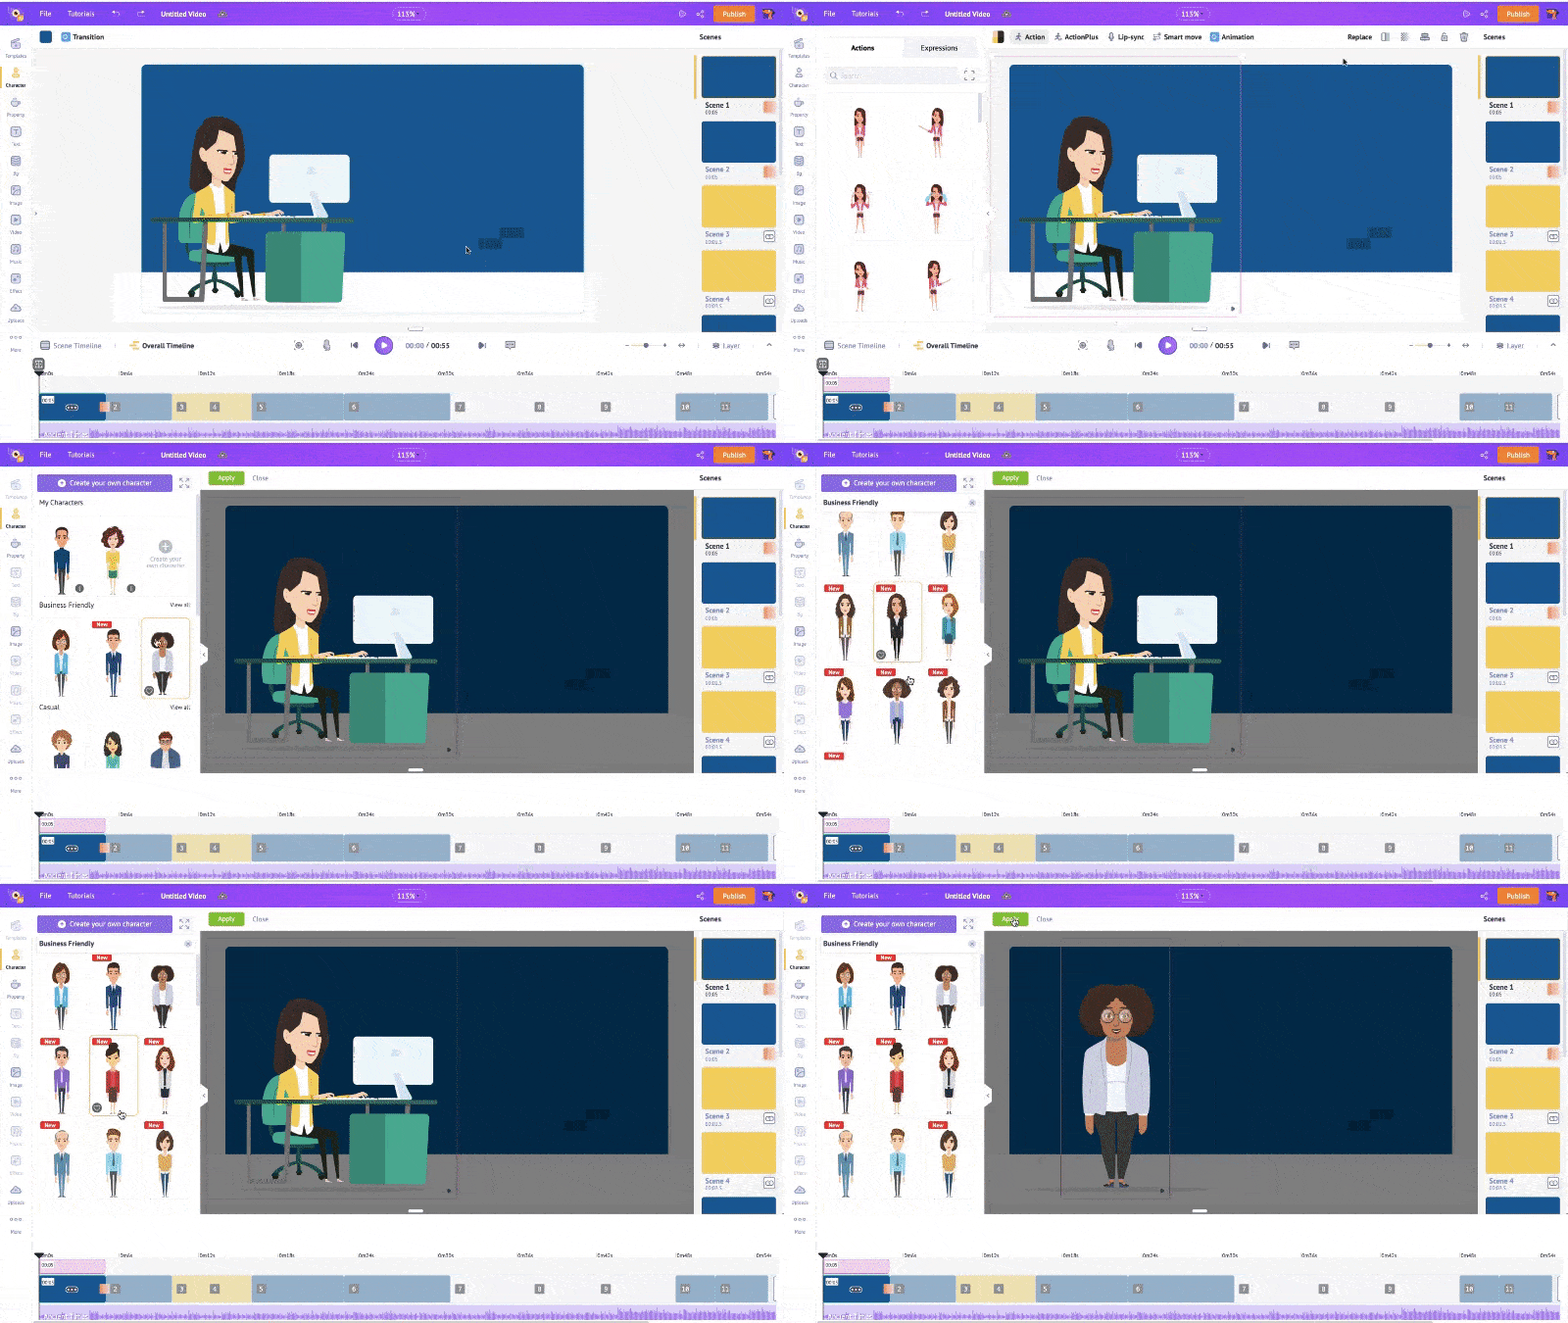
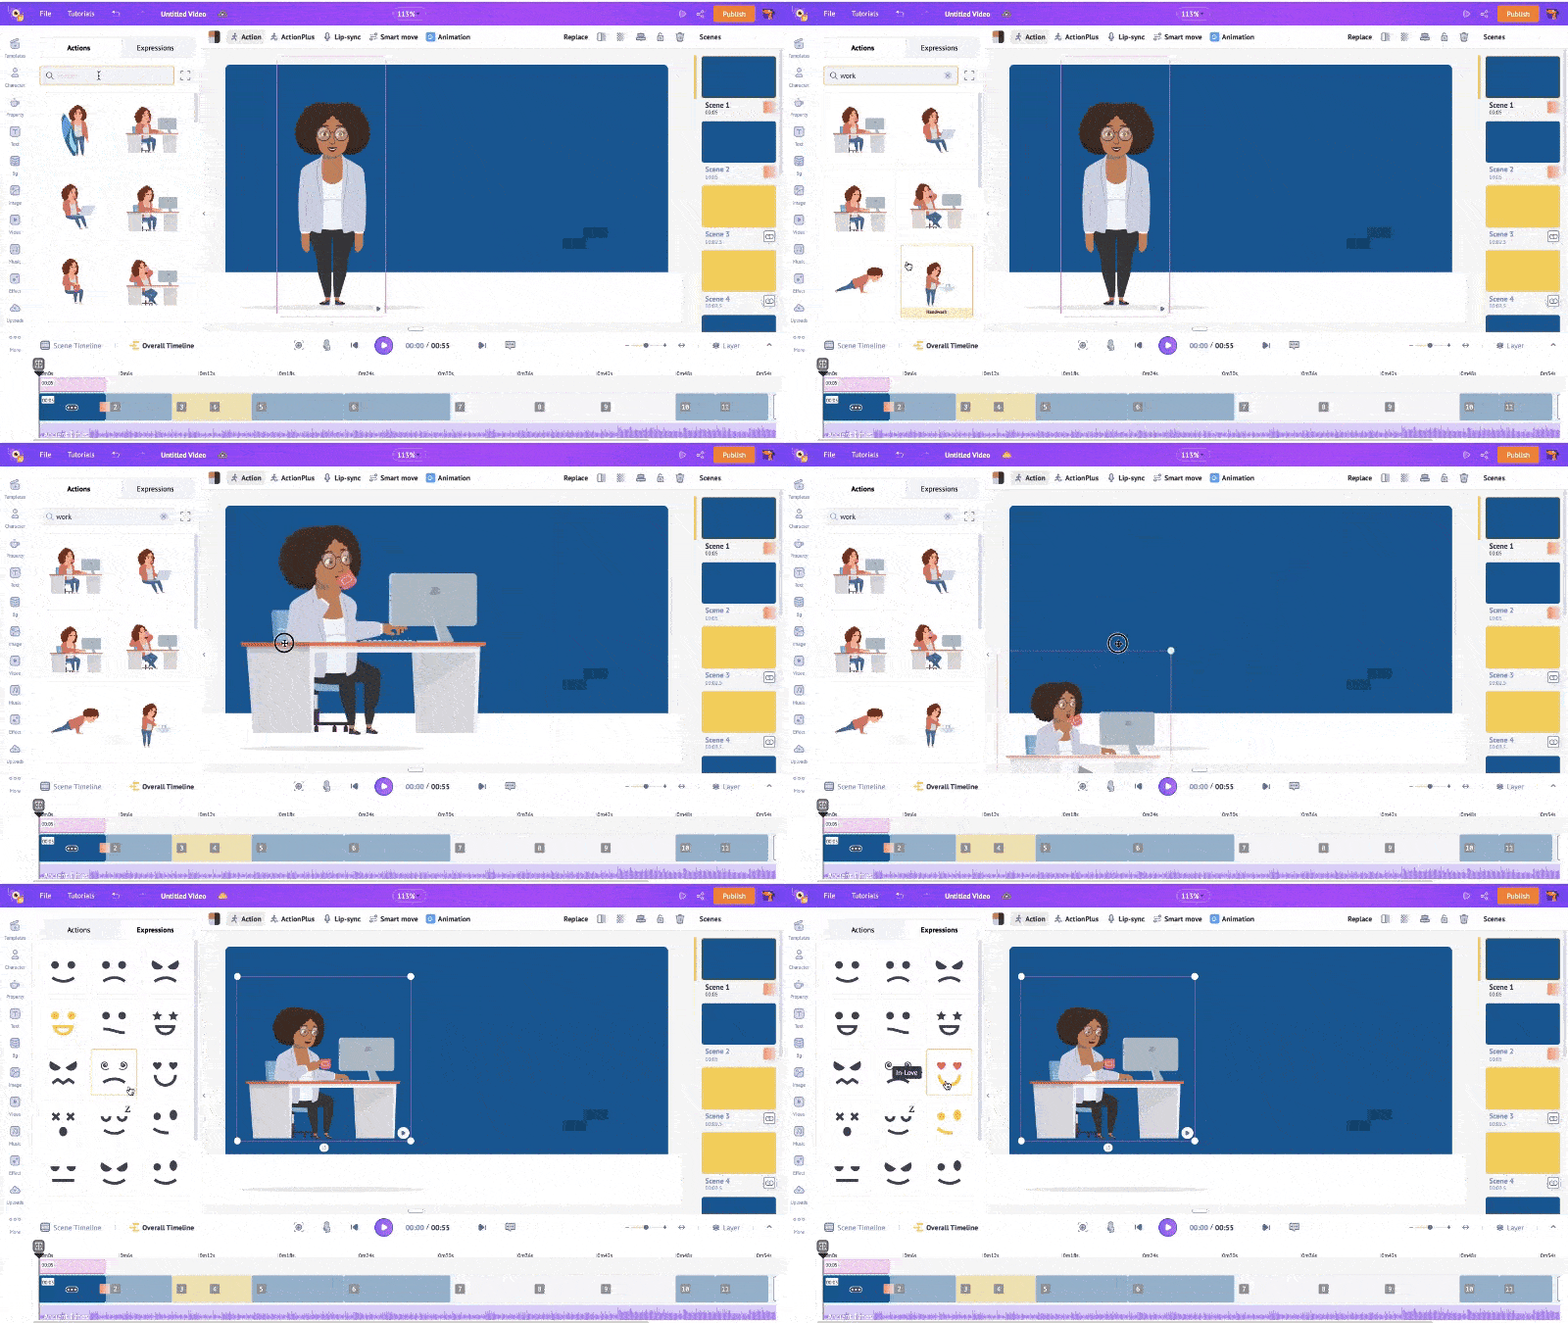
Now, a new character has replaced the existing one. Choose an action and expression for your character.
You know what also can be done? You can create your own character!
Now, that is cool. To learn how to make your own character, check out this video.
2. Text
Next, let’s swap the text with the script. When you click on a text box, a panel opens where you can change the font size and add effects to the text.
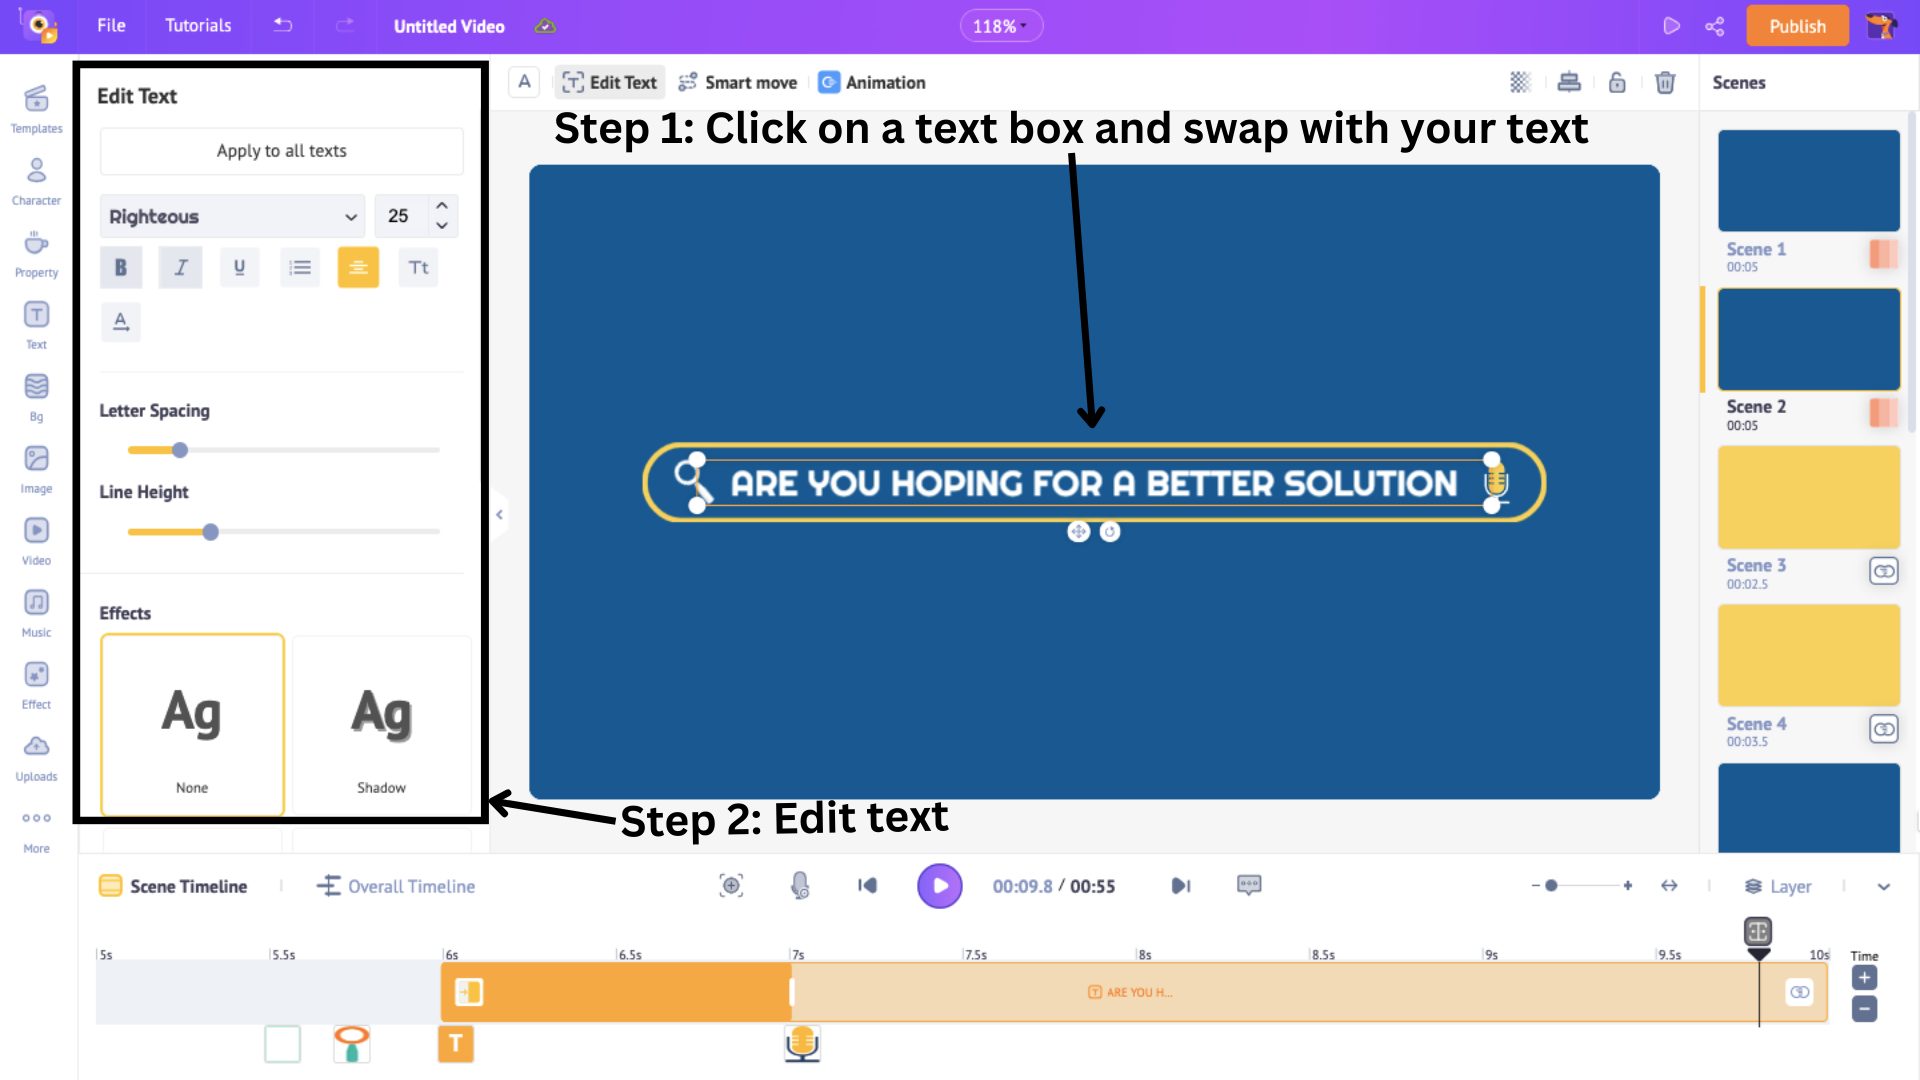
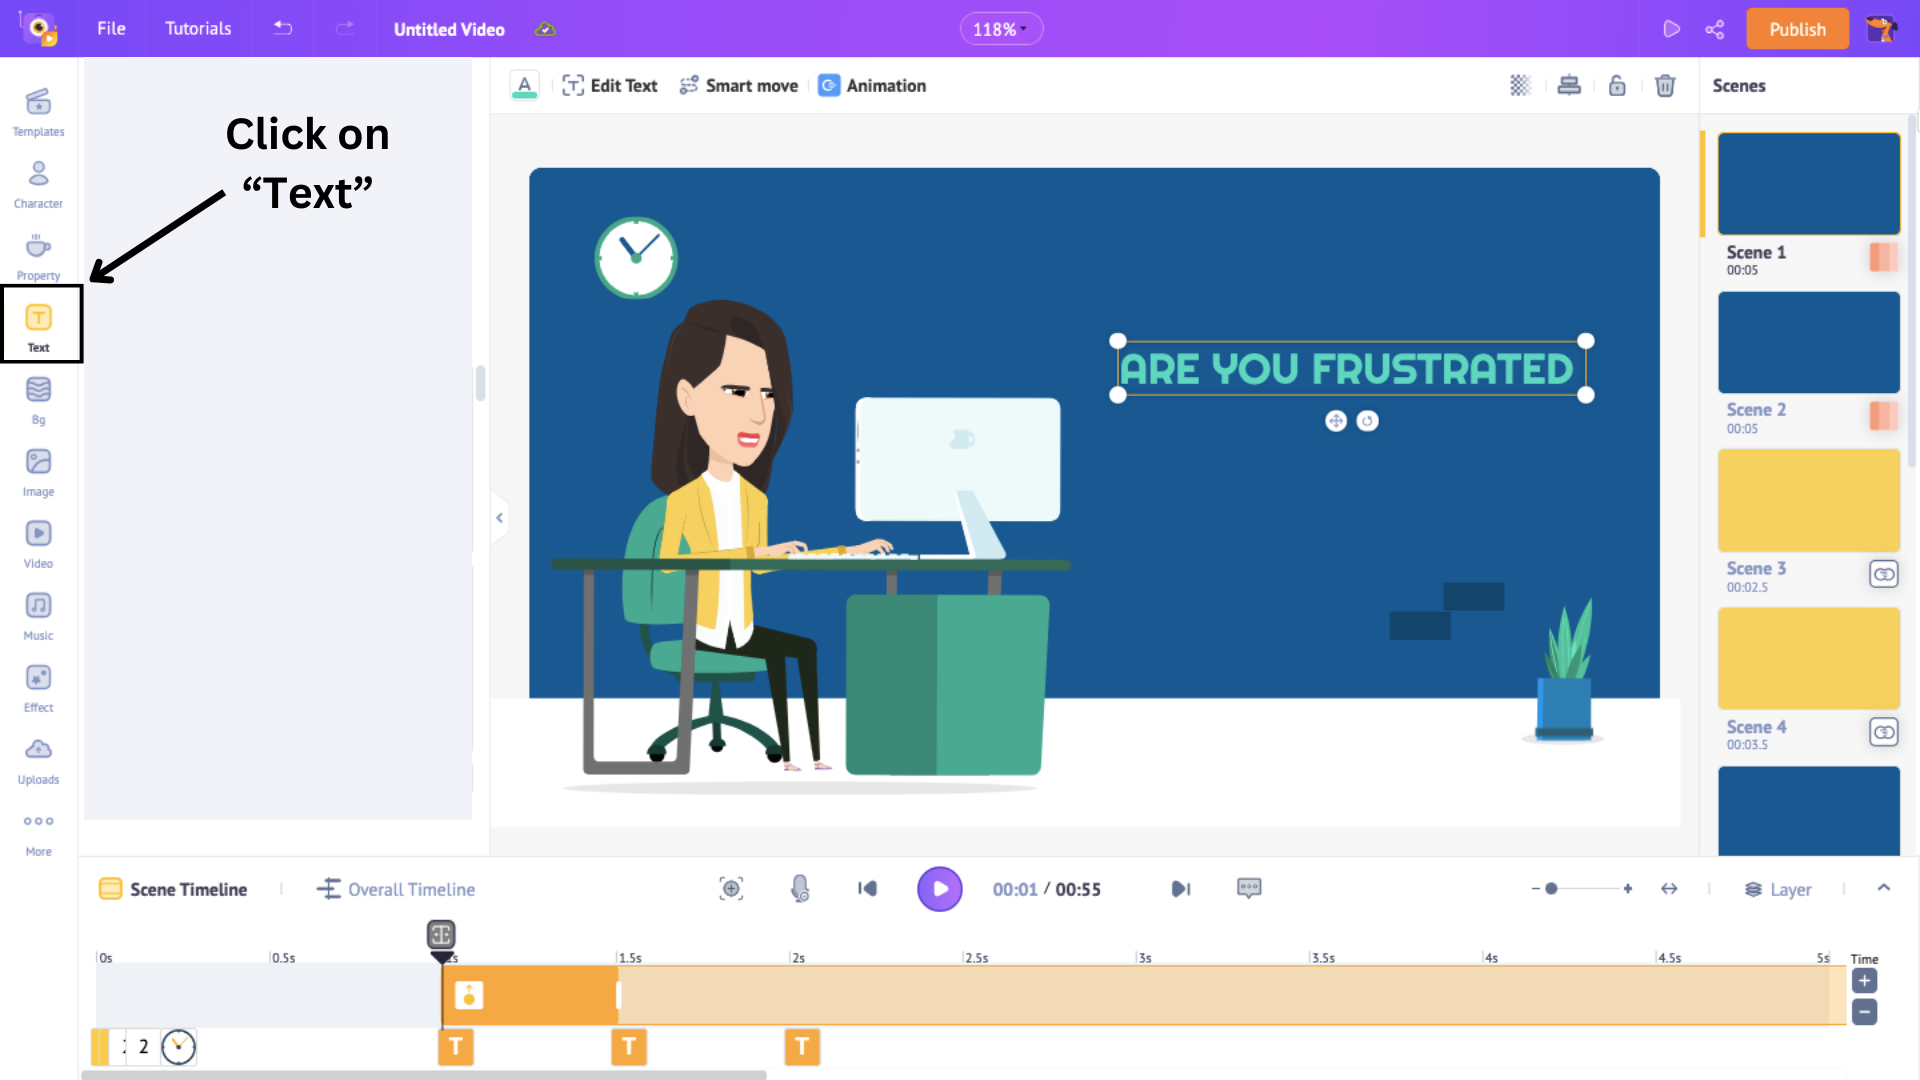
But, if you want to add a new text box, click on the Text option in the library.
This will open two types of text - Plain and Pre-builds.
Plain text boxes require designing from scratch, while Pre-builds have pre-added design, font, and animation effects.
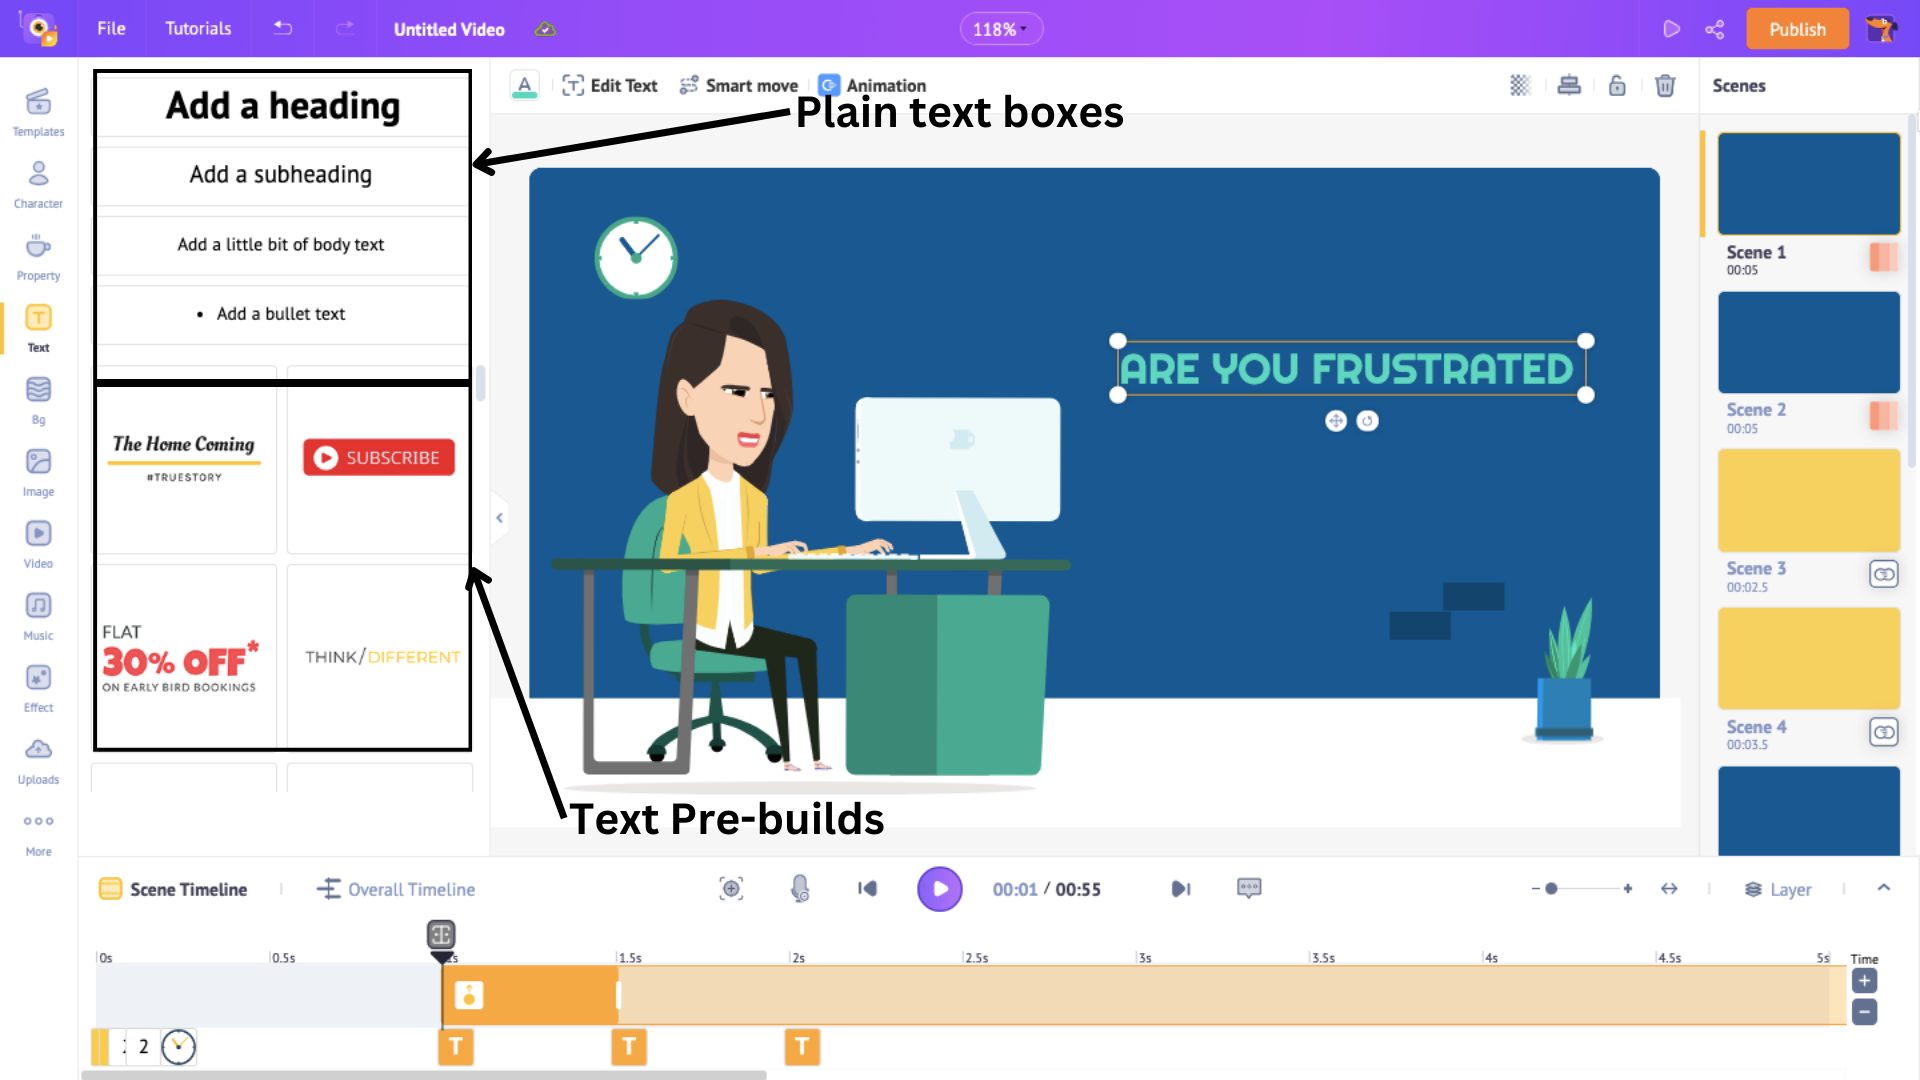
Choose one that suits you the best and click on it to add it to the scene. Then, you can position it in the scene, type in your text, and edit it in the side panel, just like we saw before.
After adding the text, you will see an orange section appearing on the timeline. This is the duration of the text in the scene. If you want the to appear at a particular time, drag one end of the colored section to the precise time.
Look at how I drag the left end and place it at the 1st second. This means that the text will appear at the first second.
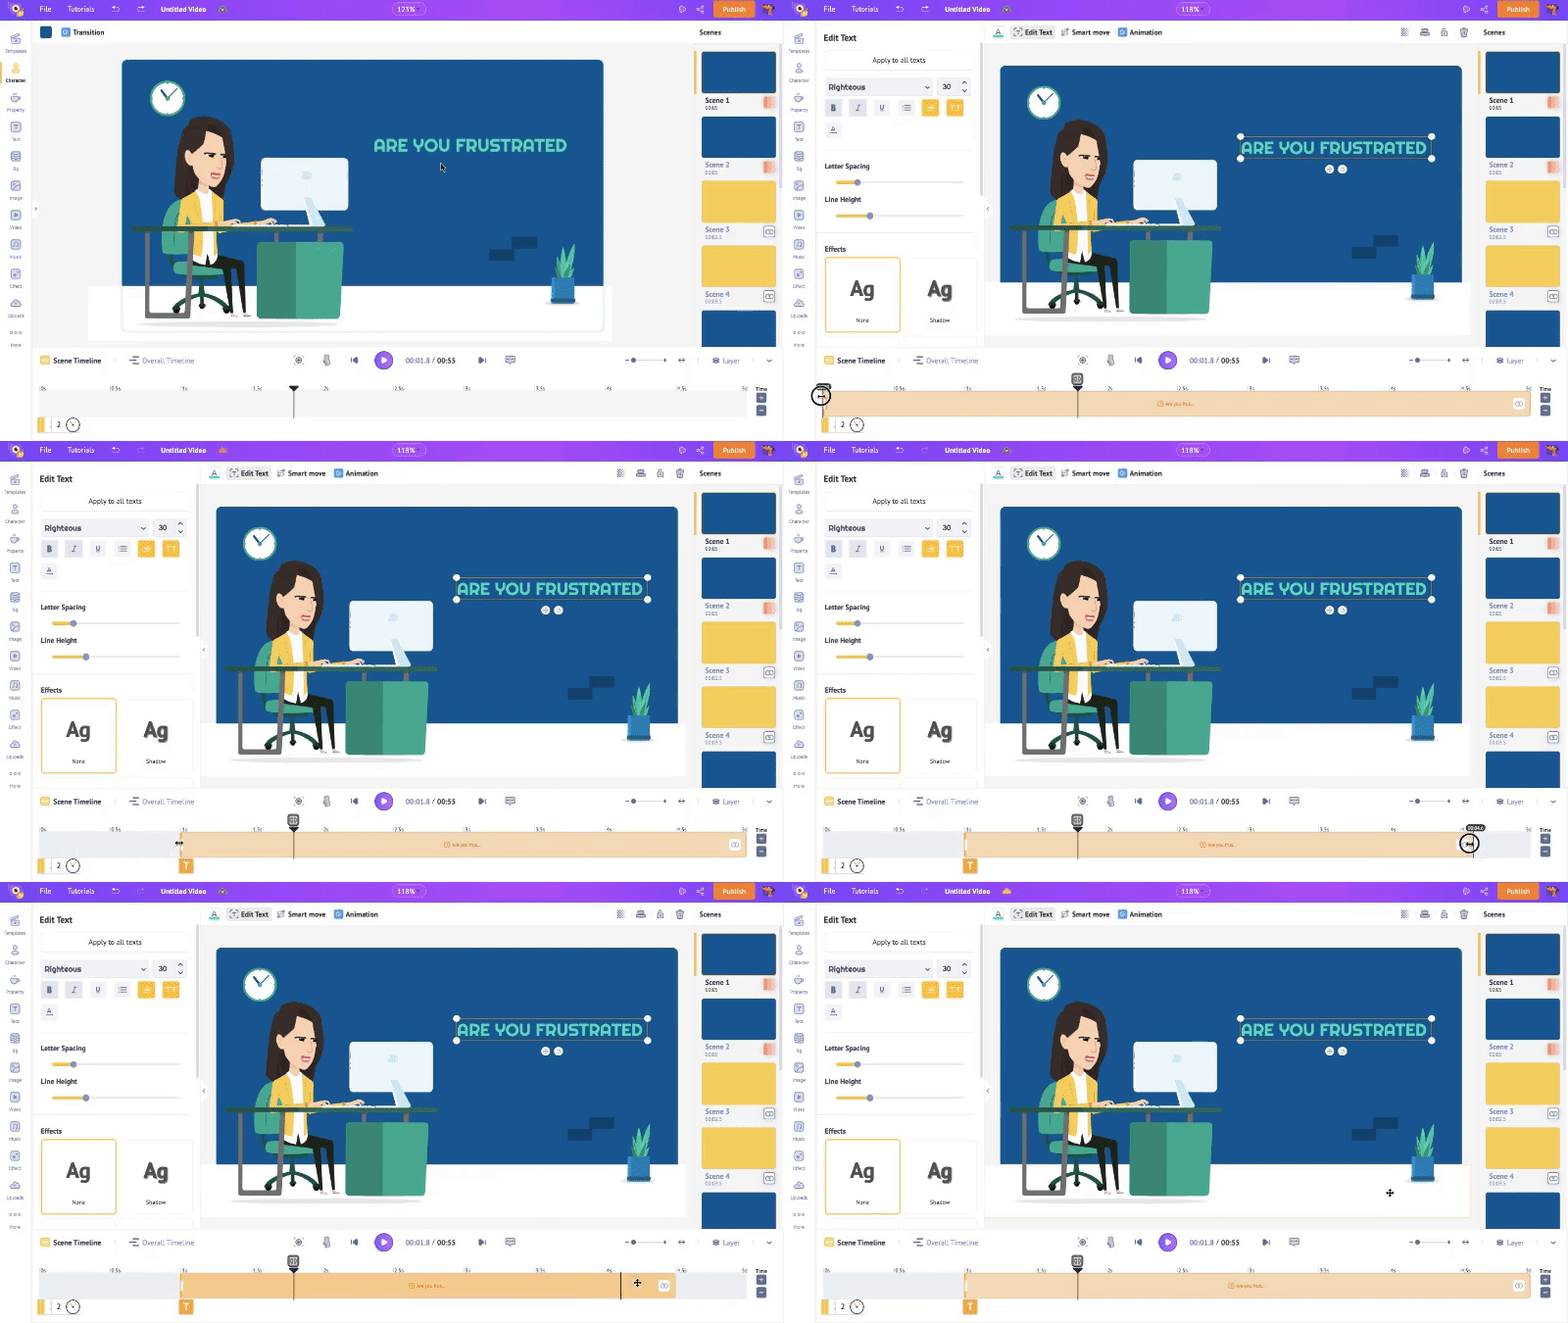
This is how you control an element’s visibility in the scene by adjusting its colored section on the timeline.
Like I mentioned before, plain text boxes do not come with animations. But don’t worry. We can add it in no time.
To add animations, select a text box and click on the Animation option above the workspace. This will open a list of 35+ enter and exit animation effects to choose from for your text.

Once you choose the effects, highlighted parts appear for the text on the timeline. These represent the enter and exit effects of the text. To control the duration of these effects, drag the inner corners across the timeline.
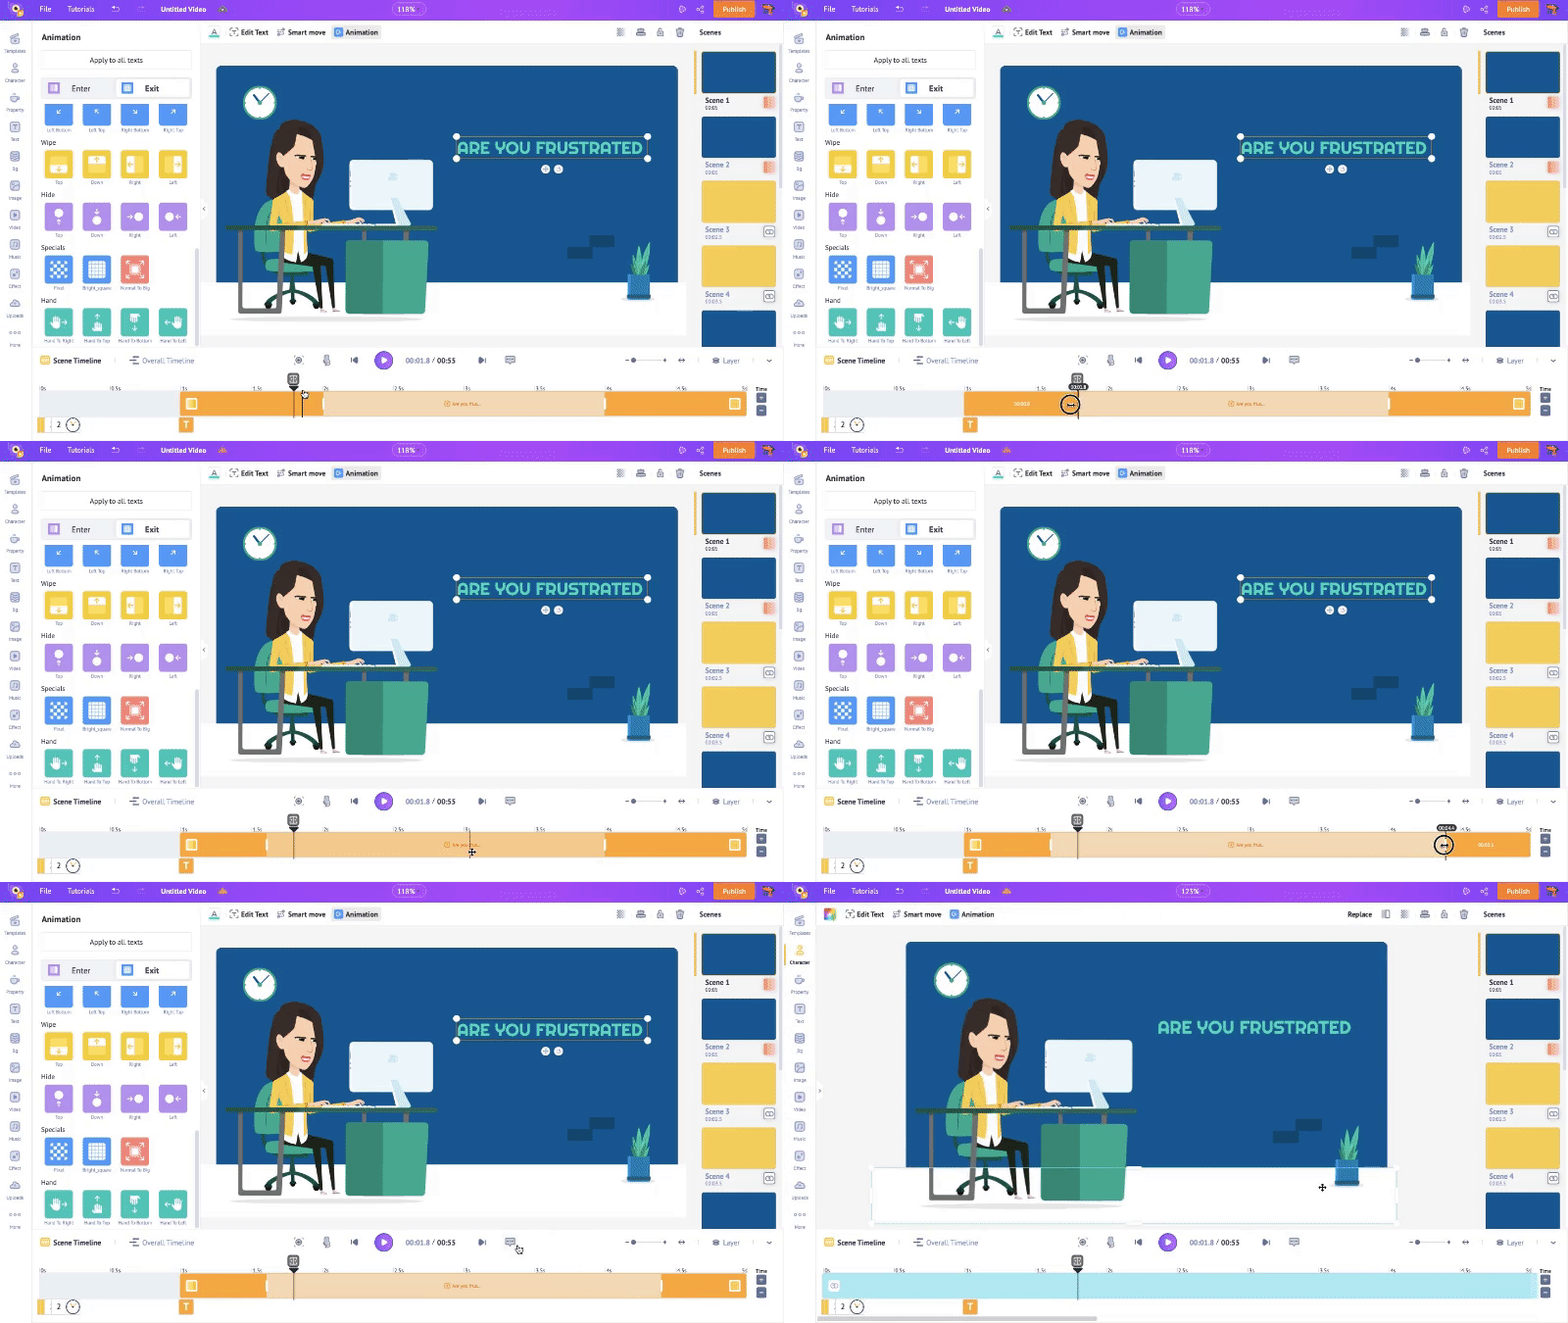
See? You added animation to your text box in no time! Let’s move on to the next element.
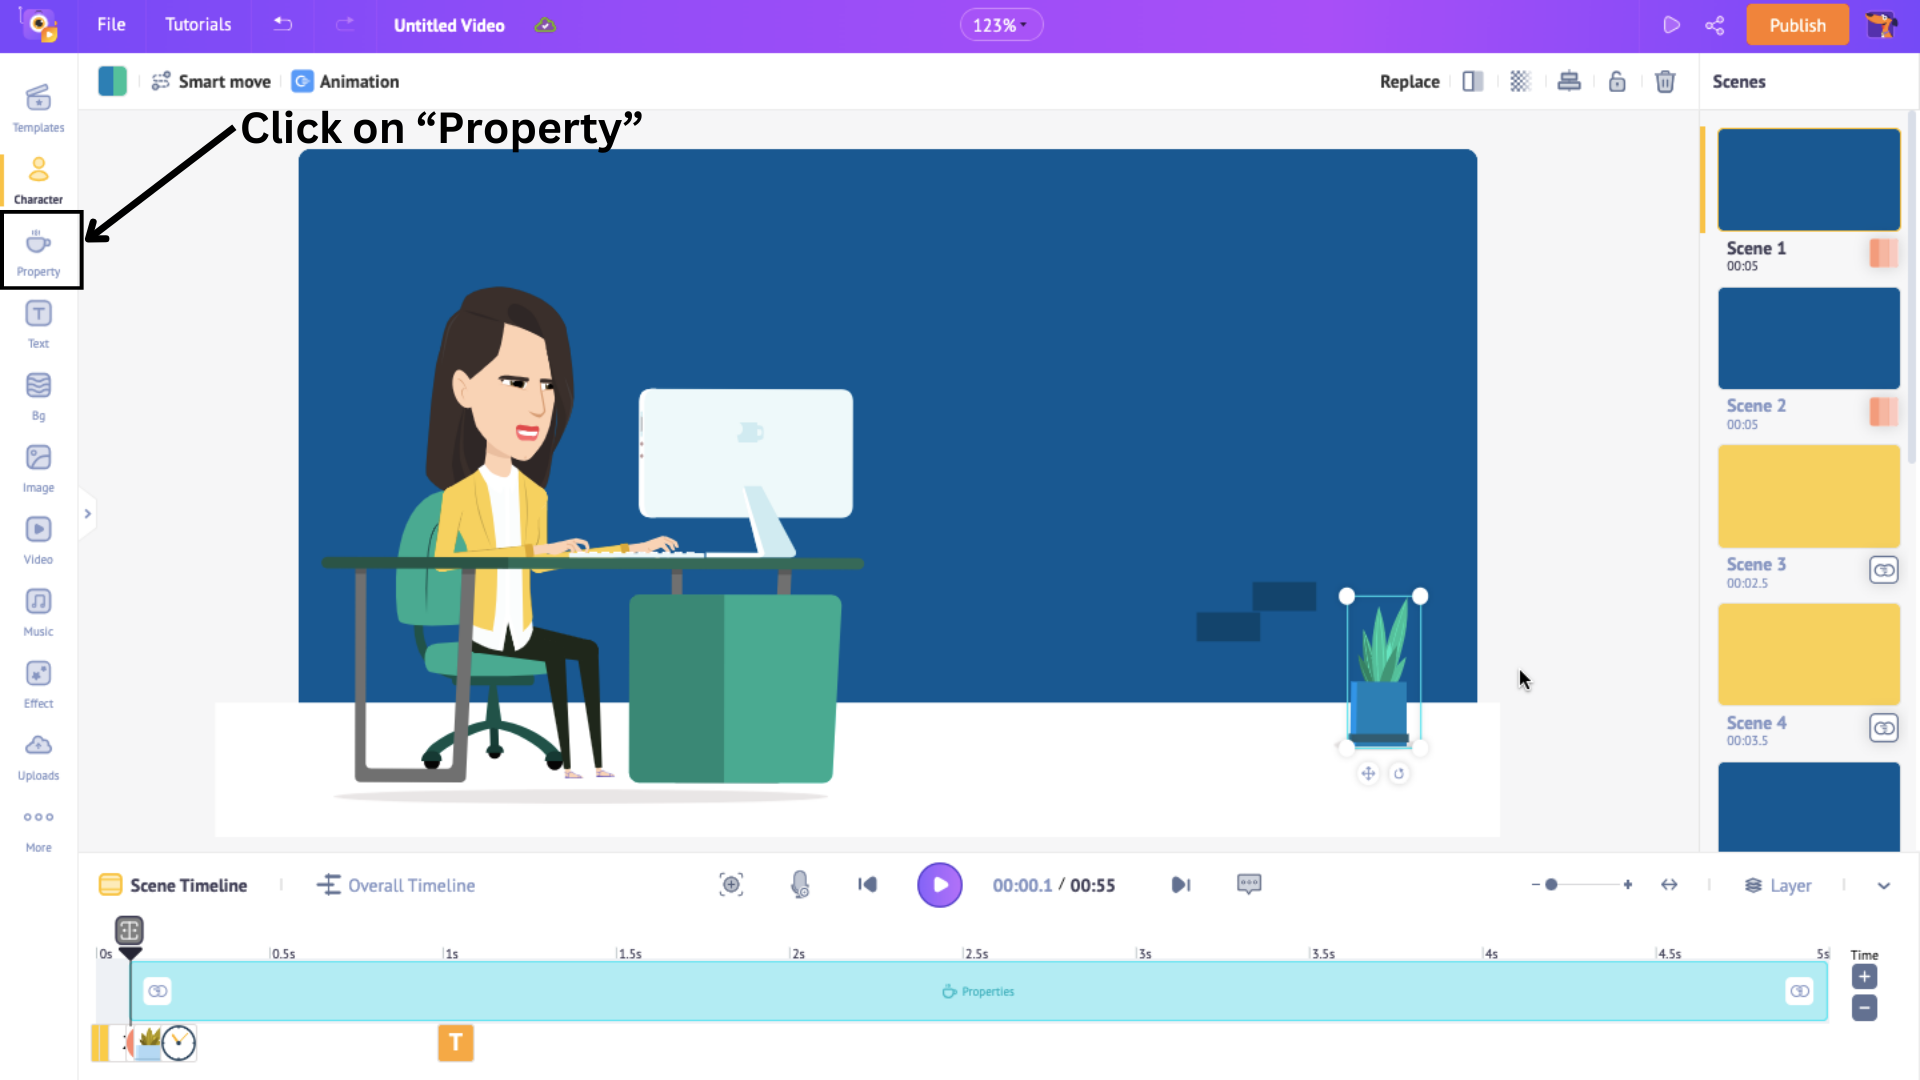
3. Property
Some scenes in the template have properties added. You can add new properties to a scene or swap the existing property to a new one.
To add a new property, click on Property option in the library.
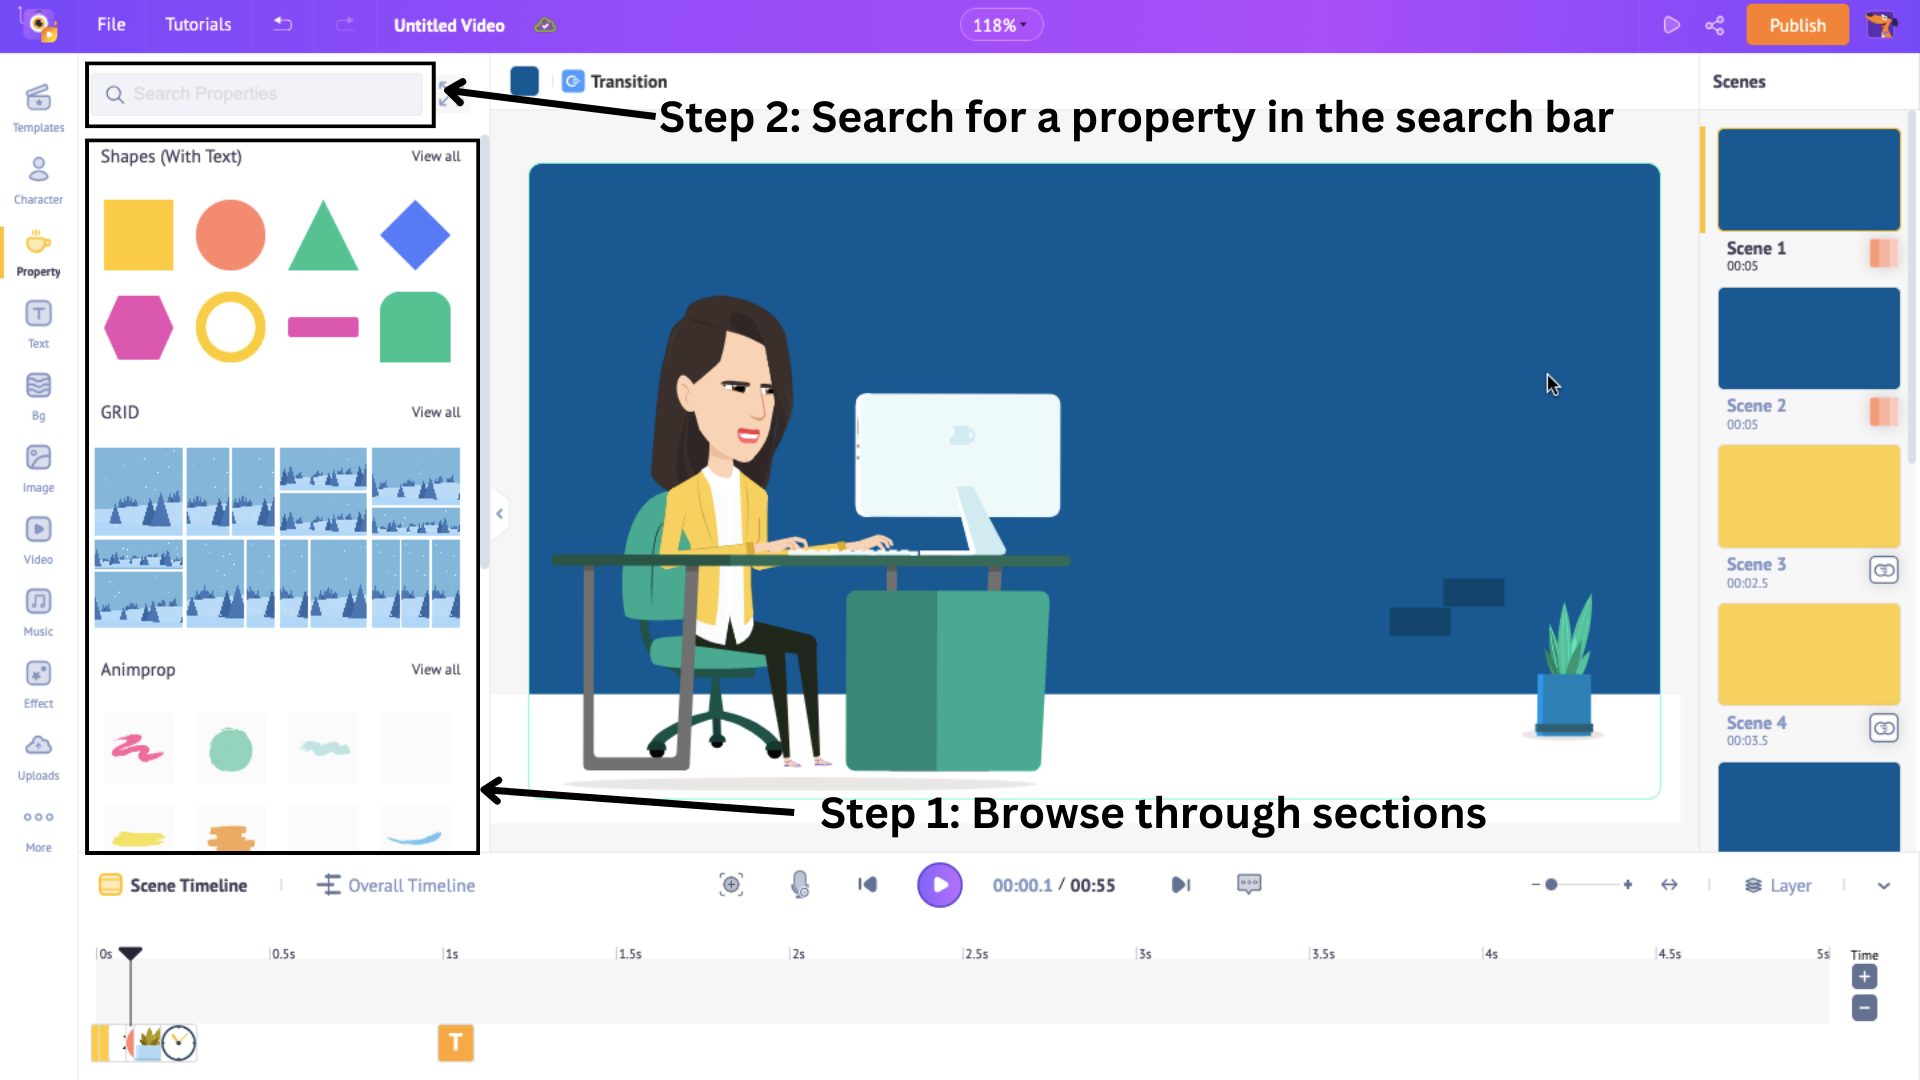
This section has 70K+ icons and properties from furnitures, shapes to grids. Browse or search in the search bar.
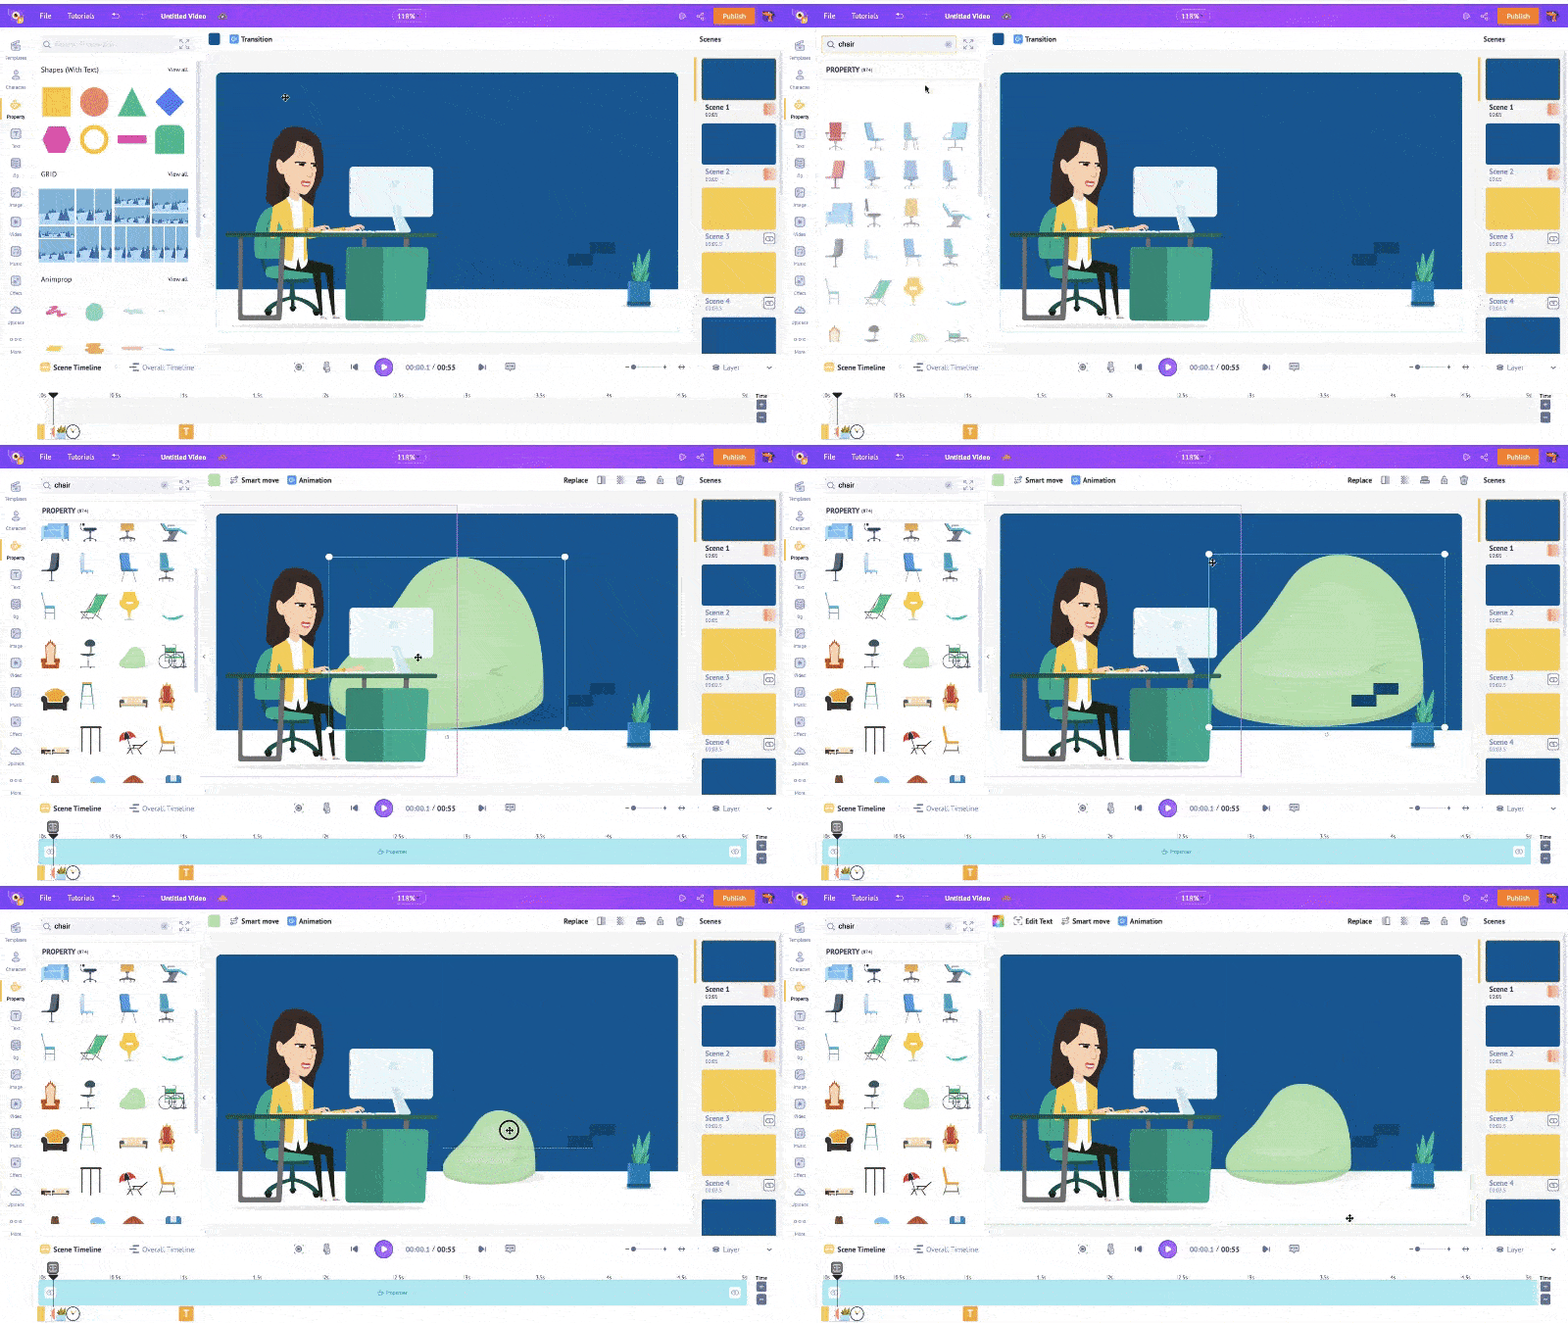
Click on a property to add to the scene. Resize it and position it in the scene.
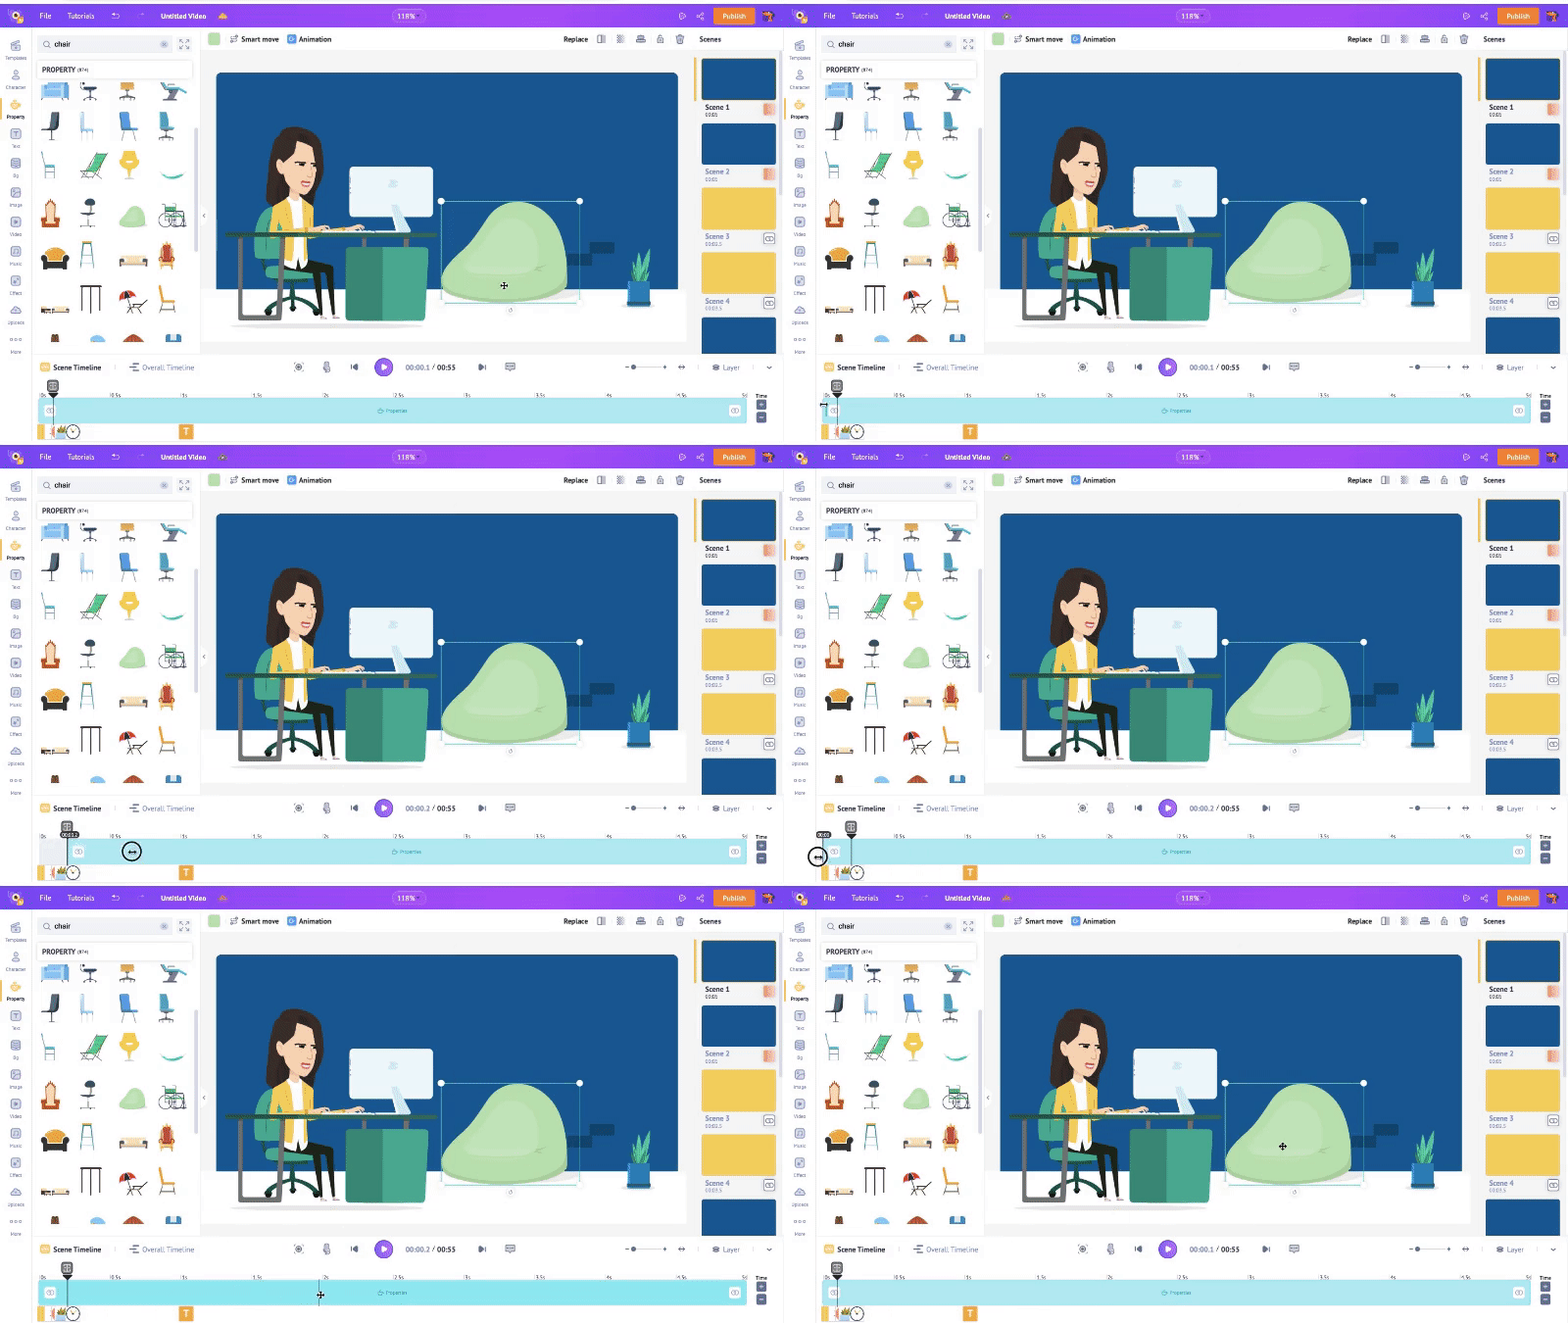
Then, adjust the property’s visibility in the scene on the timeline.
Now if you want to swap an existing element, click on the element and select Replace. Choose a property and click on Apply.
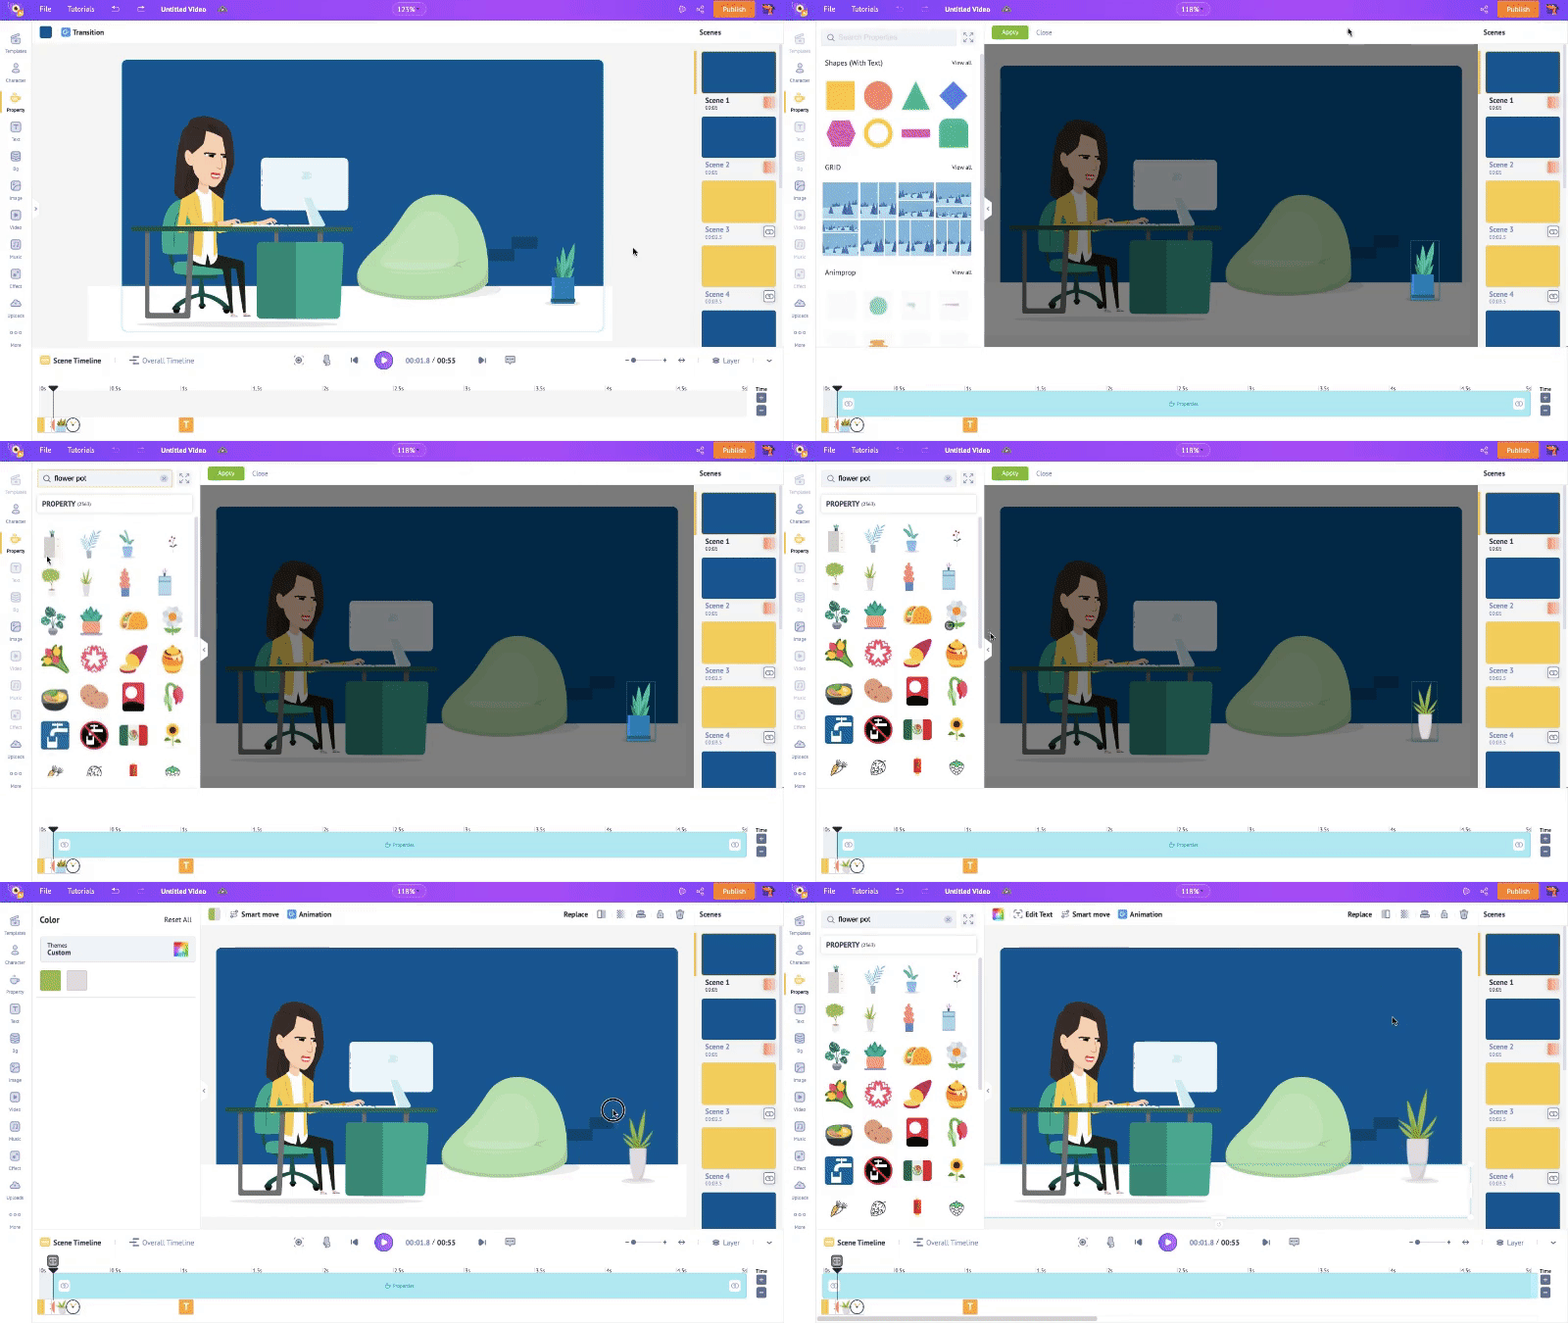
That’s it!! It is so easy, right? Let’s look at one more important element.
4. Music
You might have noticed that the template has a music track added already. However, If you wish to change it, it is very simple. Simply delete the existing track and add a new track. We do this so that the new track doesn’t overlap with the existing one.
To do that, click on the music track on the overall timeline. From the list of options, click Delete.
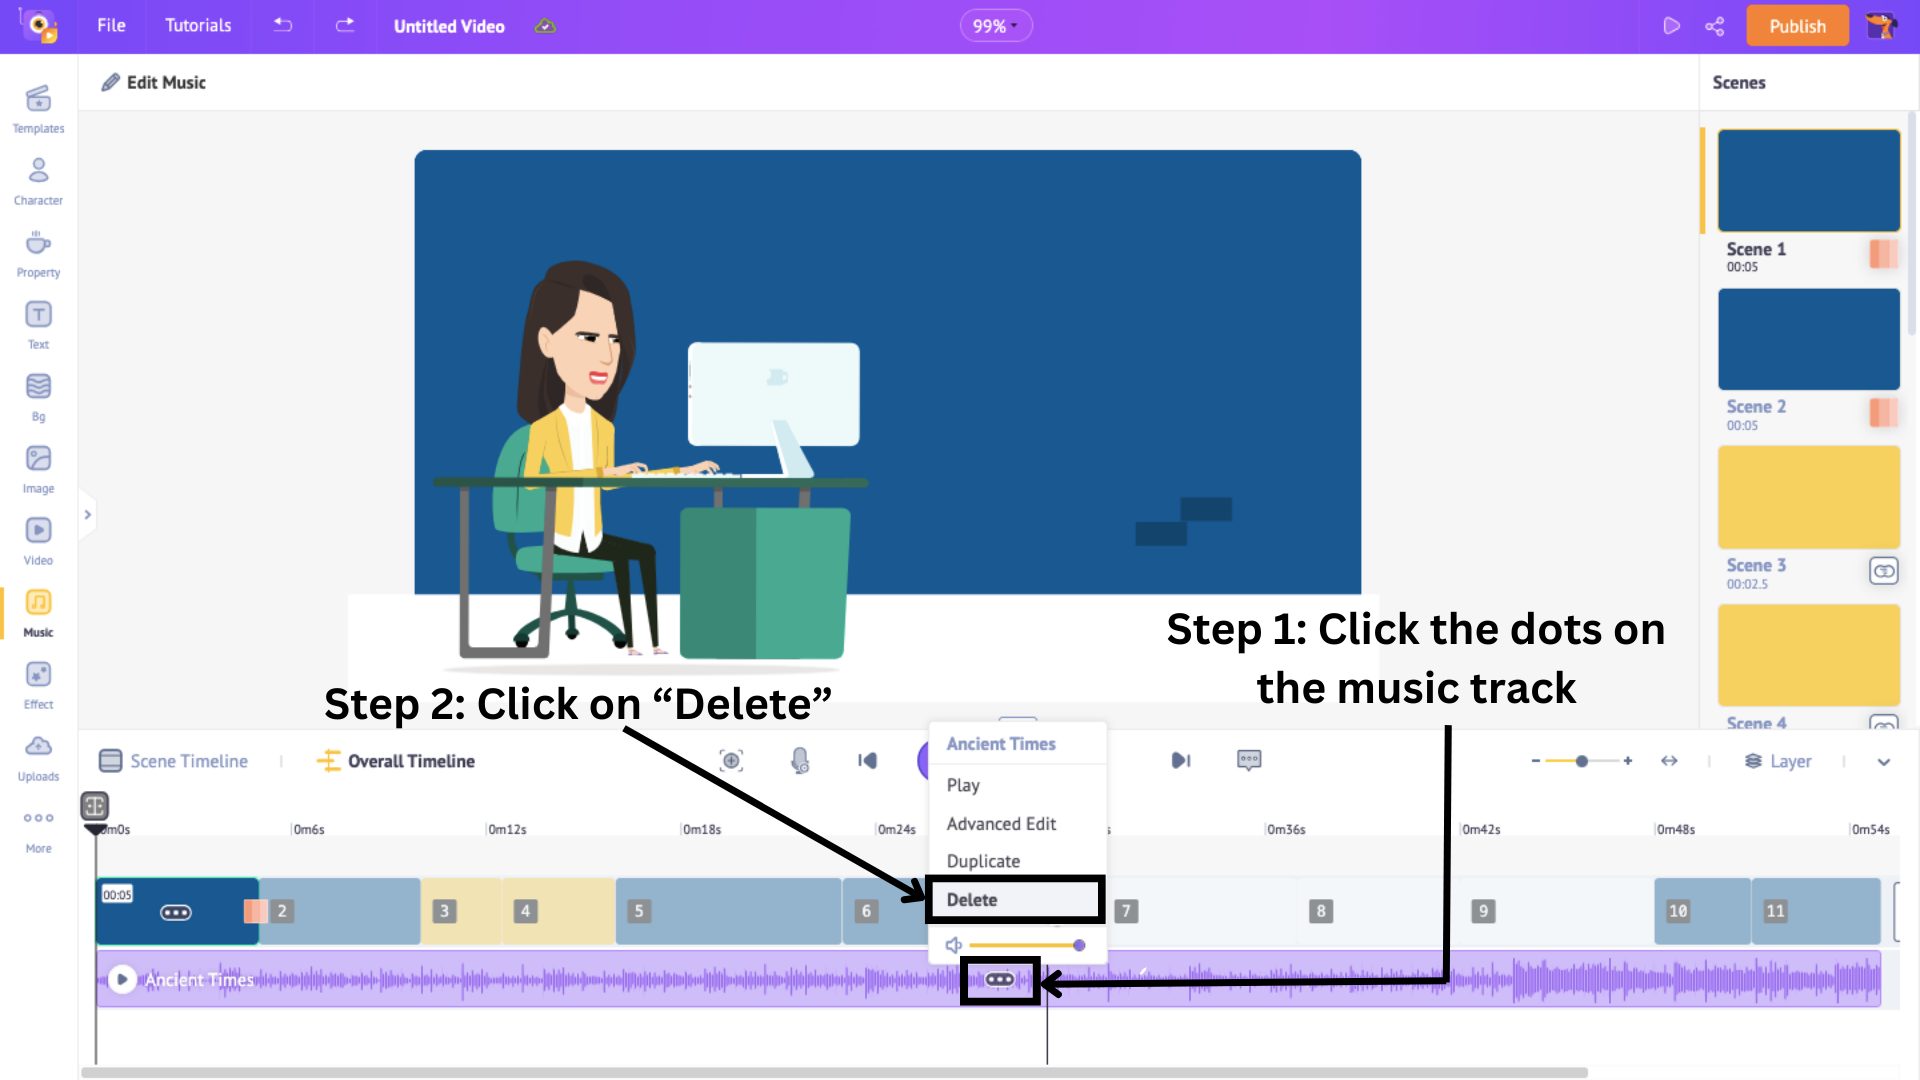
Next, click on the Music section from the library. Then, click on Expand Library to maximize the Music window.
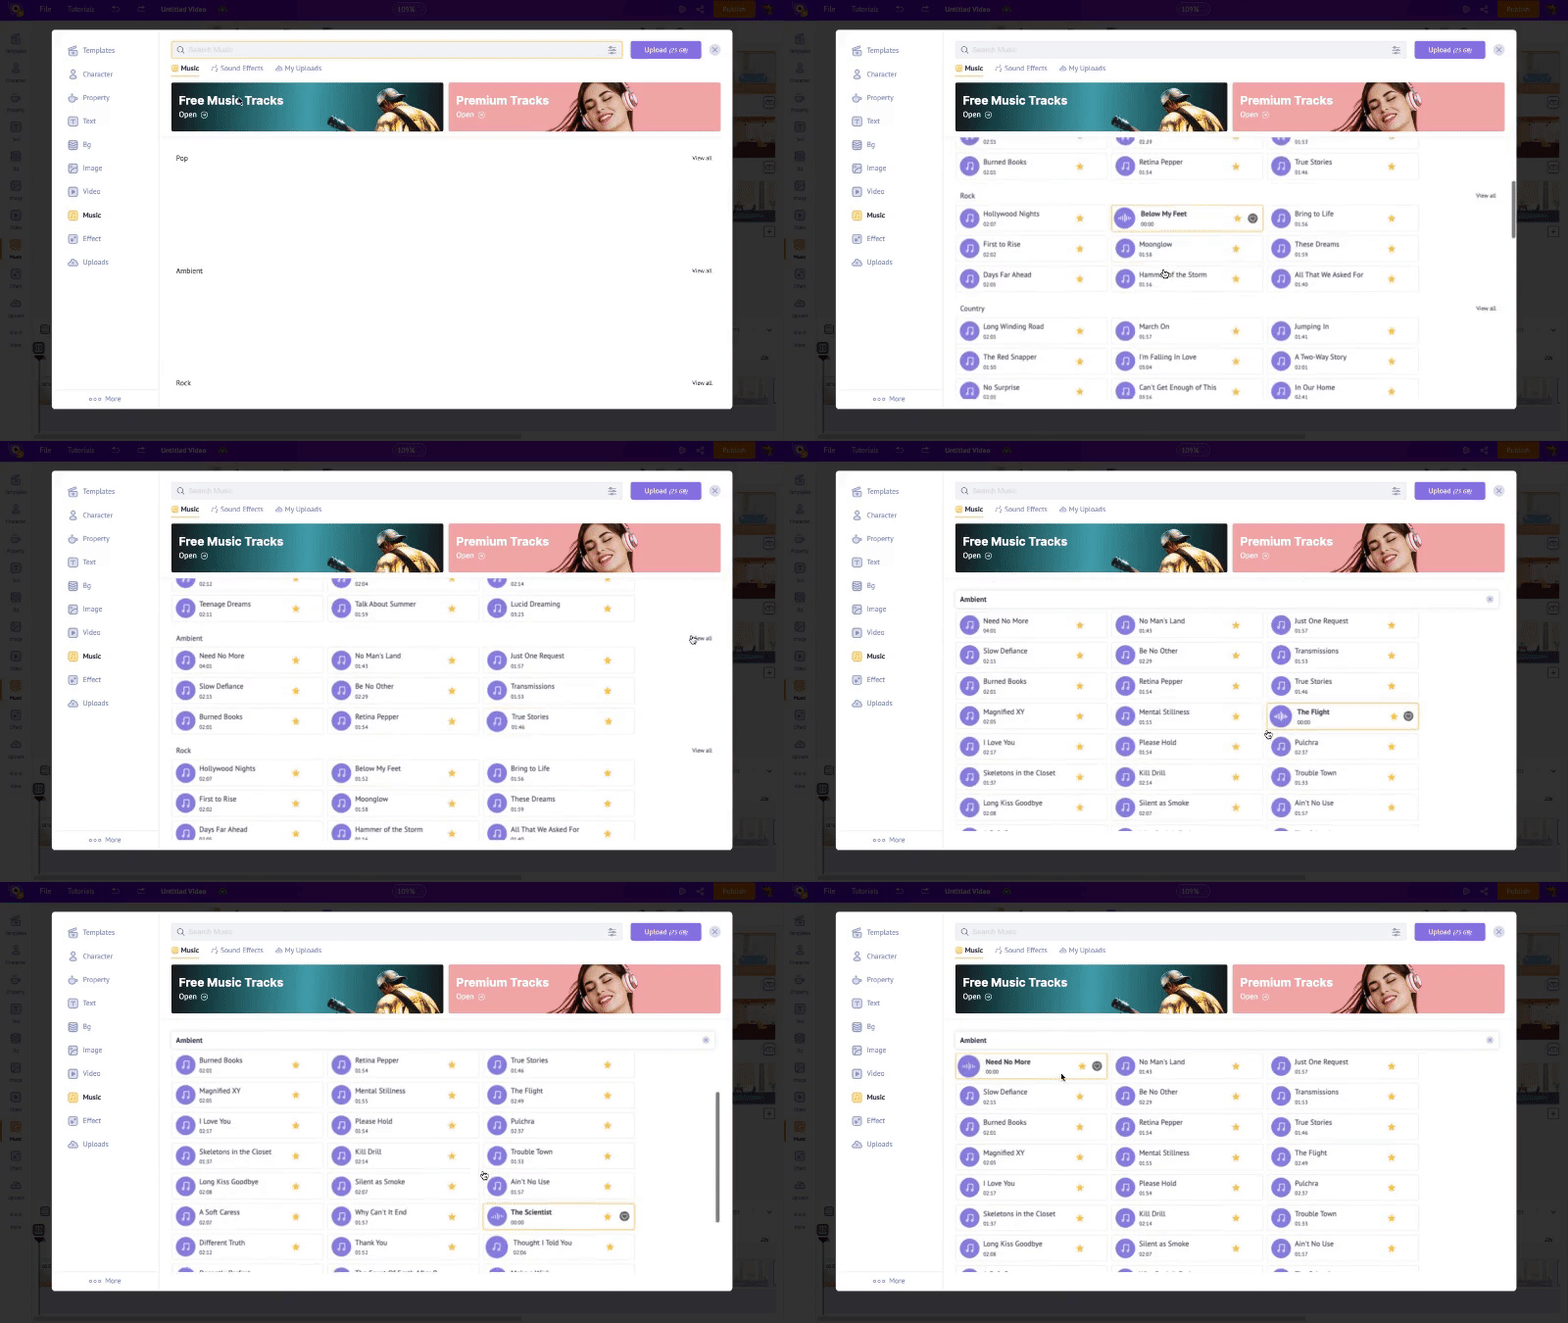
Animaker has over 30,000 music tracks, ensuring that you will find something you love. The tracks are categorized based on genres. You can browse that way or search for tracks by emotions/feelings in the search bar, to really get the sound that you’re looking for.
Hover over a track to preview it and click on it to add it to the video.
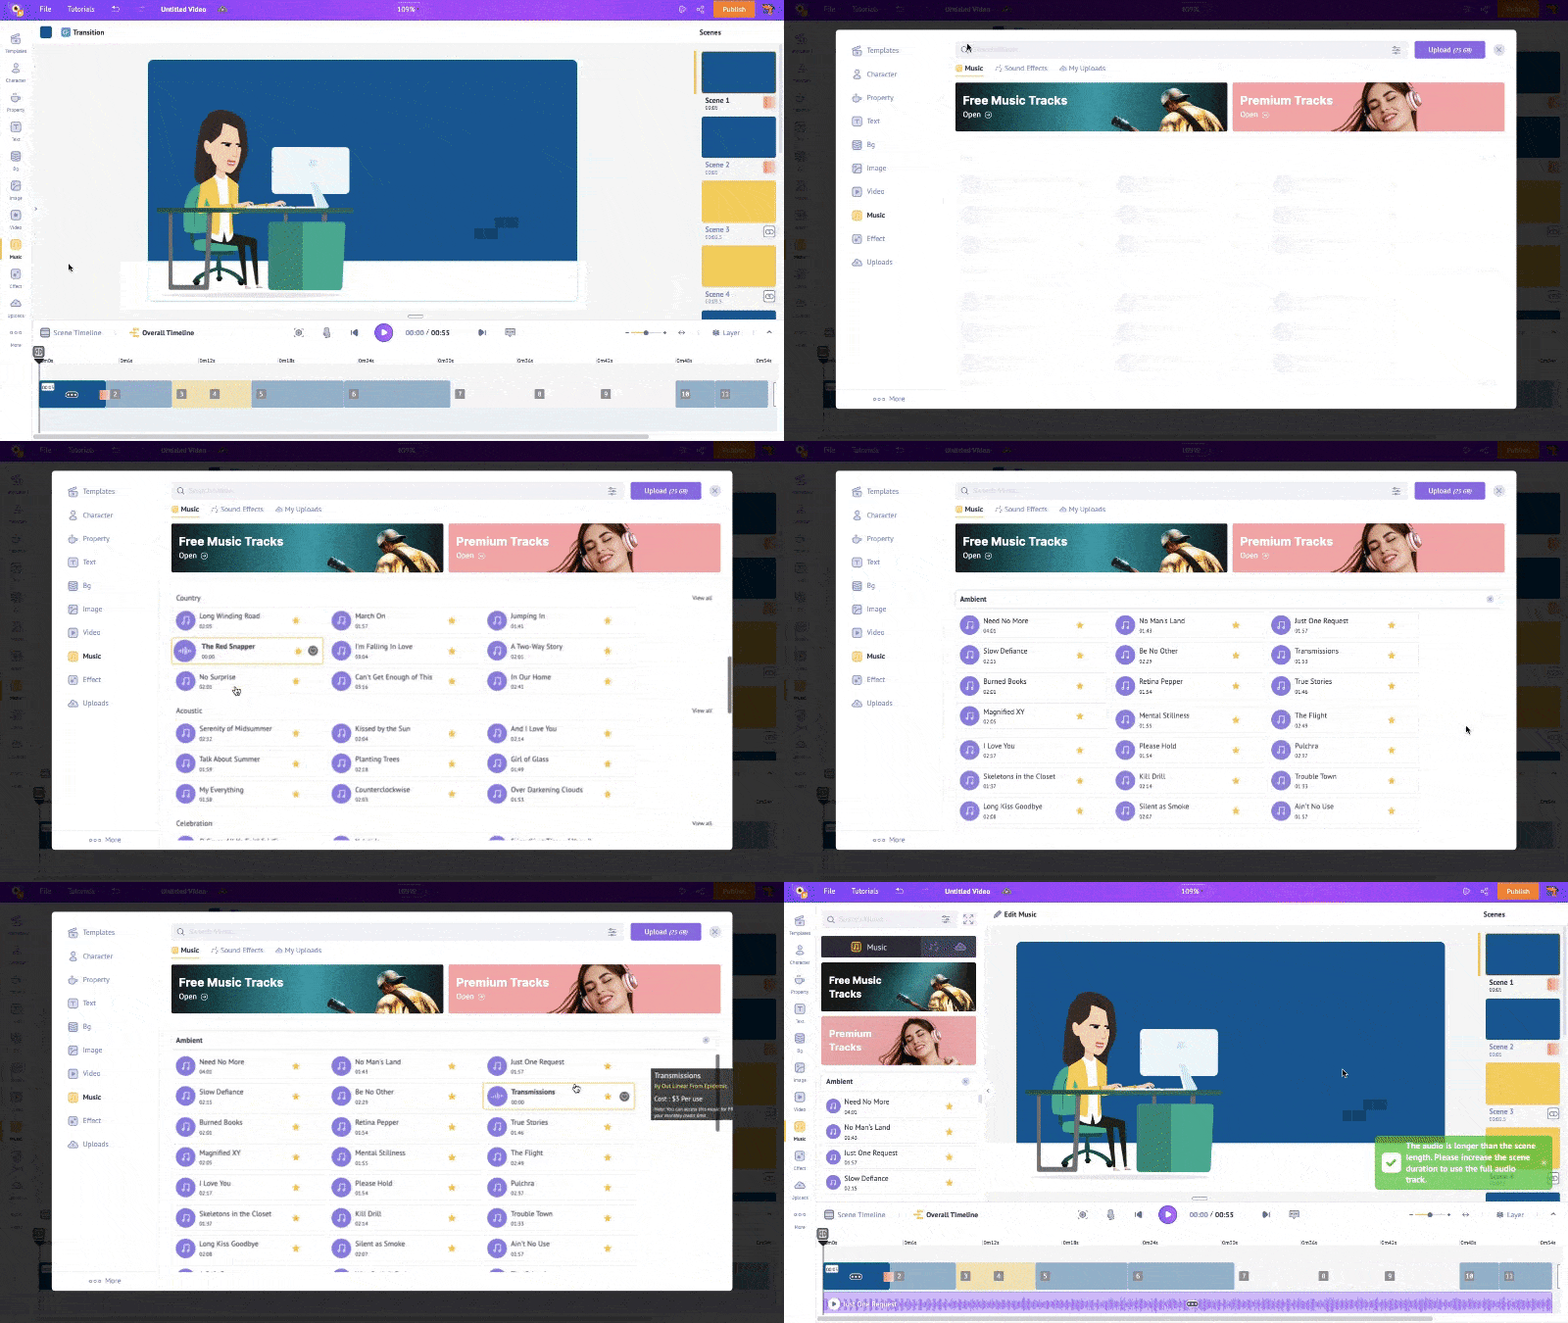
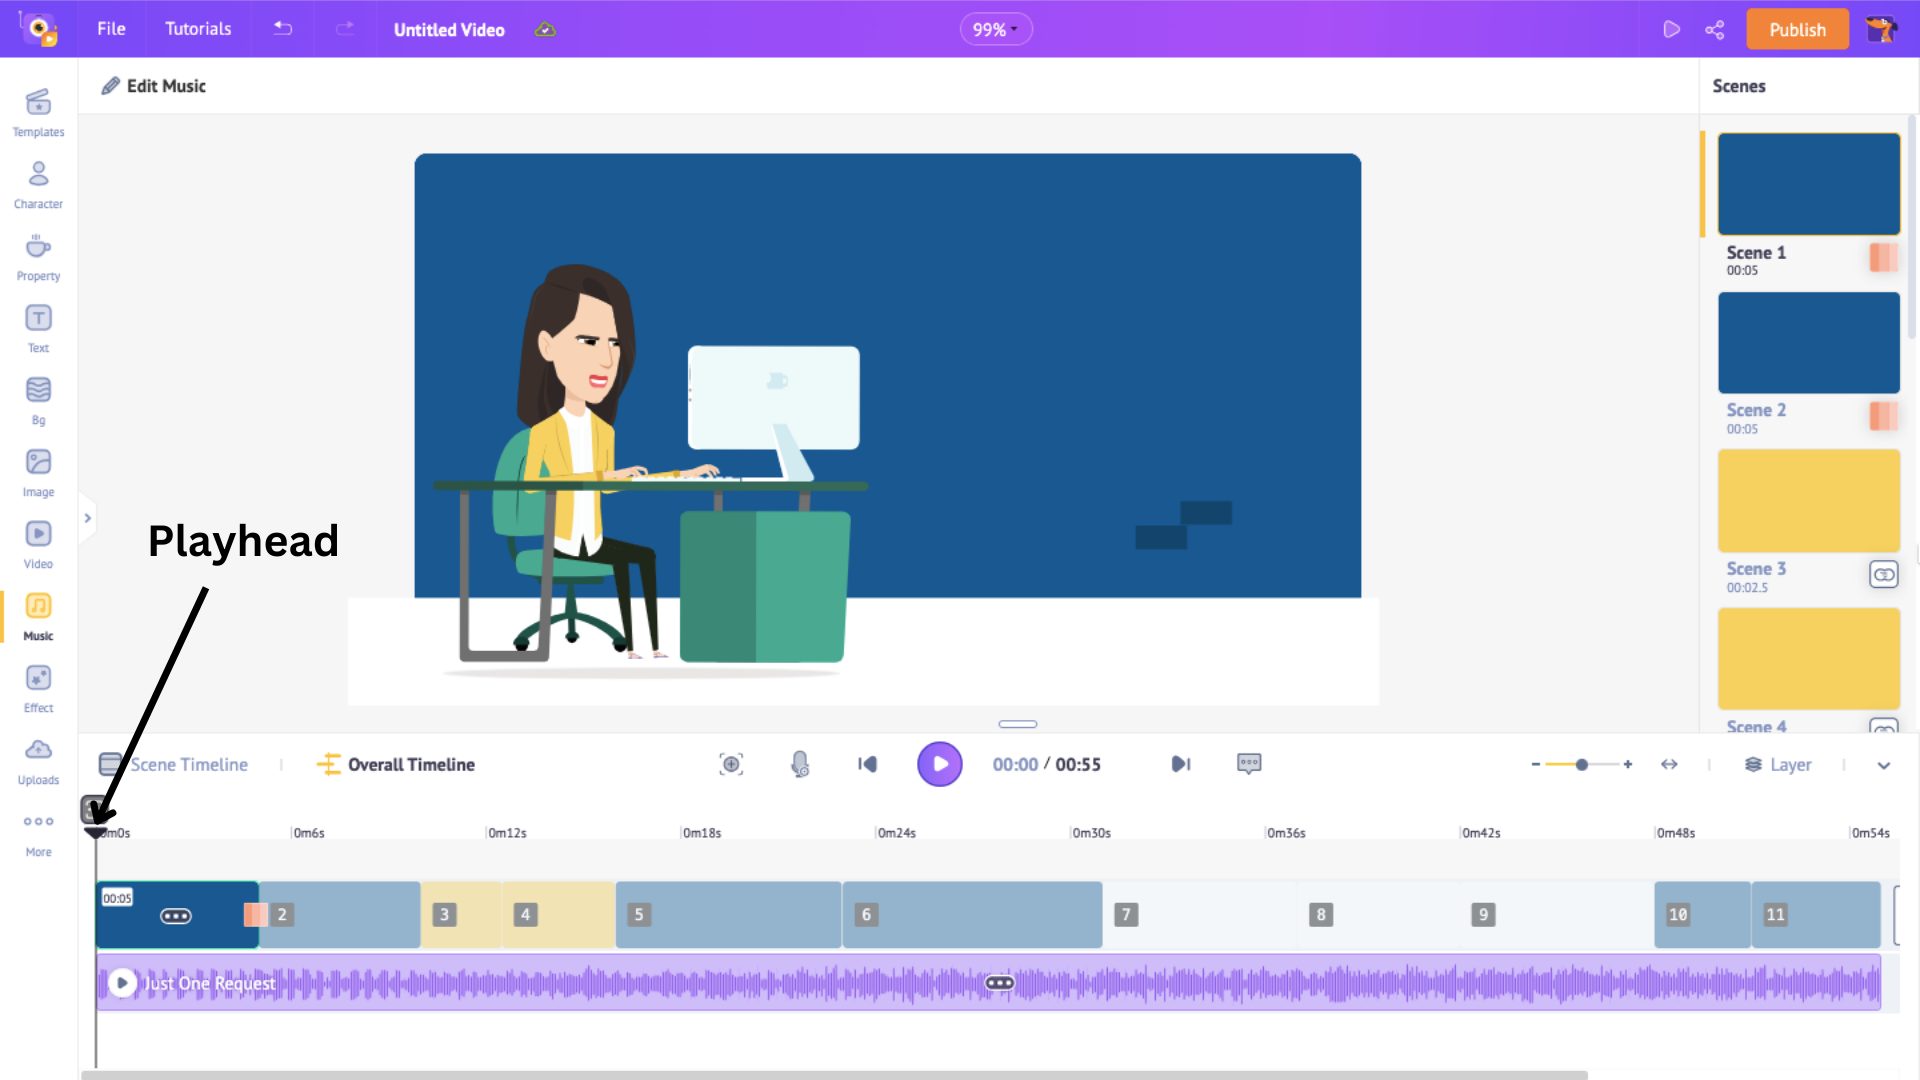
The music gets added from where the playhead is located on the timeline. So, make sure it is at the beginning of the timeline for the music to start from the beginning.
Alternatively, if you want to upload a music track of your own, simply click on the Upload option in the library and upload your chosen track.
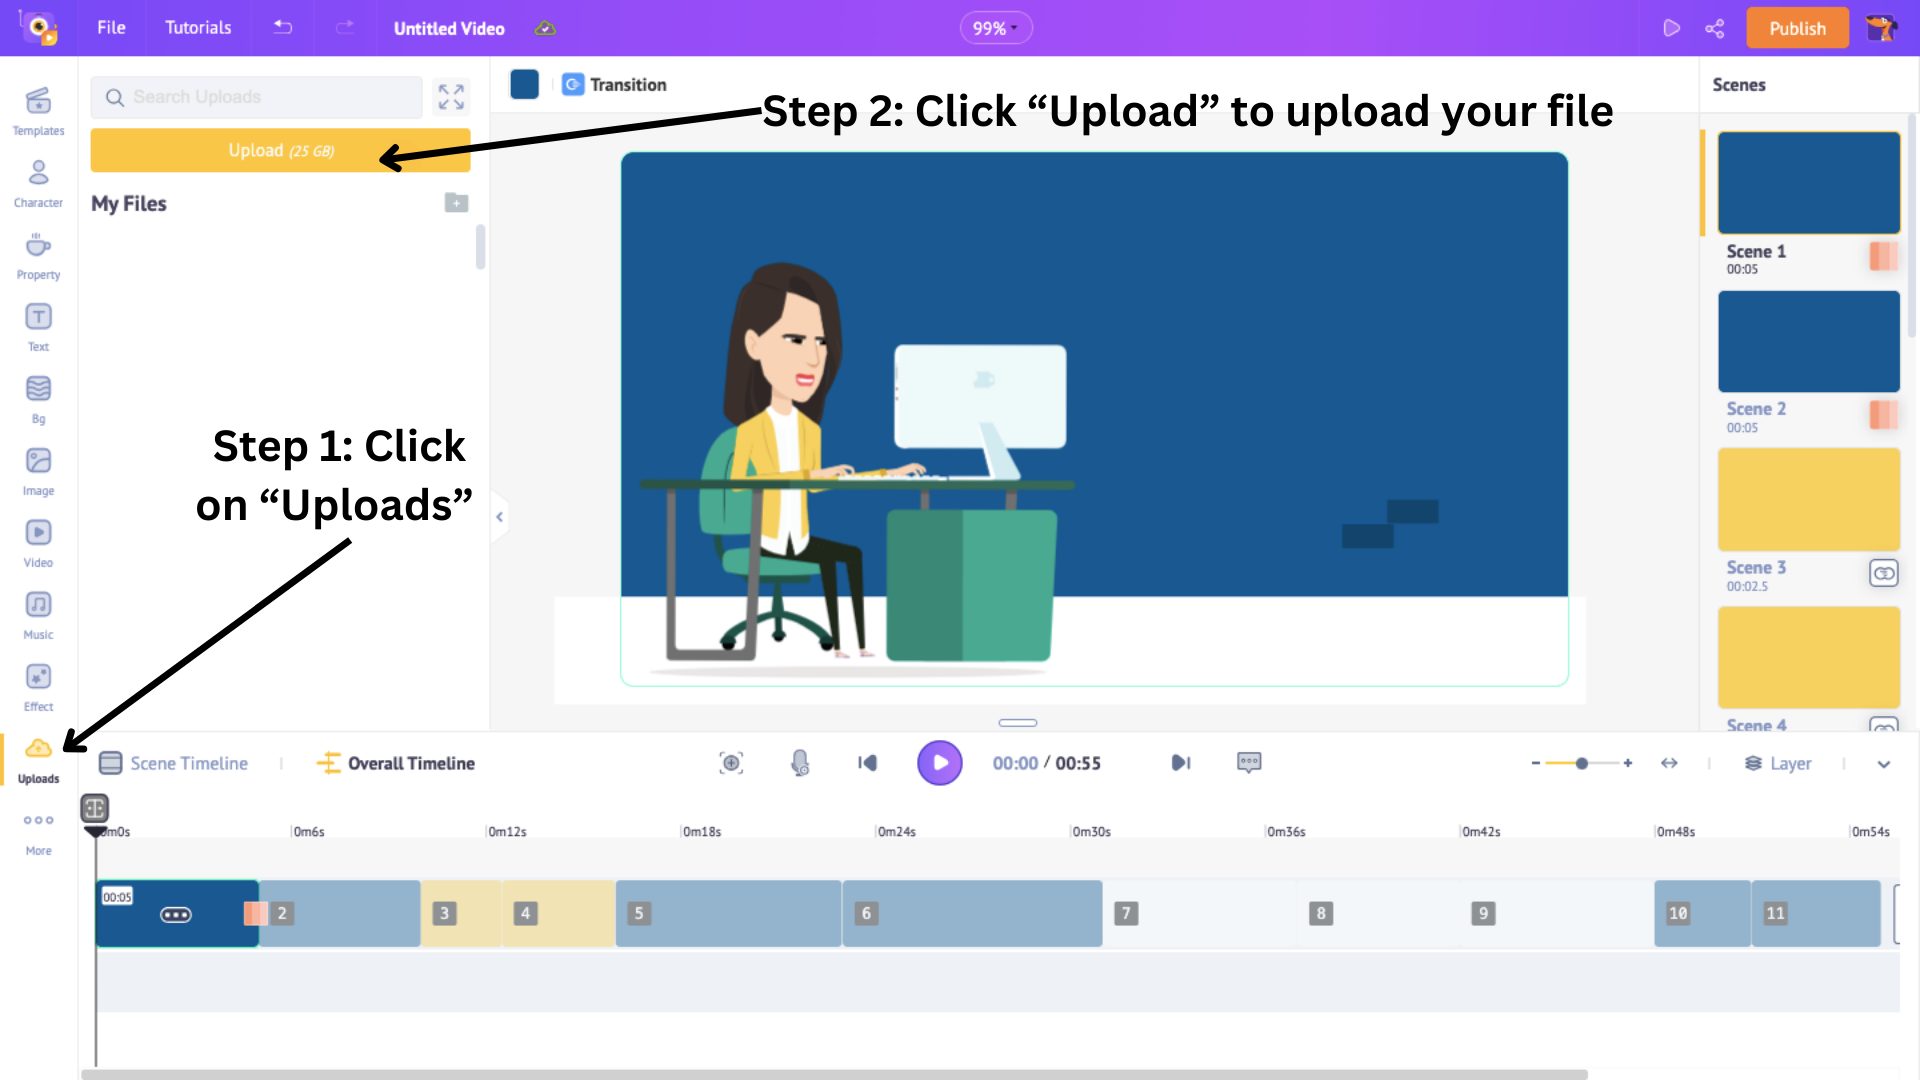
The uploaded track gets stored in the Uploads library. Click on the track to add it to the timeline.
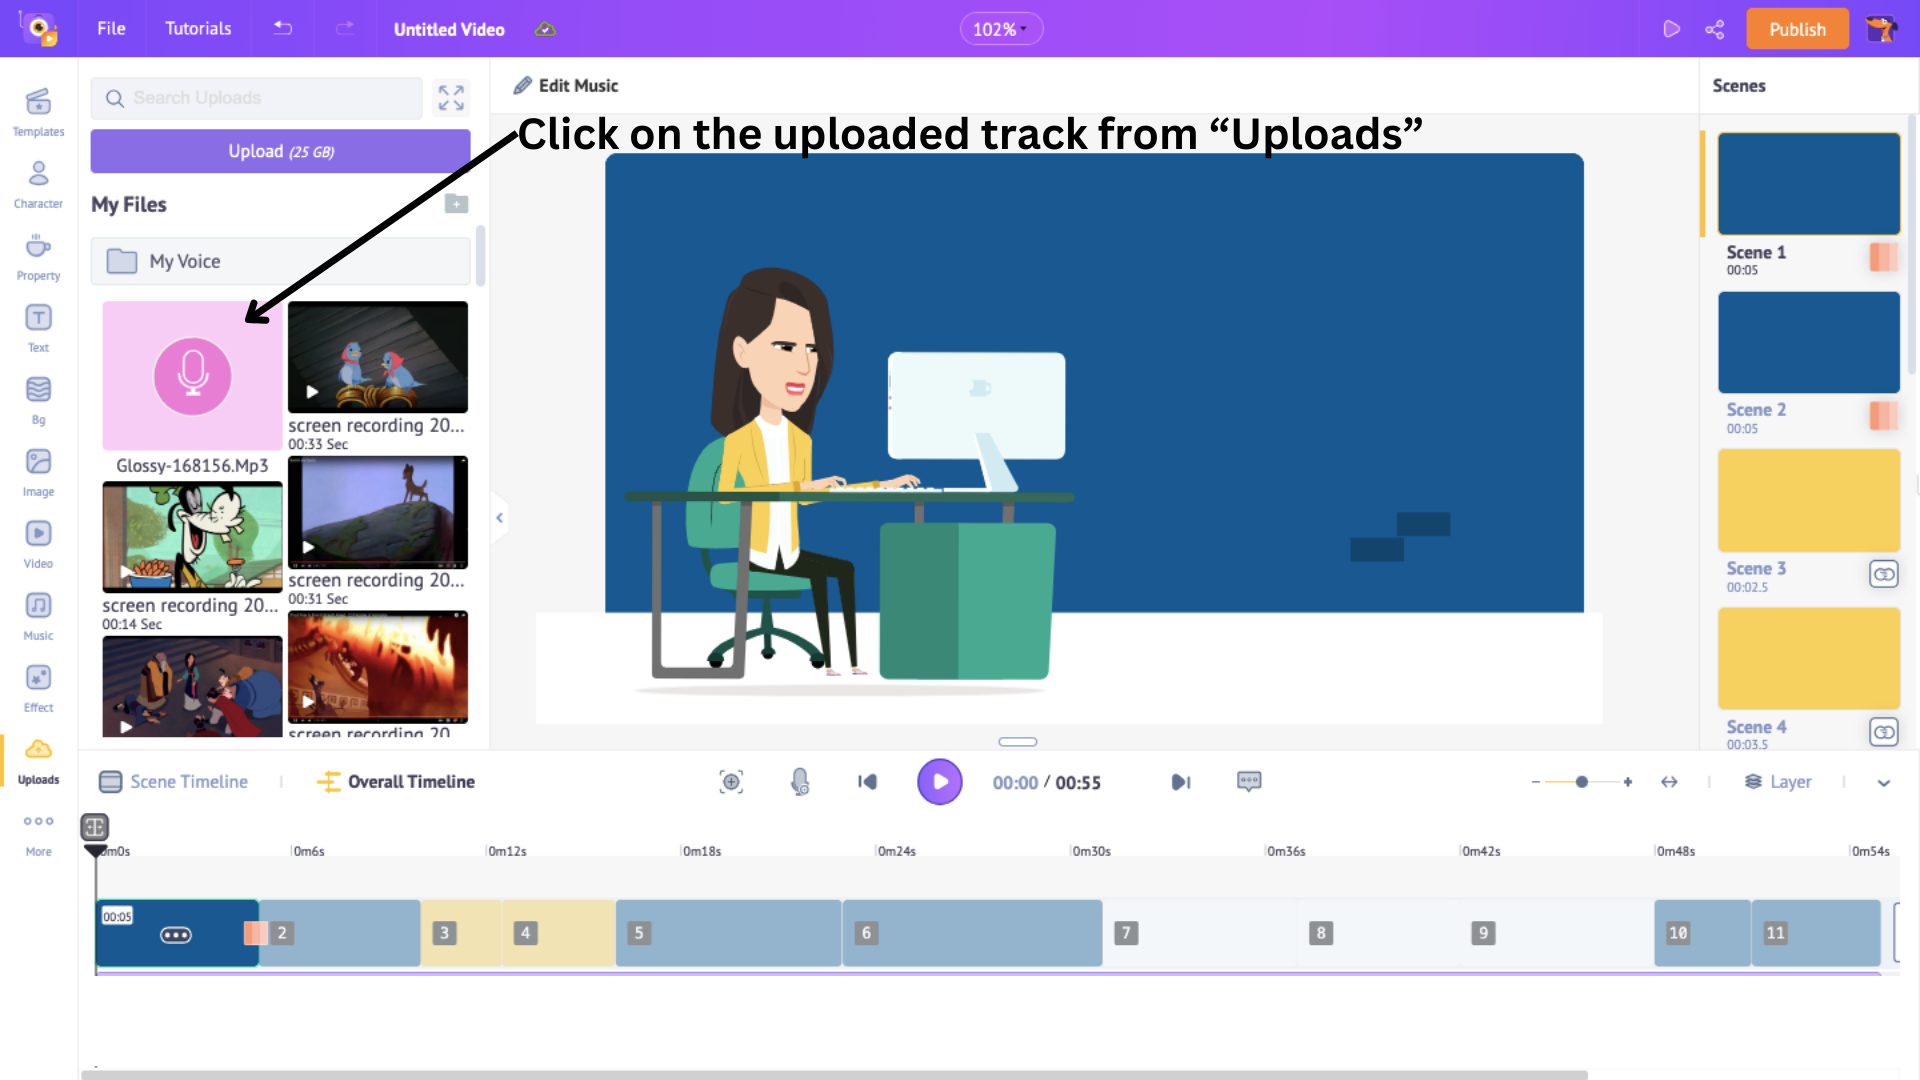
And that is how you add a different track to the timeline. Easy peasy.
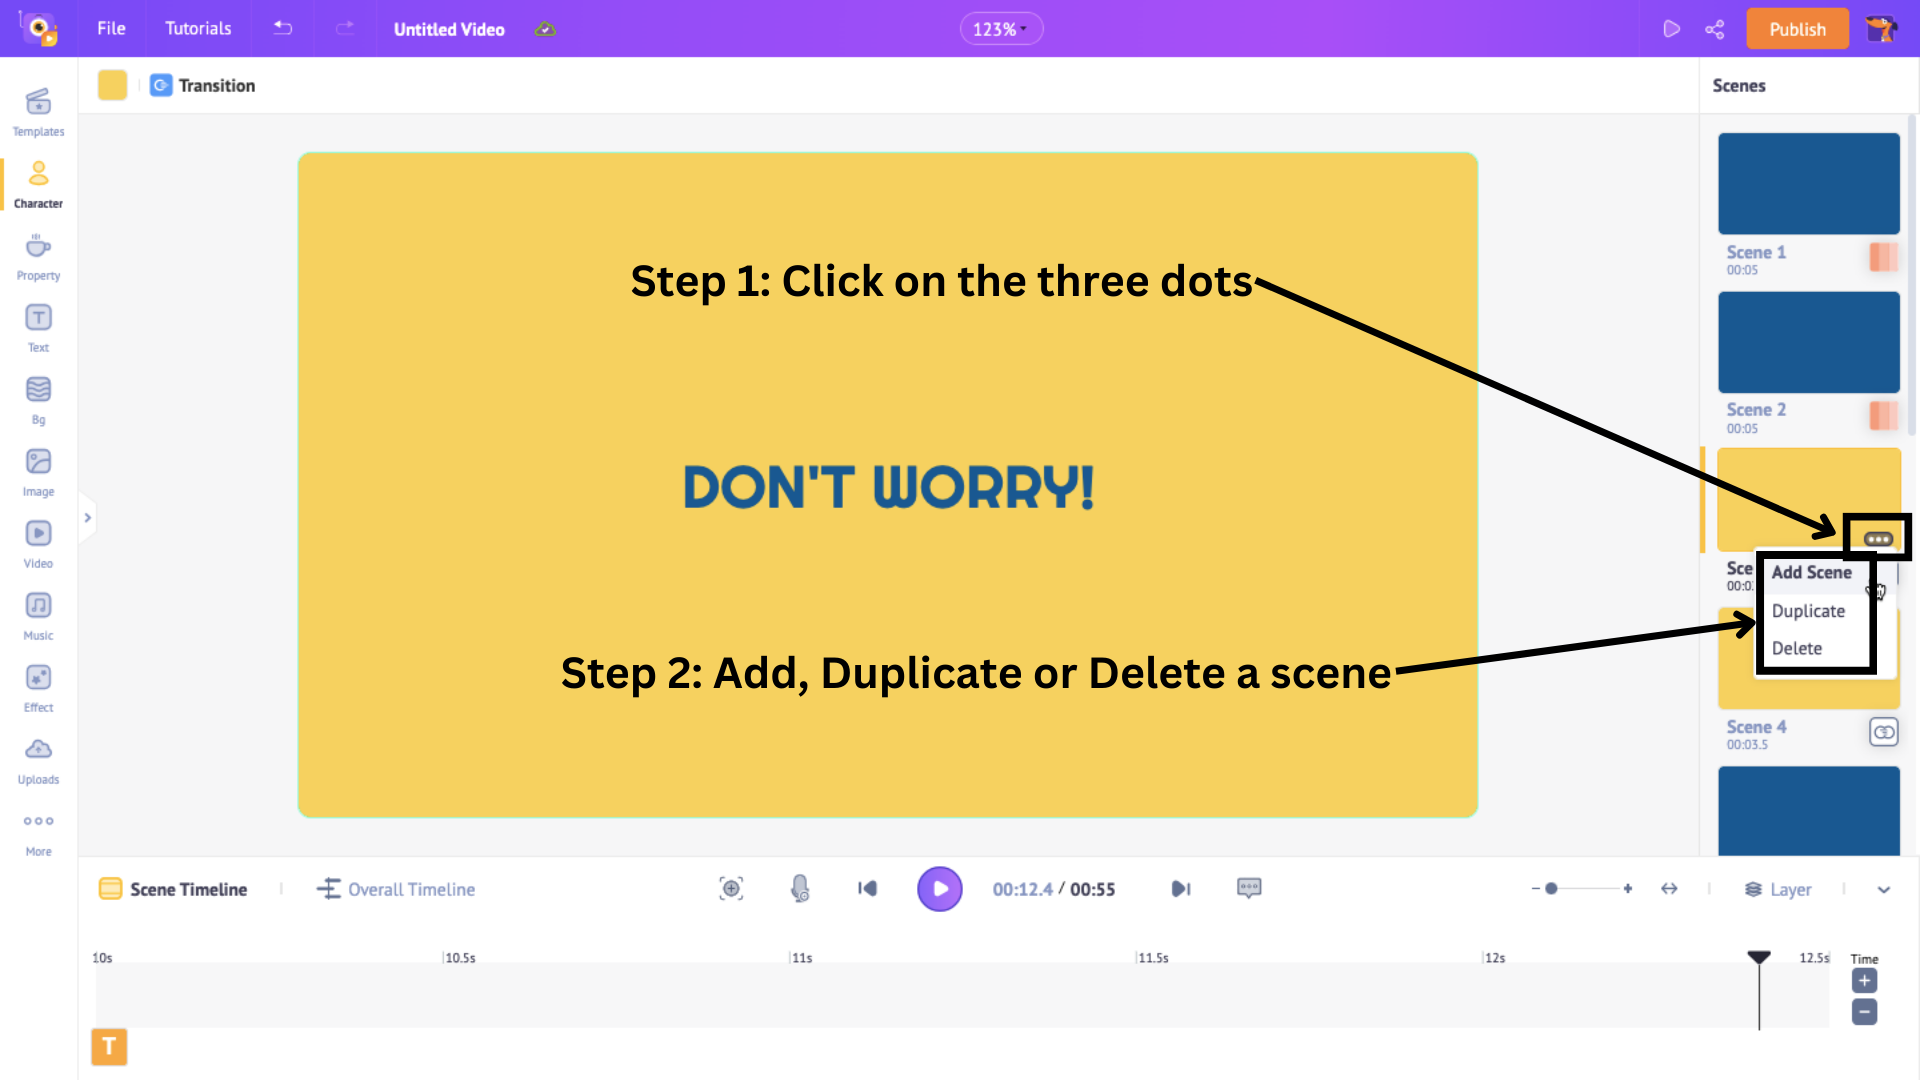
Next, when it comes to scenes, each template has many scenes. But, if you wish to add a new scene and show off your creativity, click on the dots on a scene. This will show three options: Add, Duplicate, and Delete.
Choose Add if you want a blank scene, Duplicate if you want to make a new scene with slight changes to an existing scene, or Delete if you want to delete a scene.
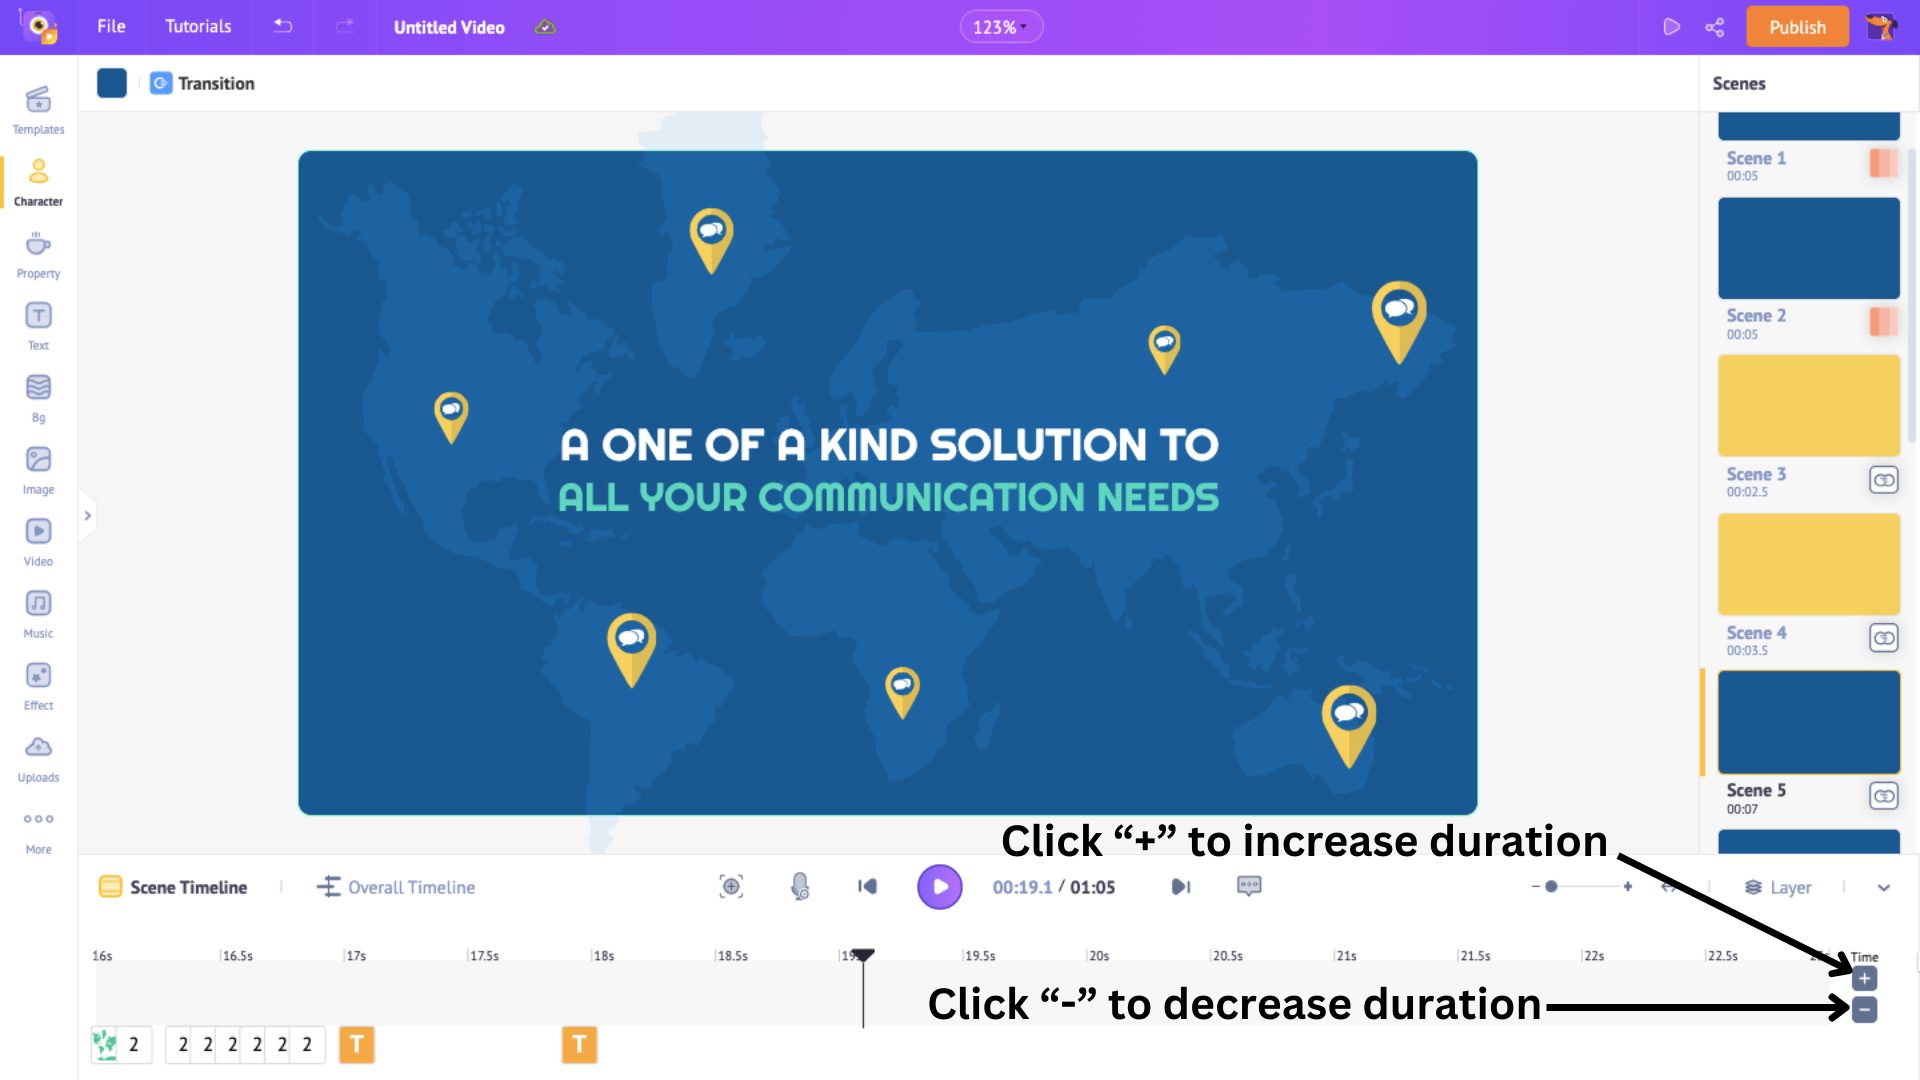
If you choose to add a new scene, the scene duration is set to 10 seconds by default. However, you can adjust the duration by clicking on the “+” and “-” signs on the scene timeline to increase or decrease the scene duration.
This current scene is empty, but you have many options to choose from to add elements.
On the left are library sections like Character, Effect, Property, Image, Video, and much more, containing over 10,000 assets.
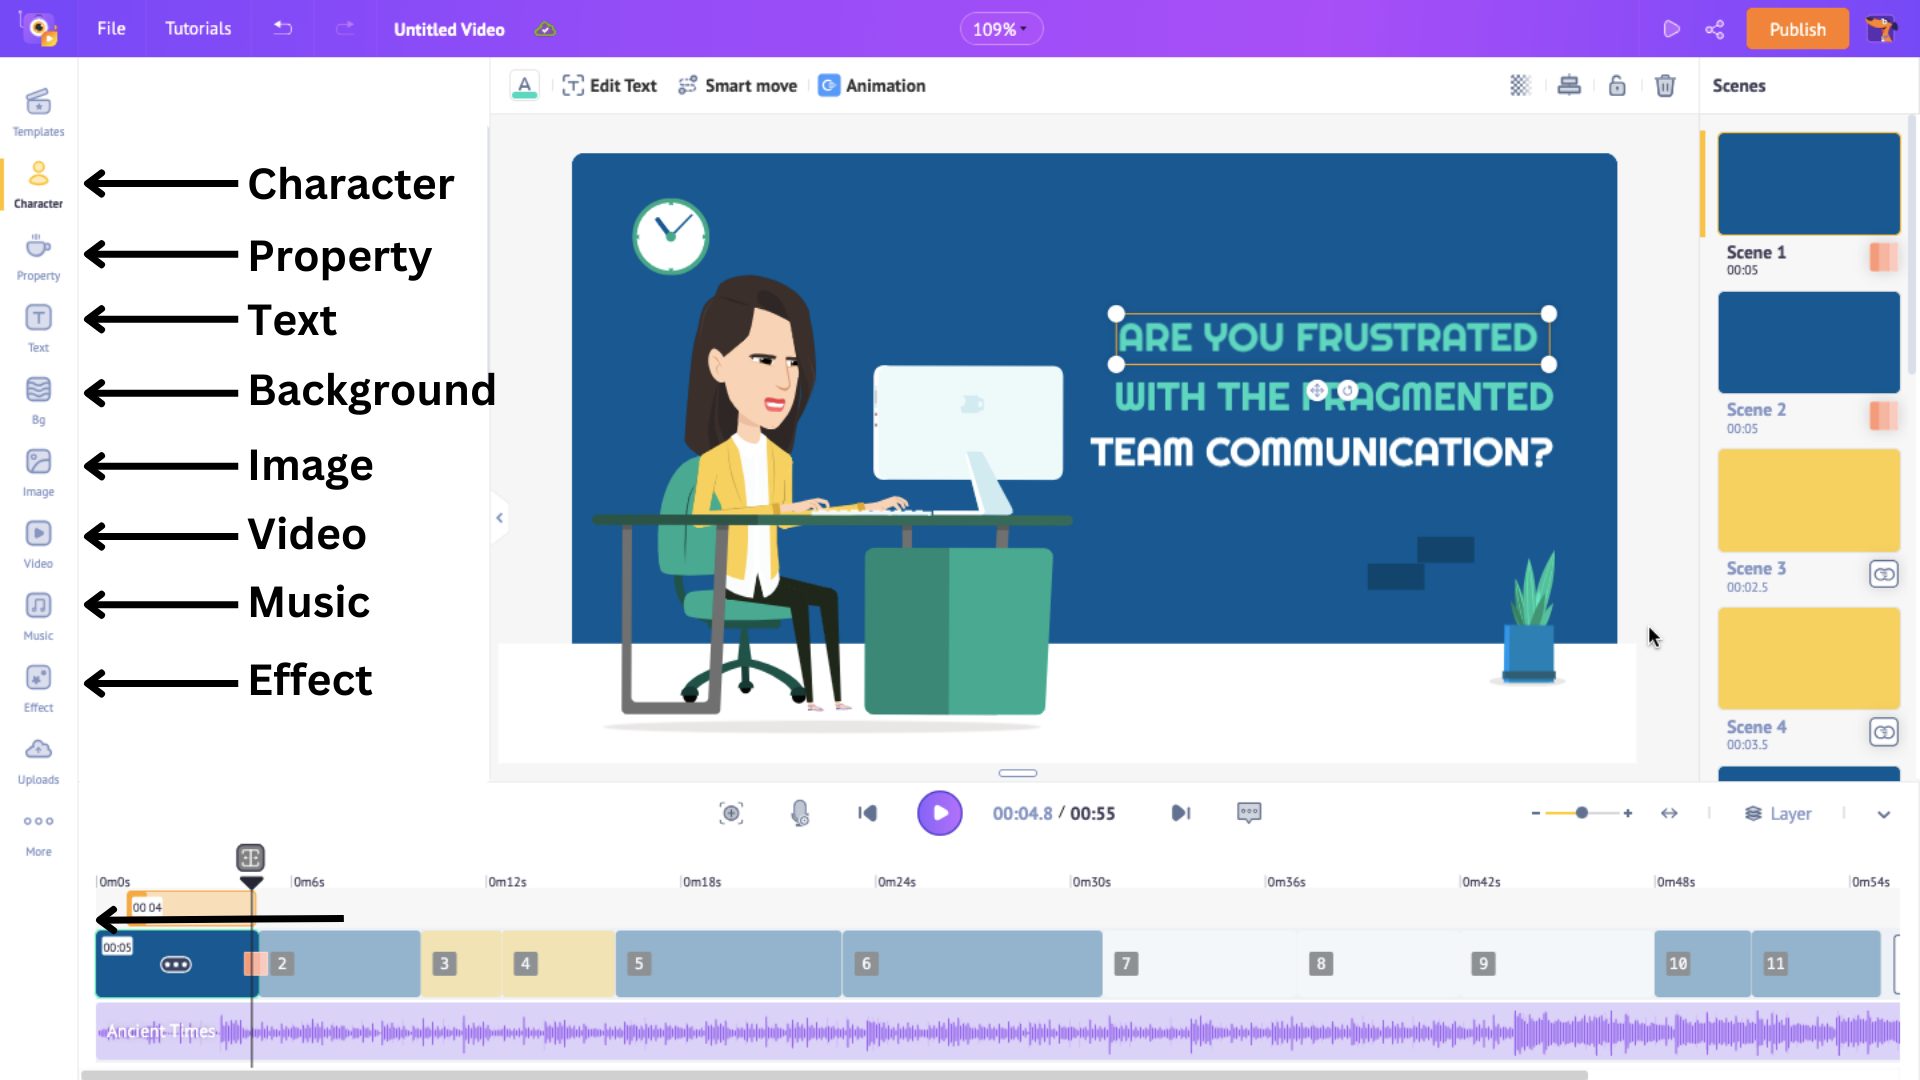
You can use these assets to enhance your explainer video. After you finish adding all the elements, we can move on to the last step.
Step 3: Preview and Download your video
Once you are done making all the necessary changes to all the scenes by swapping/editing the elements in it, you can preview your video by clicking the Preview button.
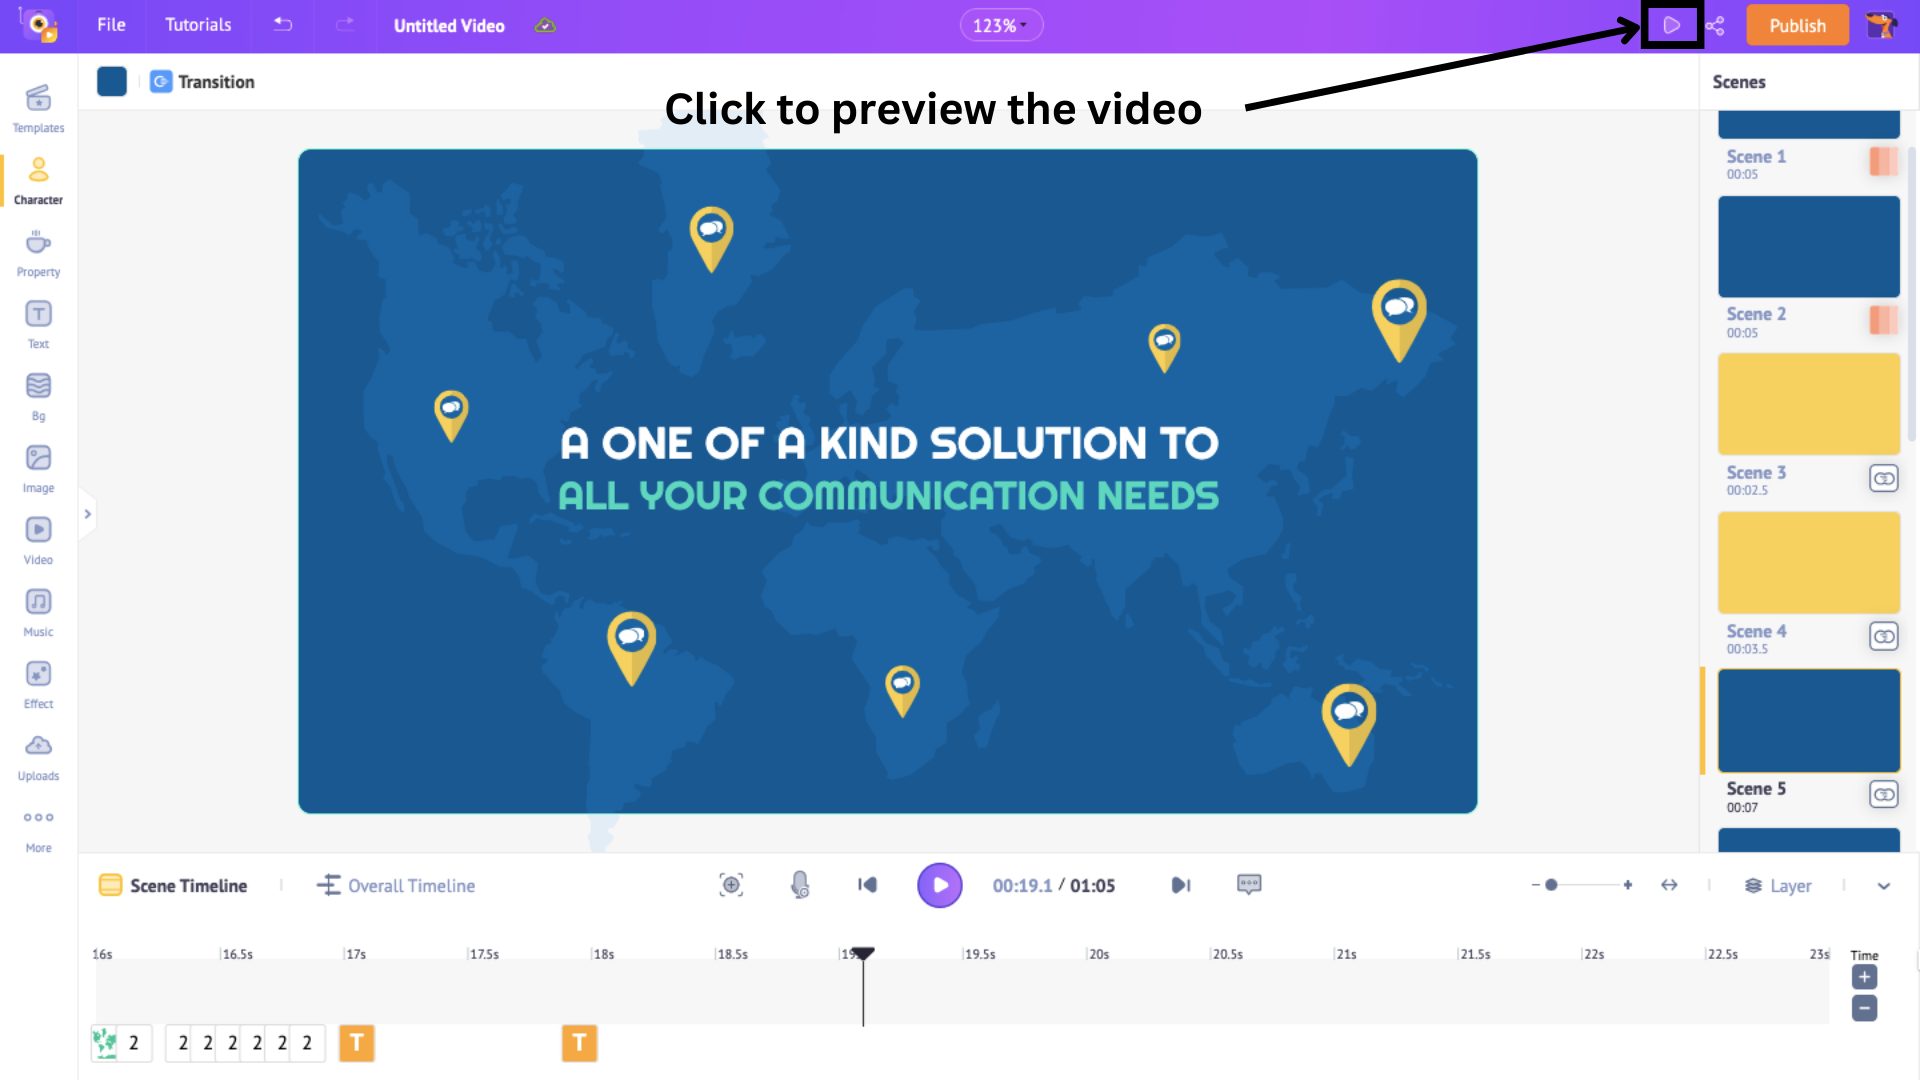
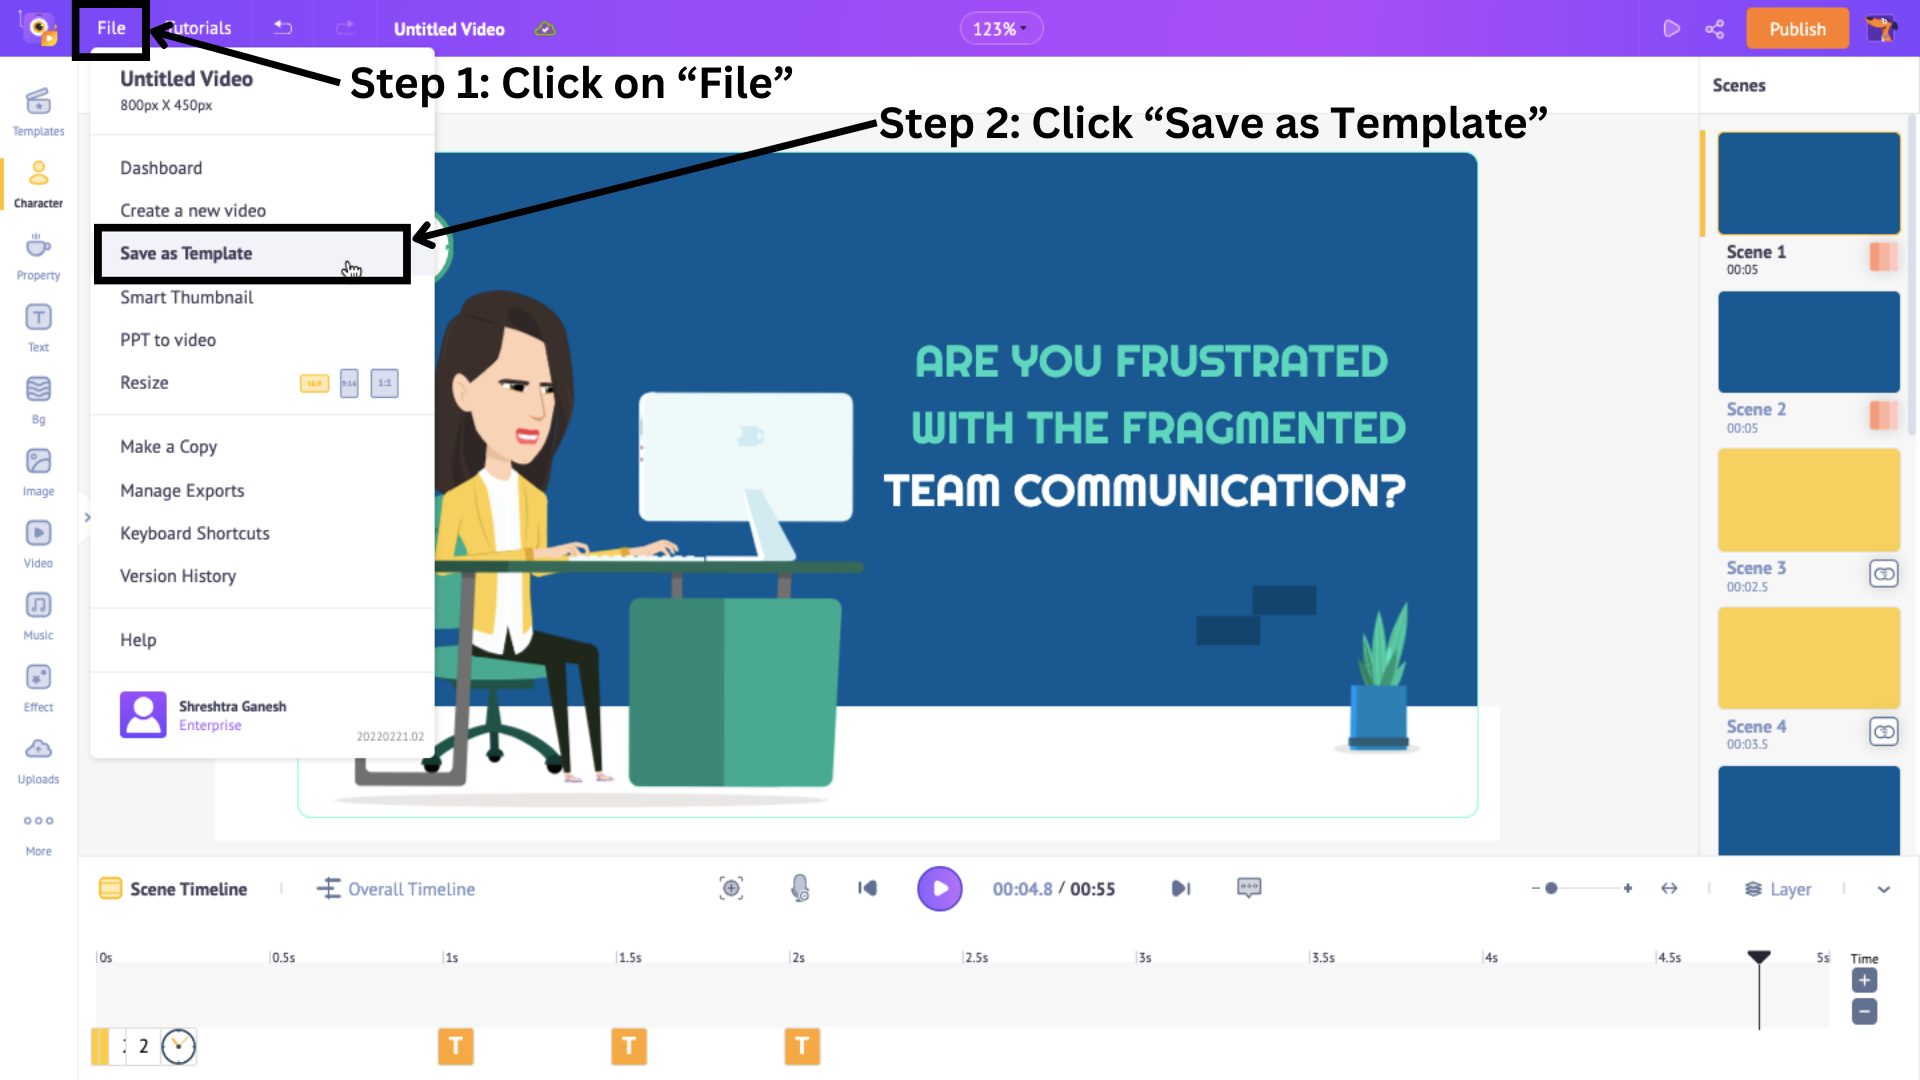
When you’re satisfied with your video, you have the option to save the video as a template for future use! To do so, click the Save as Template option from the File drop-down menu.
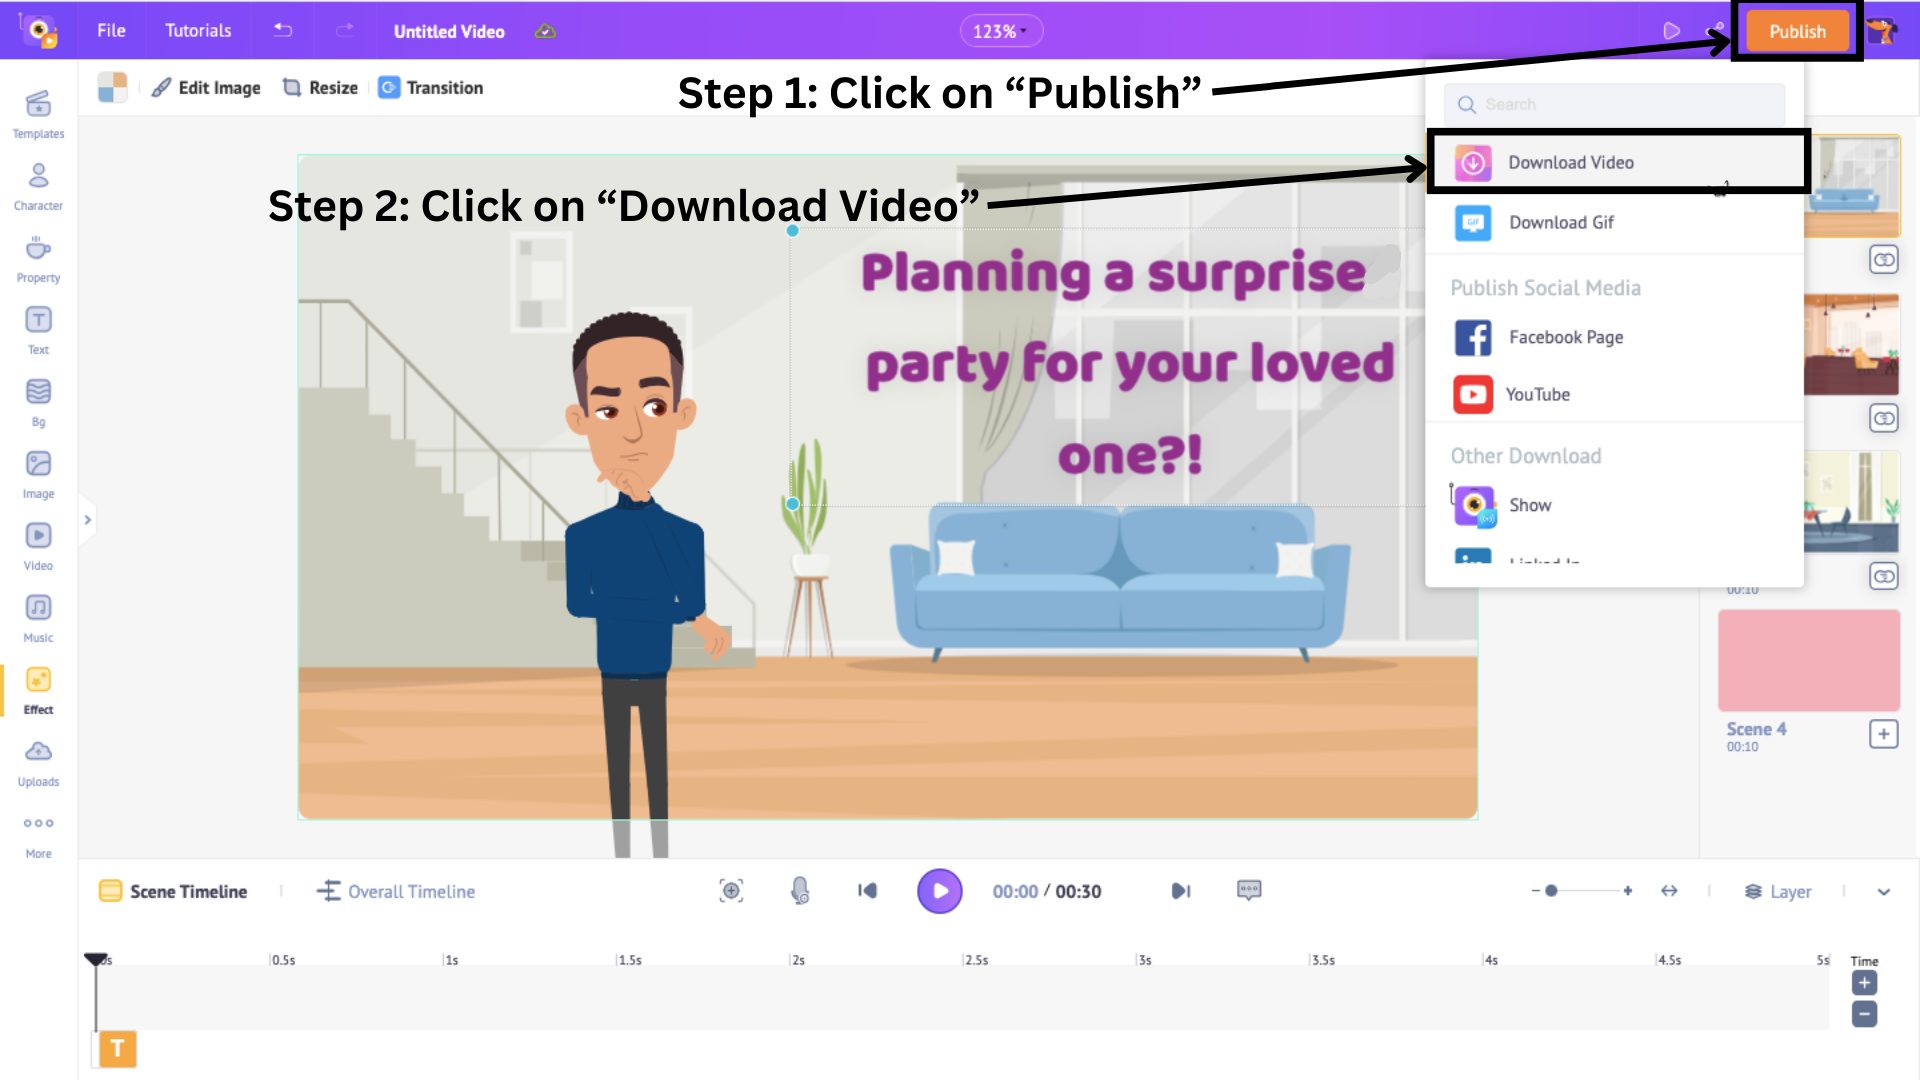
Now, to download the explainer video you just made, click on the Publish button and Download Video.
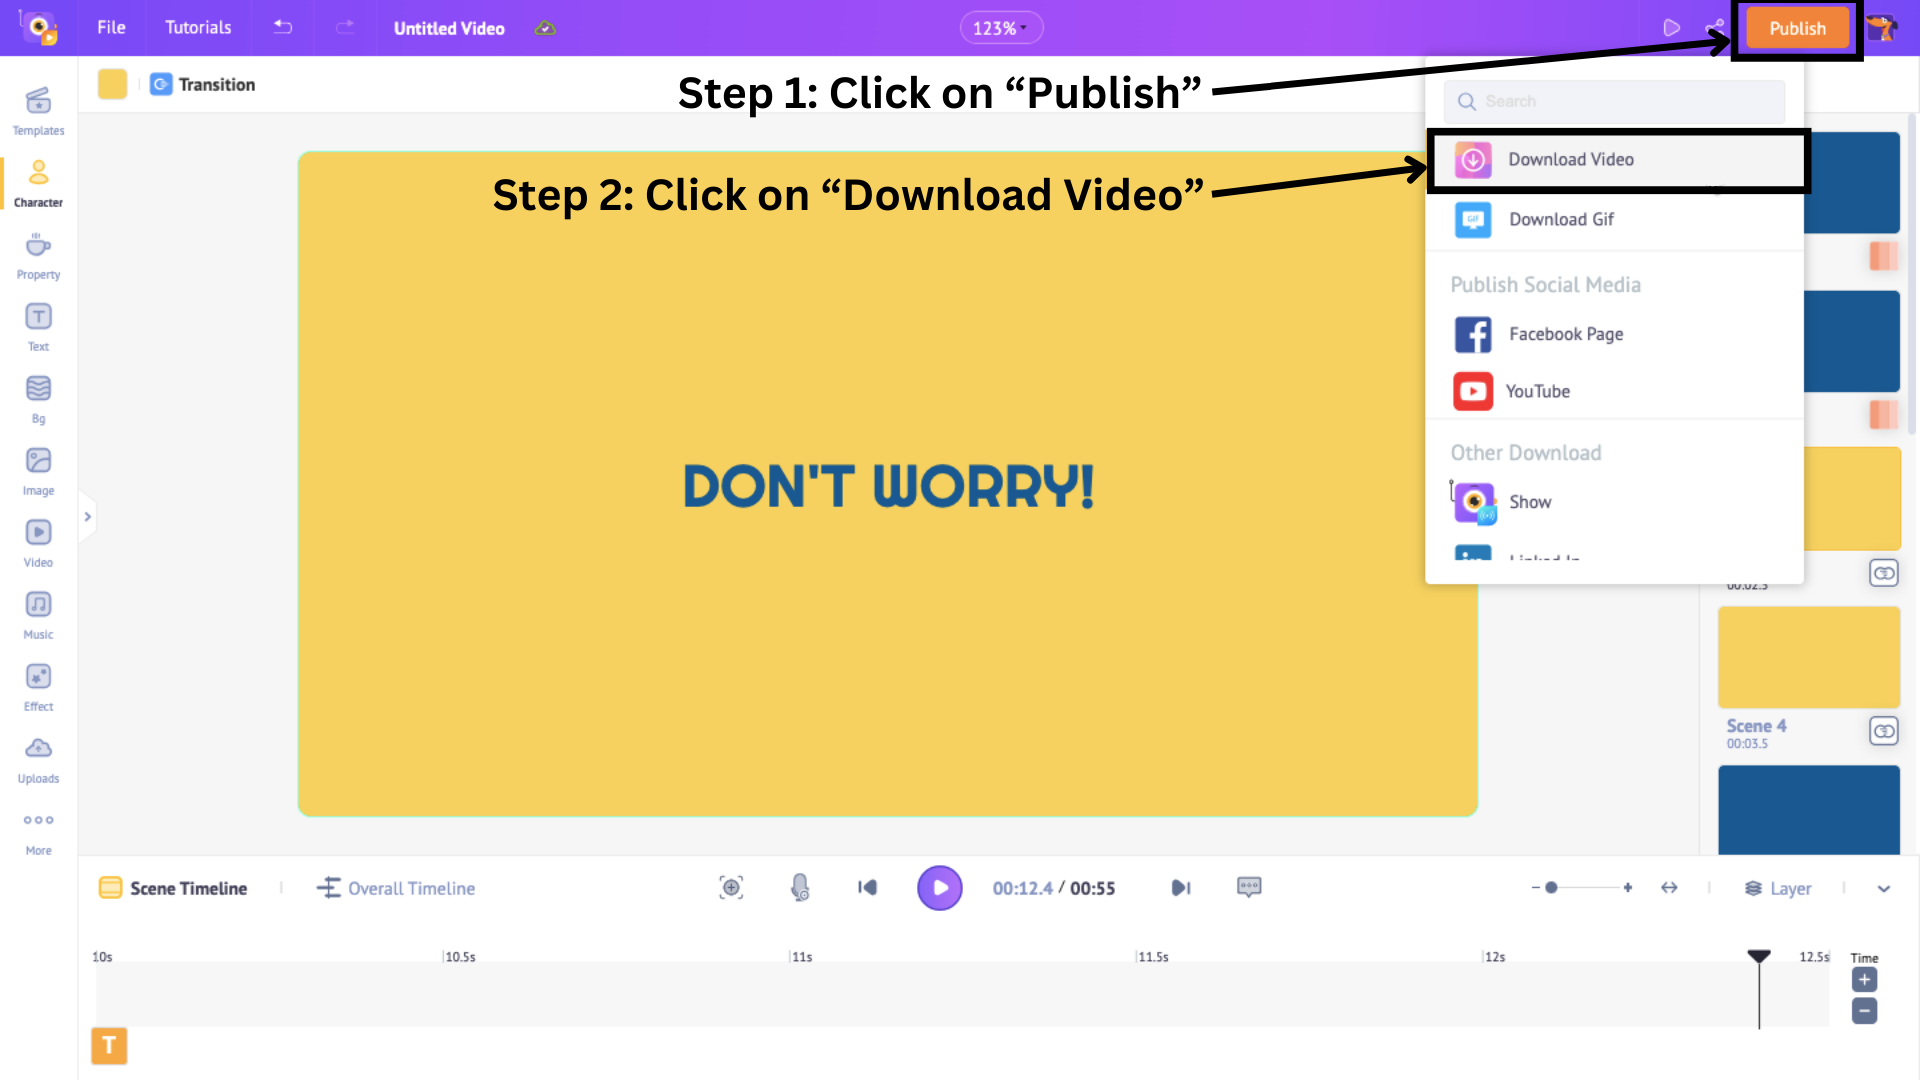
Then, click on Download.
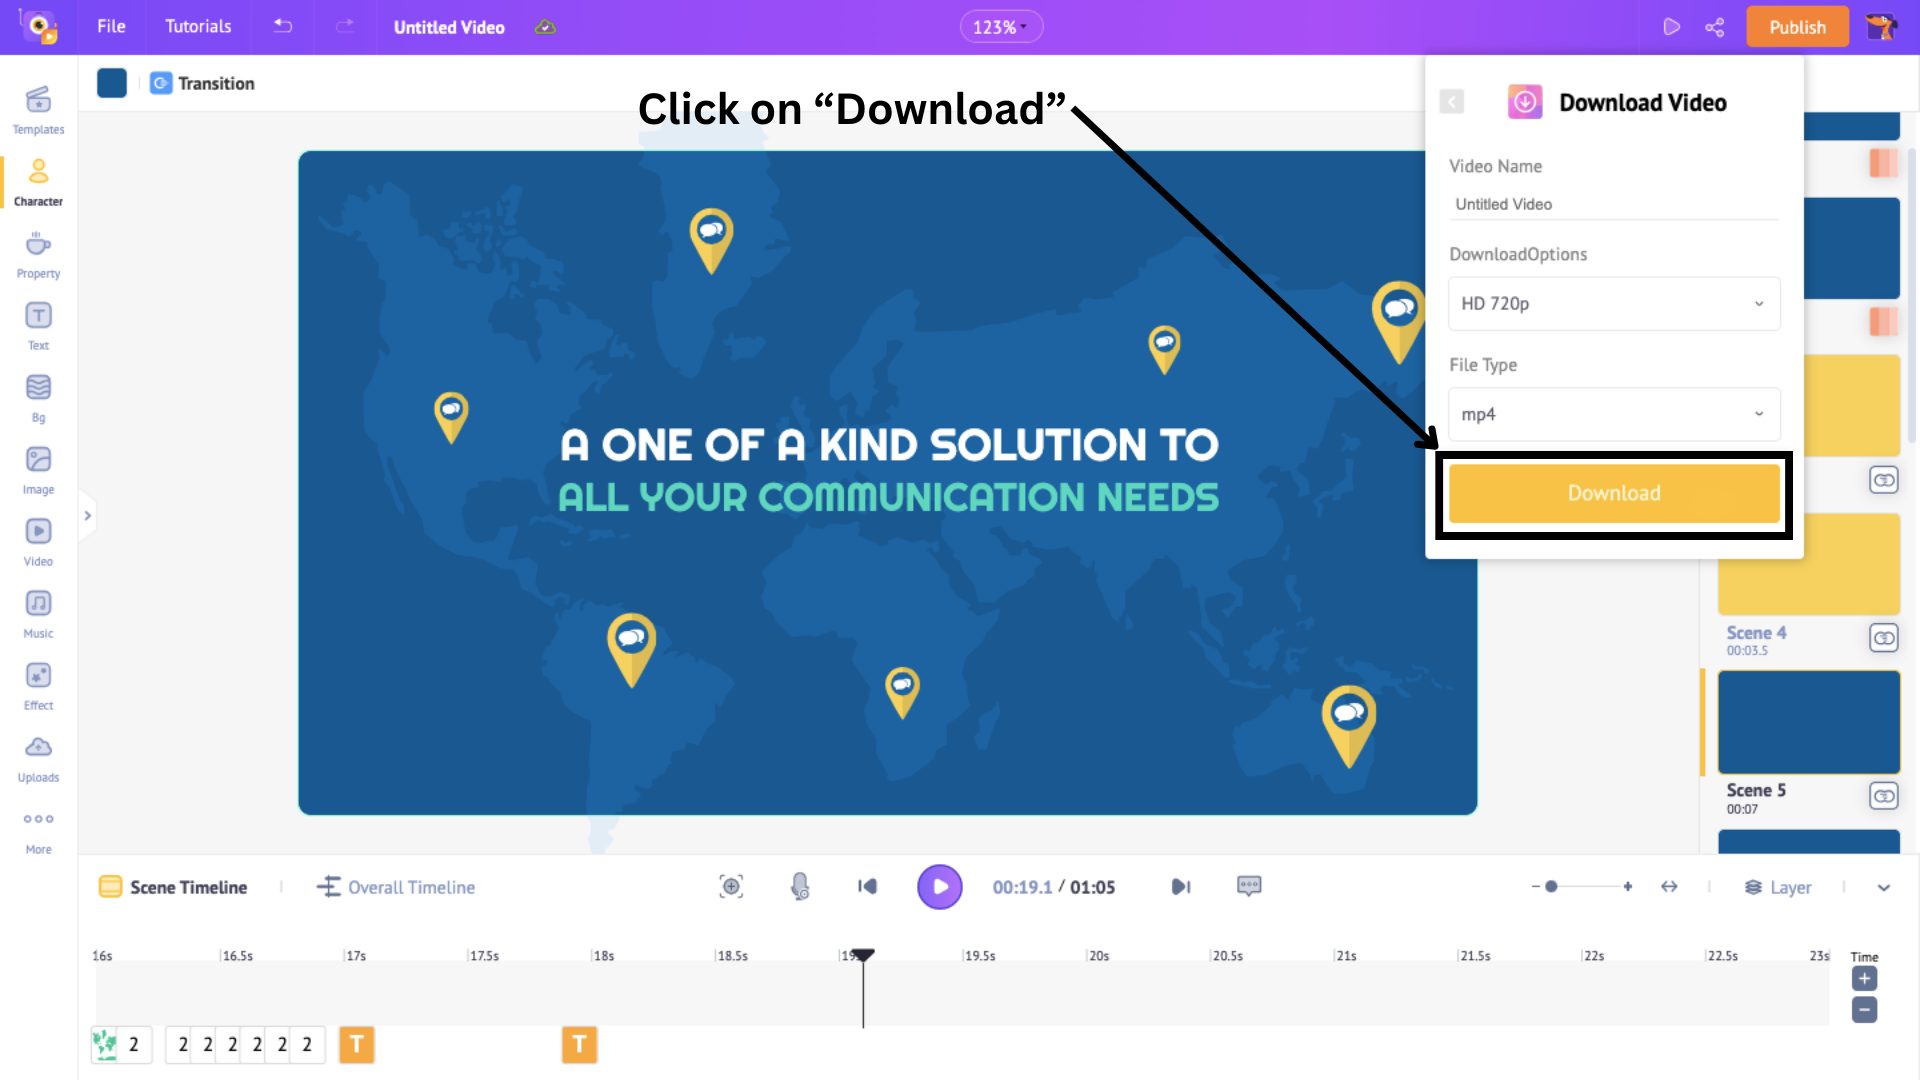
The video gets rendered, and once the video is ready for download, you will receive an email.
Congratulations! You just made an explainer video using a template in just minutes. Let’s see how to create one from scratch.
2. How to make an Explainer Video from scratch
Creating an explainer video from scratch gives you more creative freedom to design and produce a unique video that suits your specific needs and preferences.
If you are interested in creating an explainer video from scratch, check out the video guide below.
If you want to learn from a textual guide, continue to read on. Creating an explainer video from scratch involves three steps and a lot of fun.
Step 1: Create a blank project
Step 2: Add elements to the video
Step 3: Preview and Download your video
Step 1: Create a blank project
As a first step, visit Animaker and login if you already have an account, or sign up if you’re new.
On the dashboard, click on Create.
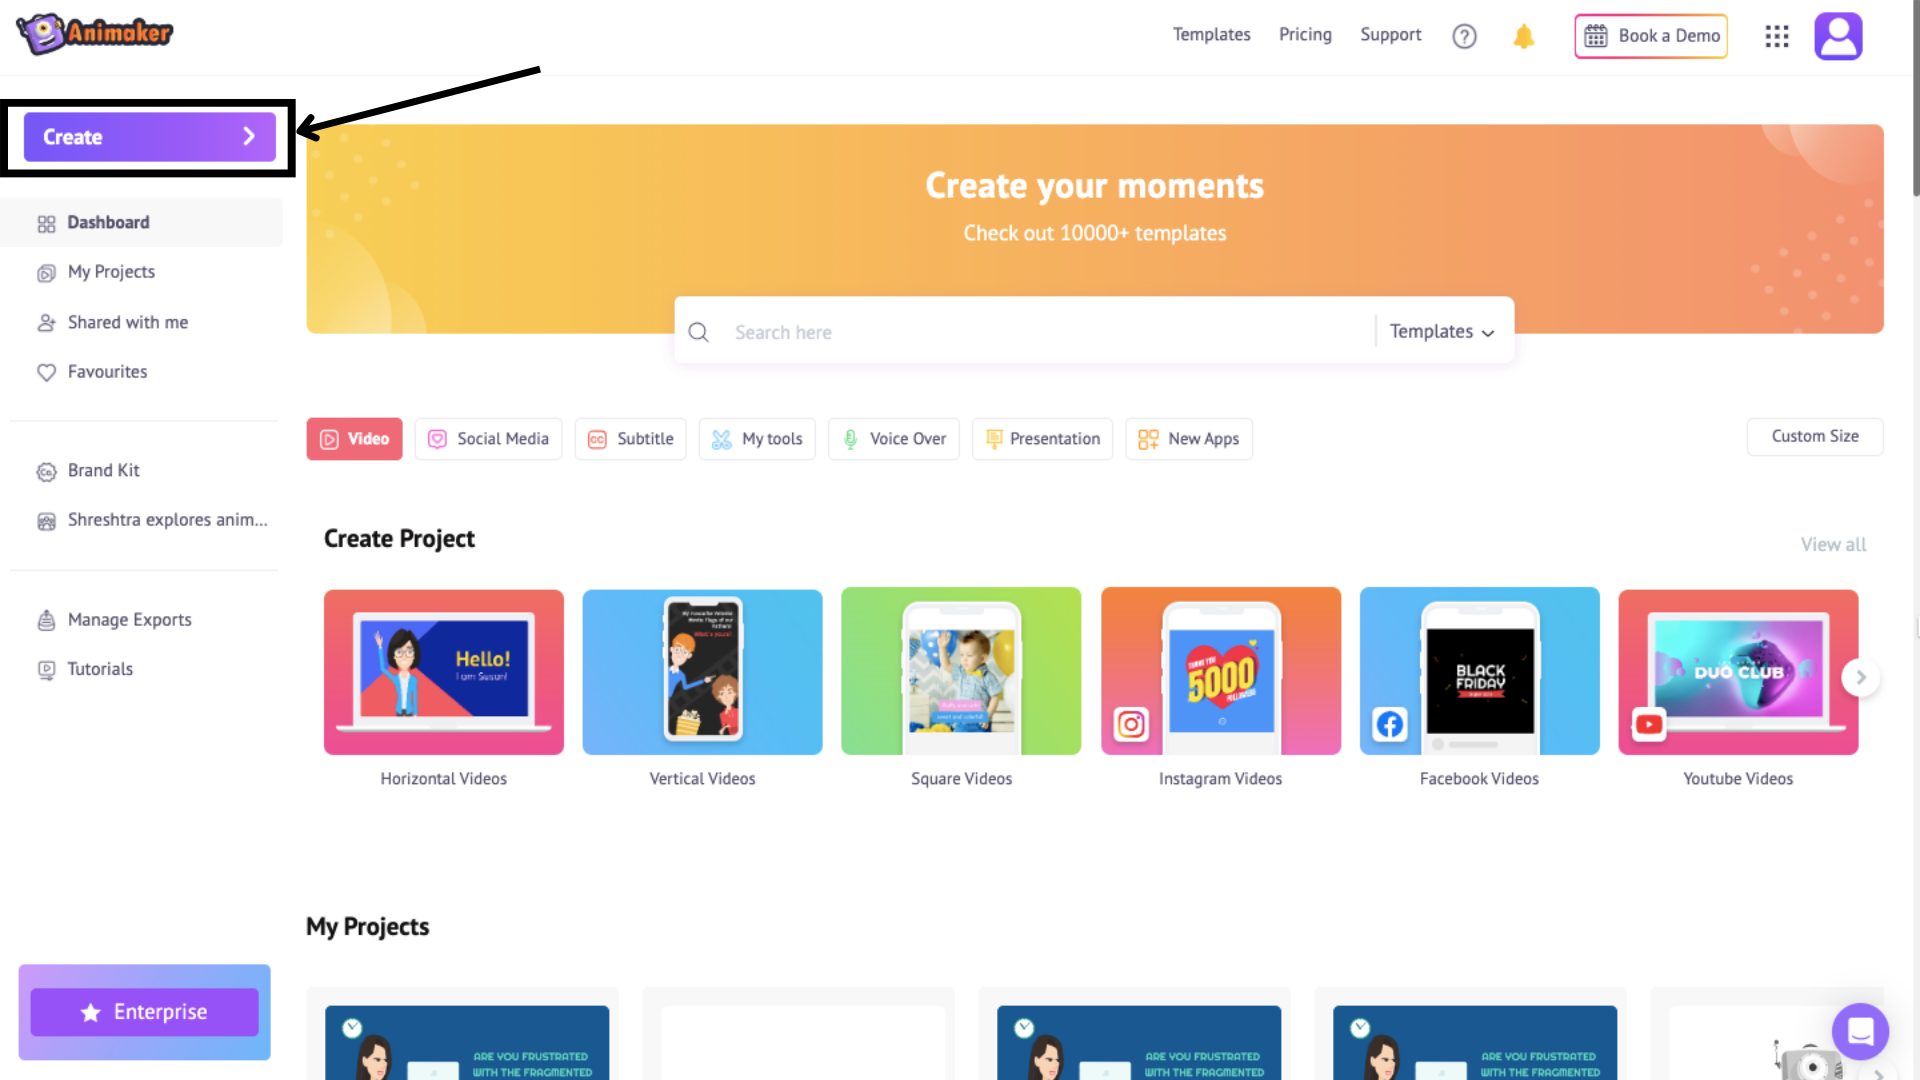
Then click on Create a Video > Blank Page.
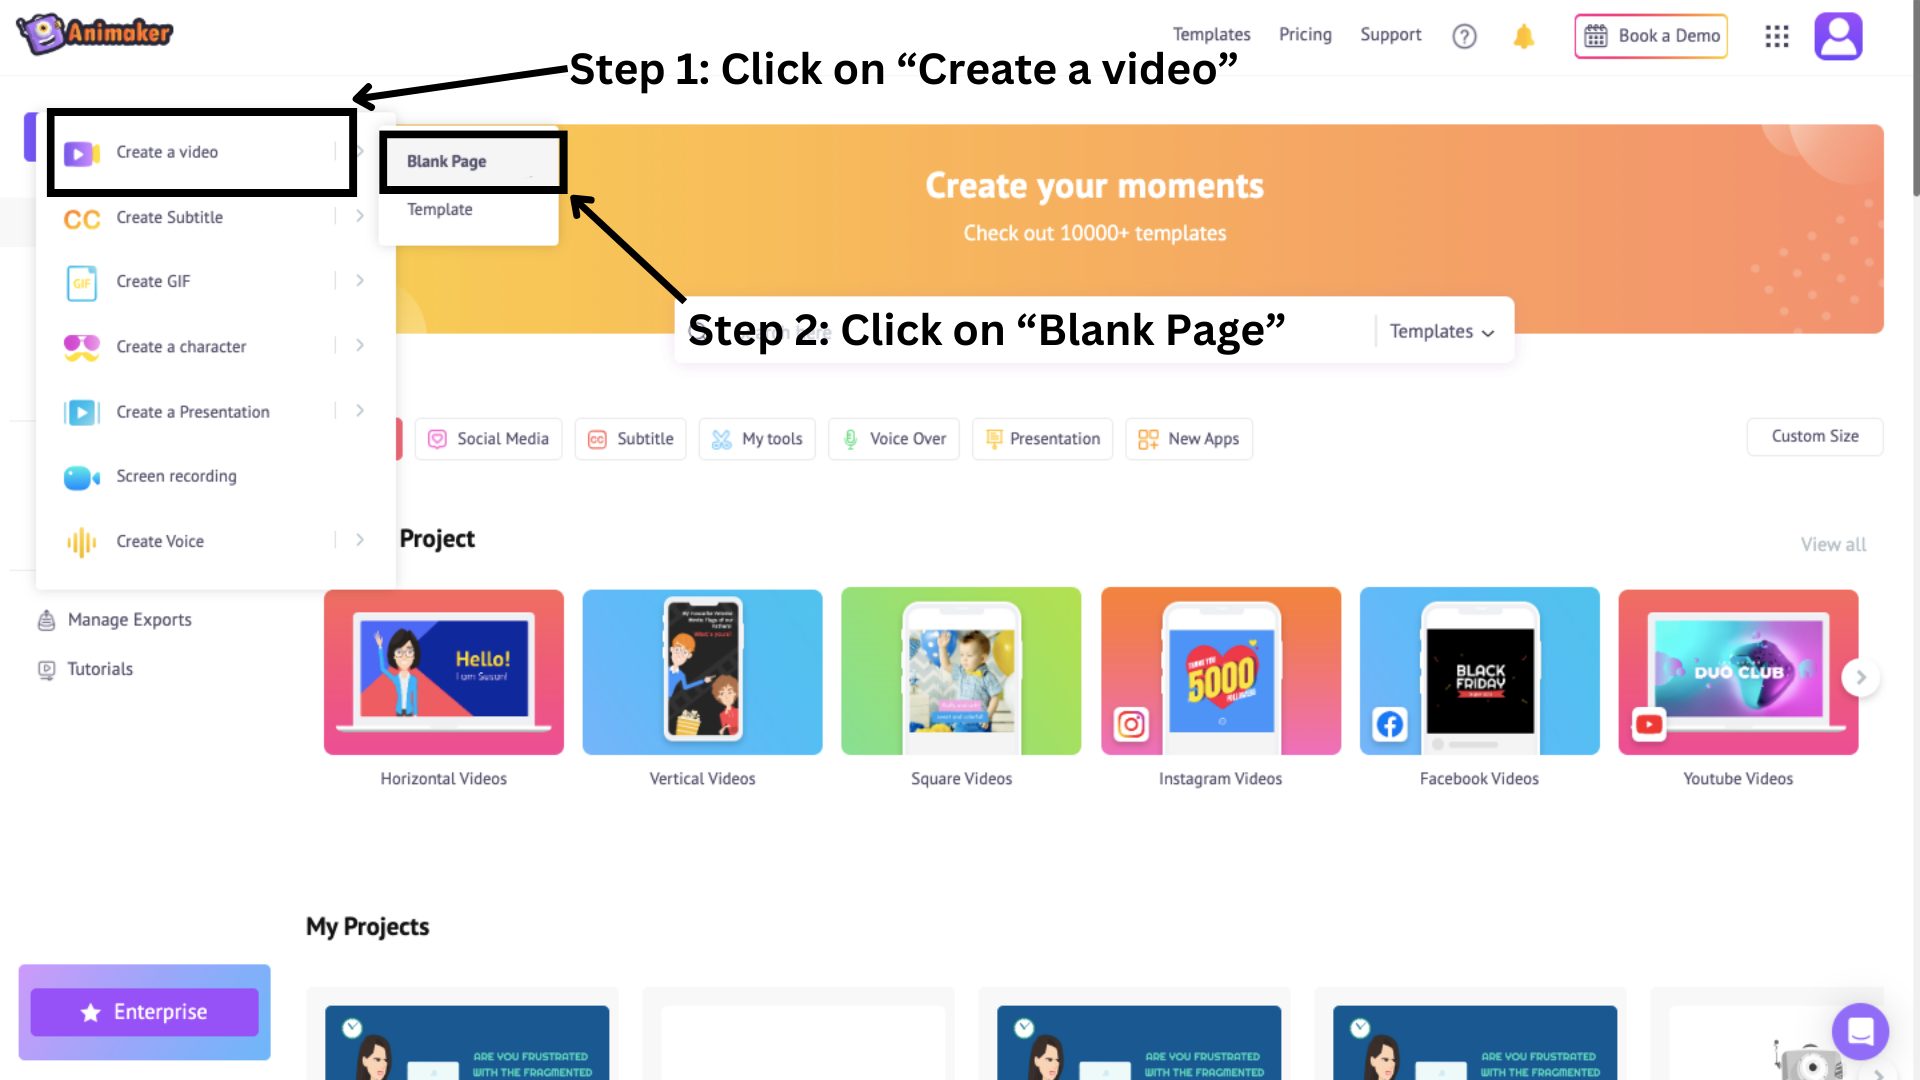
This will open a blank project. Now, let’s first get accustomed to the interface.
The workspace is in the center of the screen, where you can create and edit your video. You can find the library on the left, which contains hundreds of assets.
The scenes section on the right allows you to manage and organize your scenes. Above the workspace is a menu bar providing additional options and tools, and at the bottom is the timeline that allows you to adjust your video and its assets with precision.
Now, before creating an explainer video, it is important to have an effective script for your video.
Once your script is ready, you can start making an explainer video.
Step 2: Add elements to the video
We are going to transform this blank project into a colorful and engaging explainer video by making use of the elements and assets from the library.
The library comprises of diverse sections such as backgrounds, characters, properties, and more.
Let’s explore some of these sections to create an explainer video.
1. Background
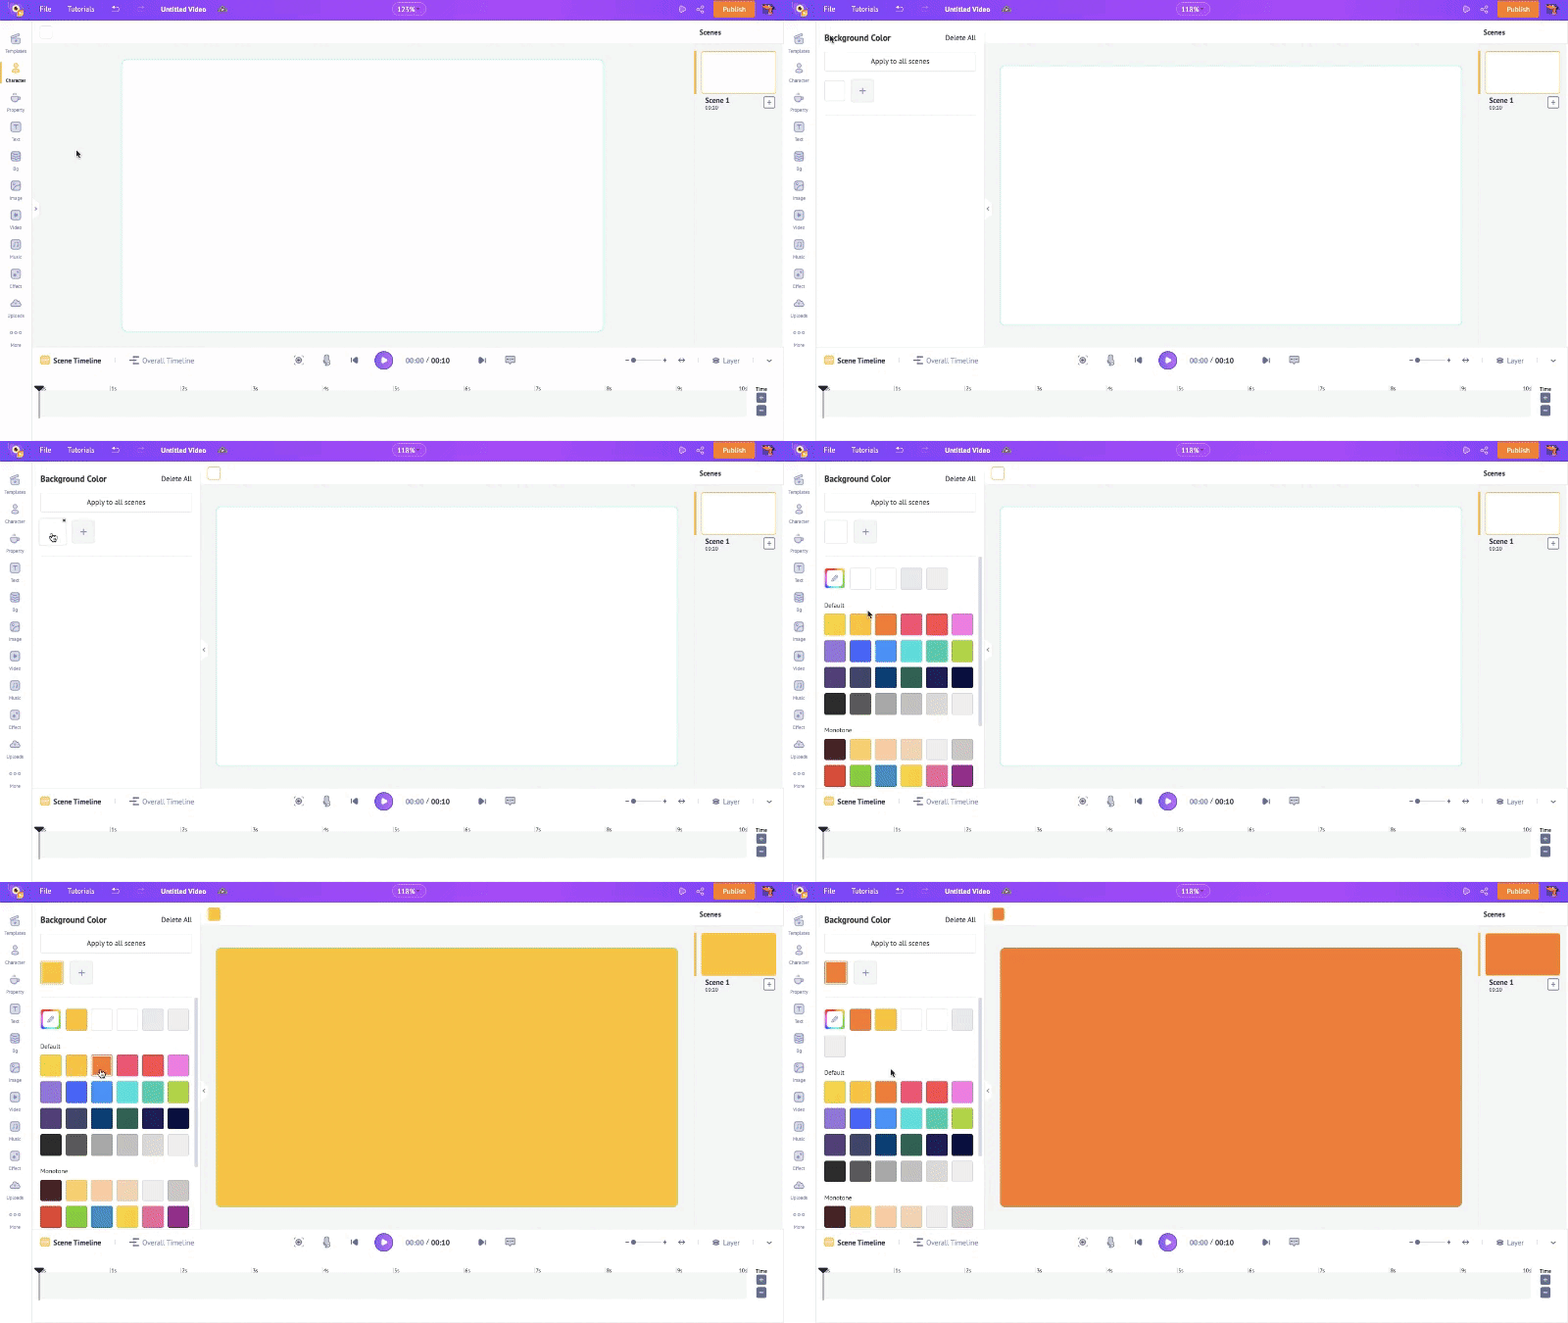
You can start off by choosing a background for your video. If you want a solid color background, you can choose by clicking on the tiny box above the workspace.
This will open a color panel, where you can choose your preferred color by clicking on the default color and exploring other options.
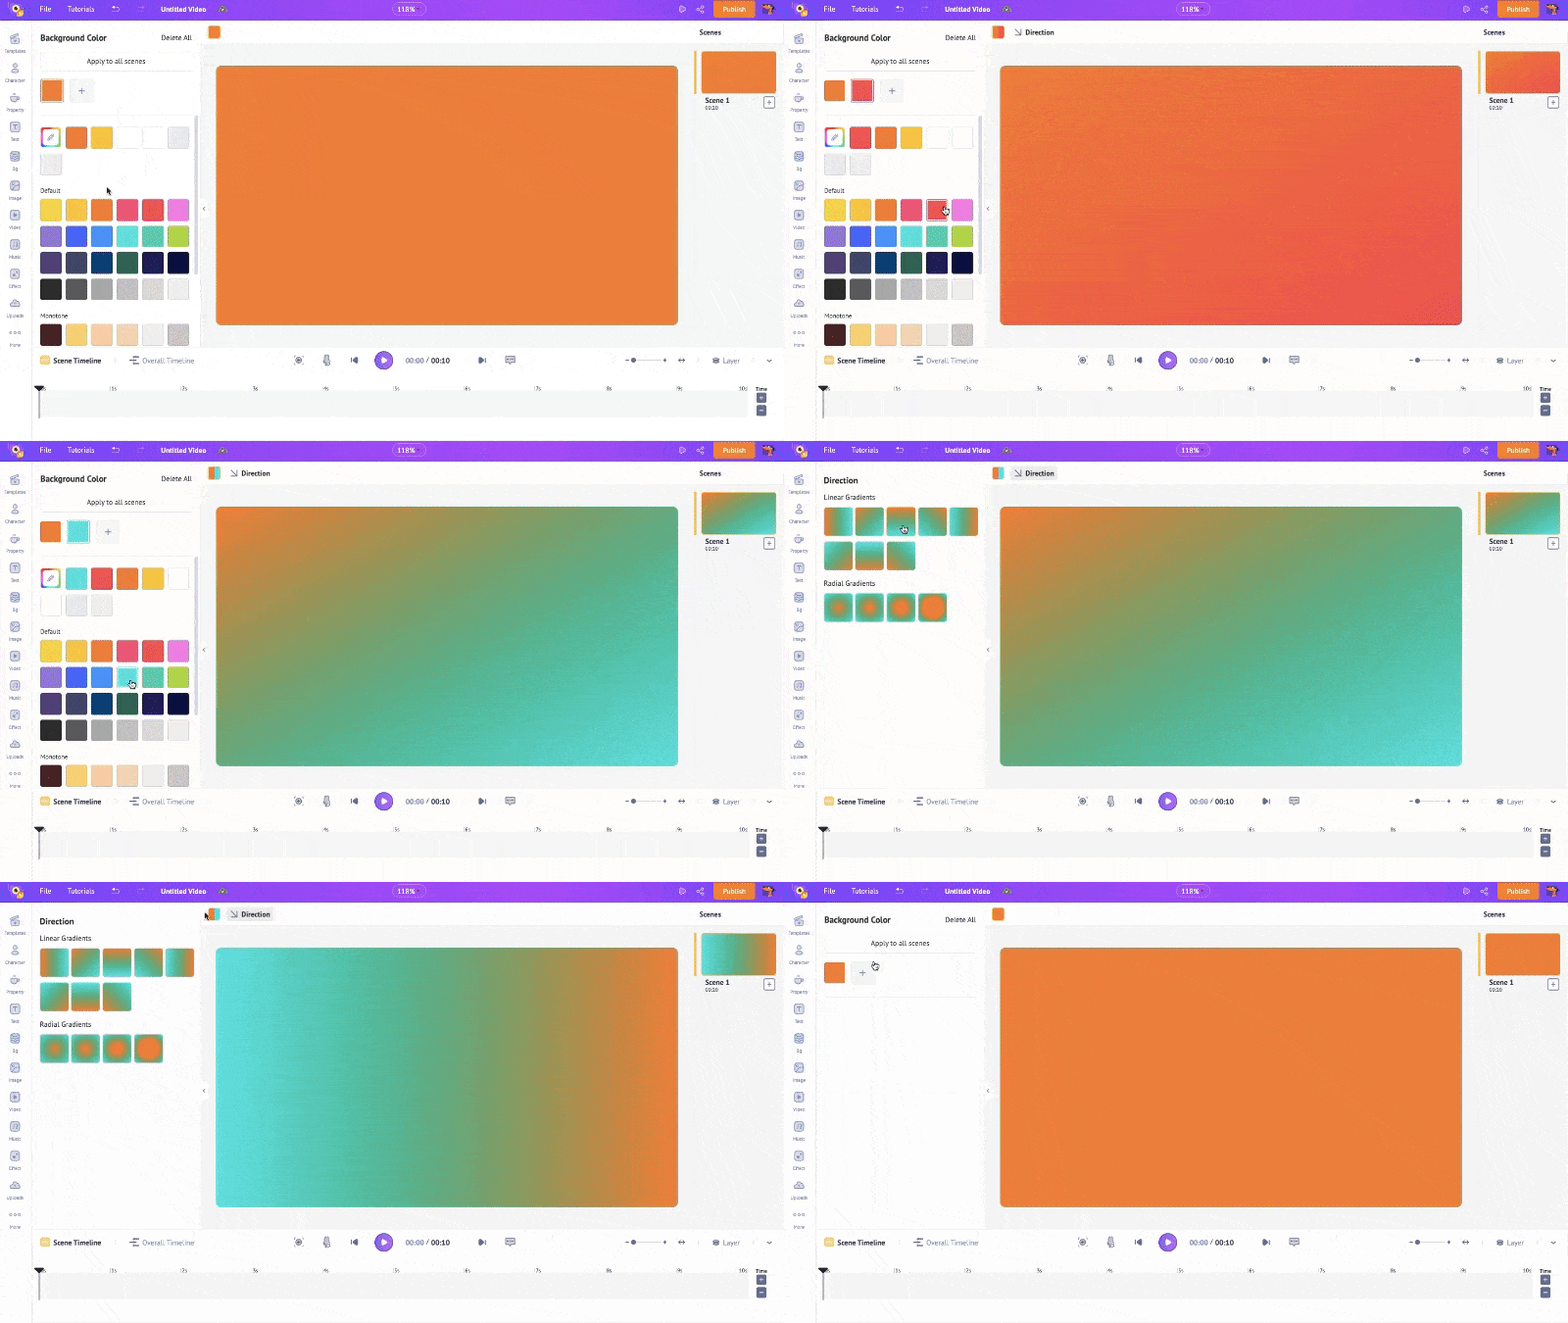
Or, if you want a gradient, you can click on the “+” sign next to the primary color. You can also change the gradient direction by clicking on the Direction option above the workspace.
Now, if you want a scenic background instead of solid colors or gradient backgrounds, click on the Bg option in the library.
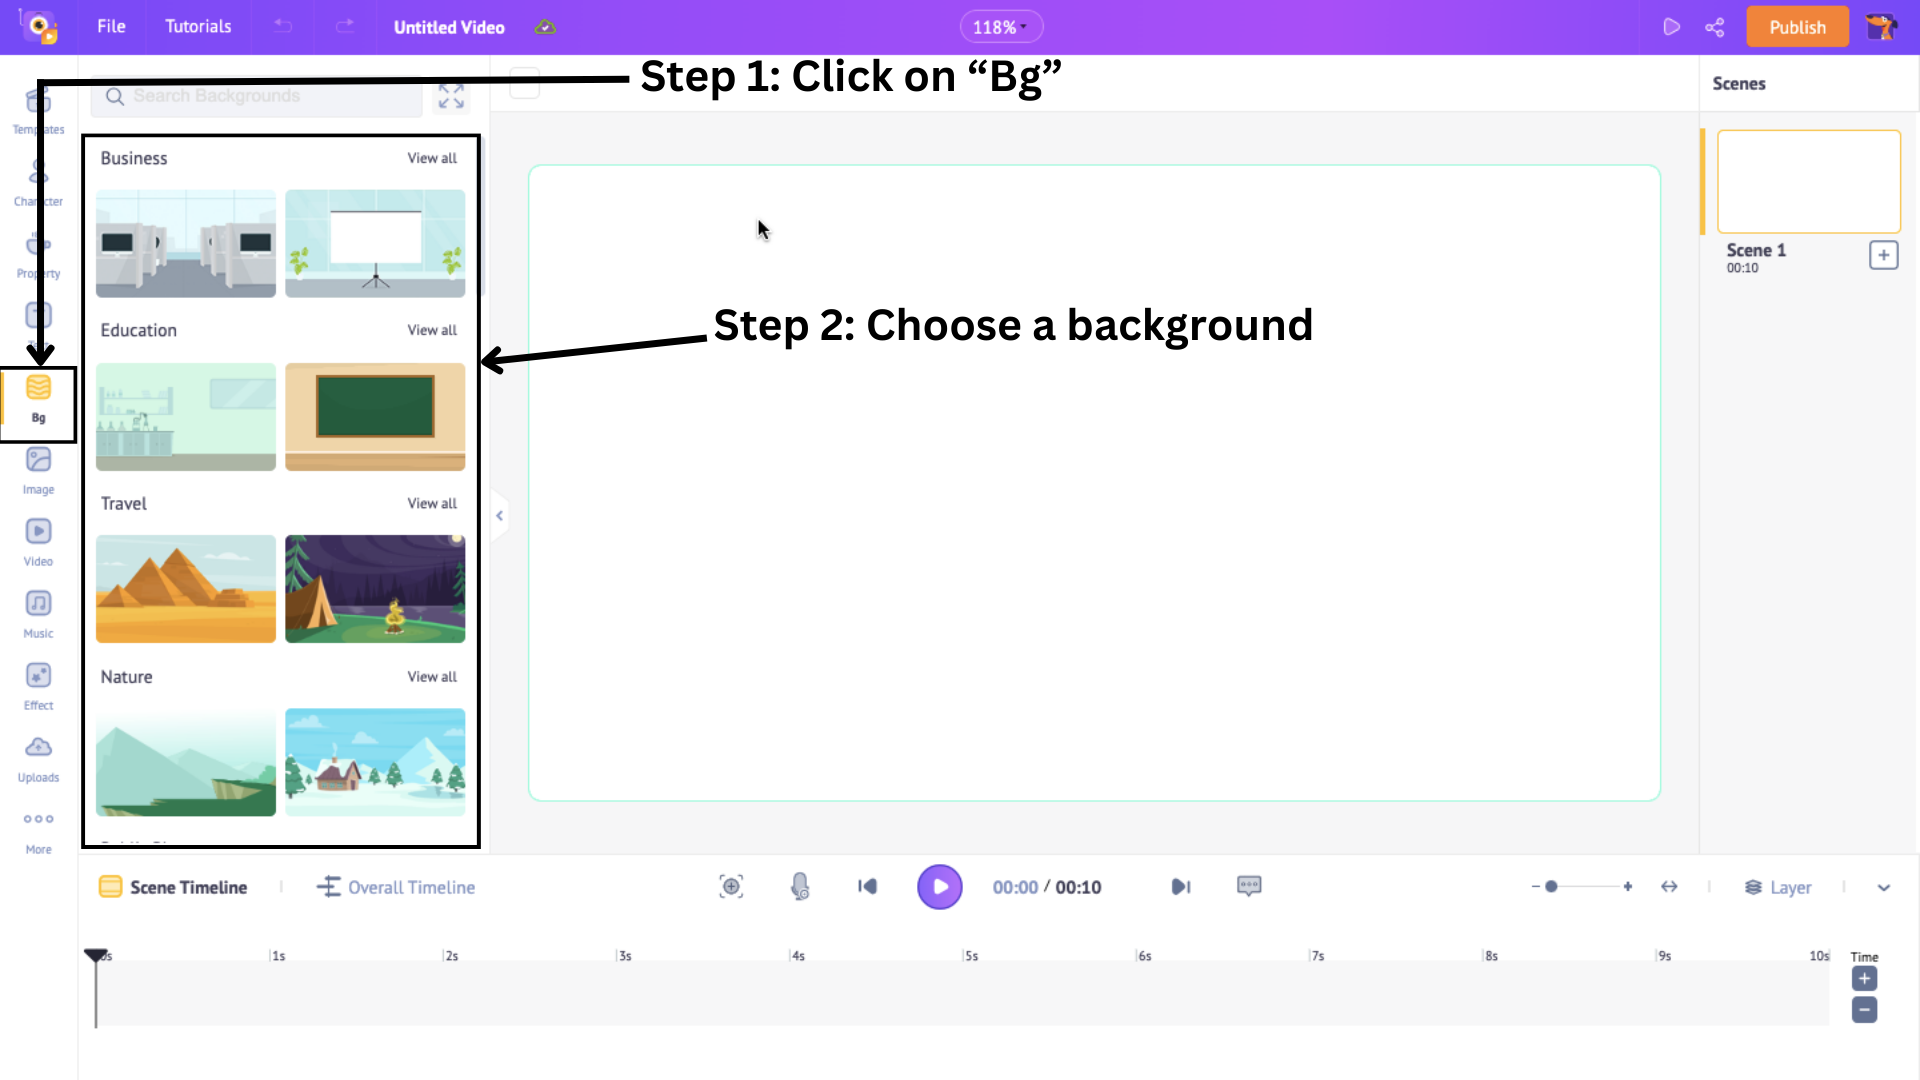
With more than 100s of options of different themes on the list, choose one that suits your brand the best.
You can change the colors of the background elements by clicking on the Change Color box above the workspace. Then, click on the individual colors to change them.
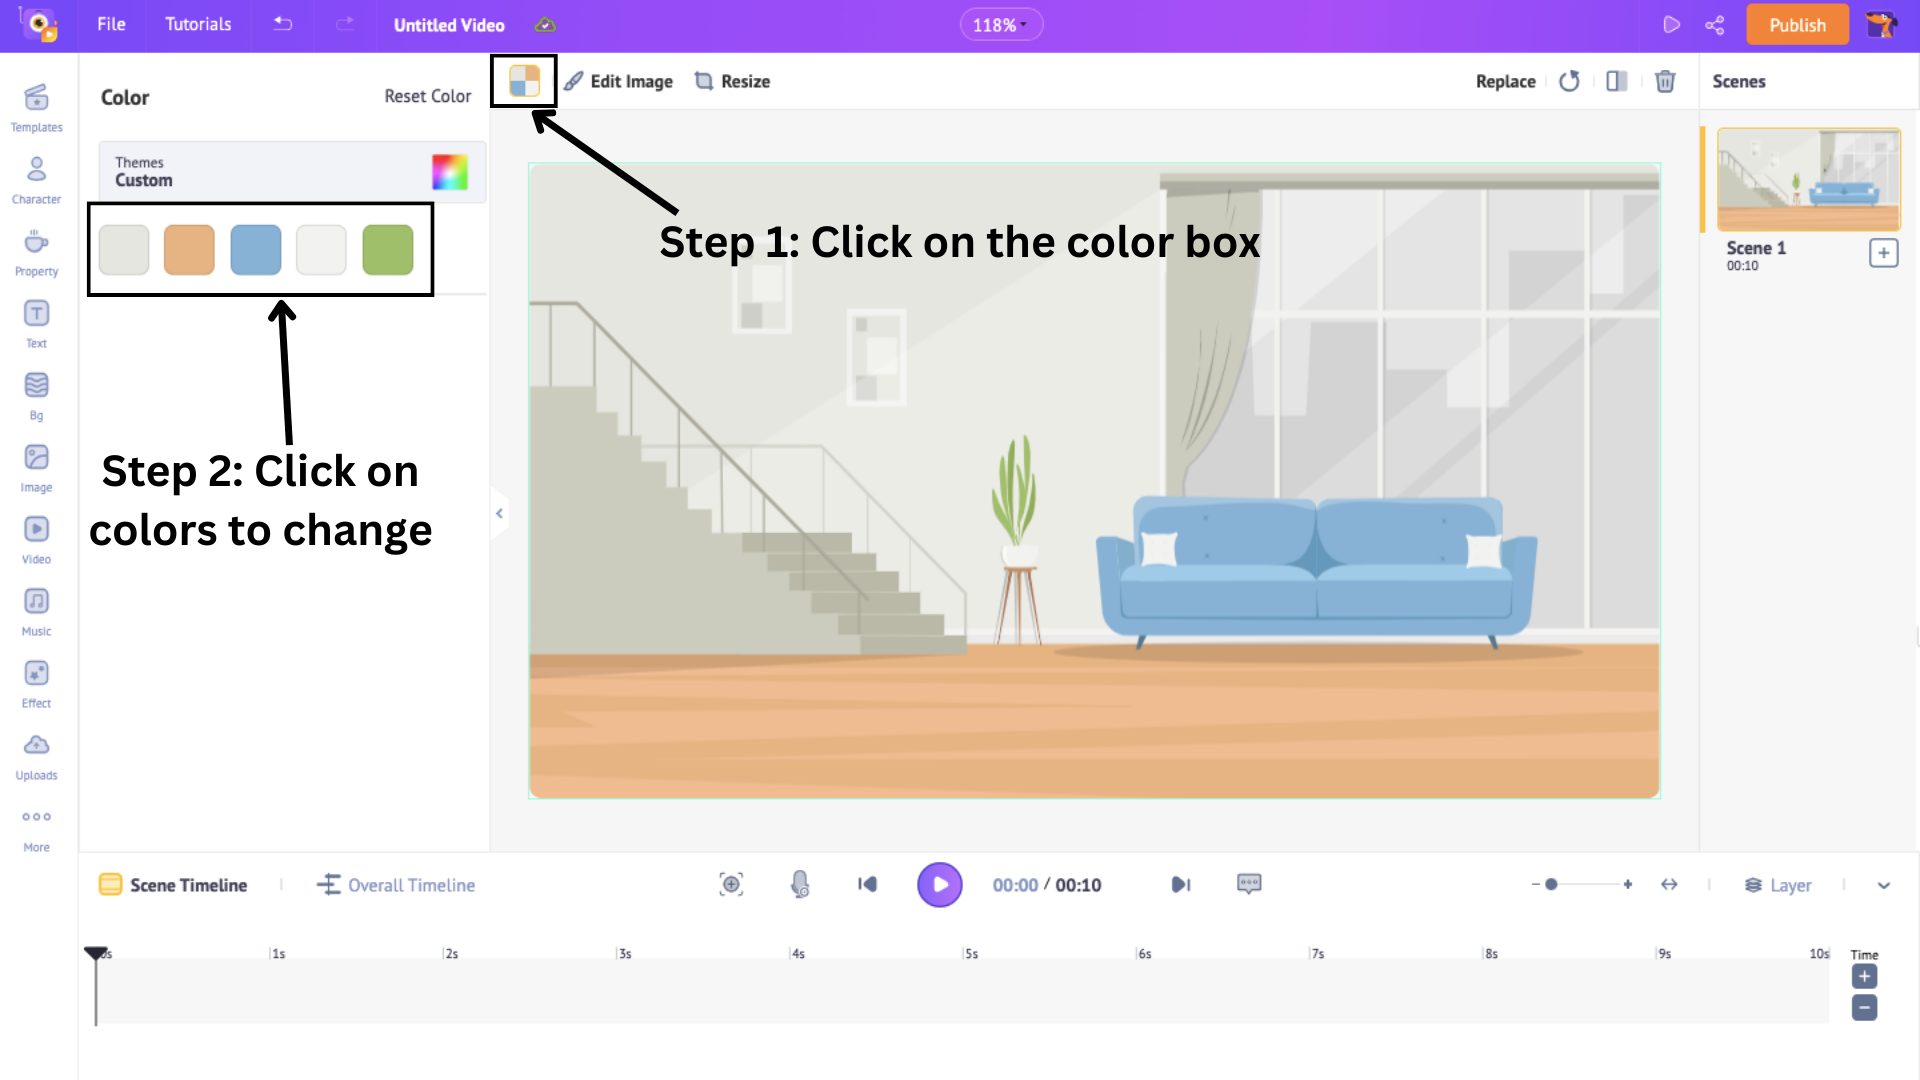
You can also add filters, adjust the brightness, and more by clicking on the Edit image option.
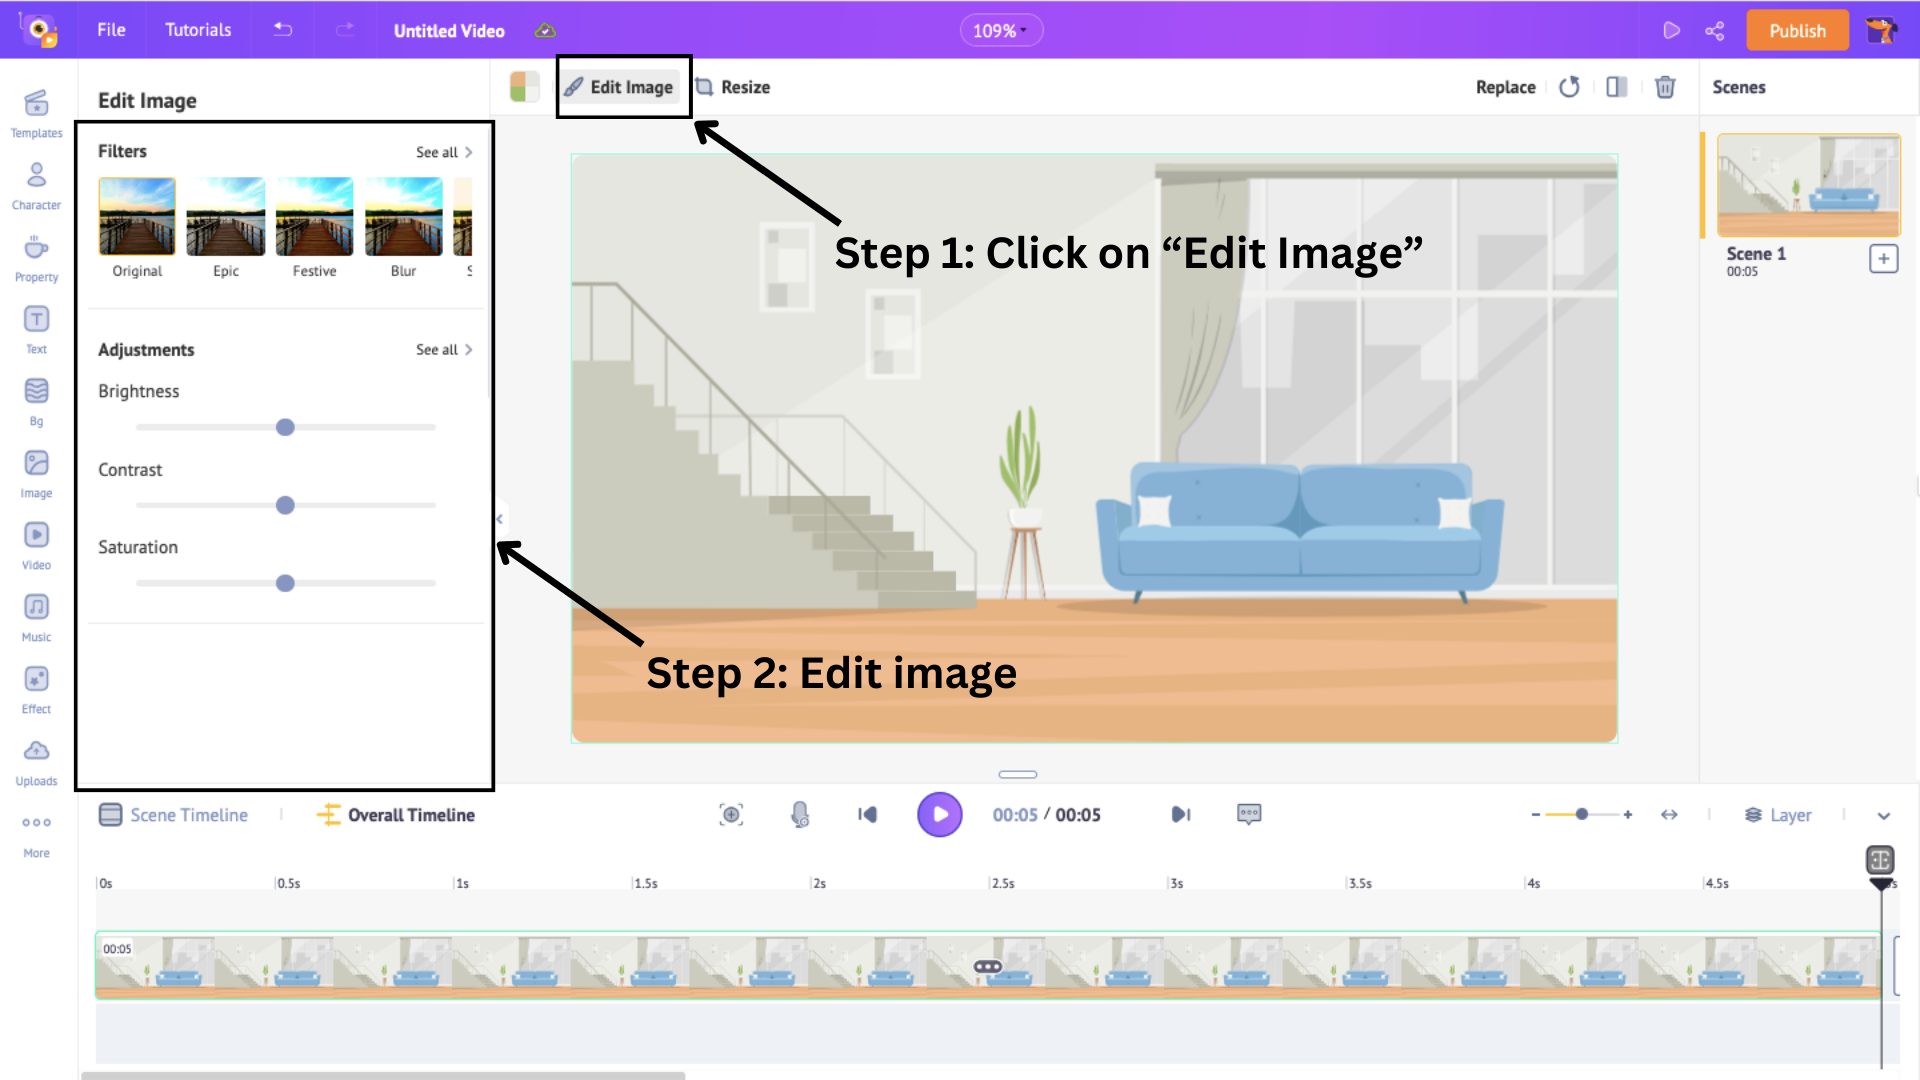
The scene’s background is now made. Let’s move on to the next section.
2. Characters
Now, let’s add characters to the scene. To do that, click on the Character section in the library.
With more than 300 characters of different sizes, ages, and professions, you have a variety of options from which you can choose one.
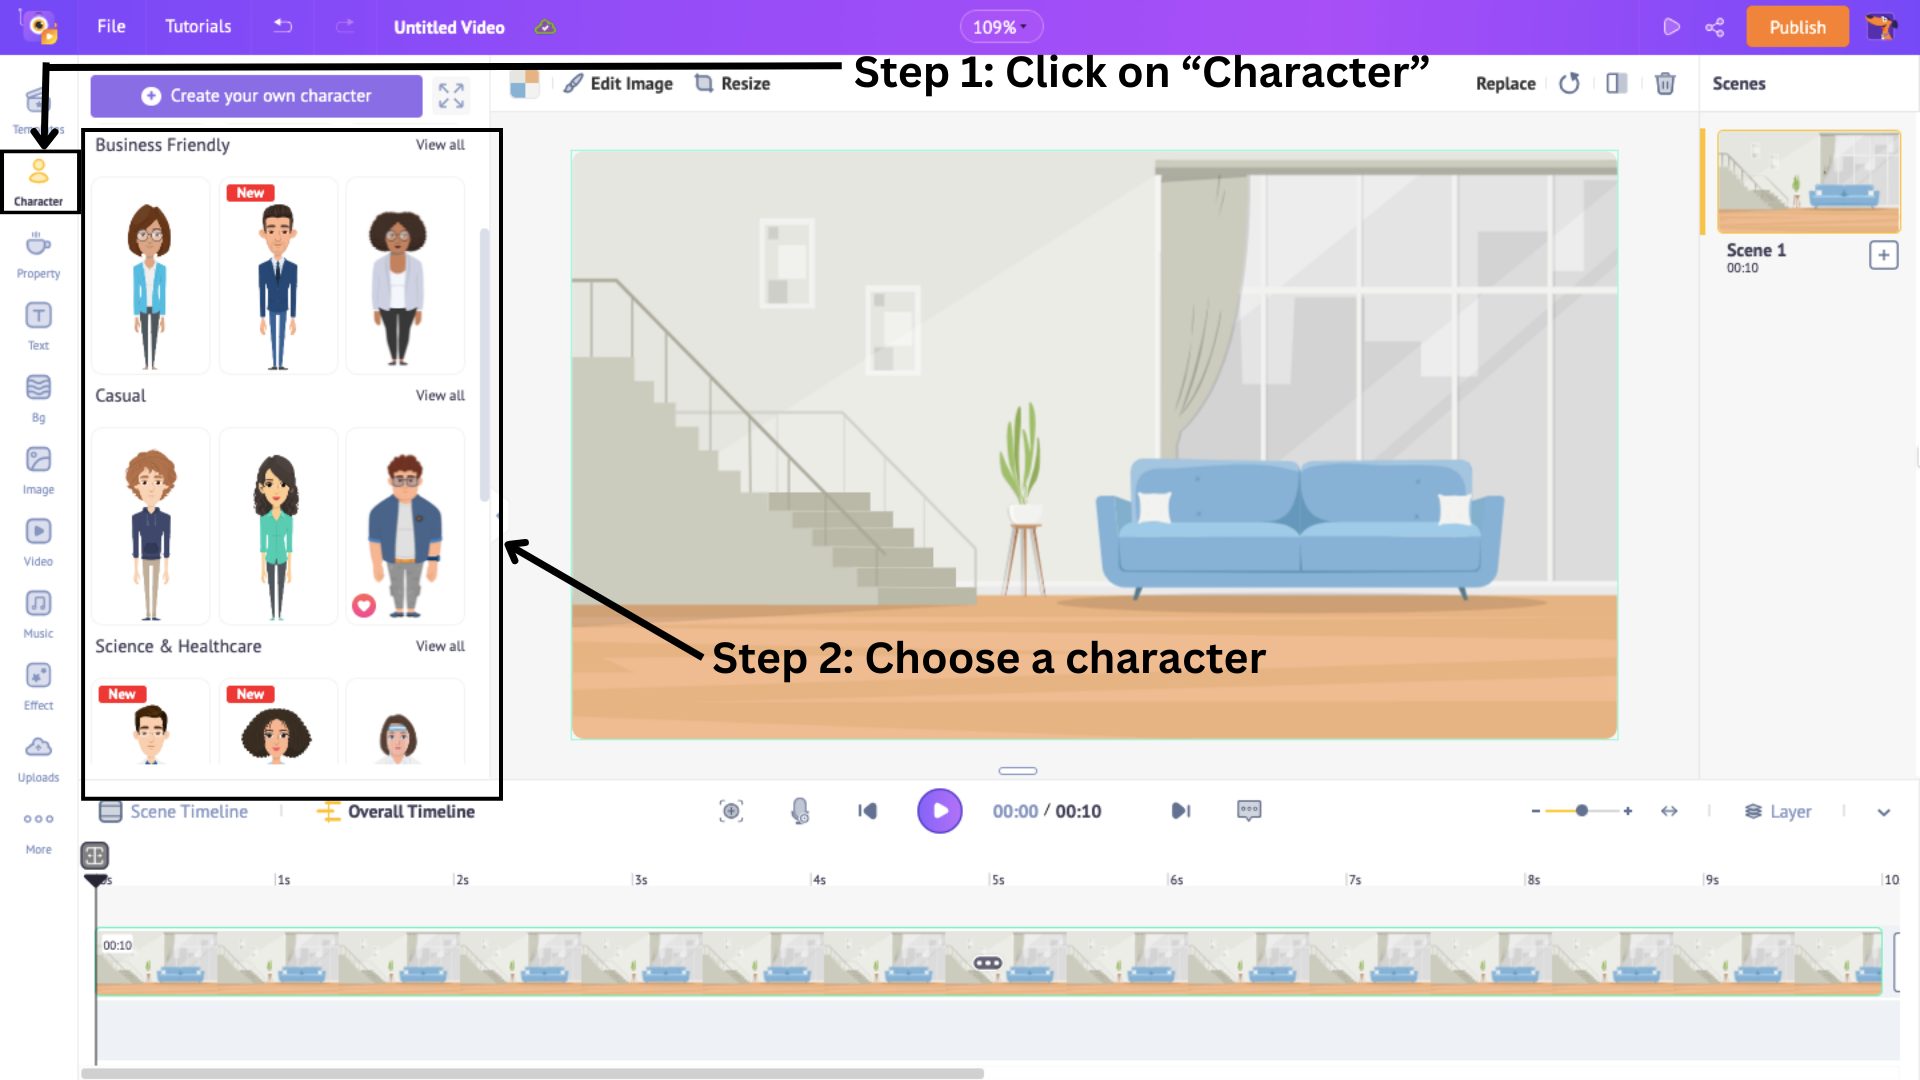
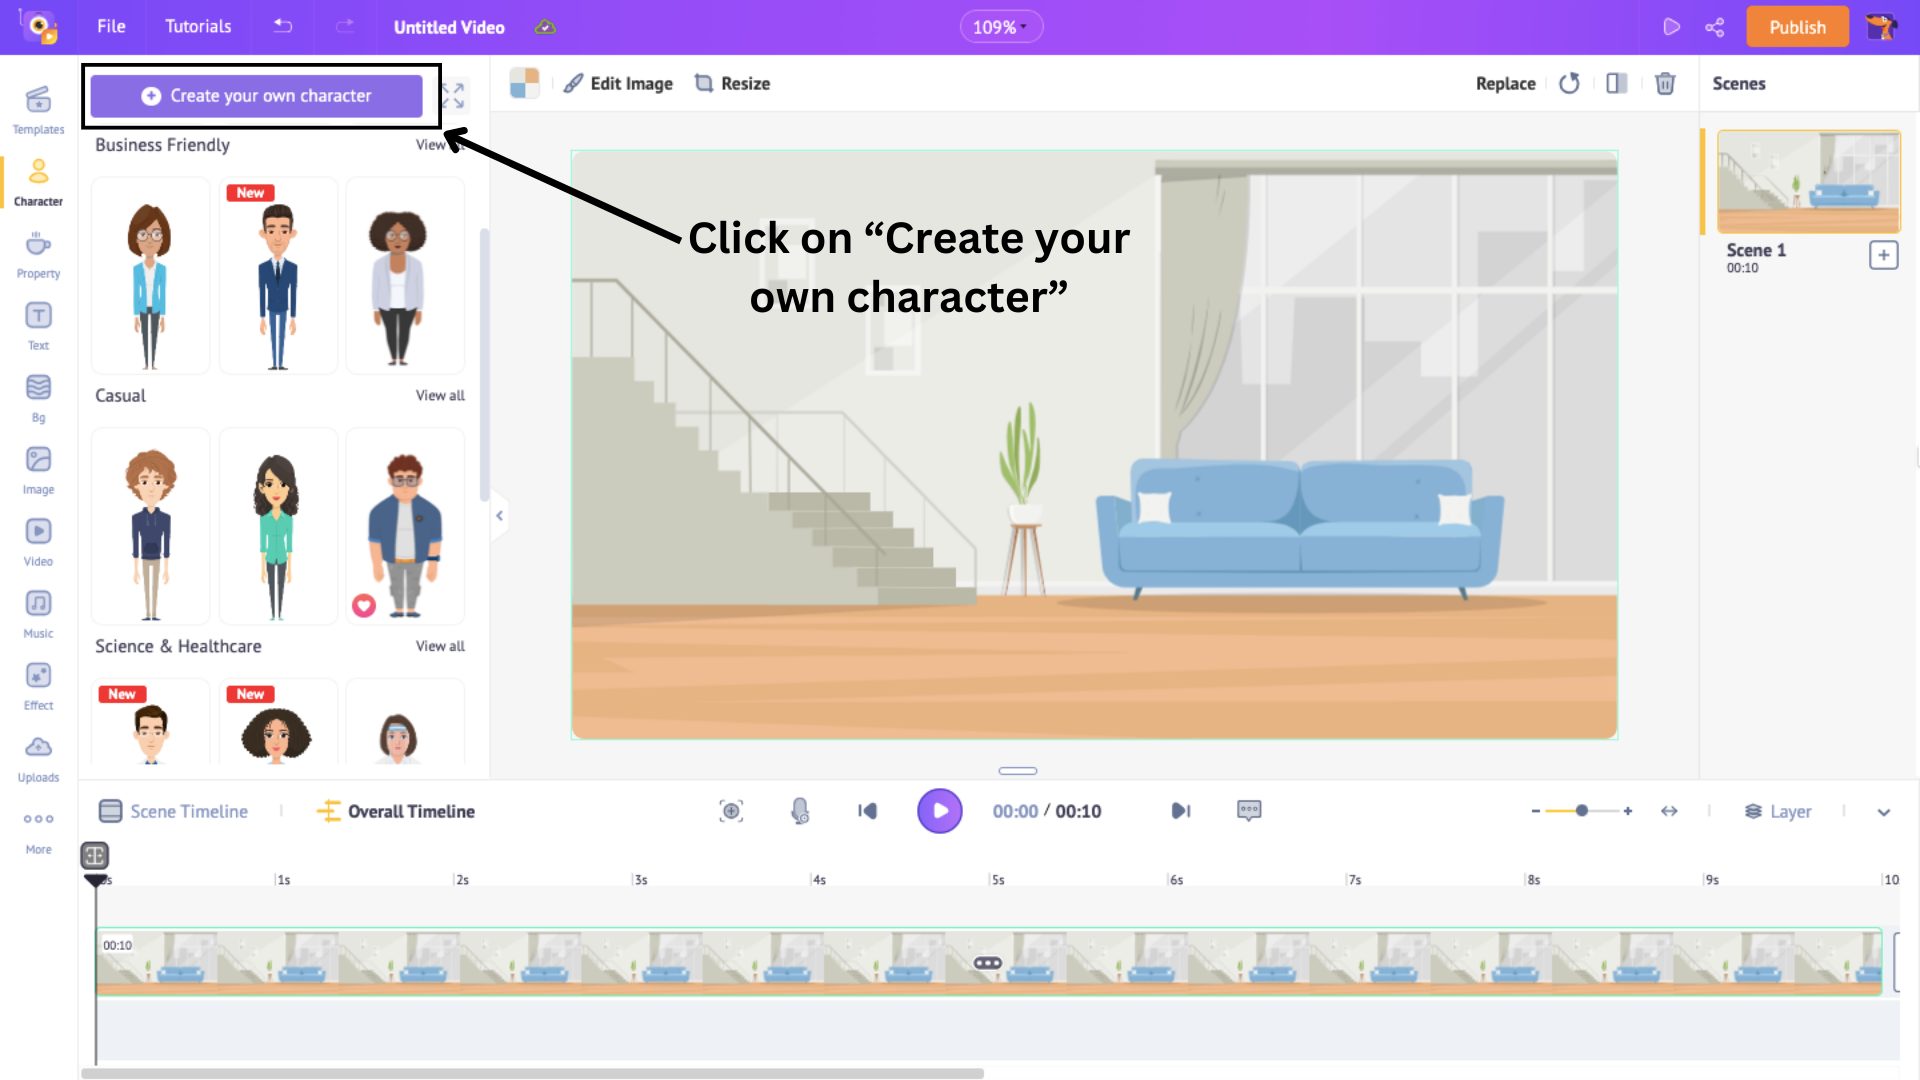
You can also bring your vision to life by making a character of your own! How cool is that? To do that, click on Create your own character.
This will open the character builder tool.
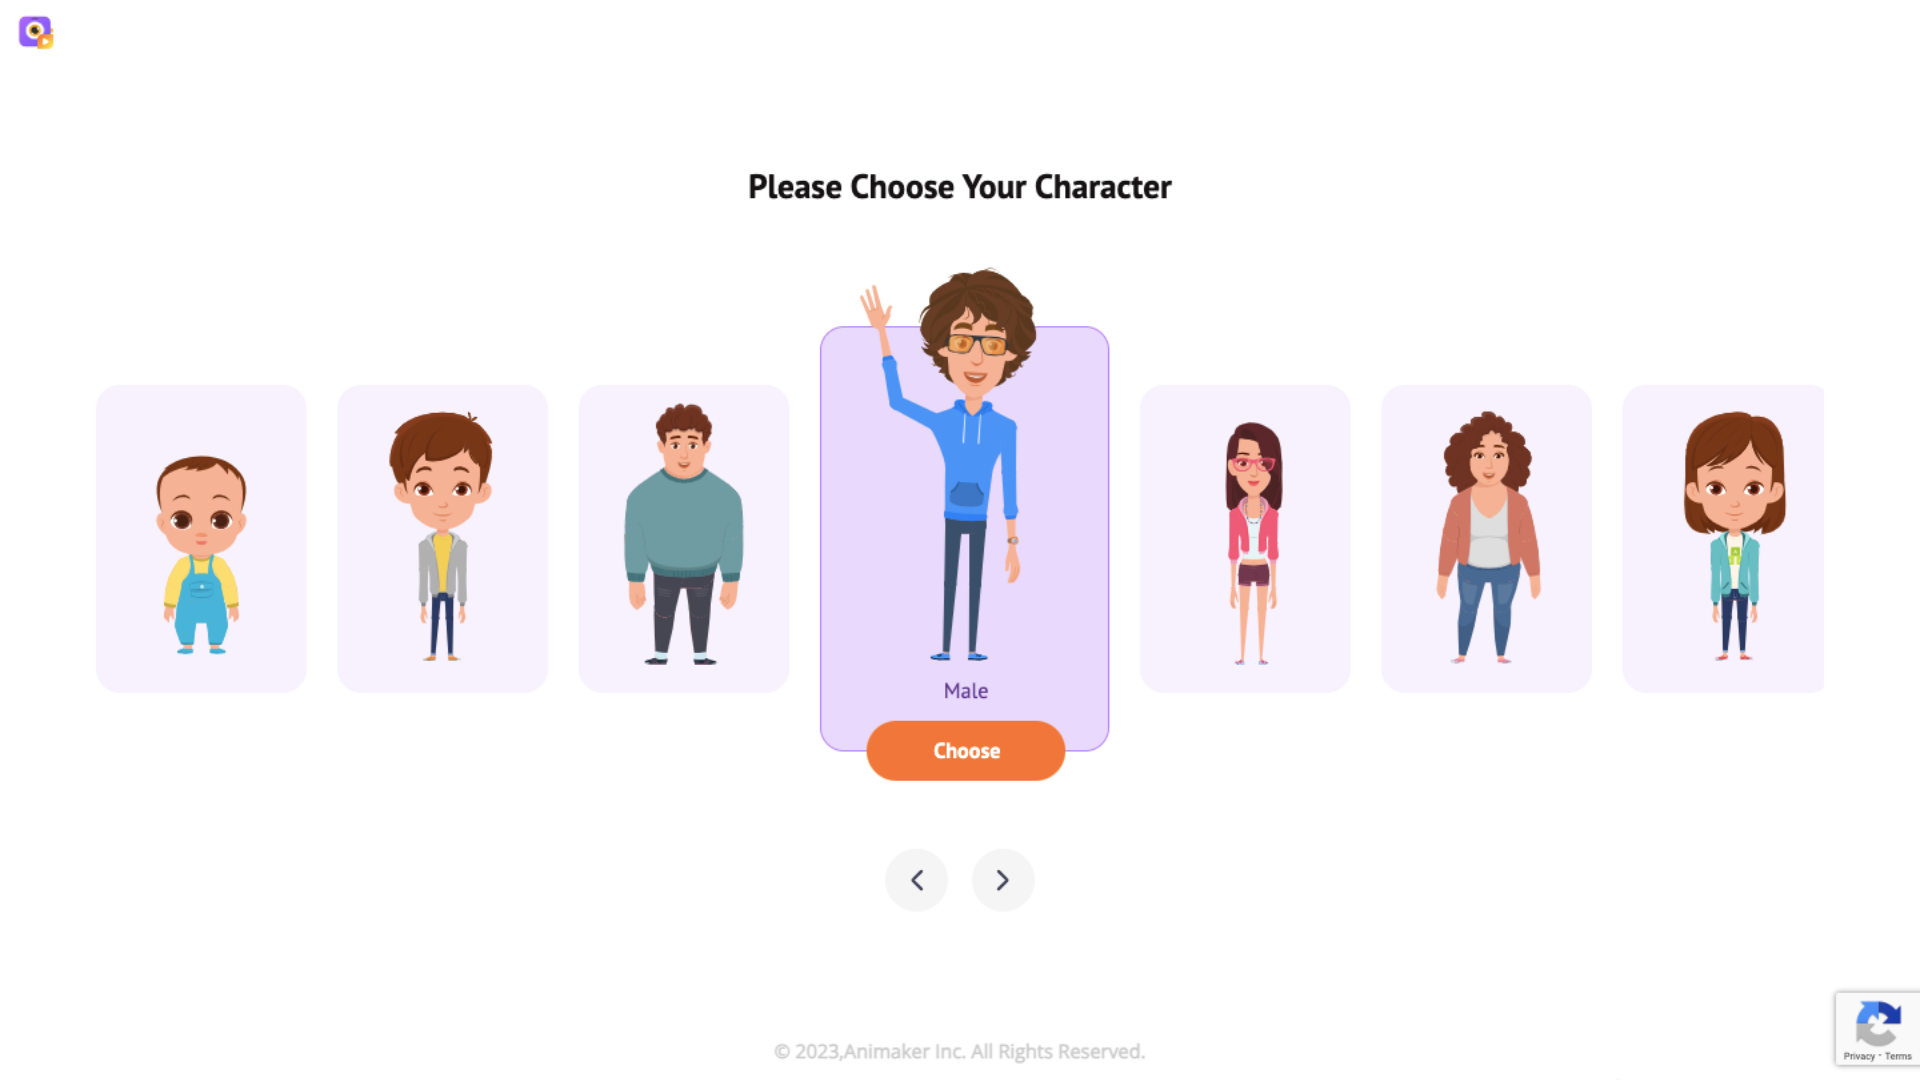
Now, to understand this tool and to create your own custom character, you can check out this video.
Once the character is created, you will find your character in the My Characters section in the Character Library.
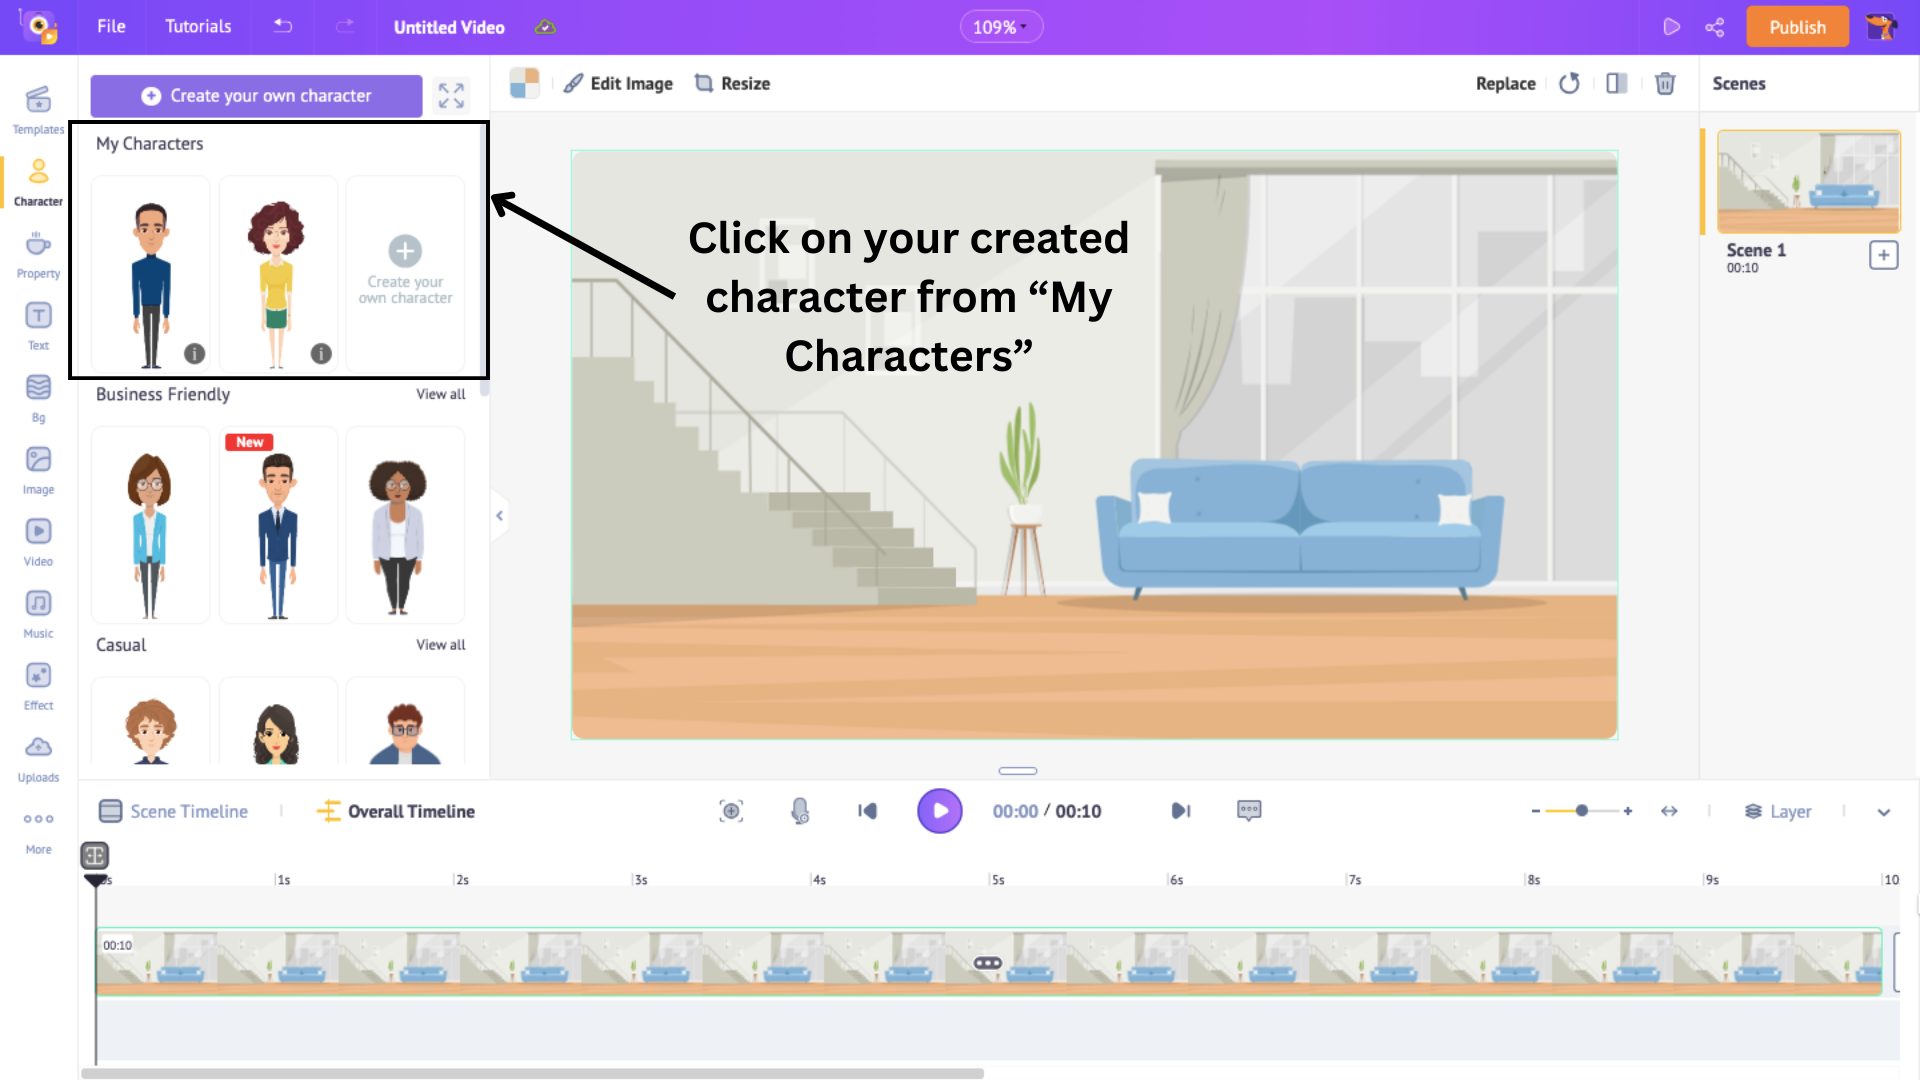
Click on the character to add it to the scene.
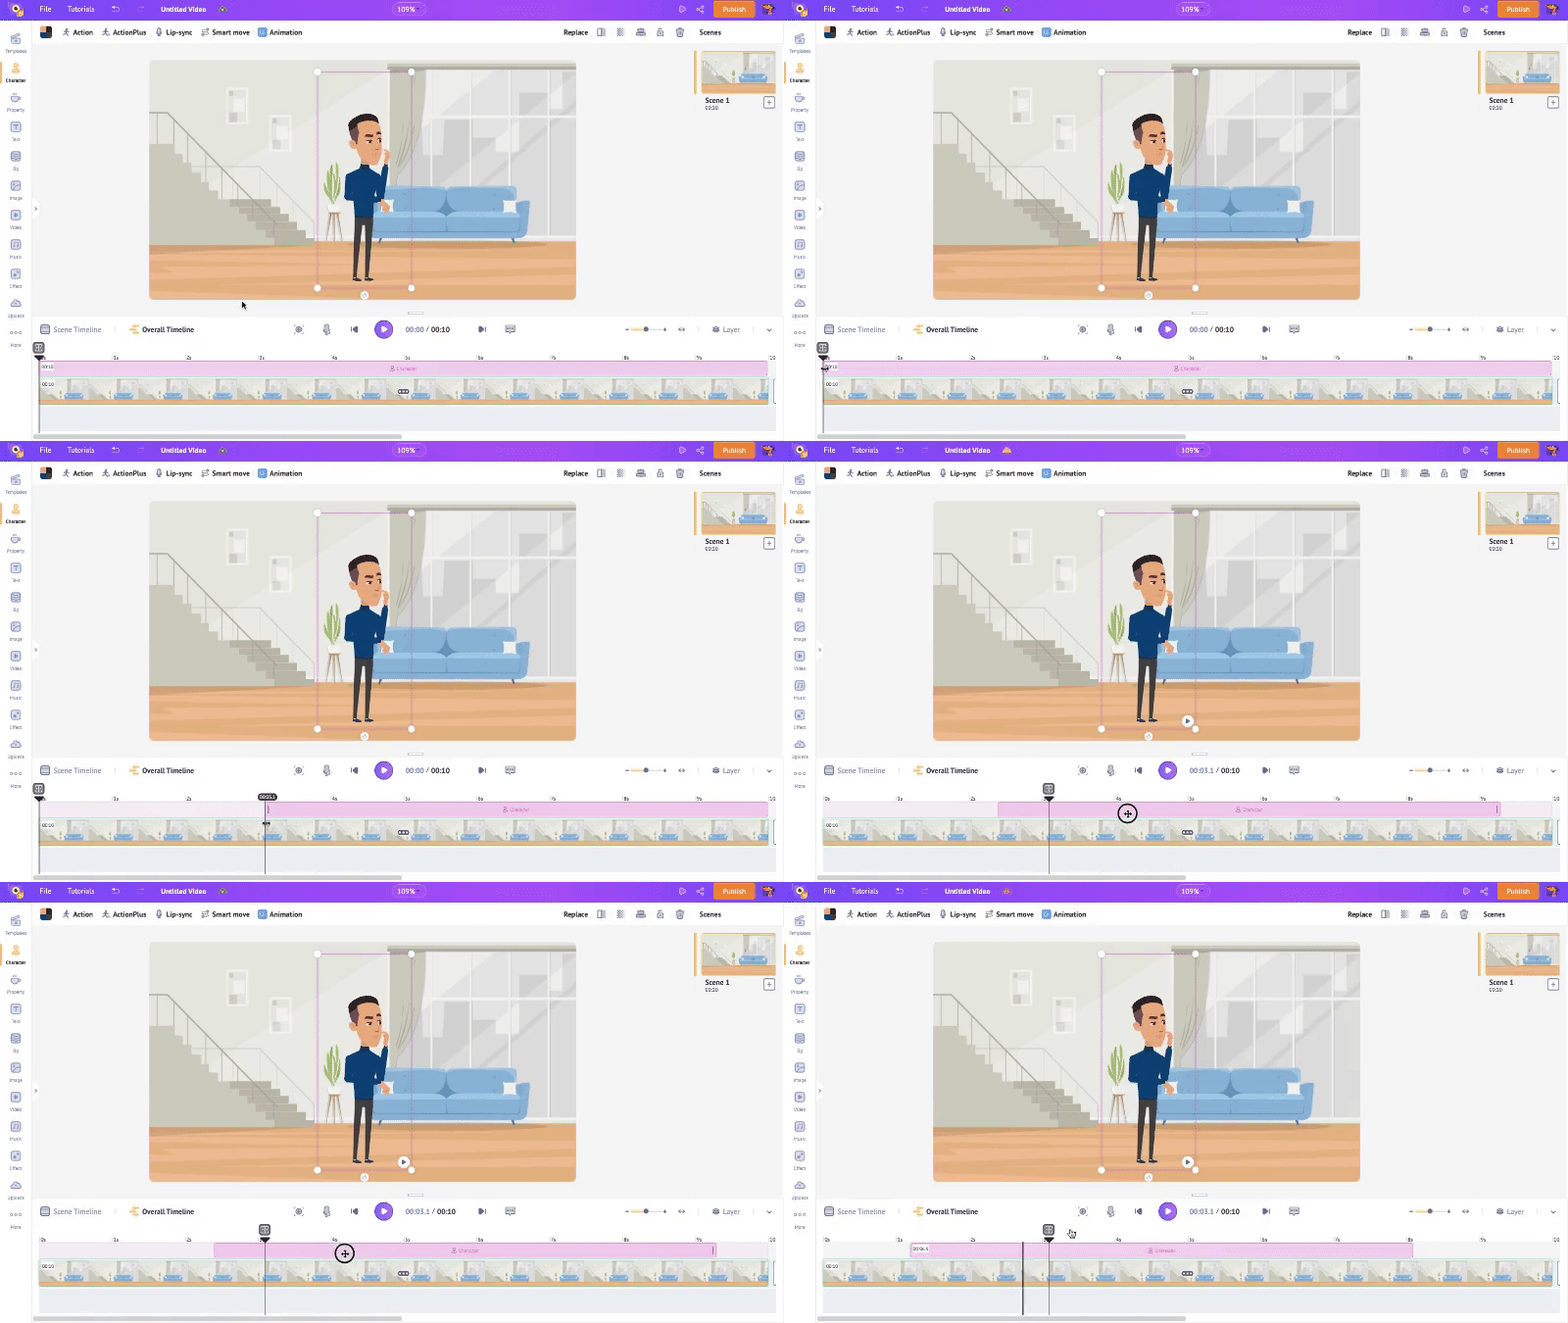
You might have noticed that a pink section appears on the timeline when you add a character to the scene.
This happens every time you add a new element to your scene.
This pink section shows the visibility of the element in the scene. You can adjust this section to control when you want the character to appear in the scene.
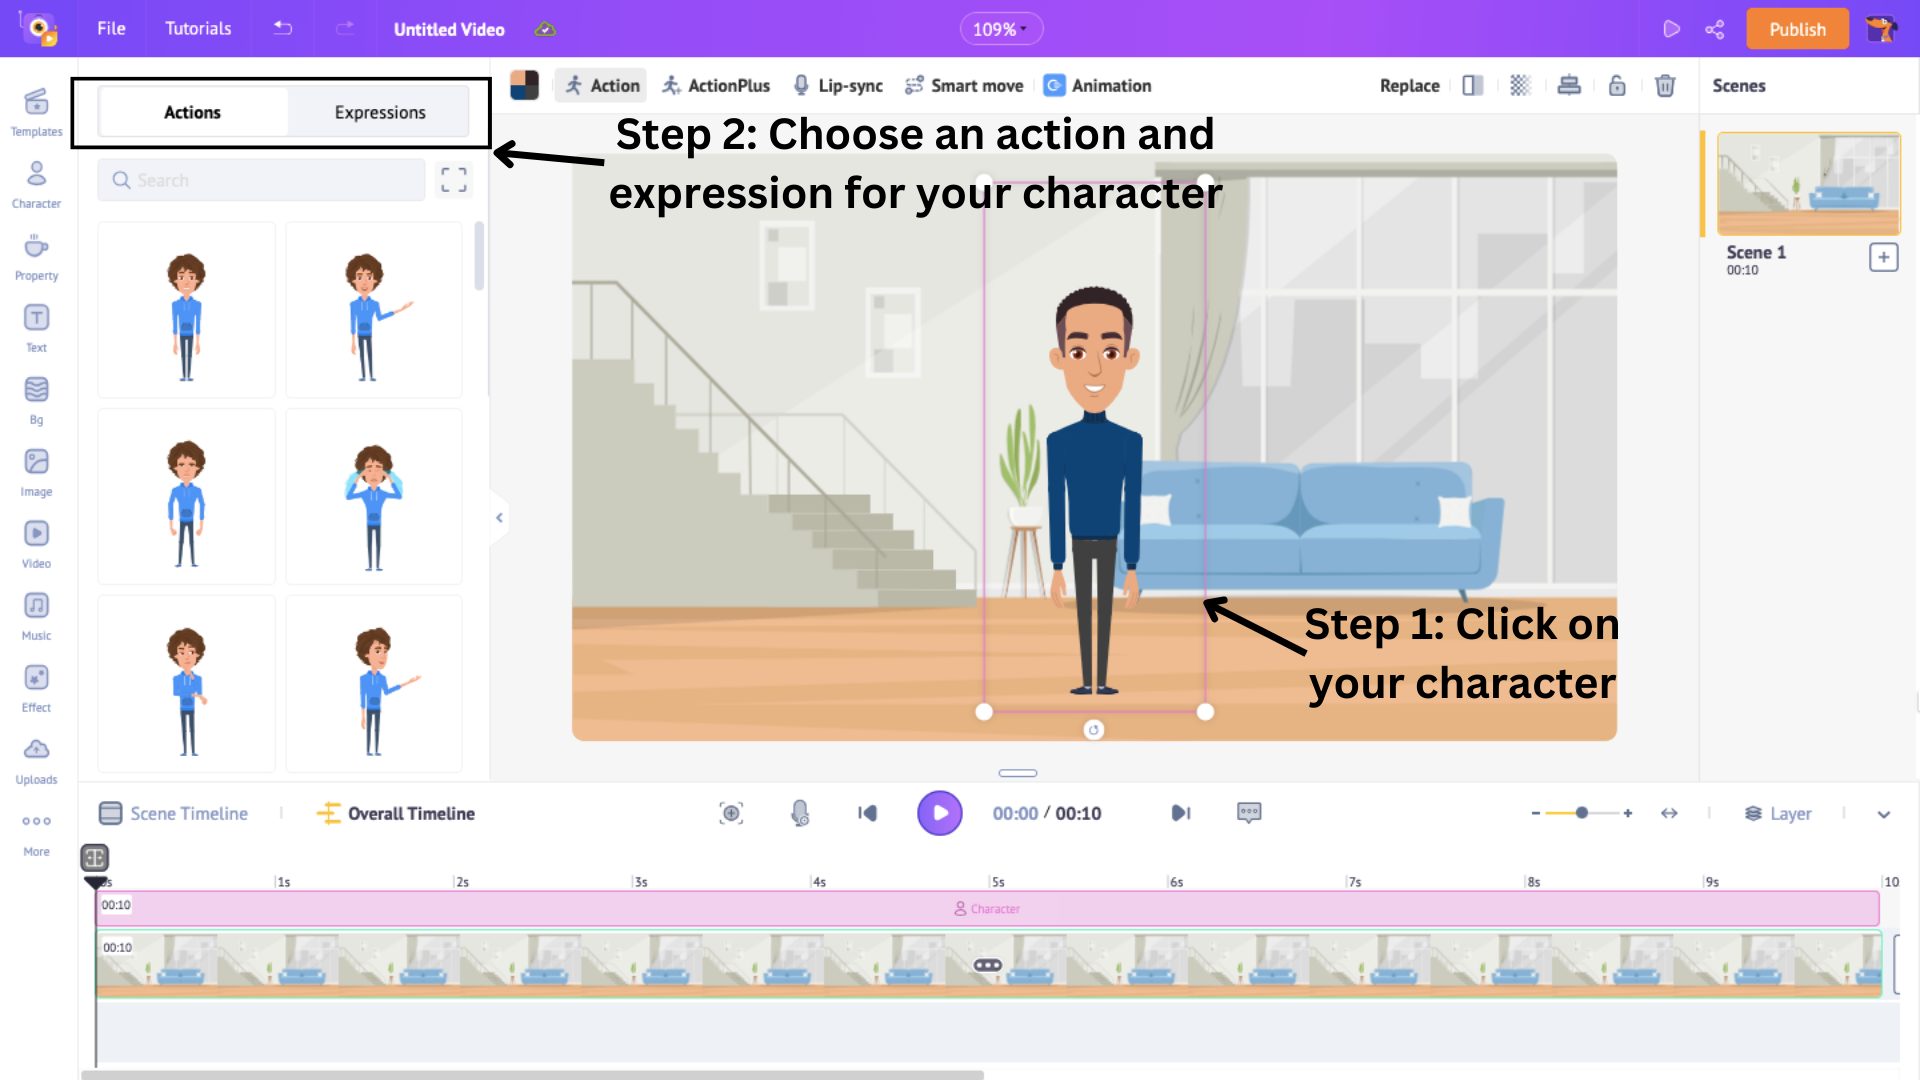
When a character is added, a panel opens on the side with actions and expressions. You can choose an action for your character by browsing through the list or searching for an action on the search bar. You can also choose an expression for your character.
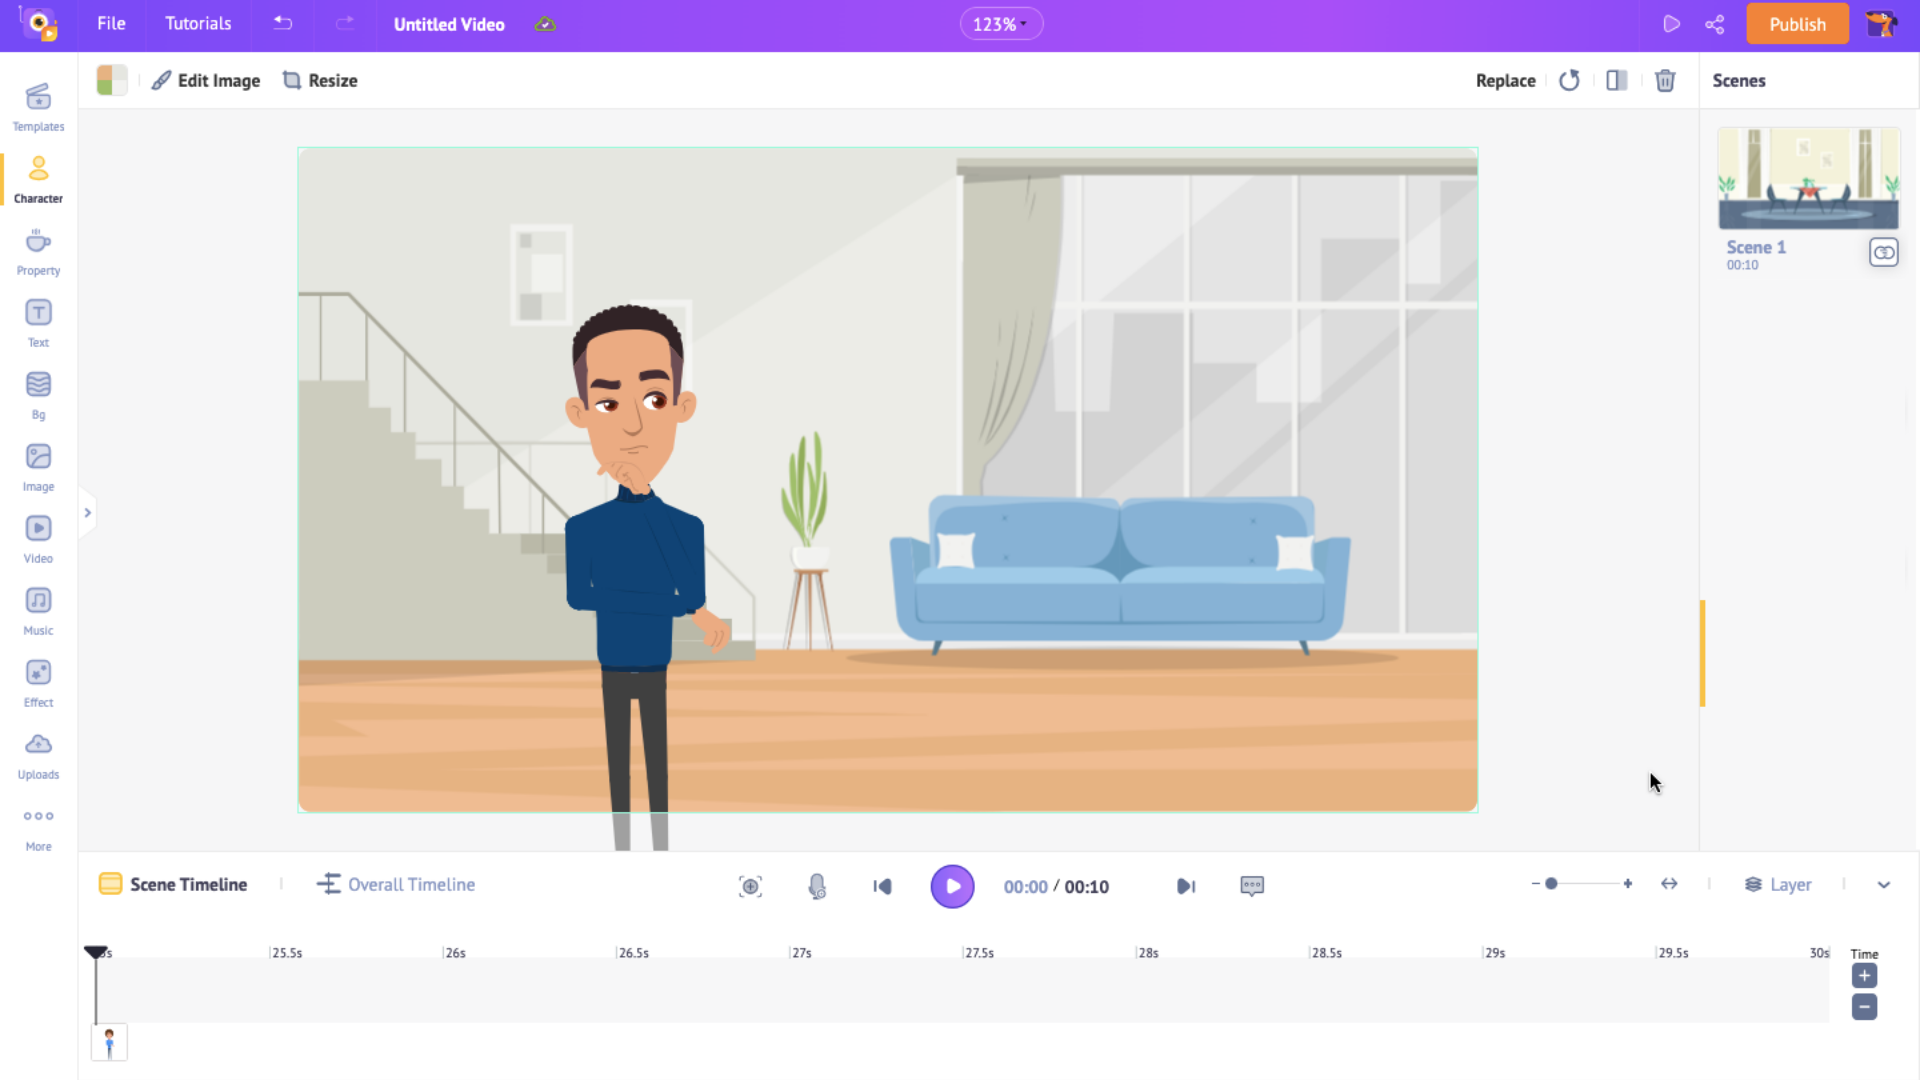
I have chosen a thinking pose for my character.
But, with Animaker, you can do more than just adding actions or expressions. For instance, you can animate your character; that is, you can add multiple actions to it. Yes! It is possible. Let me show you how.
As you see, my character is deep in his thoughts. I want a similar action but from a different angle. So, if you wish to achieve multiple actions for your character in a scene, let me tell you how.
Click on the character and select the Action-Plus option.
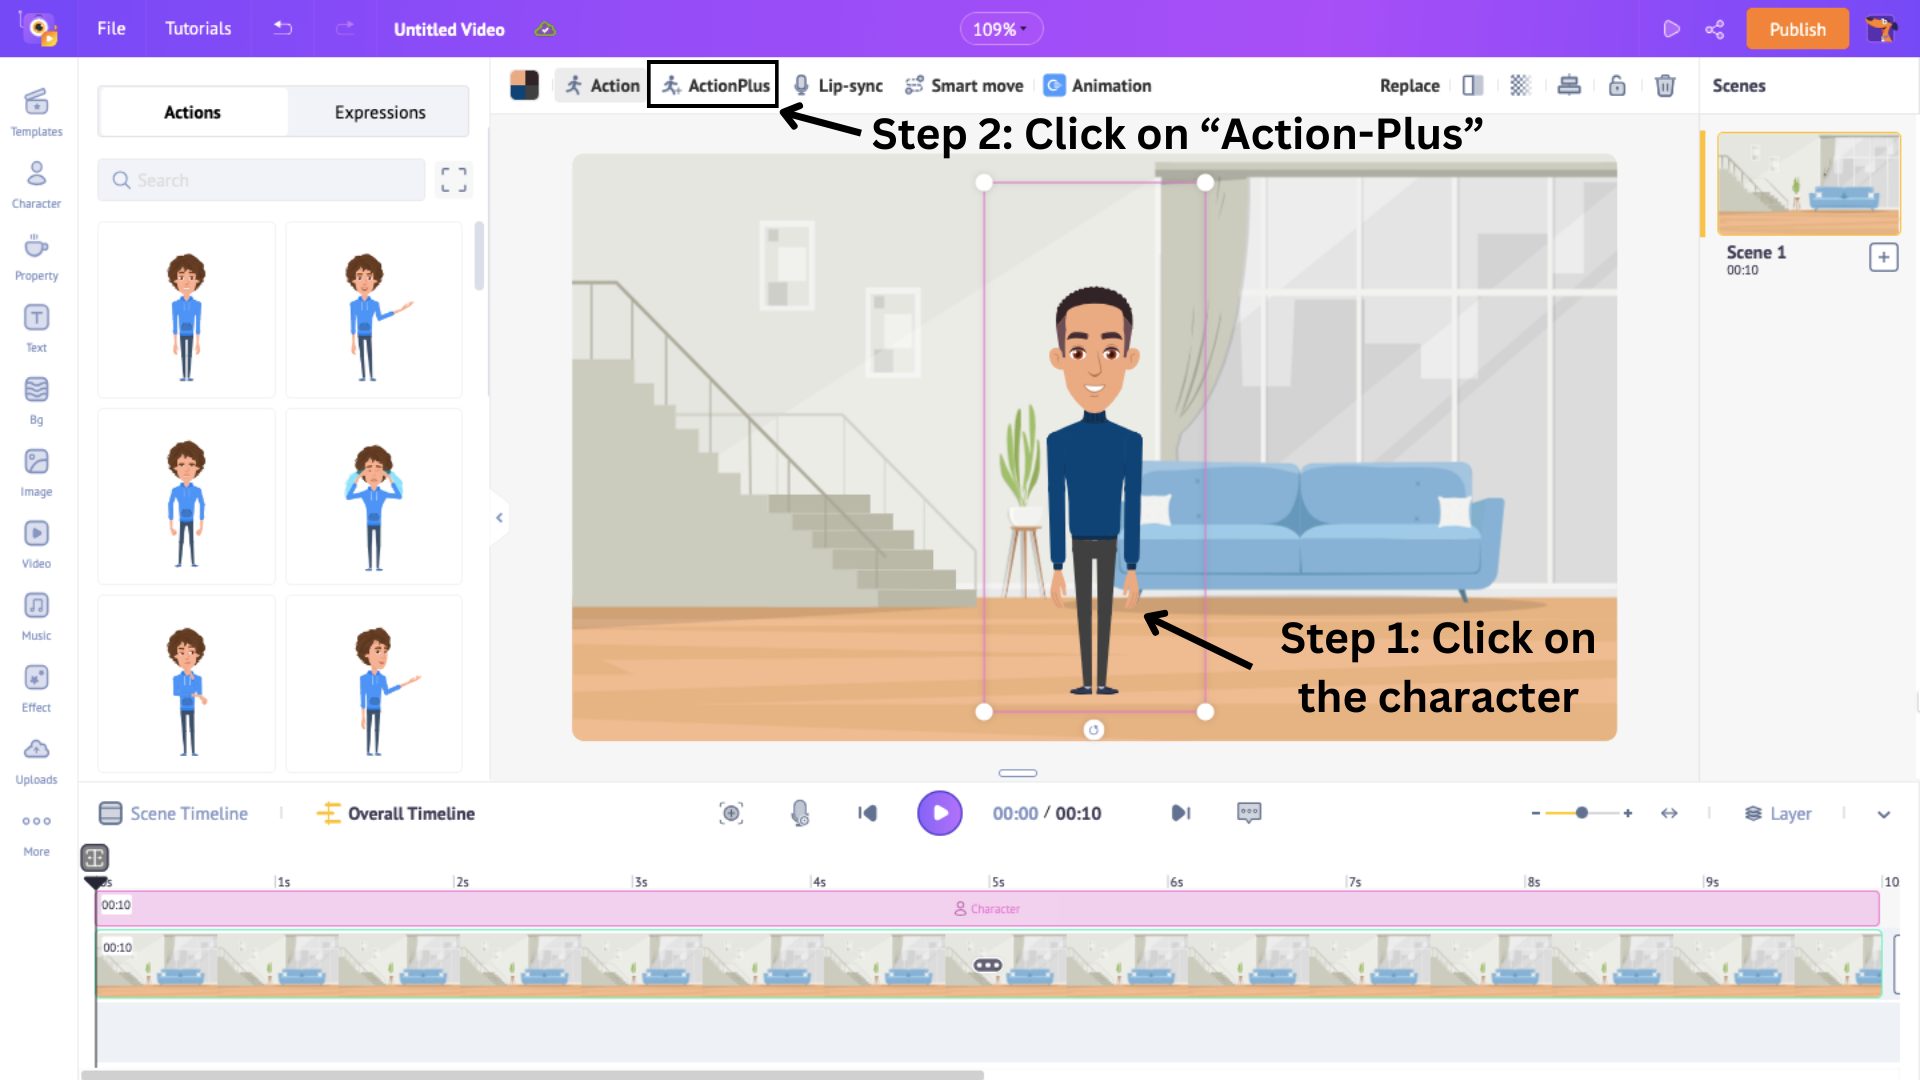
Here, you can see the chosen (thinking) action as the first action. To add another action, click on the “+” symbol. Choose an action from the list.
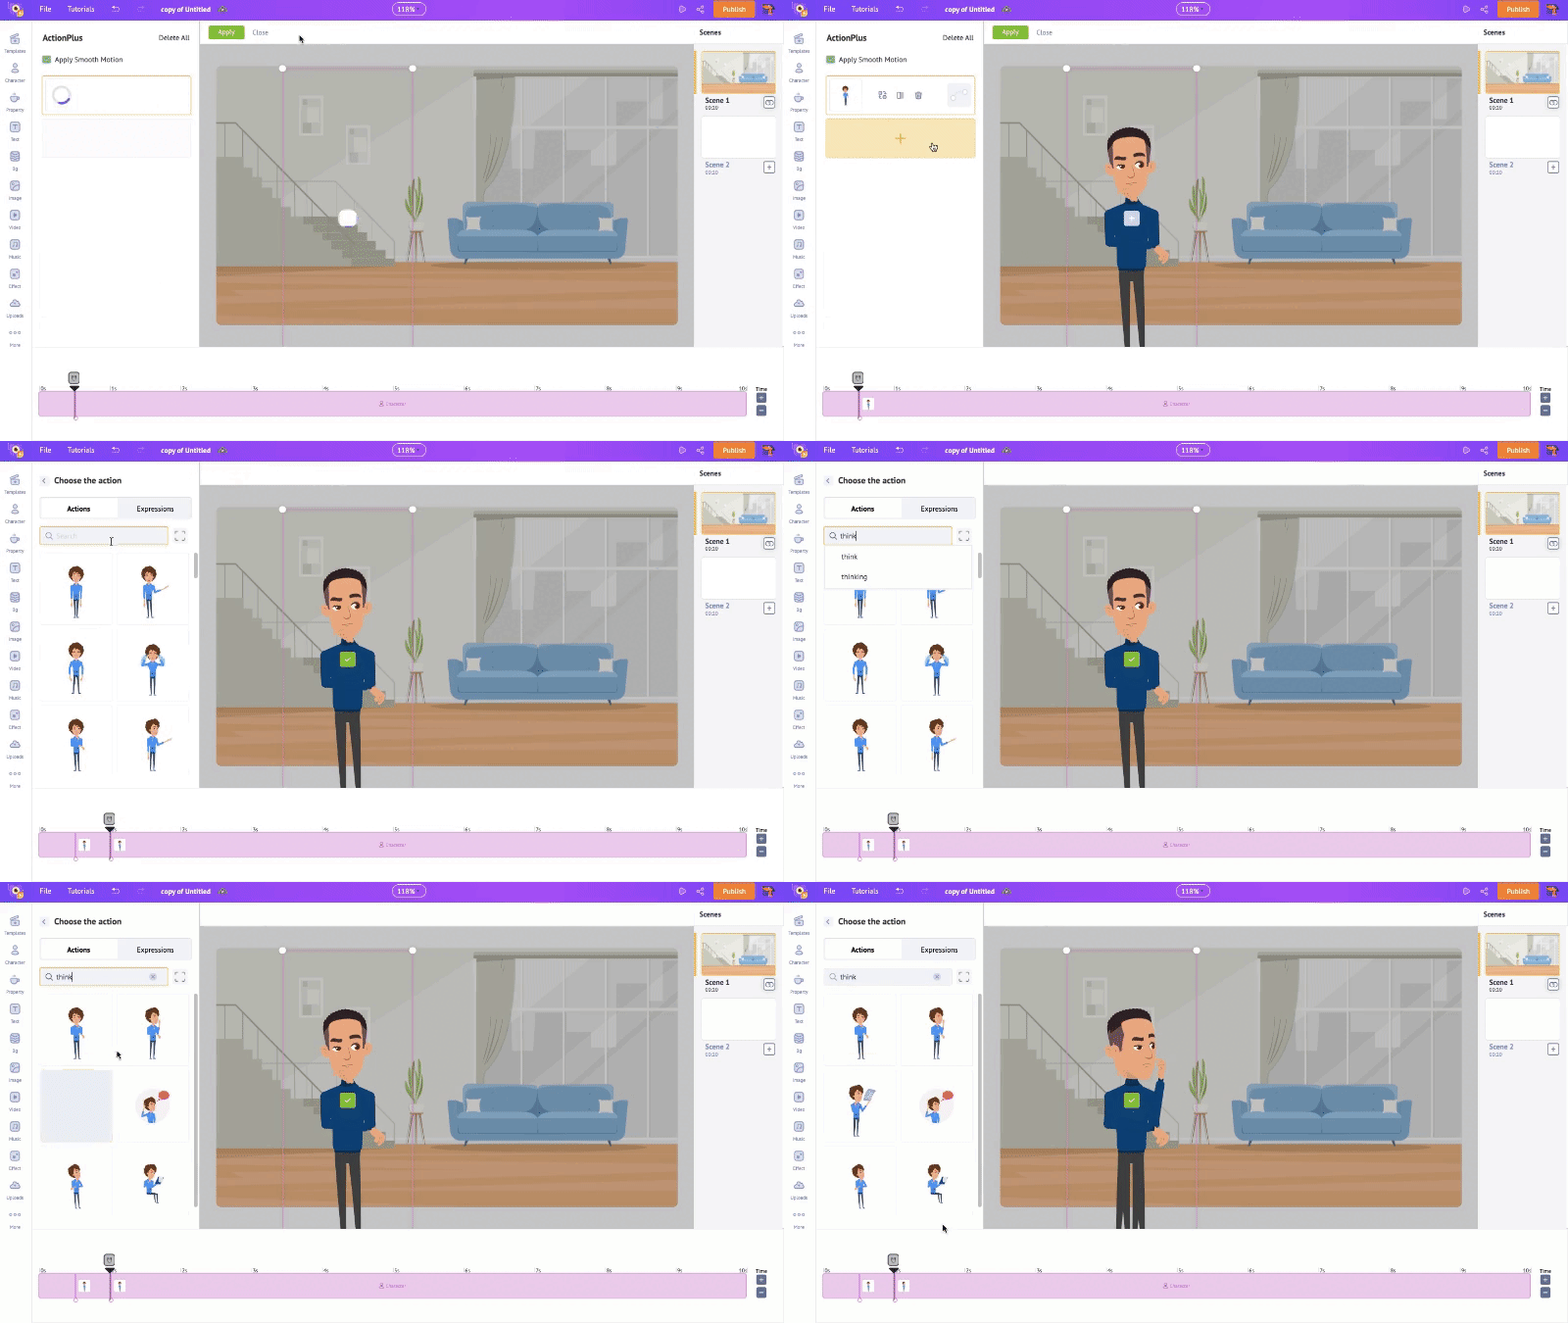
Then, on the timeline, you will see the two actions appear in the pink section. This shows when the actions appear. You can adjust its positioning on the timeline to control its appearance in the scene.
Once that is done, click on the tick symbol on the character and click on Apply.
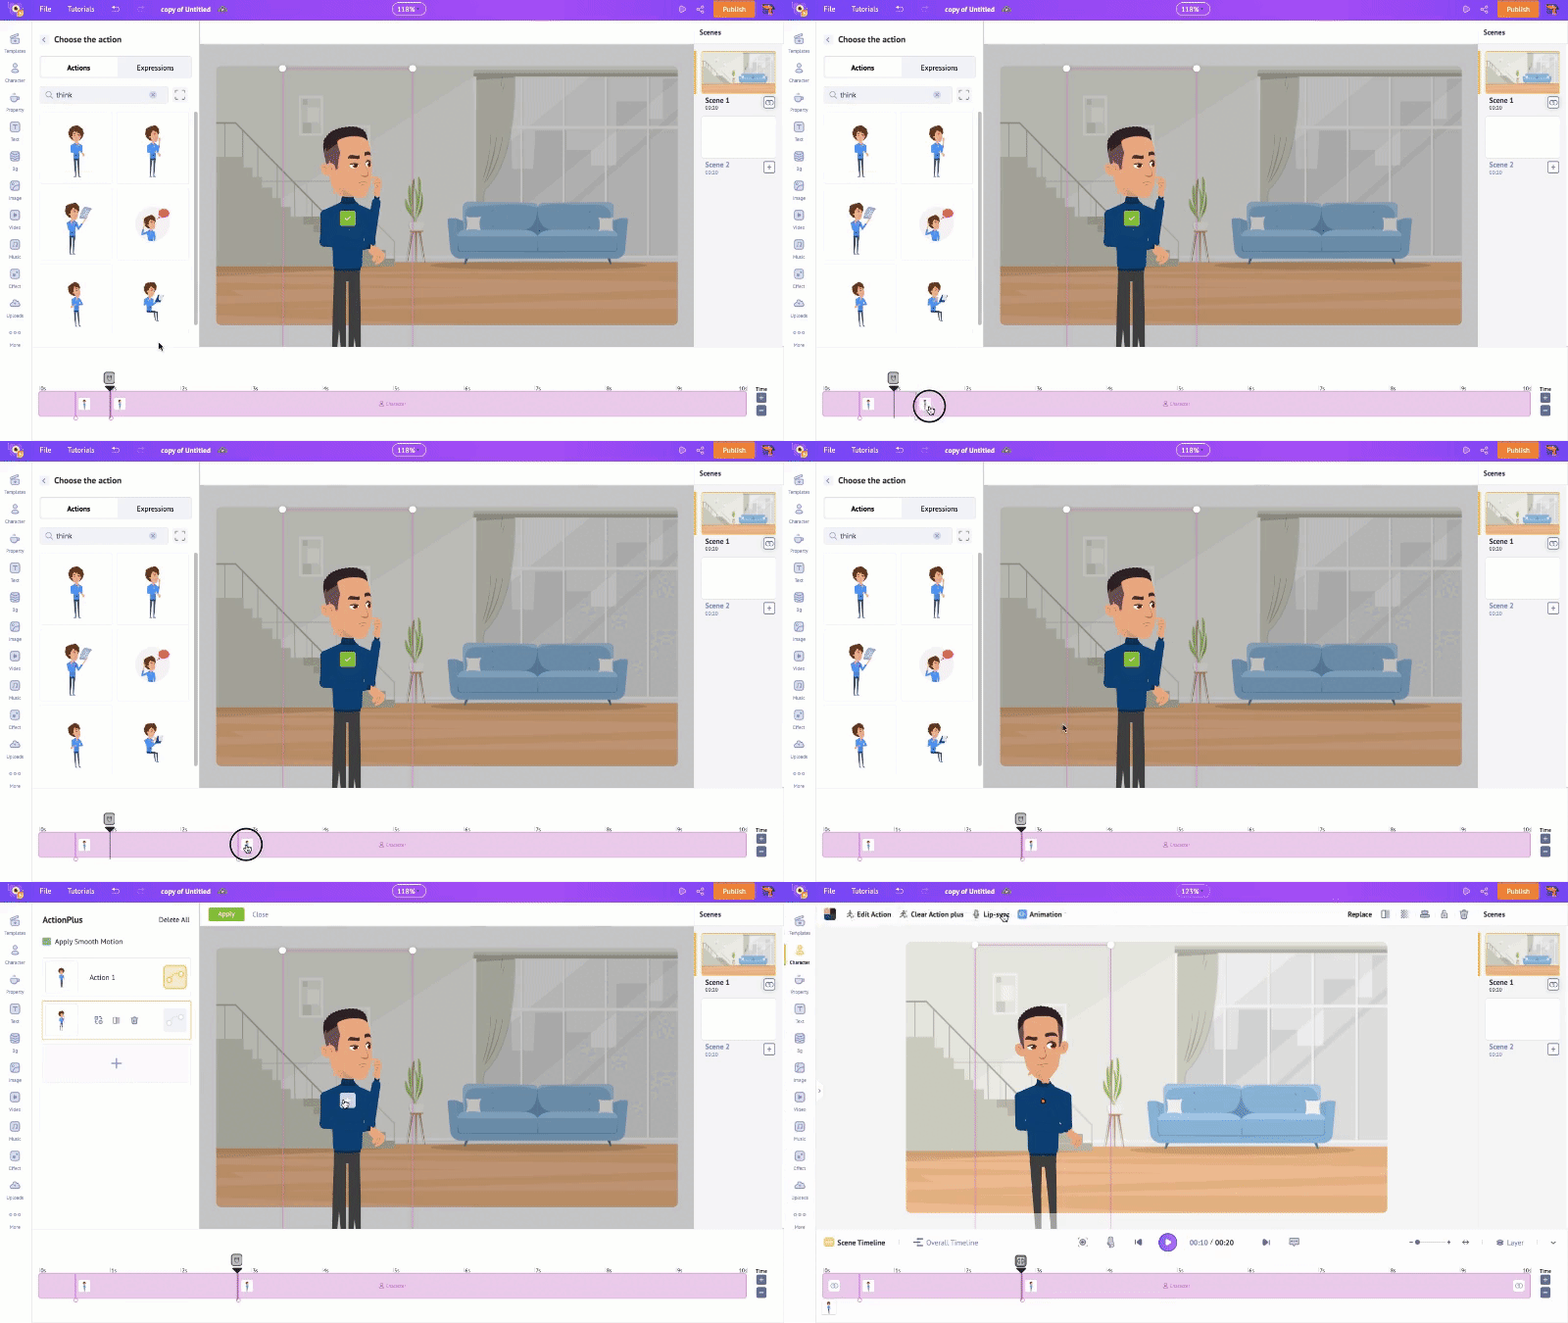
You can preview the scene by clicking on the play button. Let’s see how it has turned out.
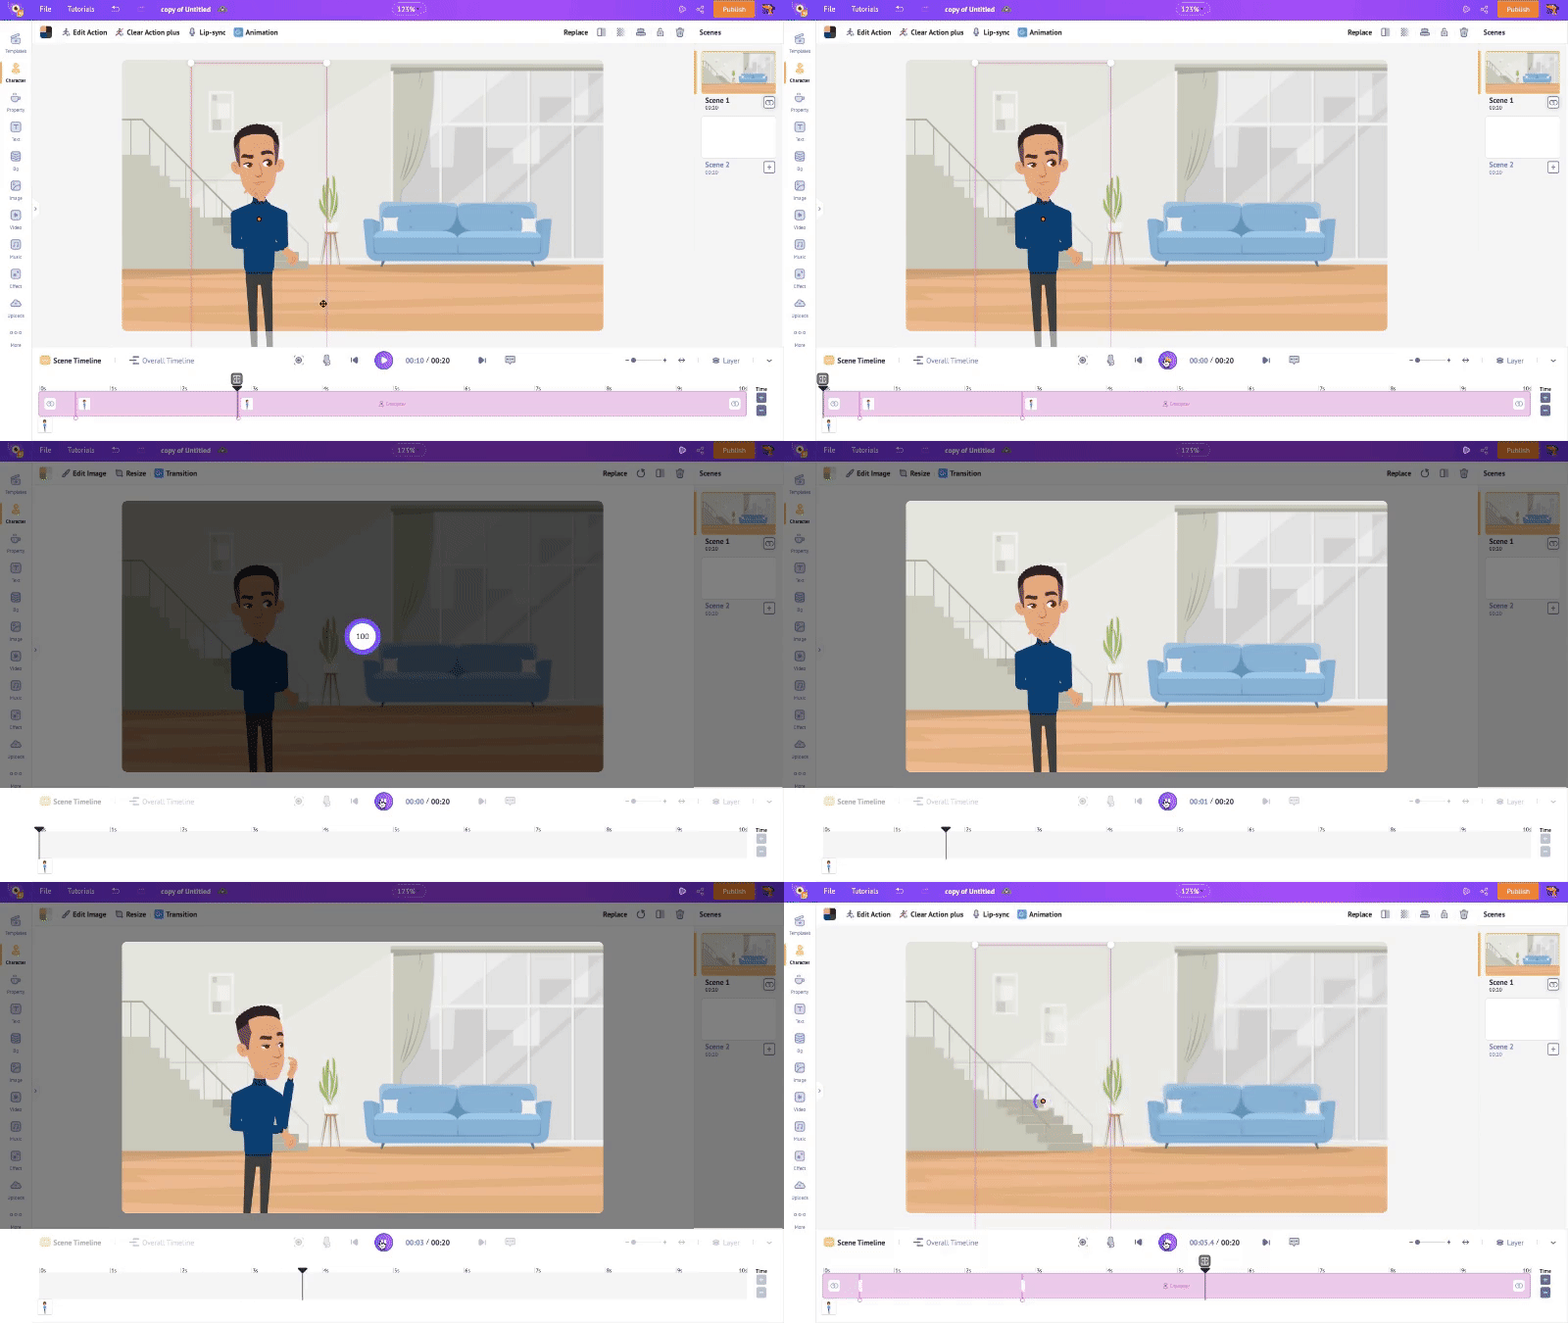
It is looking good, isn’t it?
Let’s see what else we can add to the scene.
3. Text
Now, you can add the first line of your script to the scene.
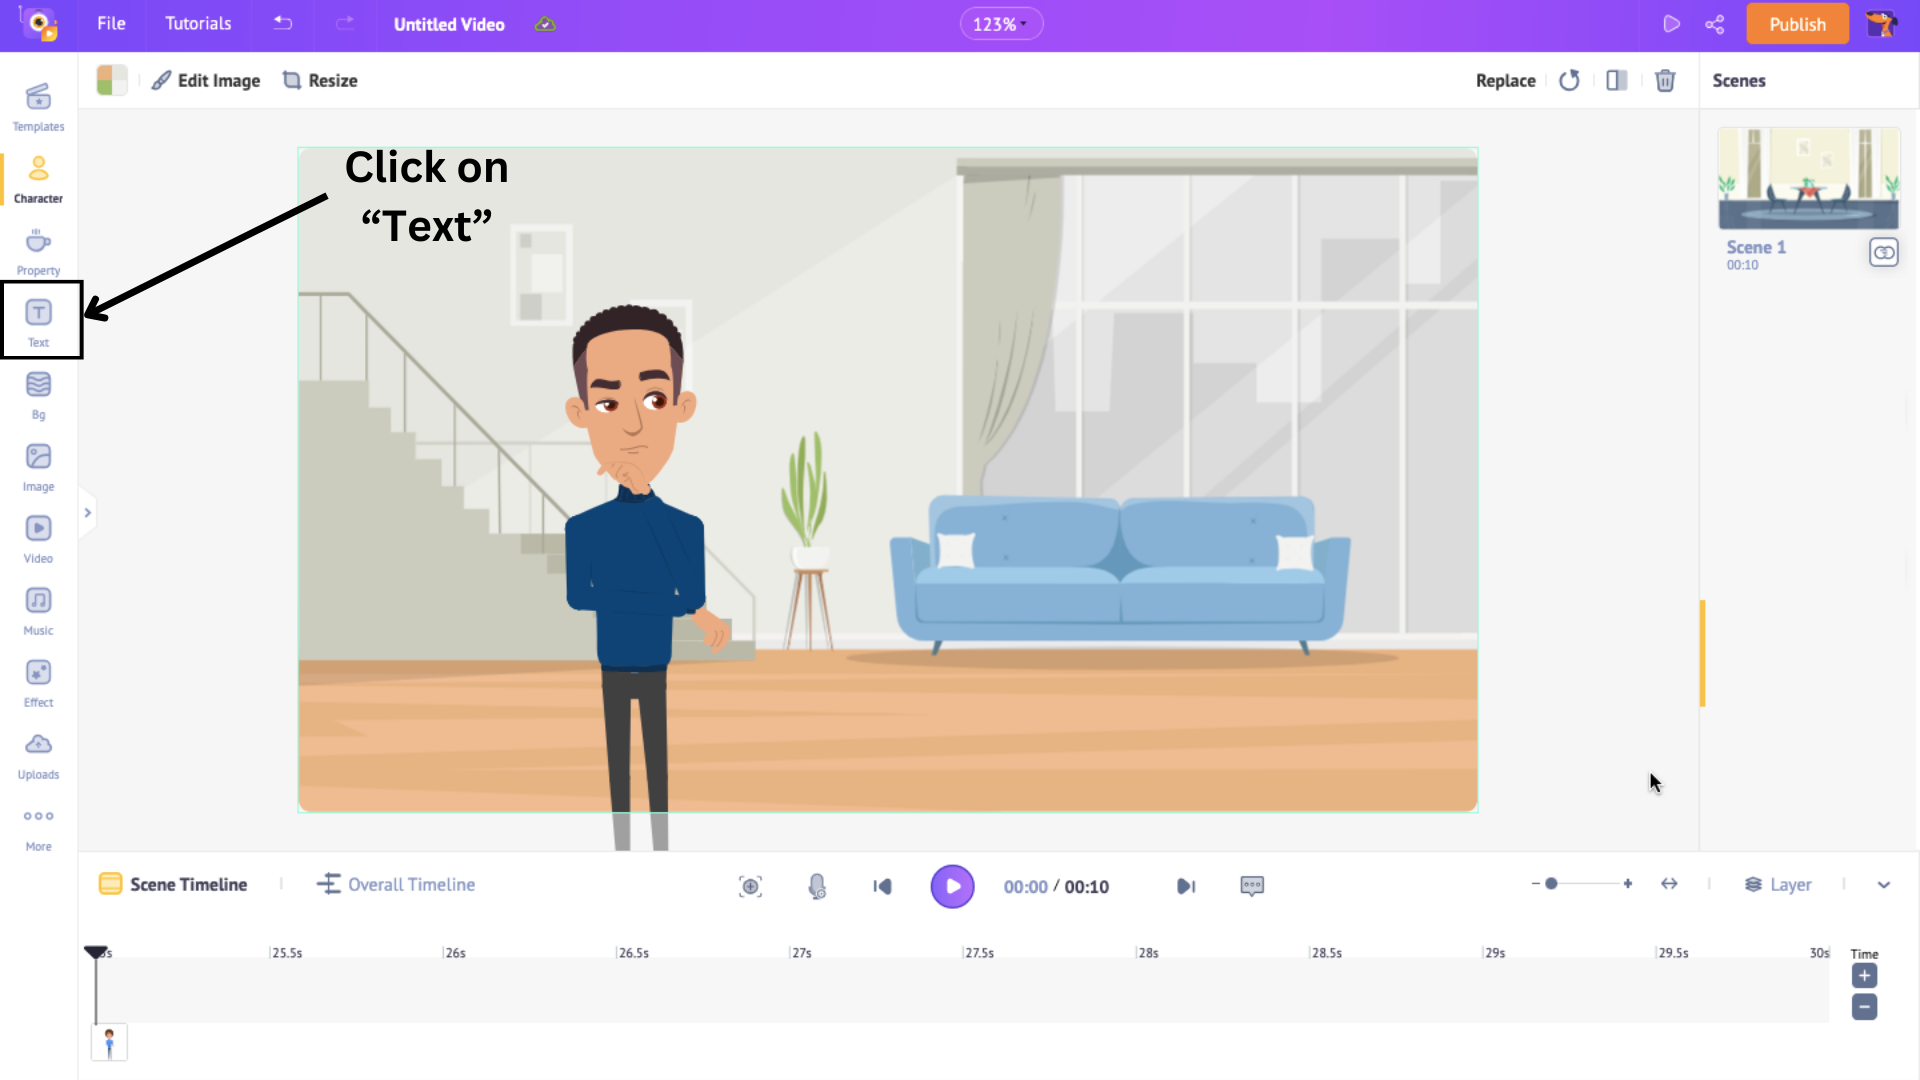
For that, open the Text option from the library.
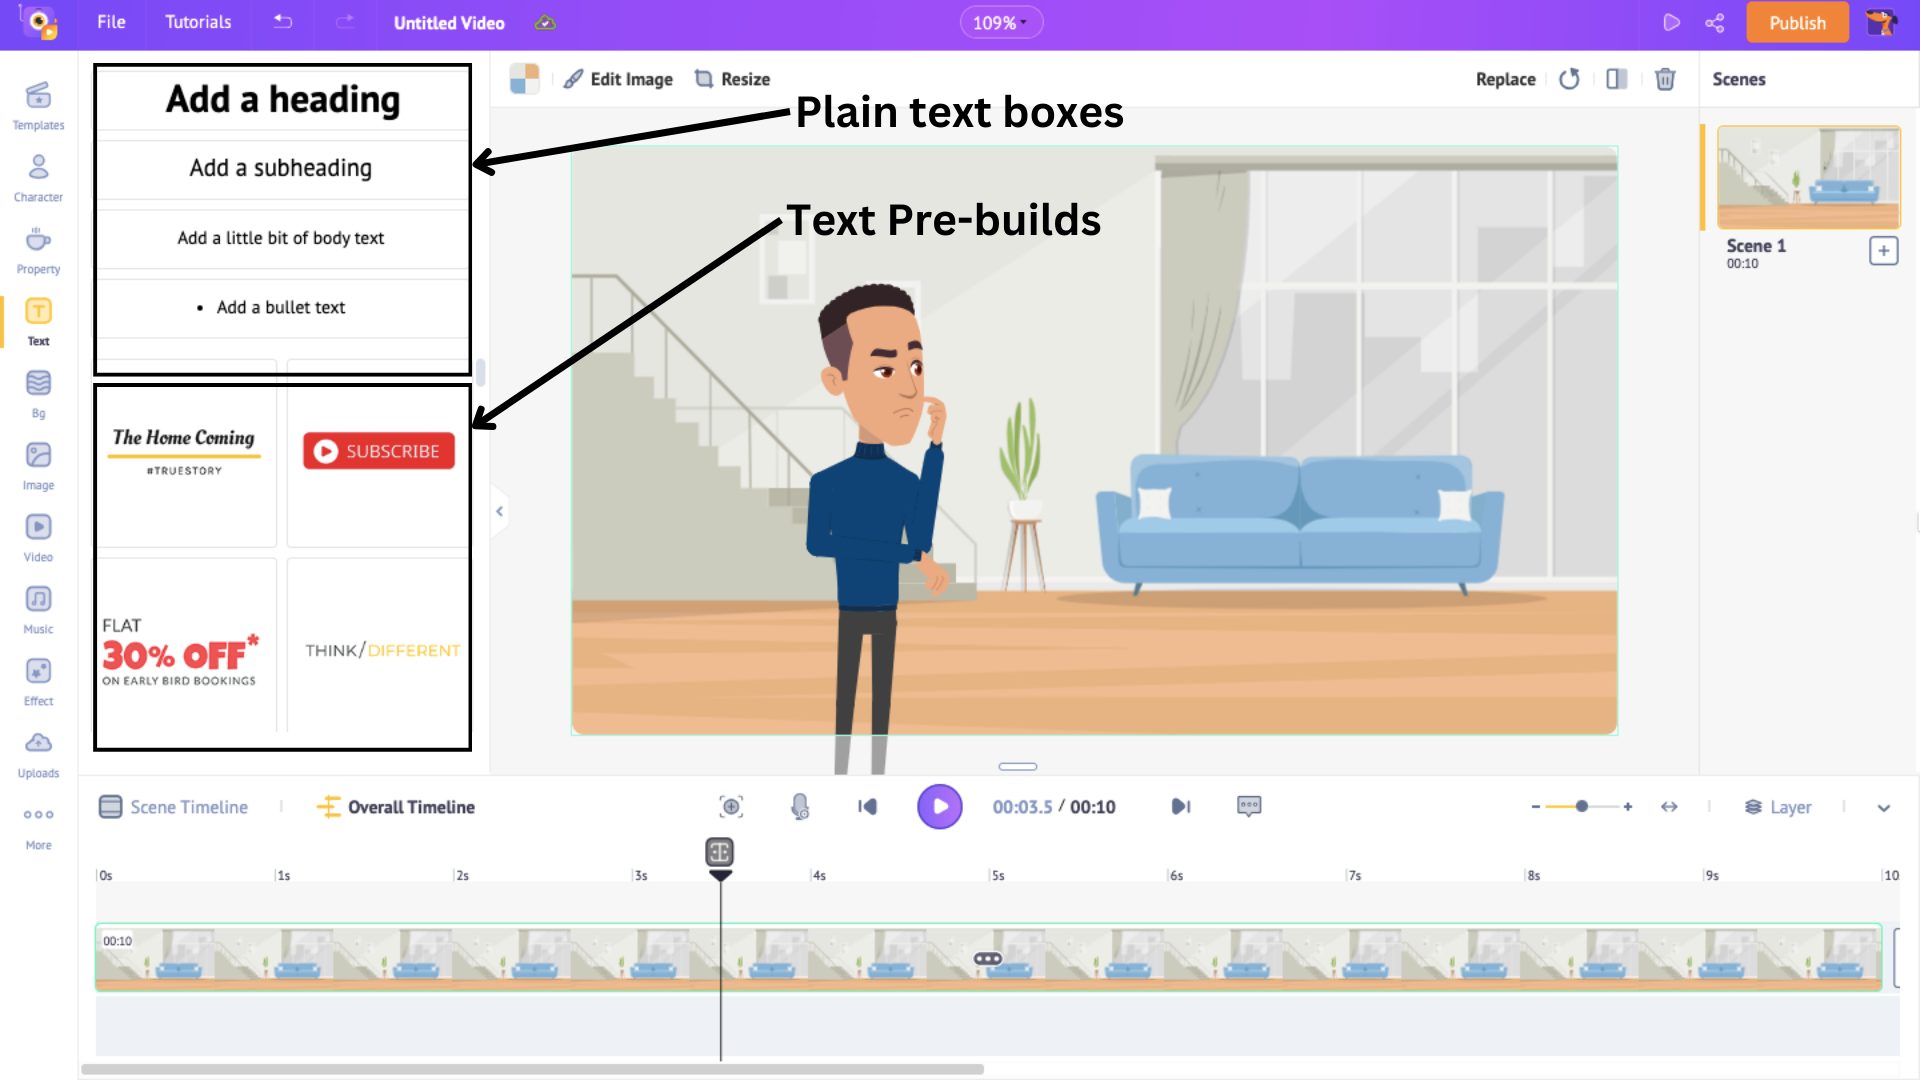
You’ll find two types of boxes - Pre-builds and Plain.
Pre-builds have pre-added design, font, and animation effects, while Plain text boxes require designing from scratch.
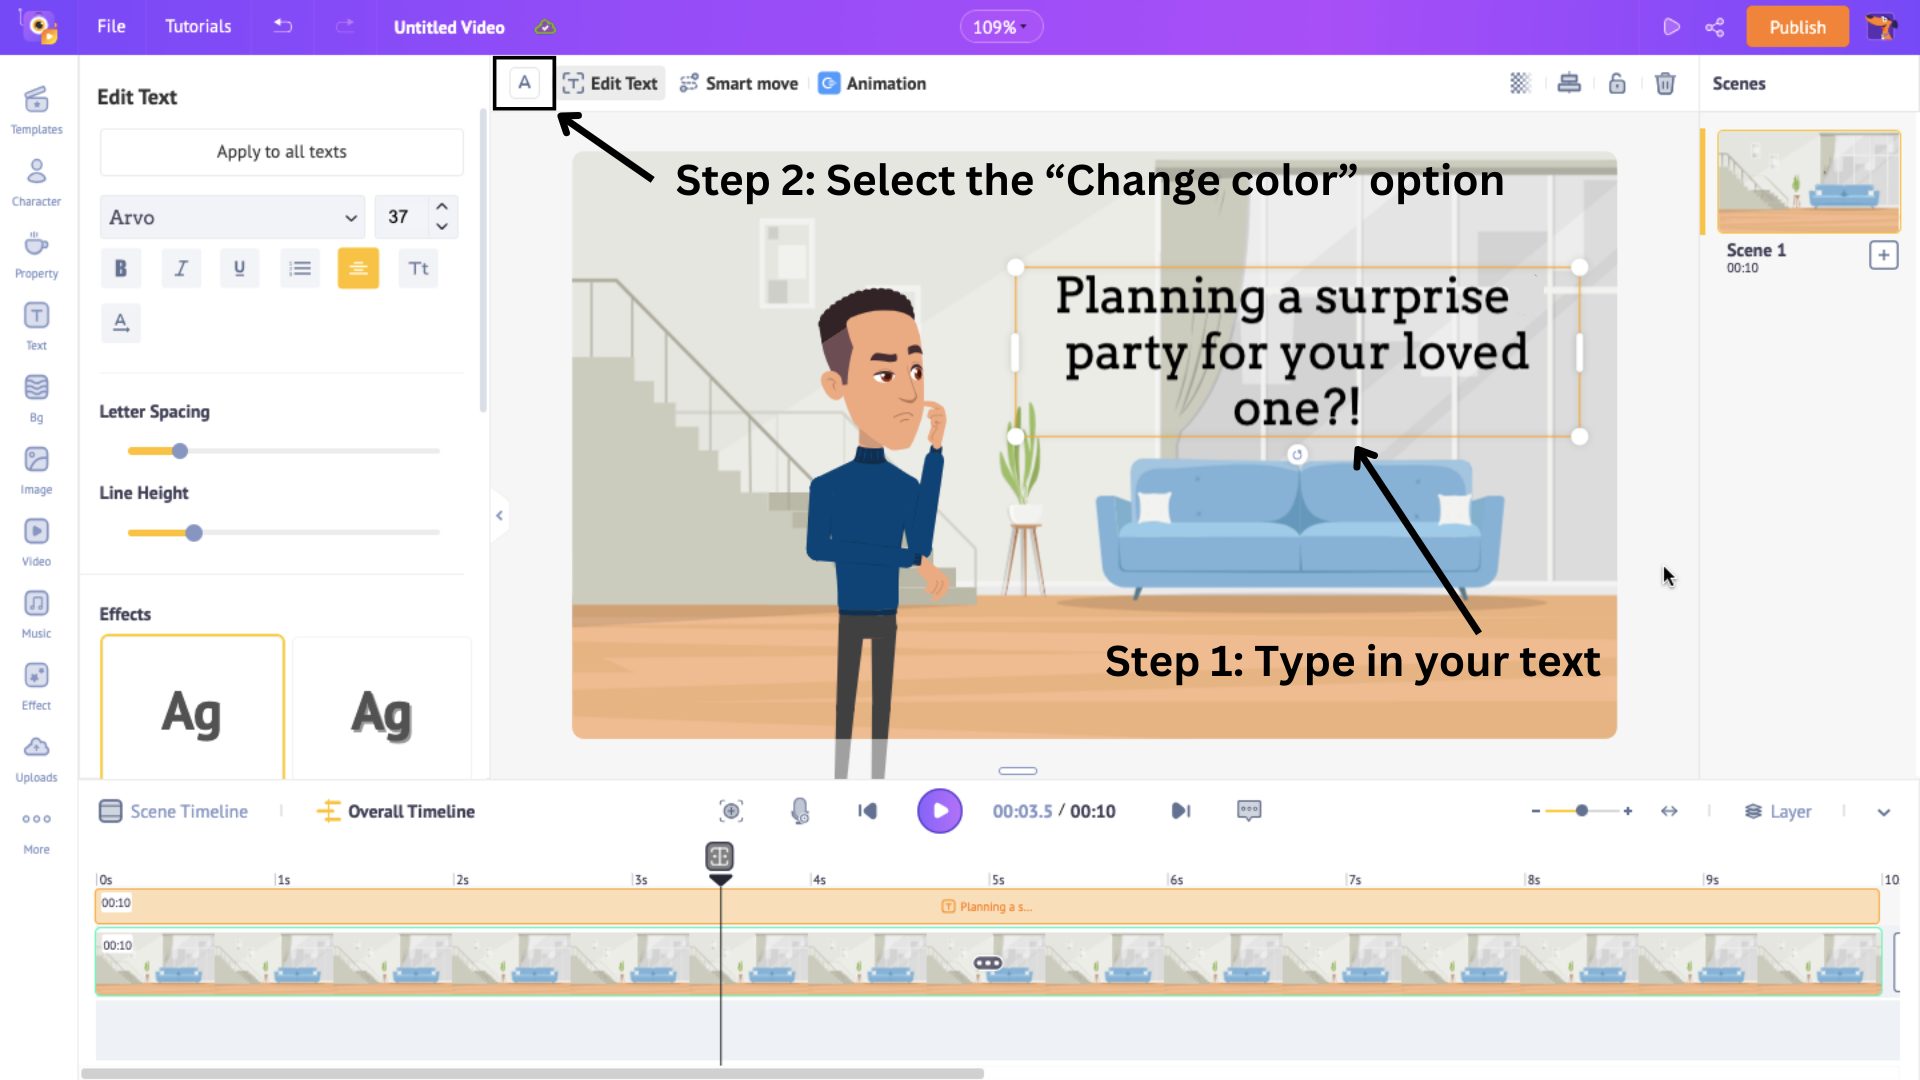
Once you choose a text box, position it in the scene and type in the line. You can change the color of the text by using the “Change Color” option above the workspace.
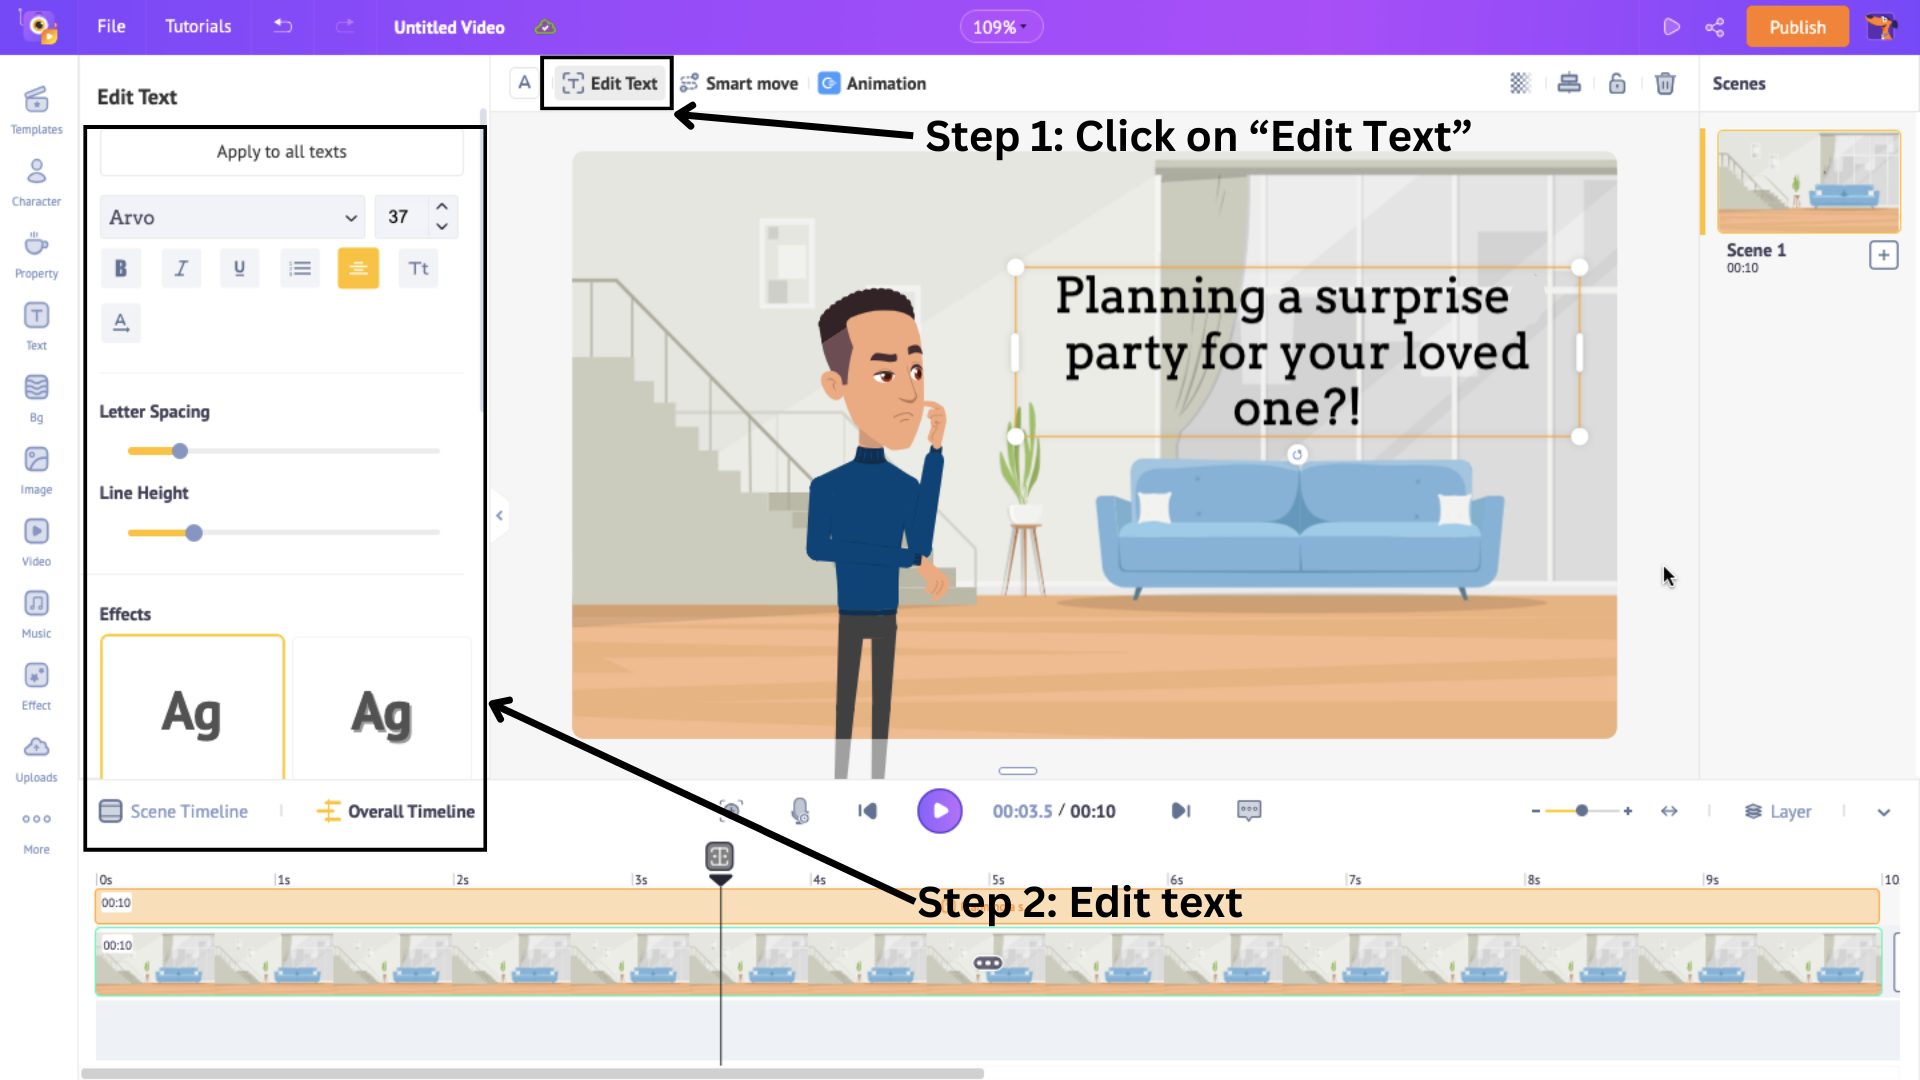
You can edit the text, including its font and size, and add effects to it from the Edit Text panel on the left.
When you click on the text box, a yellow section appears on the timeline. You can adjust the text’s appearance in the scene just like how we did for the character before.
Now that we have edited the text, it is time to add animation effects to make it lively. To do that, select the text box and click on Animation.
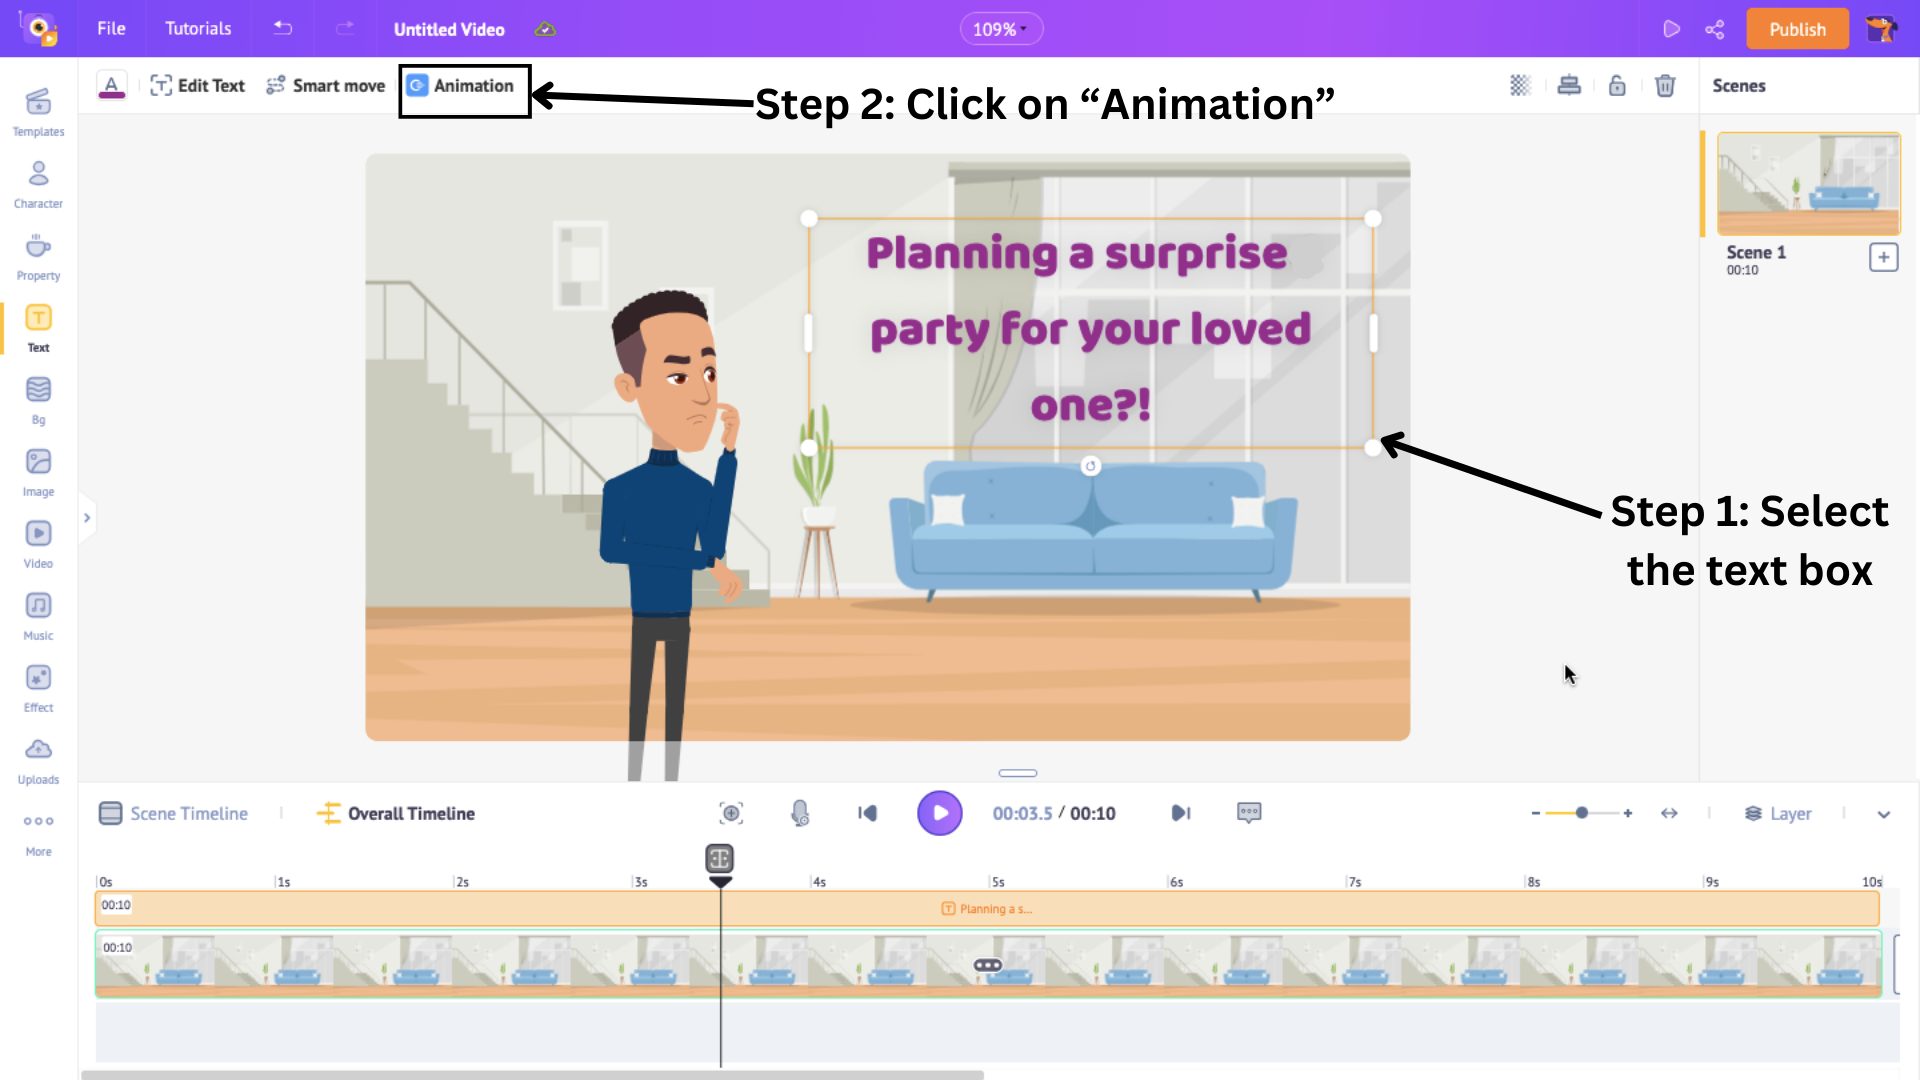
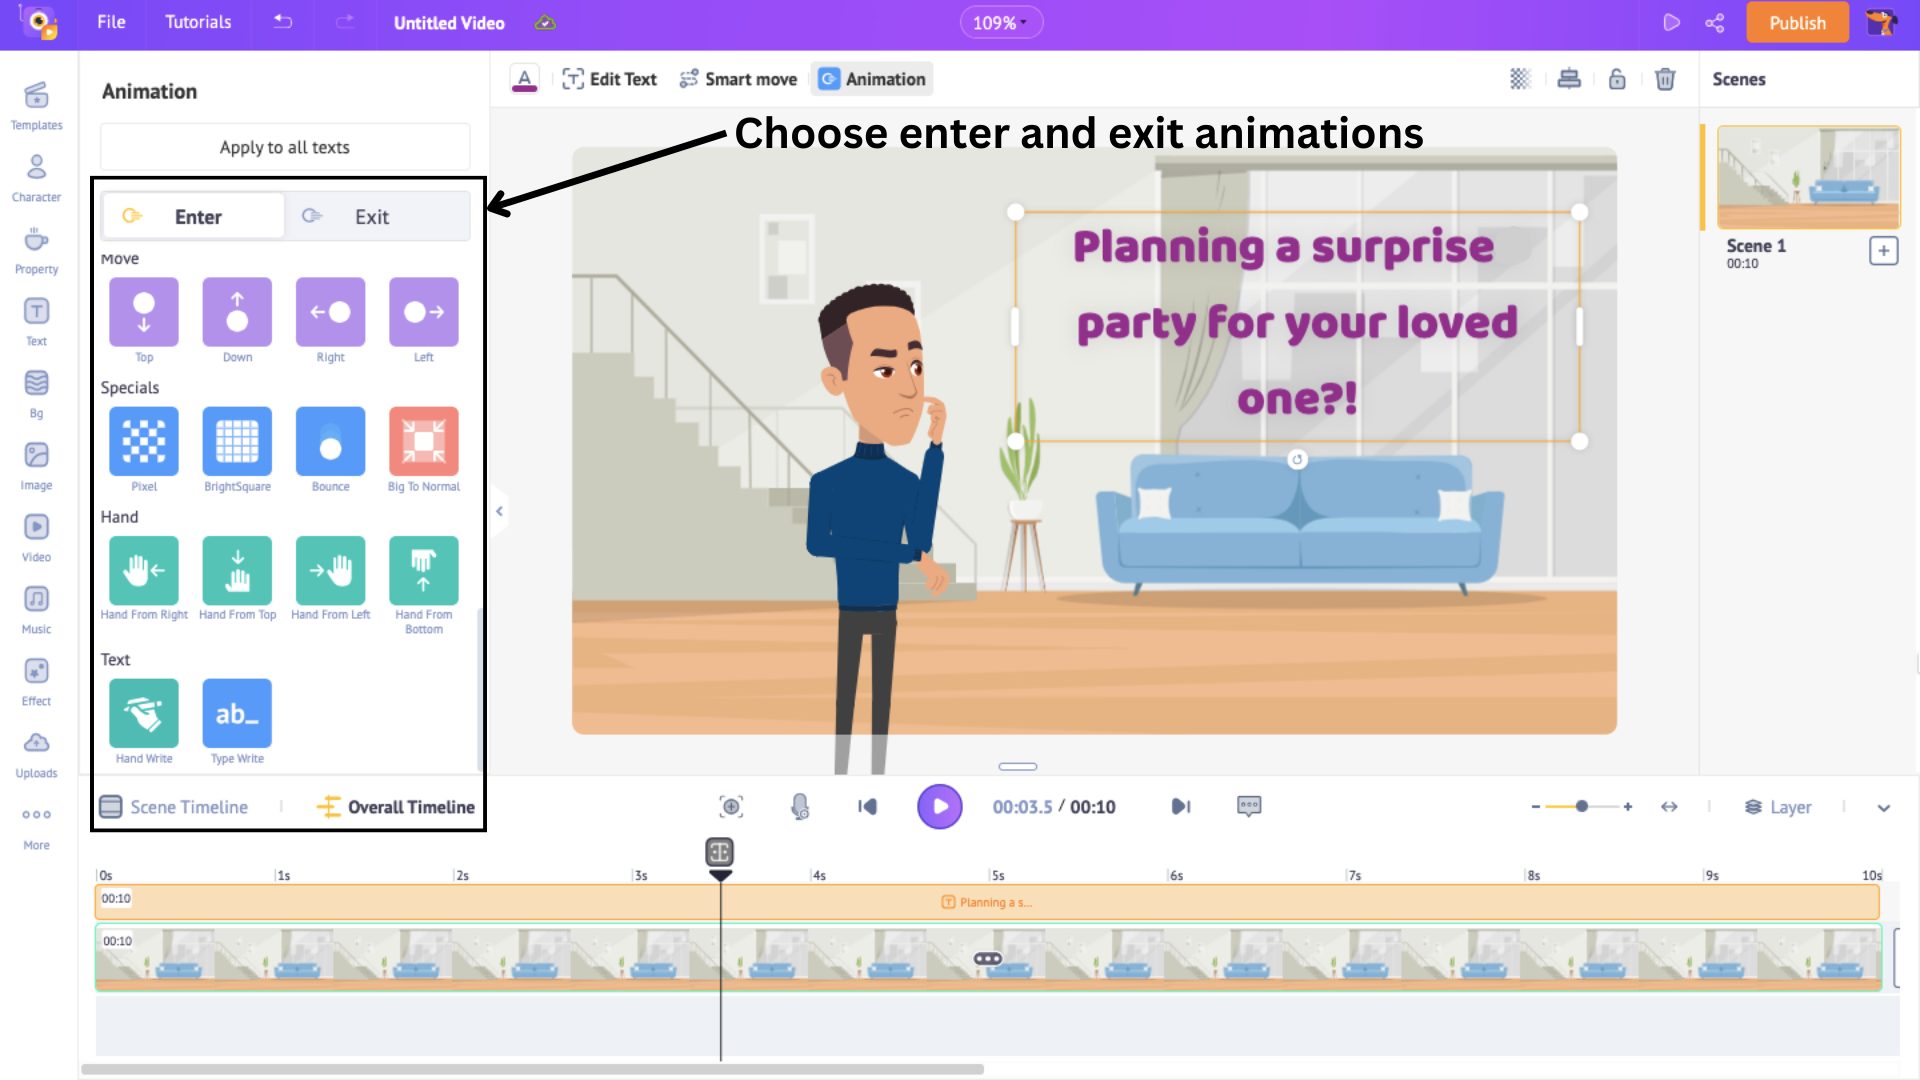
This will open a list of 35+ enter and exit animation effects to choose from for your text.
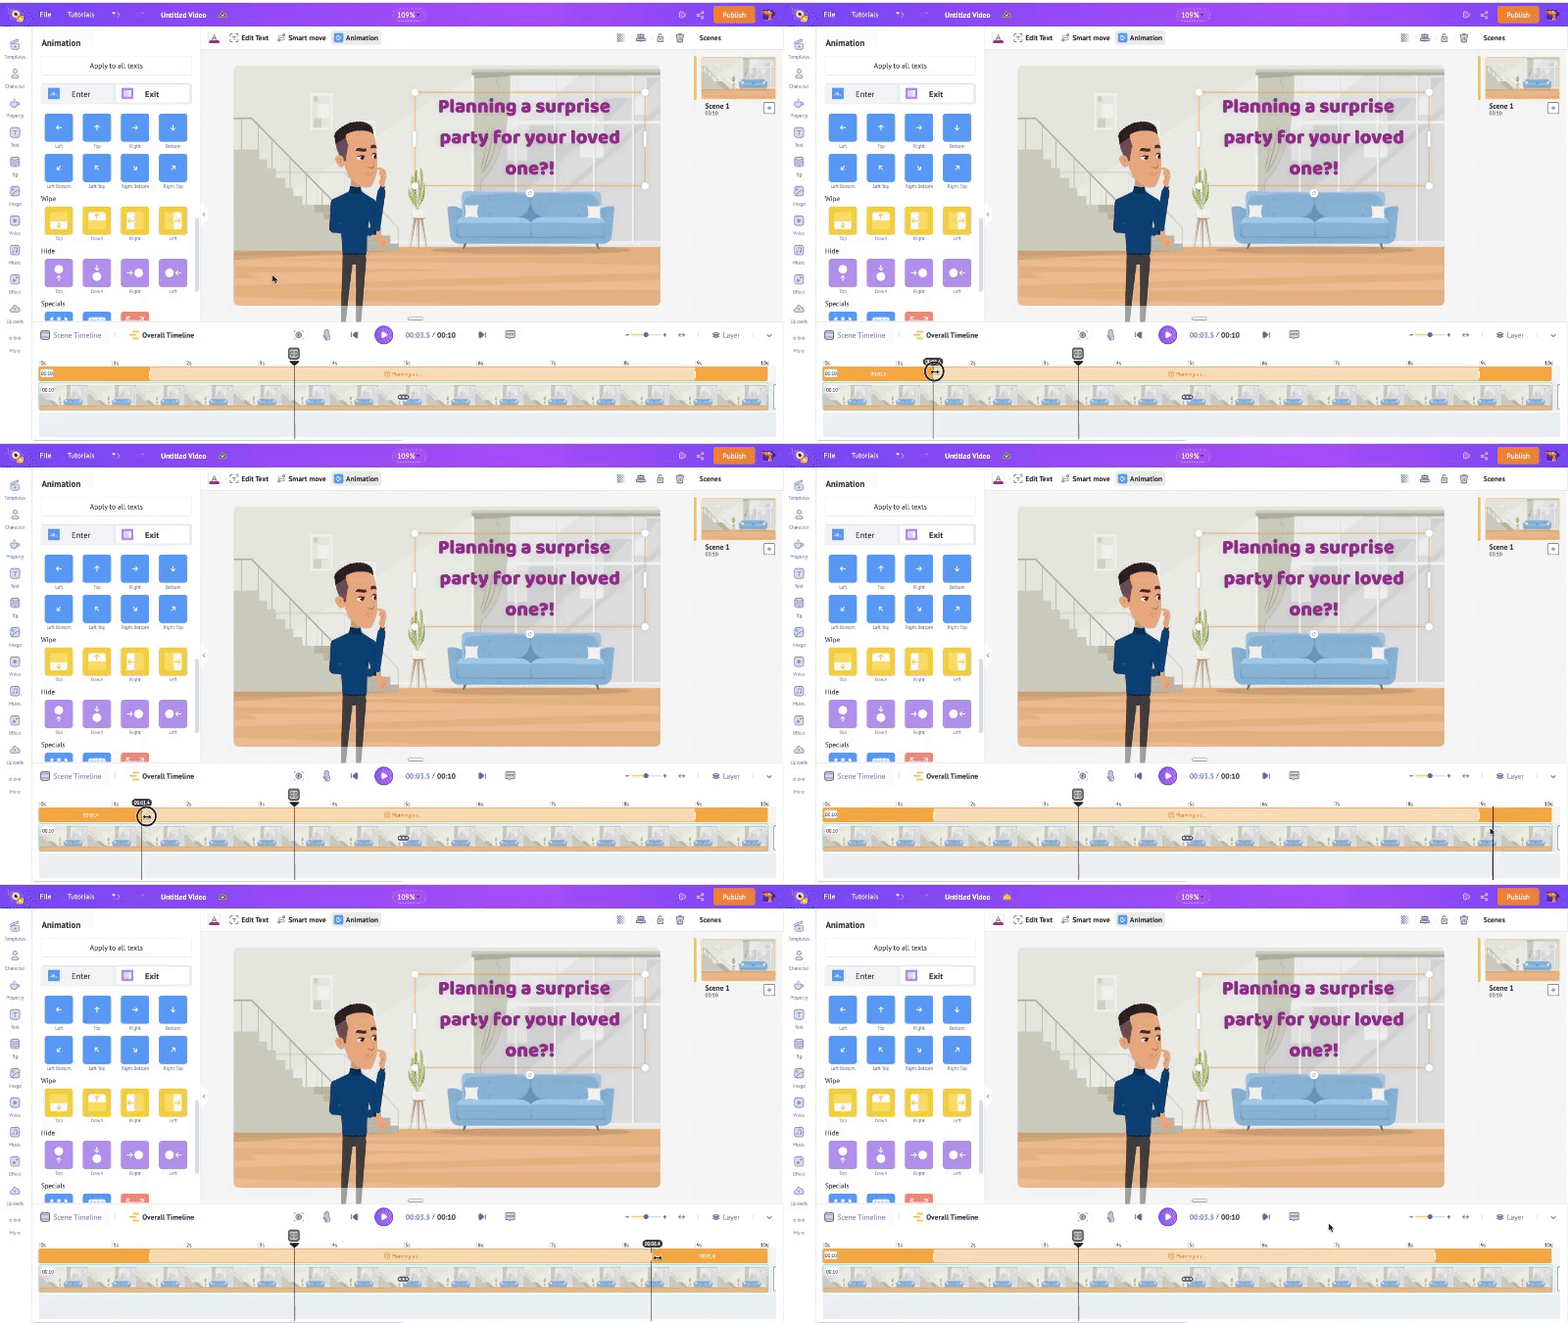
Once you select the effects, new highlighted sections will appear on both ends of the yellow section on the timeline. These highlighted sections represent the duration of the enter and exit effects.
To control the animation duration, drag the inner corners of the highlighted sections.
So far, we have set the scene’s background, created a character, animated it, added a text box, and added animated effects to it.
Next, let’s see how to add a property to the scene.
4. Property
Properties add weight to a scene. They can be a simple vase or a desk, but it makes a scene complete.
For my video, I wish to add a coffee table to the scene. Let’s see how. To add a property, click on Property option in the library.
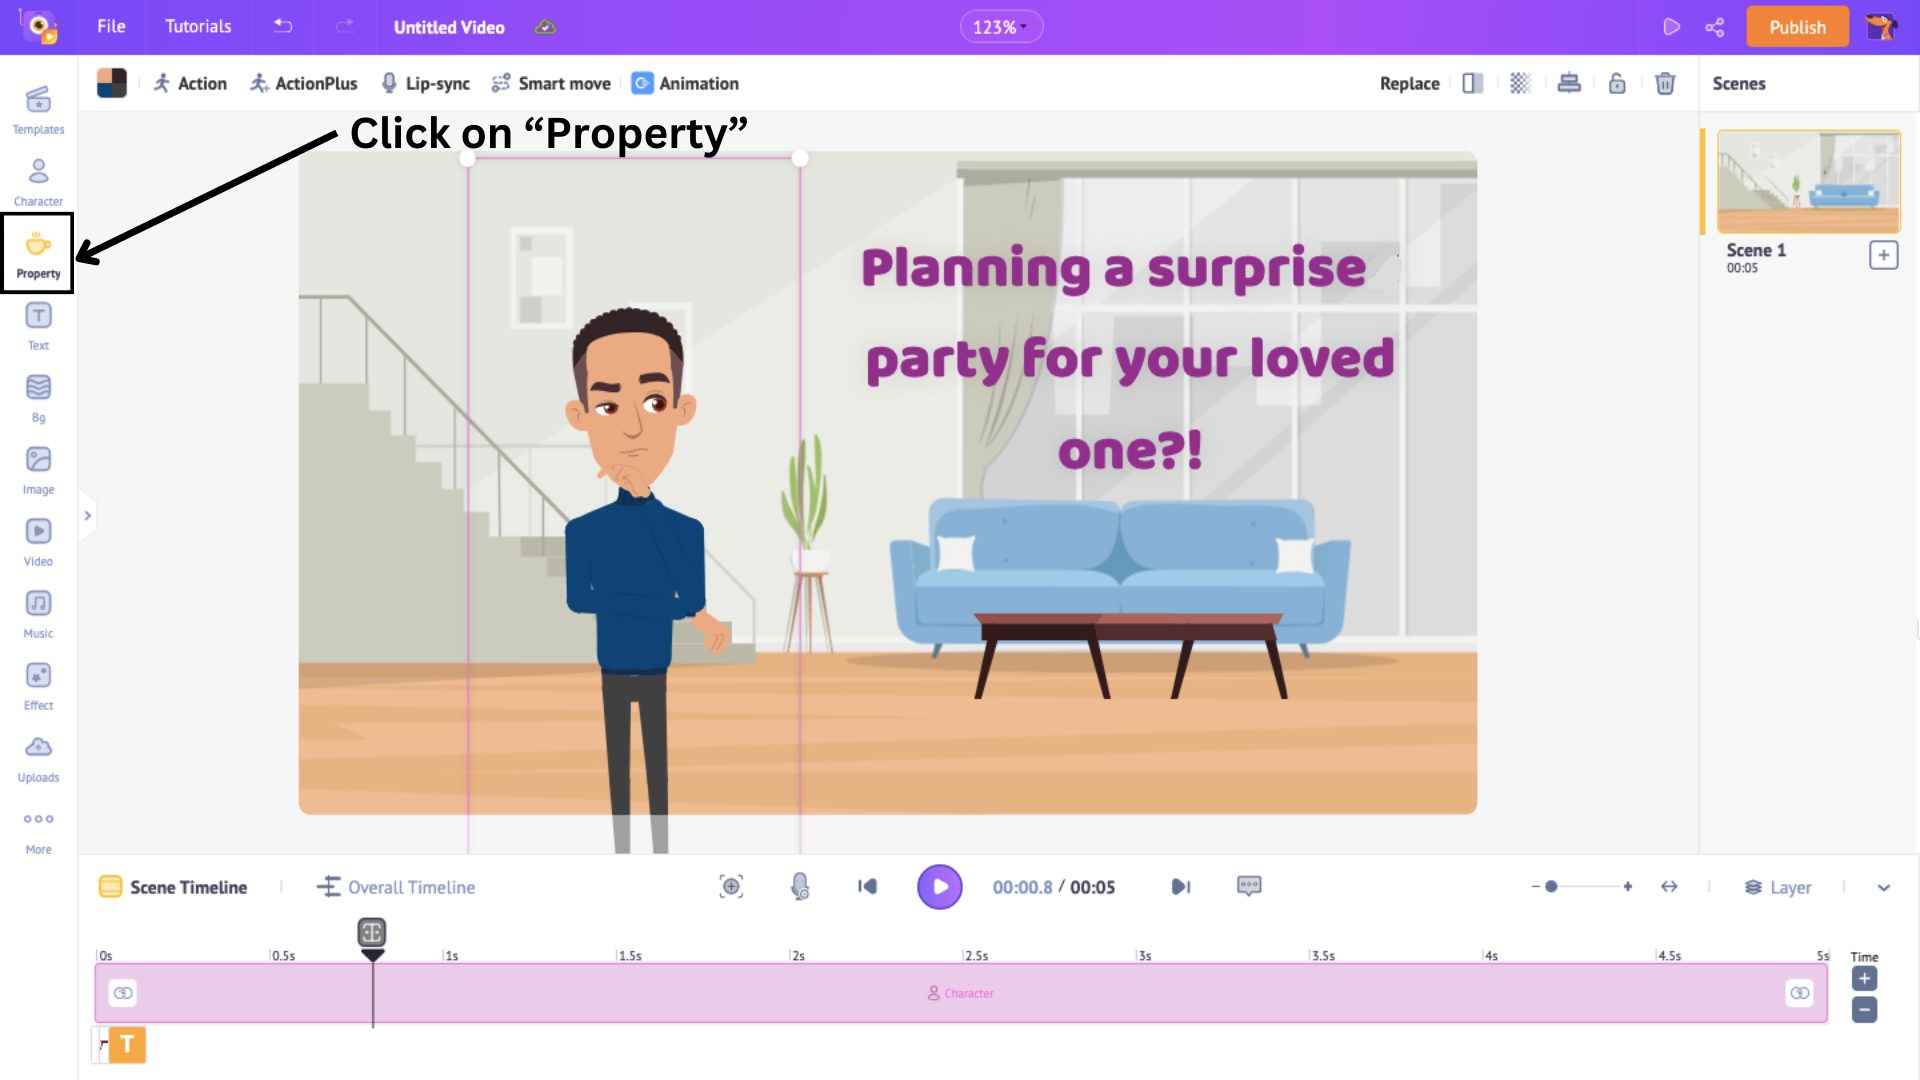
Here, there are 70K+ icons and properties, including shapes, buildings, furniture, grids etc. You have so much to explore and use in this section.
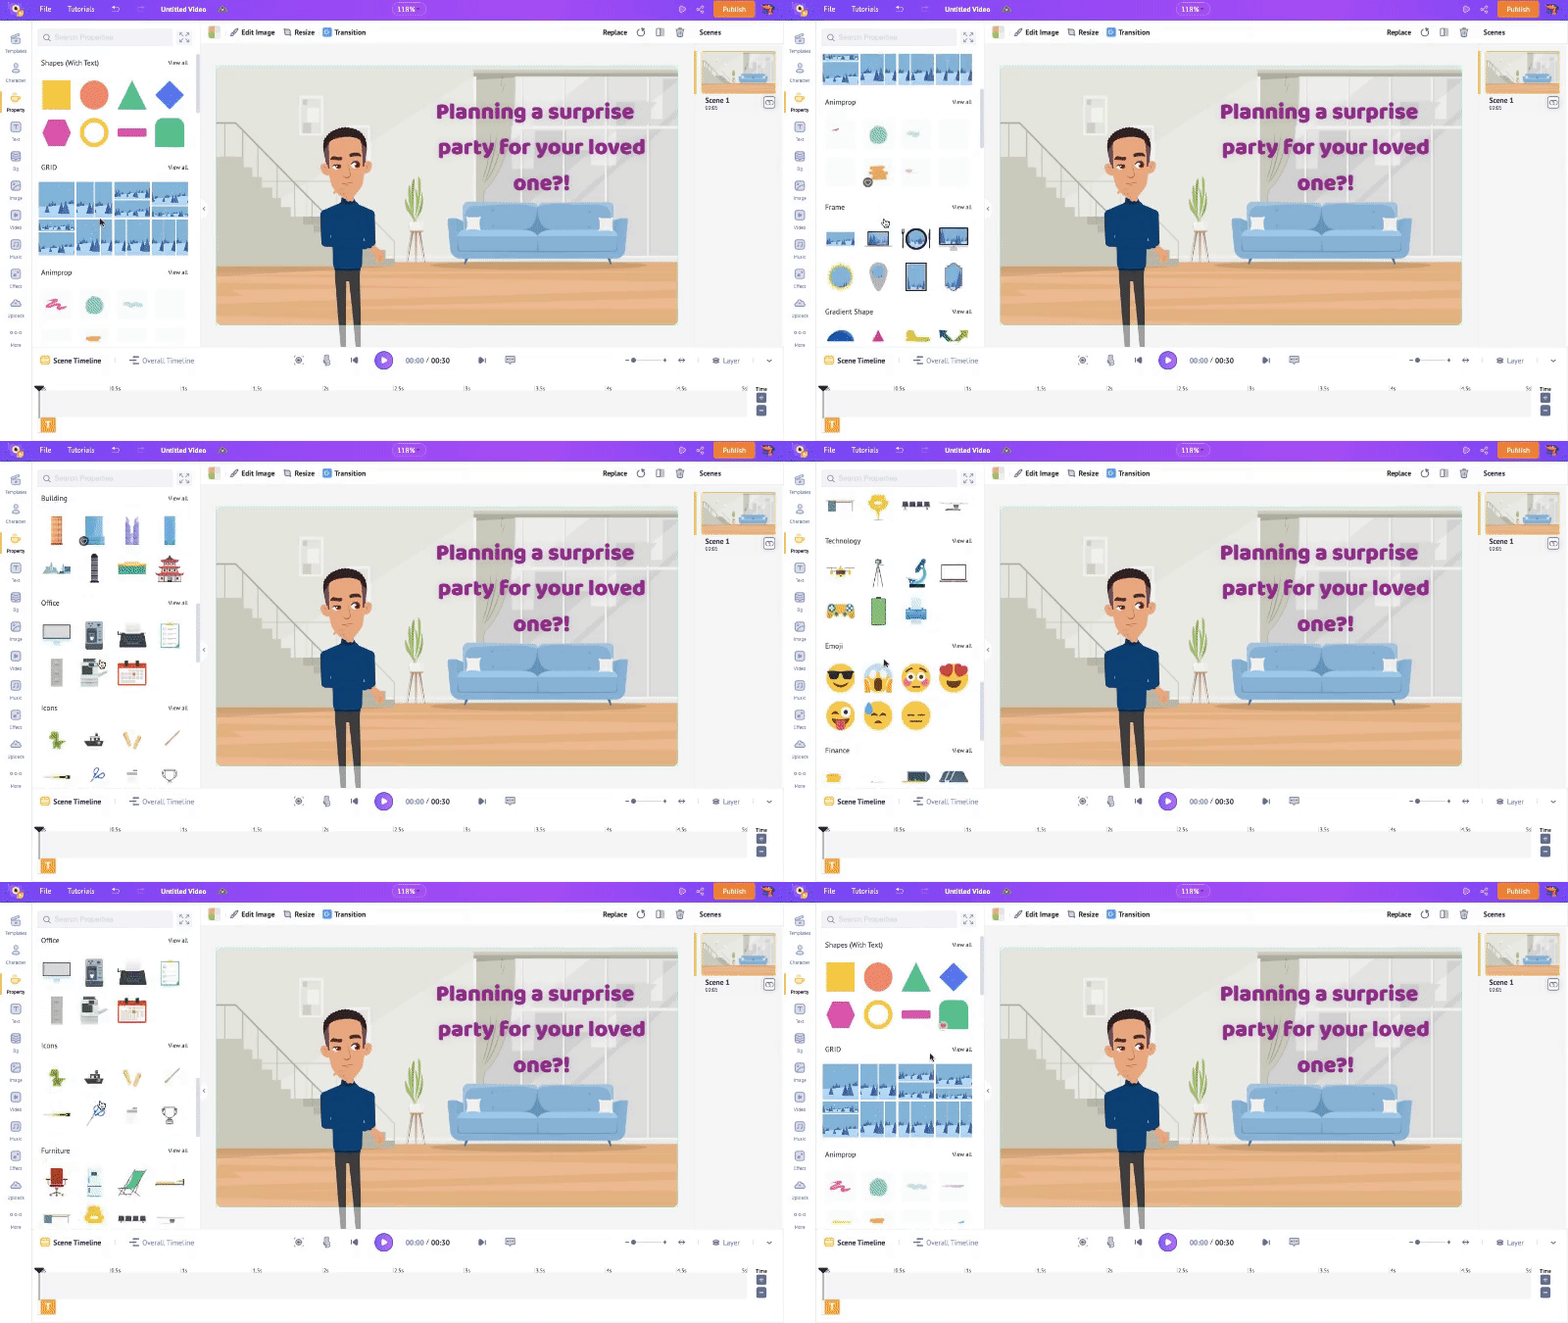
Now, since I want a coffee table, I can search for it in the furniture section or in the search bar. I’m going to use the search bar. Once you select a property, resize and position it in the scene.
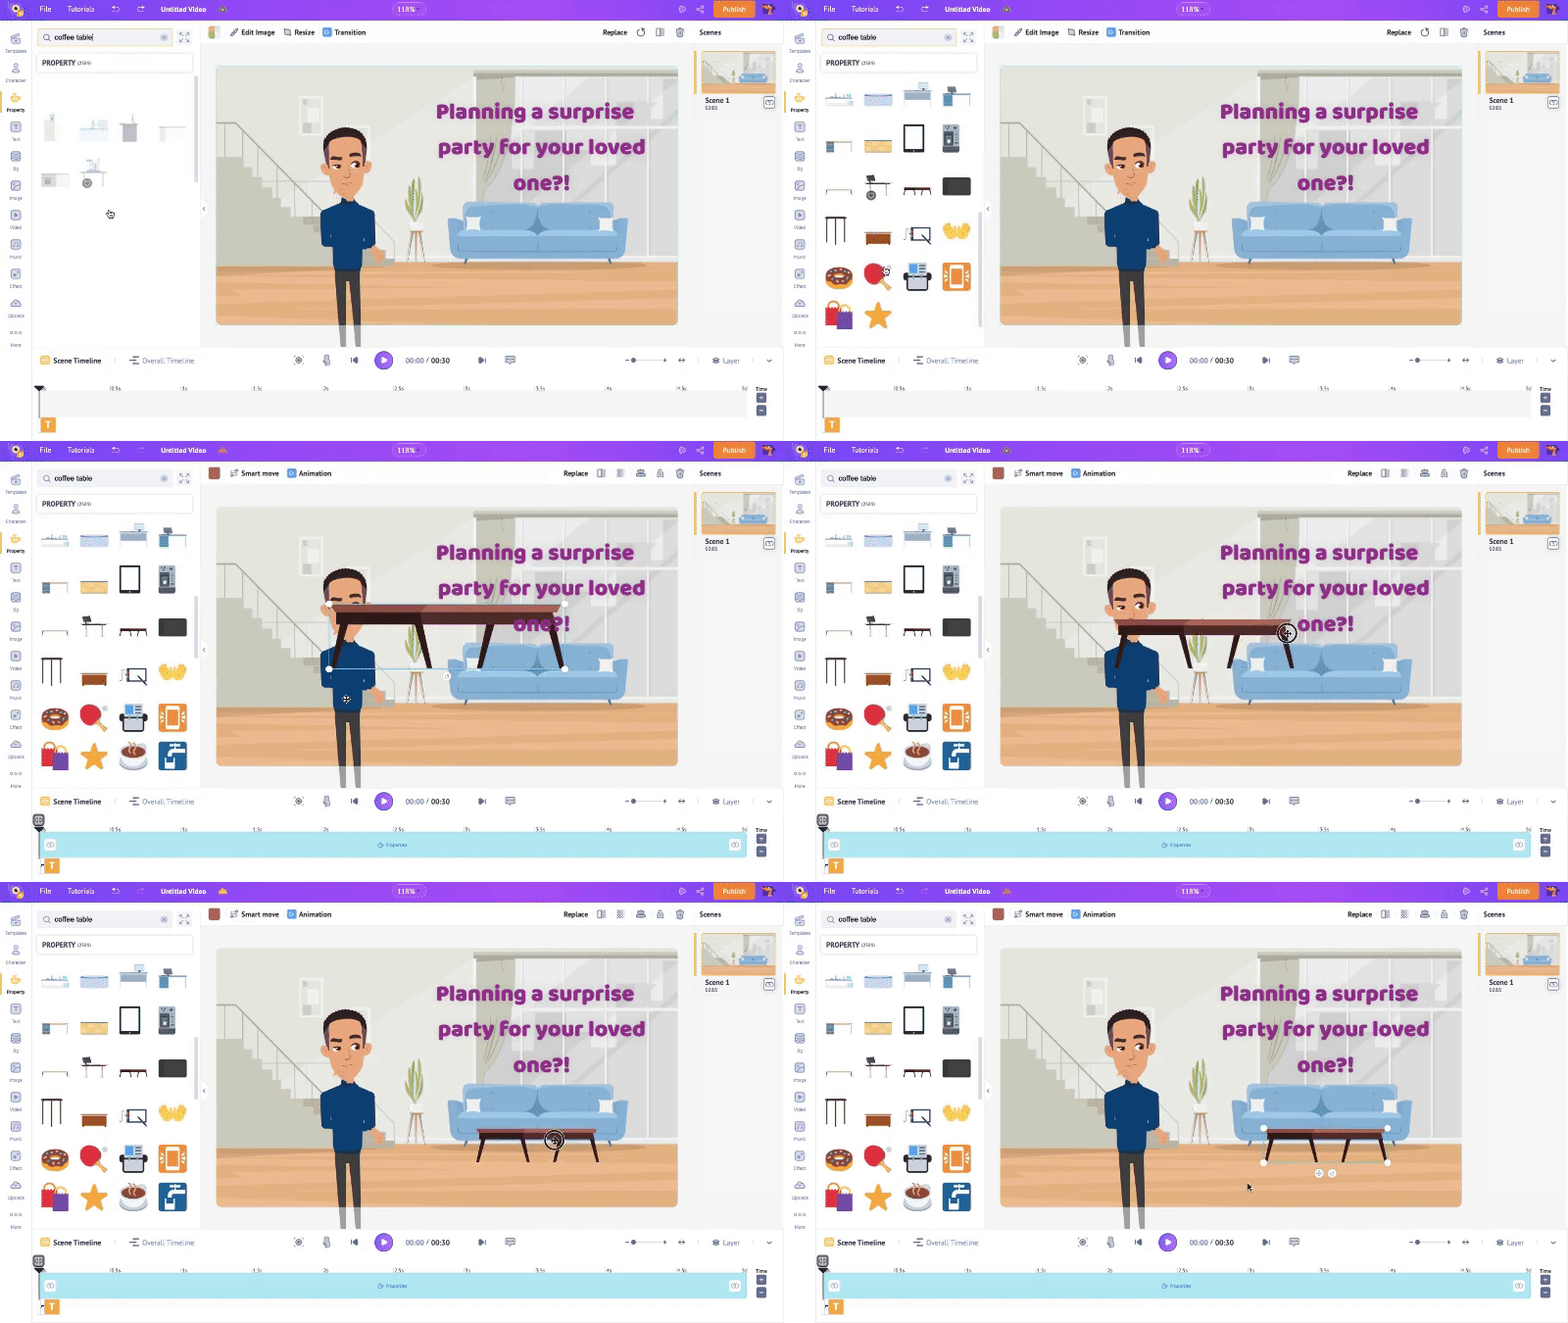
The added property has a blue section on the timeline. This shows the property’s visibility in the scene. To adjust the duration, drag the corners of this blue section to the precise time.
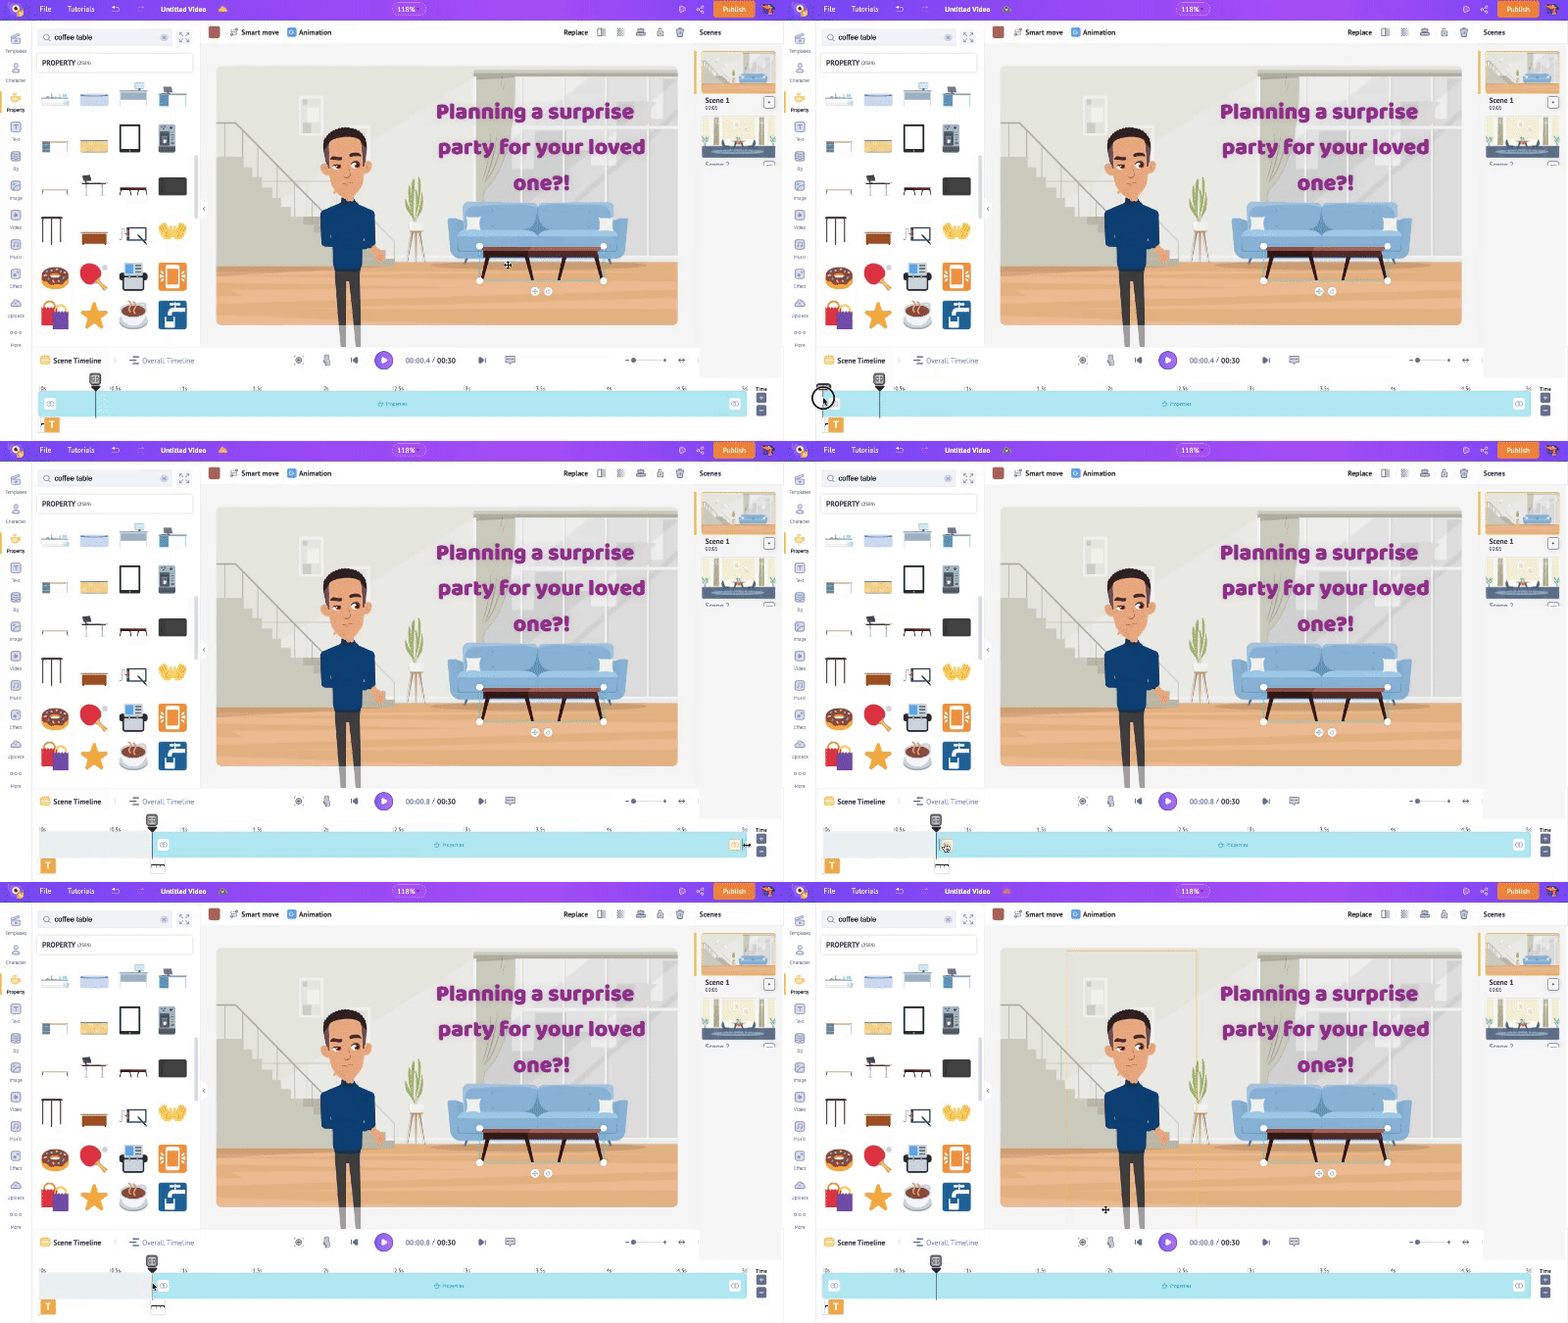
I want the coffee table to appear throughout the scene. So, I’ll have the blue section throughout the scene timeline.
And that is how you add a property!
You can create new scenes similarly, adding the lines from your script.
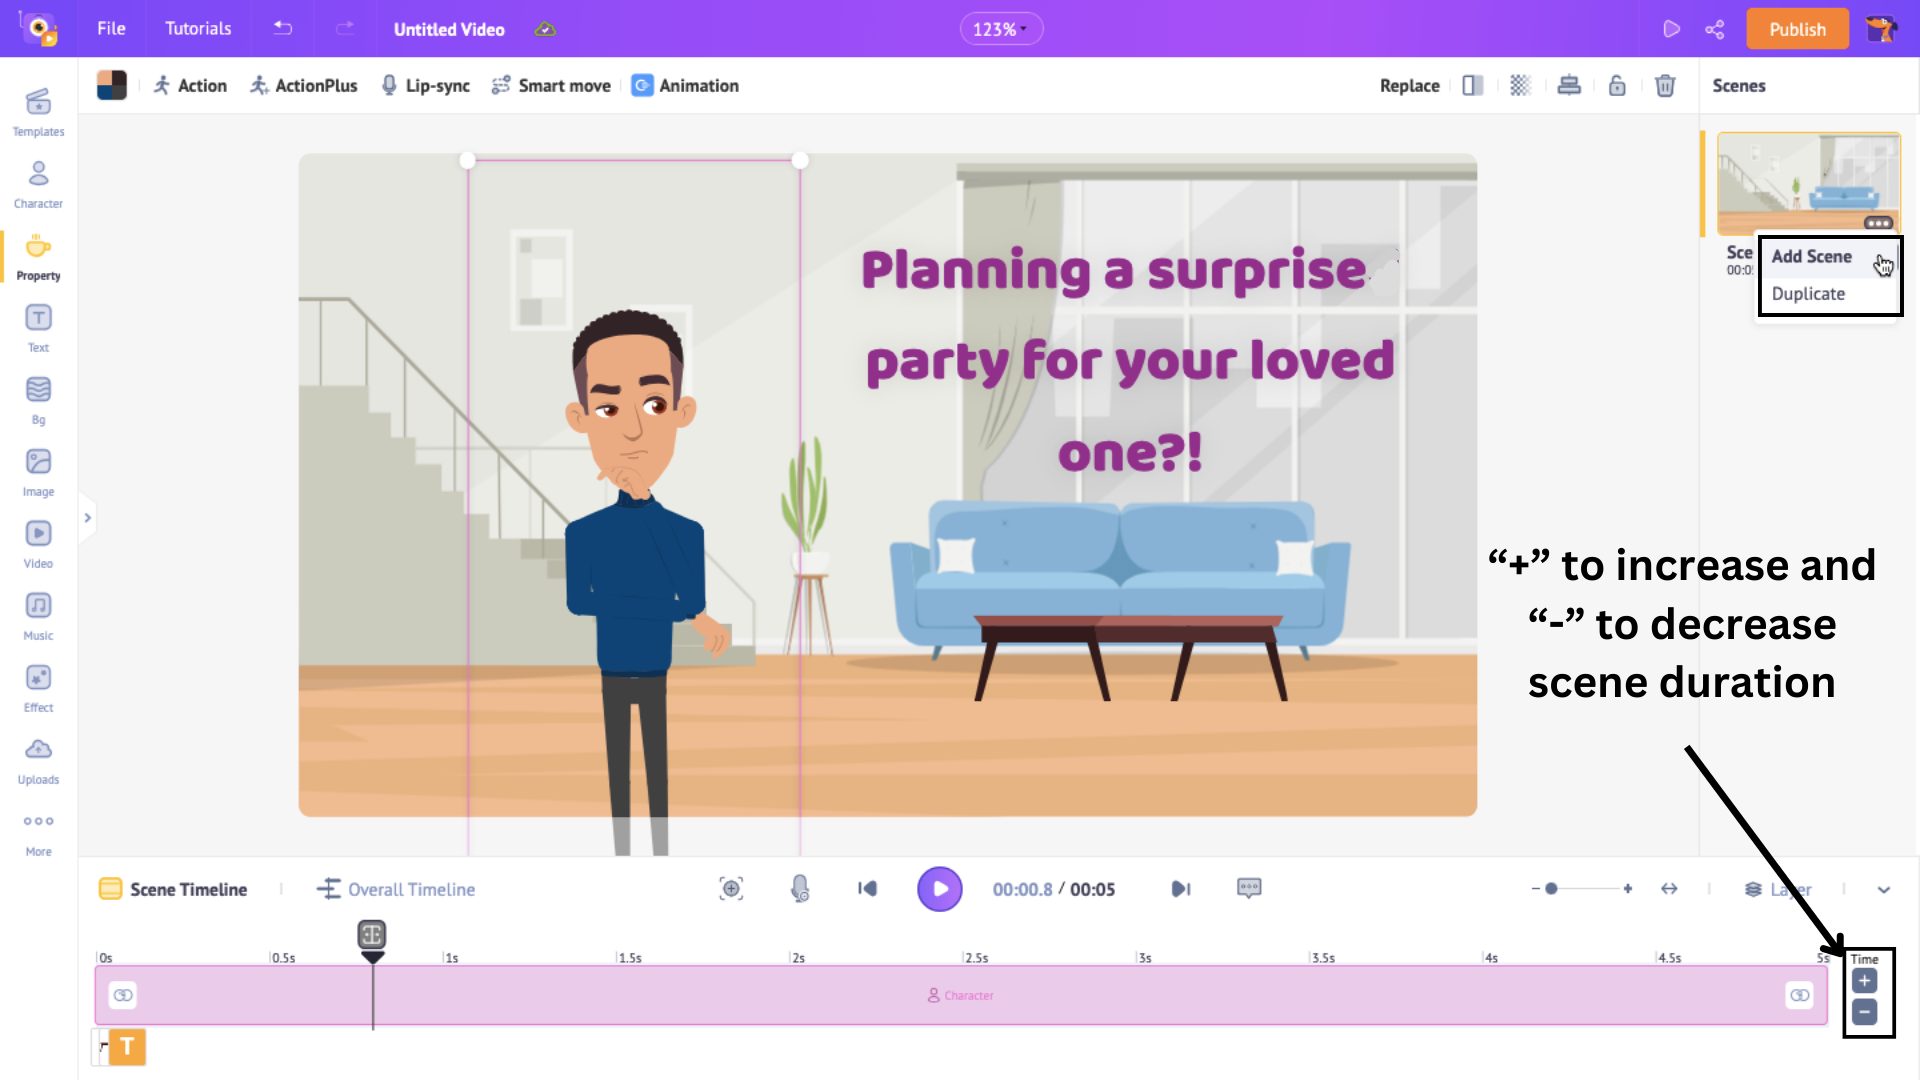
If you want to add a new scene, click on the three dots in the scene on the scenes section. It has two options: Add Scene and Duplicate.
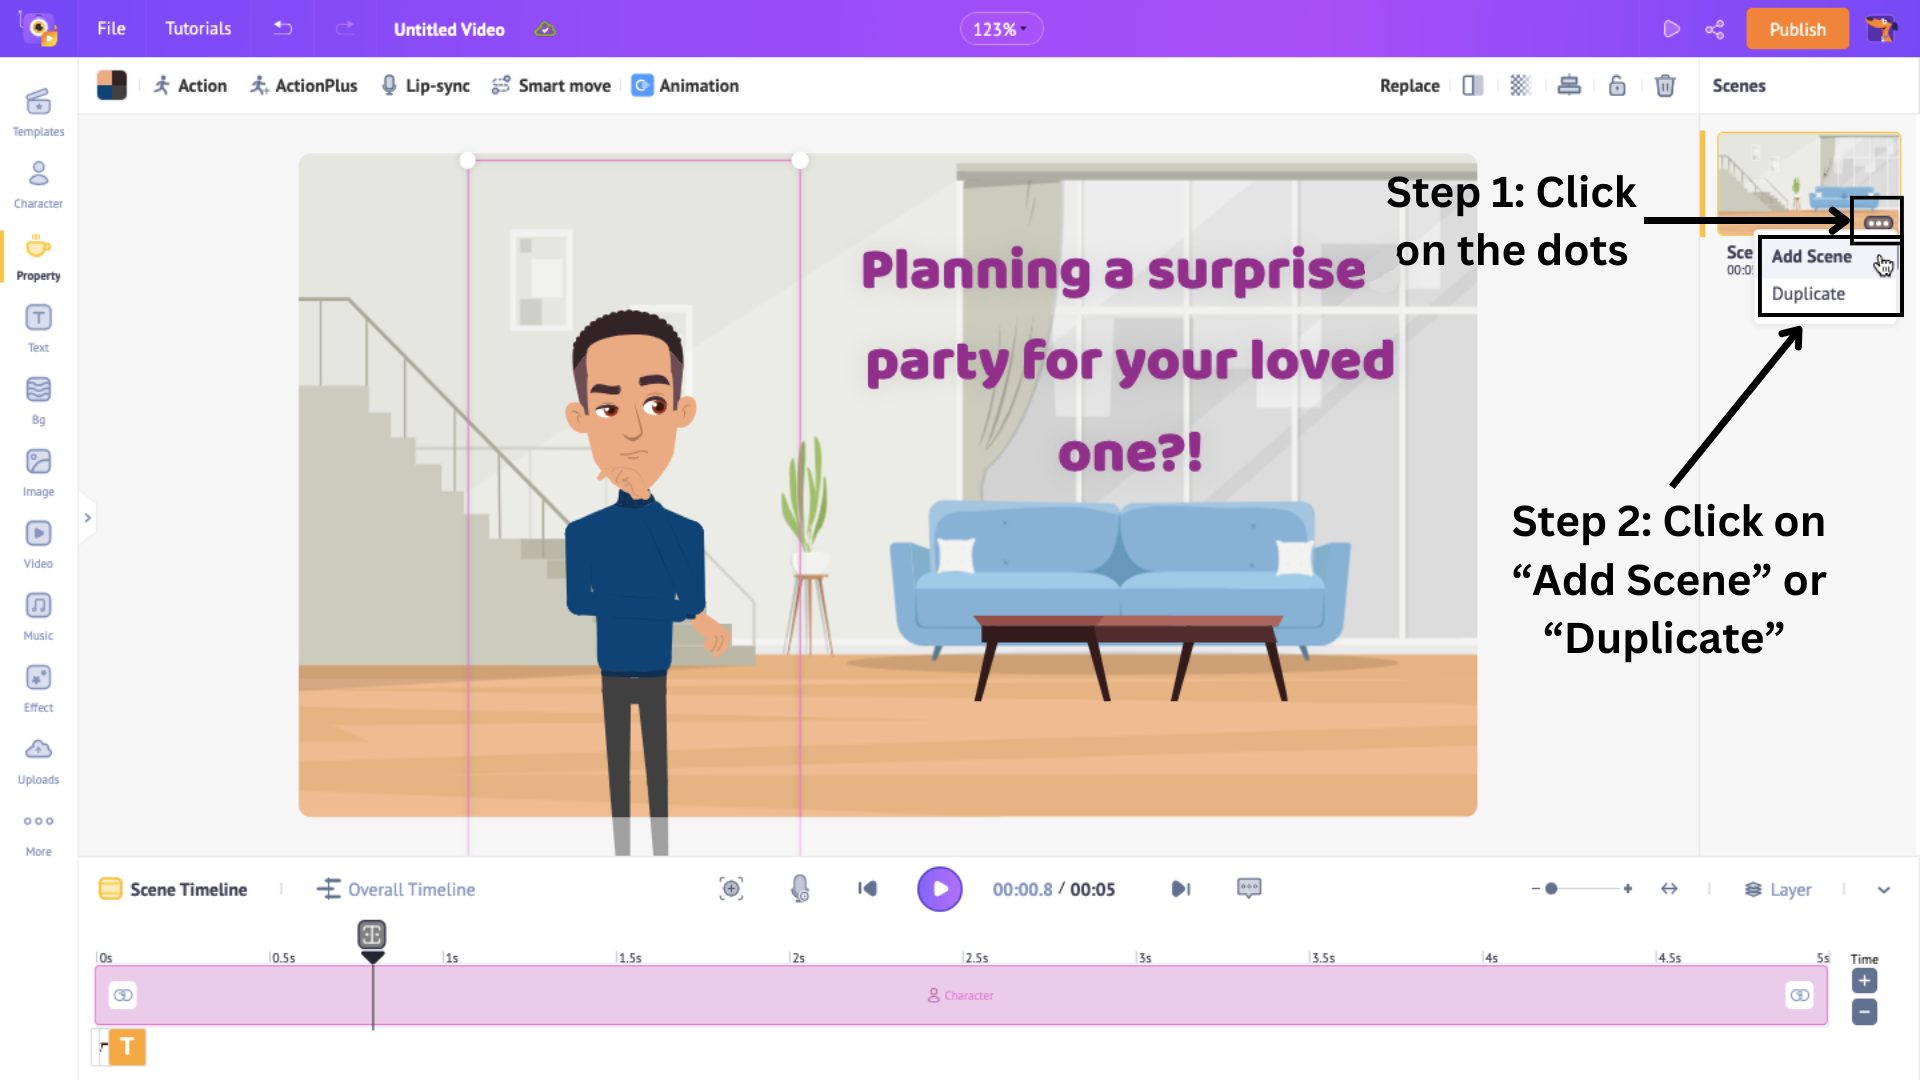
Choose Add Scene if you want a blank scene and want to create from scratch. Or, choose Duplicate if you want to make a slight changes to an existing scene.
Note that the scene’s duration is 10 seconds by default. You can always adjust the scene’s duration by clicking on the “+” and the “-” signs in the bottom right corner to increase or decrease the duration.
After you finish creating all the scenes required for your explainer video, it is time to add the final touch.
5. Music Track
To make an effective explainer video, music plays an important role. To add music, click on the Music section of the library. Click on Expand Library to maximize the Music window.
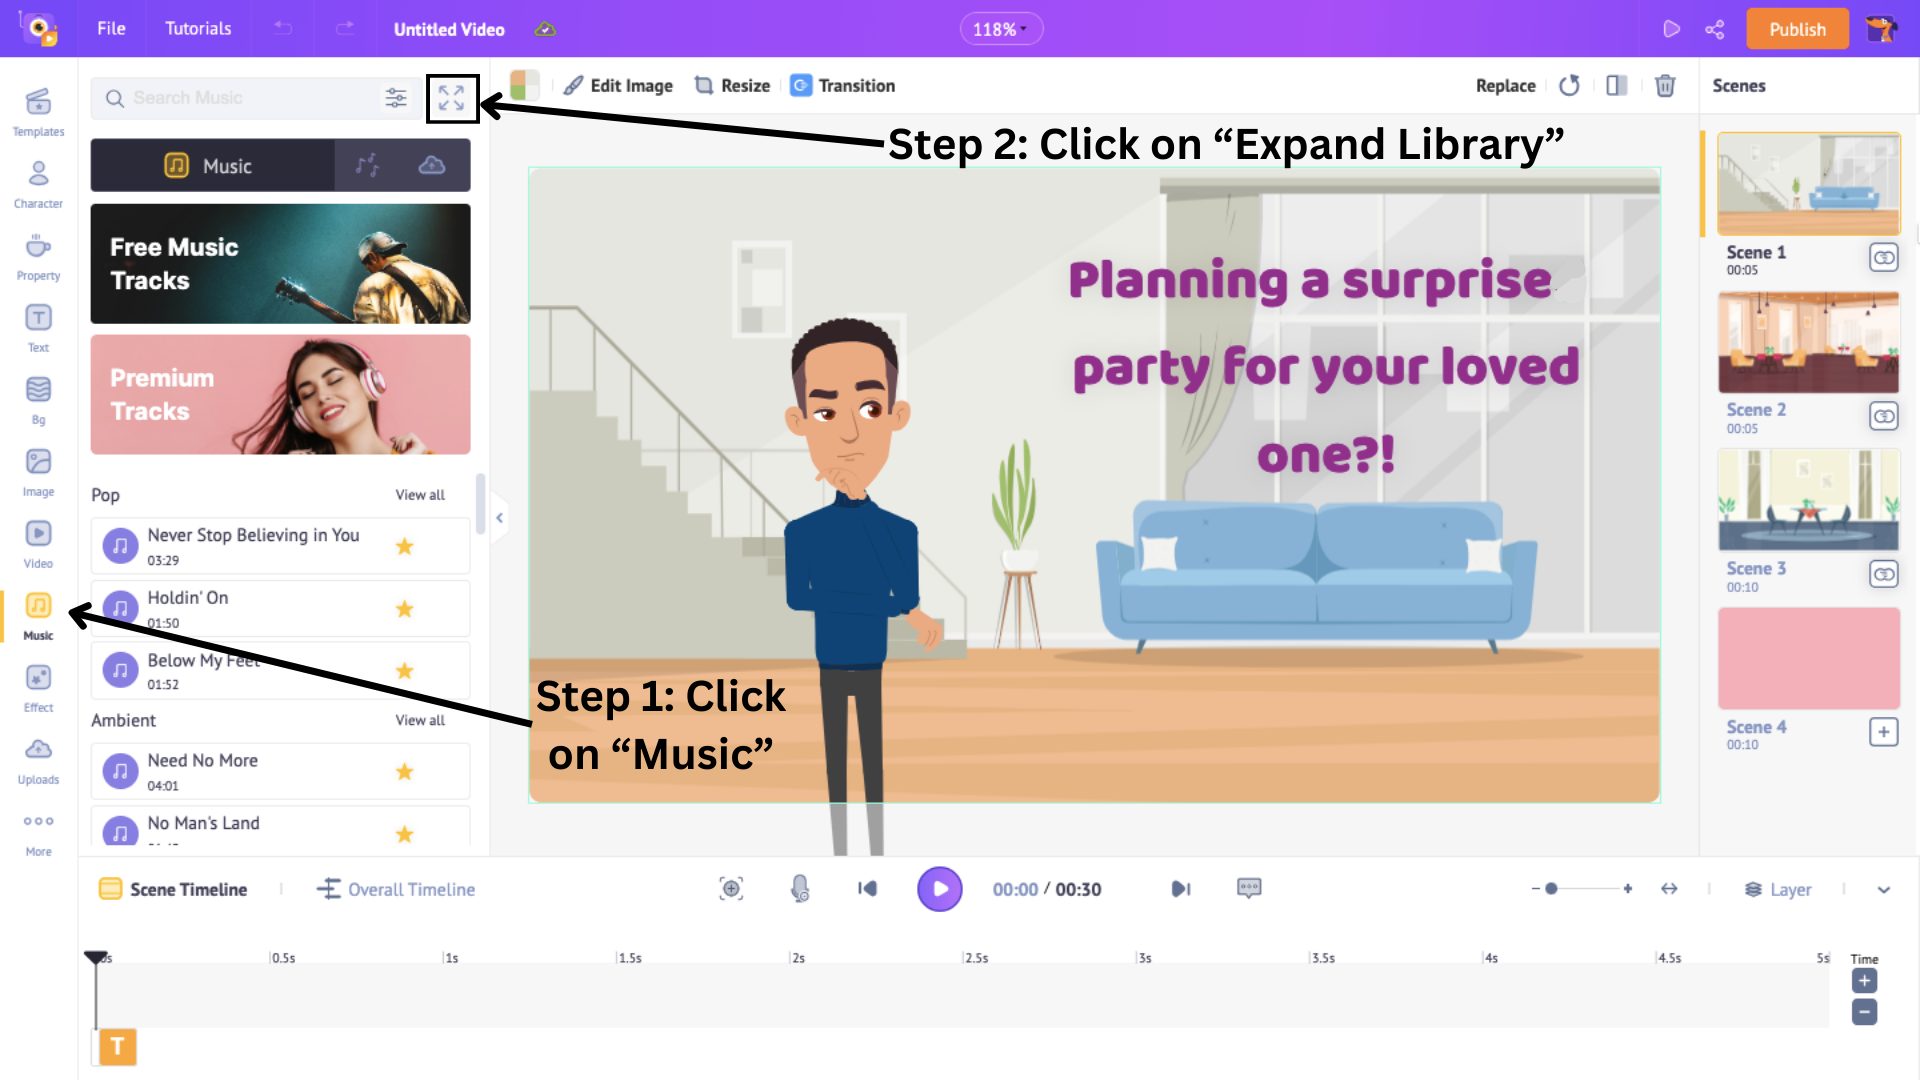
This will open 30,000+ music track options to choose from. Hover over a track to preview it and click on it to add it to the video.
We have seen few of the most important sections of the library and how we can use them to make a killer explainer video. Let’s move on to the final step.
Step 3: Preview and Download your video
The video should now look amazing. To preview the video with all the scenes together, click on the Preview button.
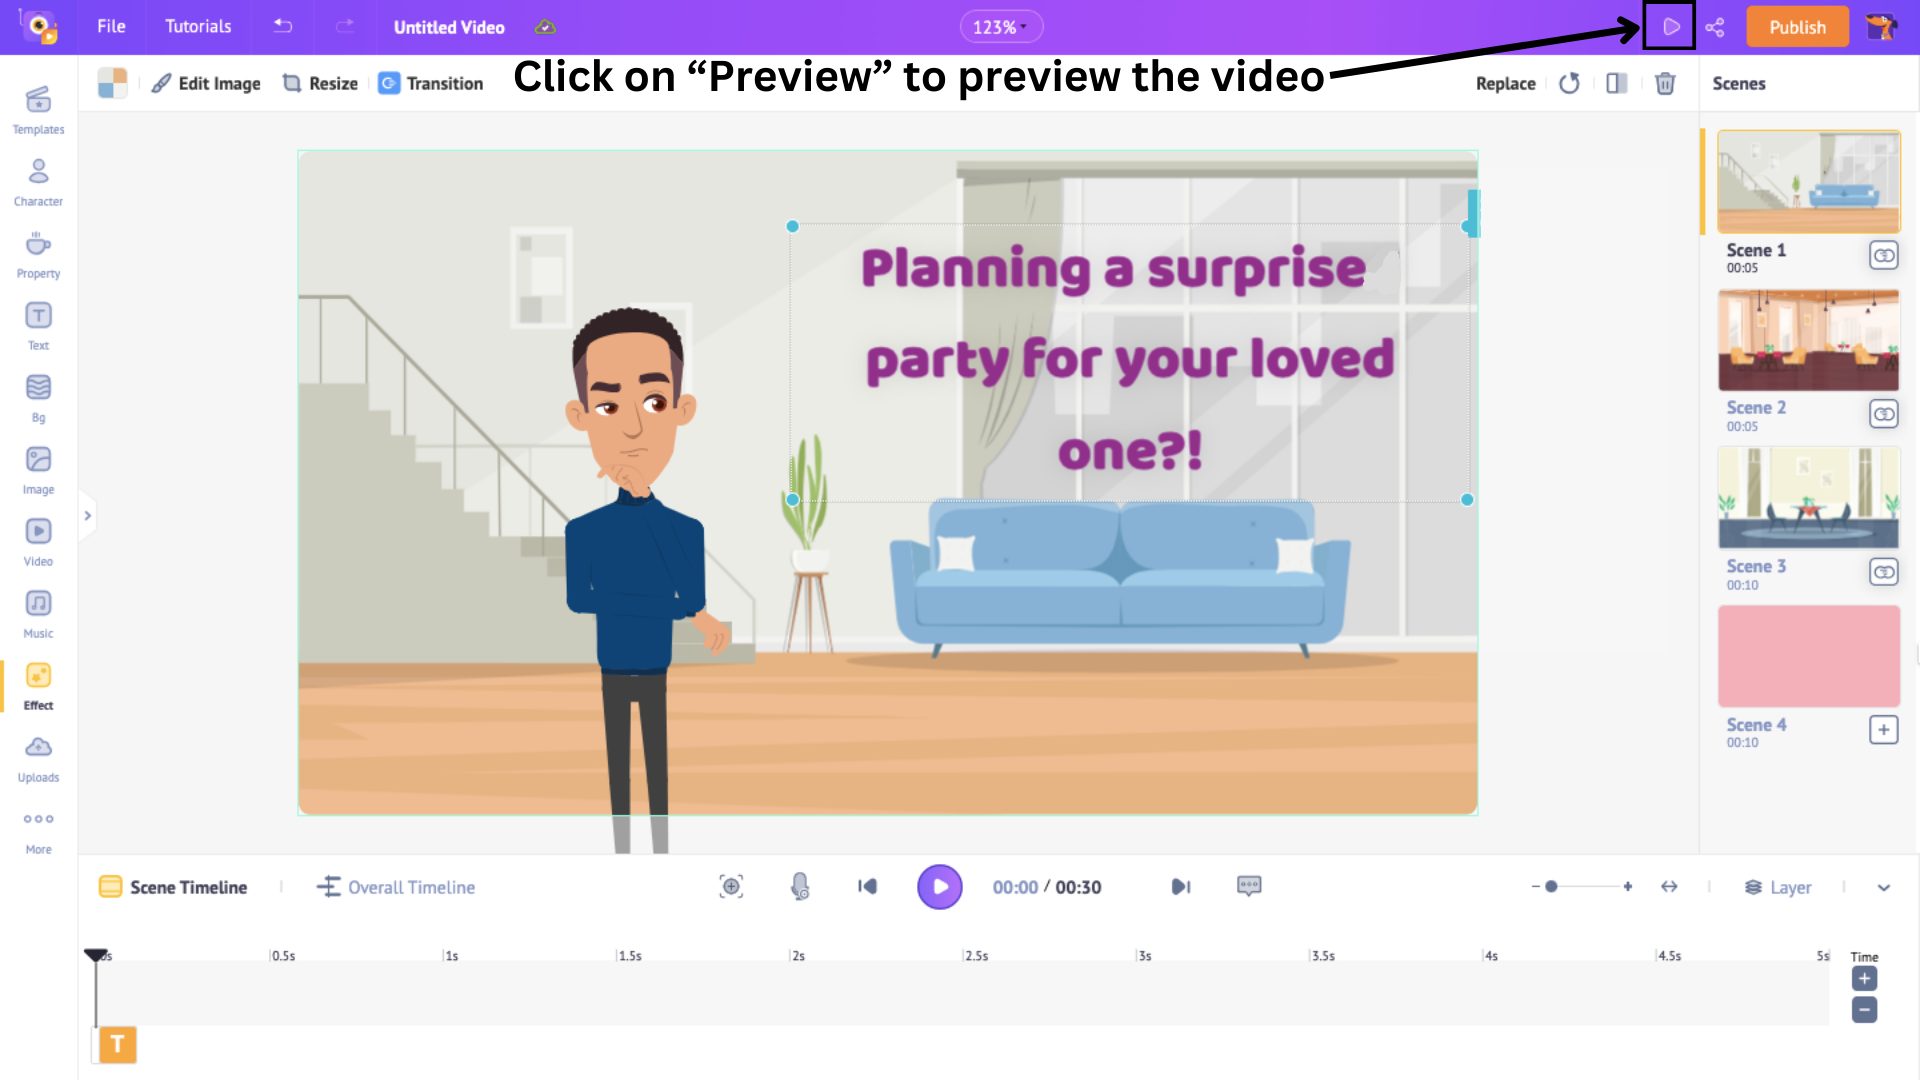
If you’re satisfied with the output, click on Publish>Download Video to download the video.
Then click on Download after you choose the resolution and format of the video.
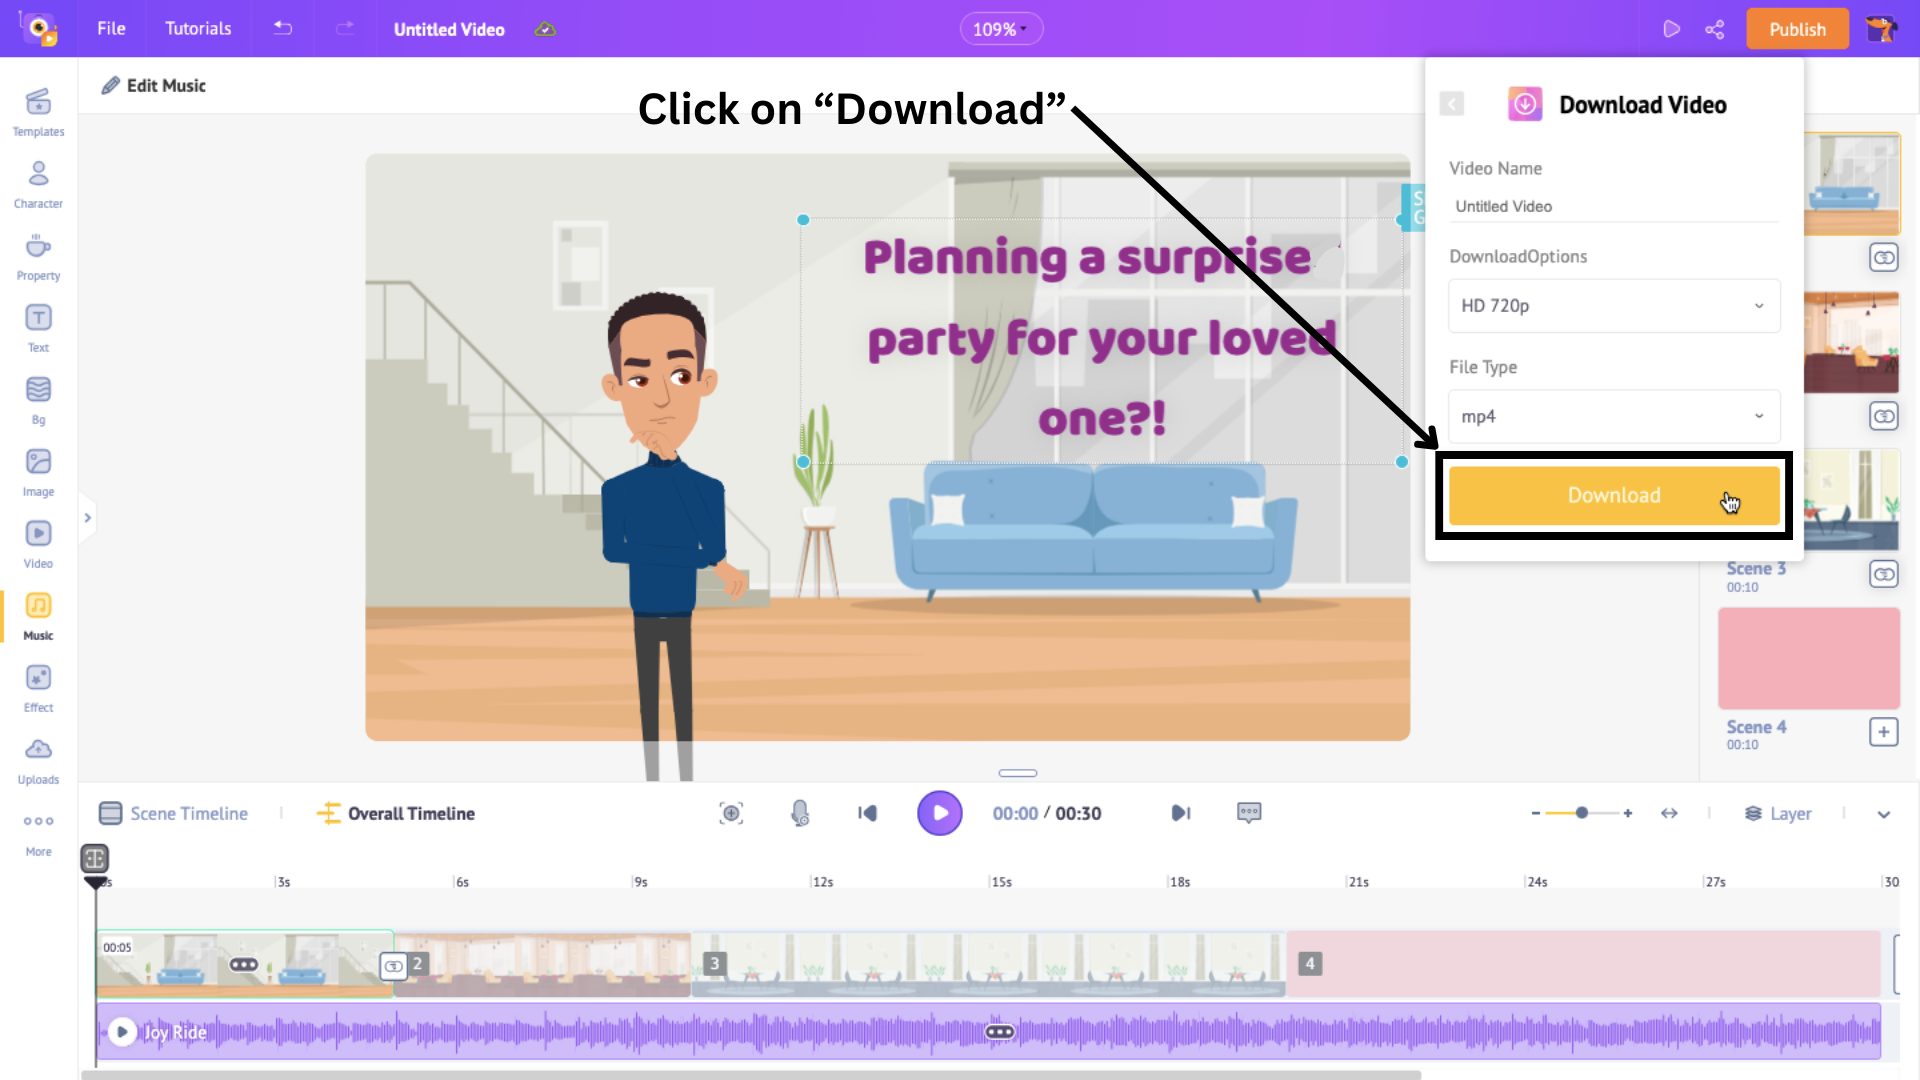
The video will be rendered and ready to download on the exports page.
***
So, that’s how you make an effective explainer video! You can choose any method to create an amazing 2D explainer video.
If you are in need of some inspiration, check out the 40 best explainer video examples to inspire your next.
Or, if you are confident with your vision and can’t wait to get started, head over to Explainer Video Maker to make your best explainer video.
Got any questions or feedback? Feel free to add them to the comments section below. We will be more than happy to help you out!
