
How to make Animated Ads? [Bound to go Viral!]

Shreshtra - November 28, 2023 - Leave your thoughts. - Last Updated: July 26, 2024 21 min read
Animated Ads! They are a game-changer for marketers, turning traditional advertising into vibrant storytelling.
In a world where conventional ads often go unnoticed, animated ads not only captivate the audience but also deliver great results.
However, the perception that animated ads are expensive to produce is a myth.
Yes! You can create a cost-effective and engaging animated advertisement that will make your audience go like this:
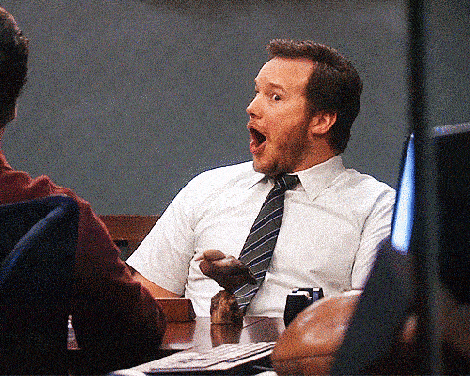
Sounds too good to be true?
Trust me, it is possible!
Animated ads featuring animated characters and vibrant colors that instantly grab the viewer's attention can also be budget-friendly and eye-catching.
How to make Animated Ads?
When creating an advertisement, a well-written script serves as its foundation. An effective ad must include an emotional appeal that resonates with the audience.
The script should use phrases like "Limited time only" to create a sense of urgency and encourage people to take action before it's too late. This time constraint will compel people to decide quickly.
Making an animated ad can seem daunting, like a complex task. But it is so simple with Animaker. In this article, we shall see two methods of creating animated ads:
Let’s look at each method in more detail.
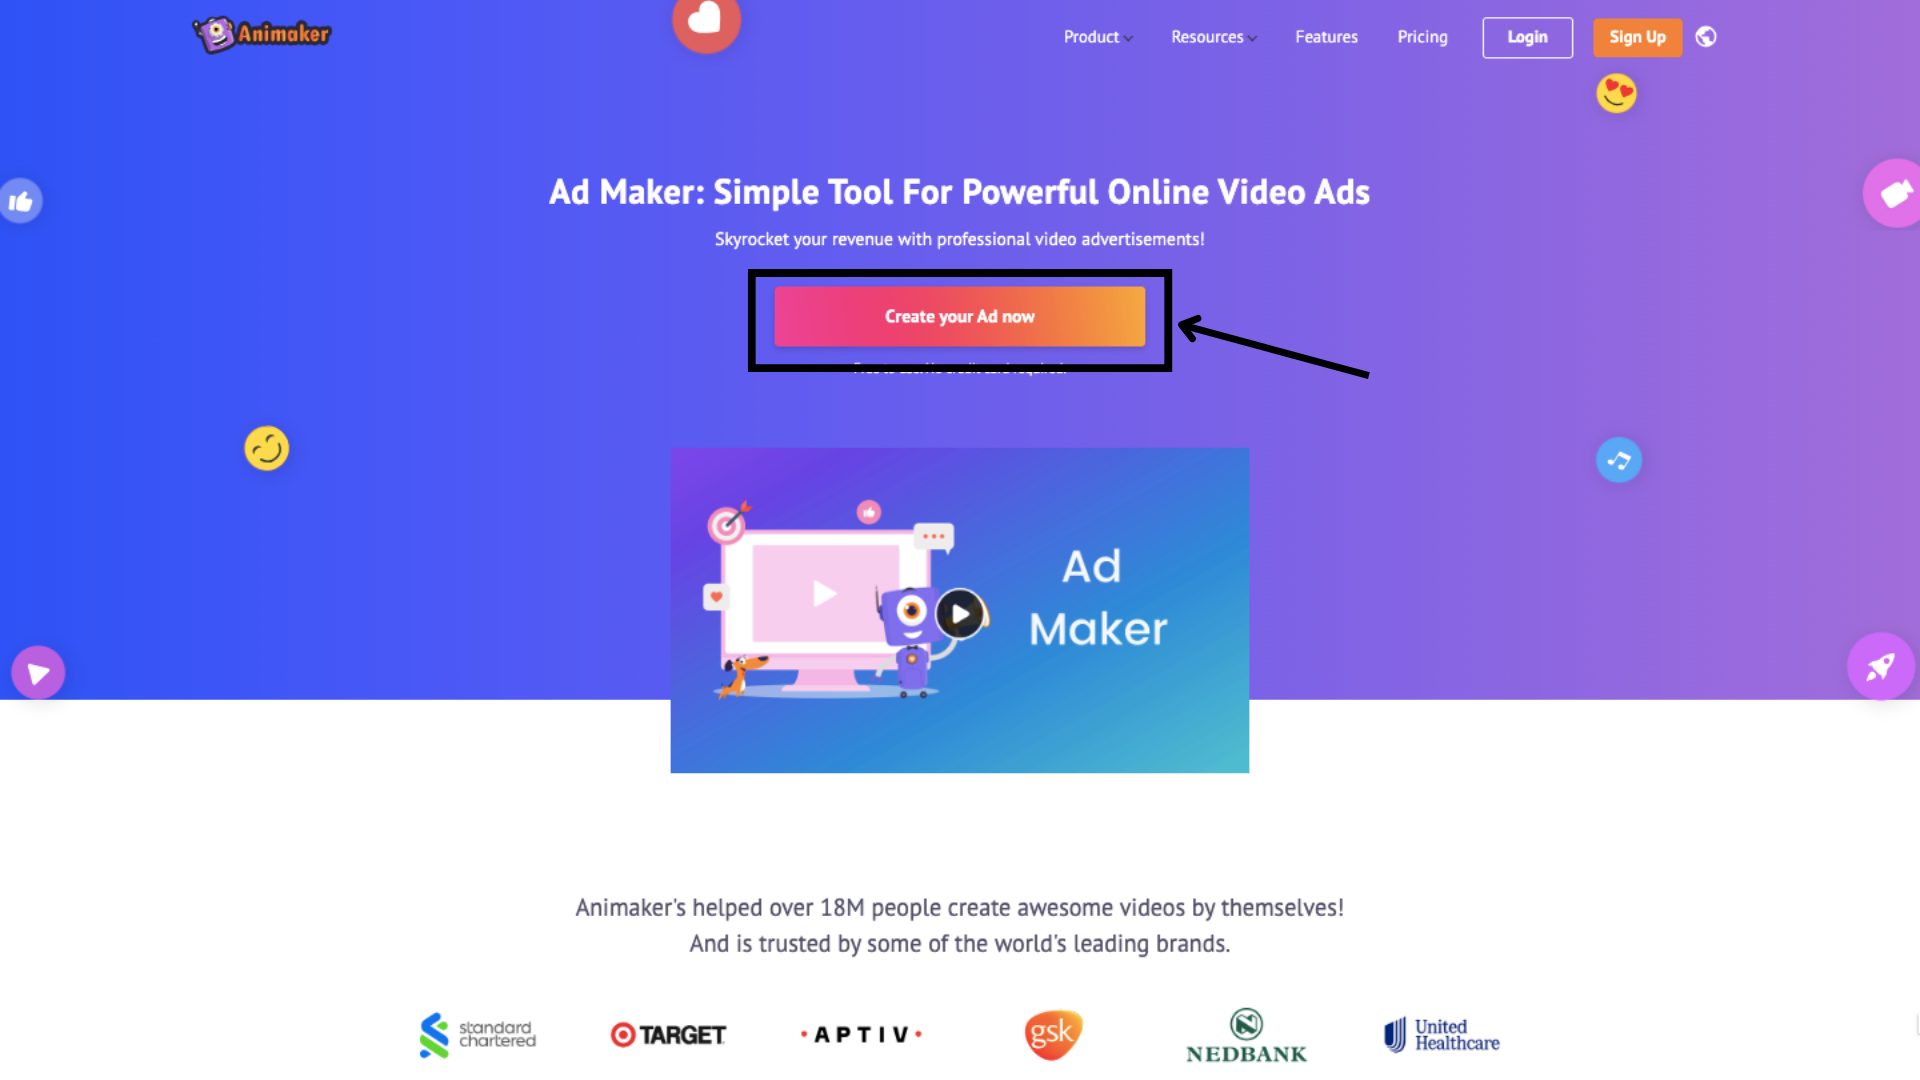
1. How to make animated ads using Animaker’s Advertisement Maker?
Animaker’s Advertisement Maker is a revolutionary tool with over 100 ready-to-use templates to make unique animated ads in minutes.
Used by many leading brands worldwide, this tool proves to be helpful in making ADs for various fields. In just three steps, you will make a fantastic animated ad.
Step 1: Choose a Template
Step 2: Edit the elements in the template
Step 3: Preview and Download your video
Step 1: Choose a Template
To start, visit Animaker’s Advertisement Maker and click on the button.
You will be redirected to the login page. Log in if you already have an account, or sign up if you’re new.
Once you’re logged in, you will be taken to the dashboard. Here, click on the Templates tab.
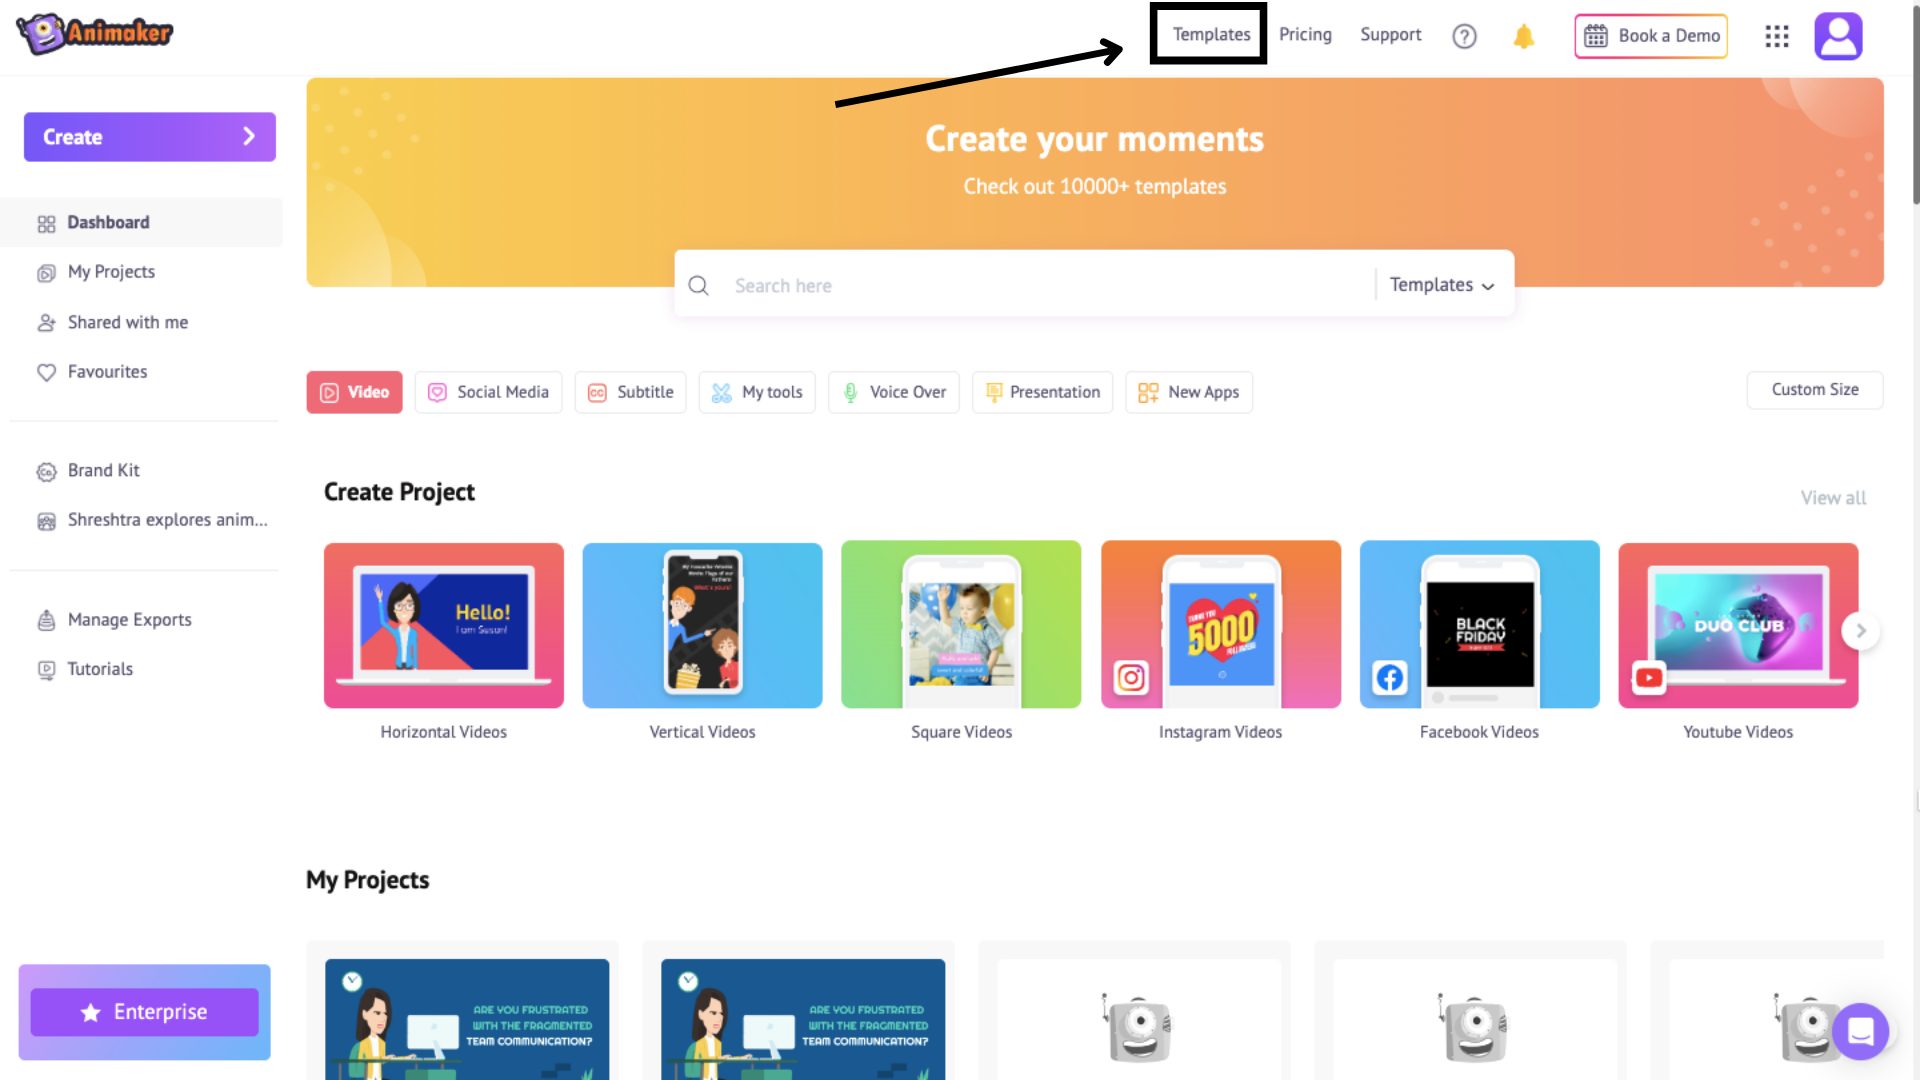
Now, click on the Ads/Promo tab to filter the AD templates.
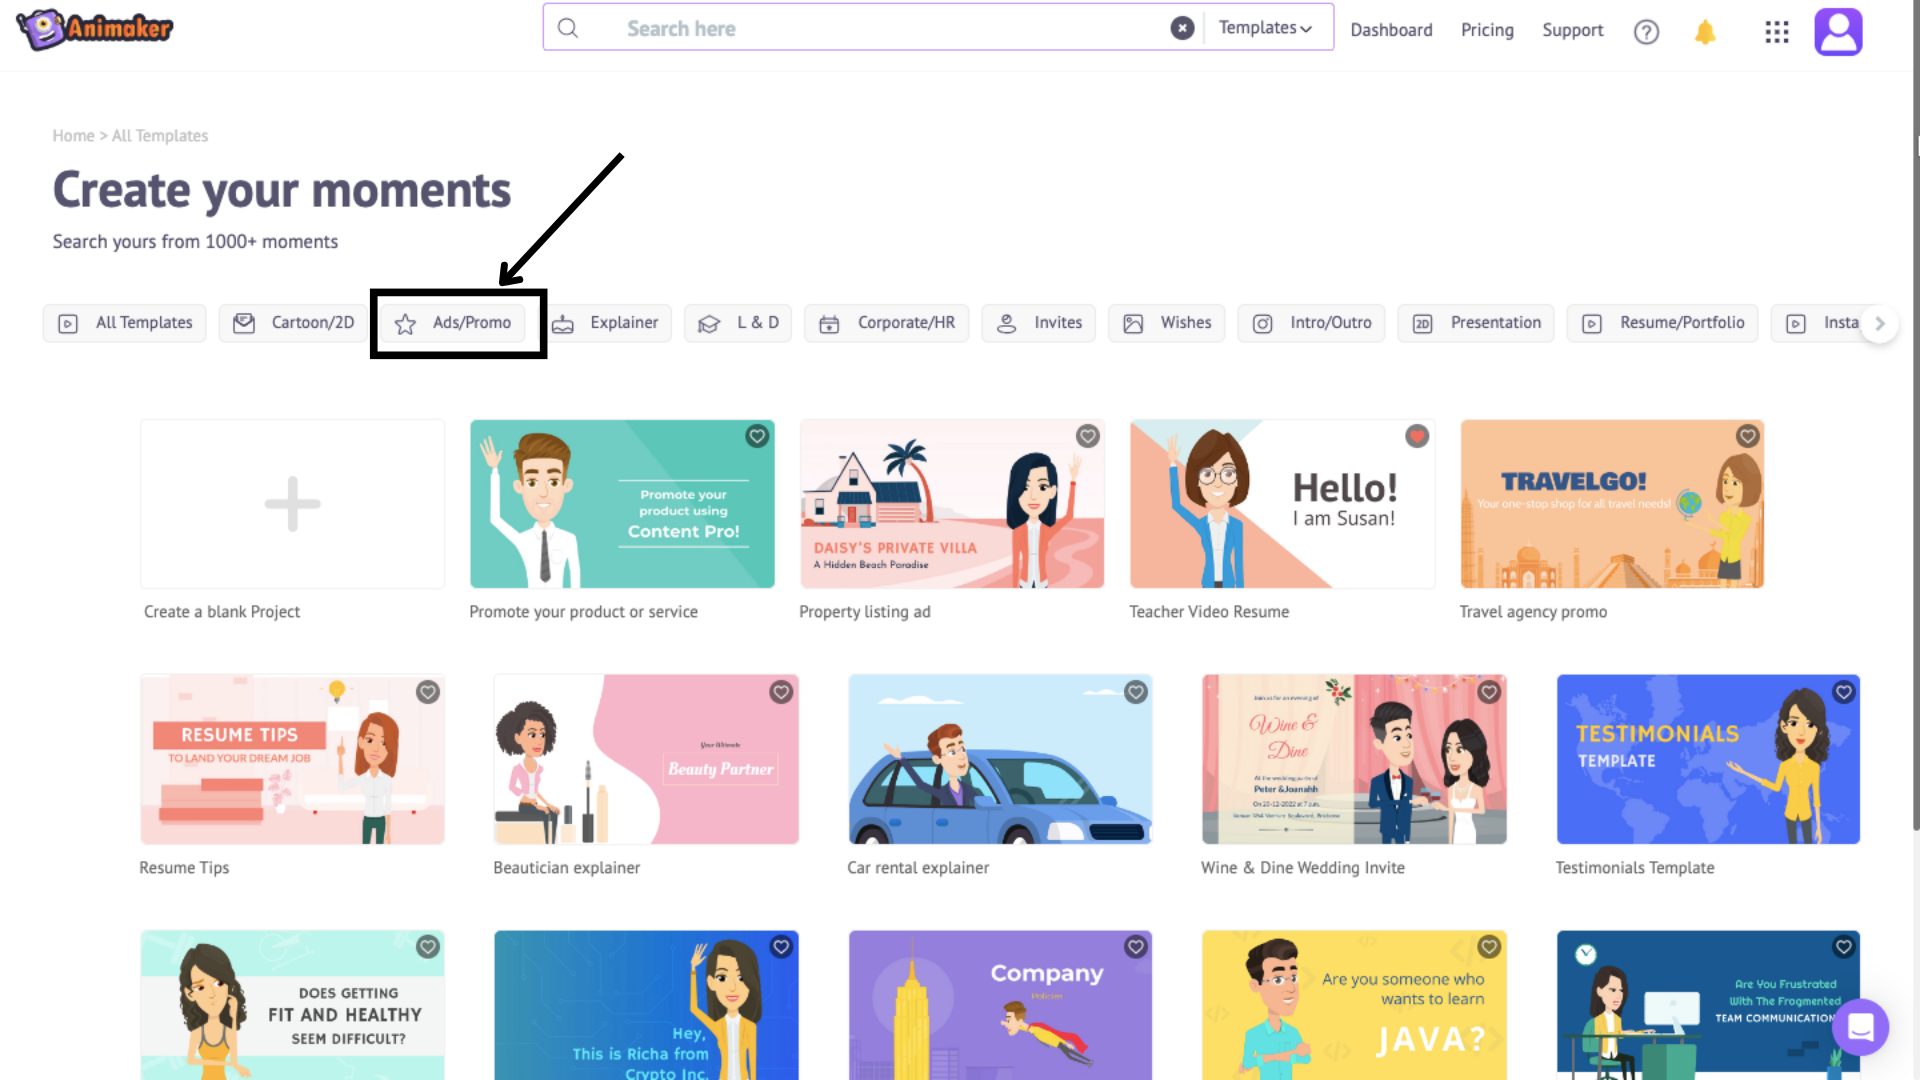
There are many templates of different dimensions, which is extremely useful if you want to advertise on different platforms like Instagram or YouTube. This way, you don’t have to worry about resizing.
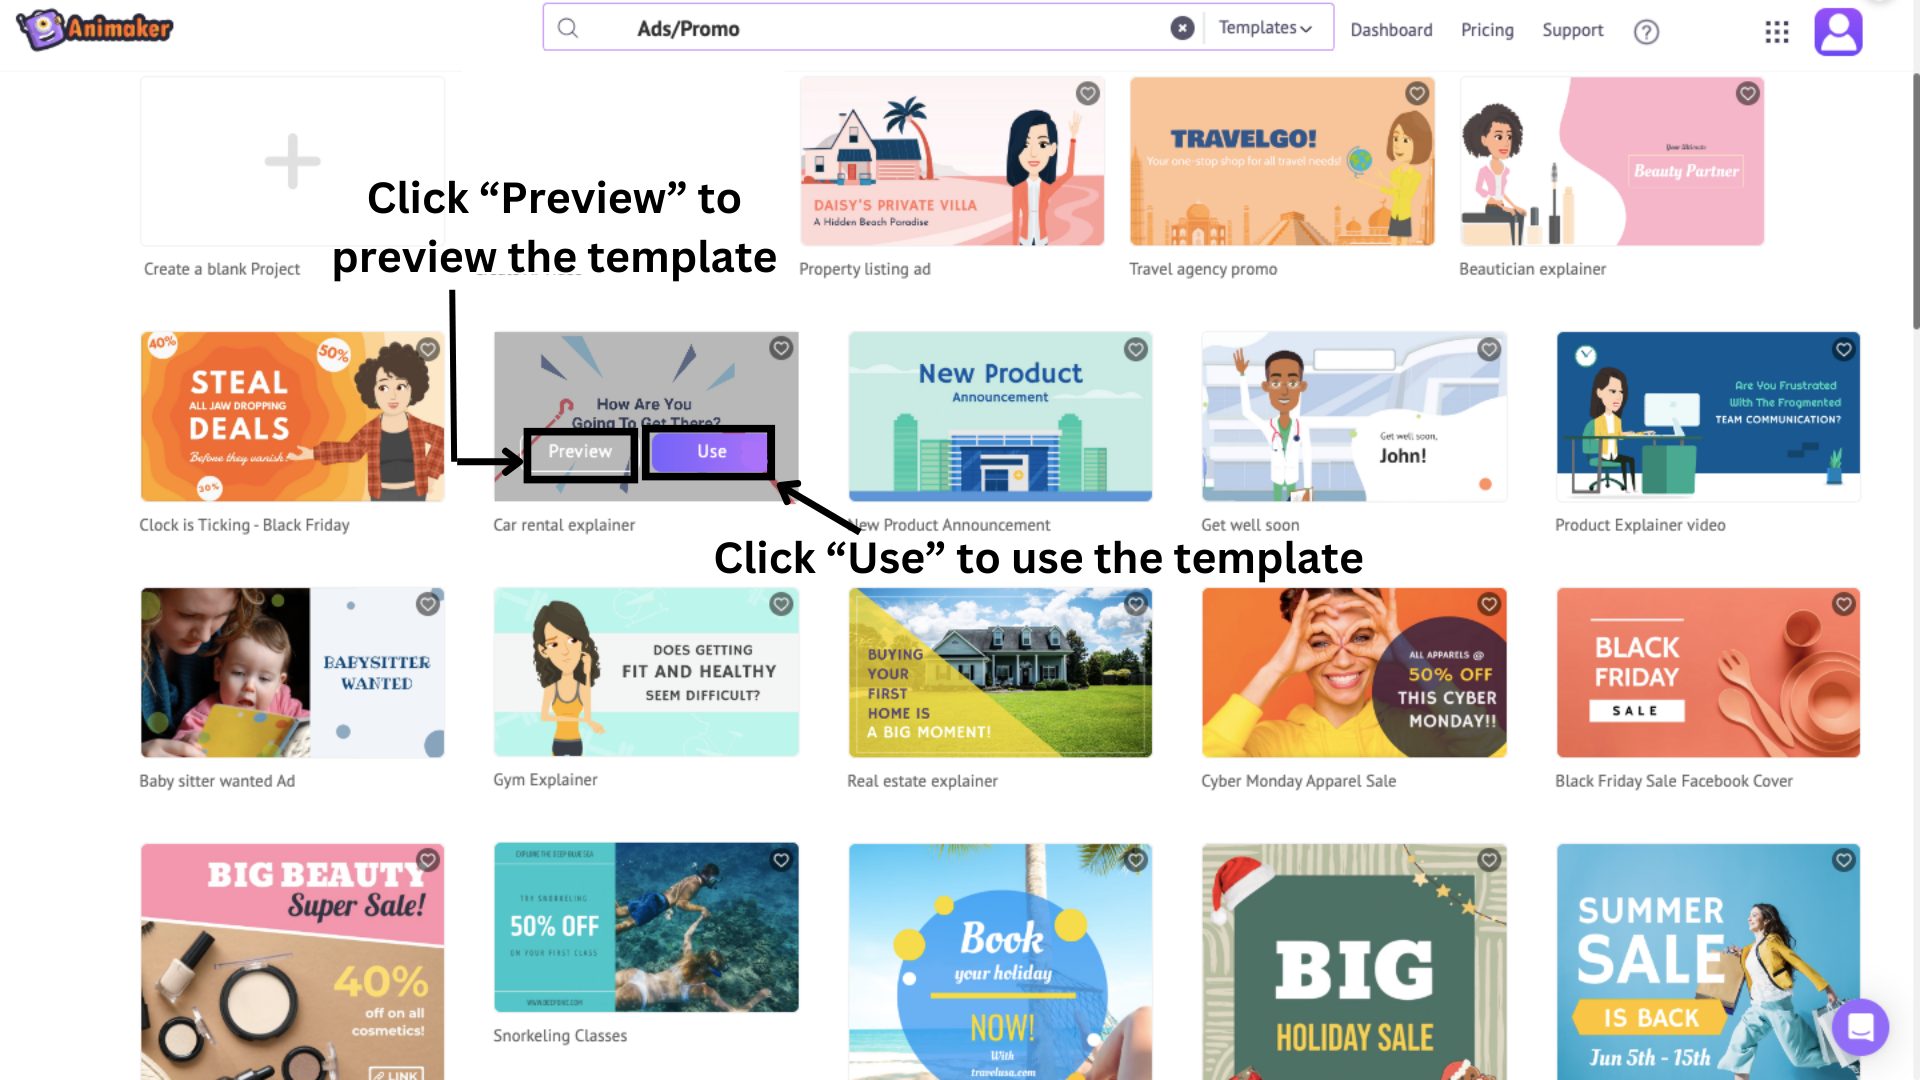
Hover over any template, and you will see two options appear: Preview and Use.
Click on Preview if you wish to preview the template and get an idea of the style. Click on Use if you want to use the template.
For example, I'm going to use the “Car Rental Explainer” template to advertise a car rental service.
Upon clicking Use, the project window opens, where you can edit the template elements.
Step 2: Edit the elements in the template
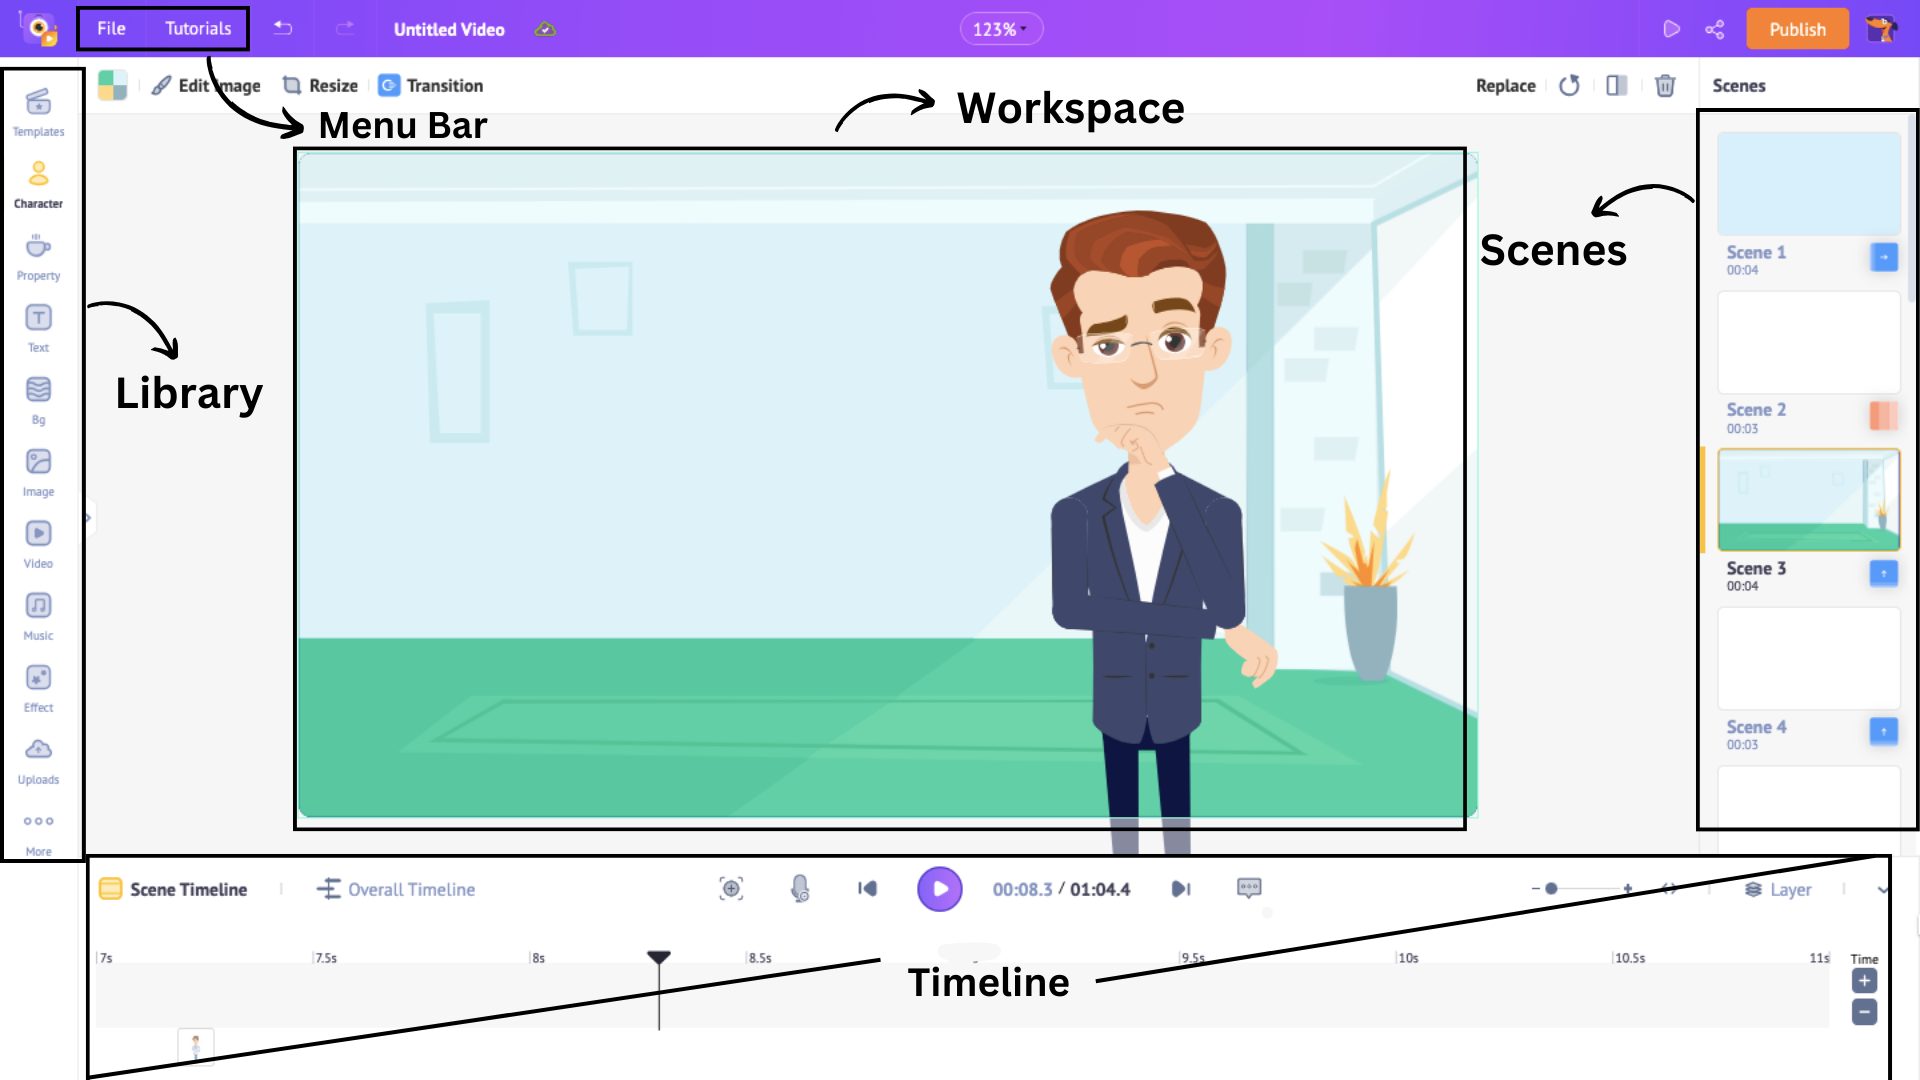
Before making changes to the template, let’s understand the interface better.
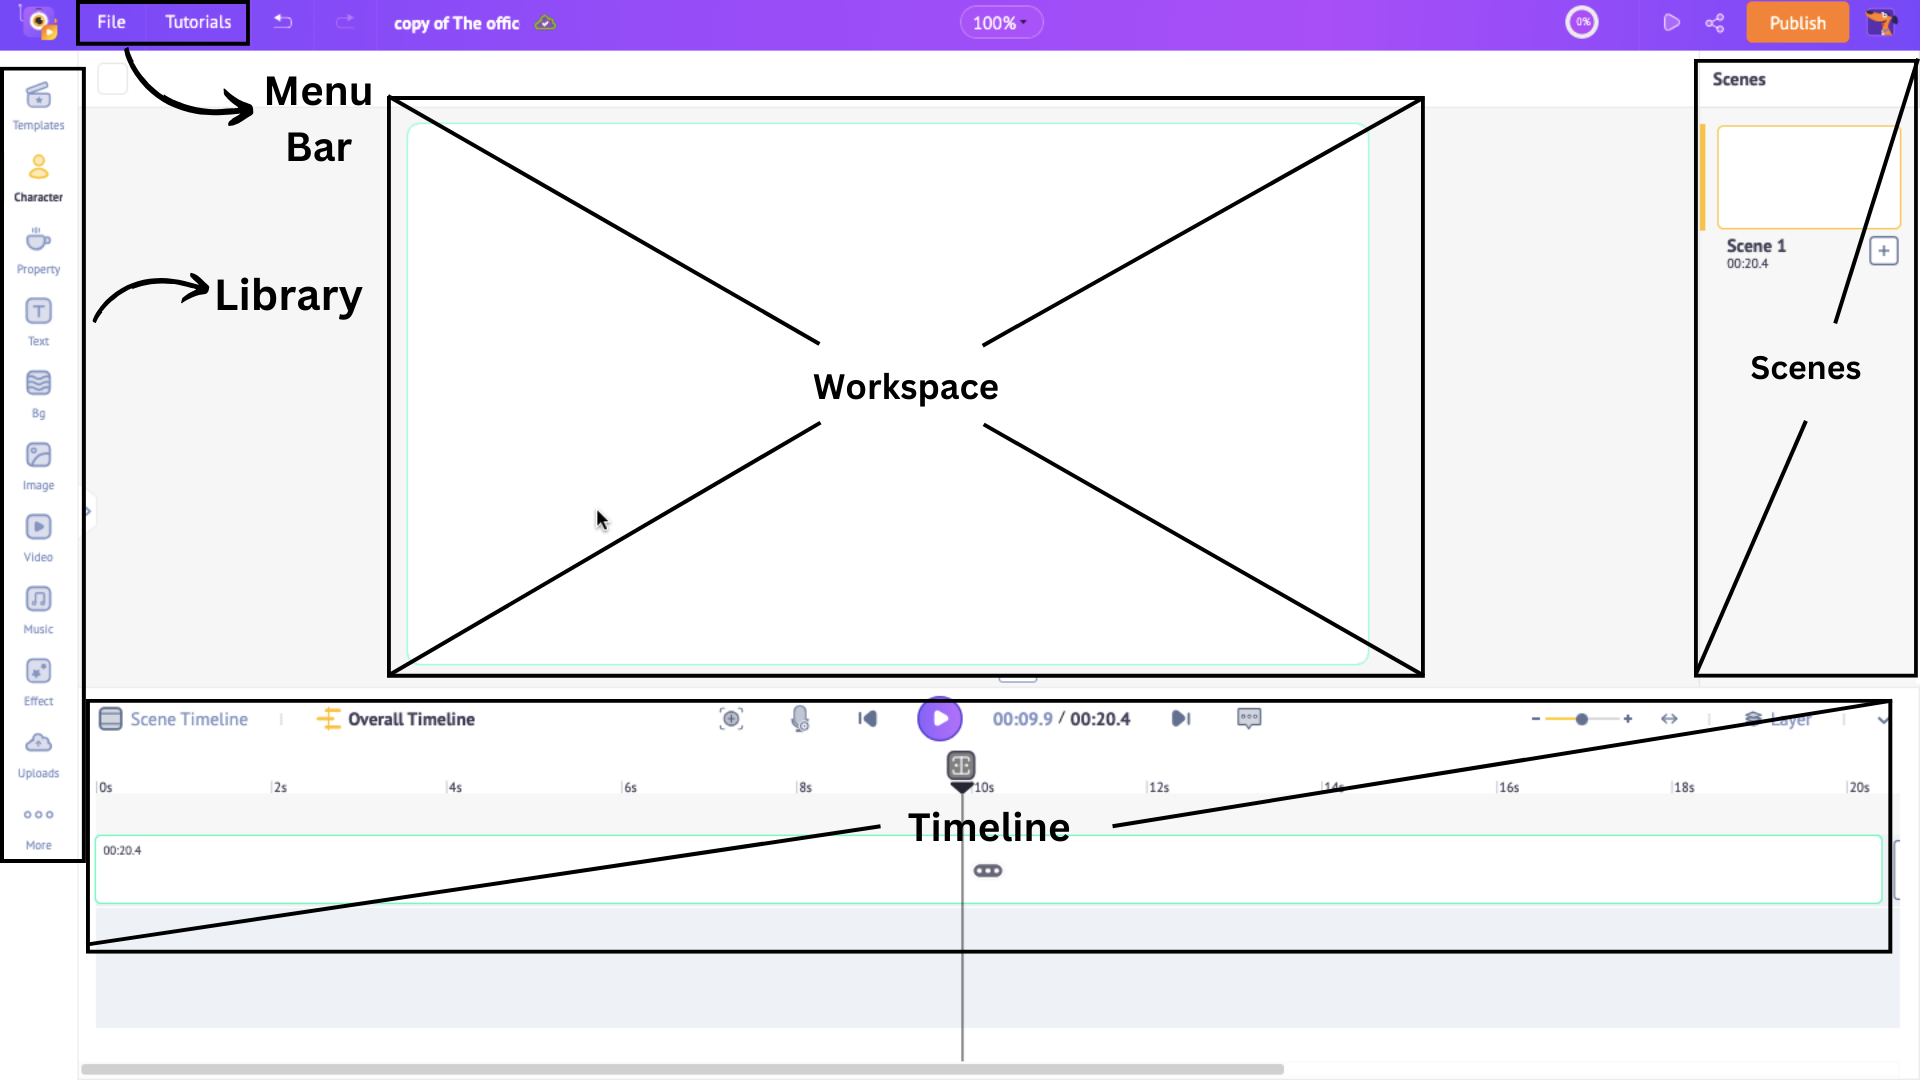
In the center of the interface lies the workspace, which enables you to create and edit your video. Above the workspace is a menu bar providing additional options and tools. The timeline lies below the workspace, where you can precisely adjust your video and its assets.
On the left, you will find the library, which offers millions of assets that you can include in your video. The scenes section on the right allows you to manage and organize your scenes efficiently.
Now that you have a better understanding of the interface, let’s proceed to edit the elements in the template.
At first glance, you can see that the template contains many scenes with multiple elements, like
..and more.
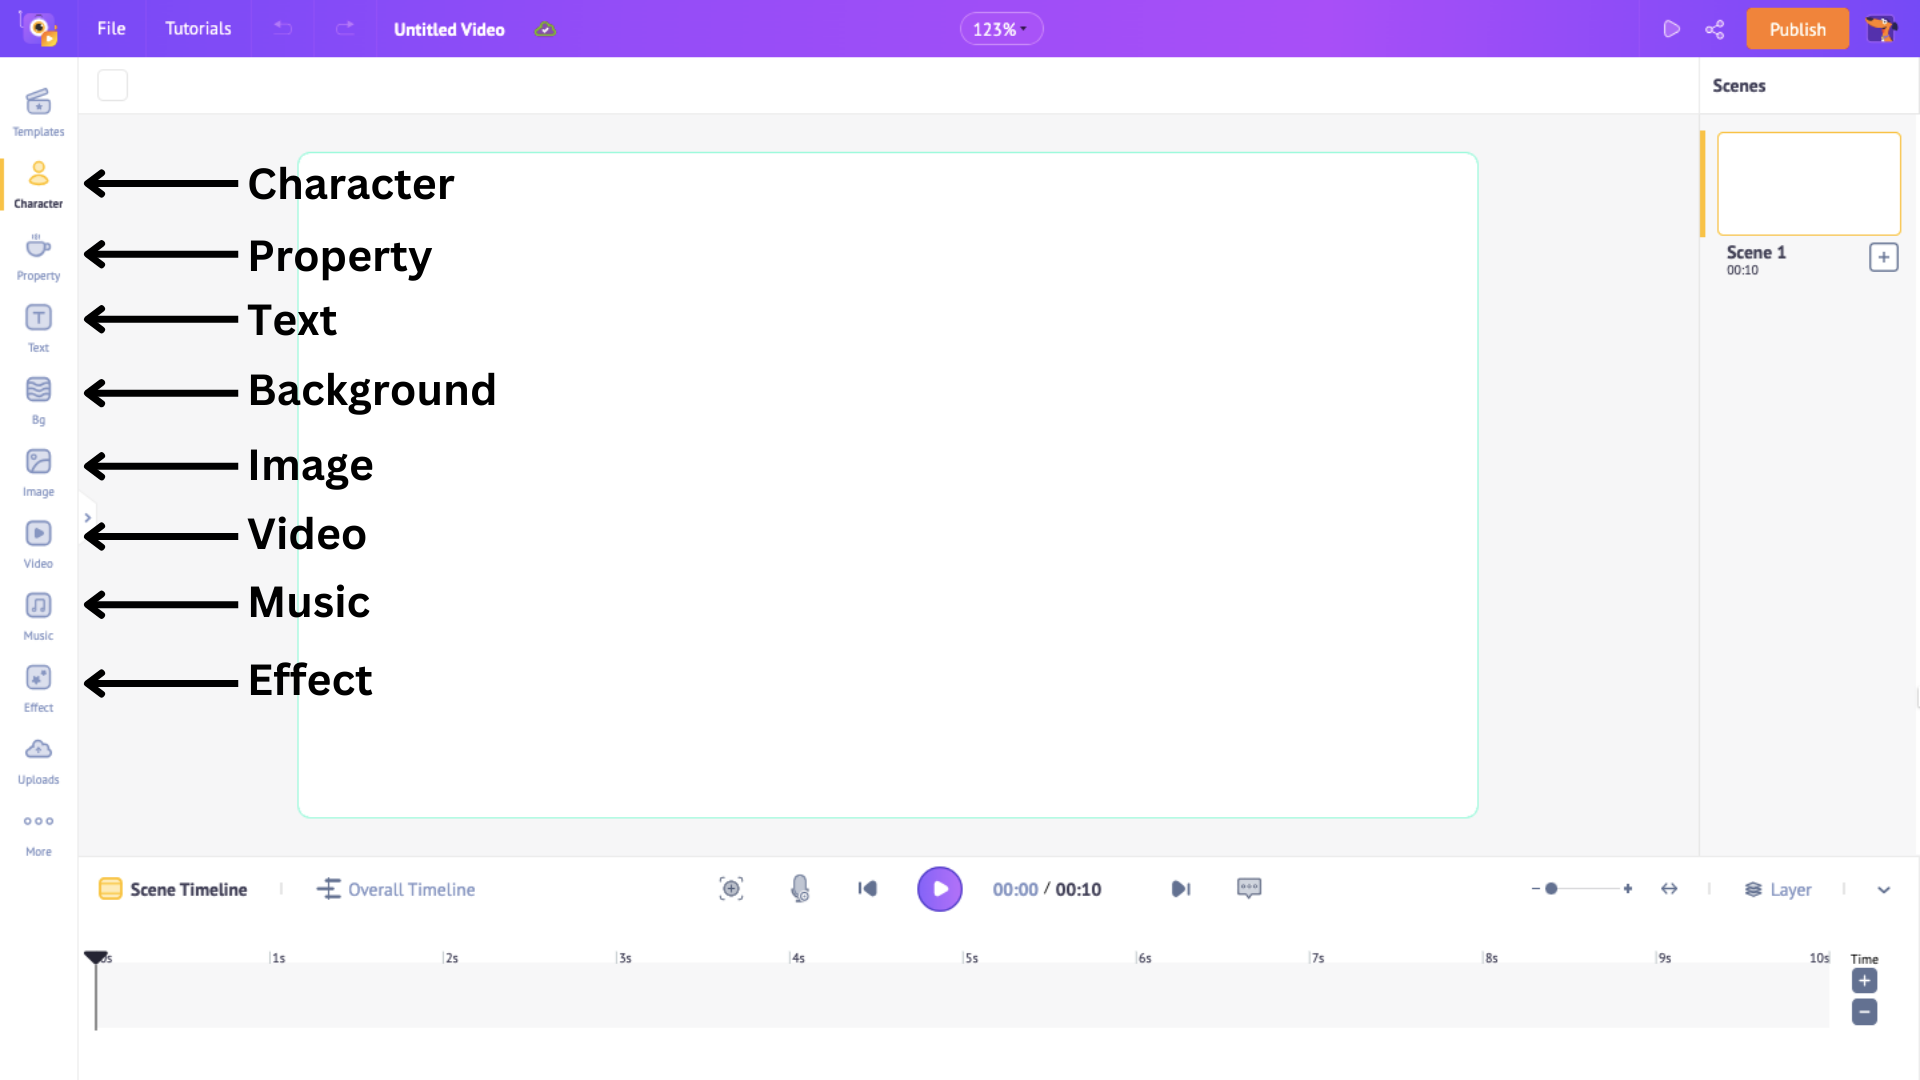
Let’s look at these four important elements from many elements available in the library.
1. Character
Characters are a great addition to animated ads. They are helpful to build a connection with the audience.
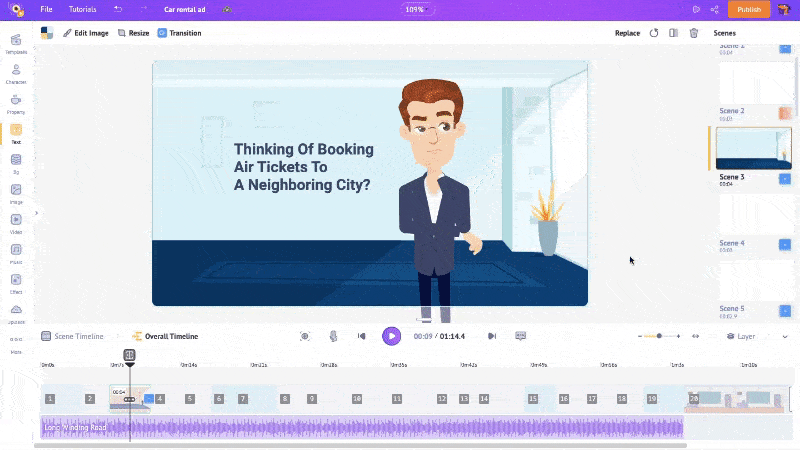
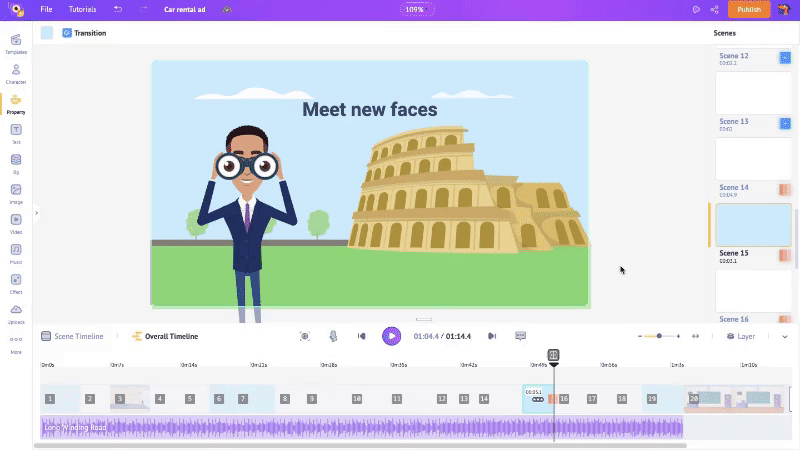
In the template I chose, a character is thinking about something in the third scene.
I want the same character to do a different action. Let’s see how to do that effortlessly.
First, click on the character. This will open a side panel with a list of 1000+ actions and expressions. You can browse the list or use the search bar to find a specific action or emotion you want to convey. Once you have selected an action, choose an expression for your character by clicking on the Expressions tab. This will display a range of emotions from which you can choose one that is suitable for the scene.
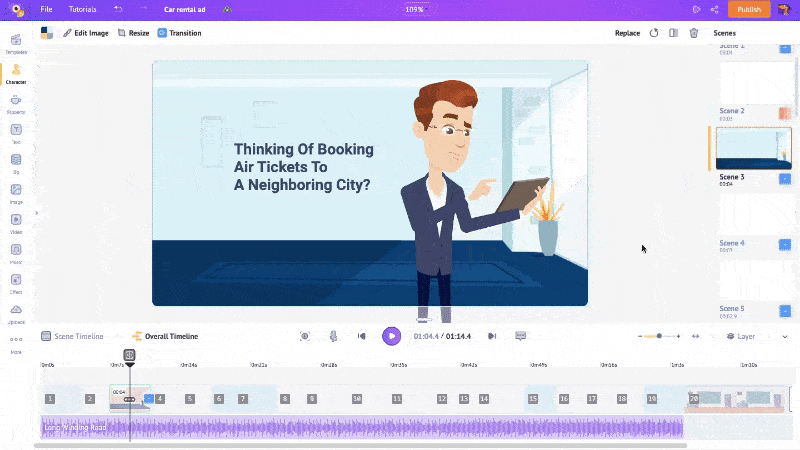
I chose my character to browse on his tablet. Looks good, right?
You can change actions and expressions for the existing character this way.
But what if you want a different character? That is possible as well! You can swap the existing character with a new one. Let me show you how.
Click on the character and click Replace.
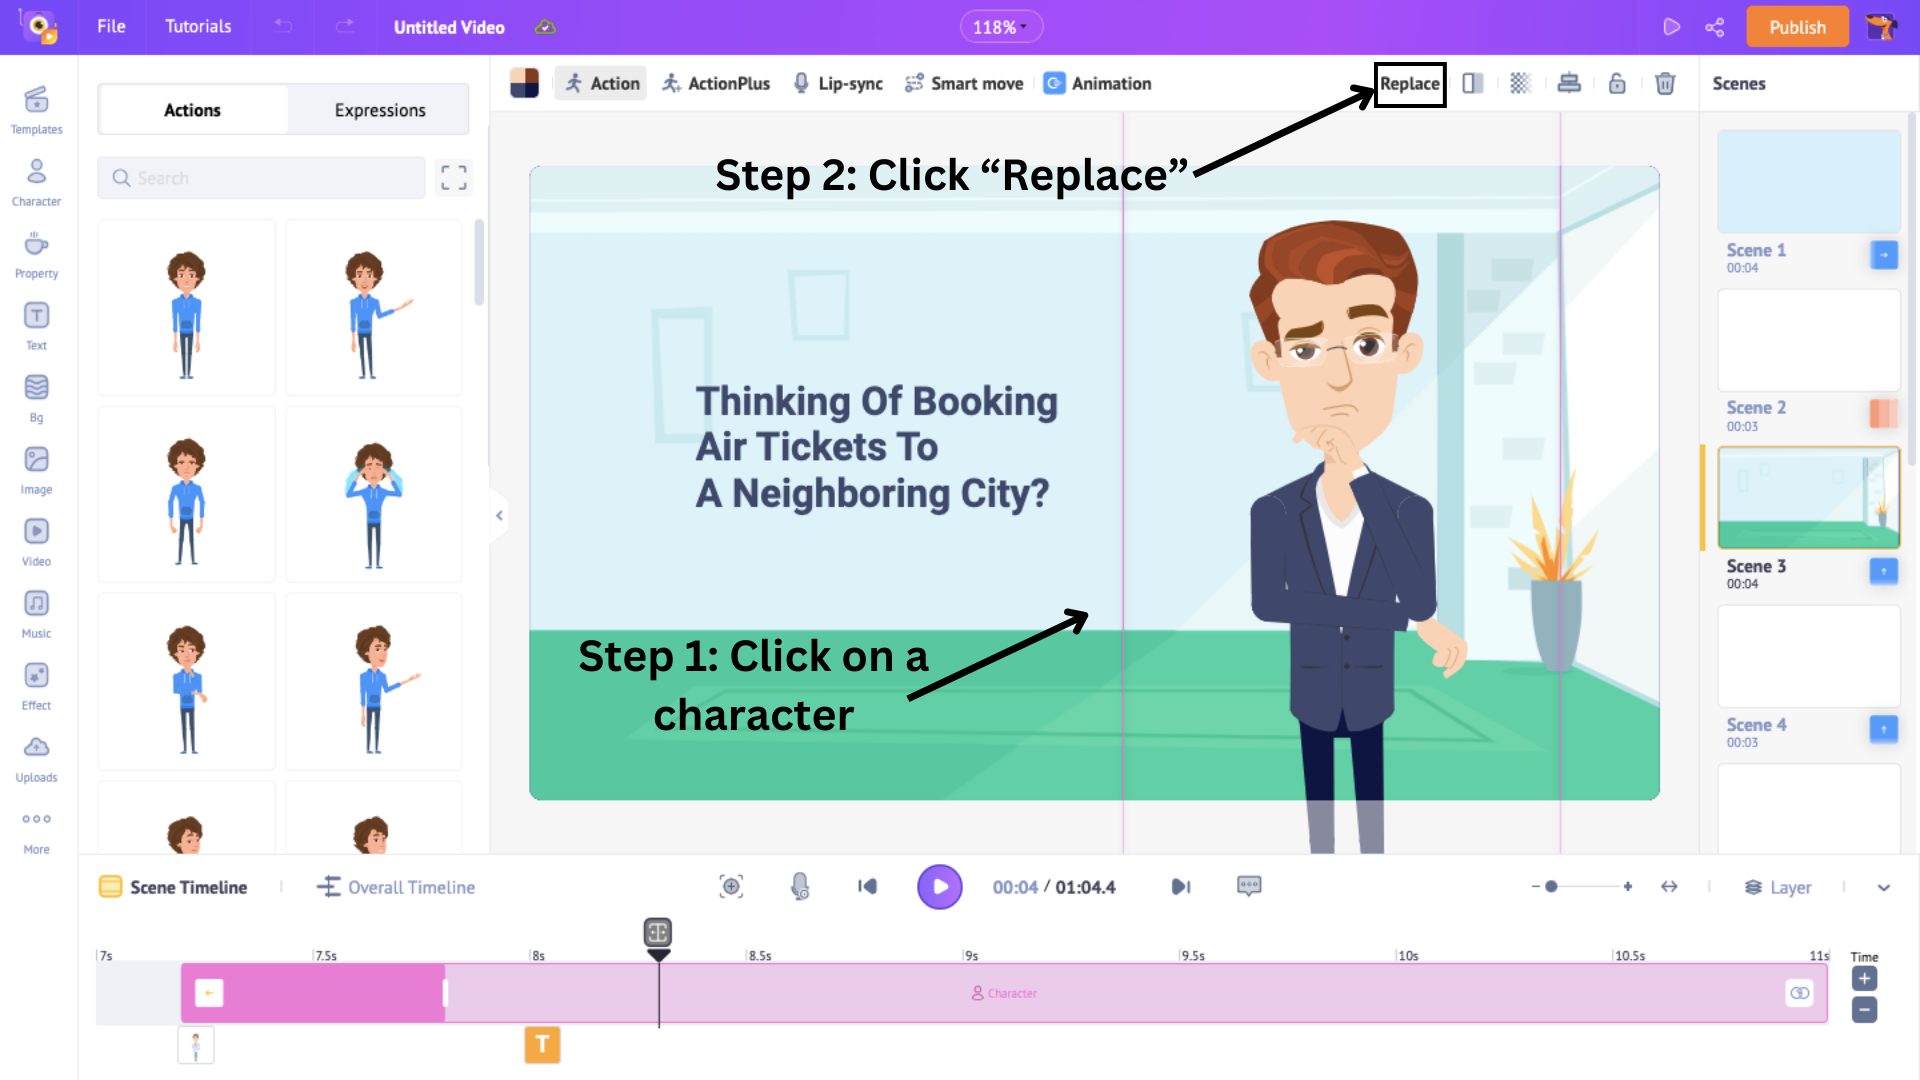
This will open the character library containing 1000+ characters. Browse through and click on a character. Then, hit Apply to replace the character.
The character is replaced with a new one.
Here, we used characters that are available in the Character Library. But if you’re feeling creative and want to make your own character, watch the video to learn how.
Now, let’s move on to the next element.
2. Property
Properties are objects and shapes that help define a scene better. You can add or swap a property with existing ones in your scenes.
First, let’s see how to swap a property.
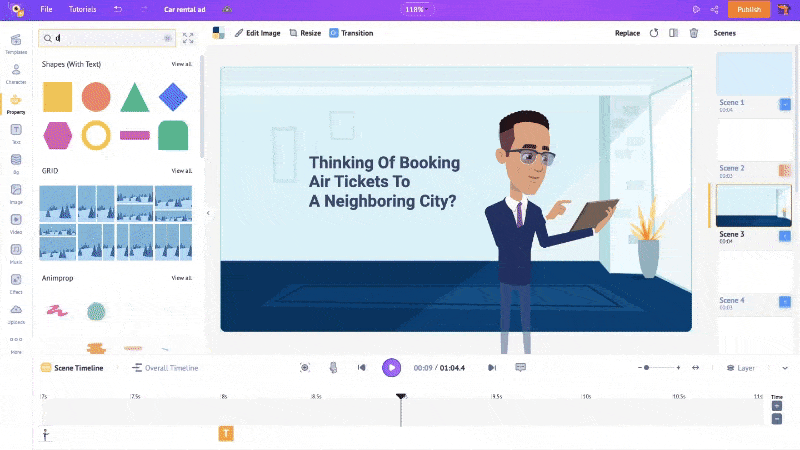
For example, in this scene, a monument is behind the character. Let’s see how to swap this monument with another.
To do that, click on the property and click Replace.
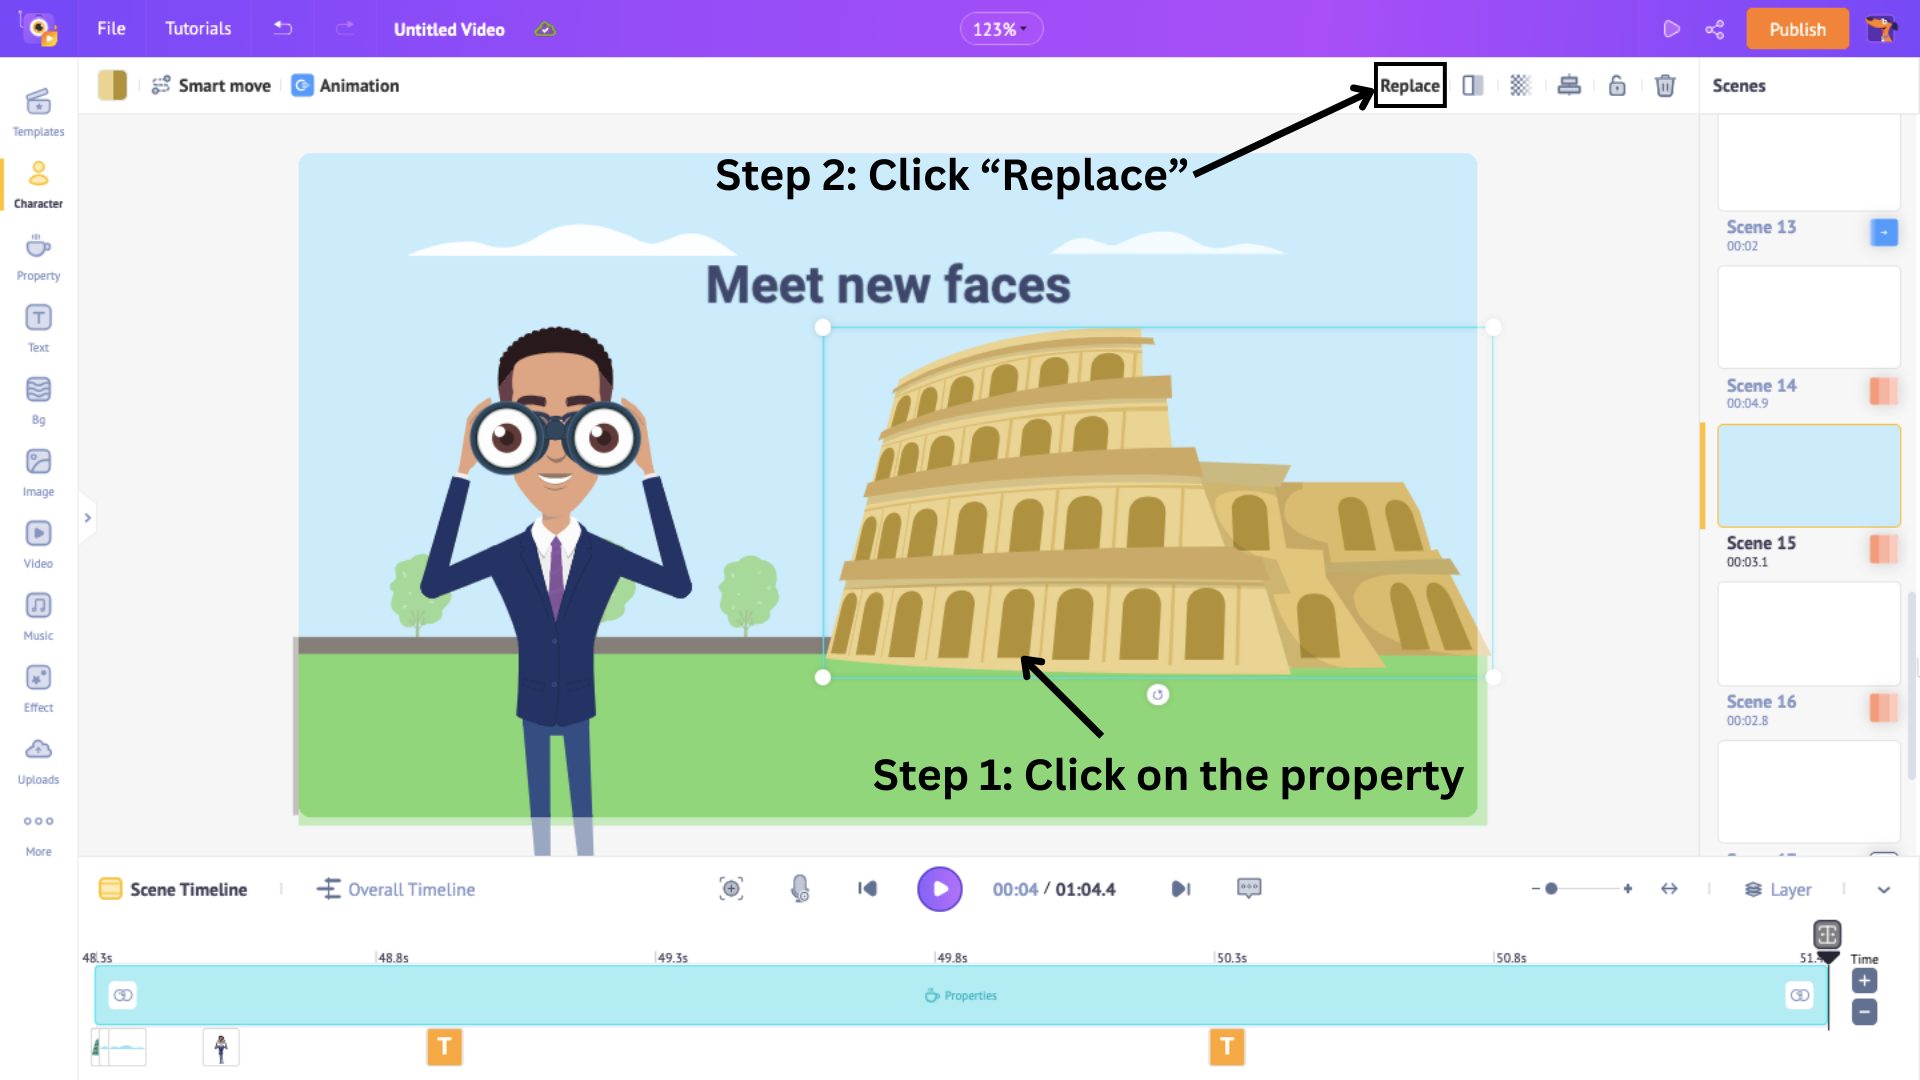
This will open the Property option with 70k+ icons and properties, including shapes and grids. Browse the list or search for a particular property in the search bar. Then, click on the property and hit Apply to replace.
Now, the scene looks better with this property.
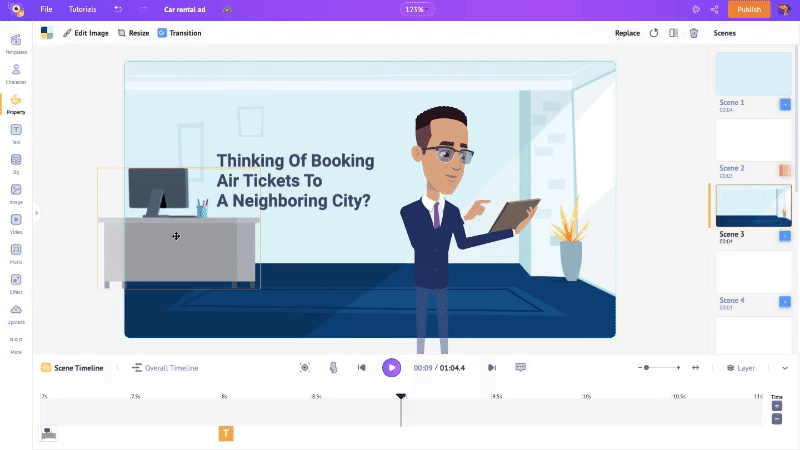
Next, let’s see how to add a new property to the scene. I’m going to add an office desk to one of the scenes.
To do that, click on the Property option in the library.
From over 70k+ properties, click on a property to add to the scene. Resize it and position it in the scene.
Now, when you add a property, a blue section gets added to the timeline. This represents the duration of the property in the scene.
You can adjust this to control the property’s visibility in the scene. To do that, drag the corners of the blue section across the timeline.
Who knew it was this simple?! Okay, let’s look at the next element.
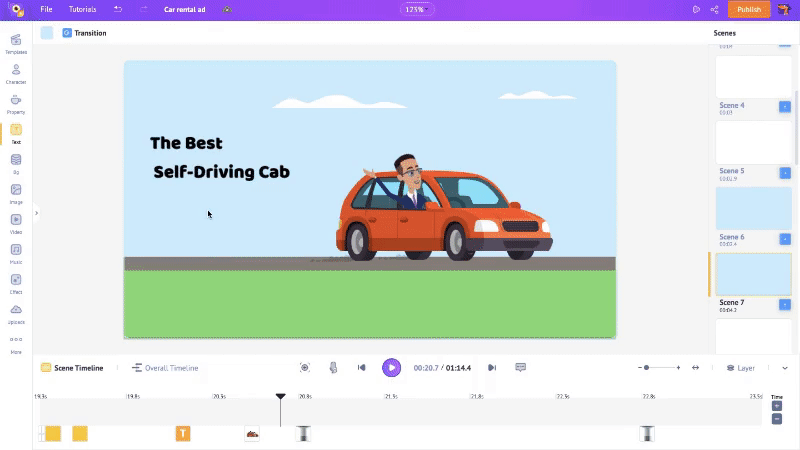
3. Text
Text is vital in advertisements. Appropriate font size and style are necessary to leave a lasting impression on its viewers.
A scene shouldn’t contain too many words as it can get difficult to read. So, take the first line from your script, and let’s see how to swap it with the text box already in the scene.
Click on the text box in the scene and delete the existing text. Then, enter the first line of your script.
When you do that, a panel opens on the side. Here you can edit the text by changing the font size and more.
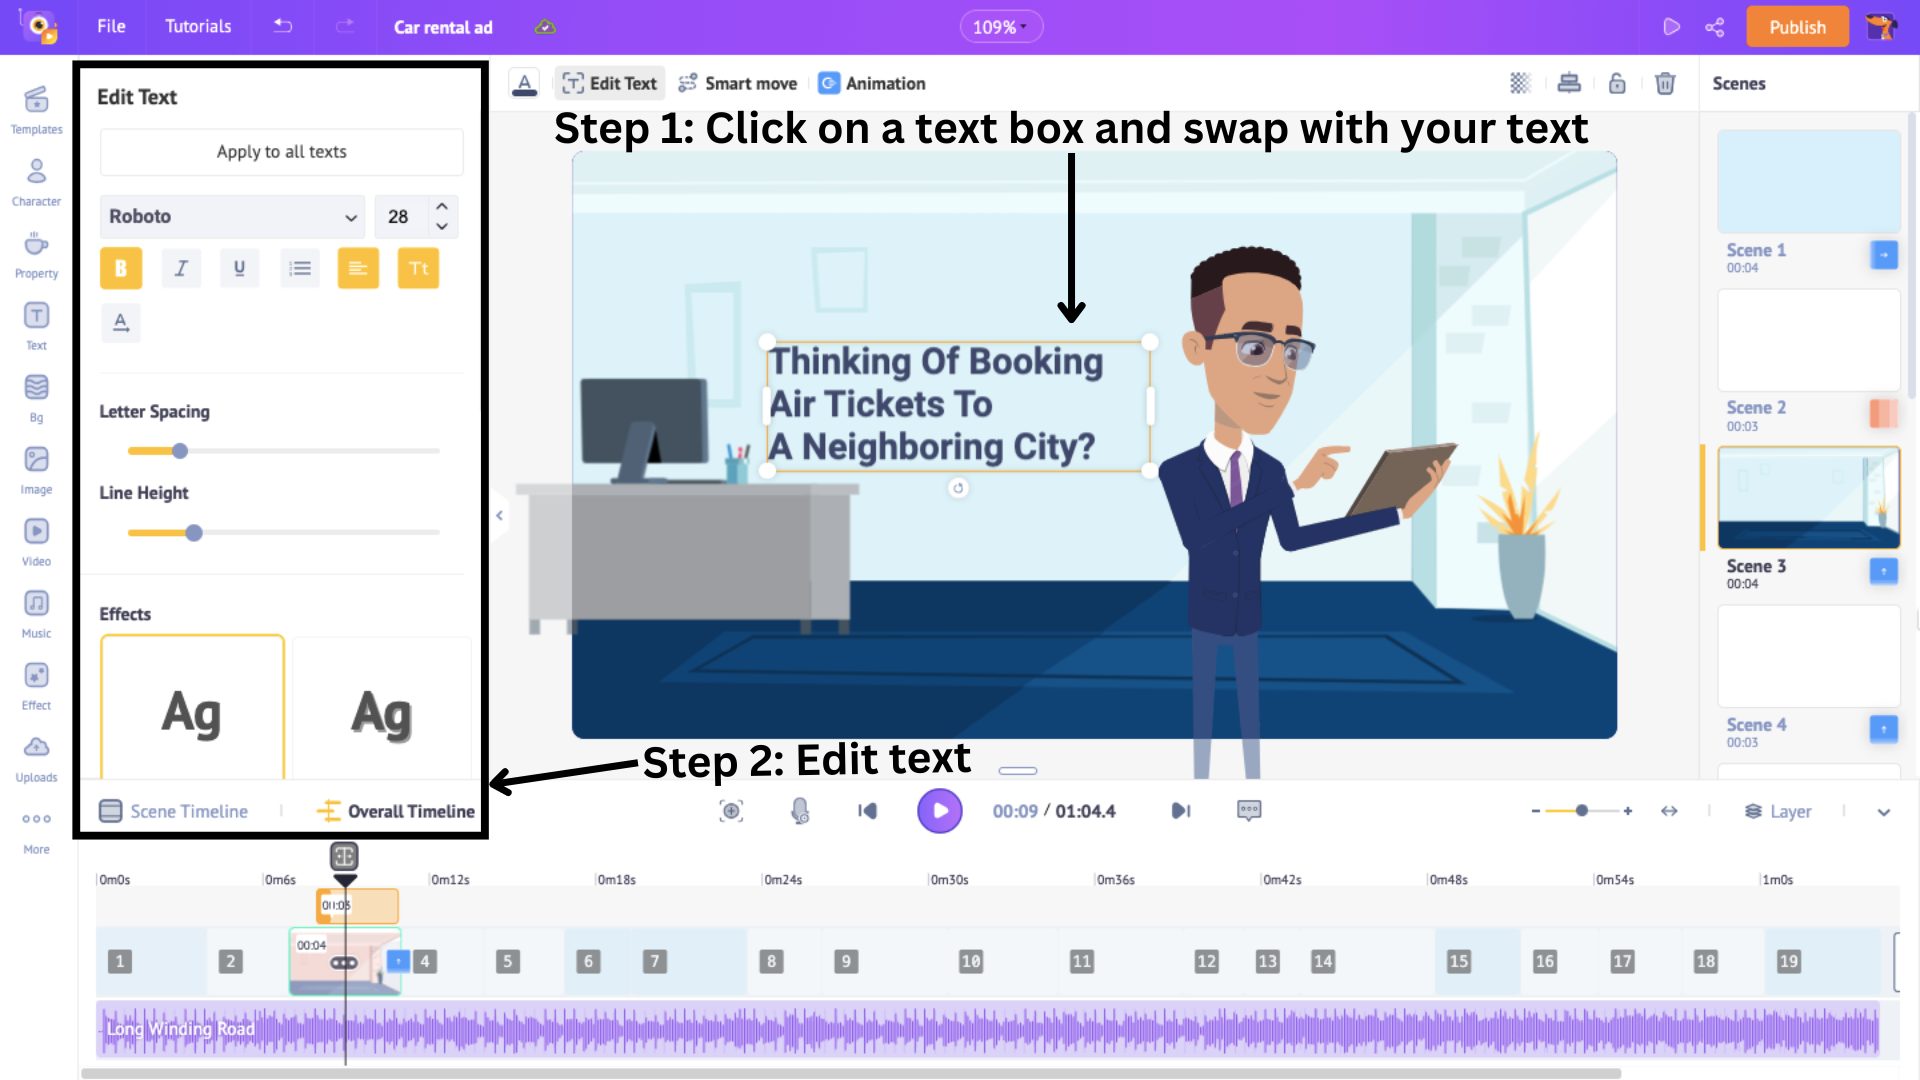
This is how you swap the text and edit it. However, if you want to add a new text box, click the Text option in the library.
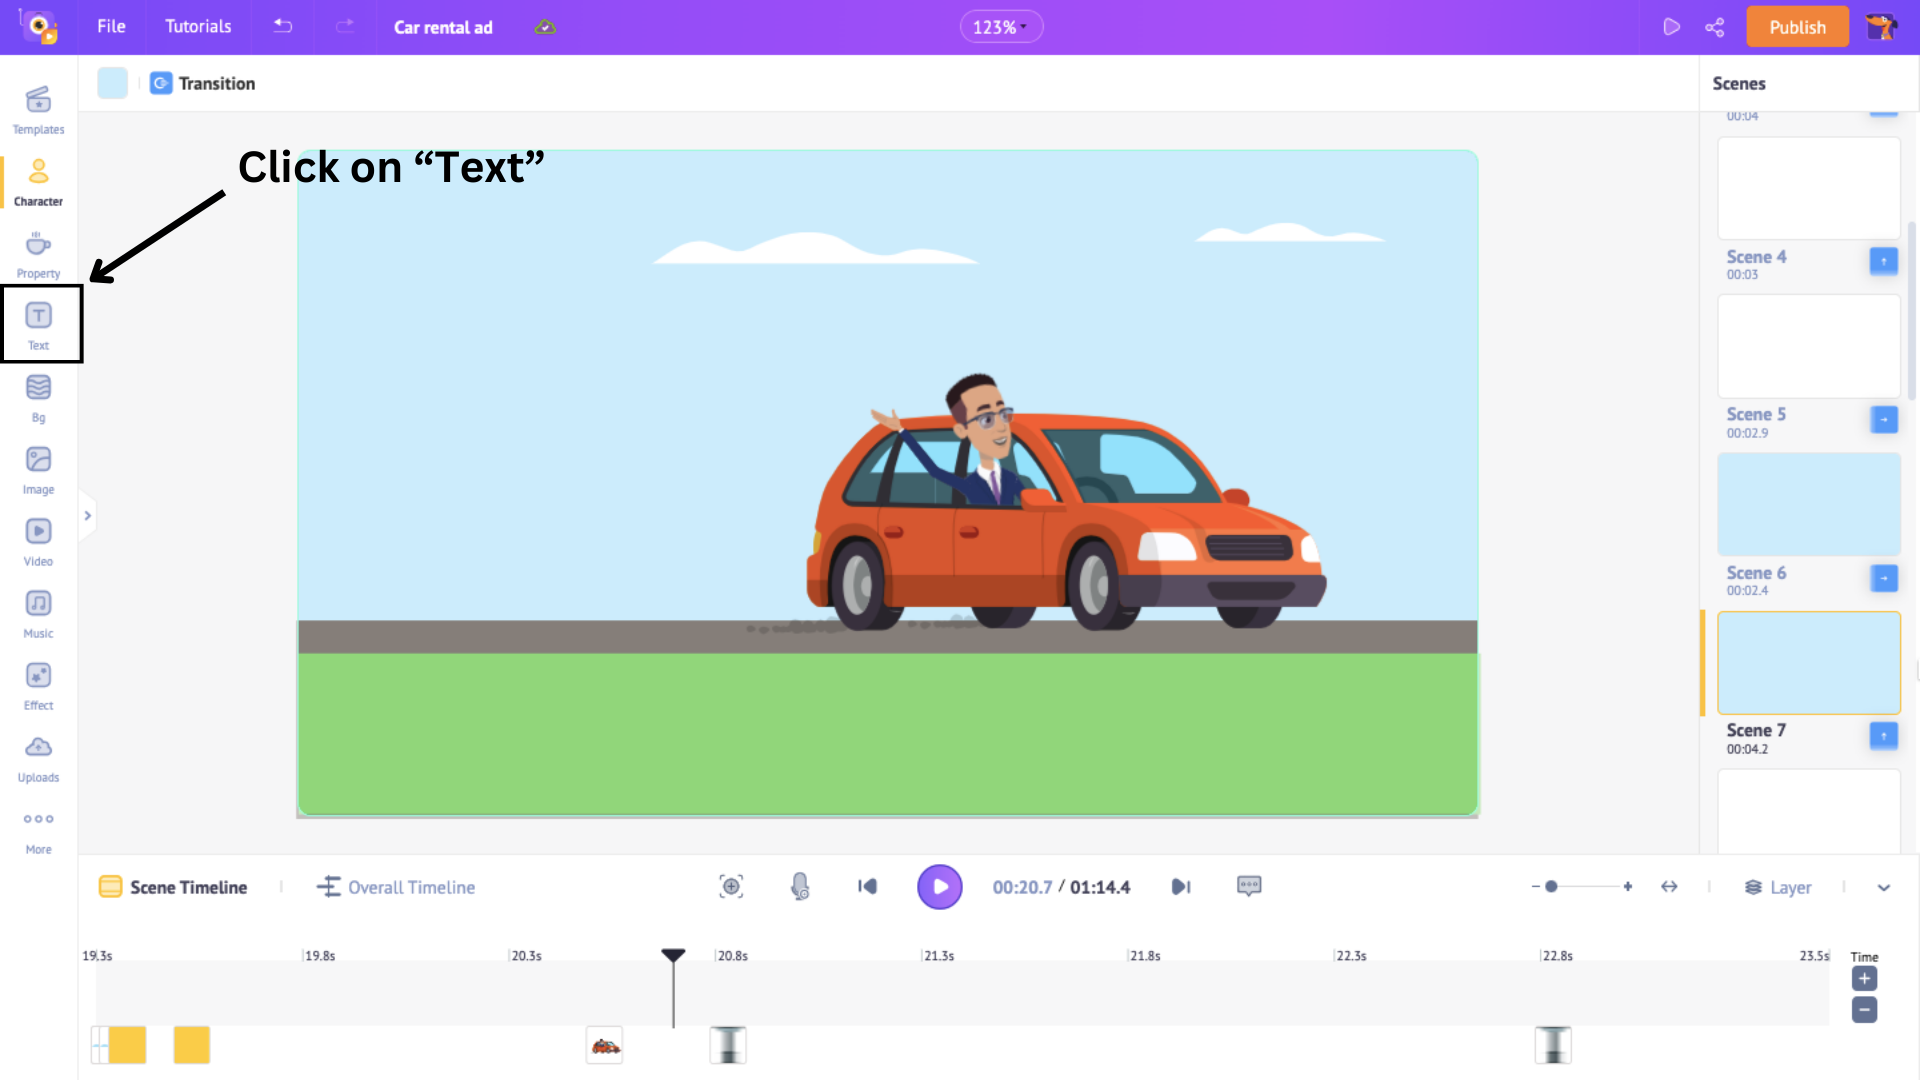
This will open two types of text – Plain and Pre-builds.
Plain text boxes require designing from scratch, while Pre-builds have pre-added design, font, and animation effects.
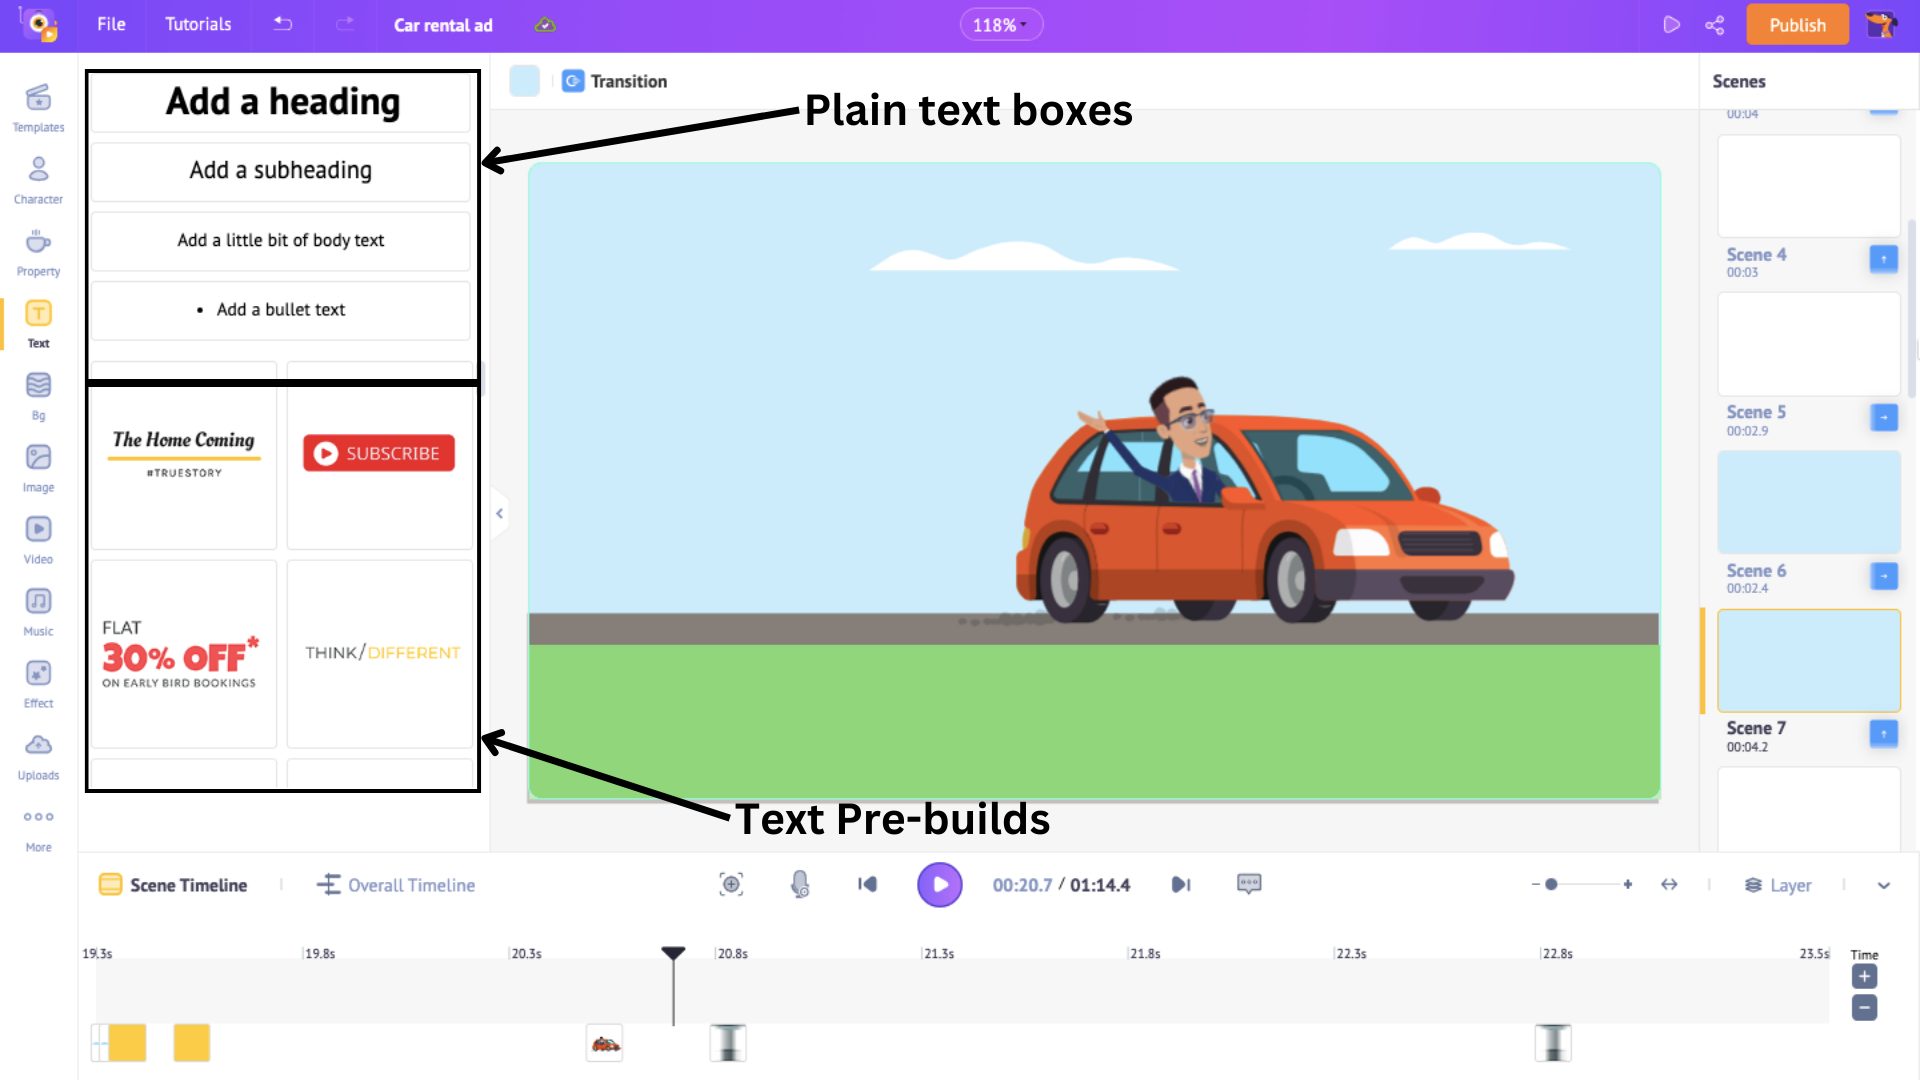
Choose one option and click on it to add it to the scene.
Position the text box in the scene and type in your text. Then, edit the text in the side panel, as we saw before.
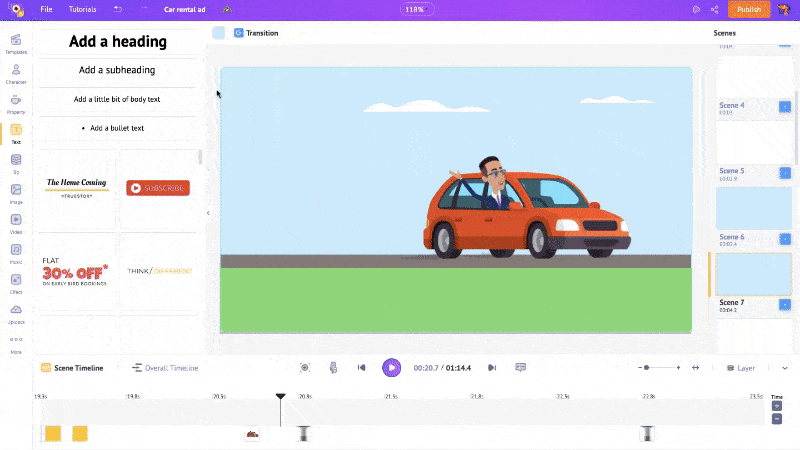
Once you add a text box, an orange section appears on the timeline. This is the duration of the text in the scene.
By default, the text appears for the entire scene. But, If you want it to appear at a particular time, drag the ends of the colored section to the precise time.
Here, I am dragging the left end to the 1st second. This means the text will appear in the first second of the scene.
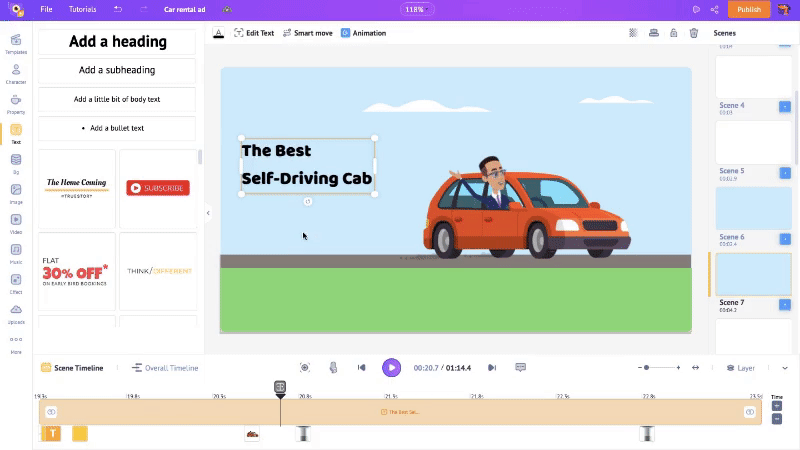
Usually, advertisements are filled with text accompanied by animations and effects. These animations help grab viewers' attention and retain the information.
While Pre-build text boxes have animation effects, plain text boxes do not.
So, if you choose a plain text box and want to add animation effects, it is a simple process.
Let's see how.
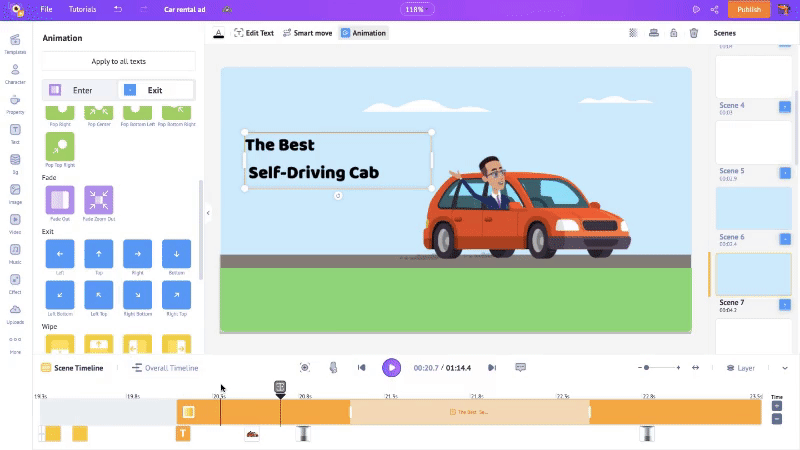
To add animations, click a text box, enter your text, and select the Animation option above the workspace.
This will open a side panel of 35+ enter and exit animation effects to choose from for your text.
Once you choose the enter and exit effects, highlighted parts appear on either end of the orange section on the timeline.
These highlighted sections represent the duration of the effects. To control the effects’ duration, drag the inner corners of the highlighted sections across the timeline.
That was quick, right? Let’s move on to the final important element.
4. Music
Music helps set the tone for the advertisement. It can evoke emotions and build an emotional connection with the audience. So, it is important that we choose a great track for an ad.
In Animaker’s Advertisement Maker, every template has a music track added.
If you feel the music on the template fits your ad, you can continue to use it.
However, If you wish to change it, it is very easy.
Click on the existing track and click on Delete so that the new track doesn’t overlap with the existing one.
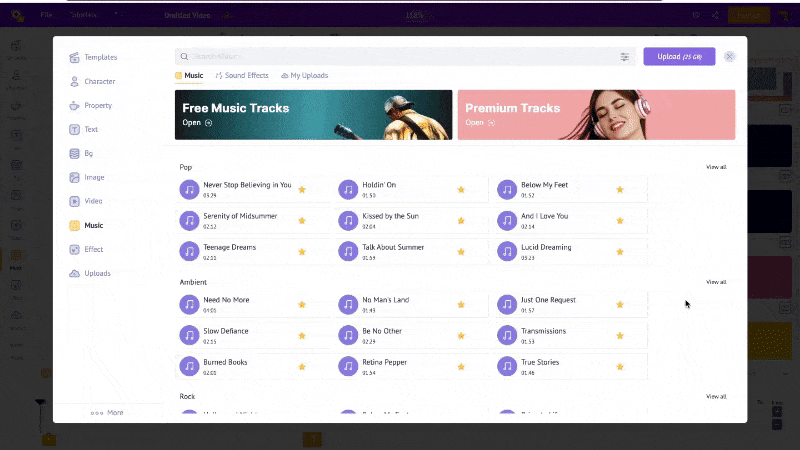
Then, click on the Music section from the library and maximize the window by clicking on Expand Library.
Animaker has over 30,000 music tracks, categorized based on genres. Browse through these genres or search for tracks by feelings/emotions in the search bar to find the right tone for your ad.
Hover over a track to preview it and click on it to add it to the video.
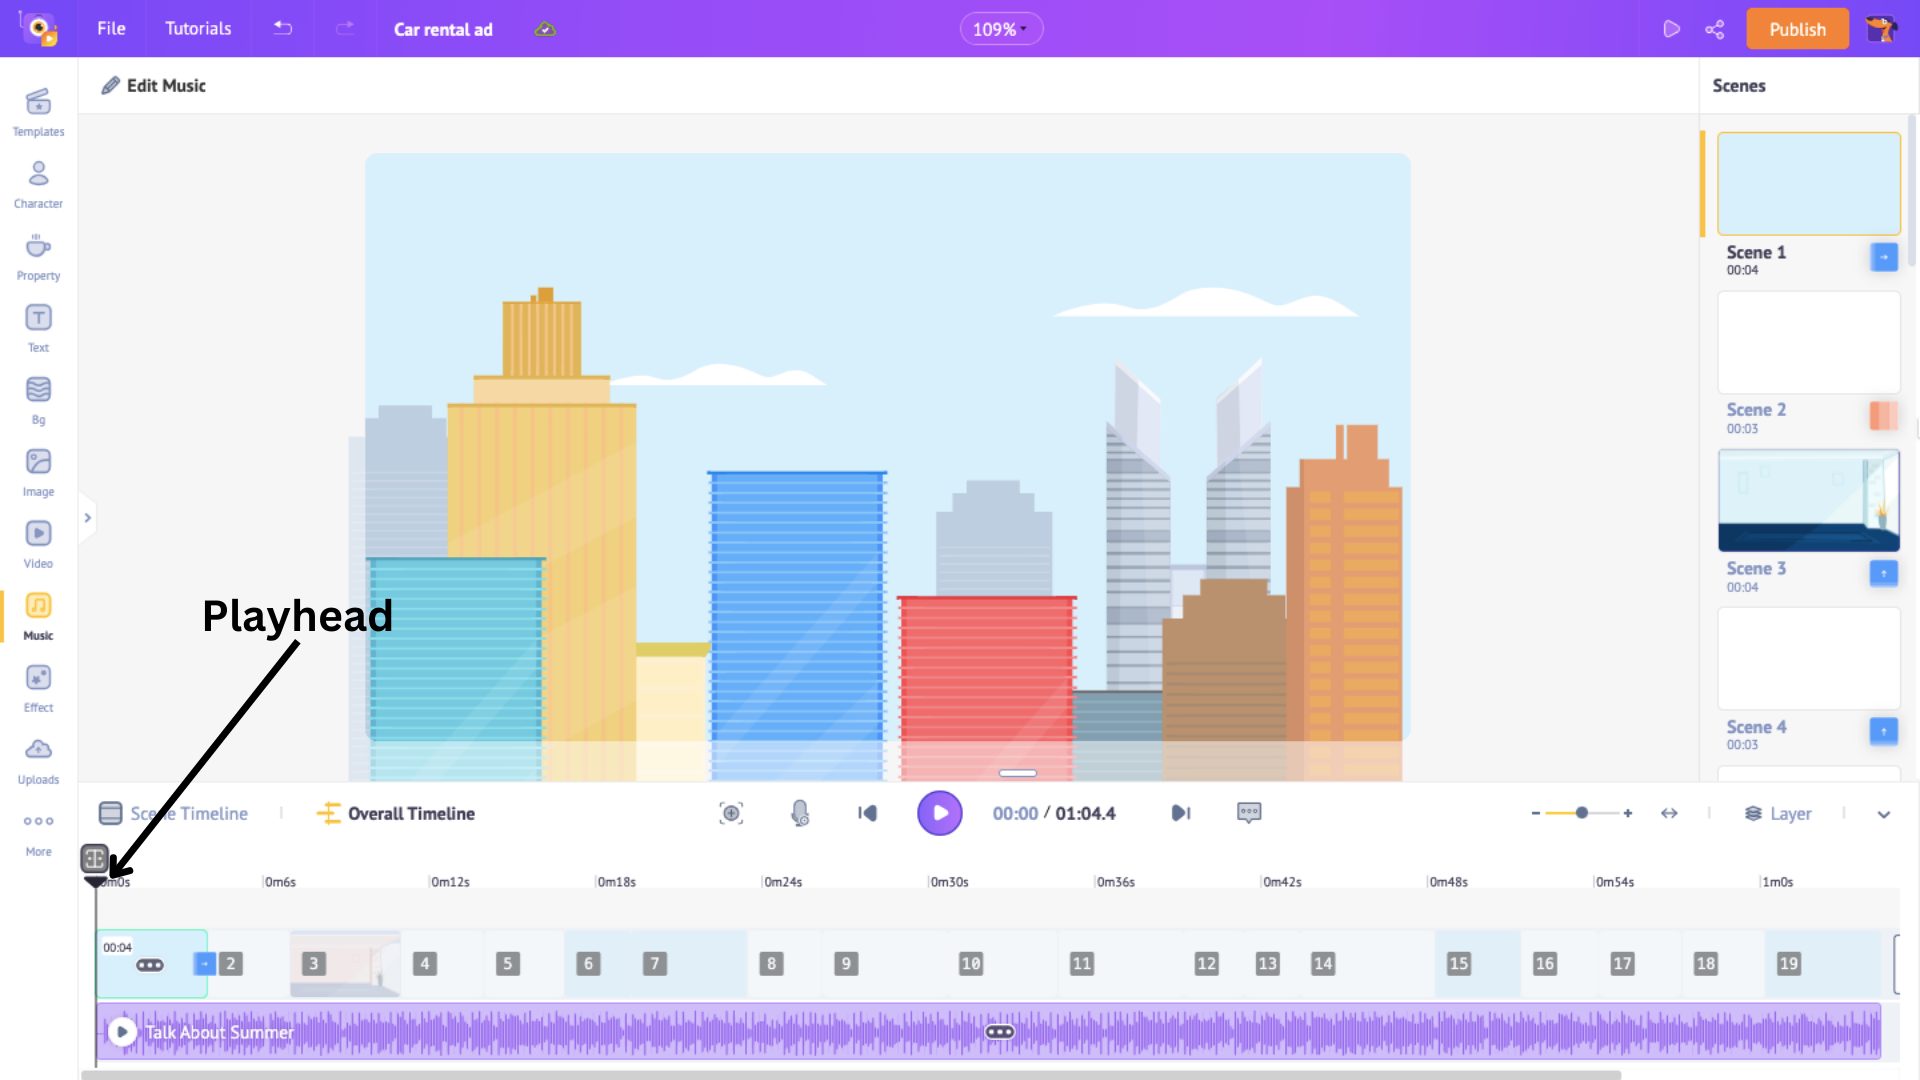
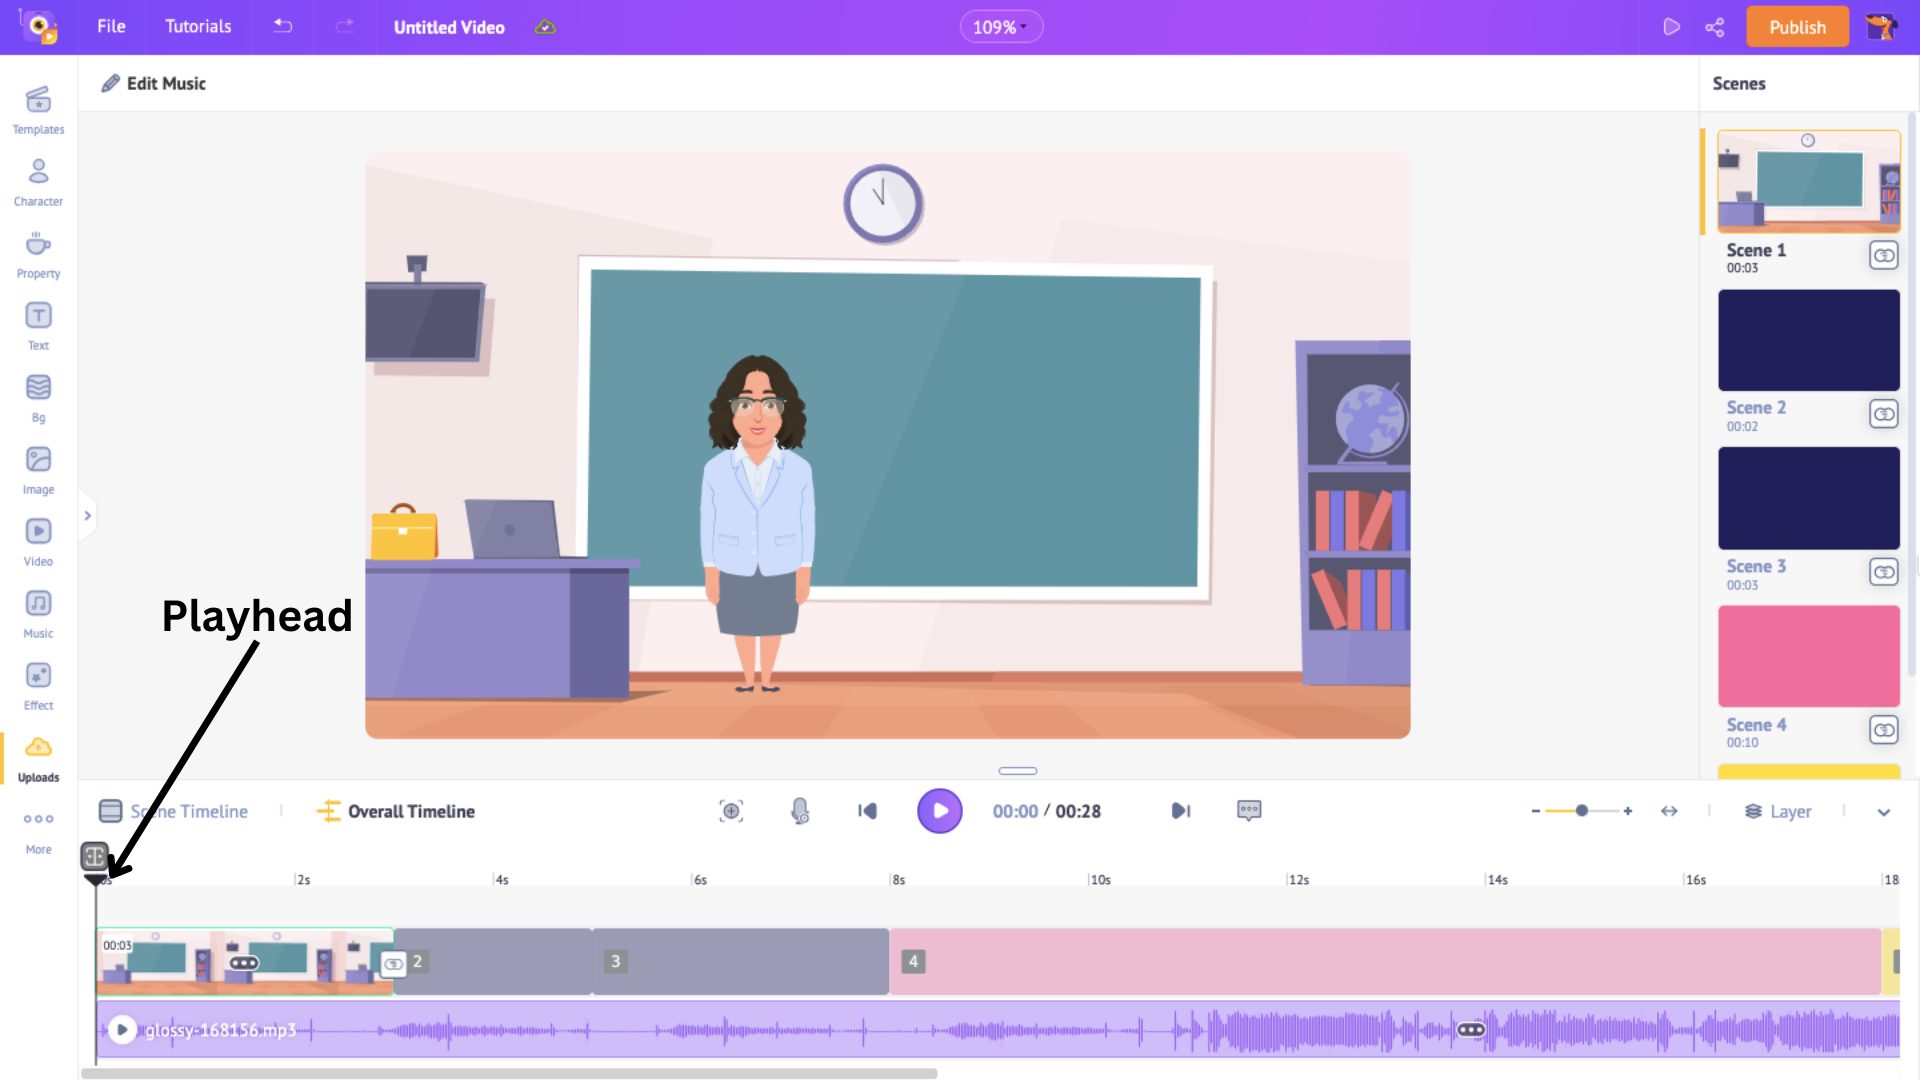
Note that the music gets added from where the play head is on the timeline.
So, if you want the music to start from the beginning of the video, ensure the play head is at the beginning of the timeline.
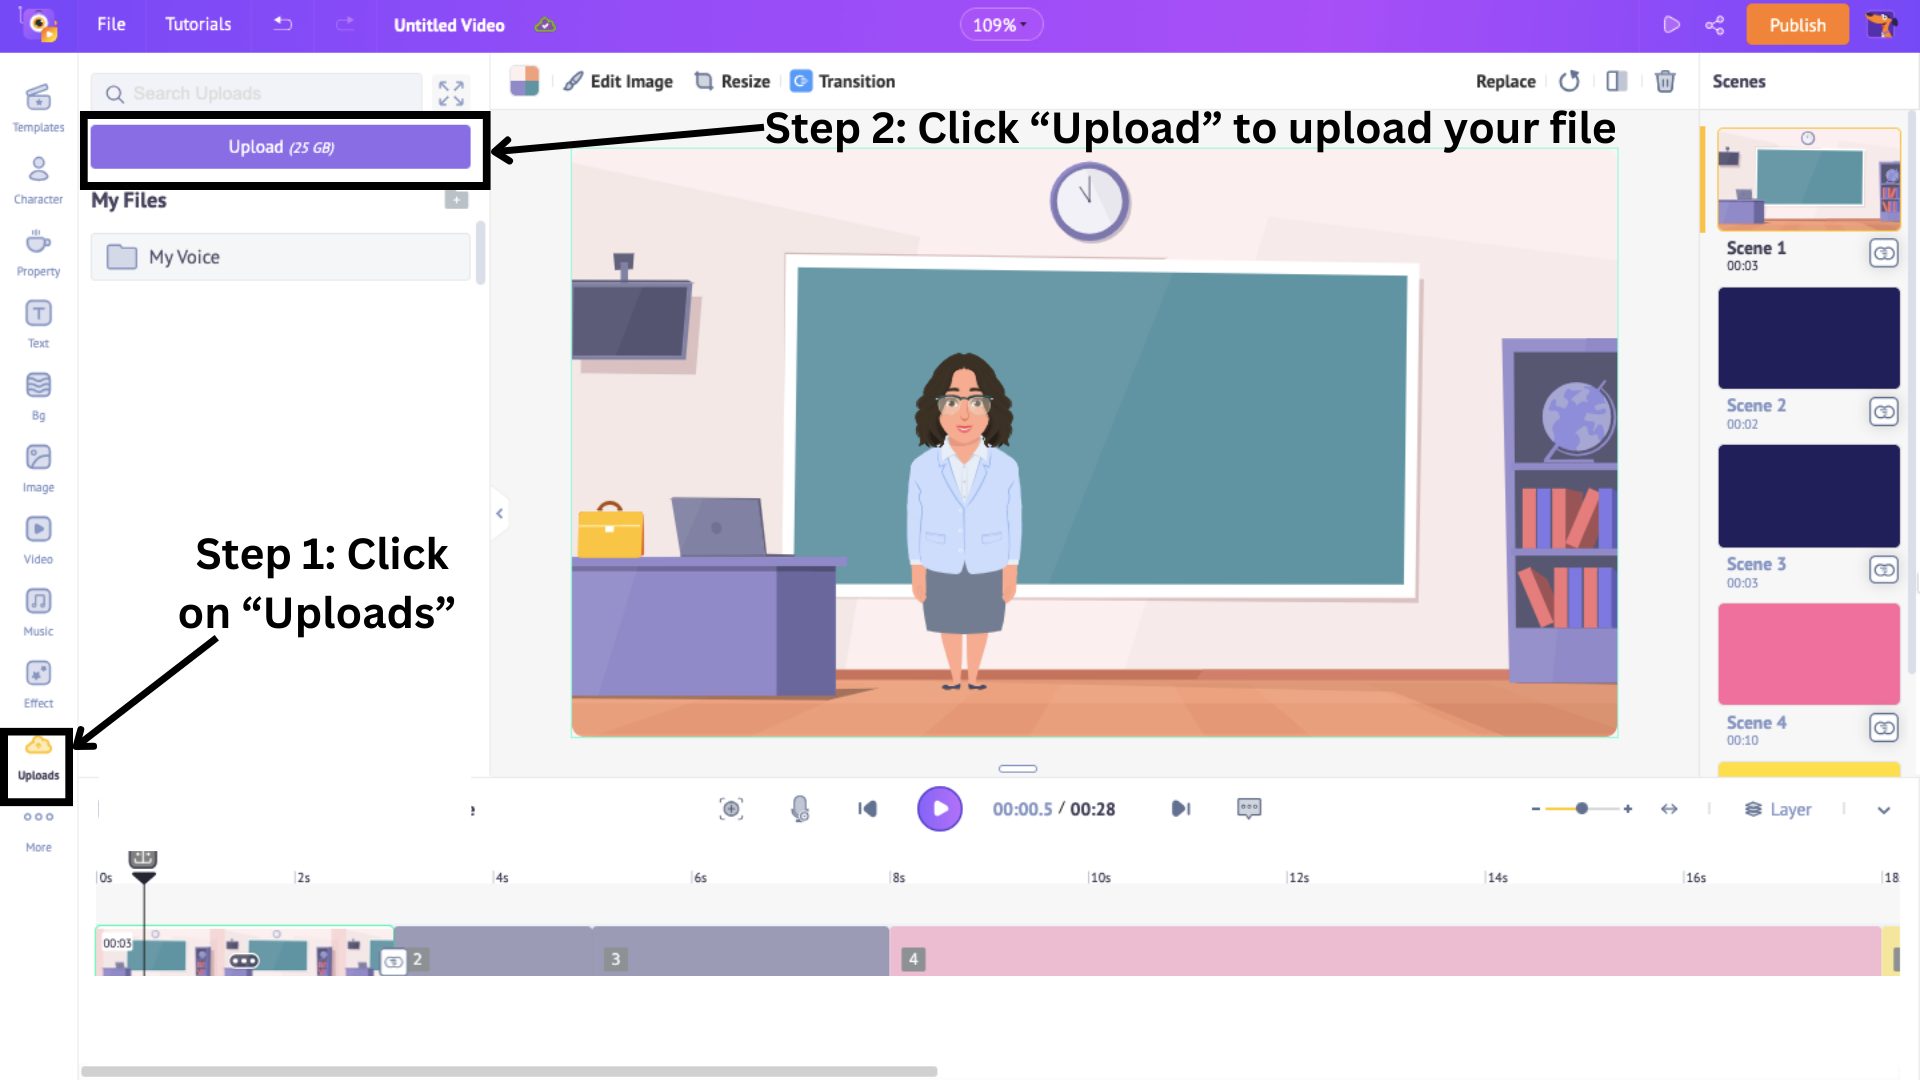
Alternatively, if you want to upload a music track of your own, simply click on the Uploads option in the library and click on Upload.
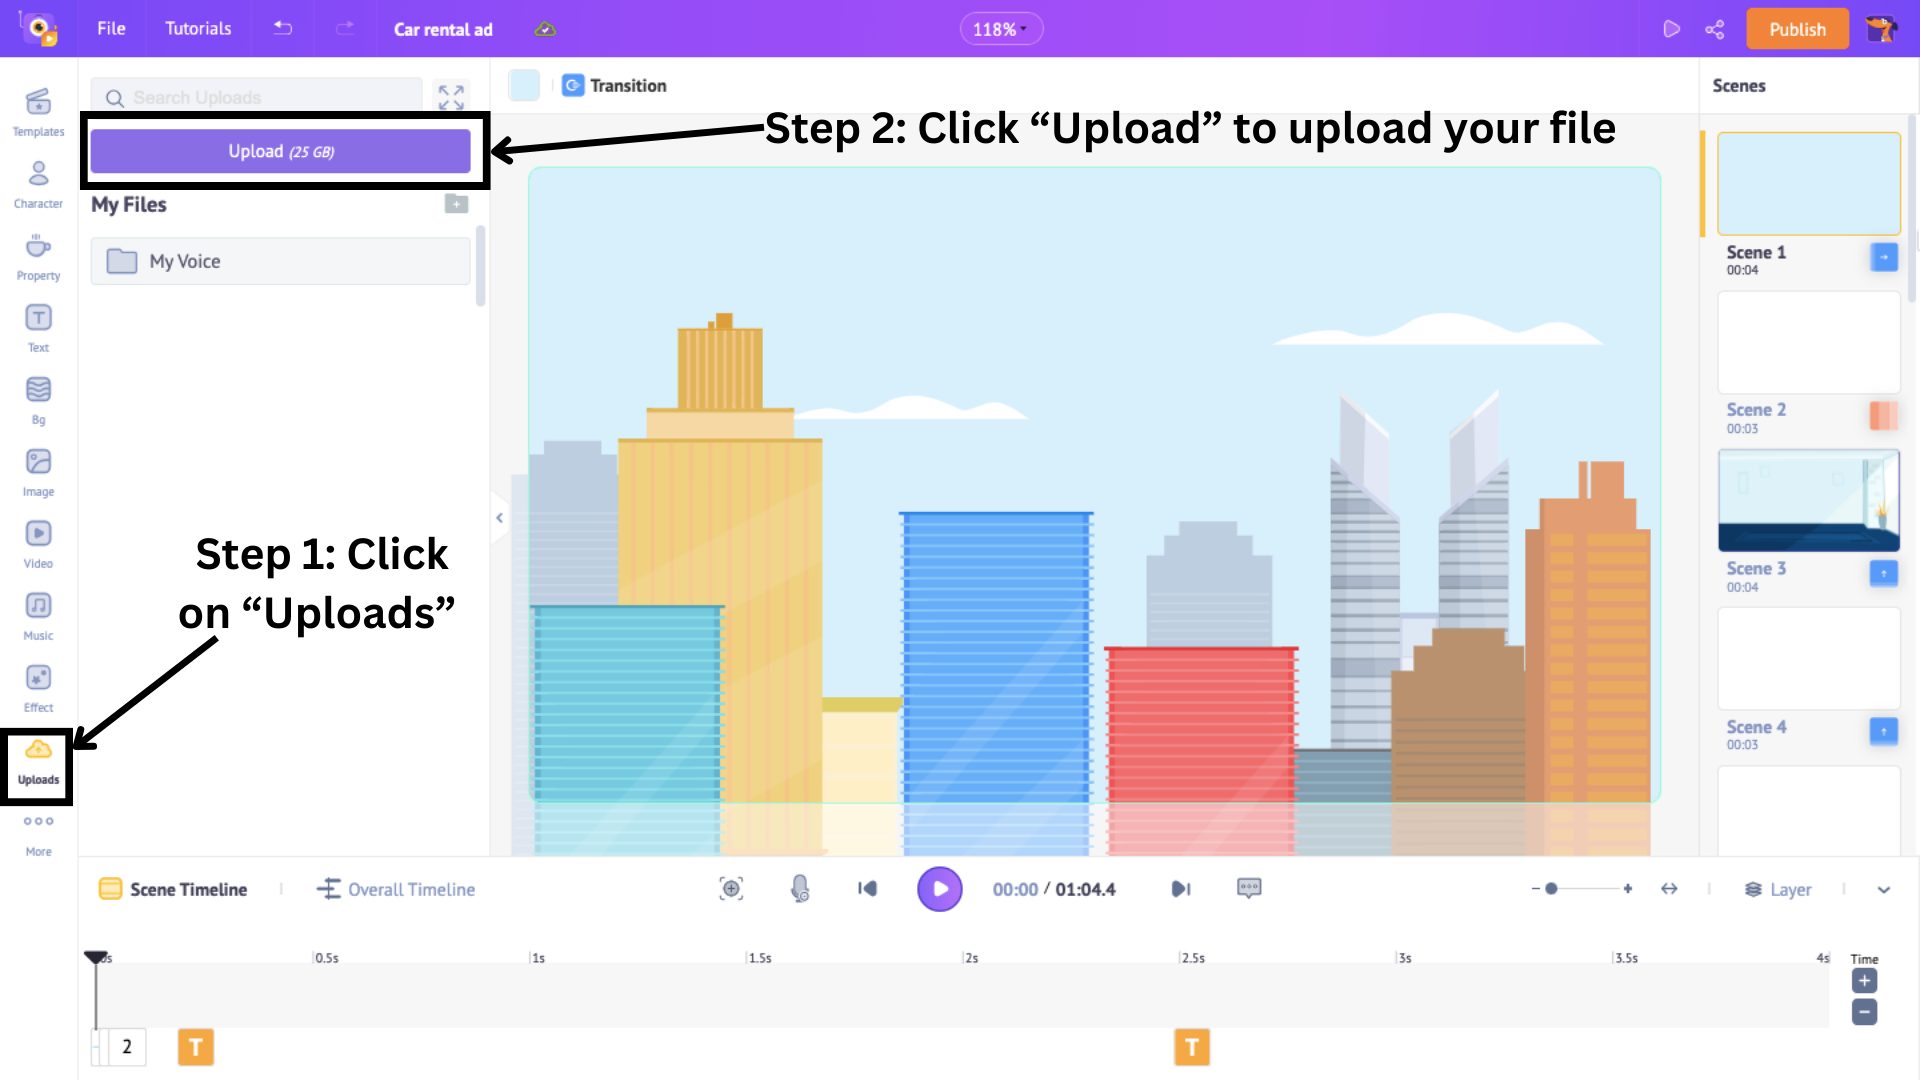
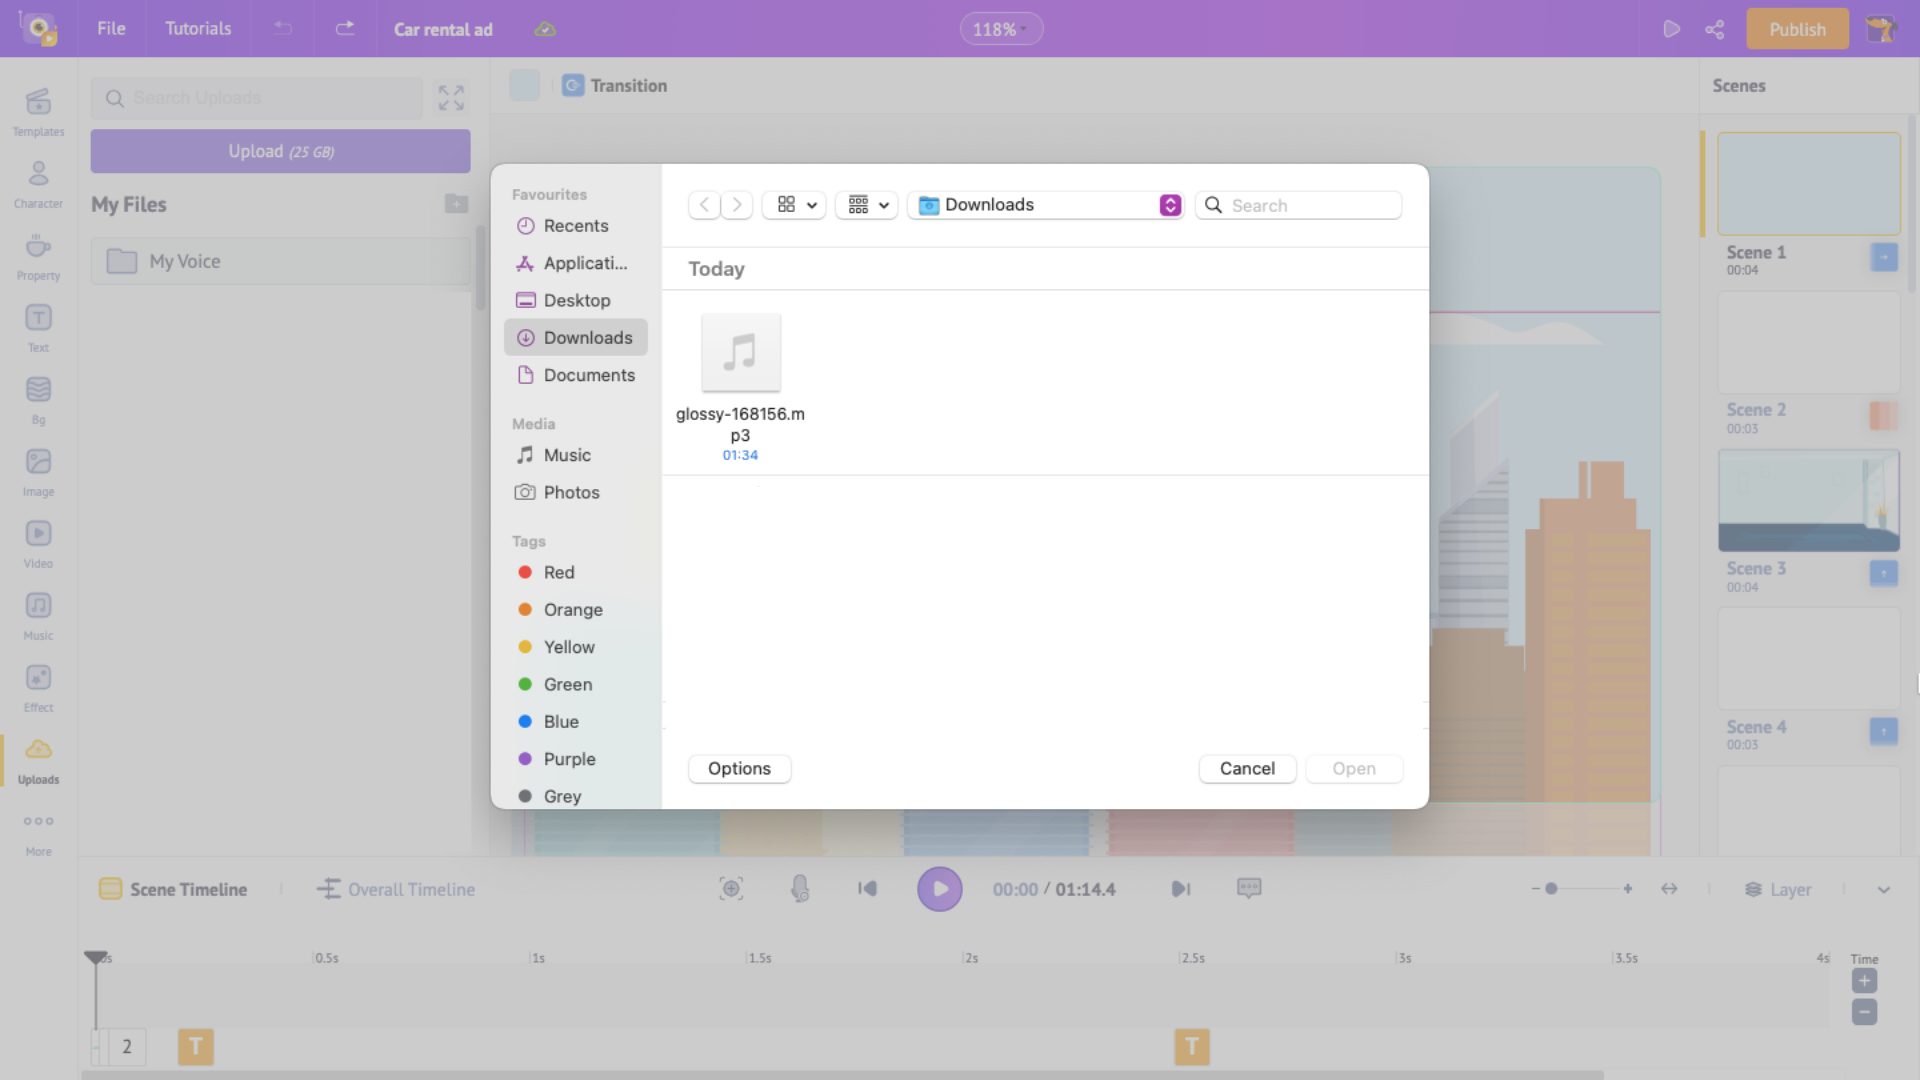
This will open the file explorer window. Choose a track to upload.
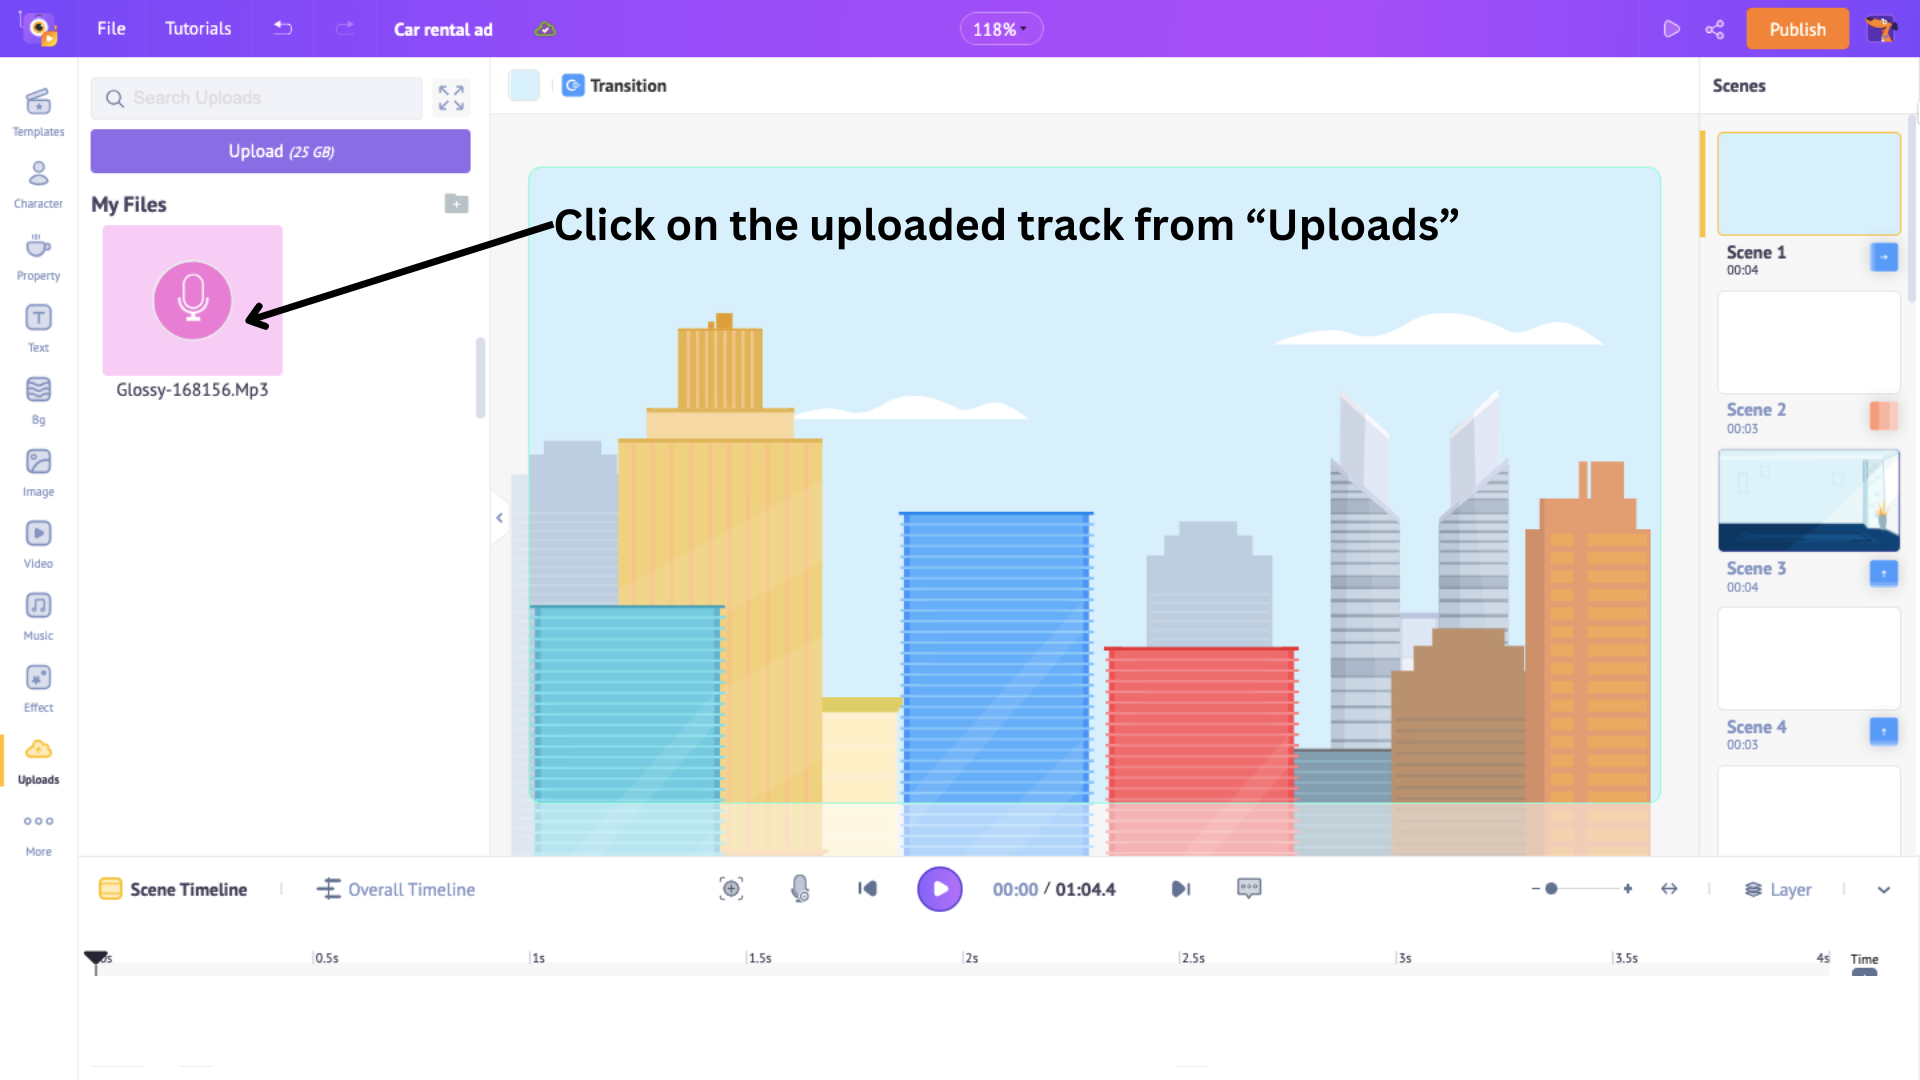
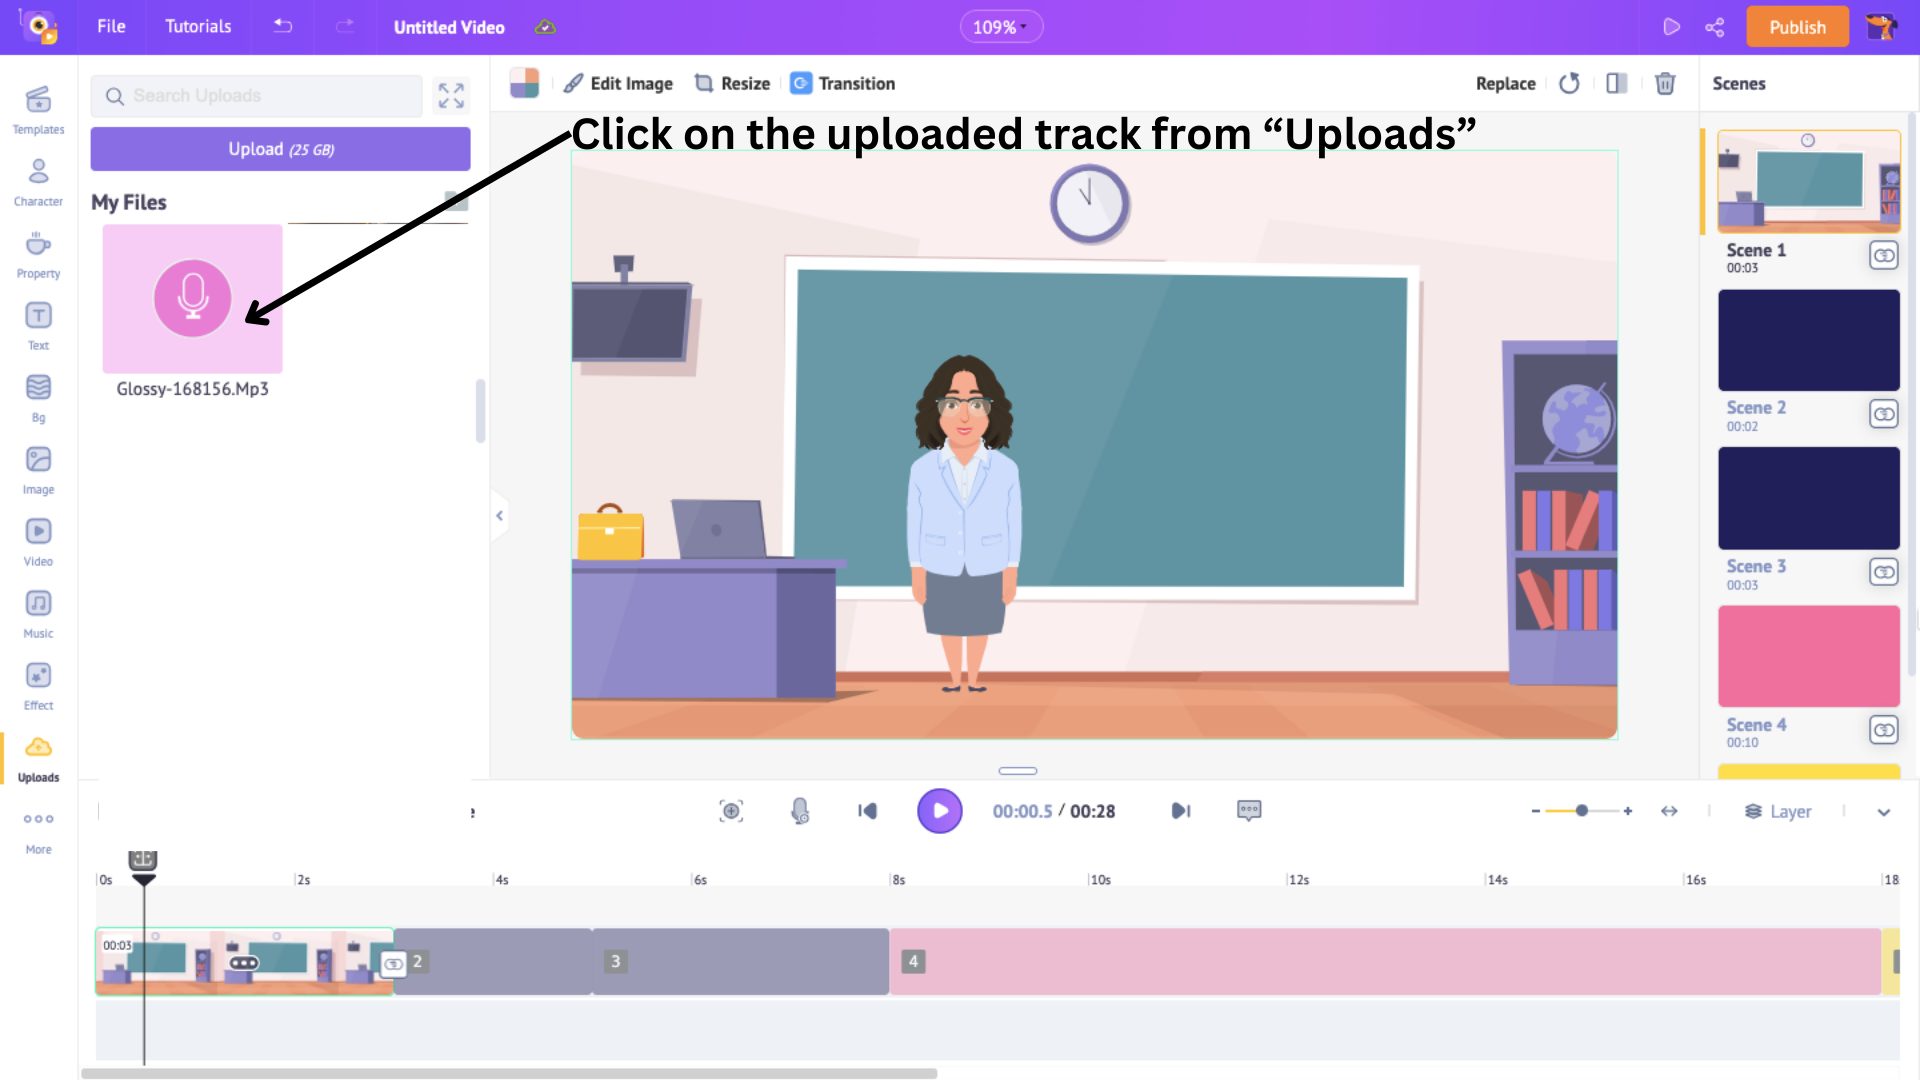
The uploaded track gets stored in the Uploads library. Click on the track to add it to the timeline.
And that's how you add a new music track to the timeline.
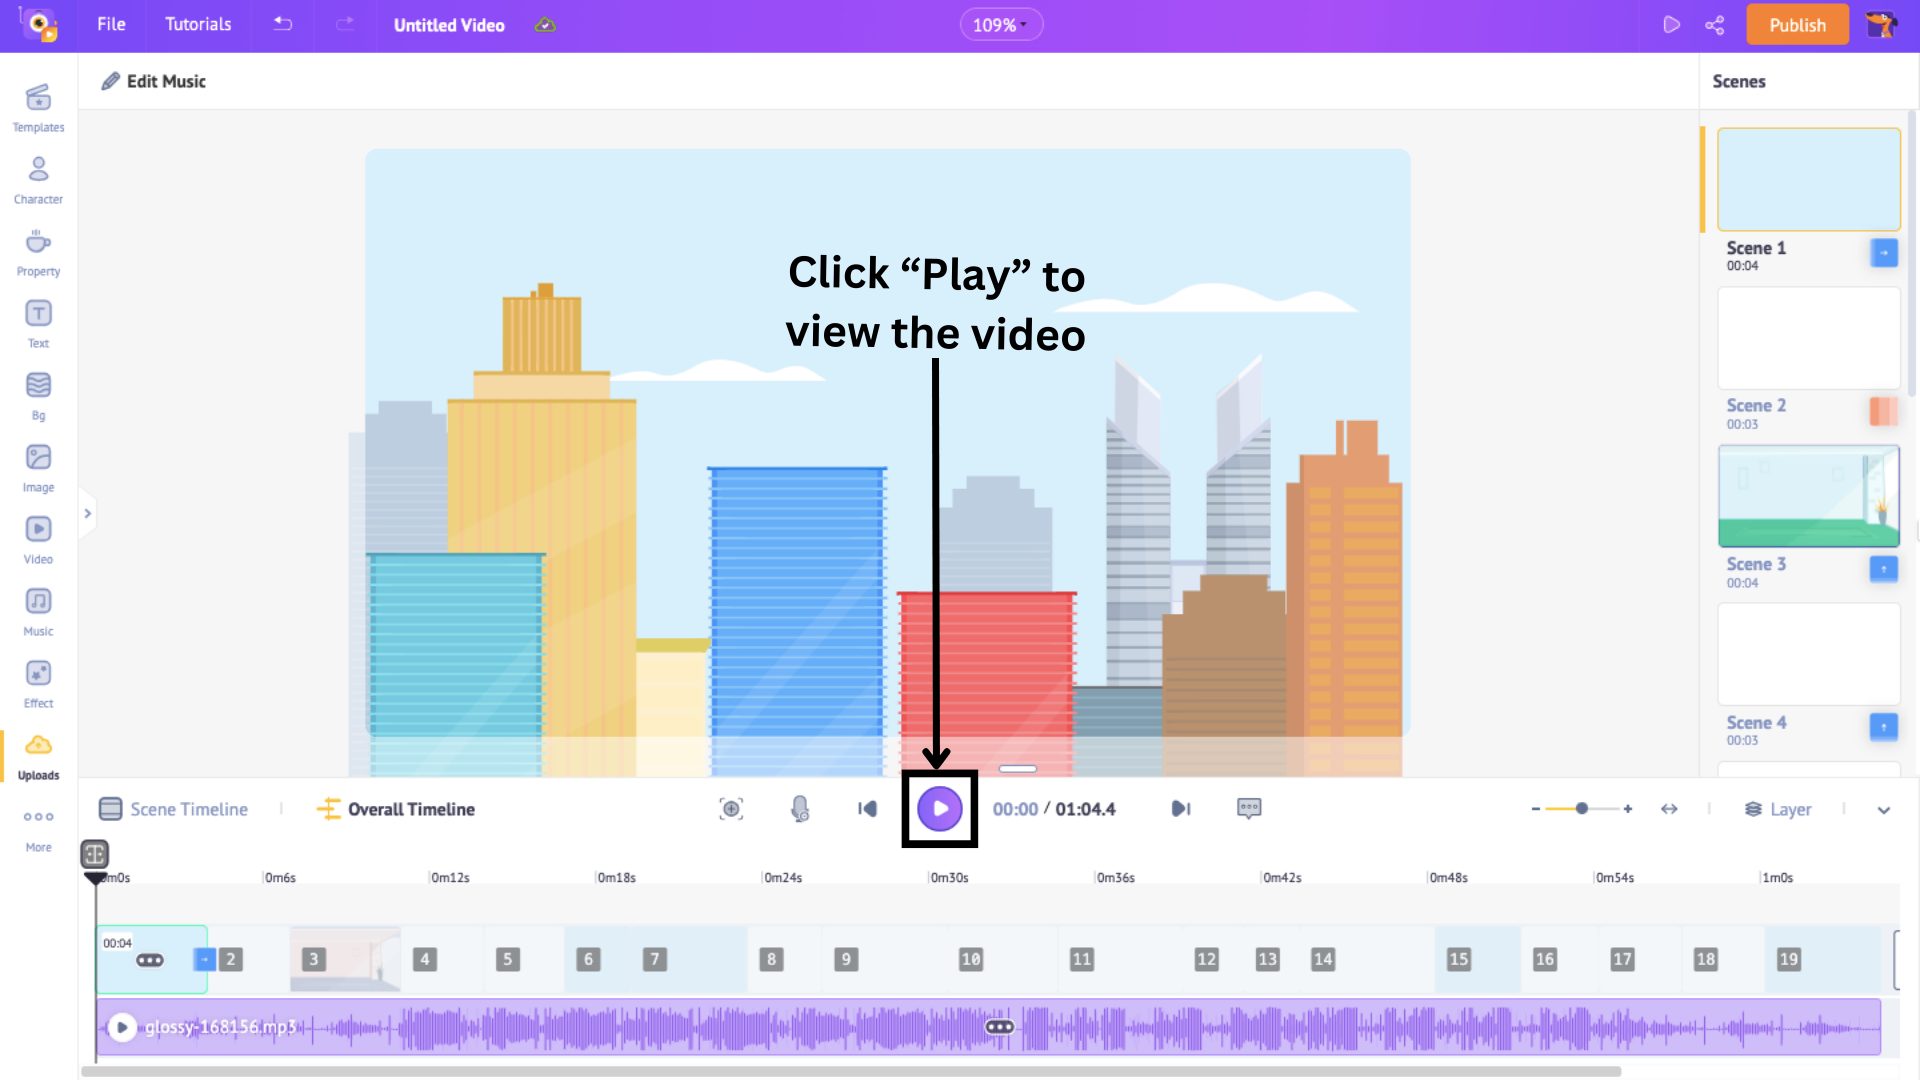
Click on the Play button to listen to the music along with the scene.
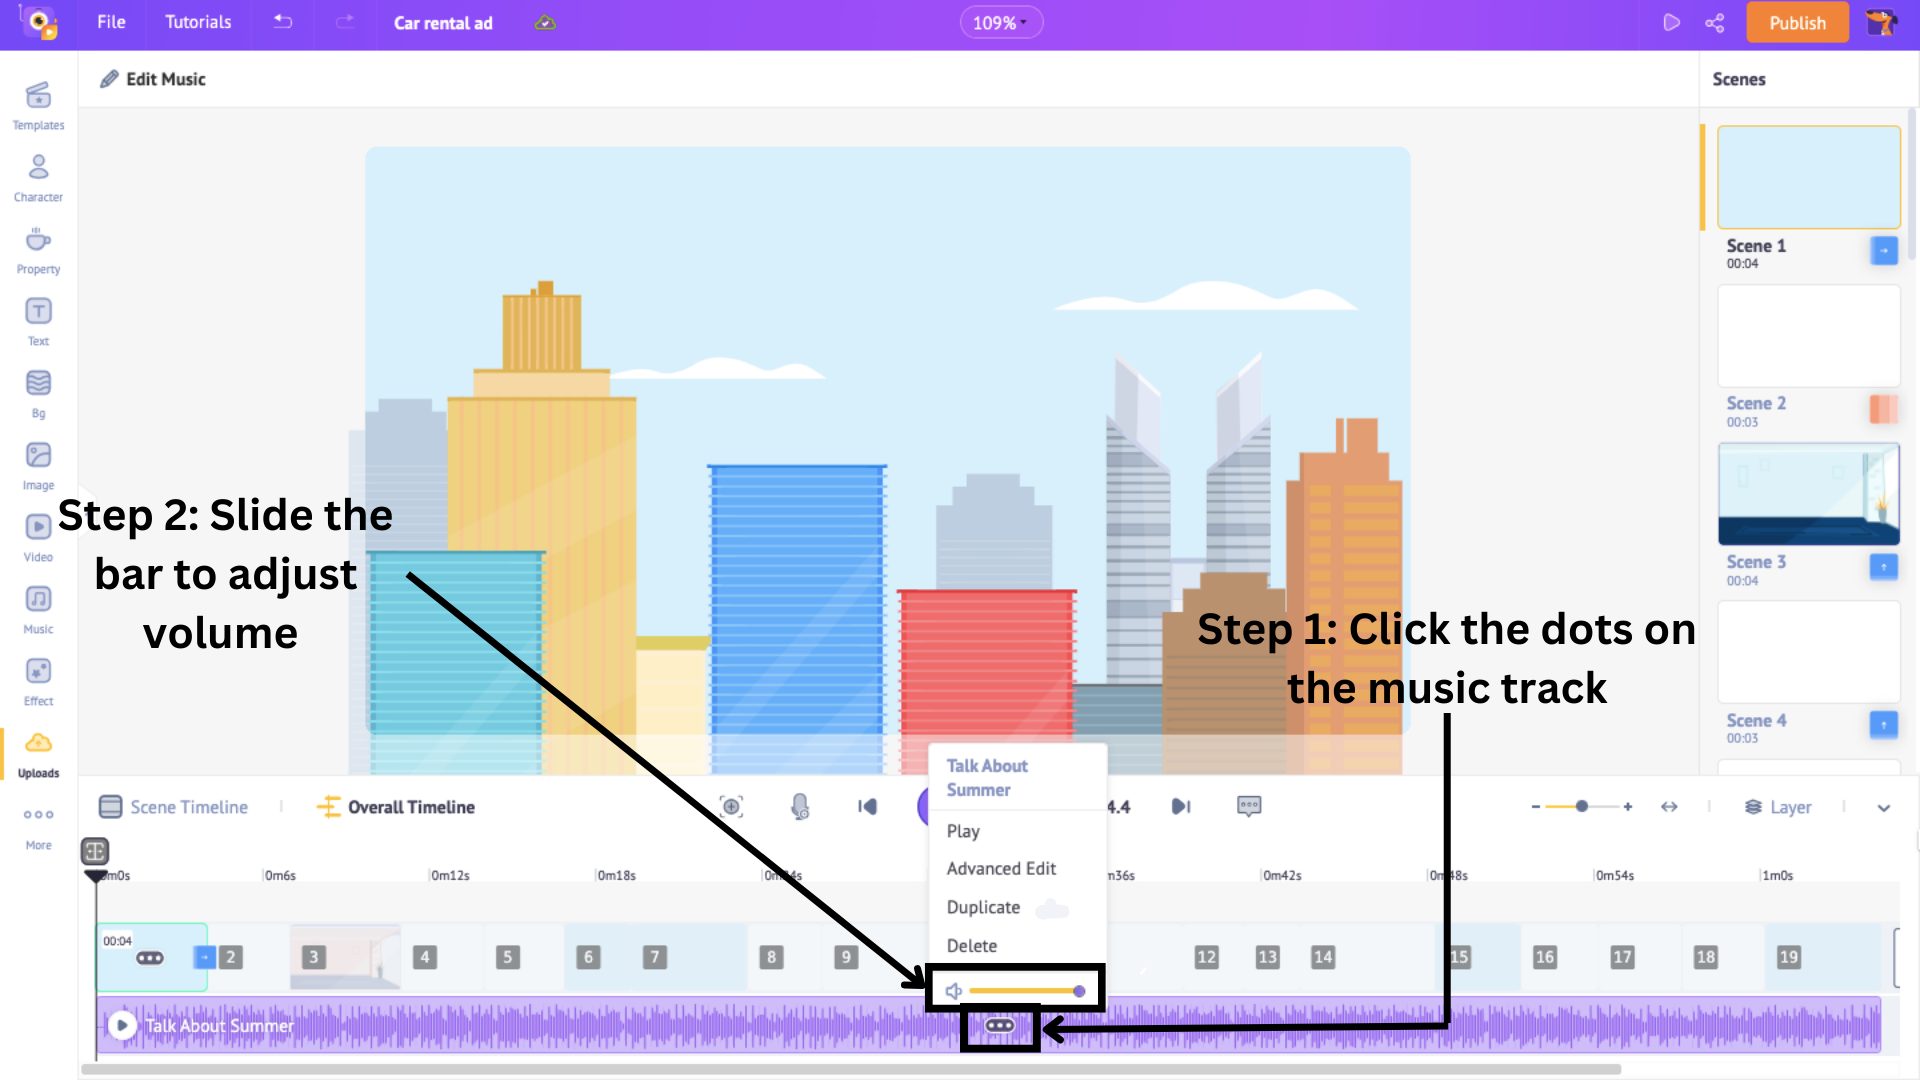
If you want to adjust the volume of the music, click on the track on the overall timeline, and you will see the volume bar appear.
Slide the bar to adjust the volume.
Easy peasy.
Now that we have seen the four important elements, let's talk about scenes. The template contains plenty of scenes already.
But, if you wish to add a new scene and show off your creative side, click on the dots on a scene. This will show three options: Add, Duplicate, and Delete.
Choose Add if you want a blank scene and start designing from scratch, Duplicate if you want to make a new scene with slight changes to an existing scene, or Delete if you want to delete a scene.

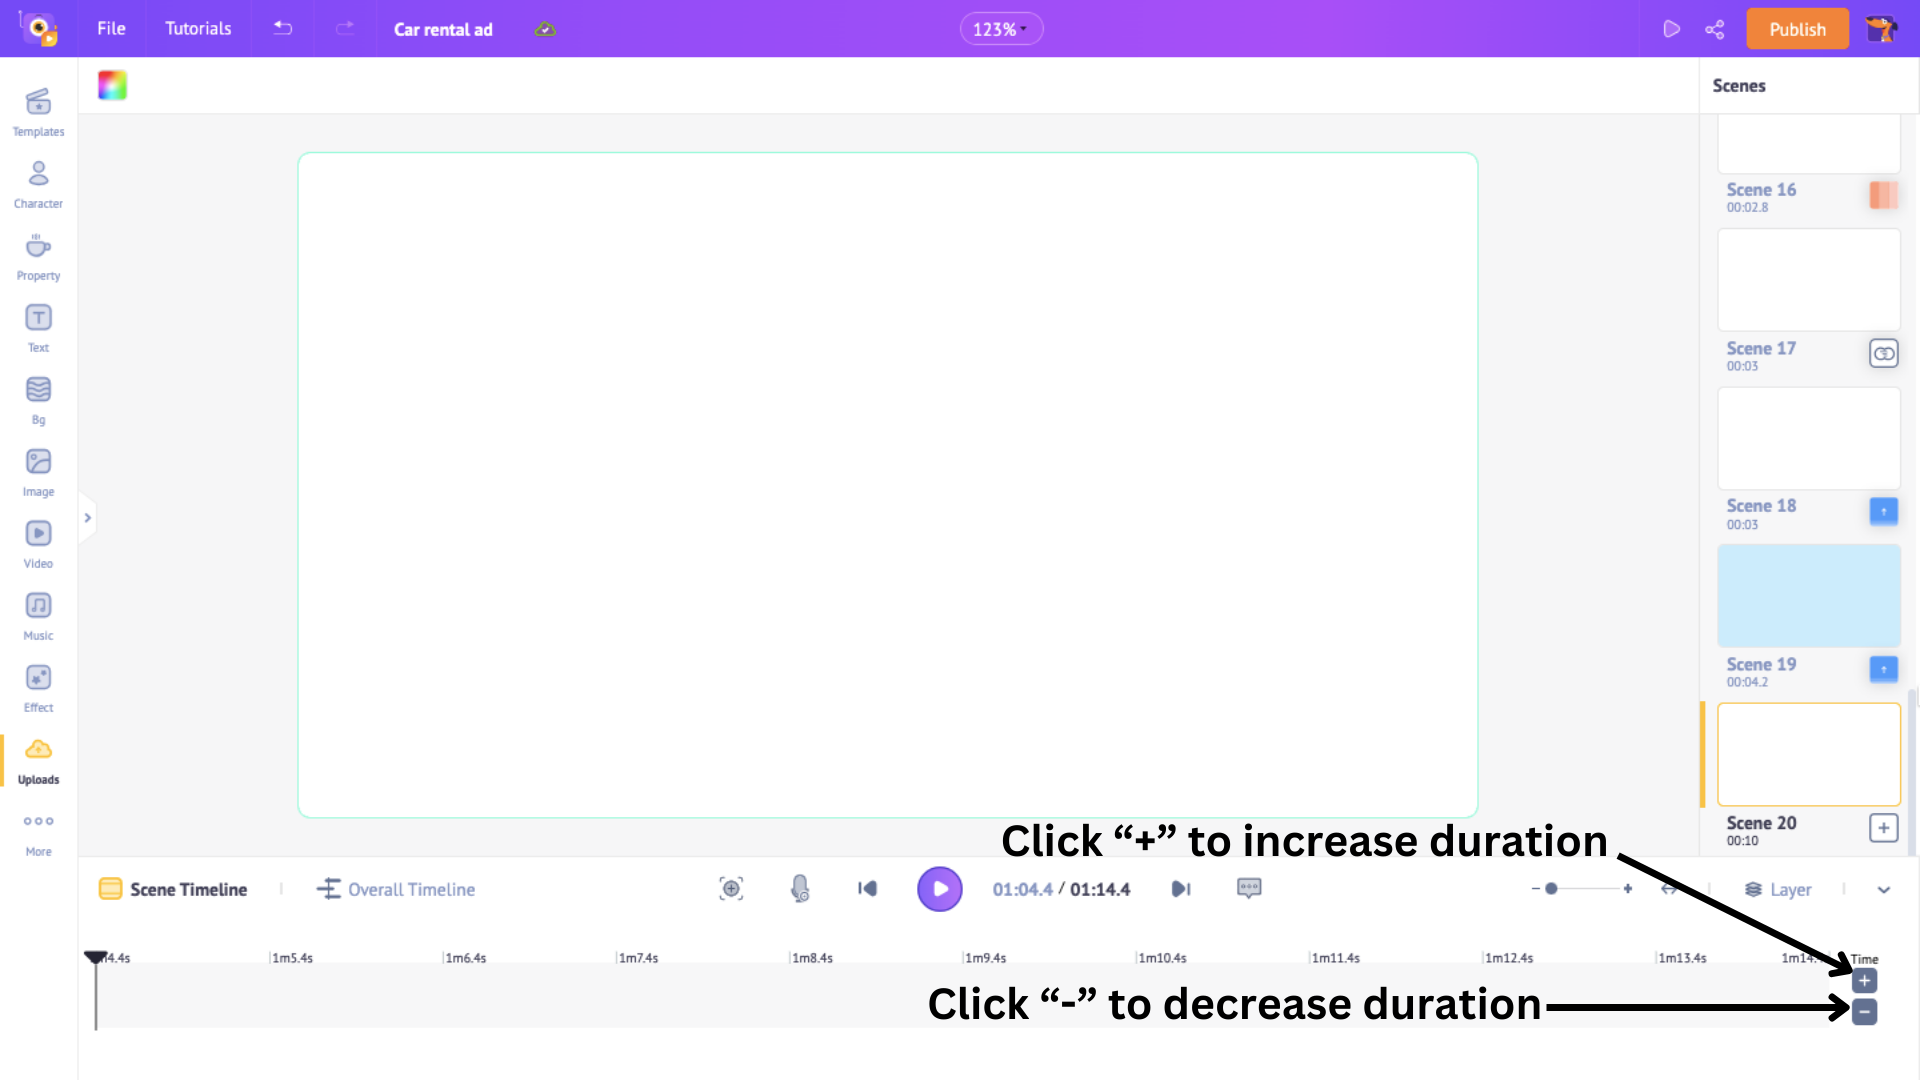
If you choose to add a blank scene, the scene duration is set to 10 seconds by default.
However, you can adjust the duration by clicking on the “+” and “-” signs on the scene timeline to increase or decrease the scene duration.
This current scene is empty, but you have many options to choose from to add elements.
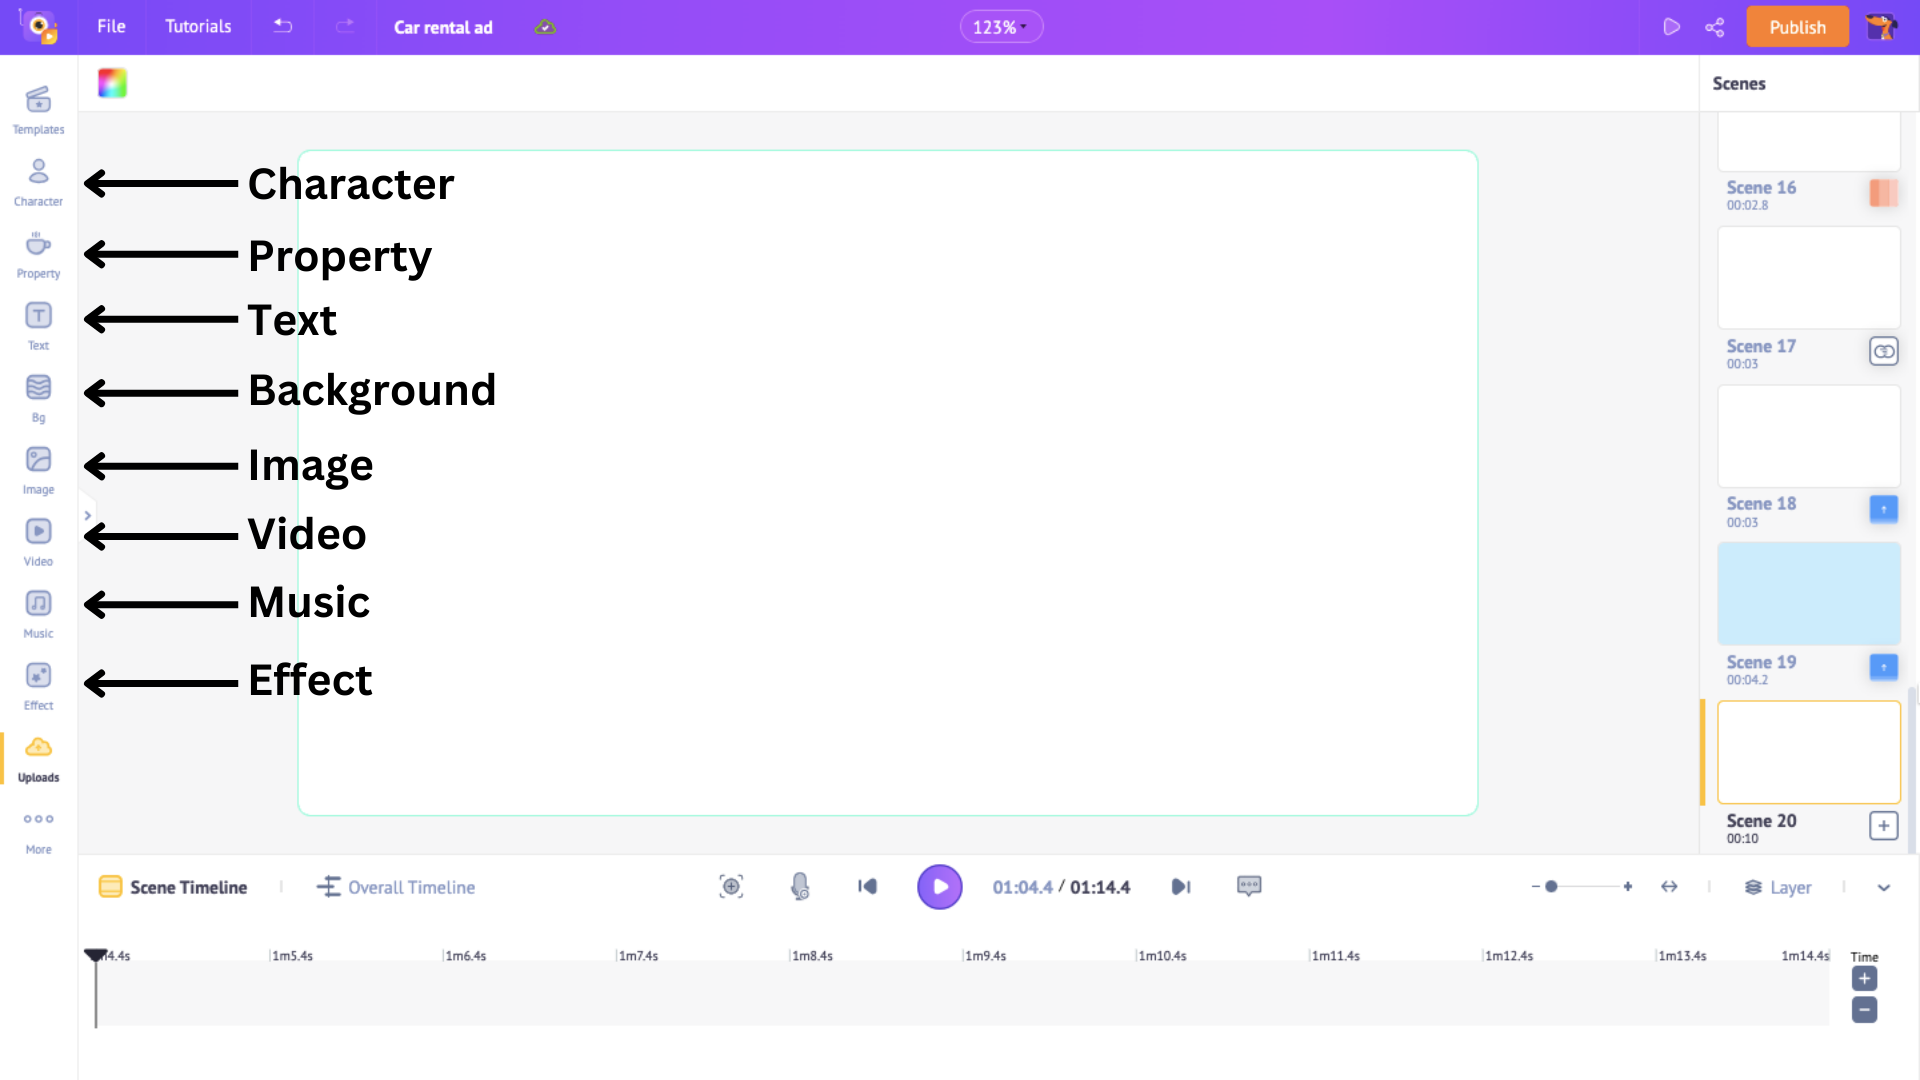
Apart from the elements we have seen so far, other sections like Image, Video, Background, and Effects contain over 10,000 assets.
You can use these elements to create an animated ad.
After you add all the elements, we can move on to the last step.
Step 3: Preview and Download your video
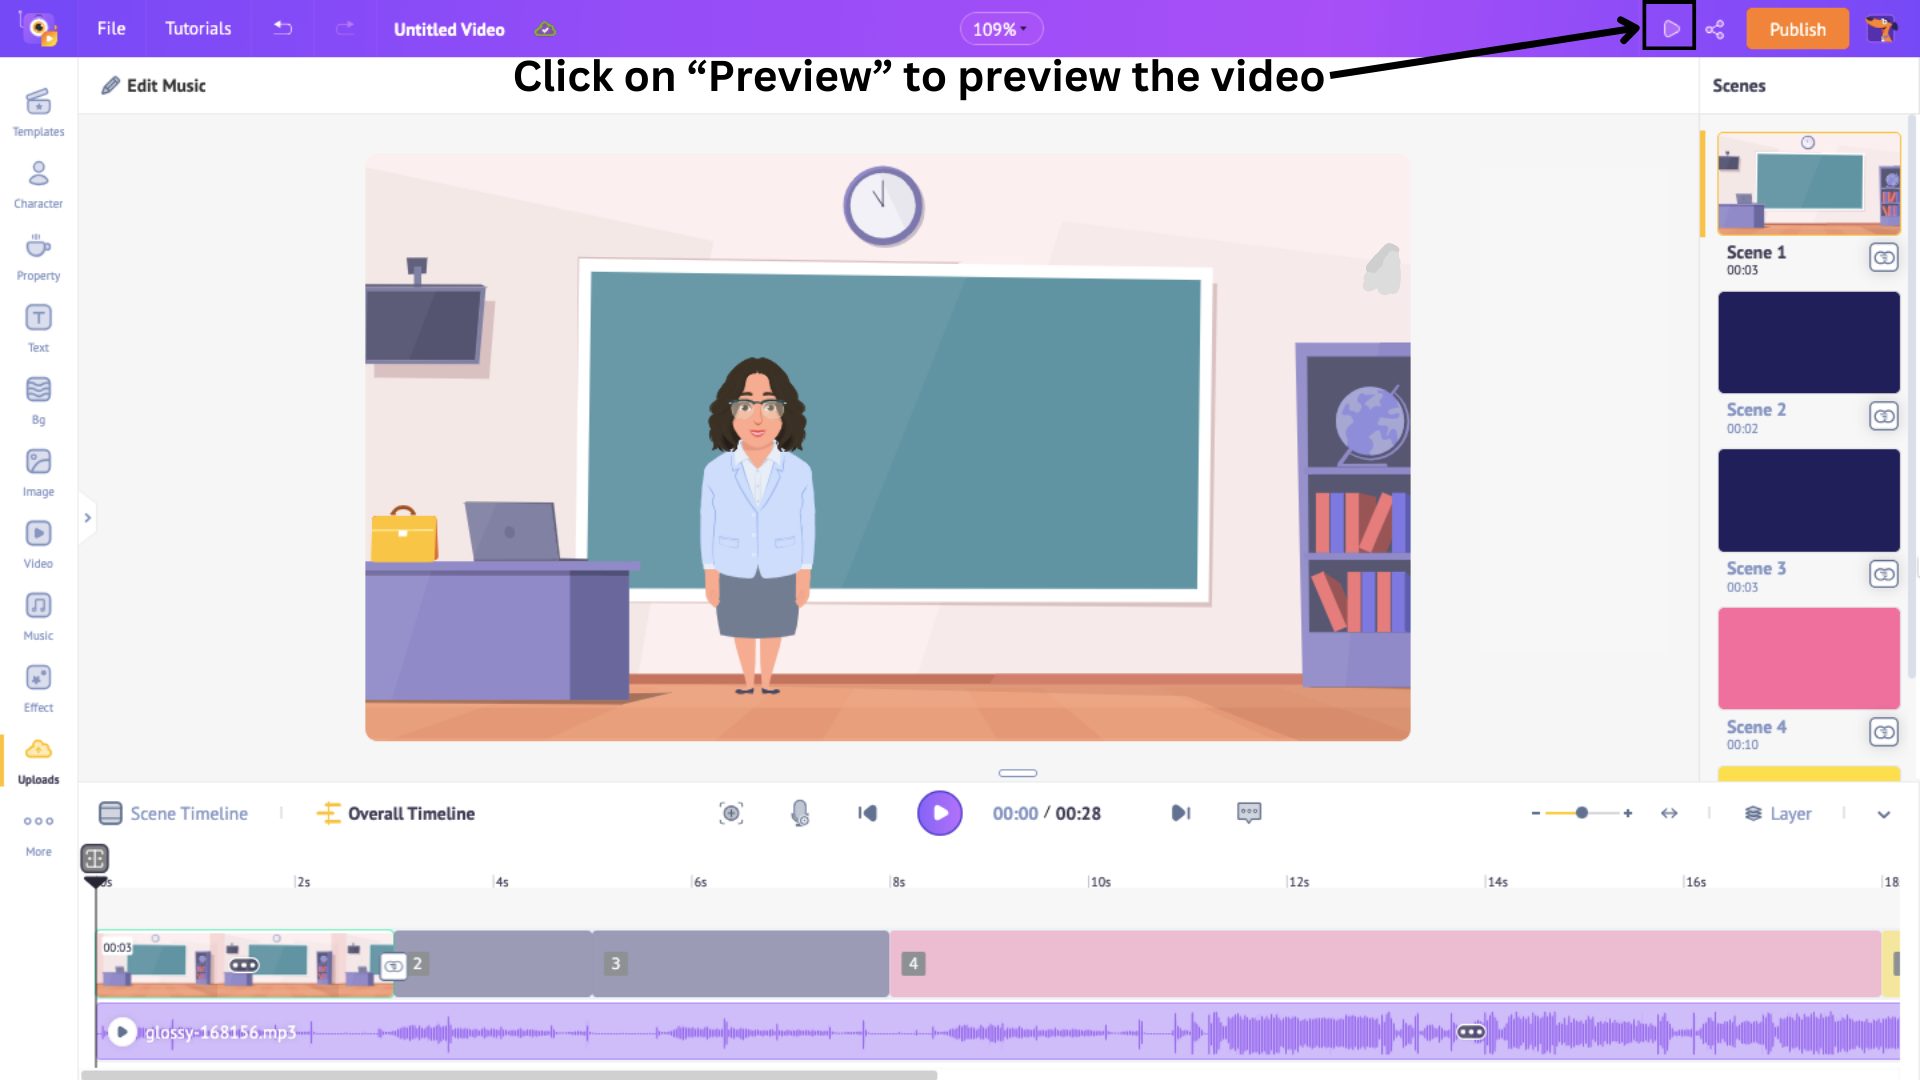
Now that you have added all the elements, click on Preview to see how the video has turned out.
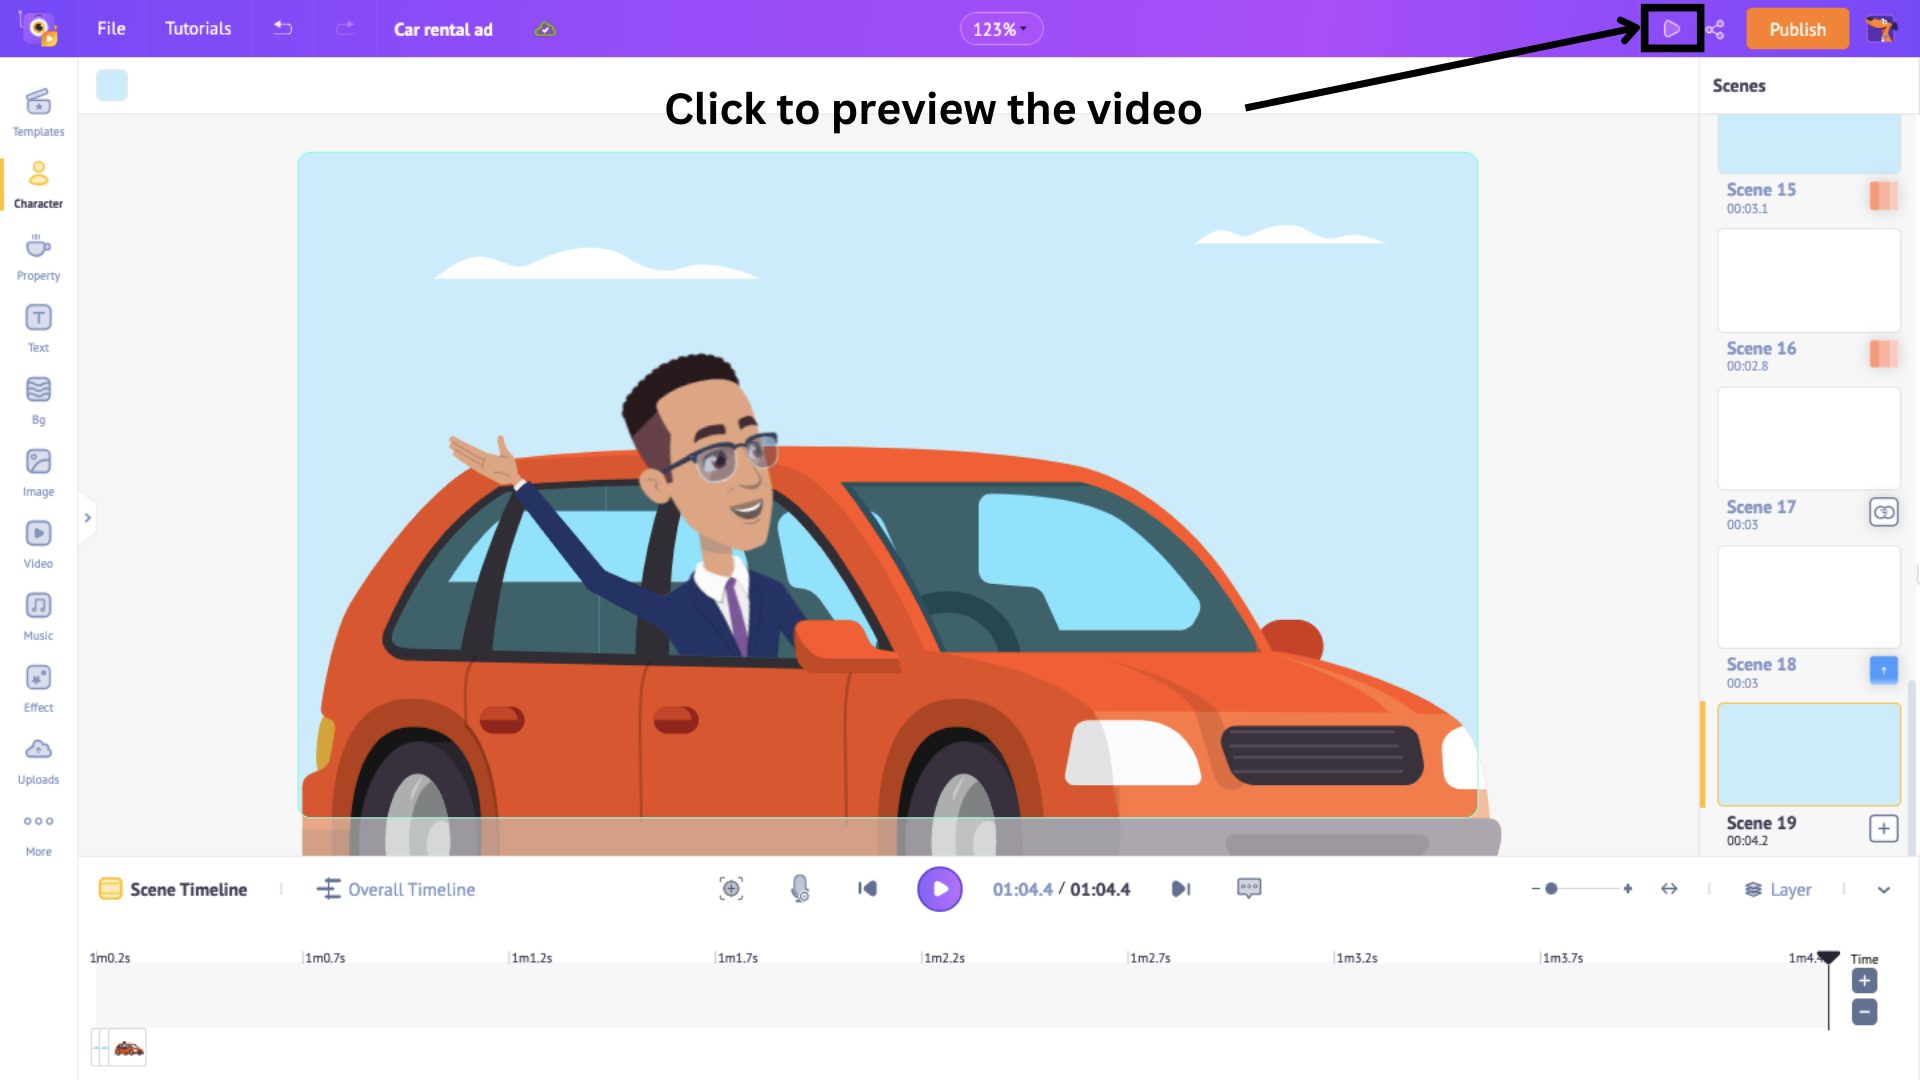
If everything is A-OK and you wish to save this video as a template for future use, click the Save as Template option from the File drop-down menu.
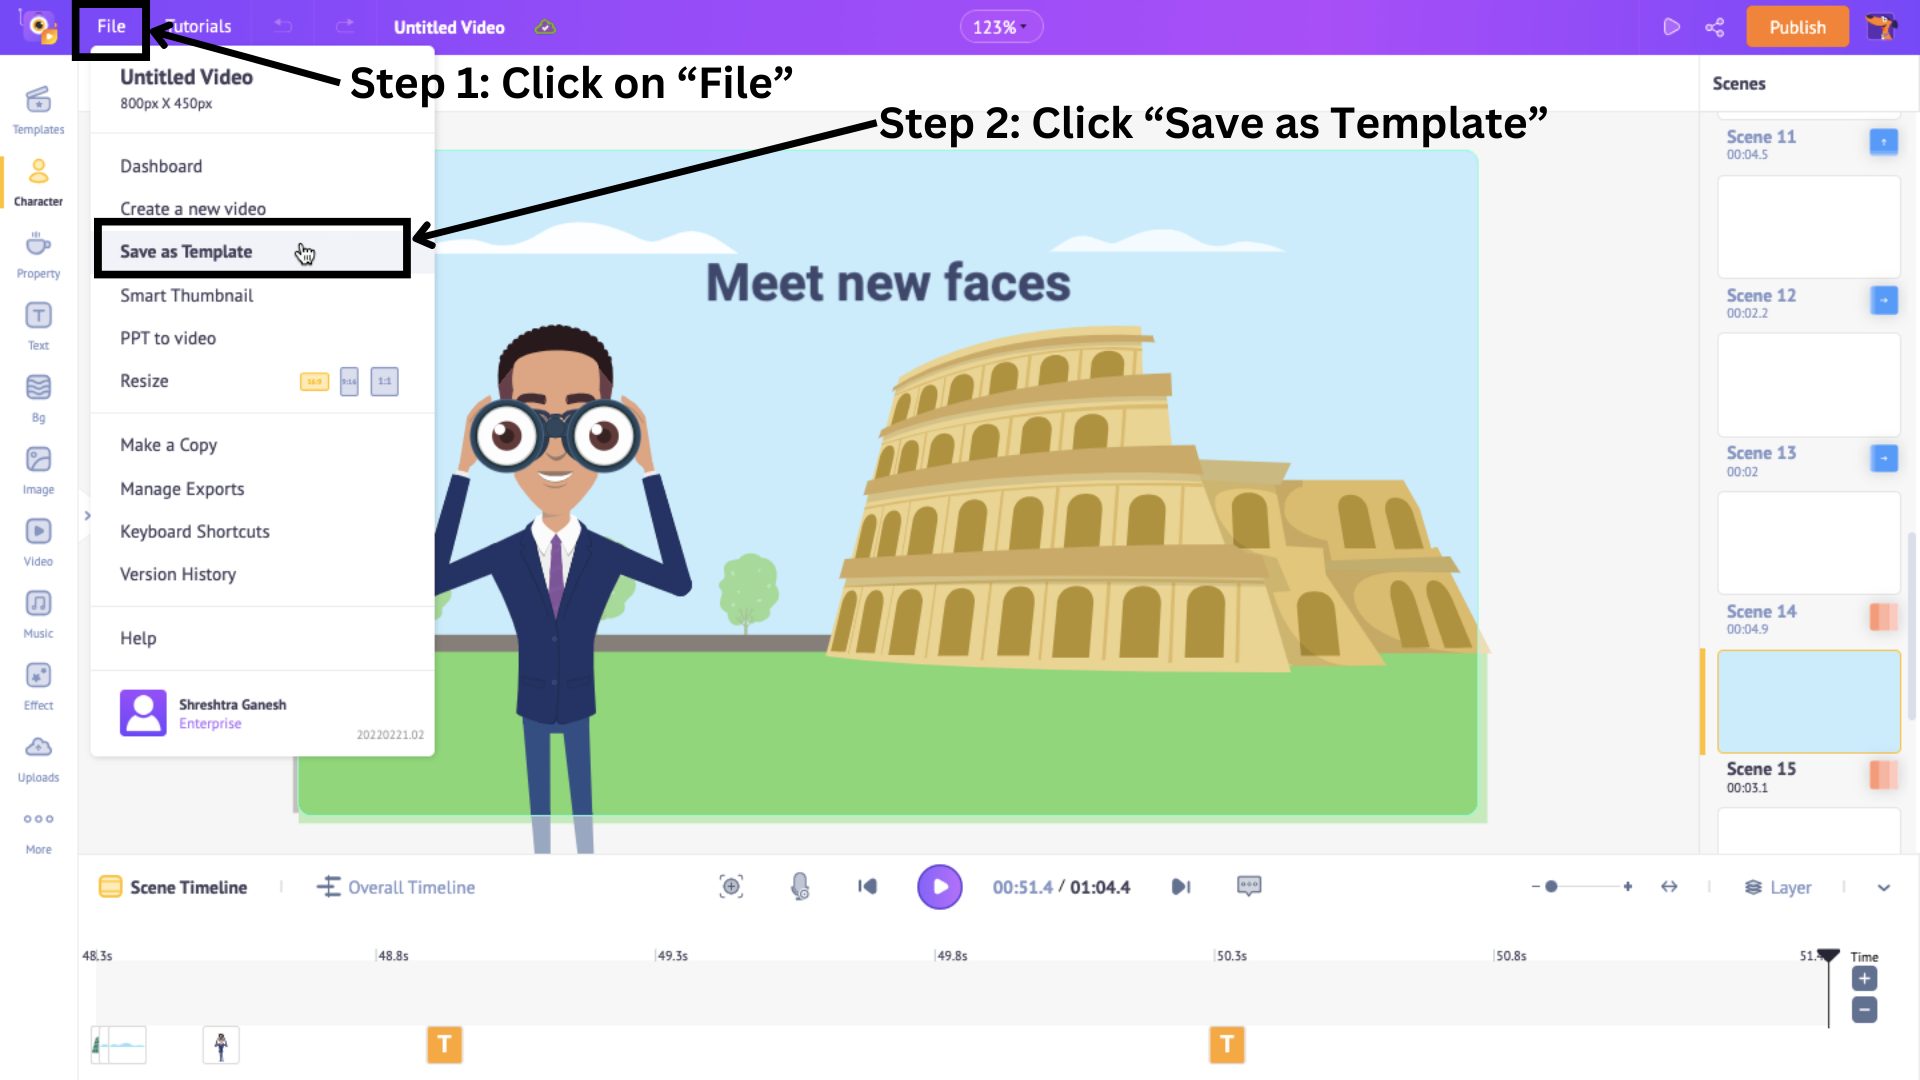
You now have your very own template. How cool is that?!
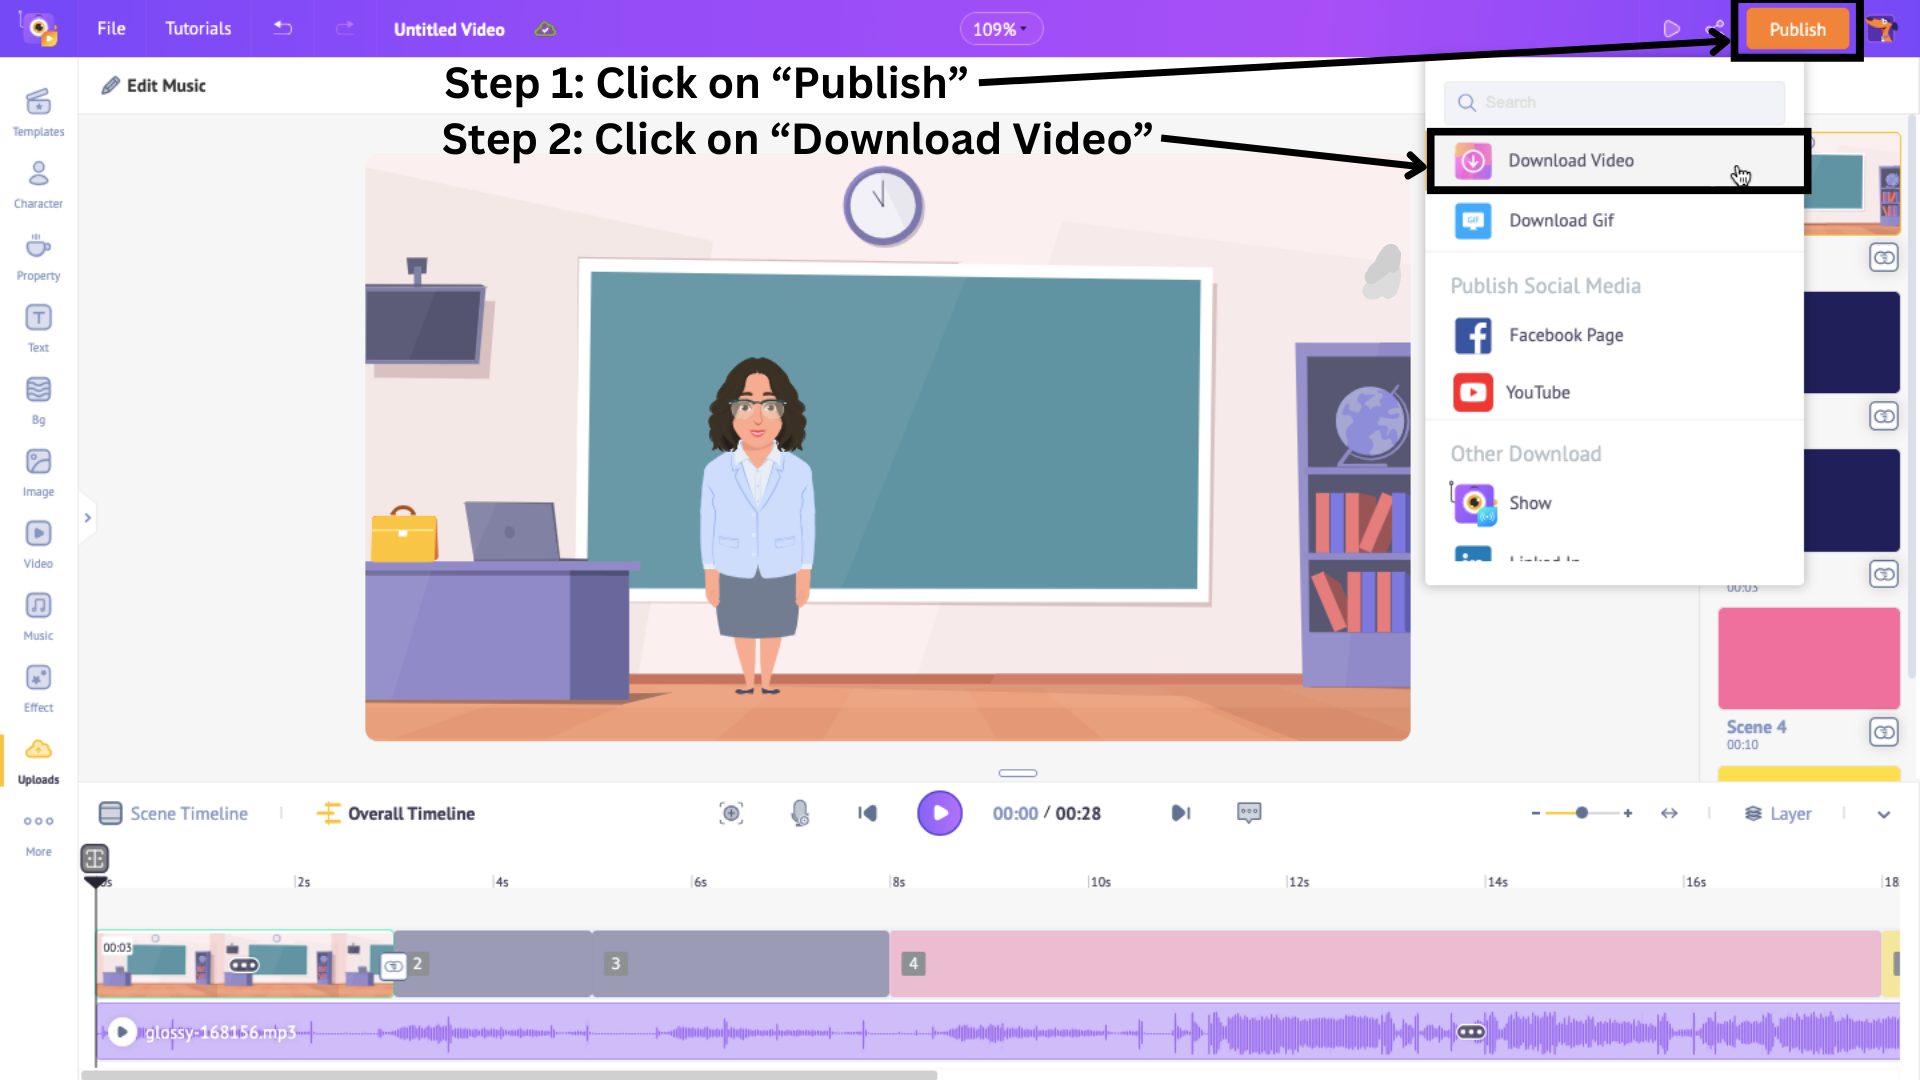
Next, to download the animated advertisement that you just made, click on Publish > Download Video.
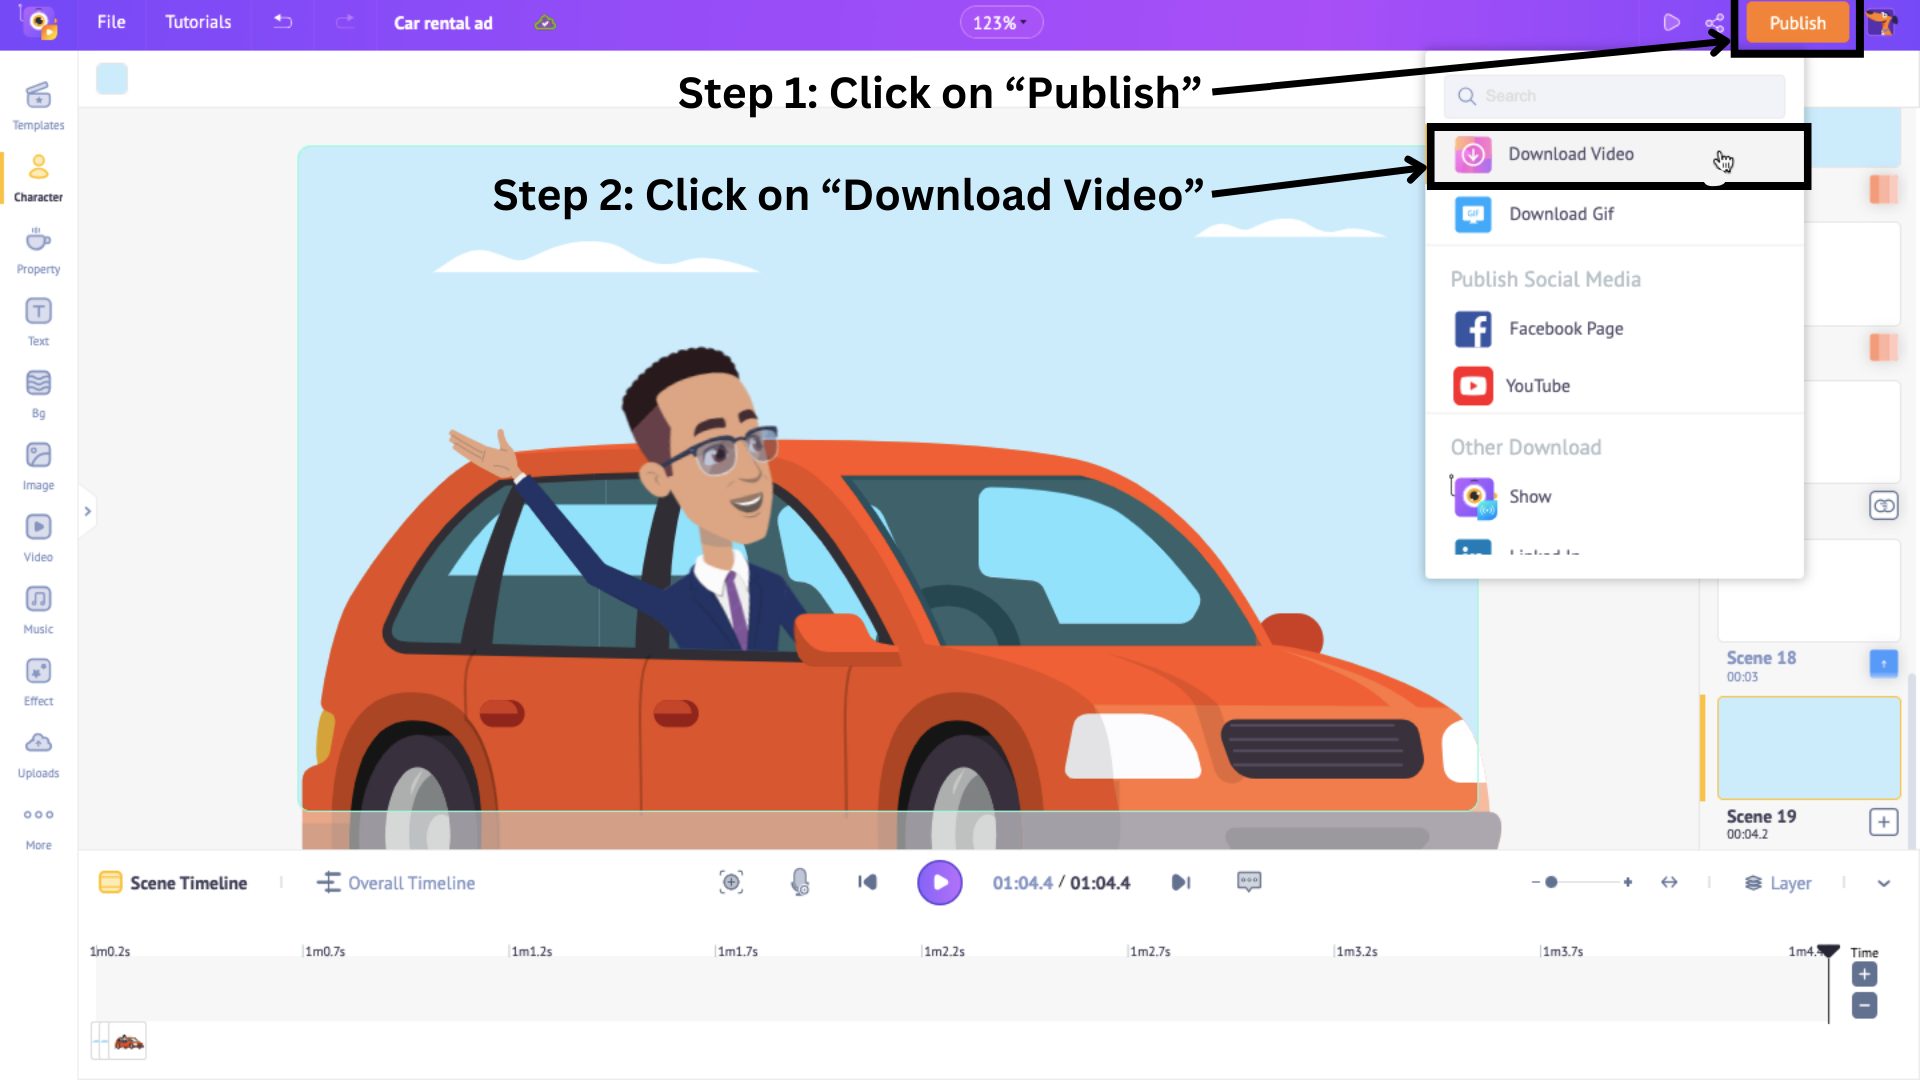
Then, click on Download.

The video gets rendered, and you can download it from the Exports page.
Congratulations! You just made a stunning animated ad from a template in minutes.
Let’s see how to create one from scratch.
2. How to make animated ads from scratch?
Creating an animated ad from scratch gives you much more control in designing and building the scenes that suit your brand style.
There are three steps involved in creating an animated ad from scratch.
Step 1: Create a blank project
Step 2: Add elements to the video
Step 3: Preview and Download your video
Let’s begin!
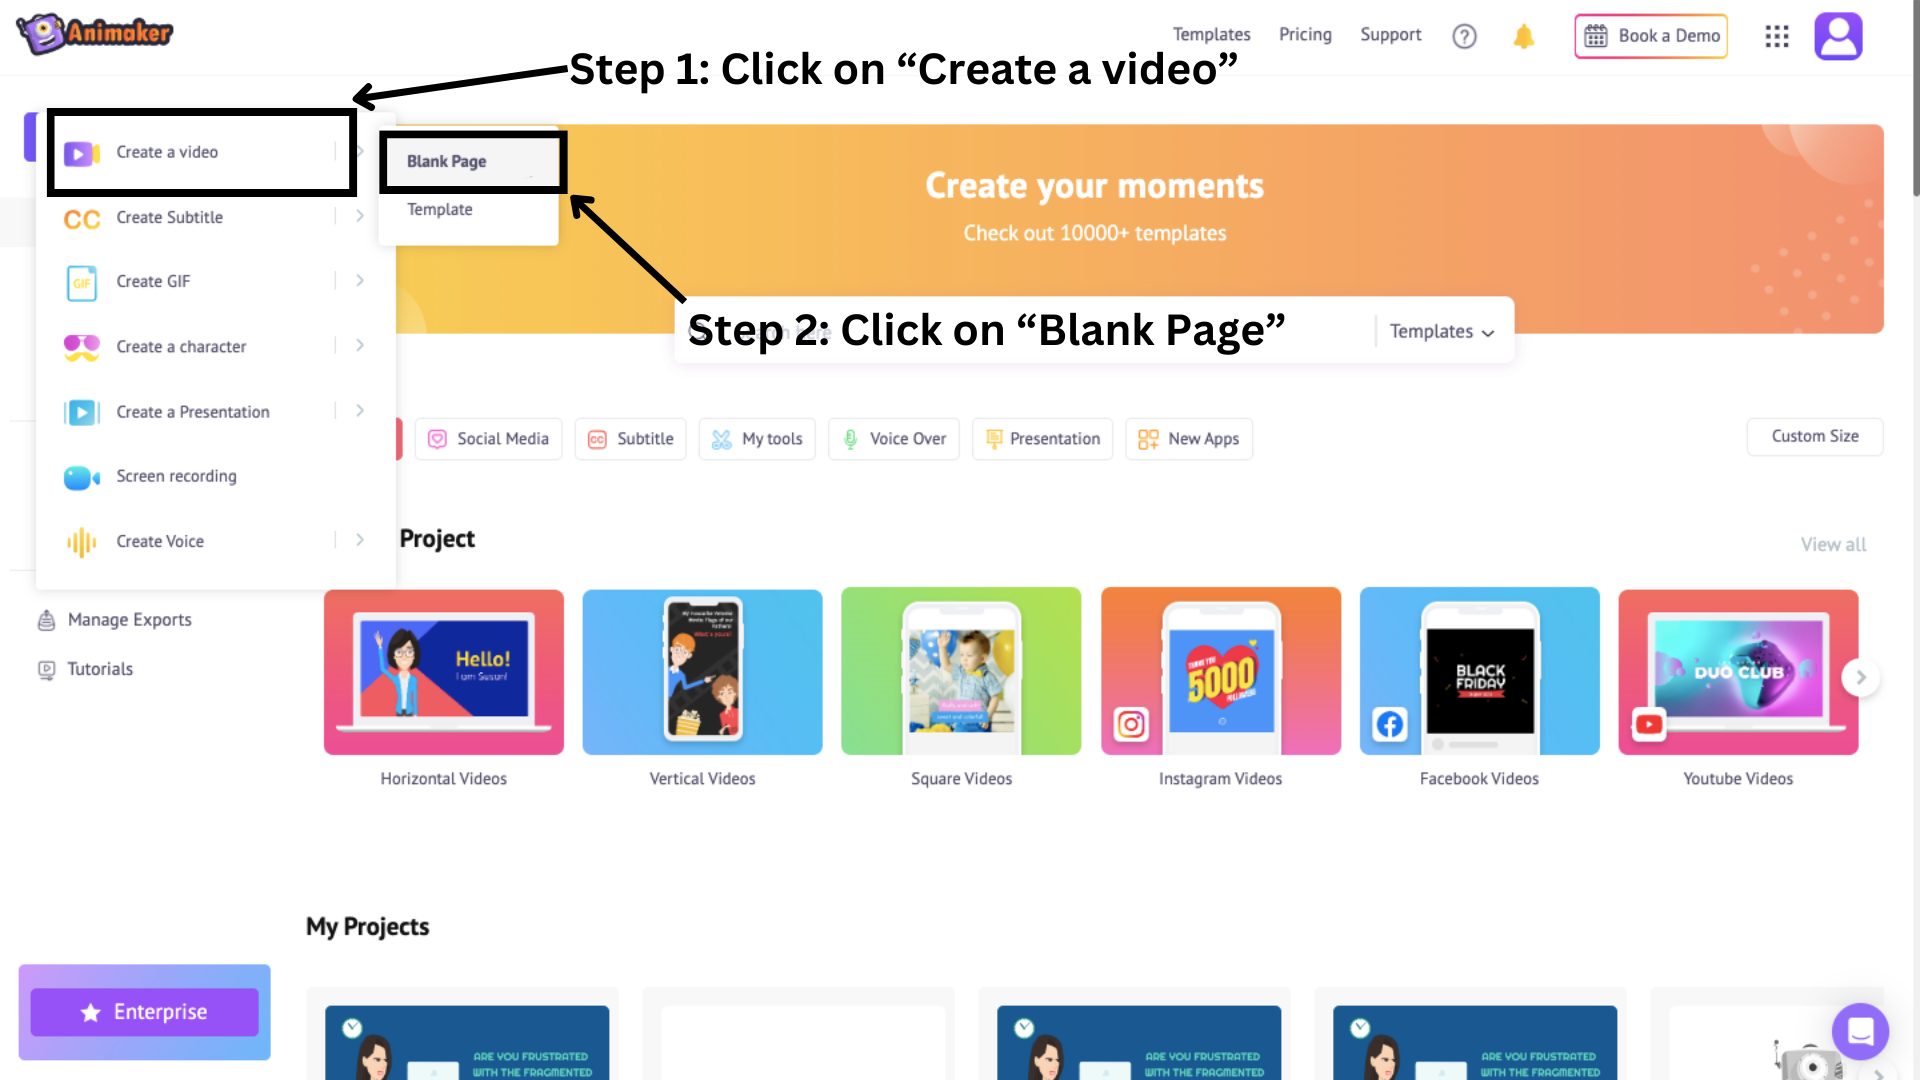
Step 1: Create a blank project
First, visit Animaker and log in if you already have an account, or sign up if you’re new.
On the dashboard, click on Create.
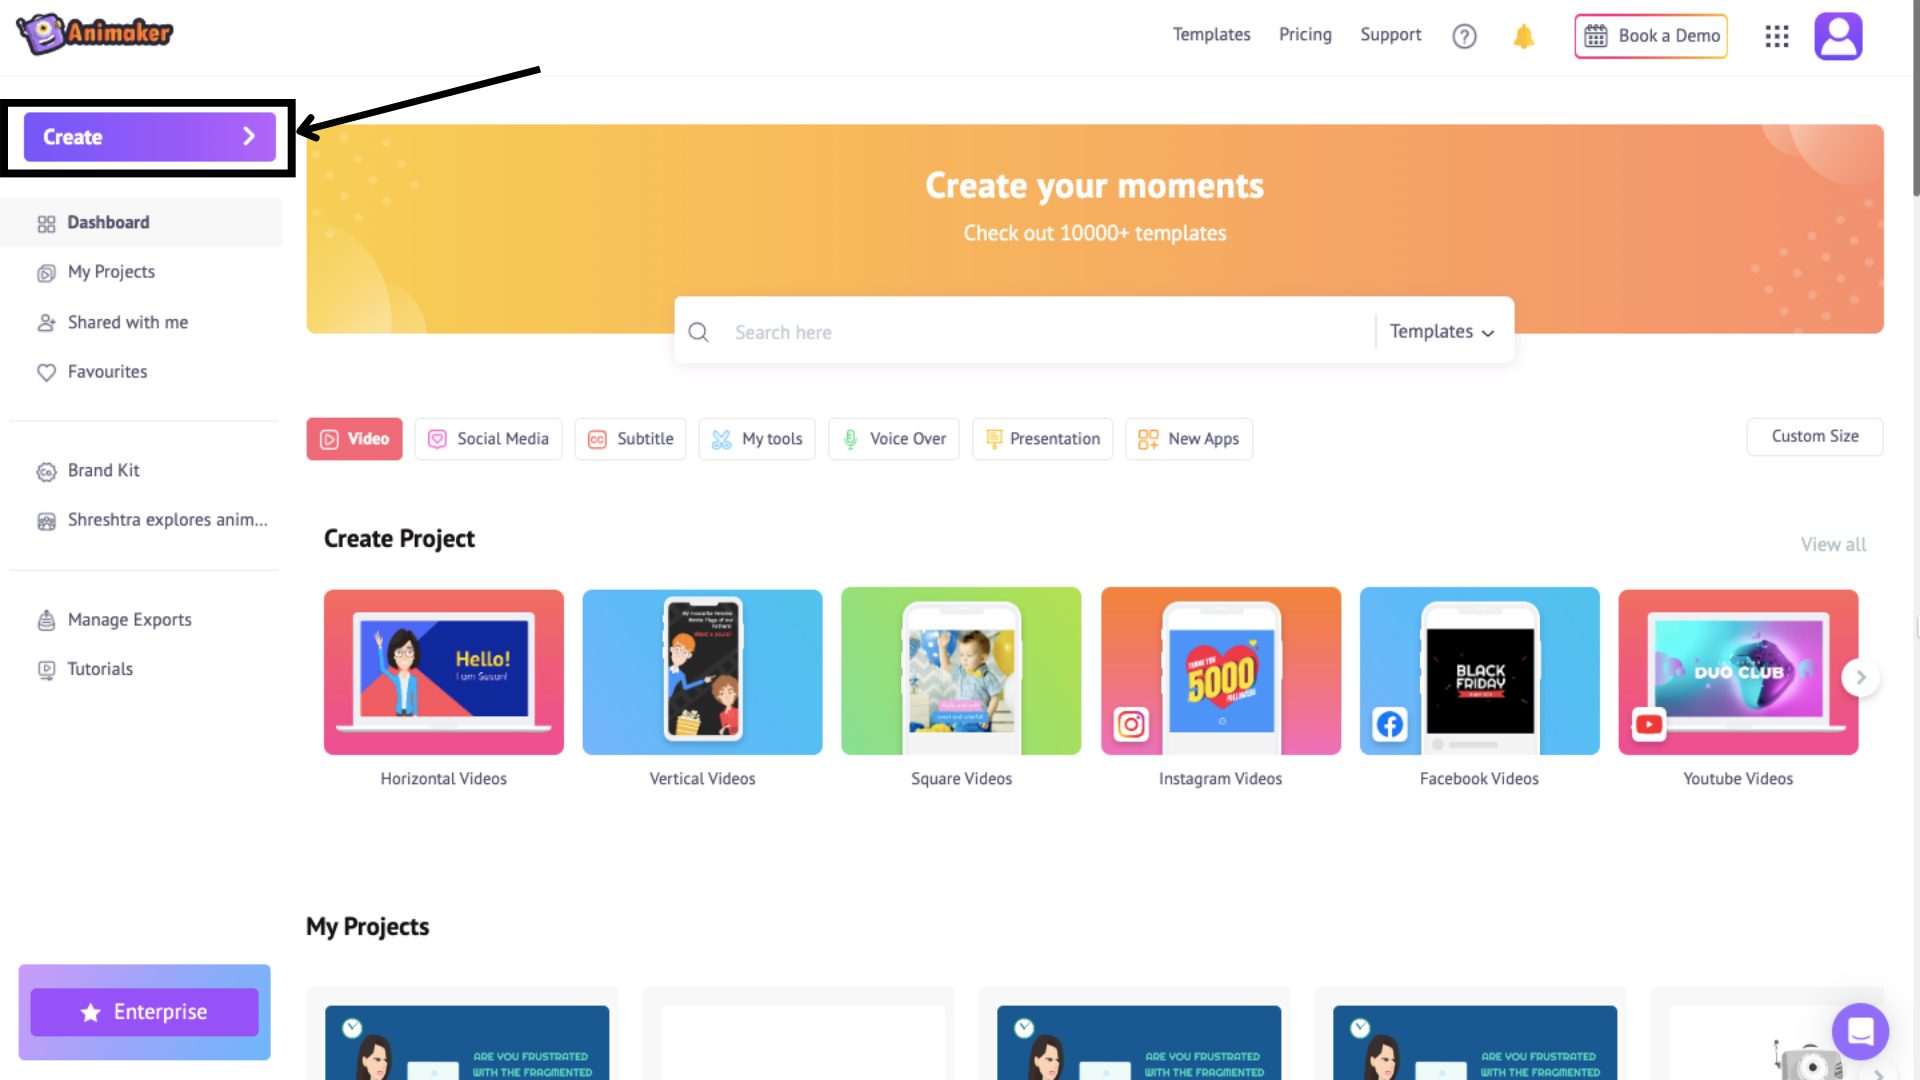
Then click on Create a Video > Blank Page.
This will open a blank project. Let’s first get accustomed to the interface before creating an animated ad.
The workspace is in the center of the screen, where you can create and edit your video. On the left is the library with millions of assets, and on the right is the scenes section where you can manage and organize your scenes.
Above the workspace is a menu bar providing additional options and tools, and at the bottom is the timeline where you can adjust your video and its assets with precision.
Now that you have a better understanding of the interface, I hope you have your script ready because we will create an animated ad from scratch.
Step 2: Add elements to the video
This blank project is empty right now, but by the end of this article, we will have created an animated ad from scratch using the assets from the library.
The library comprises diverse sections such as backgrounds, characters, properties, text, and more.
I am going to create an animated advertisement for an online language course. Let’s explore some of these sections to create an animated ad.
1. Background
As we have a blank scene, you can start by choosing a background for your ad, and there are five different options for it - solid, gradient, 2D, Image, and Video.
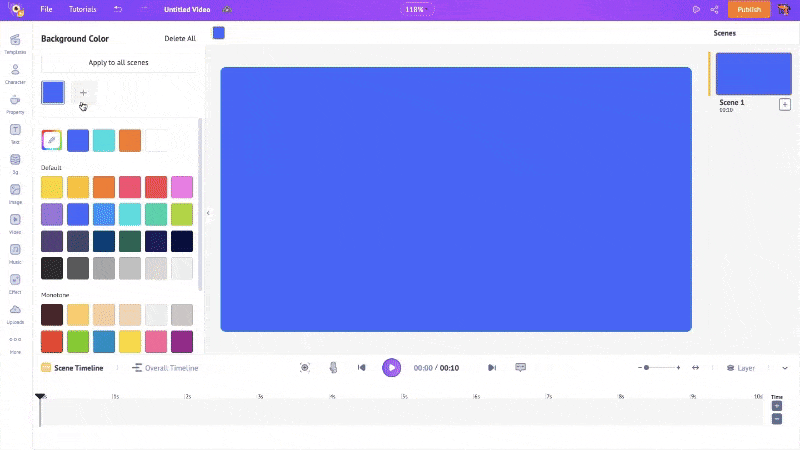
If you want a solid color background, click on the “Change color” box above the workspace.
This will open a color panel, where you can choose your preferred color by clicking on the default color and exploring other options.
Or, if you prefer a gradient background, click on the “+” sign next to the primary color. To change the gradient direction, click on the Direction option above the workspace.
The third option is a 2D background. To add a 2D background to a scene, click on the Bg option in the library.
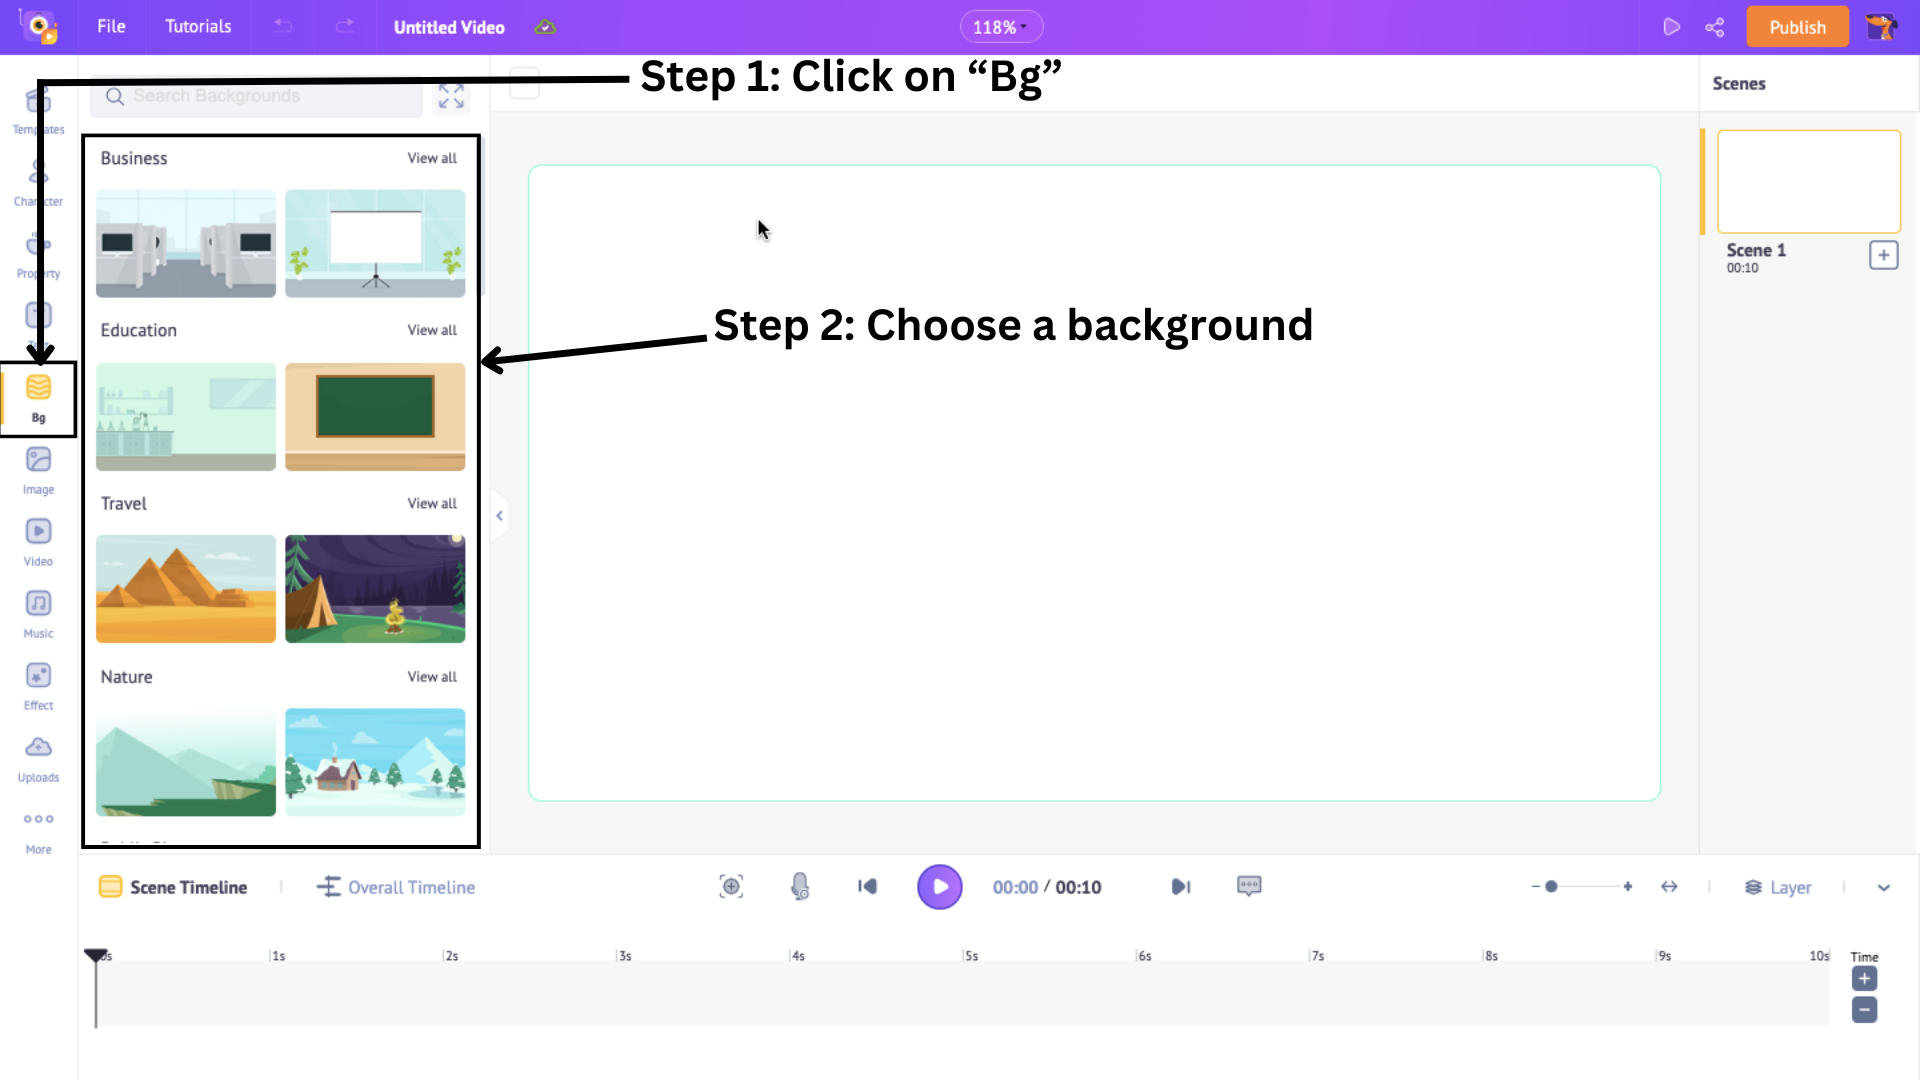
This will open the background library with more than 100 options of different themes. Click on a background to add to the scene.
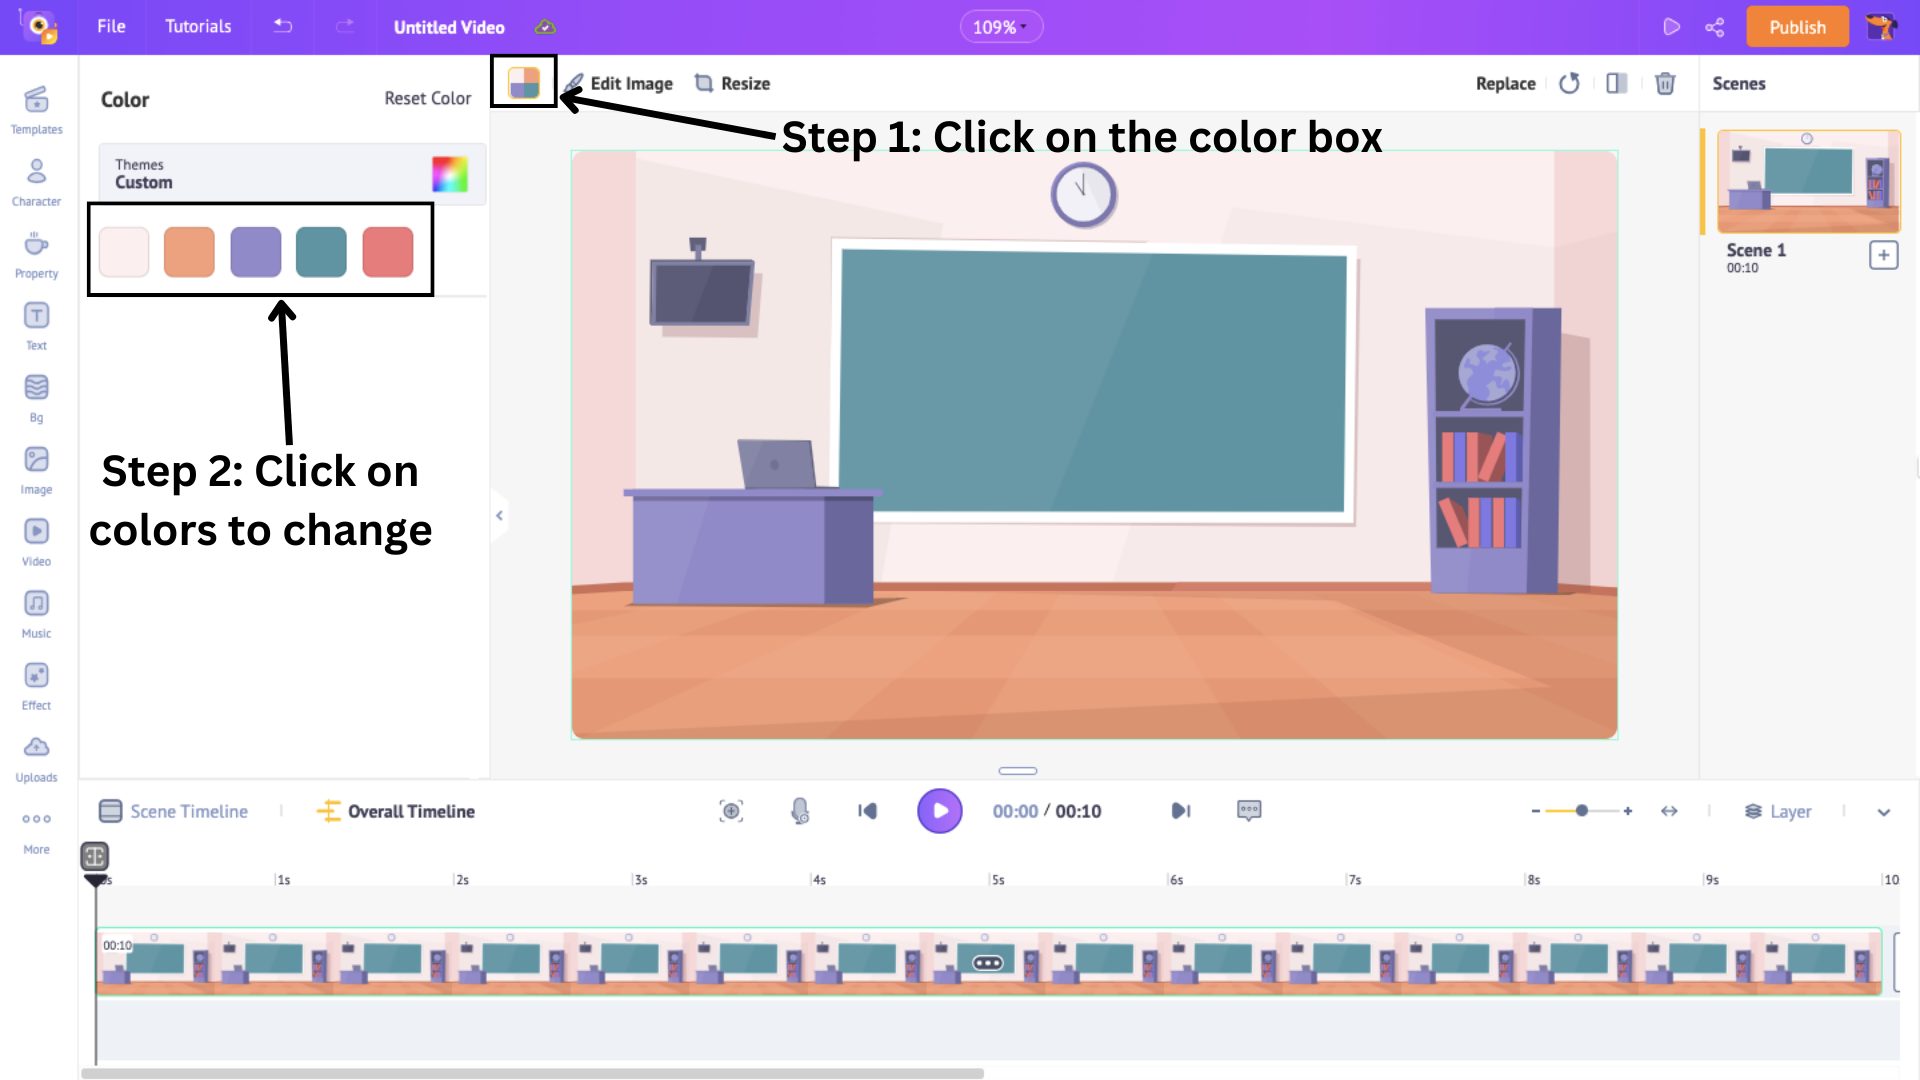
What’s great is you can also change the colors of the background elements to fit your brand theme. How useful is that?!
You can do so by clicking on the Change Color box above the workspace. Then, click on the individual colors to change them.
Let’s quickly look at the other two background options - Image and Video.
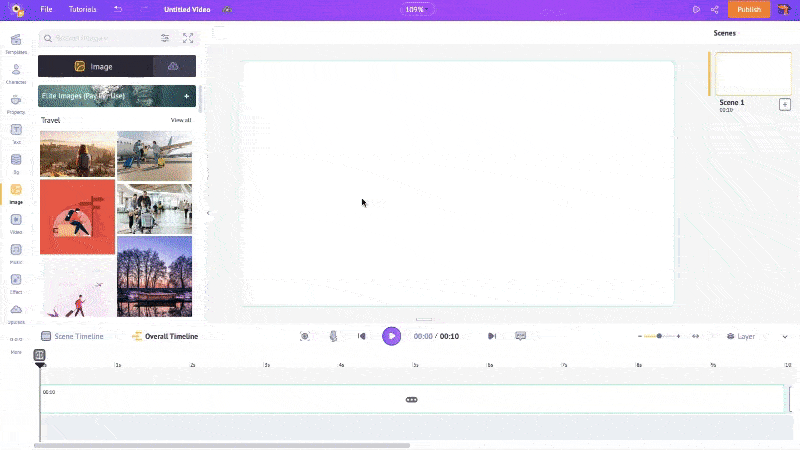
To have an image as a background, click on the Image option in the library.

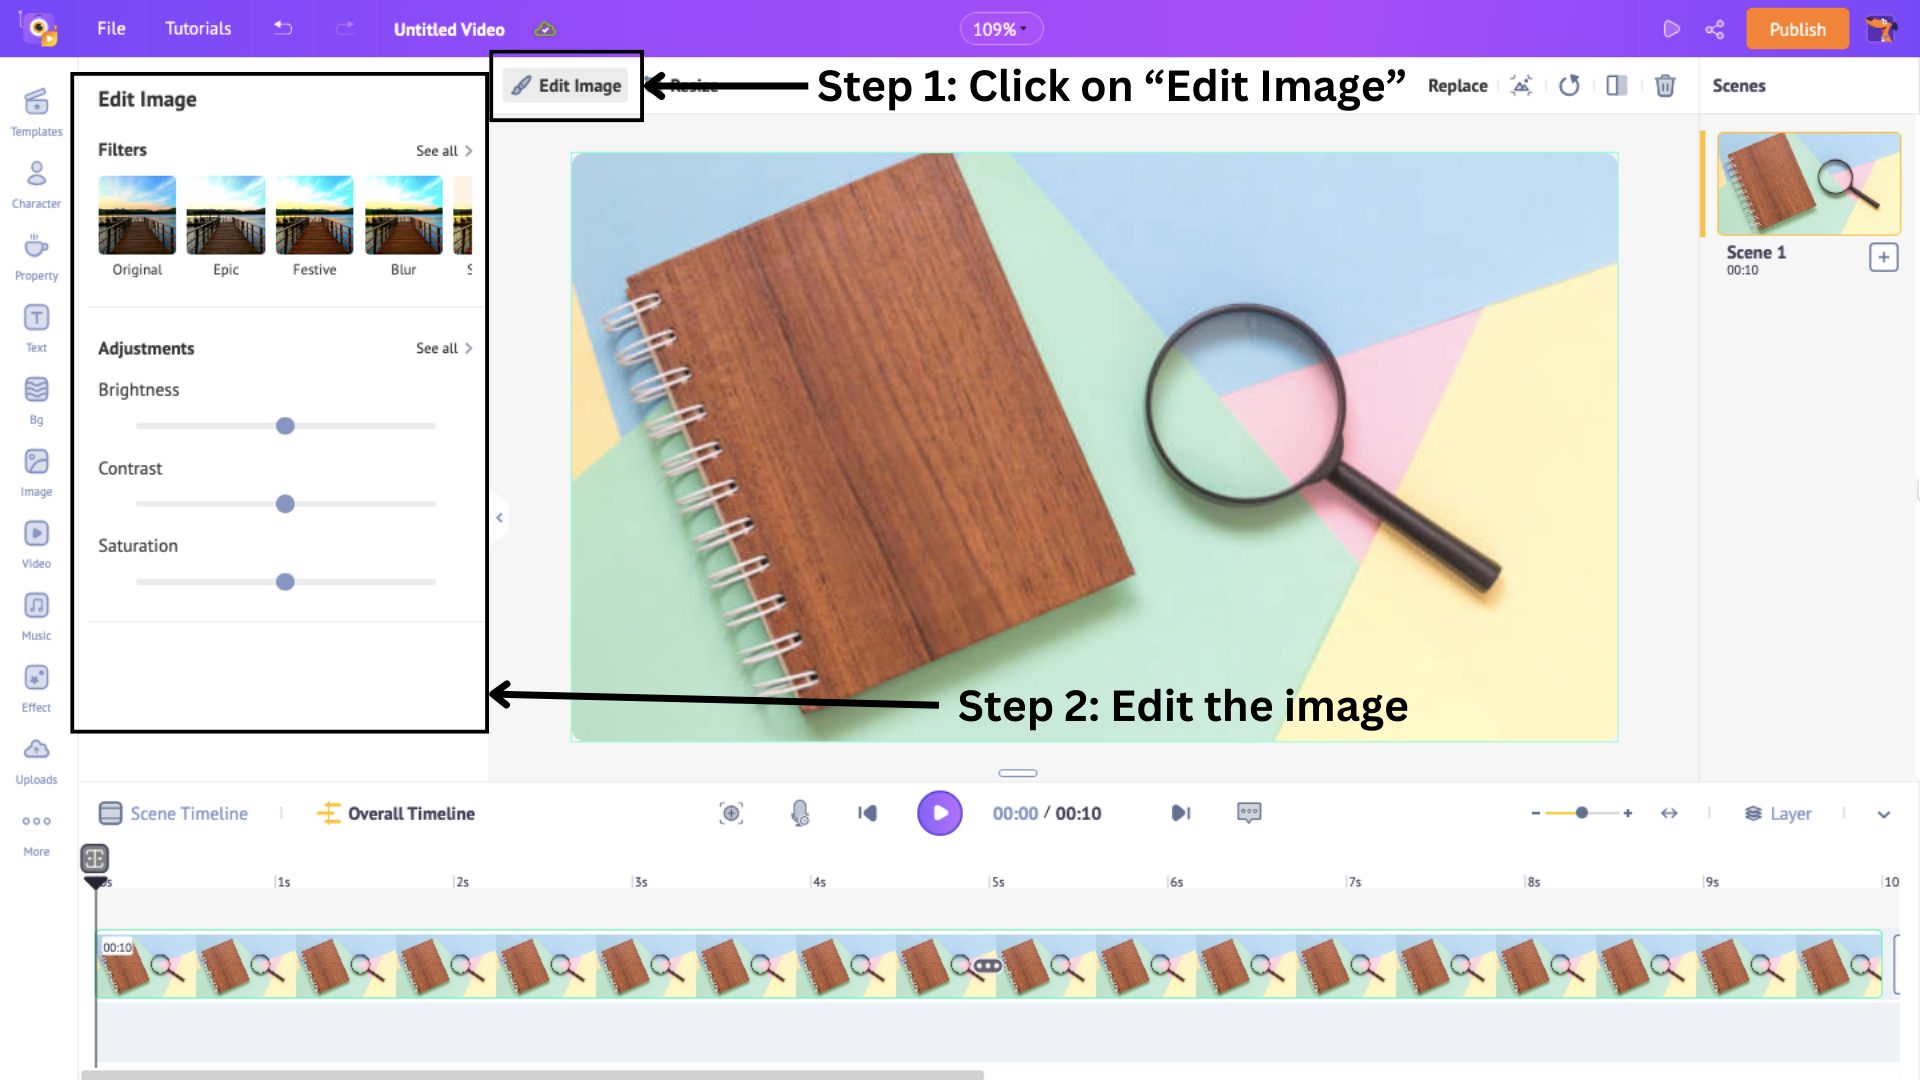
With over 100 million stock assets in the image library, choose an image to set as the background for the scene. Browse through the list or search for an image in the search bar. Once you choose an image, click the Set as Bg option to set it as the background.
If you want to edit this image, click on the Edit image option. On the panel to the side, you can add filters, adjust the brightness, and more.
Let’s look at the final background option - video.
Click on the Video option from the library.
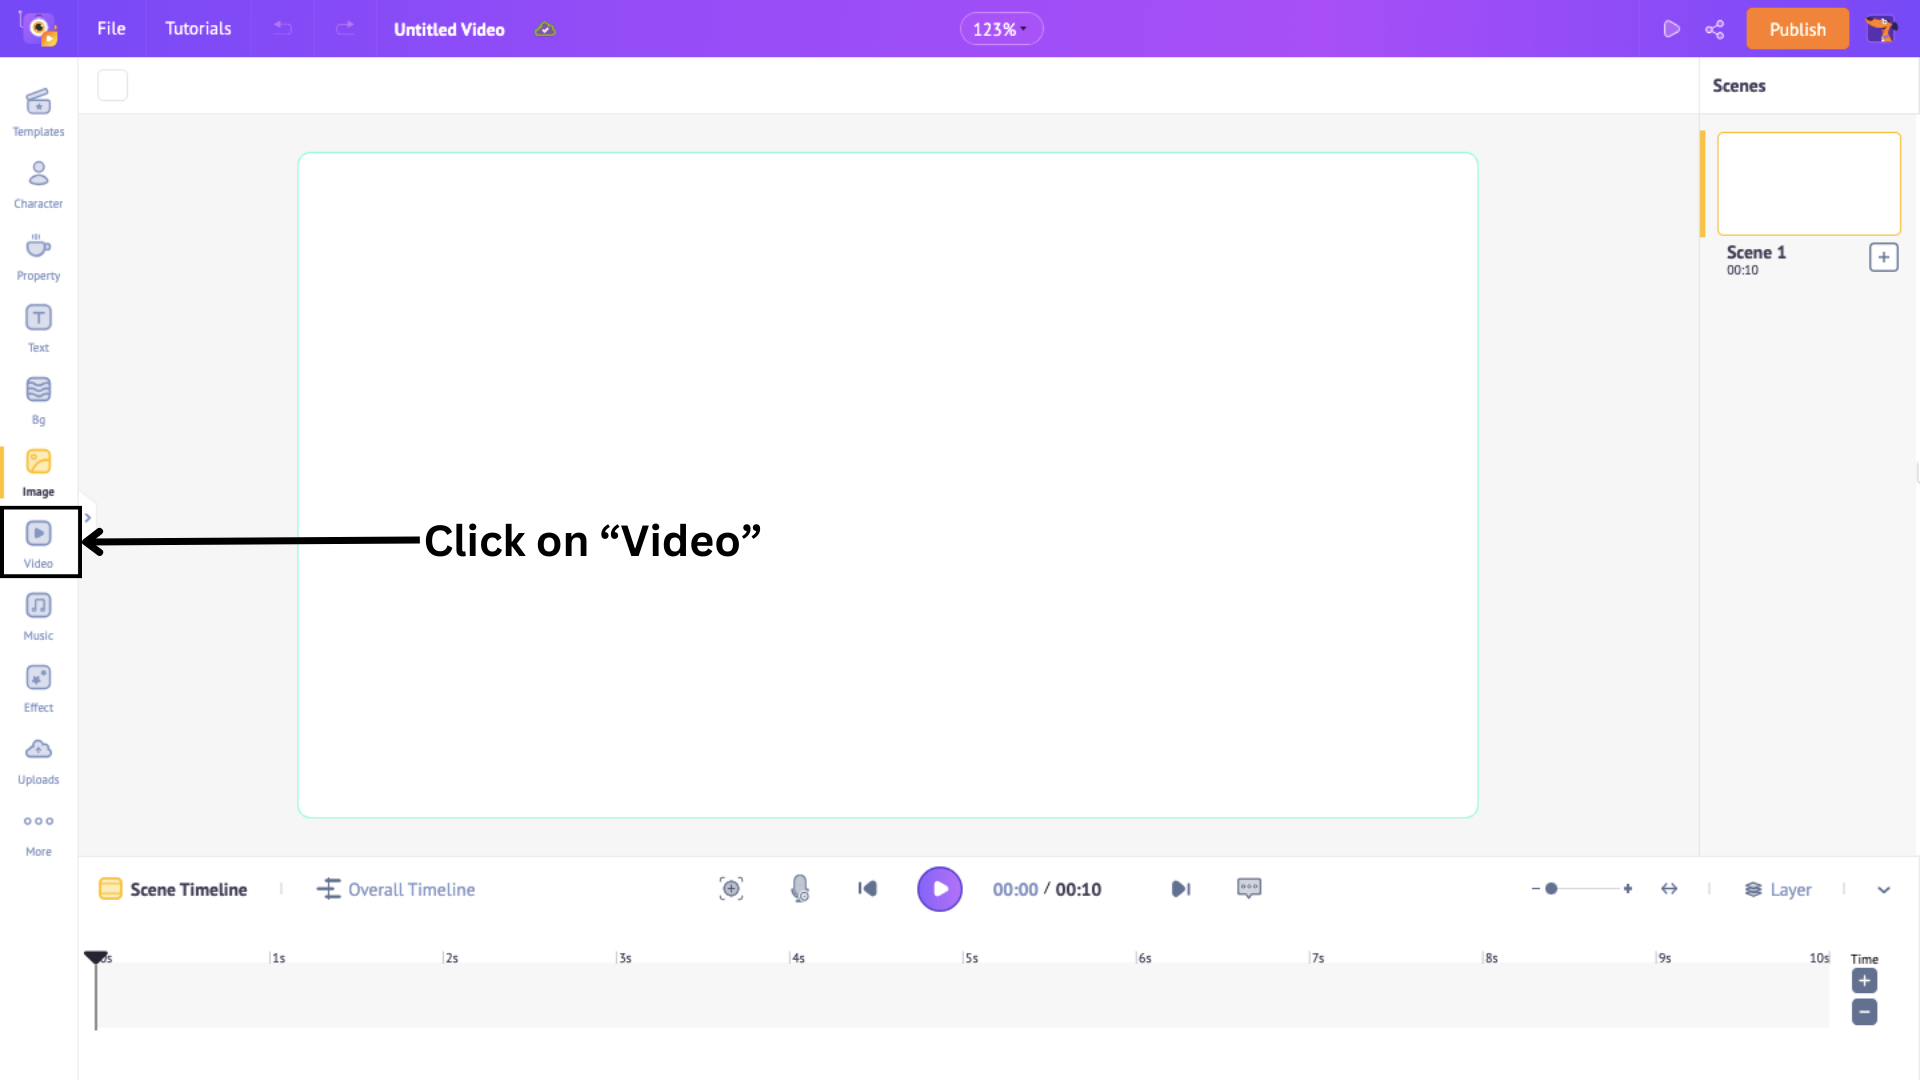
This will open a panel of 100M+ assets of different video types. Browse through the list or search in the search bar and click on a video to set as a scene background.
Now that the scene’s background is made, let’s move on to the next section.
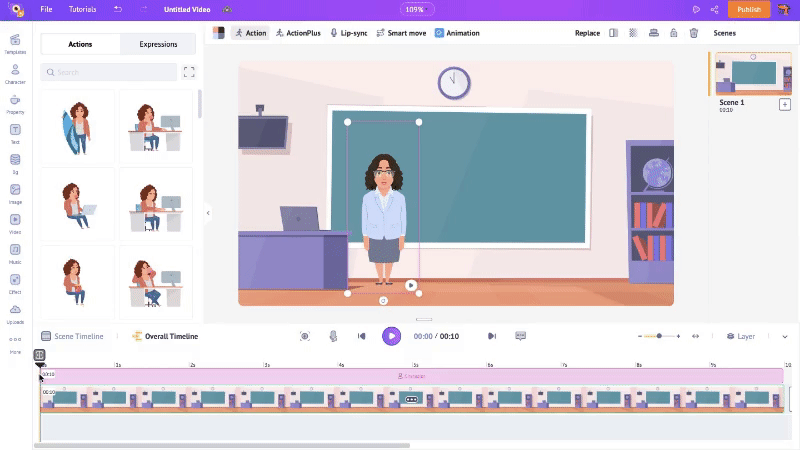
2. Characters
Characters are the stars of our animated ads. They help build a connection with viewers.
To add them to a scene, click on the Character section in the library.
With more than 1000+ characters of different sizes, ages, and professions, you have a variety of options from which you can choose.
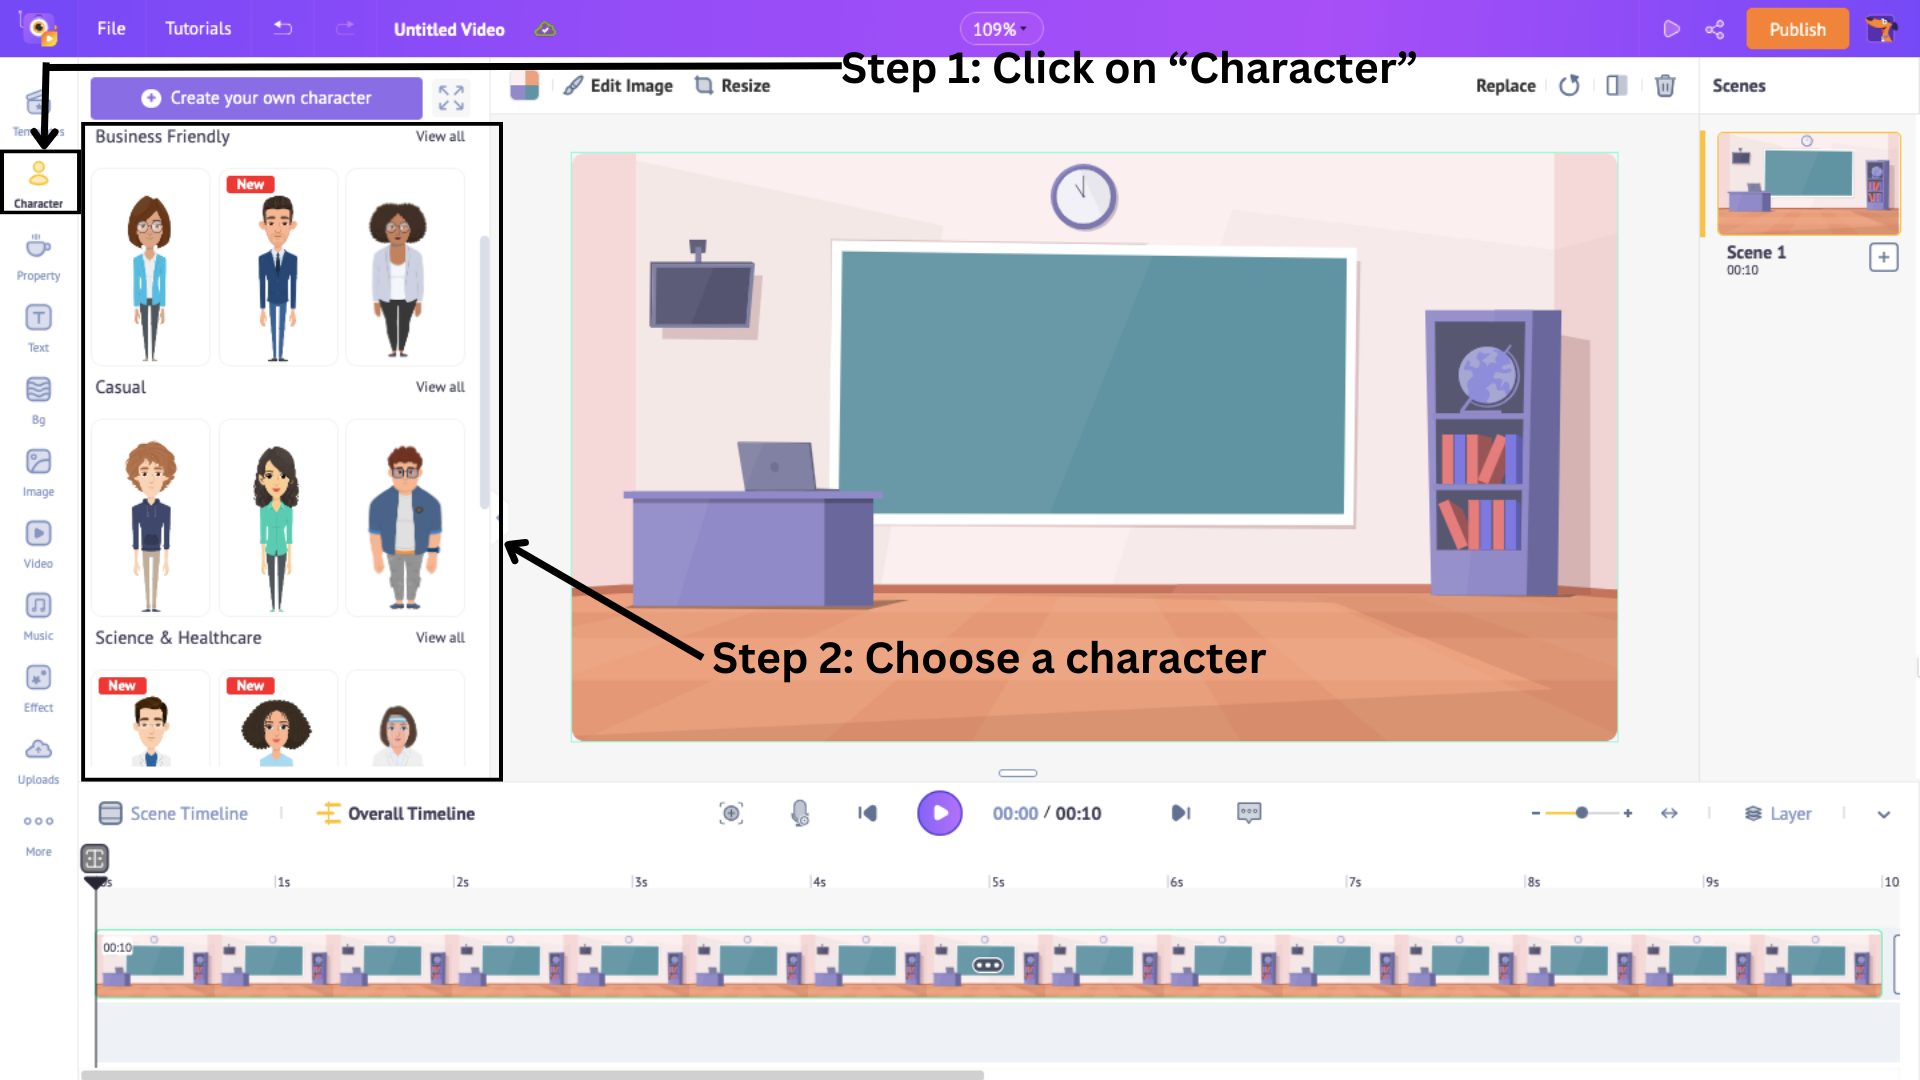
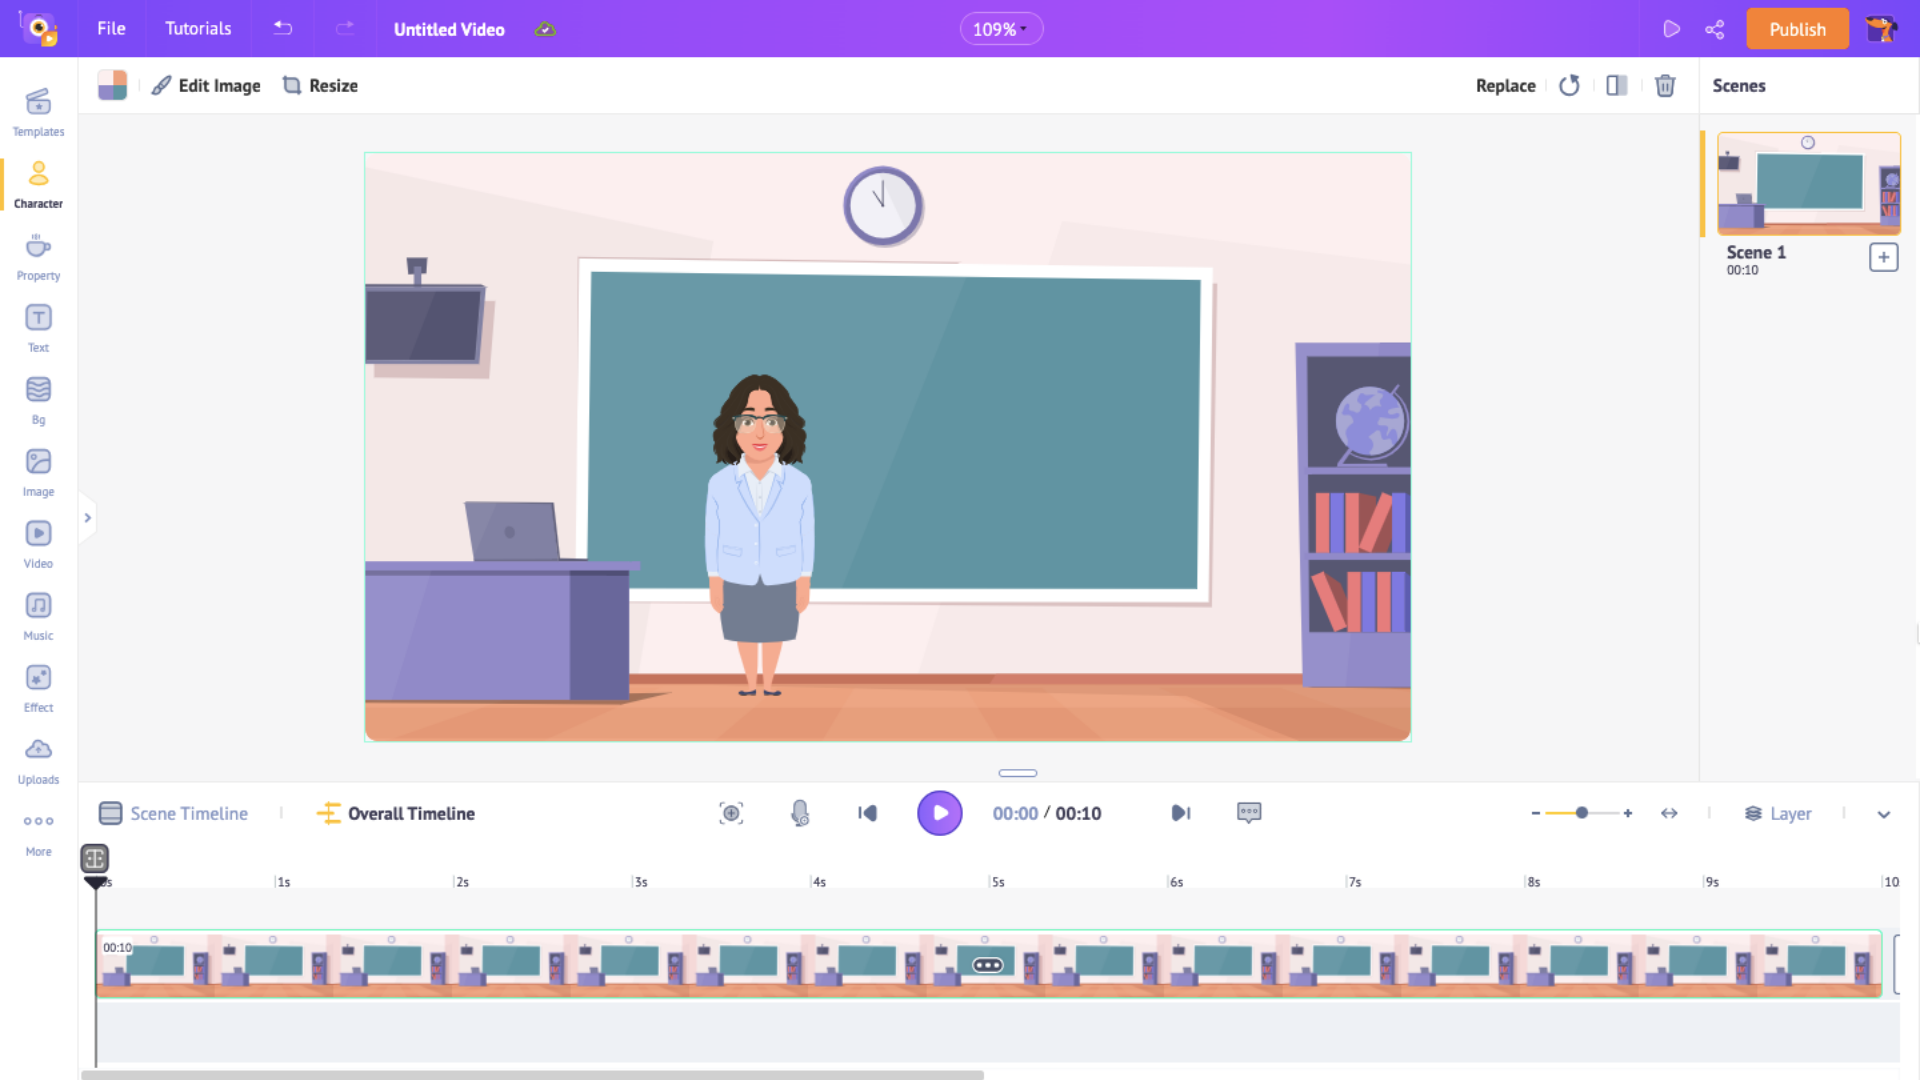
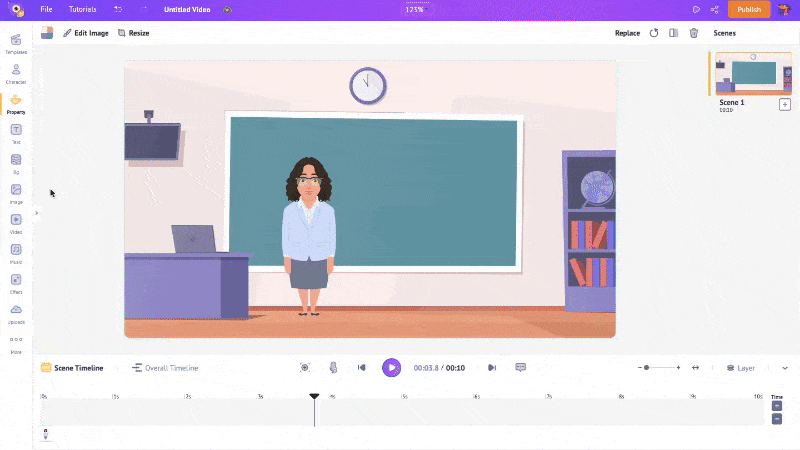
I chose a teacher character from the Character Library to fit my advertisement.
Alternatively, if you want to create a character, there is a way for that as well! Click on Create your own character.
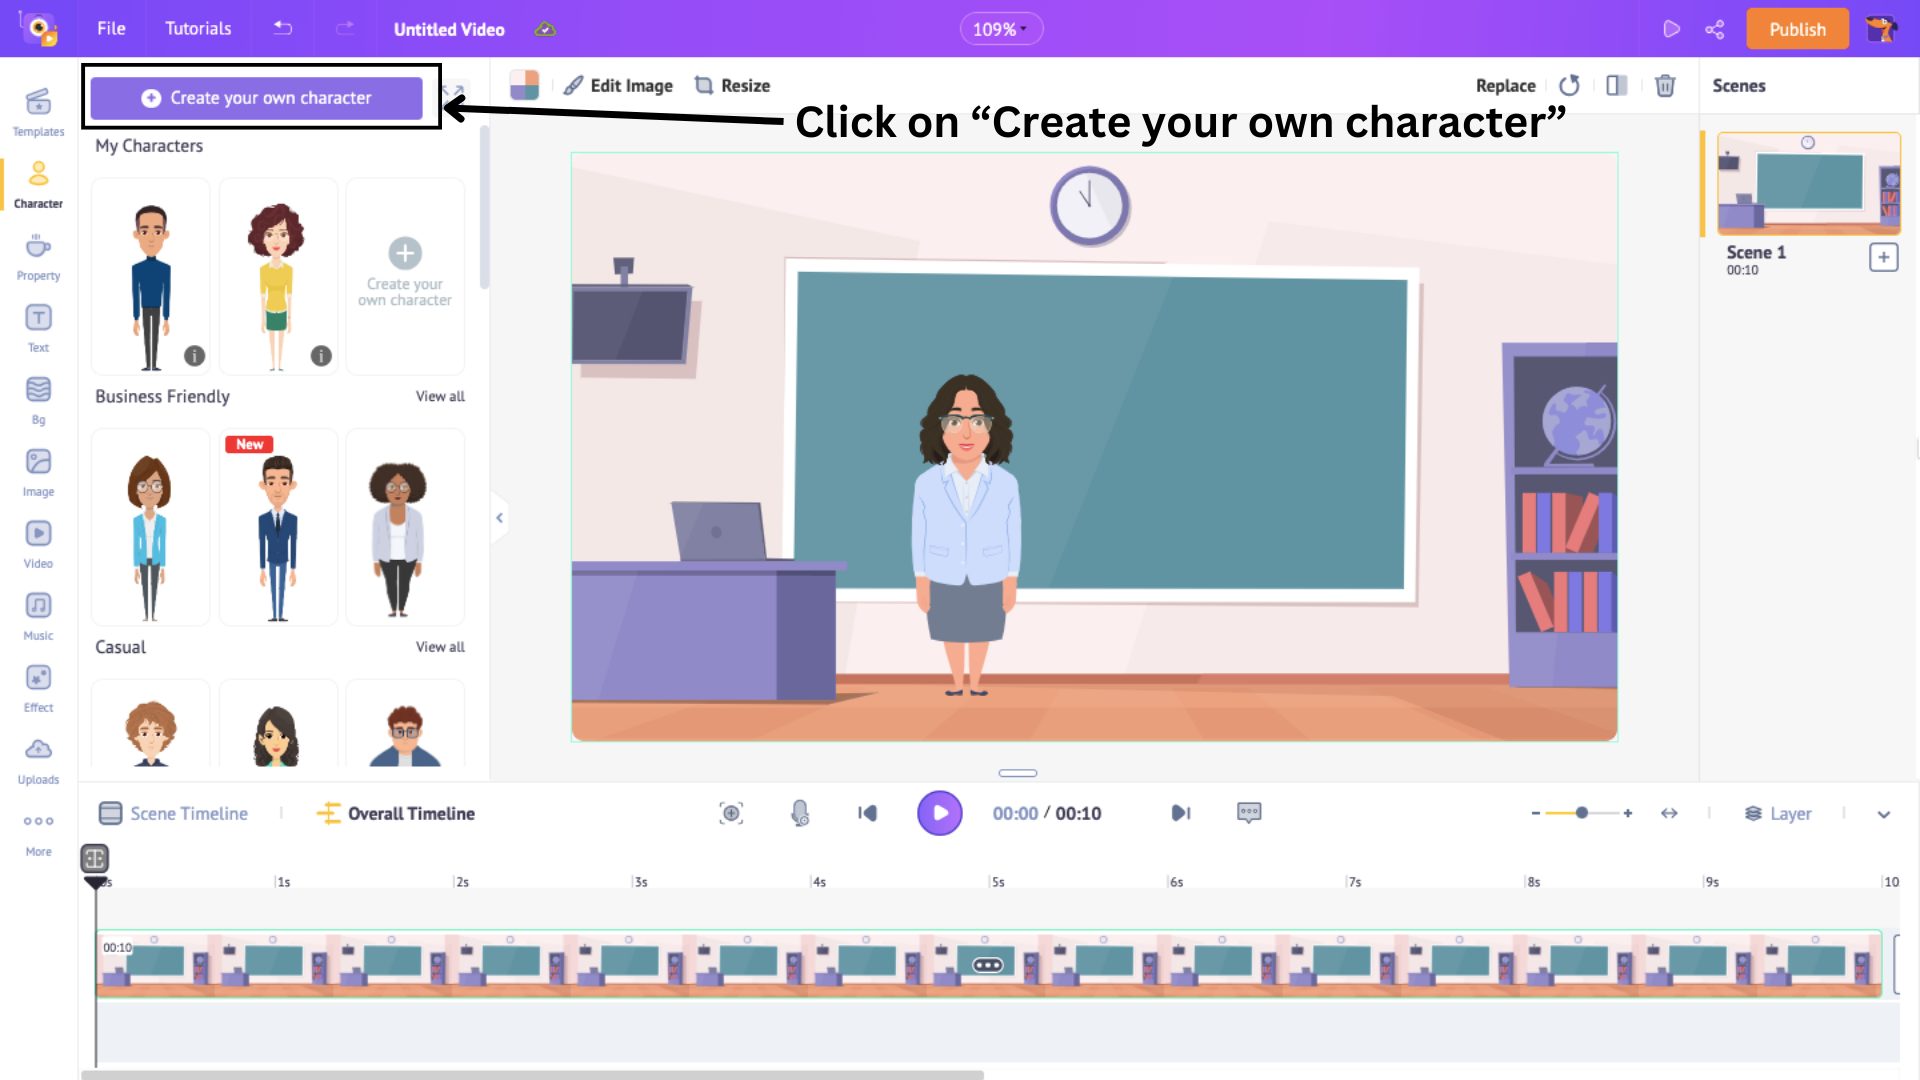
This will open the character builder tool.
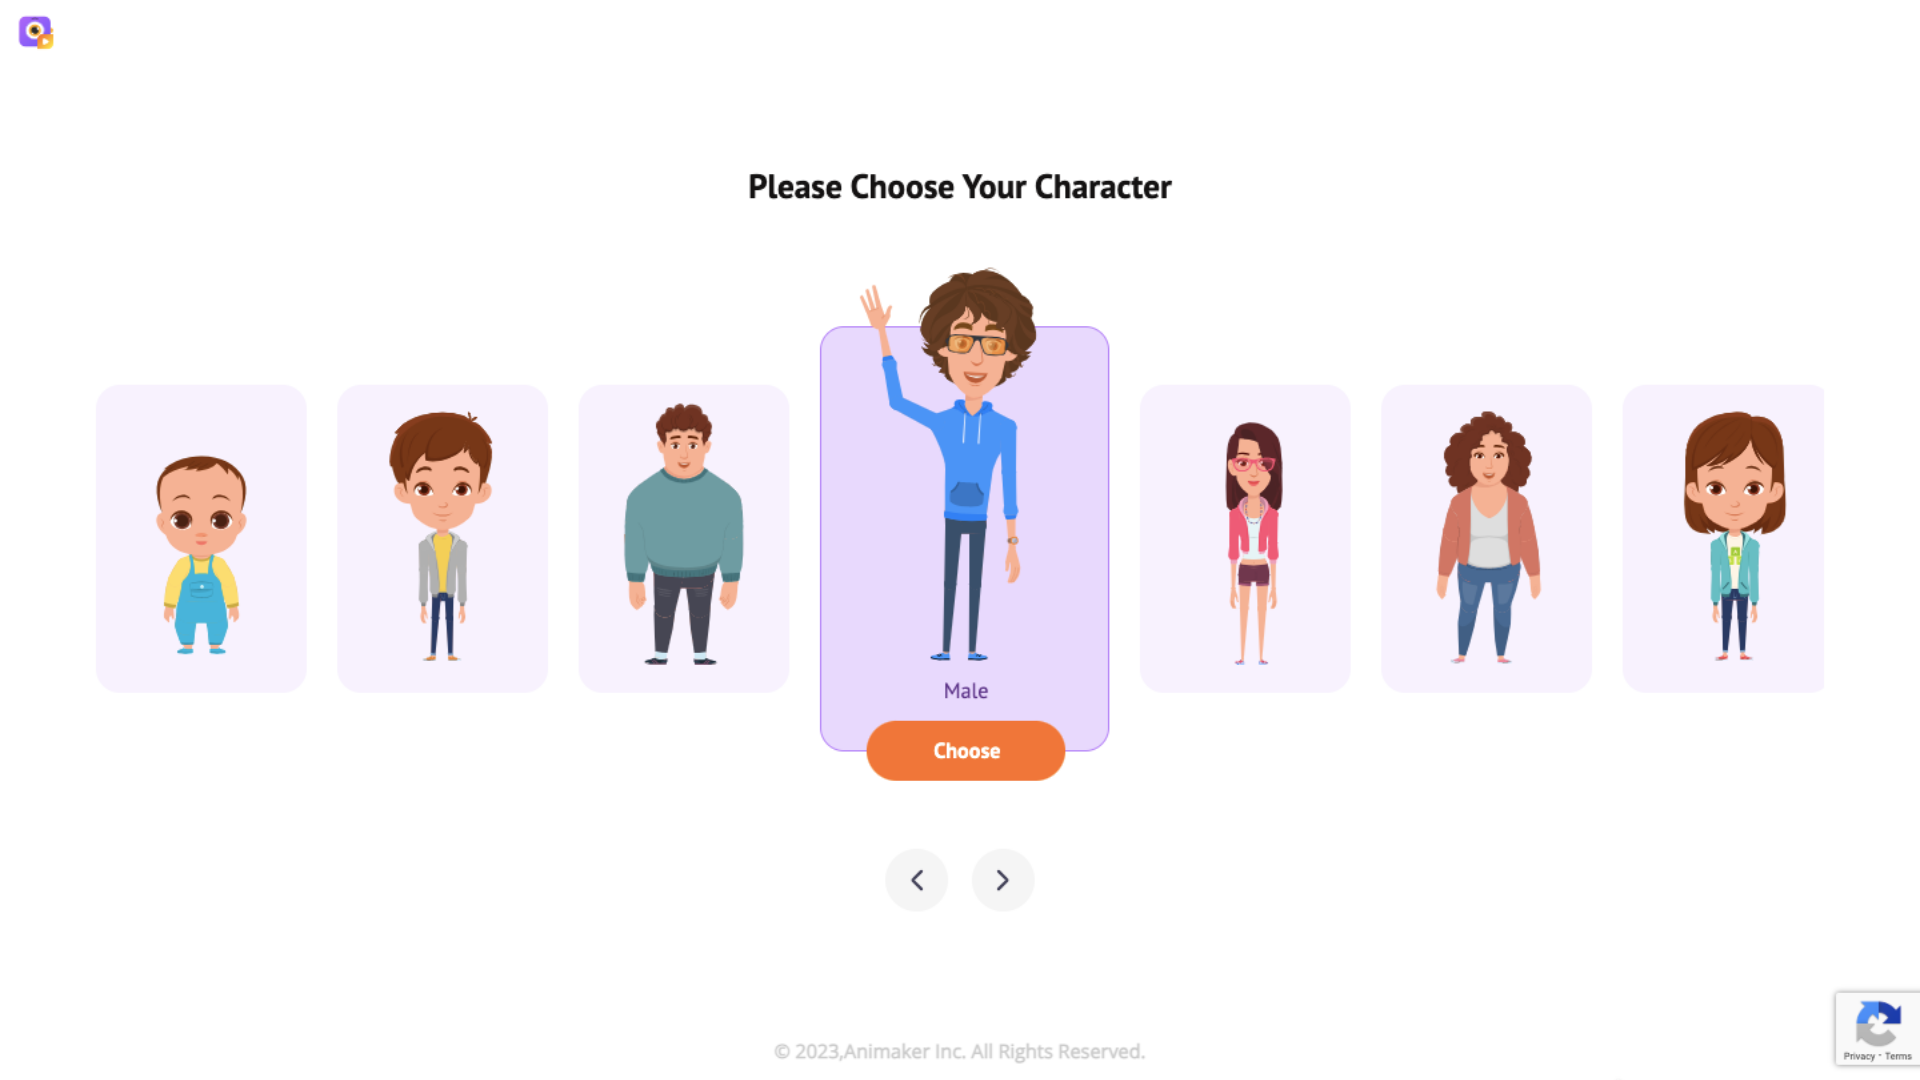
To learn how to create your own custom character in detail, check out this video.
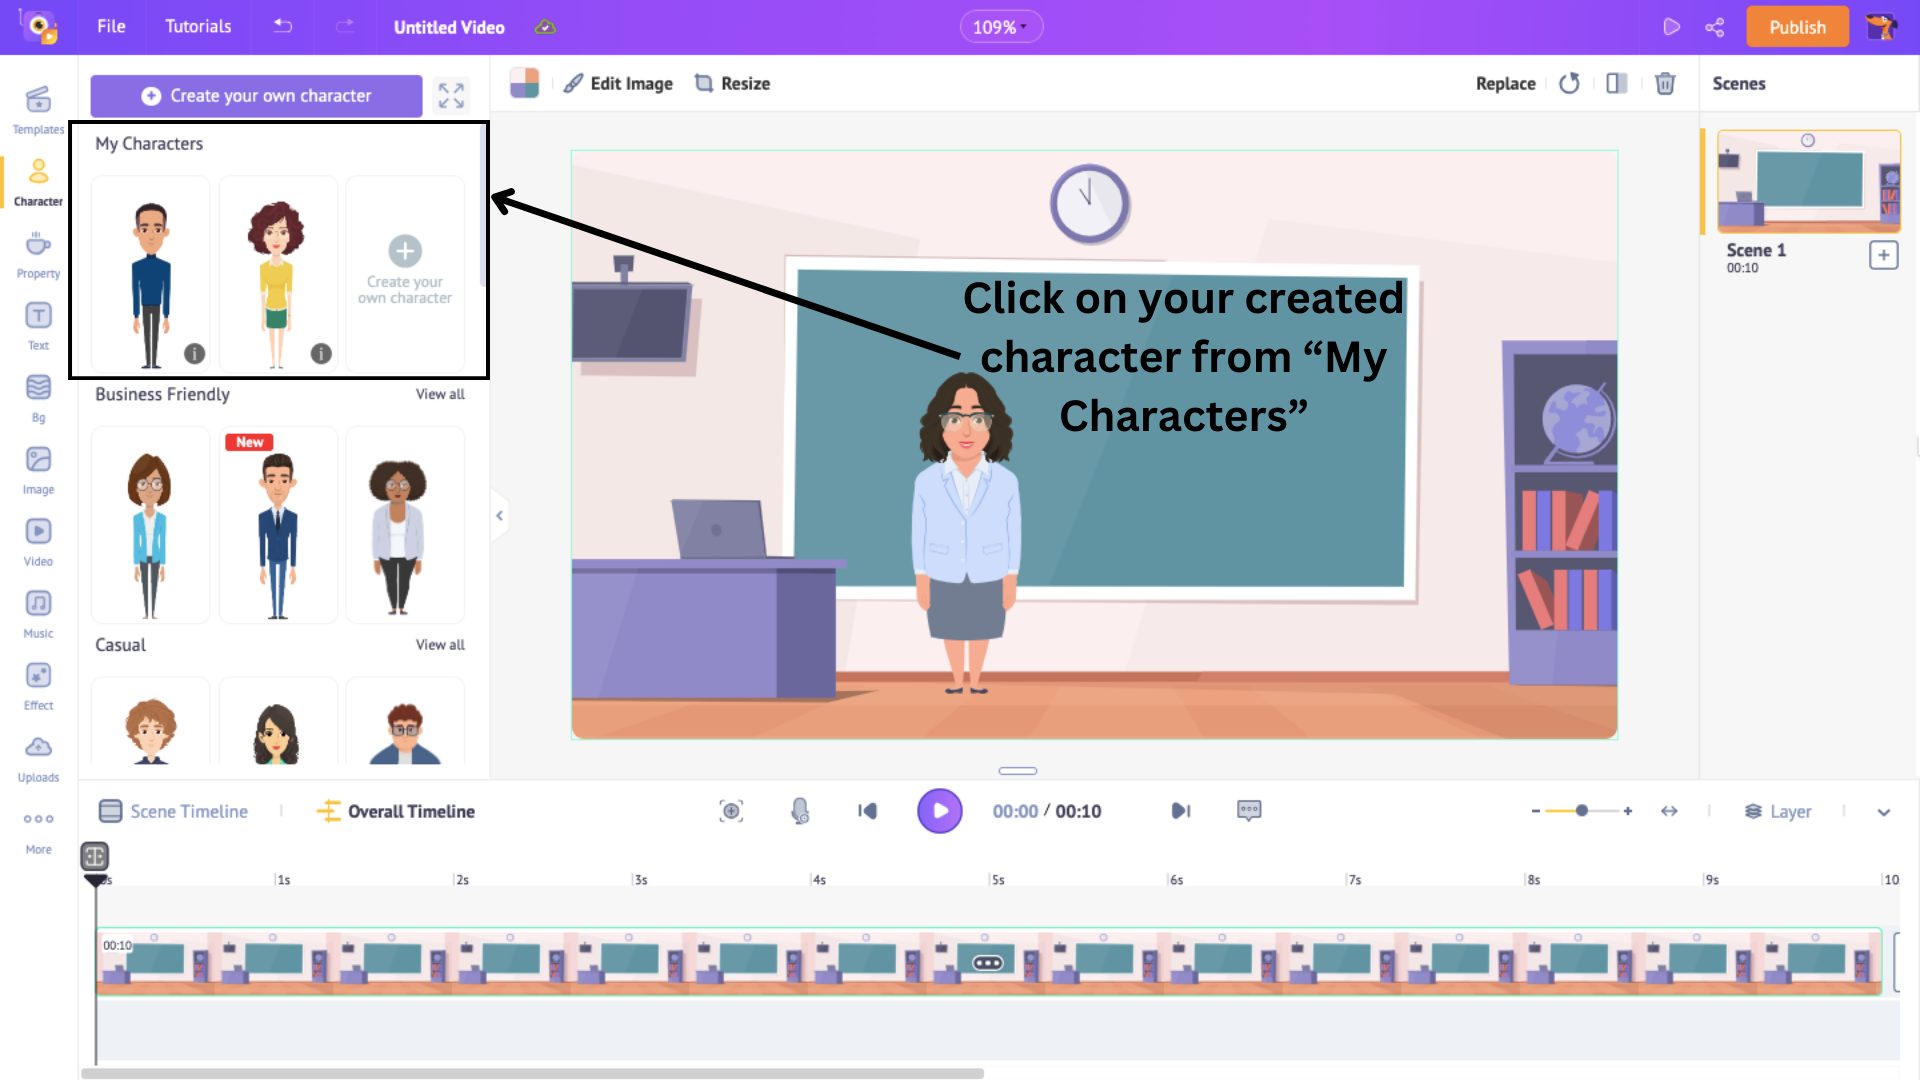
The custom character that you create, gets saved in the My Characters section in the Character library. Click on the character to add it to the scene.
Once you add a character to the scene, two things happen - a pink section appears on the timeline, and a panel opens on the left.
The pink section represents the duration of the character's appearance in the scene.
Adjust the ends of the pink section across the timeline to control the visibility of the character appearing in the scene.
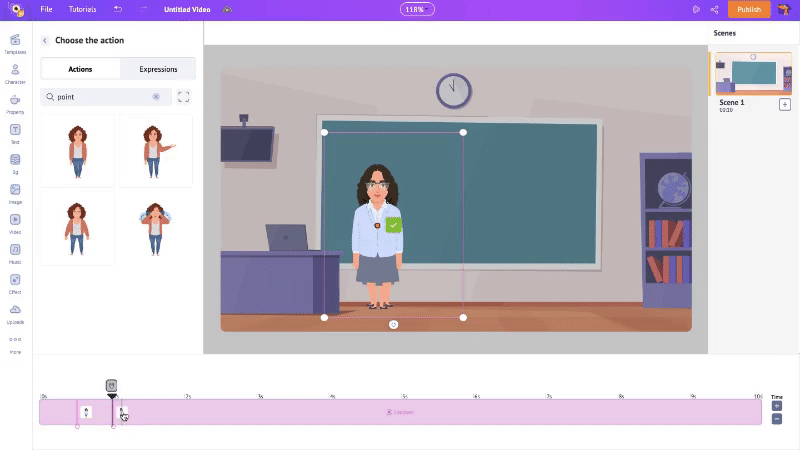
The left panel contains 350+ actions and over 20 expressions that you can add to your character.
Choose an action by browsing the list or searching for it in the search bar. Give your character an expression that is appropriate for the scene.
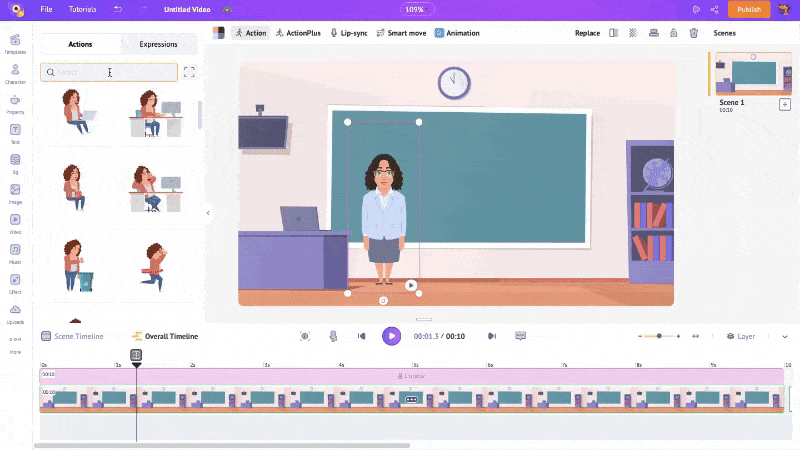
Since my character is a tutor, I have chosen a standing action next to a blackboard.
But, with Animaker, you can do more than add just one action to a character. That is, you can add multiple actions to a character, animating them!
Let me show you how.
As you see, my character is simply standing. But, to make the character appear as teaching the class, let’s add a pointing action.
To do that, click on the character and select the Action-Plus option.
Here, you can see the first (standing) action. To add another action, click on the “+” symbol. Choose an action from the list. You can see the second action overlaps with the first action in the scene.
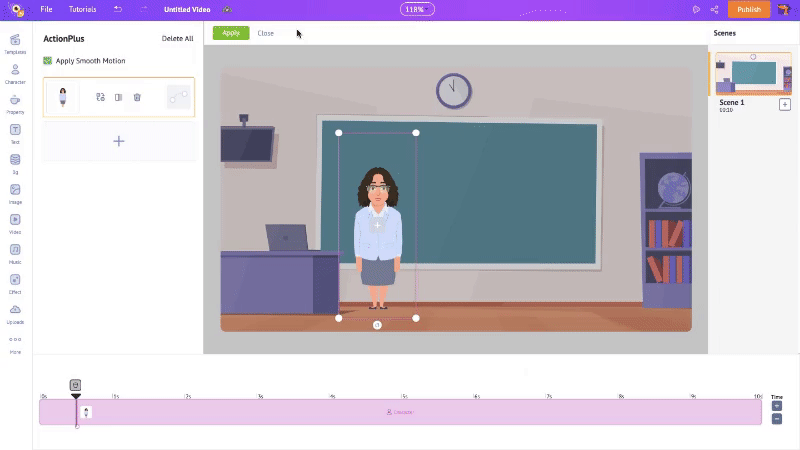
Now, on the timeline, the two actions appear in the pink section. This shows when each action appears in the scene. If you want to control the timing between the actions, adjust their positioning on the timeline.
Then, click on the tick symbol on the character and click Apply.
To see how the scene looks so far, click the play button.
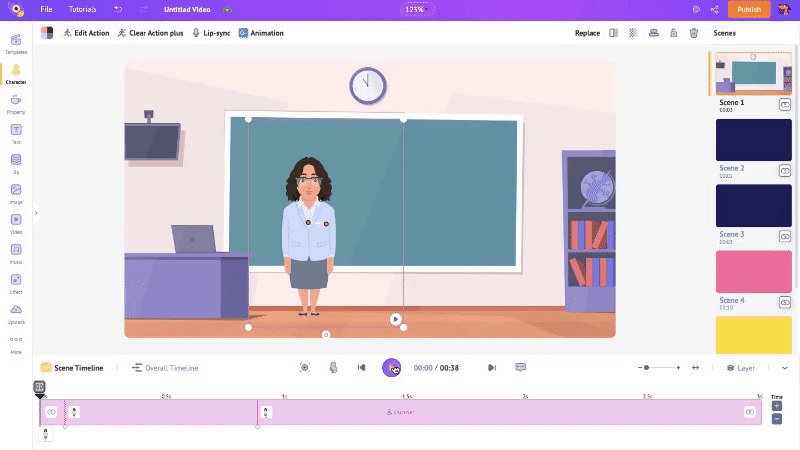
It looks great, doesn’t it?
Let’s continue with the next element.
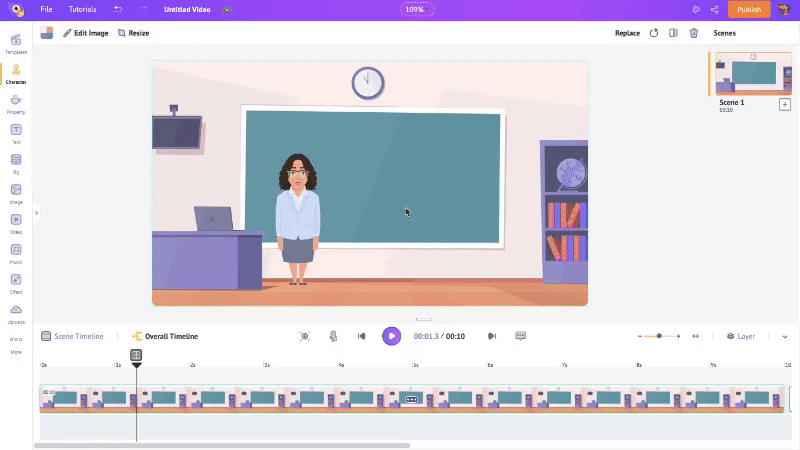
3. Property
Properties are objects and shapes that add weight to a scene. They help define a scene better.
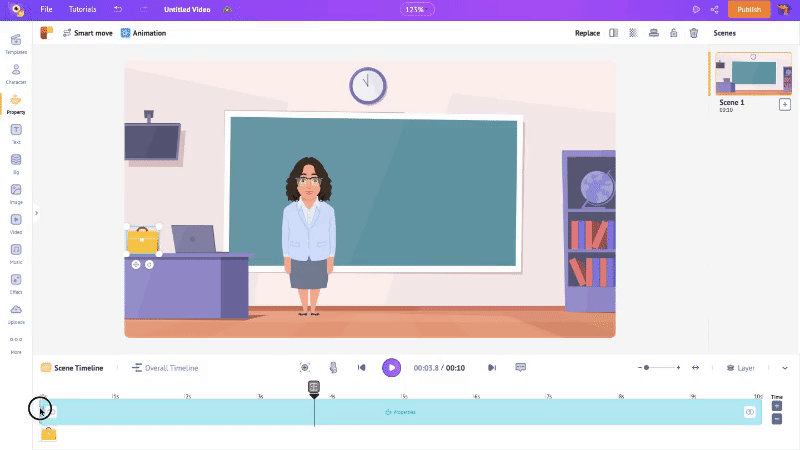
For my animated ad, I wish to add a bag on the desk. Let’s see how. To add a property, click on the Property option in the library.
This opens a vast collection of over 70K+ icons and properties, including shapes, buildings, furniture, grids, etc.

To simplify your search, type in the property in the search bar. Once you select a property, resize and position it in the scene.
Once the property is added, a blue section appears on the timeline. This is the duration of the property in the scene. Adjust the corners of the blue section to control the property's visibility in the scene.
And that is how you add a property to a scene! Let’s look at the next element.
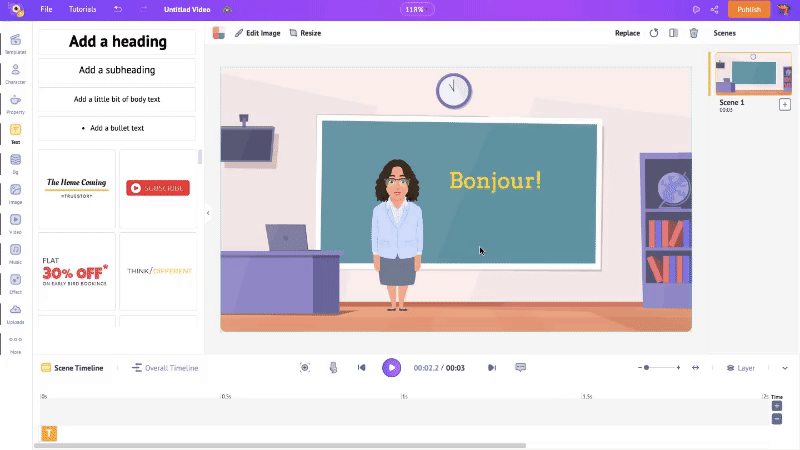
4. Text
Now that we have set the scene, it is time to add the lines from our script.
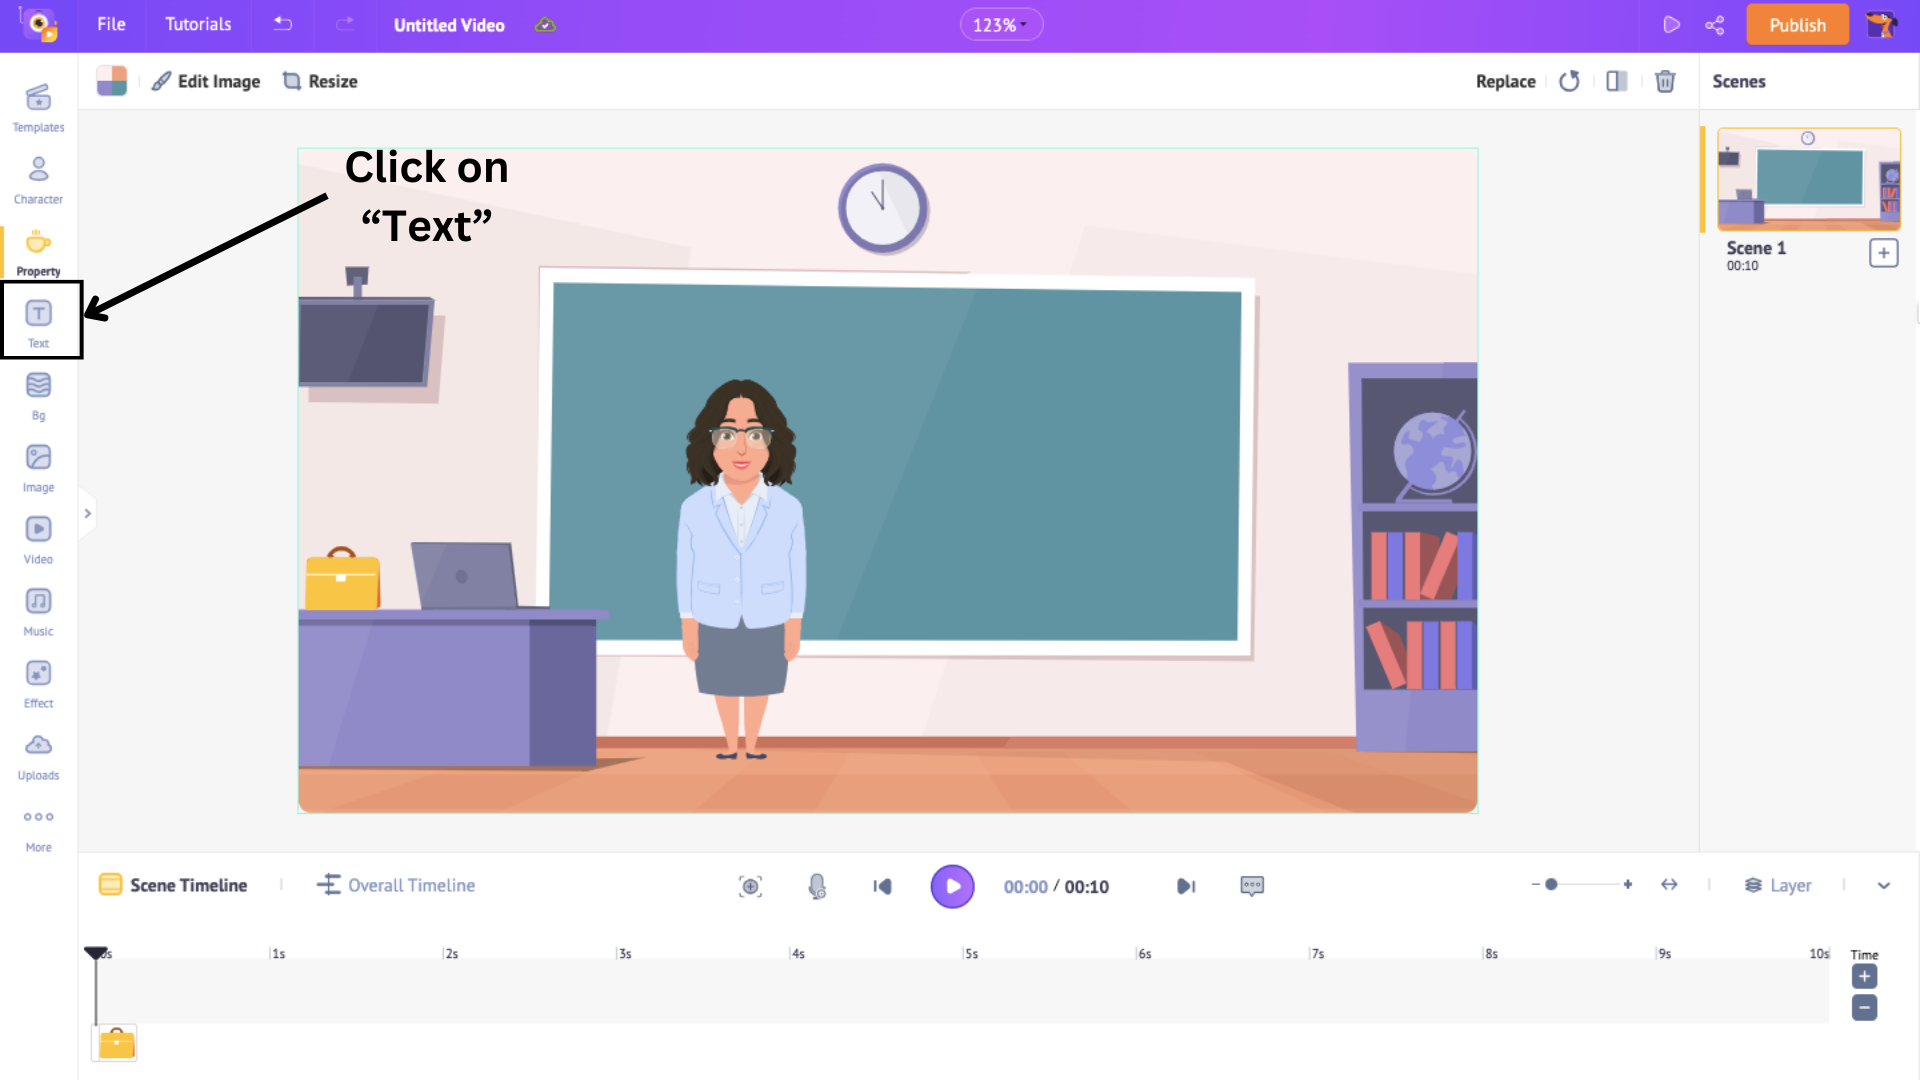
To do that, click on the Text option from the library.
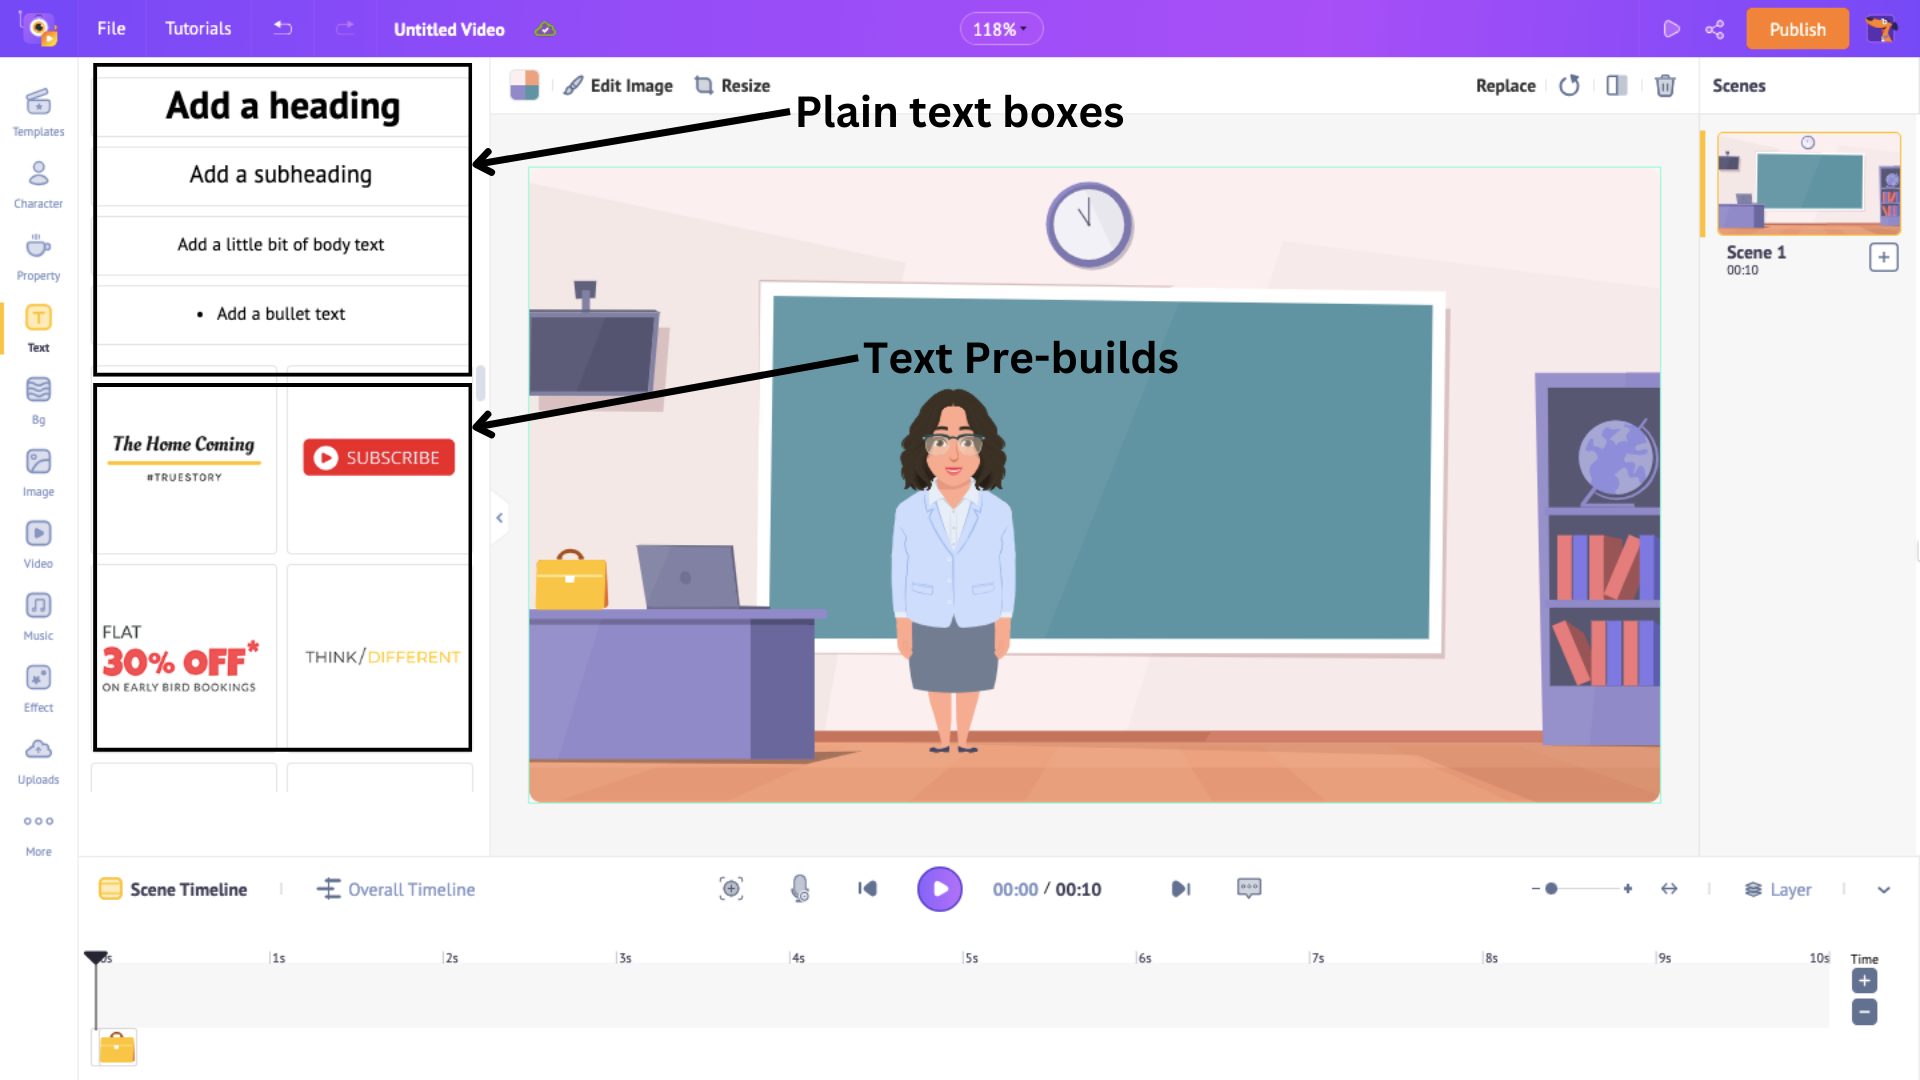
This will open a panel with two types of boxes – Pre-builds and Plain.
Pre-builds have pre-added design, font, and animation effects, while Plain text boxes require designing from scratch.
Choose a text box and position it in the scene. Then, type in the first line of your script. If you wish to change the text color, click on the “Change Color” option above the workspace.
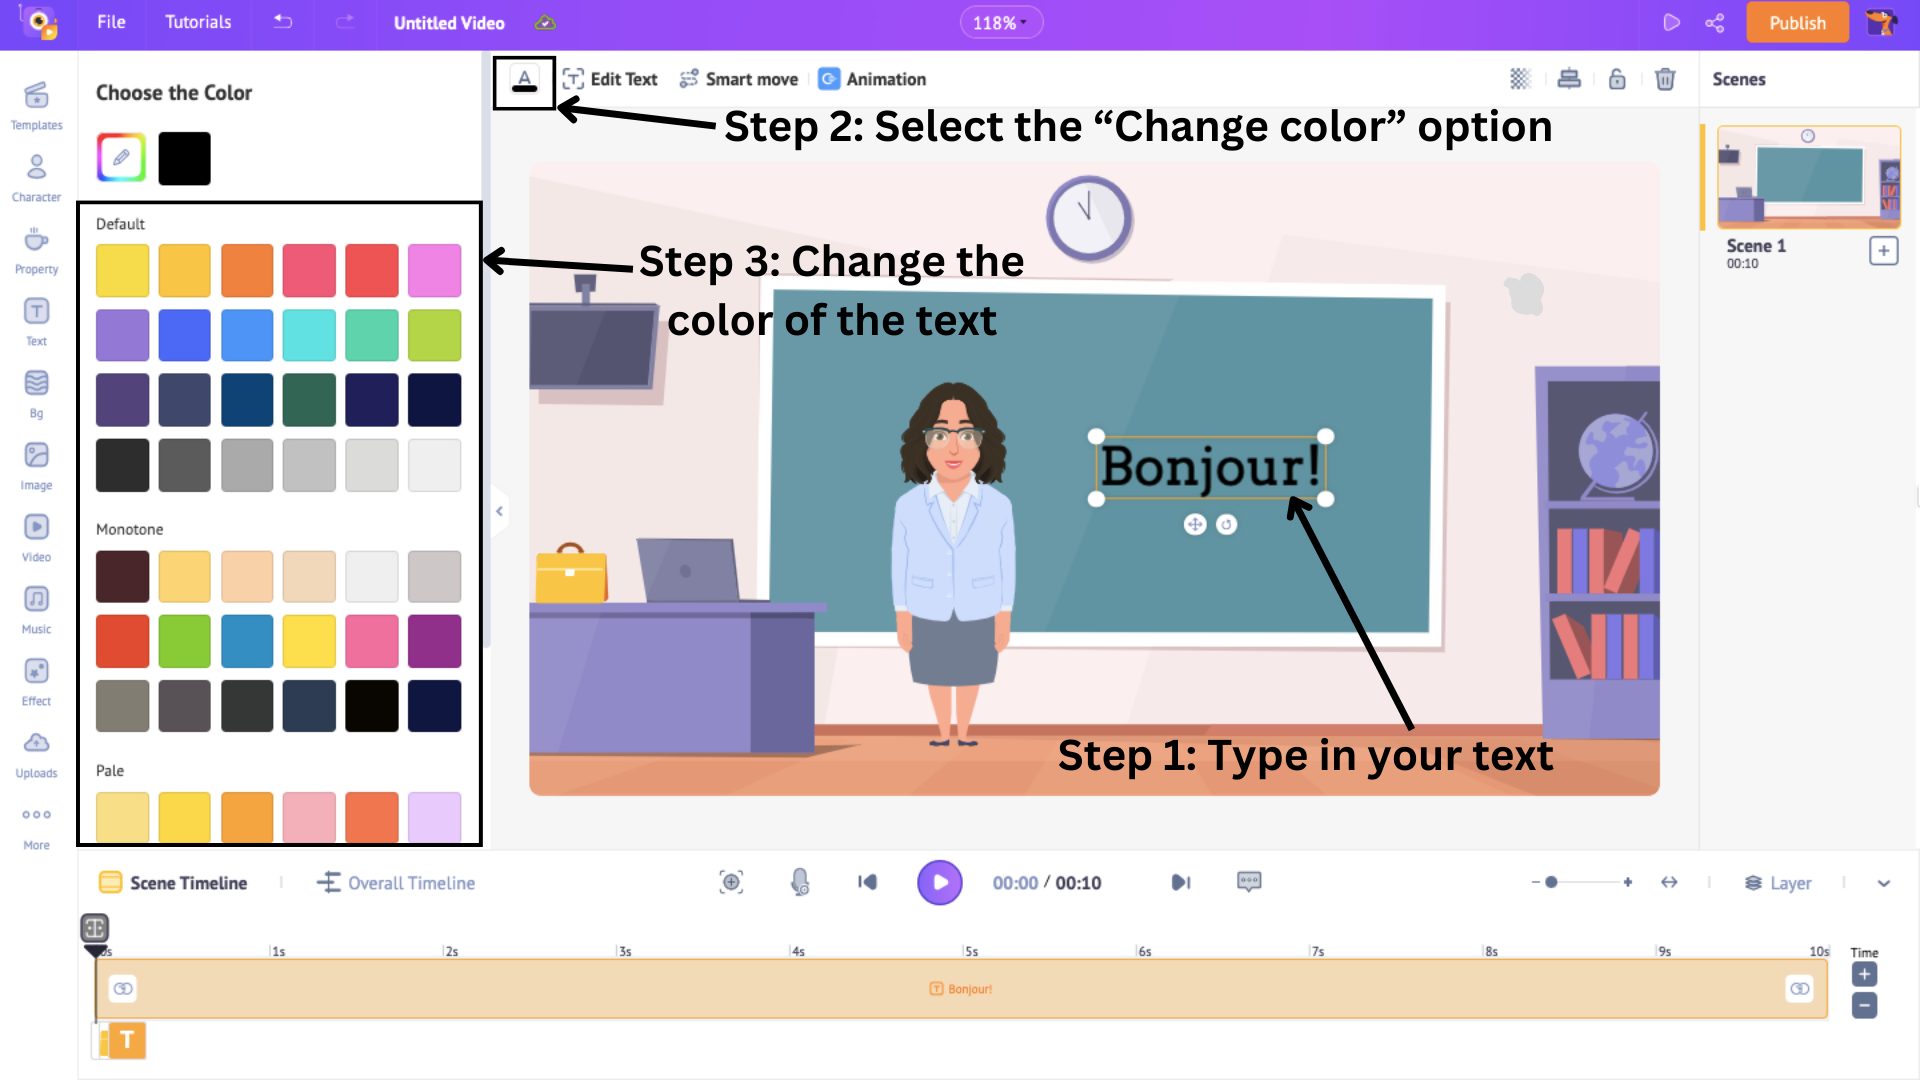
To edit your text, click on the Edit Text option. This will open a bunch of editing options for your text, including font and size.
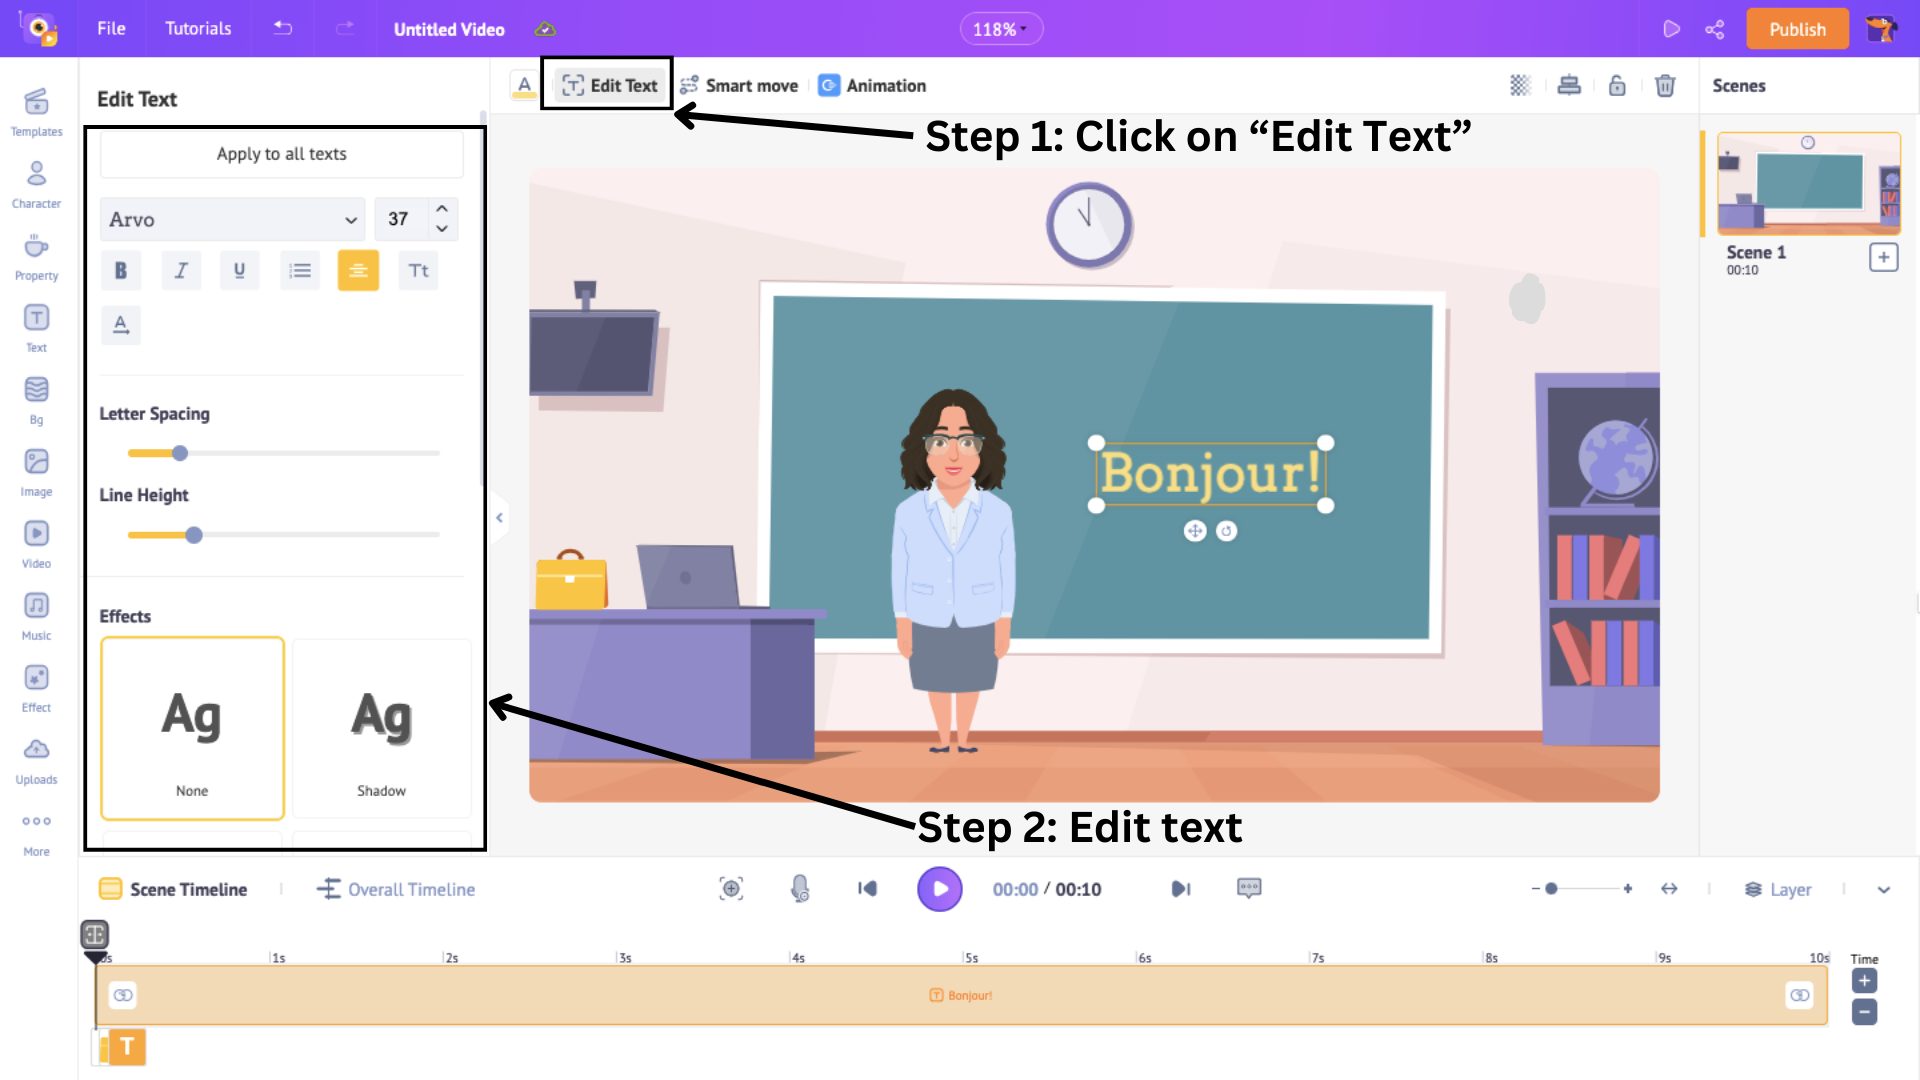
Just like the previous elements, a new colored section appears on the timeline when you add text. Here, an orange section indicates the text's duration in the scene.
Adjust the ends of this section to control the appearance of the text in the scene.
The text looks good after editing, but animations need to be added to make it lively, like in advertisements.
To do that, select the text box and click on Animation.
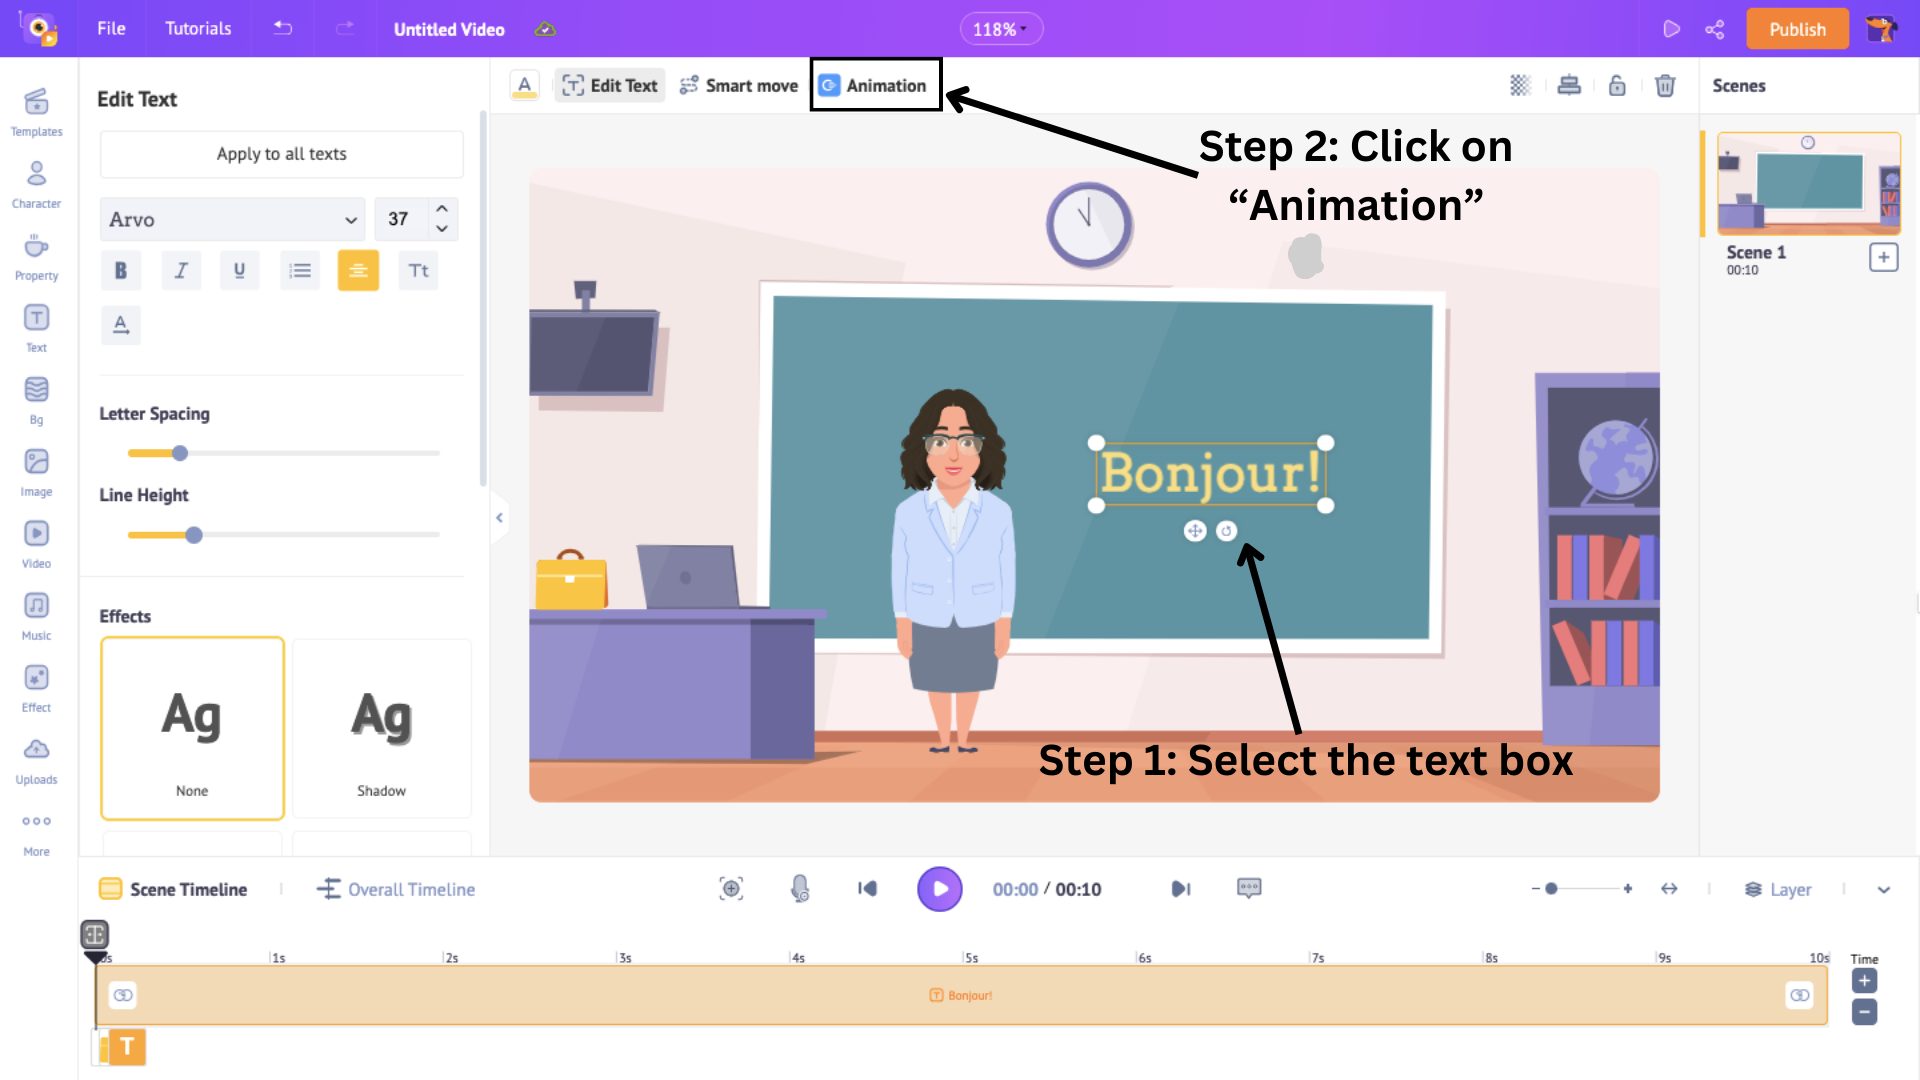
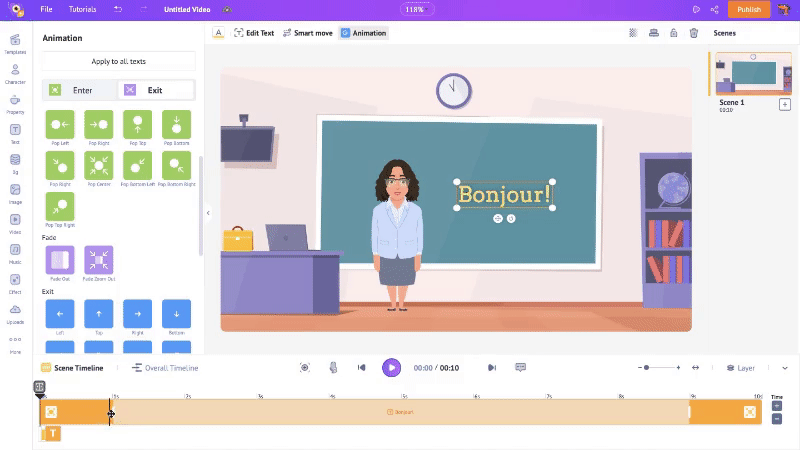
This will open a list of 35+ enter and exit animation effects to choose from for your text.
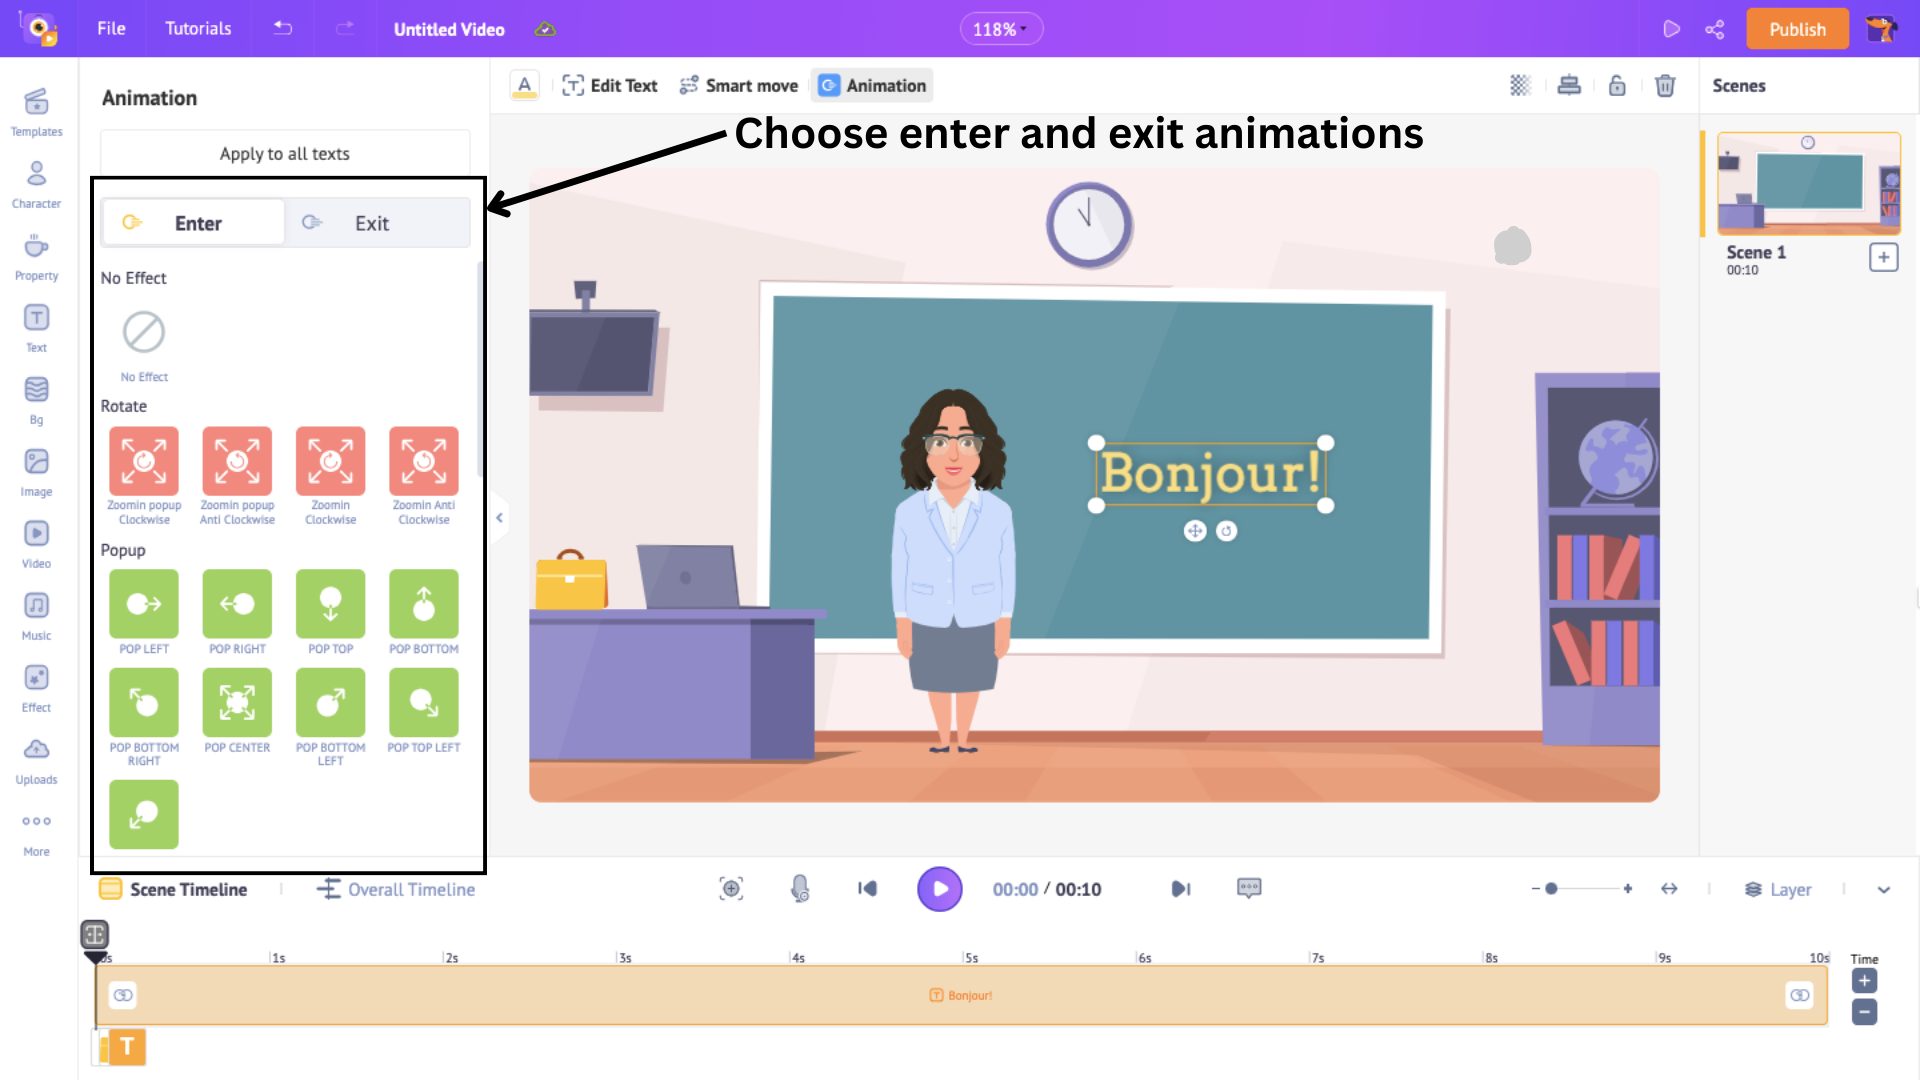
Once you choose the effects, new highlighted sections will appear on both ends of the orange section on the timeline. These highlighted sections show the duration of the two effects.
To control the animation duration, drag the inner corners of the highlighted sections.
With the BG applied, and the character, property, and text added, our scene is complete.
Now, let’s add a new scene. To do that, click on the three dots on the scene. It will open two options: Add Scene and Duplicate.
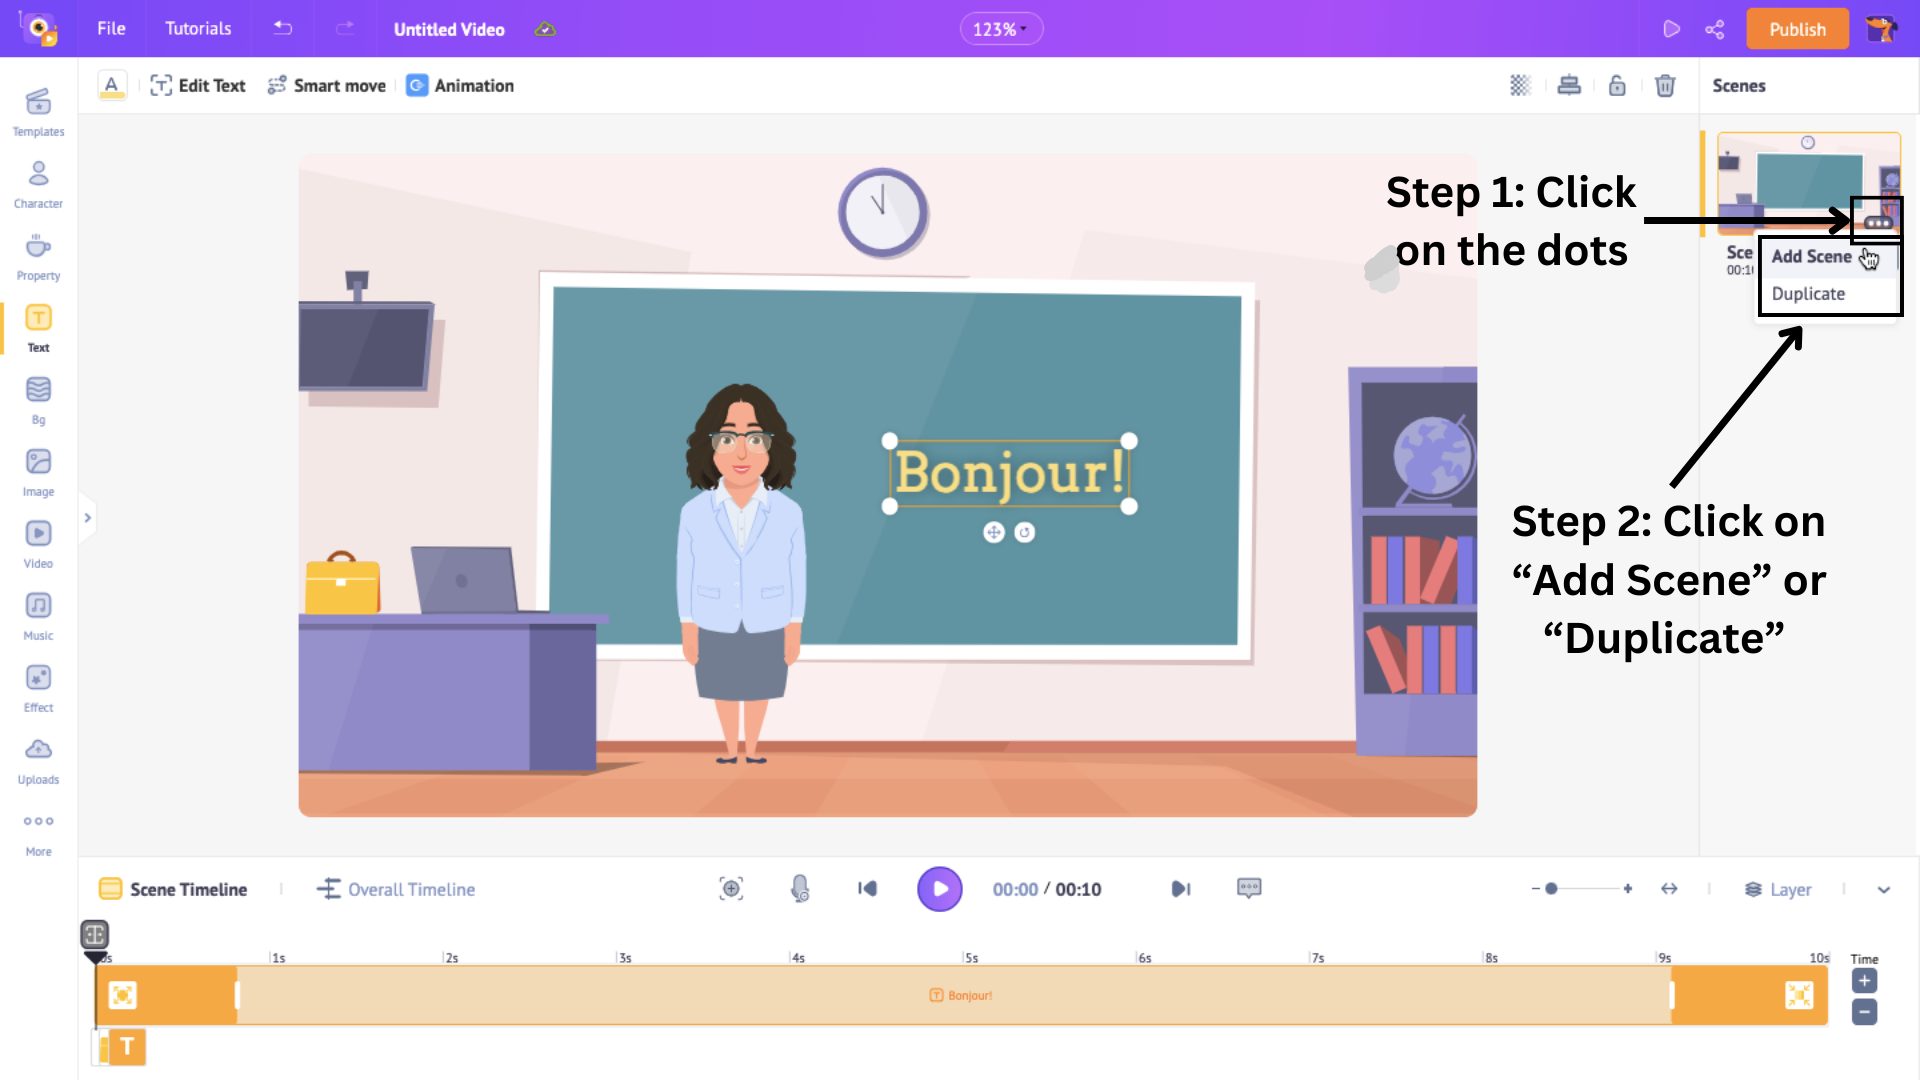
Choose Add Scene if you want to create a blank scene from scratch. Or, choose Duplicate if you want to make slight changes to an existing scene.
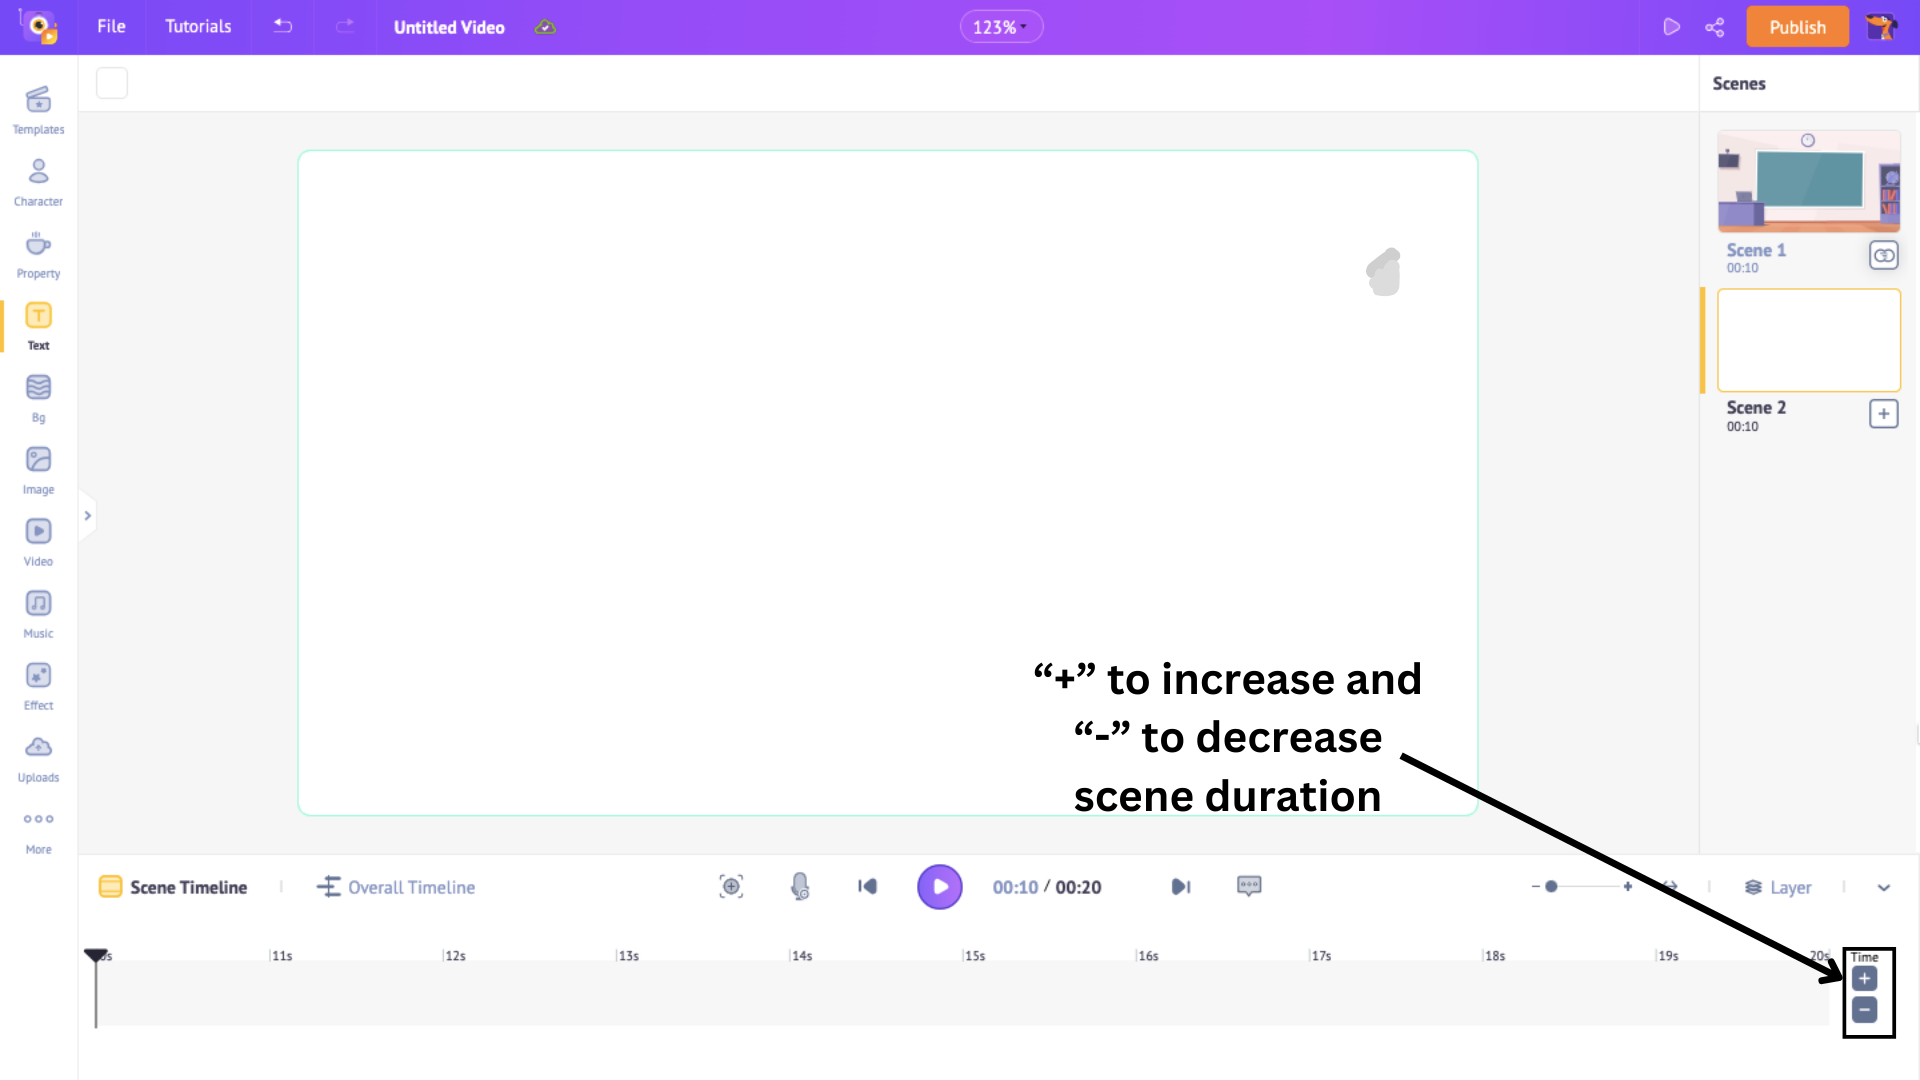
Note that every scene’s duration is 10 seconds by default. You can always adjust the scene’s duration by clicking on the “+” and the “-” signs in the bottom right corner to increase or decrease the duration.
Create scenes similarly, adding lines from your script. Once you’re done making all the scenes, it is time to add one important element to the scene.
5. Music
Music plays a huge role in advertisements. Although they play in the background, they help bring life to the advertisement.
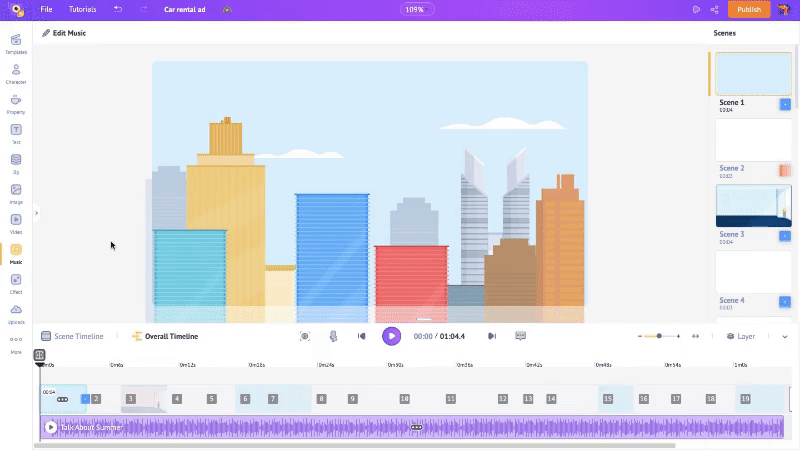
Let’s bring life to our animated ad. To add music, click on the Music section of the library and maximize the window by clicking on the Expand Library button.
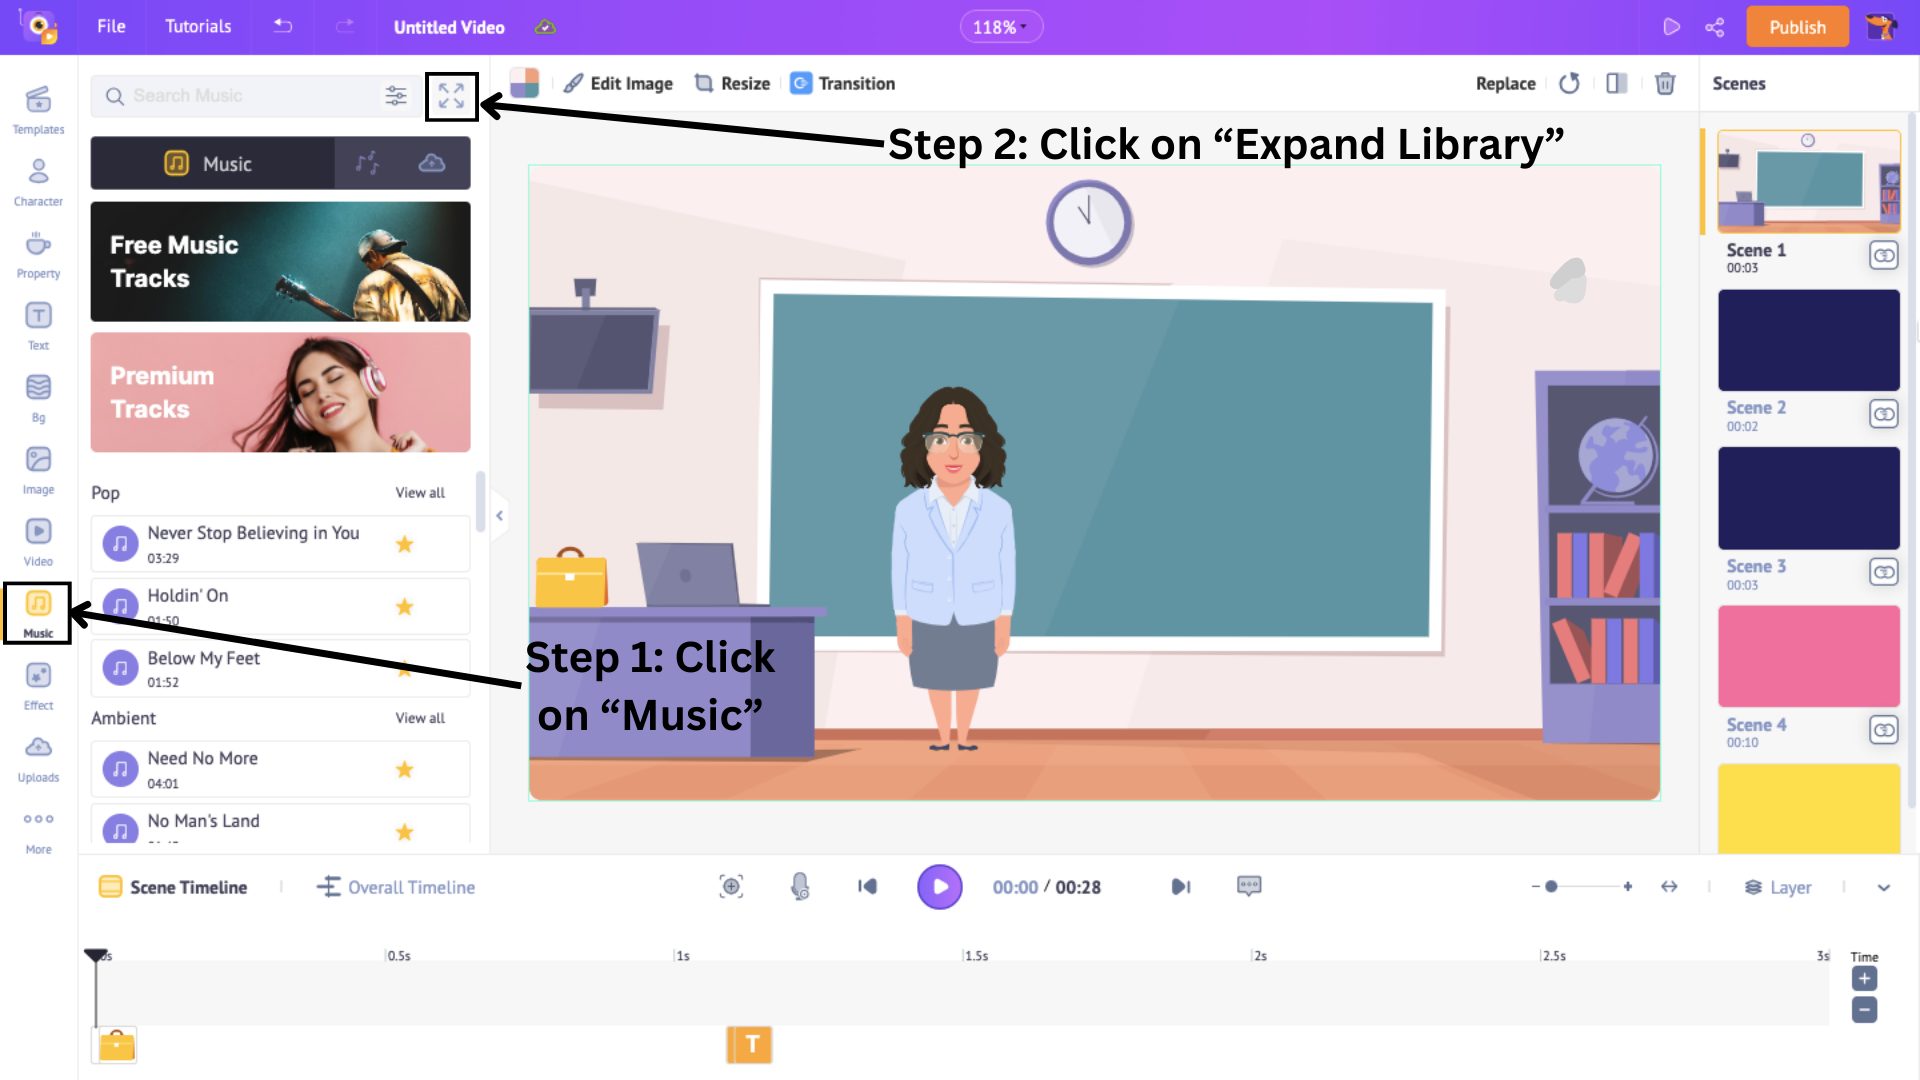
This will open a plethora of 30,000+ music track options for you to choose from. Hover over a track to preview it and click on it to add it to the video.
On the other hand, if you want to upload your own music track, click on the Upload option in the library.
Upload your music track, and it gets stored in the uploads folder. Click on the music track to add it to the scene.
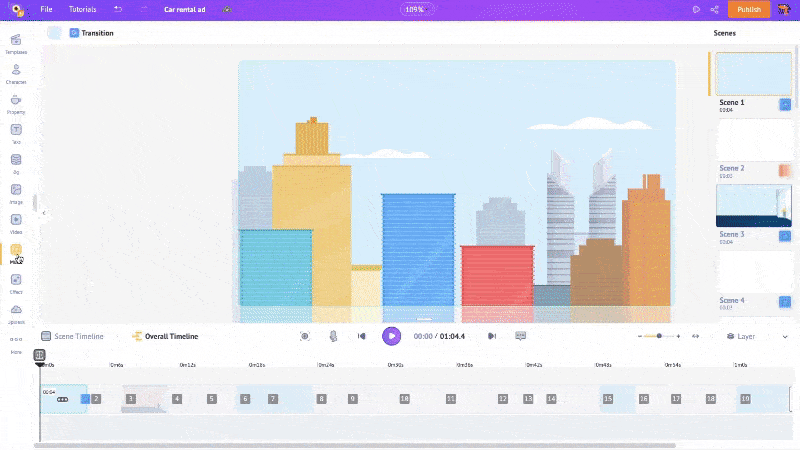
Note that the music gets added from where the play head is located on the timeline. If you wish for the music to start from the beginning of the video, then make sure the play head is located there.
And that is how you add music to the video!
To summarize, we have used a few of the library's important sections to make a fantastic animated ad. Let’s move on to the final step.
Step 3: Preview and Download your video
You have worked hard to create this animated video. So, to see how it turns out, click the Preview button.
My advertisement has turned out amazing.
If you’re satisfied with your output, then click on Publish > Download Video to download the video.
Here, choose the resolution and format of the video, and then click Download.
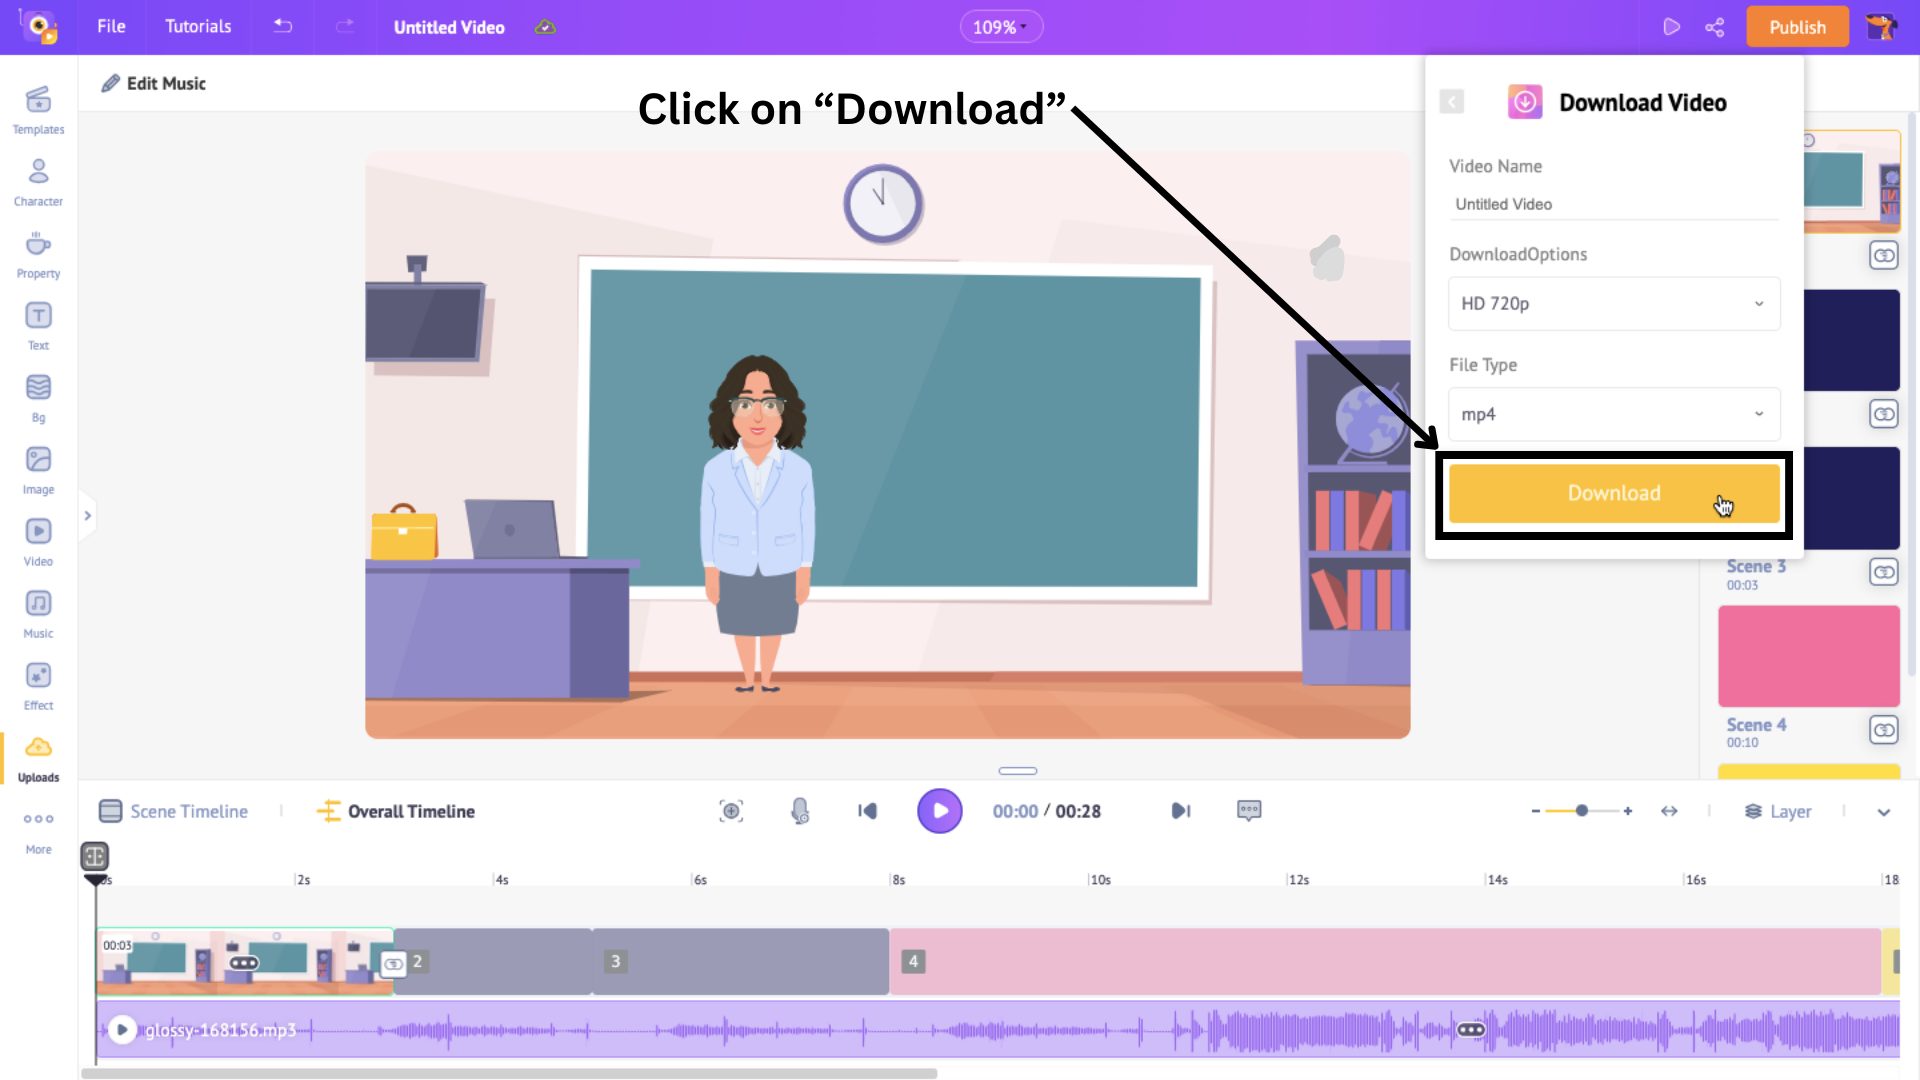
The video gets rendered and can be downloaded from the Exports page.
***
Give yourself a pat on the back because you learned how to make an animated ad just like that! 🤌🏼
Animated ads are not only entertaining but offer a multitude of benefits. So, what are they?
Benefits of Animation for Advertisement
- They are cost-effective.
- They have visual appeal, capturing more attention than regular ads.
- They allow room for creative storytelling and help convey complex ideas visually.
- Animations can help maintain brand elements like characters, contributing to brand recognition.
- Animated ads have an inherent entertainment factor, making the viewers remember more vividly.
These are just a few of their benefits, and many big companies have started including them in their marketing strategies.
To see how these companies include animation in their marketing strategy, take a look at these 10 stunning animated marketing videos.
Who knows, you might get your inspiration from these. Or, if you are confident with your skills and can’t wait to get started, head over to Advertisement Maker.
Got any questions or feedback? Feel free to add them to the comments section below. We will be more than happy to help you out.