How to make video edits? [Tips, tricks, and best practices]

Nandhini TS - September 24, 2020 - Leave your thoughts. - Last Updated: February 16, 2024 15 min read
You’re at the job interview of your dream company and the recruiter says you have two minutes to talk about your accomplishments.
What would you do?
You’d cut to the chase, eliminate rambling, weed out unworthy information, and make the points strong enough to have the recruiters’ attention.
Won’t you?
The concept of video editing is similar to this.
With a minimal attention span of the audience, video creators face the need to entice them with attractive, useful, engaging, and duration-bound video - all at once.
Video editing is one of the most important skills for video creators. In fact, editing takes up the biggest chunk of the video creation process.
If you are a video creator looking to sharpen your video editing skills, this is your only thorough guide on all things you need to know about video editing.
Whether you are looking to edit videos that you have shot using your camera or mobile, a screen recording done through a tool like Camtasia or Vmaker, or a nice and bright stock video - we’ll cover the different tools within Animaker that’ll enable you to edit all types of videos with some pro tips and hacks.
Let’s dive right in!
What is video editing?
Video editing is the process of bringing together different elements of a video (concept, music, aesthetics, and flow) with video editing tools and resources to turn raw visuals into a finished video that is ready to watch and enjoy.
Video editing also involves removing unnecessary visuals and details that do not add value or make the video too long.
Why is video editing important?
Creating a bland video for the sake of it could really harm your reputation and benefit no one in any way. Video editing is a critical step in the video-making process that helps you make it more engaging.
In a nutshell, you should edit videos to:
- Refine, tidy up, and perfect the content
- Make it more appealing and creative
- Slice and dice unnecessary detail
- Add significant details
- Get an overall critical review
We'll be discussing editing tips in this article. If you are interested in a particular section, jump head!
- Getting the footage ready
- Handy editing tools for a stunning video
- Jazz up with the right dose of audio editing
Ninja video editing tactics that you can’t miss
I. Getting the footage ready
Before you begin the editing process, make sure that your video is in the right dimension, size, and angle. Here are a few things that can help you make your videos feasible for further editing.
Rotate video
Having a video horizontal when intended to be vertical and vice-versa is agonizing. We get that.
If you are eager to make a cool video from old footage and find that they’re not in the desired orientation, it is quite easy to fix it.
You can rotate your videos with Animaker in three simple steps:
1. Choose upload to import your videos in Animaker or simply drag-and-drop the videos you want to rotate
2. To upload an asset, just click on the upload icon and choose the asset from your system and upload it to the Animaker library. From here, you can drag it to the workspace
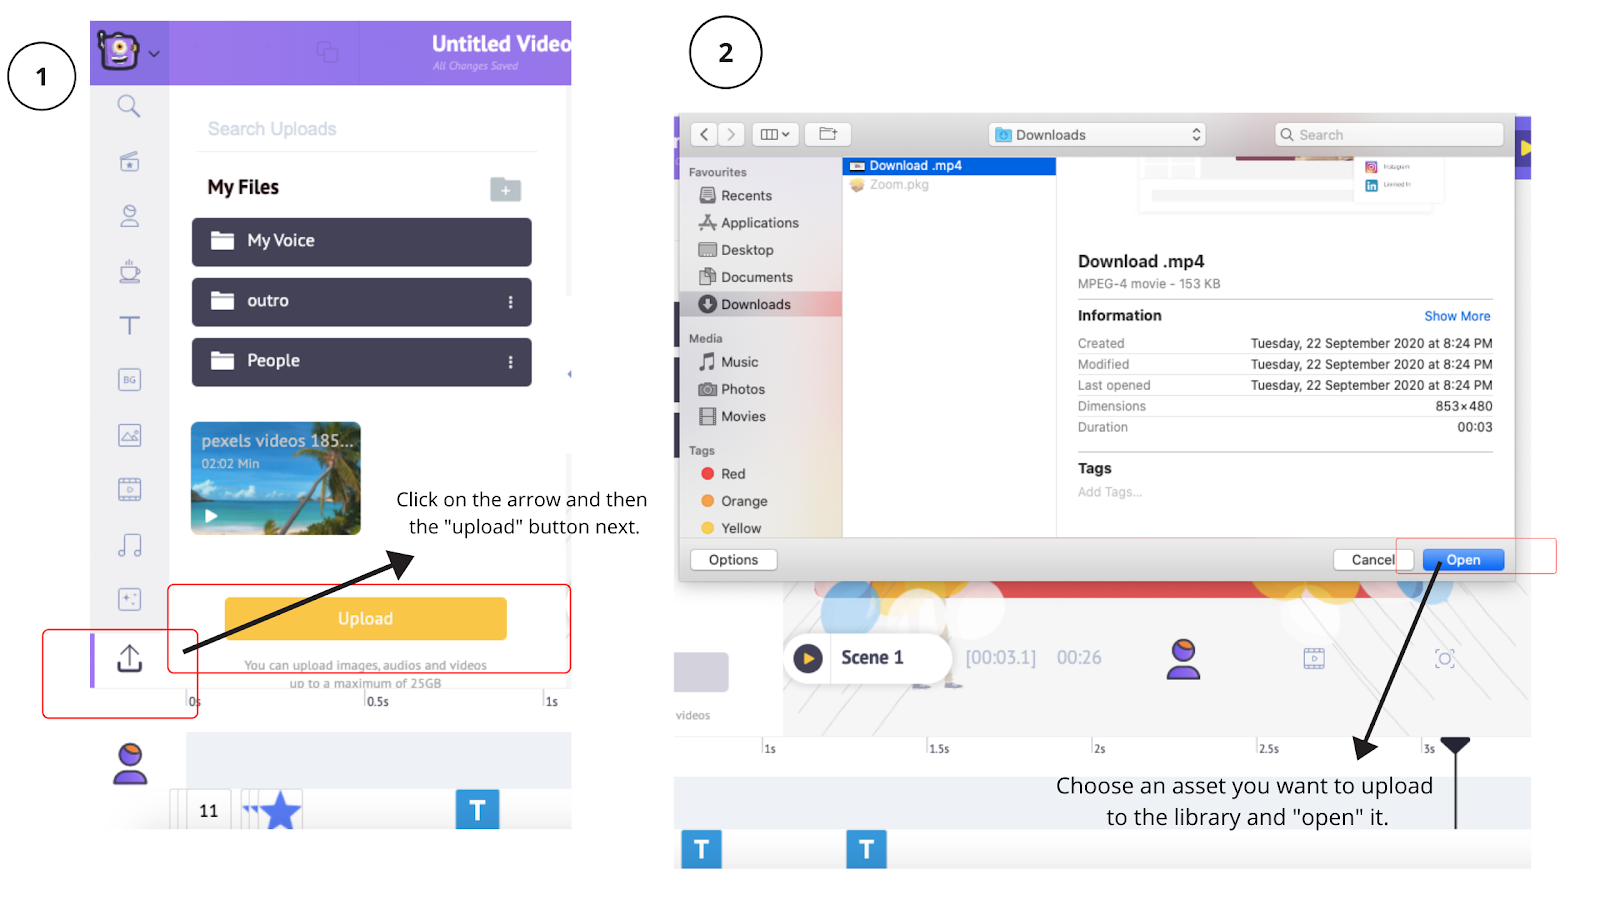
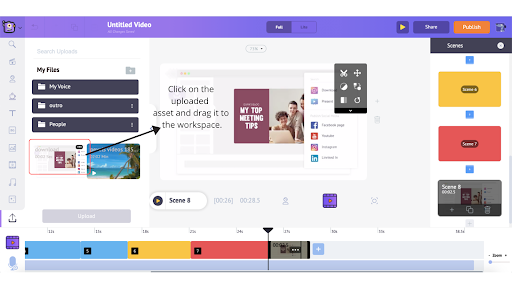
Once you’ve uploaded your video, drag it to the workspace to adjust and rotate the video.
 3. Click on the scene or the background and an item menu appears
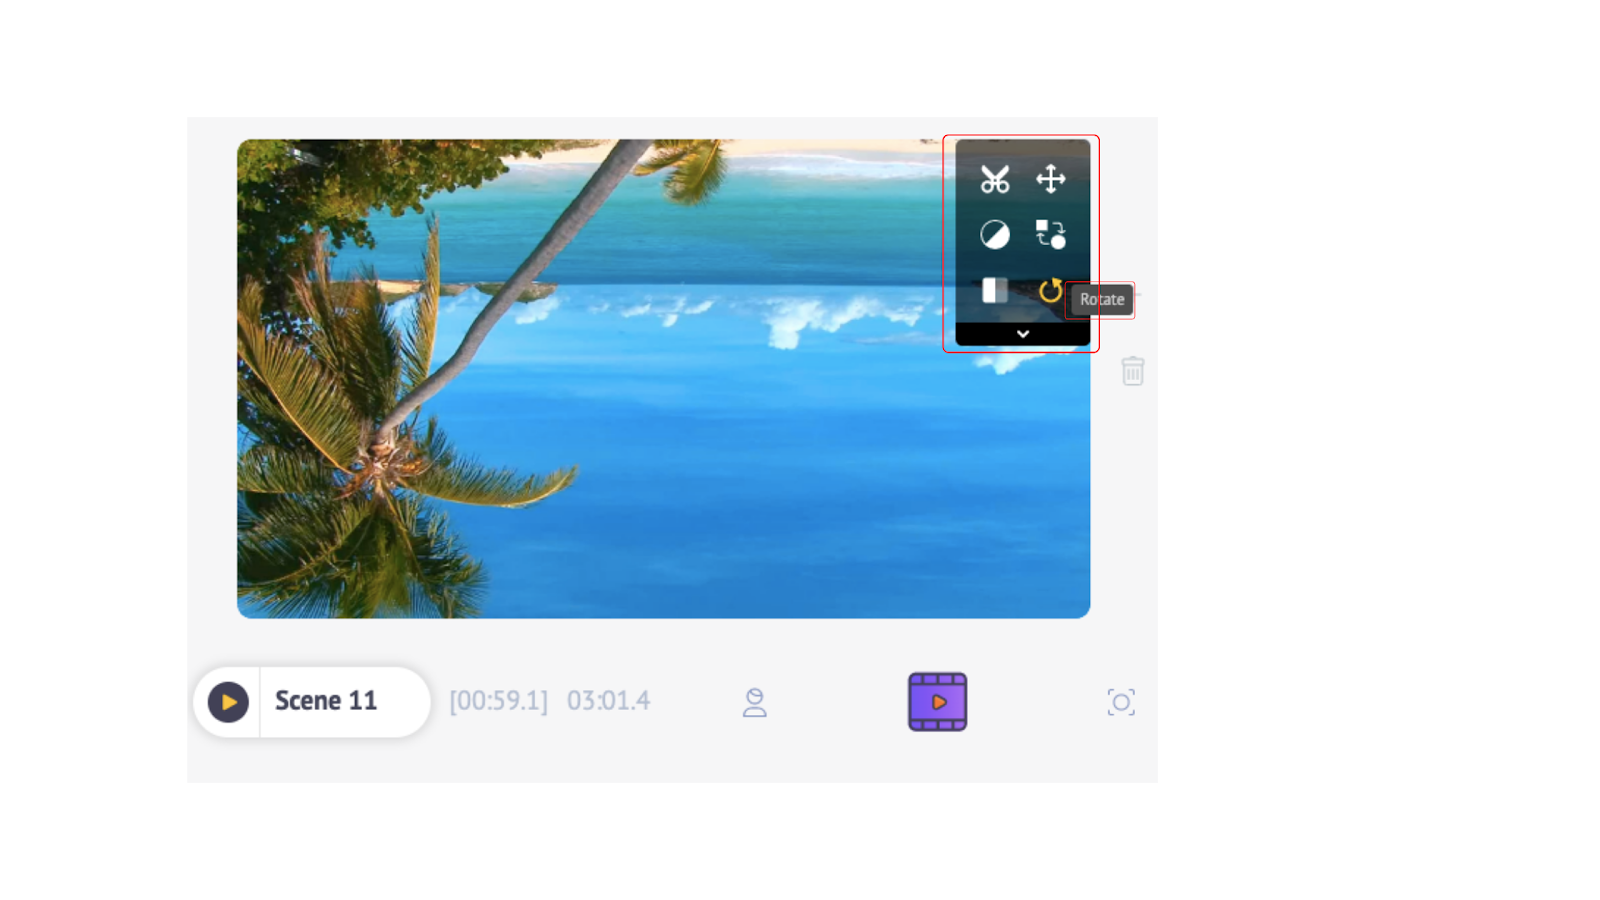
4. Click on the arrow symbol to rotate your video 360 degrees to any preferred orientation
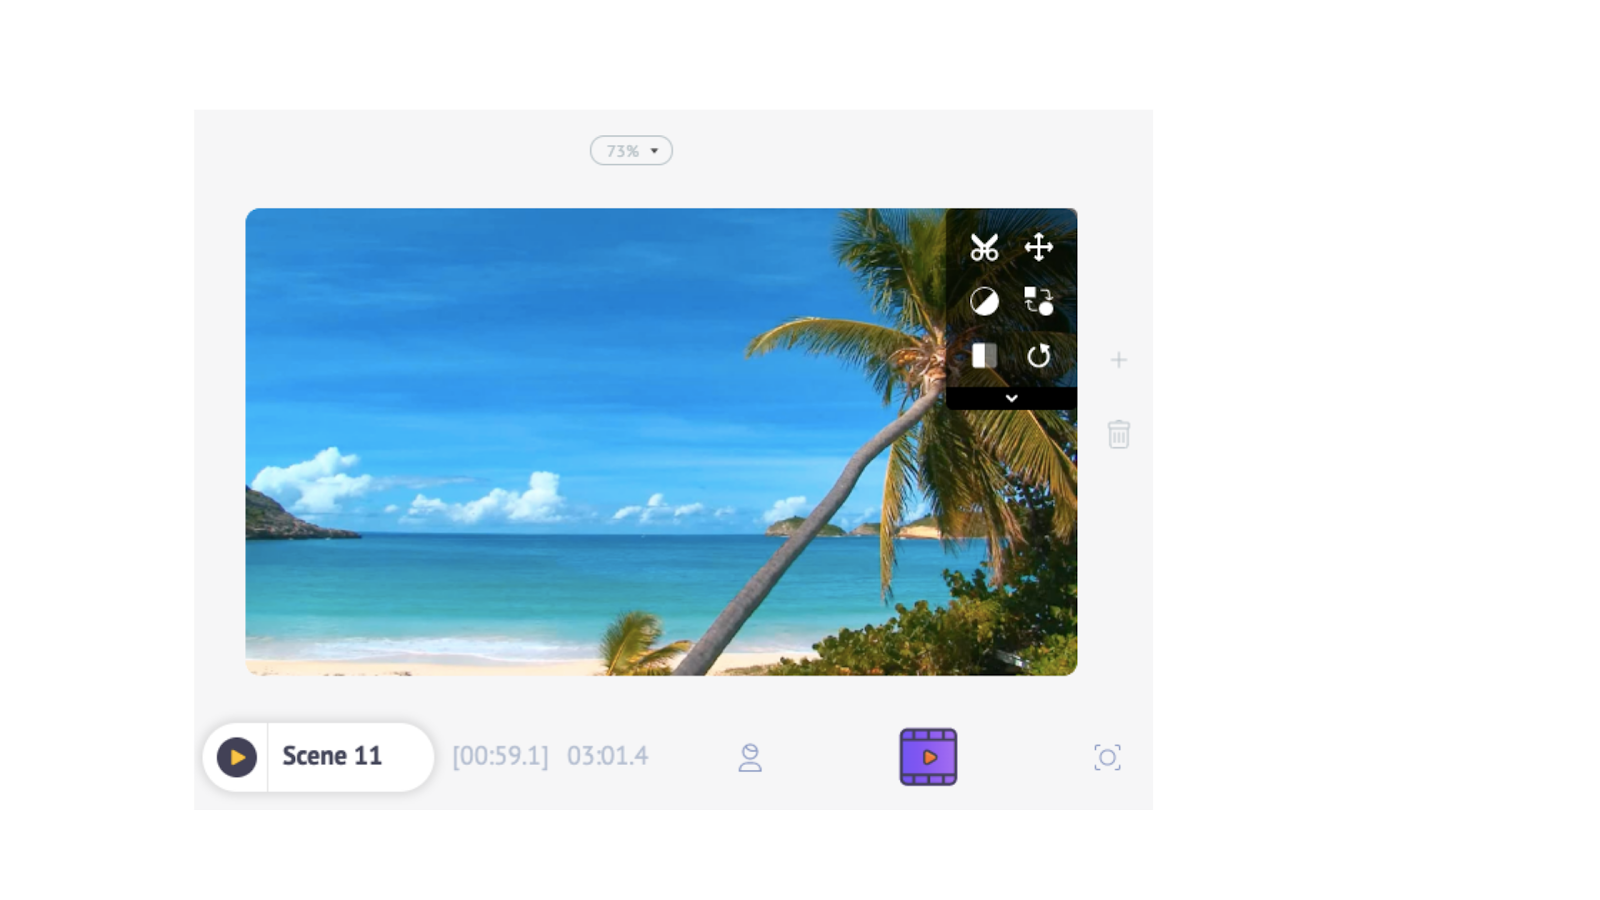
Voila! Your video is rotated!
Flip video
You may have shot a video facing the mirror or you prefer the stock footage on your video to be flipped so that you can add text on a particular side of the video.
These are certain things that may seem small but make a huge difference in the quality of the output.
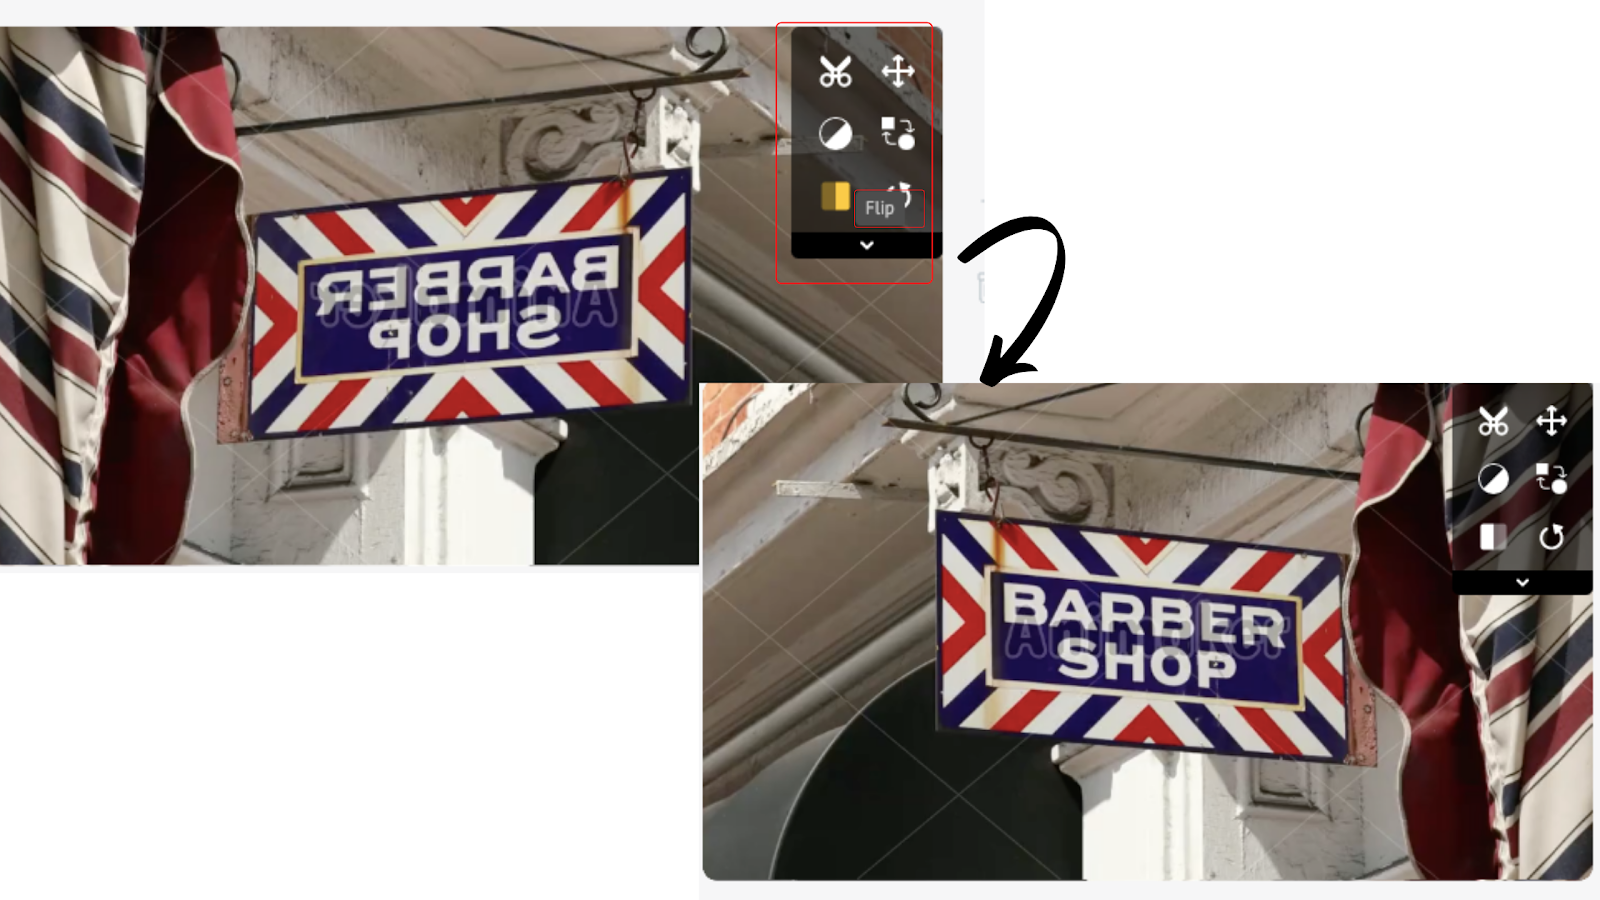
With Animaker, you can flip the videos horizontally or vertically.
1. Begin by clicking on the scene
2. Upon doing so, an item menu expands and you can click on the “flip” option to tilt the scene as per your preferences (right, left, top, and bottom)
Resize Video
One of the most time-consuming tasks in video editing is customizing the dimensions to make it relevant and optimized for different social channels. But, tools like instant resize can help you skip through the manual process by resizing videos with a single click of a button.
With Animaker, you can repurpose your videos to be posted on 20+ different social channels and just think of all the time you’d be saving with a video editing tool like this!
1. Pick a social platform you want to resize the video for or add a custom size
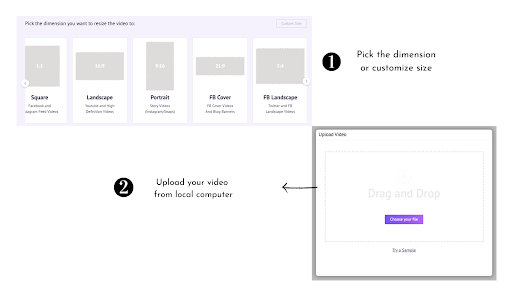
2. Upload a video from your local computer
3.To upload an asset, just click on the upload icon and choose the asset from your system and upload it to the Animaker library. From here, you can drag it to the workspace
4. Download the video or share it on 20+ social media platforms
Publish on 20+ social media platforms.
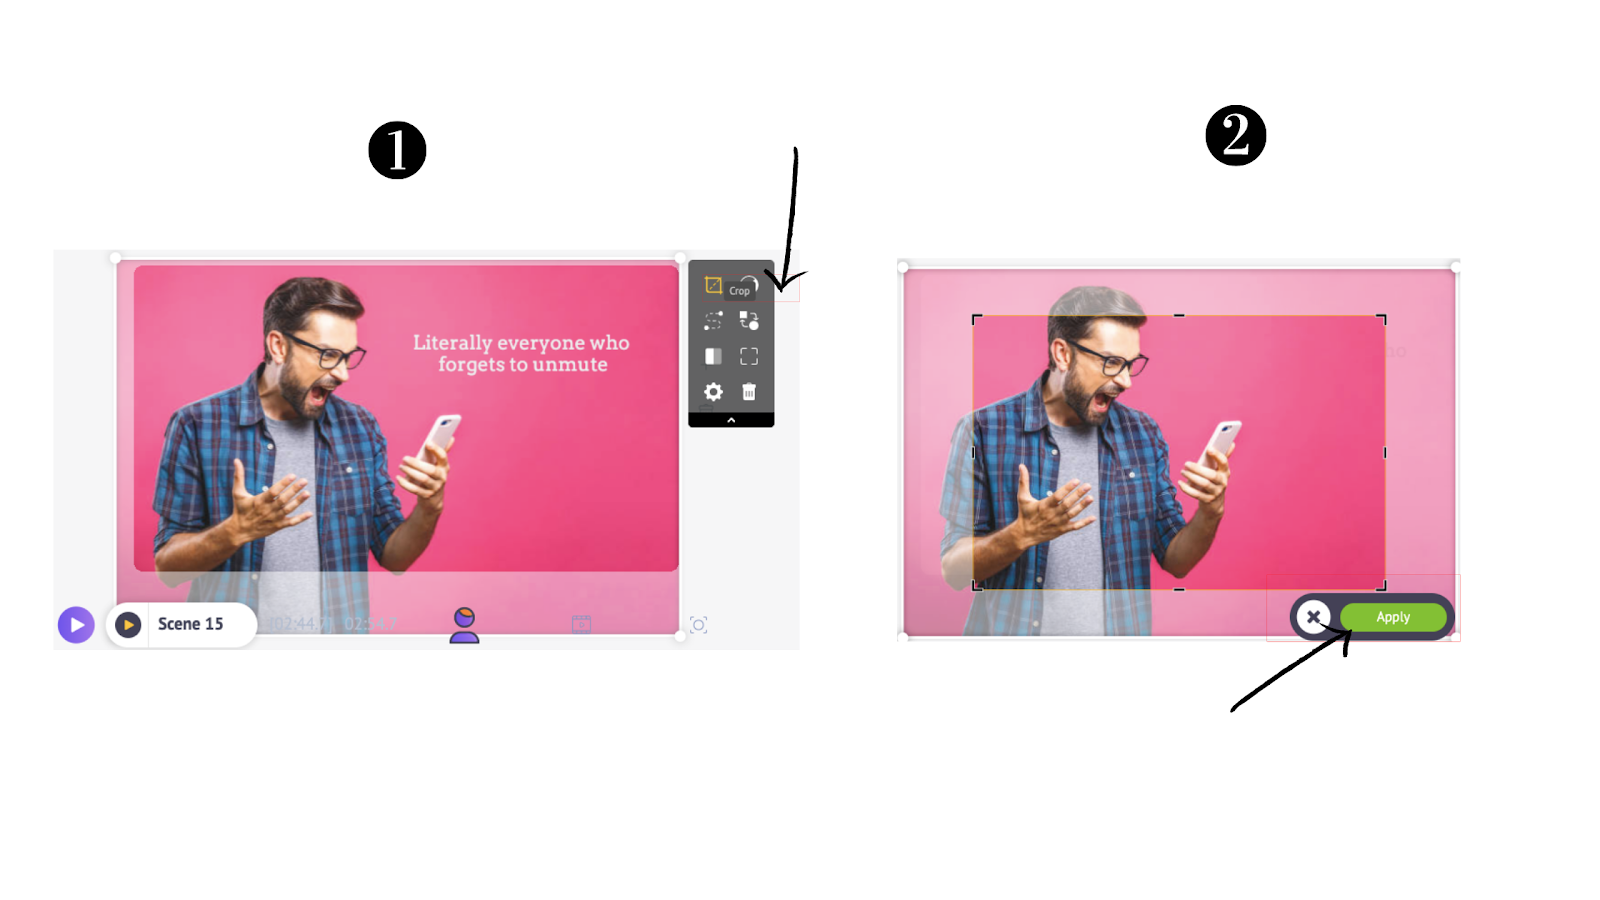
Crop Video
- Select the scene
- Click on the crop icon from the item menu
- Resize and apply
II. Handy editing tools for a stunning video
Trim video
The attention span of an average human is on a consistent dwindle and getting the audiences hooked to your content is more difficult than ever.
If there’s too much drag at the beginning or sluggish at the end, there’s a high chance your audience will bounce off.
With Animaker, you can trim and chop off unnecessary clips and get the audiences to pay attention.
1. Click on the scene or the background and see an item menu expand

2. Click on the scissors icon. You’ll see a window open and the background blur out
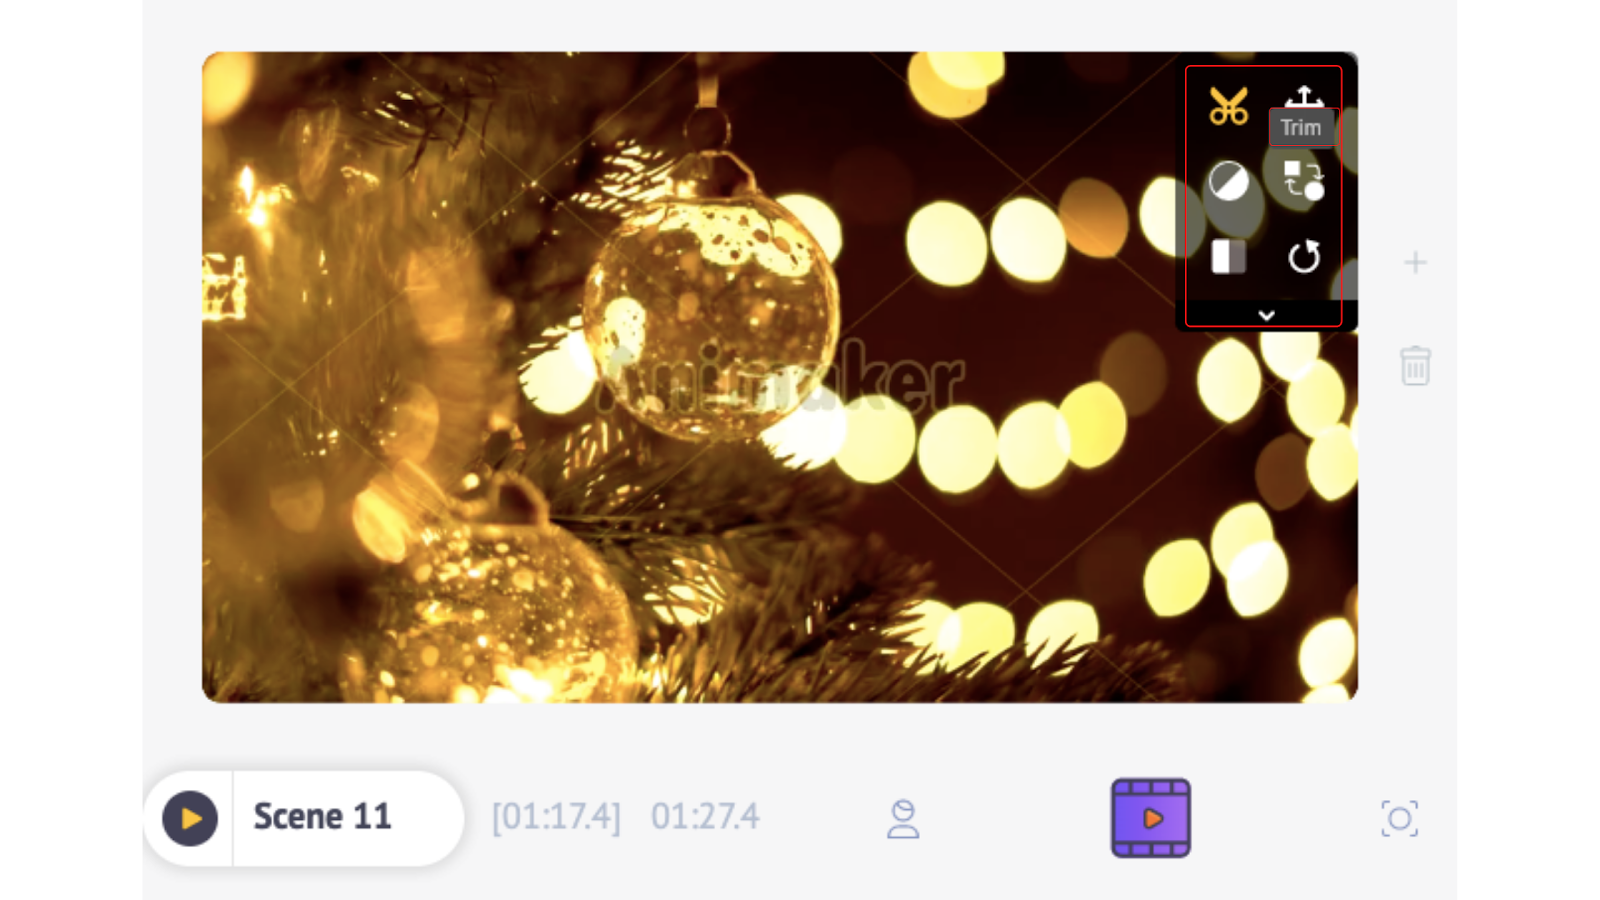
3. Trim the videos by dragging the pins inward or outward to trim the beginning of the end of the video accordingly
4. Drag the purple pins as per your requirement to adjust and trim out the unnecessary portions of the video.
Camera effect
The zoom effect is one of the oldest filmmaking practices that was first commercially used in the 19th century in a film called Wings. Ever since it has become the go-to practice of every video maker to create a dramatic effect and get the audiences hooked to a specific portion of the frame.
But, you don’t have to invest in an insanely expensive camera or software to add the pan and zoom effect for your video. It’s as easy as a pie with Animaker and here’s how:
1. Drag-and-drop the video to the workspace from the Animaker library to which you want to add the camera effect or upload your own
2. To upload an asset, just click on the upload icon and choose the asset from your system and upload it to the Animaker library. From here, you can drag it to the workspace
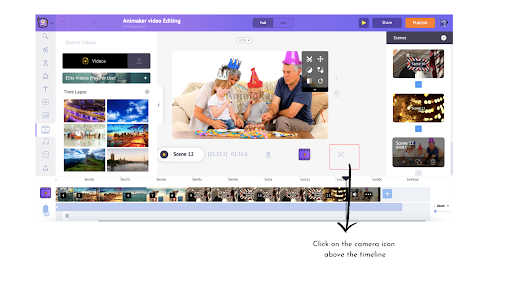
3. Select the “camera icon” above the timeline to use the camera effect
 4. You can find another camera icon on the purple timeline bar and if you click on it, it’ll expand to two options - static camera and dynamic camera
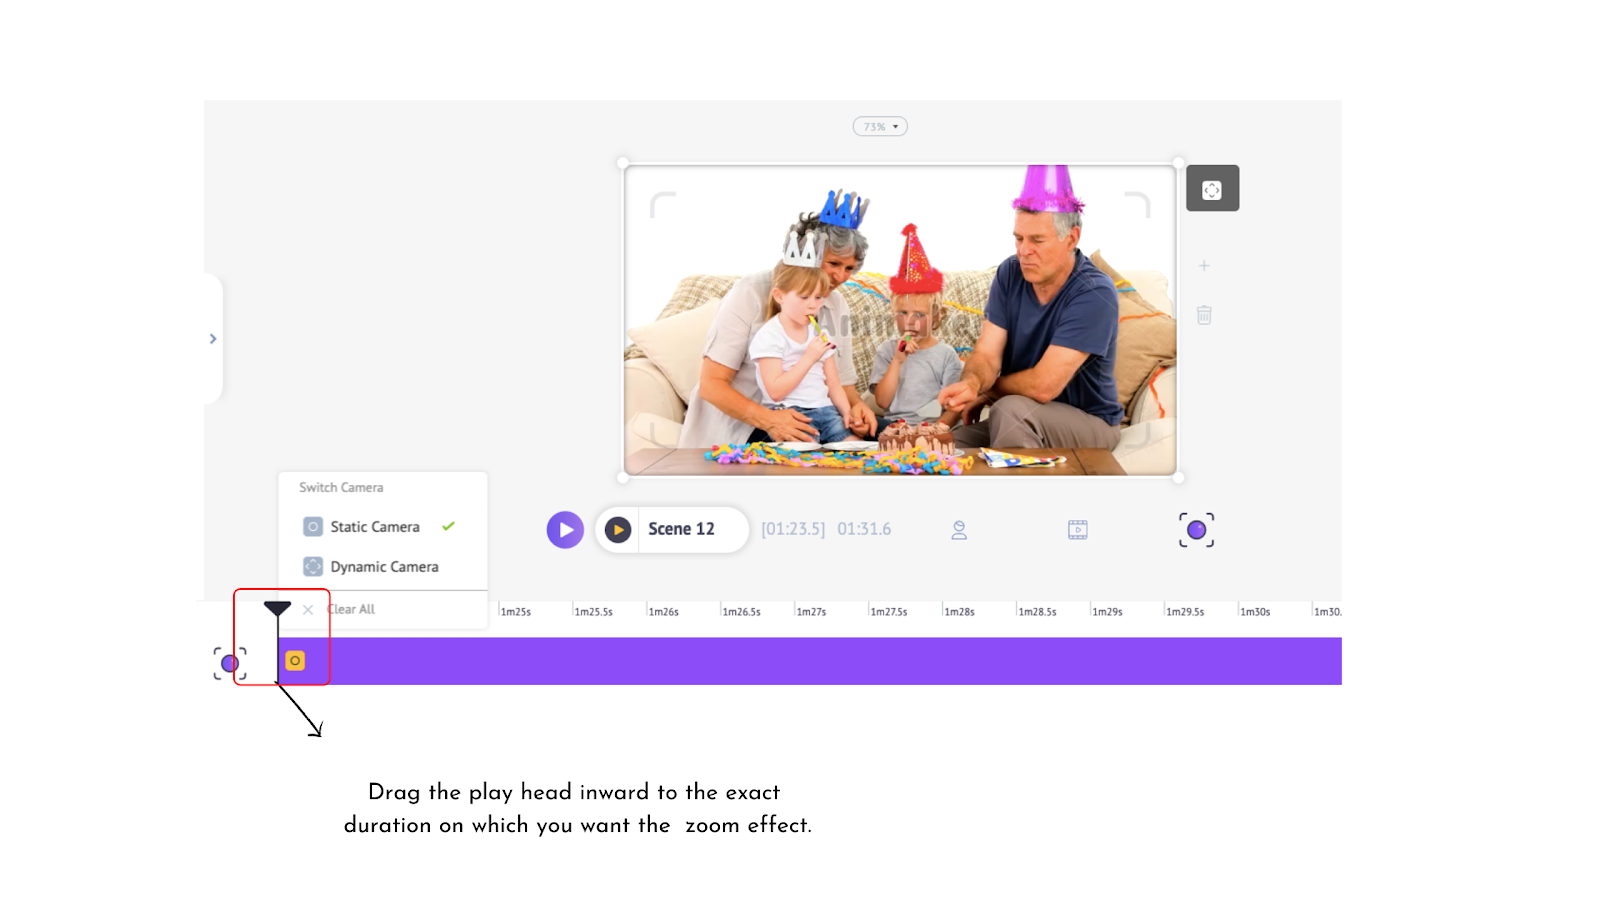
5. If you want a zoom effect without animations, go for a static camera else choose a dynamic camera
Let’s first try out the dynamic camera.
Now, we’re going to zoom-in to focus on the little dude with a grumpy face. To do that, just click on the video icon above the play head and drag the square on the screen to select the part you want to zoom-in (in our case it’s the little guy).
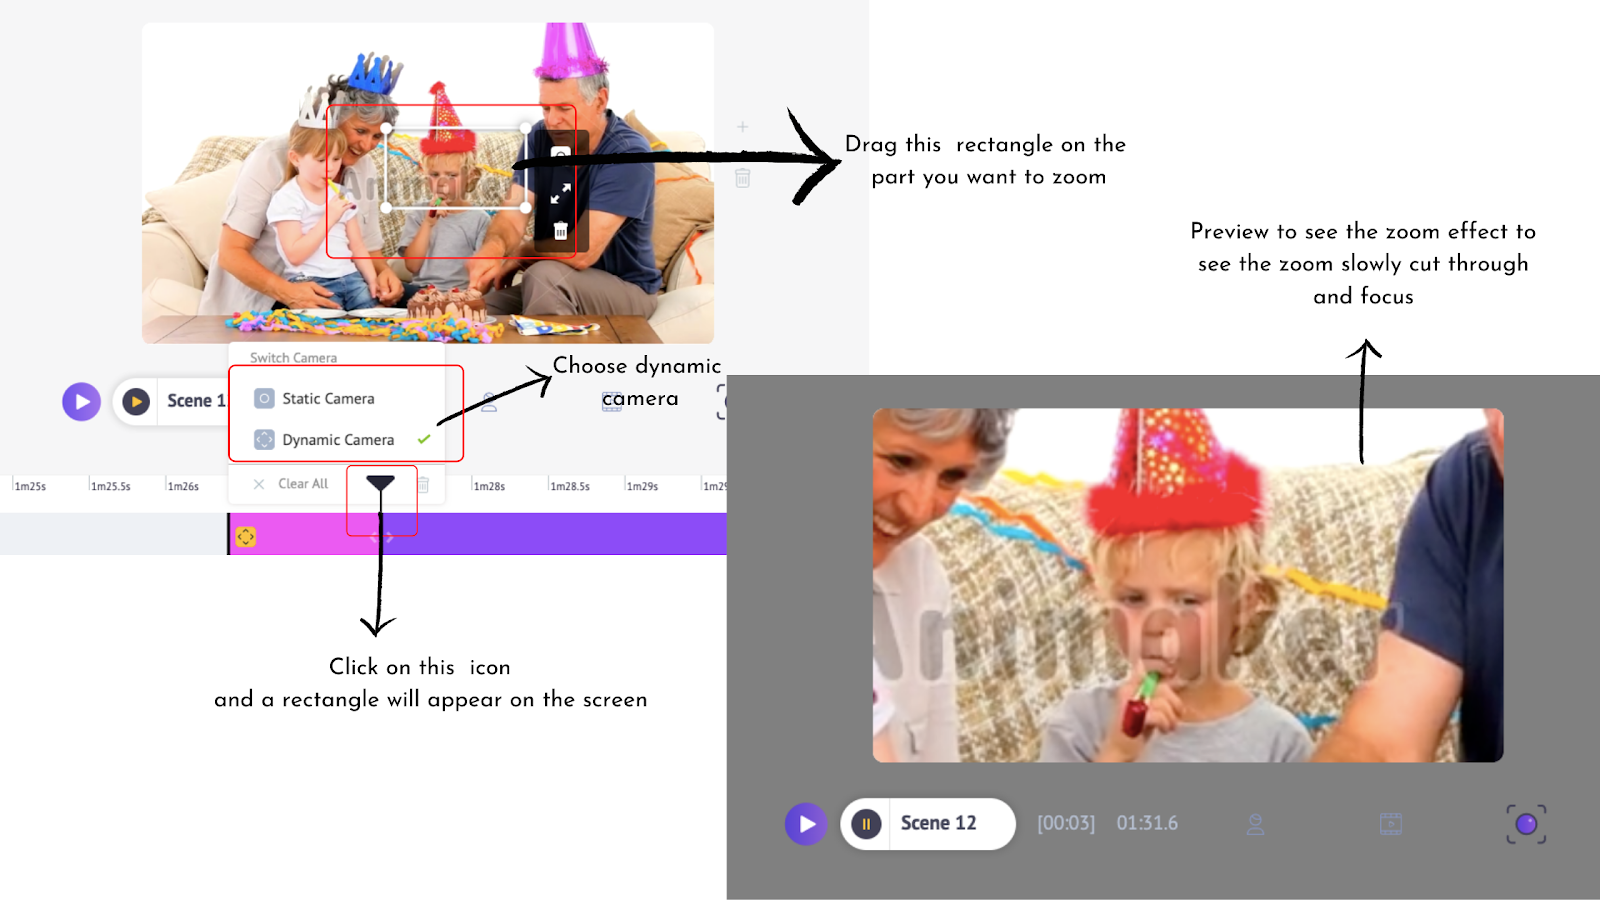
Note: If you want to use the static camera, choose the static camera option and see the zoom effect come live in the preview without any transition effect like the dynamic camera.
Add Animated Text
Animated texts layered on your videos wonderfully complement the visuals and get the message across to the audience with minimal efforts.
If you are creating a video about your product or offering a discount, or talking about the benefits - it’s impossible for you to contain such a huge load of information through just visuals or by virtually talking.
Enters Animated texts. Pop-in important takeaways for your viewers with digestible animated texts.
With Animaker, you can add animated titles easily, and let’s see how:
1. Pick from hundreds of pre-built animated texts
2. Drag-and-drop to the workspace
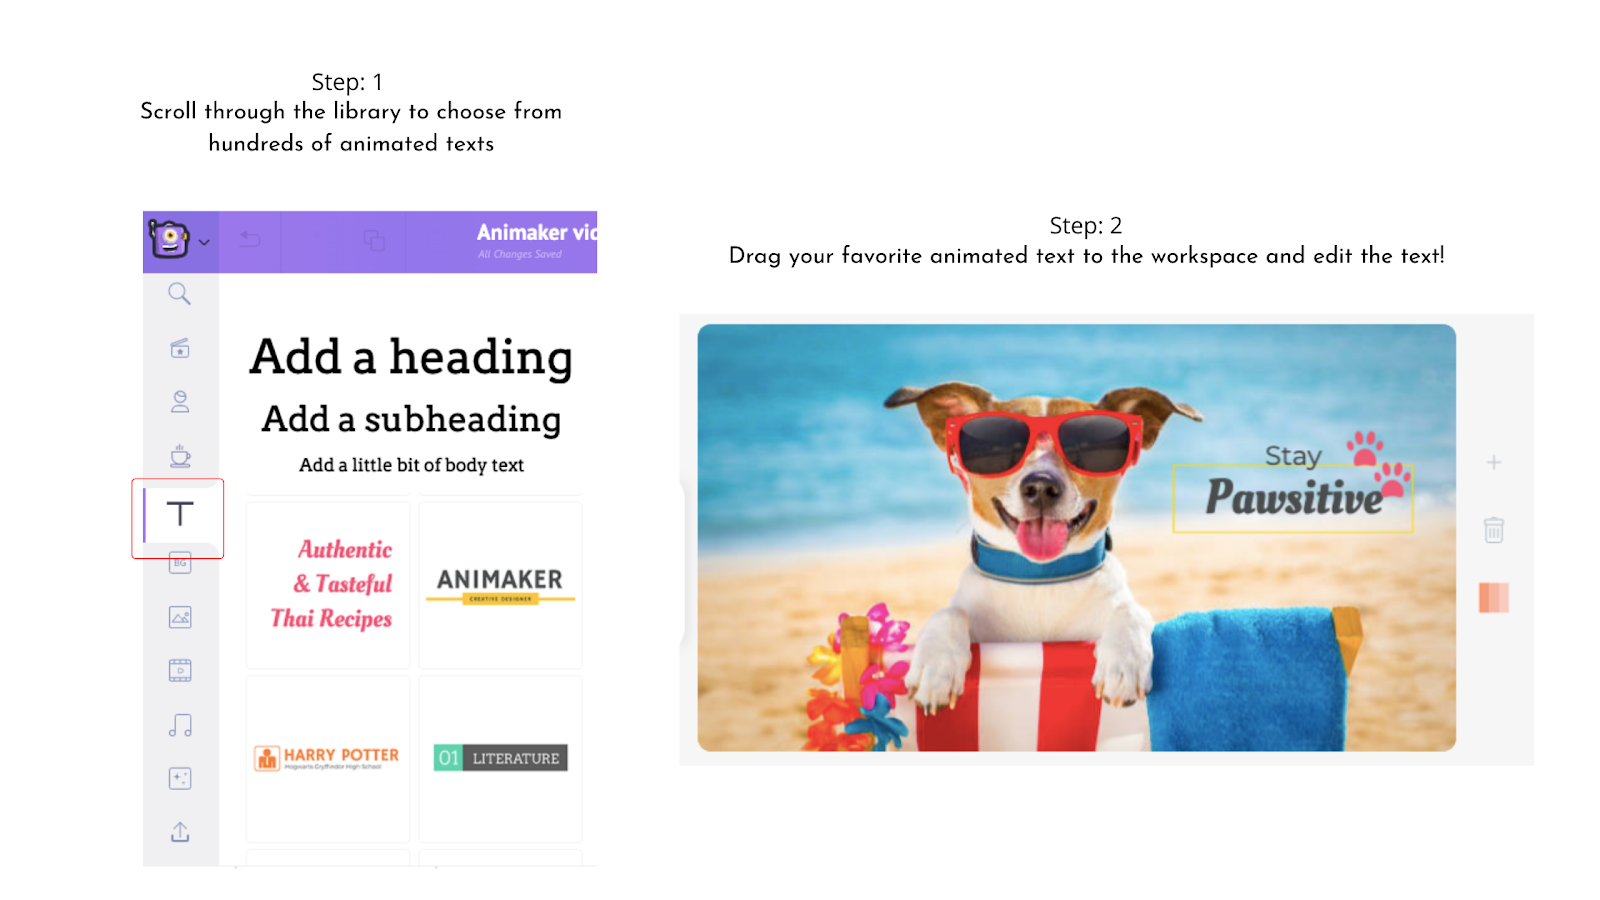
3. Edit the text to add your content and place it well
4. You can also control the duration of the animated text on the screen and the time of entry and exit. Upon clicking the animated text, a purple bar will apply to the timeline. You can drag the two pins on either side inward or outward depending on how long you want the animated text to stay and exit the scene
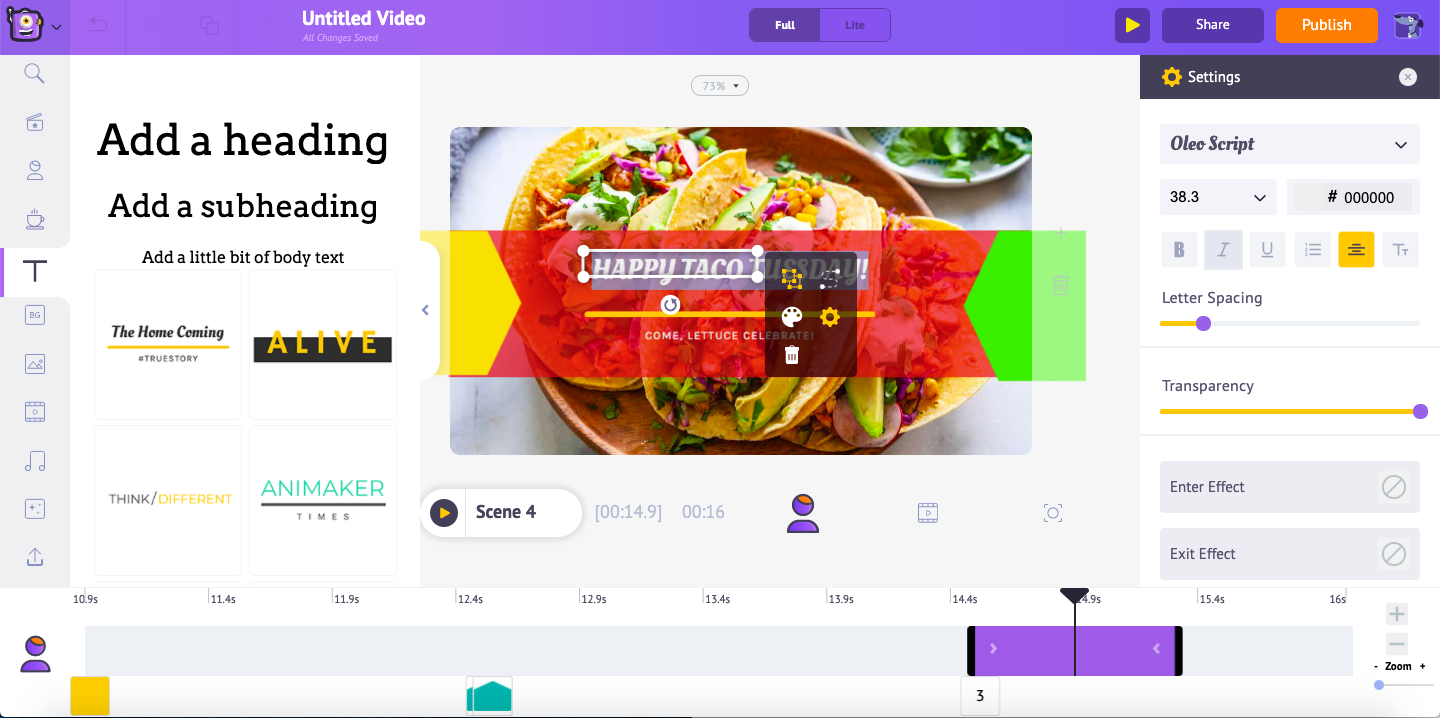
5. If you want to add entry and exit effects, then simply click on the animated text and see the effects option open on the right side of the screen. You can choose from tons of entry and exit effects from the options and it will be applied to the texts (in the timeline)
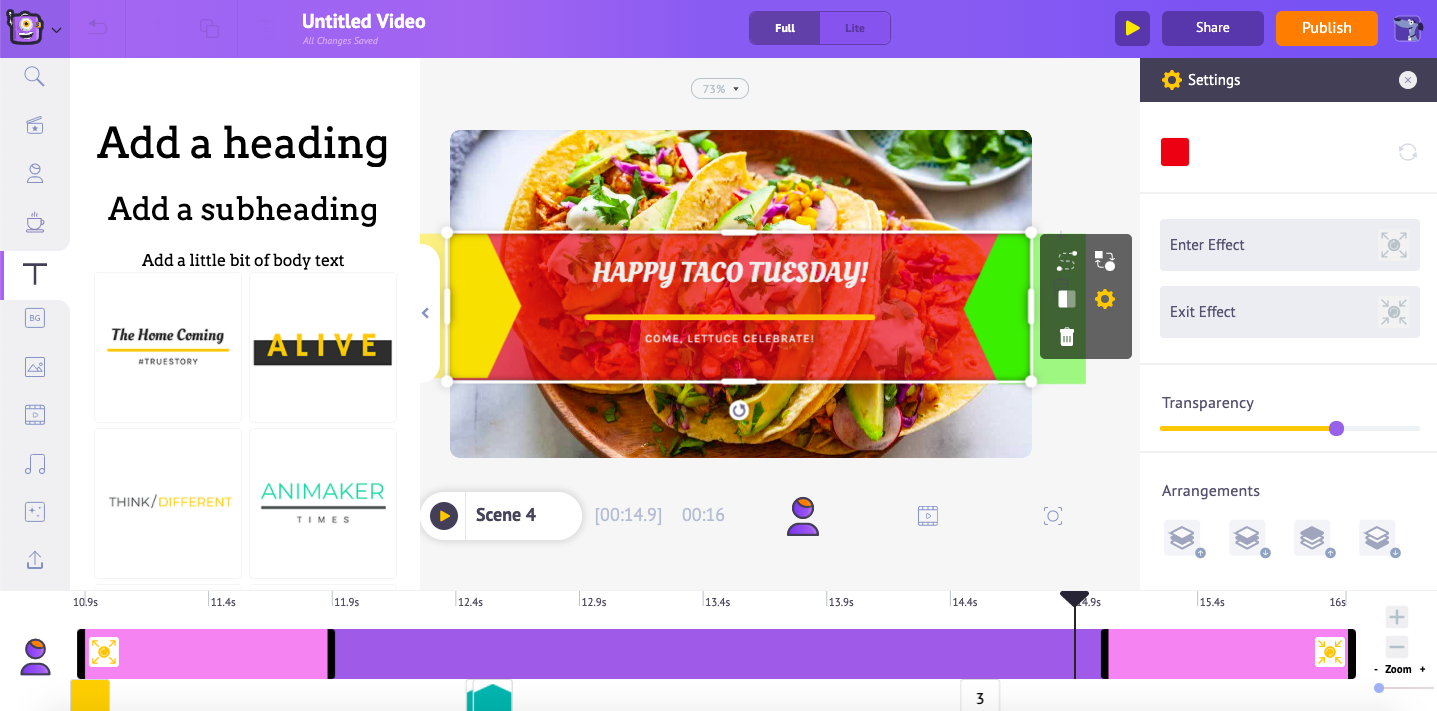
The pink bar determines the duration of the entry and exit effect which can be adjusted by dragging inward or outward based on your requirements.
💡 Pro Tip:
Add some icons that fit your story and place it tastefully along with the animated text to add a personality that can resonate with your audience. For example, we’ve added a paw icon along with the animated text (see above).
Similarly, if you’re offering a discount, add a dollar sack icon or if you’re an ice-cream seller, add an ice-cream icon! You can access millions of icons from the Animaker library itself 😻
Add subtitles
With channels like Facebook that get over 8 Billion average daily video views, your videos need to strike a chord with the audience whether they don’t understand your language or can’t turn up the volume.
Also, videos with subtitles improve engagement.
Now to the best part. The actionable tips:
- Choose a text from the library and see it appear on the workspace
- Type the subtitles for your video, scene-by-scene
- Customize the text to change font style, size, color, and other formatting

Like in the case of animated titles, the duration of the text (subtitles) elements on the scene can be adjusted.
Add stickers, emojis, and shapes to your video
Adding emojis, shapes, and stickers are talked less about in the video editing hacks, but, these are the little things that make your videos more fun to watch and visually better.
What do these do in your scenes?
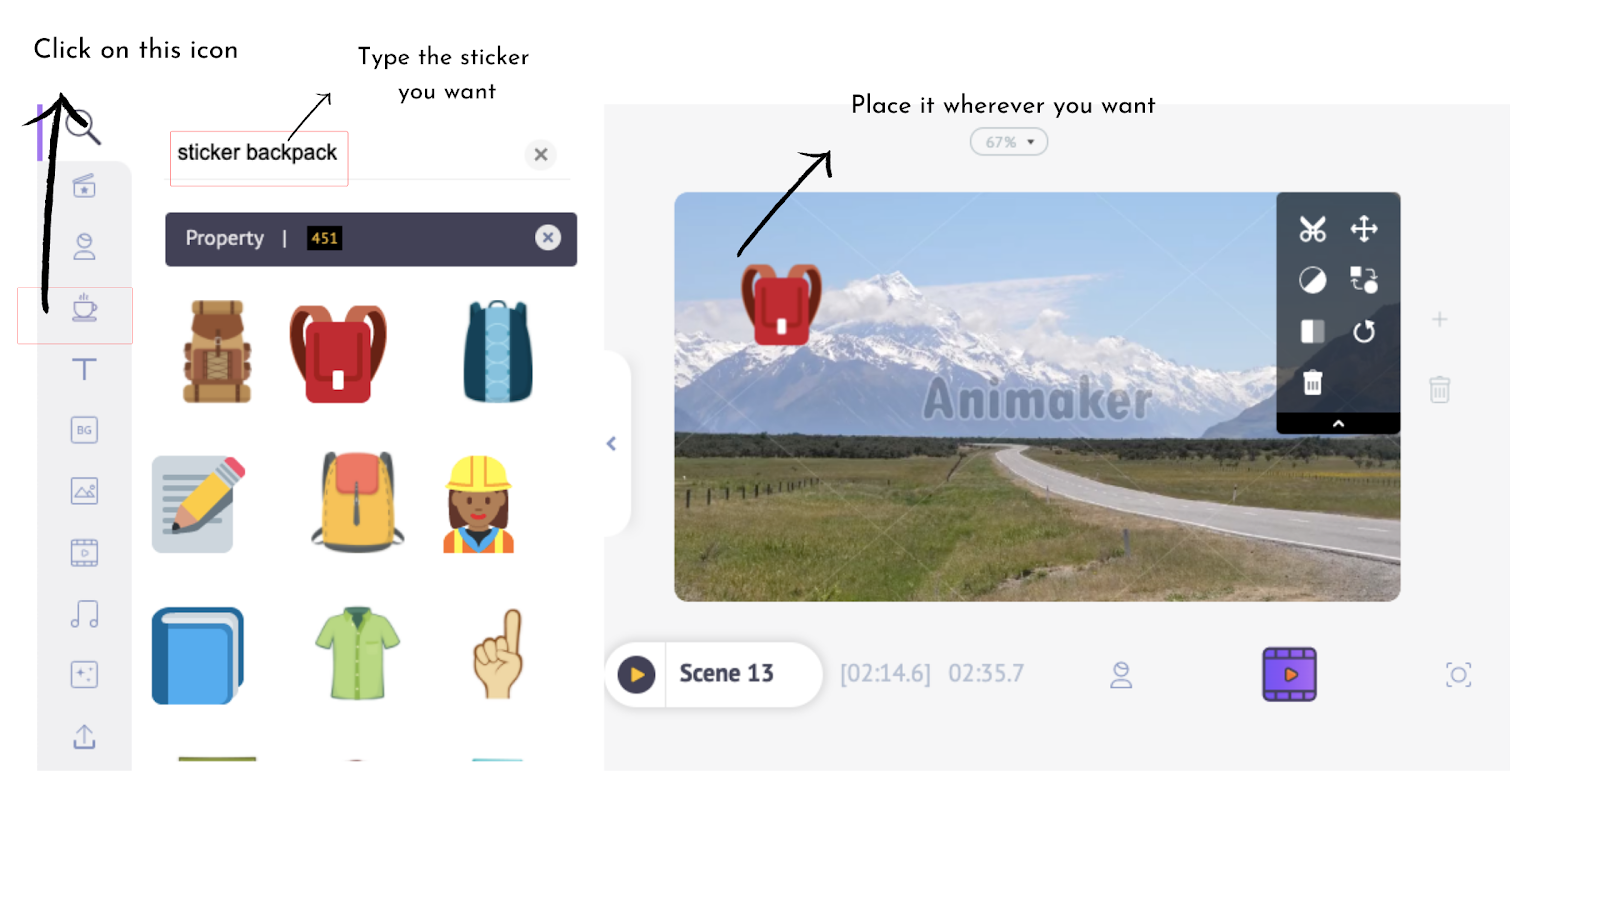
- Stickers lighten the intensity of the visuals and make the video more subtle and friendly. For example, a cute virus sticker on a video that talks about the danger of a disease can help the audience focus on the solutions rather than fretting
Click on the mug icon and type the keyword suffixed by “sticker” and choose the sticker you want. Place it on your scene.
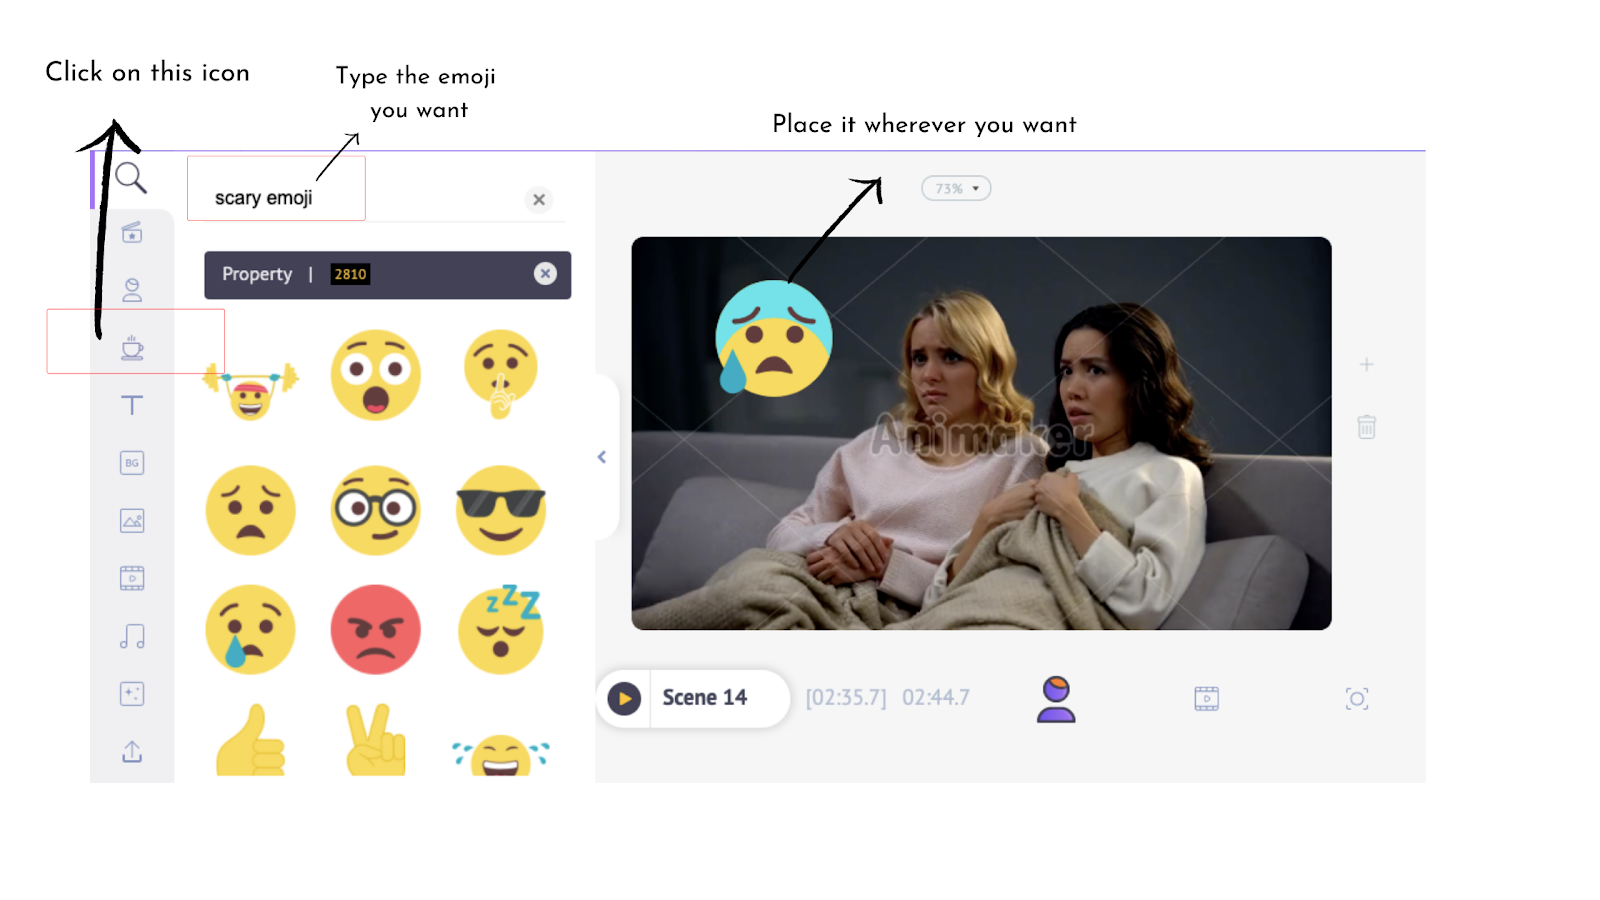
- People connect with emojis easily as they use it every day. Emojis can be added to the scenes to make it more funny and relatable.
Click on the mug icon and type the keyword suffixed by “emoji” and choose the emoji you want. Place it on your scene.
- Shapes are a life-saver when you want to use texts on your scenes and when the background is too cluttered. You can make your texts more visible by layering them on different shapes and playing around the opacity of the shape
Click on the mug icon and browse the shapes or type what you want. Place it on your scene.

Again, like in the case of animated titles and subtitles, the duration of sticker elements on the scene can also be adjusted.
💡 Pro Tip:
- Don’t be carried away by the idea of stickers and emojis and overuse them
- The idea that stickers and emojis are unprofessional is a myth - use them optimally
- While layering shapes on your scenes, make sure that the colors complement the video and adjust the opacity if required
- Refrain from using stickers and emojis on your CTA screen to prevent the split of focus
Add credits and watermark to video
Branding your videos and adding credits to acknowledge the creators is important to leave a lasting impact on the audience. With Animaker, you can upload your brand logos and add them to your scenes and also add credits with plain or animated texts!
Add filters to video
Adding filters to videos has become the millennial way of posting visual content. There’s a reason why everyone loves this. Filters can turn a bland video into anything you want - into a retro effect, black and white, add a sunny effect, and a lot more.
If you’re crazy about adding filters for your videos, here’s how you can do it with Animaker:
1. Click on the scene or the background video and see an item menu appear
2. Choose the filters option
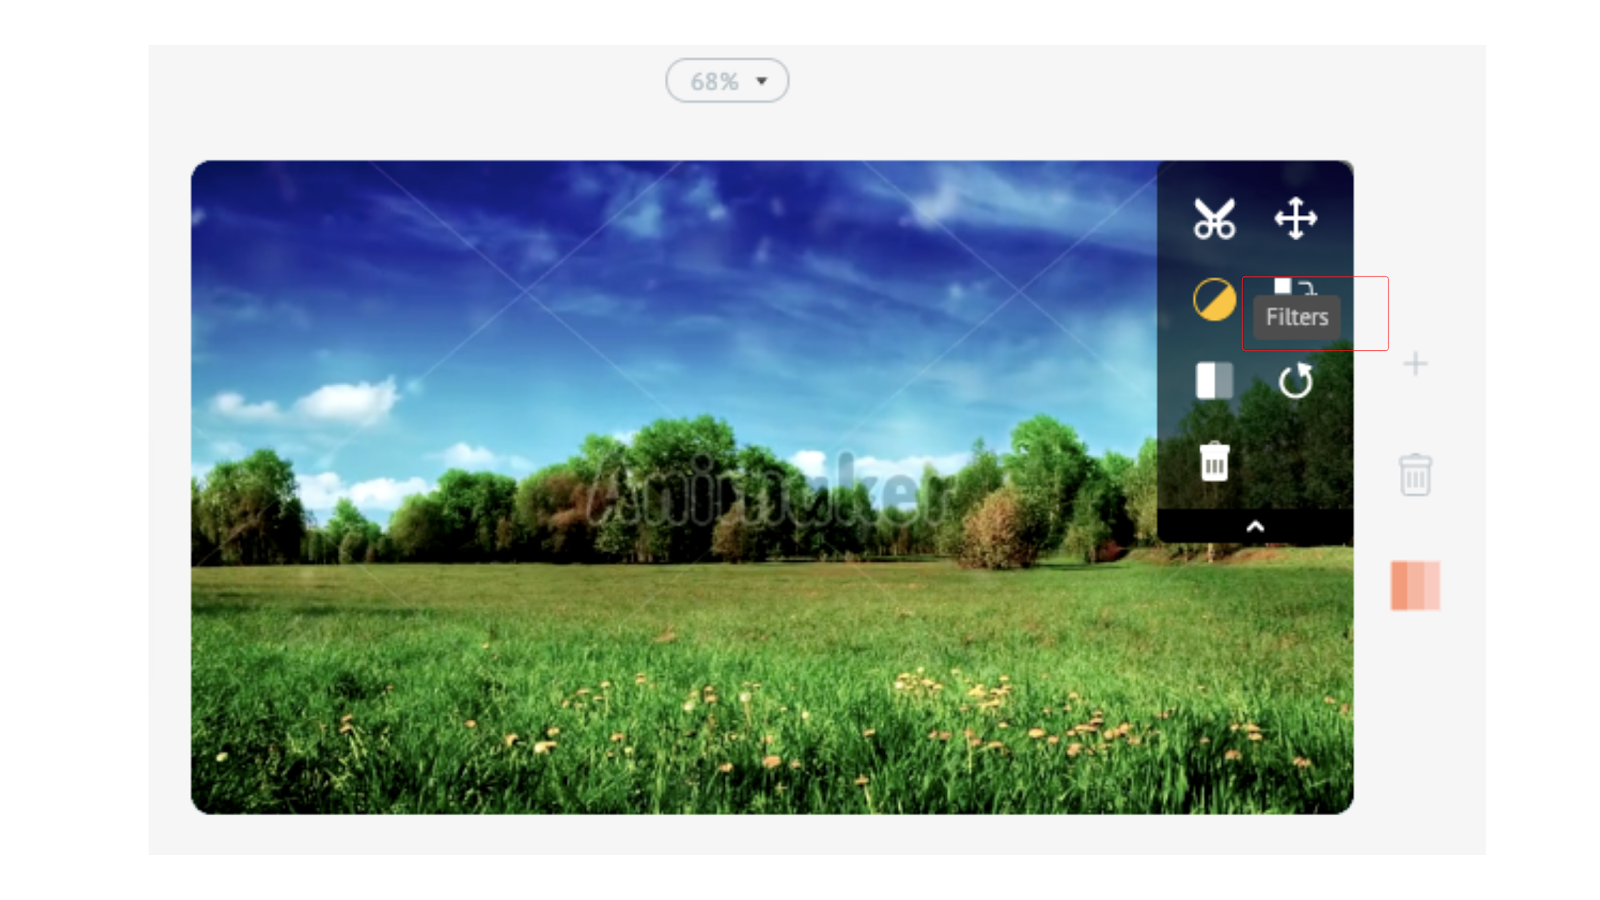
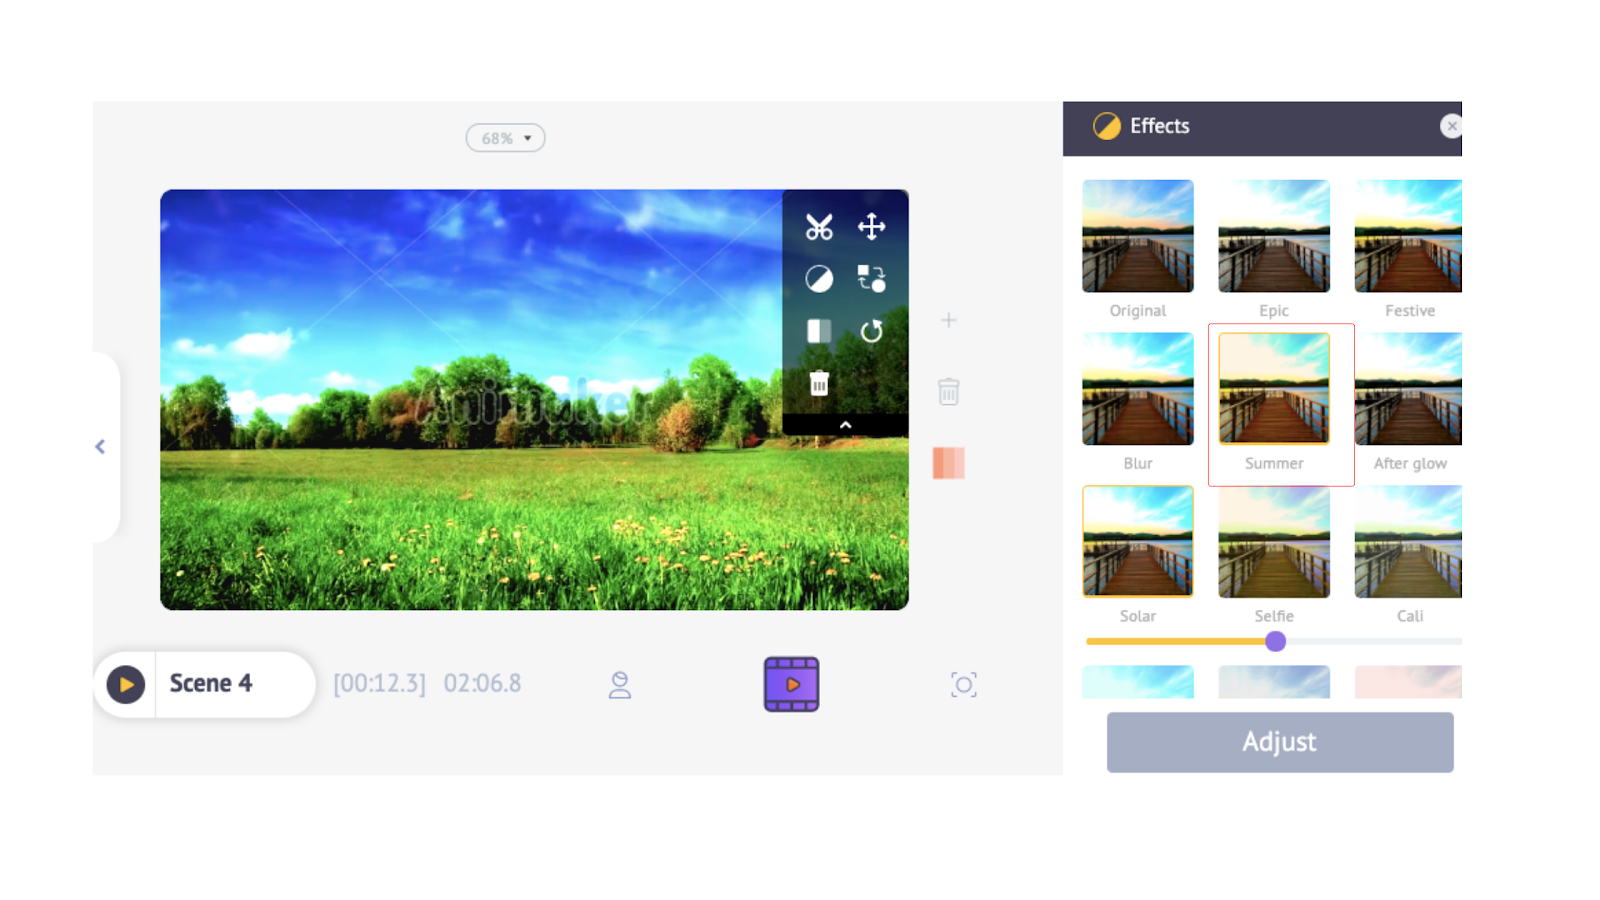
3. Scroll through to pick your favorite filter and click to add
Let’s now add a summer filter to a gloomy scene. Click on the filter and see it reflect on your video.
💡 Pro Tip:
Filters are fun and tempting to add. But, be mindful of why you’re doing it and refrain from going overboard.
- Don’t add filters for the sake of it. Be tasteful and picky with the reasons
- Layer the filters with texts that complement the color of the background
- Make sure to maintain the consistency of the color, feel, and texture throughout the video
- Don’t add different filters for every scene
Use screen effects
The videos we see today are far from having formal intros and boring designs. From big brands like Starbucks and Adidas to a budding Youtuber, and even a B2B marketer is trying to set a tone, personality, and a voice for their brand with videos.
Adding a personality to your brand through videos lies in the choice of colors, concepts, themes, and keeping it casual. But, to make this possible for your videos, you don’t have to be a huge brand.
With pre-built screen effects in Animaker, you can pick from tons of choices to add that extra quirkiness to your videos and let’s see how:
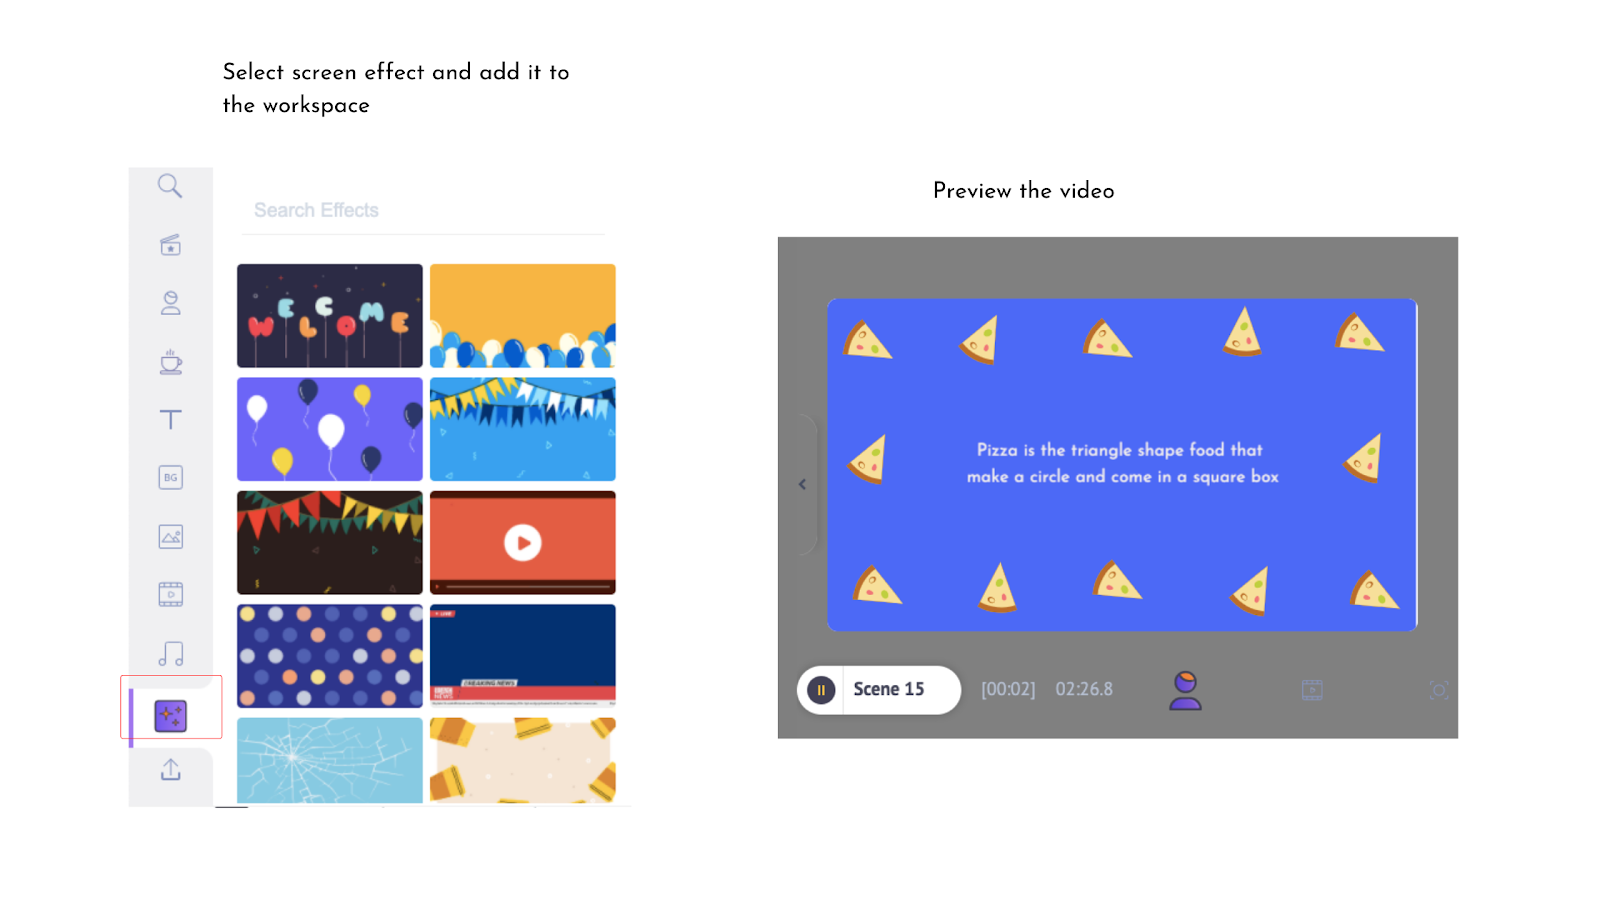
1. Click on the “screen effects” icon in the library
2. Choose the screen effect you want
3. Add it to your scene, layer it up with a nice text, and watch it instantly make your video wonderful!
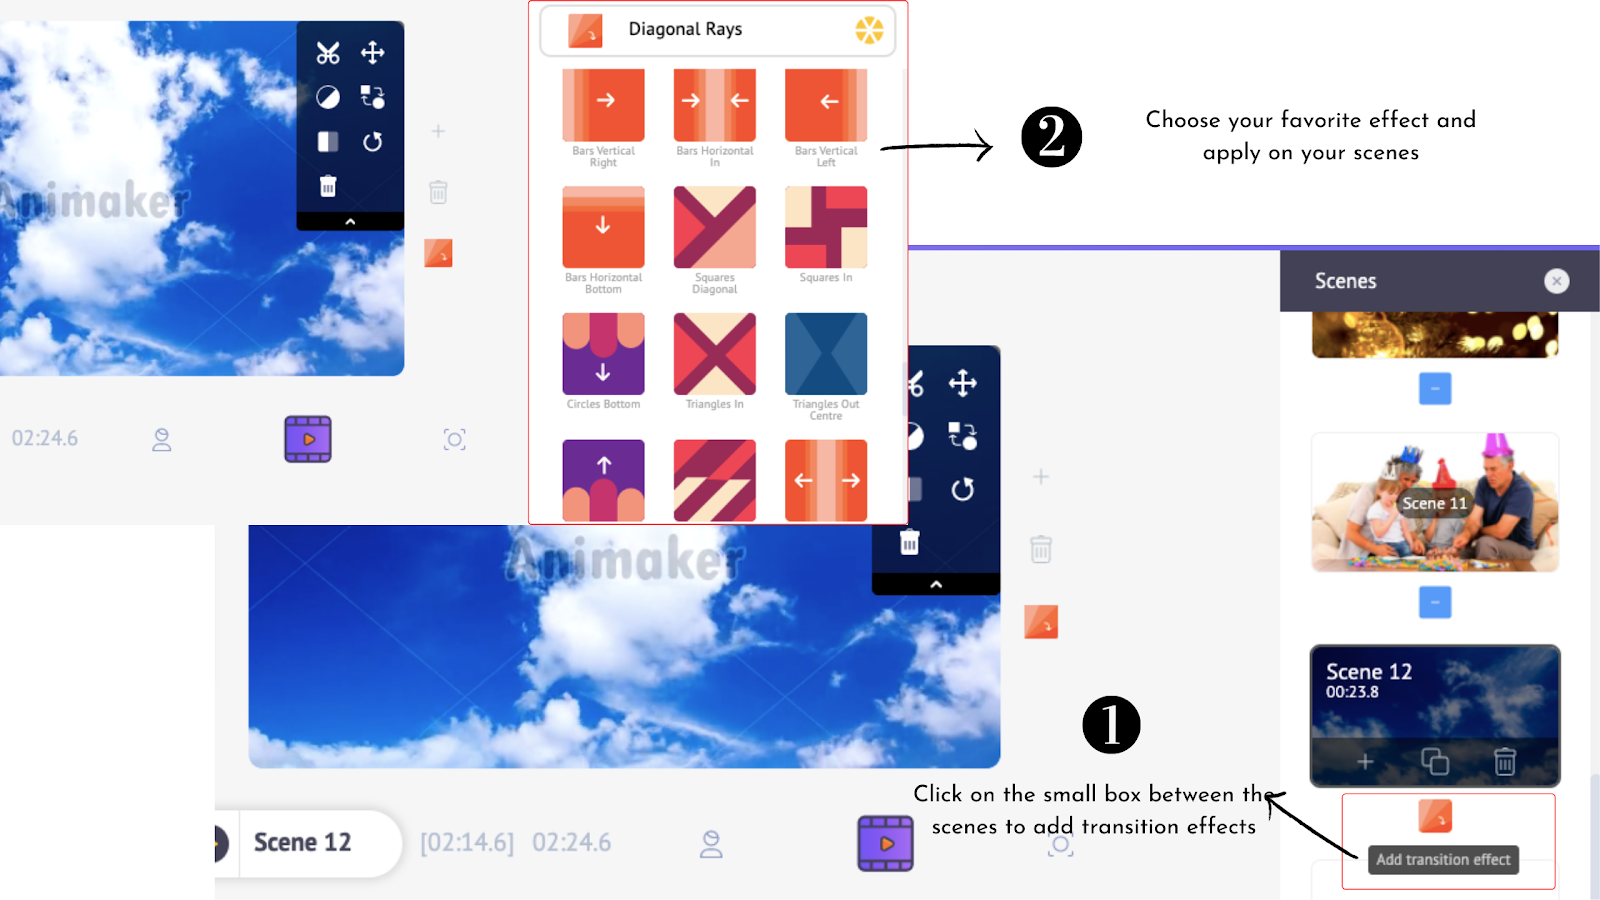
Add Transitions
The connectivity between stand-alone scenes is what makes a visual with a flow and story. Videos are distinguished from other forms of visual because of the loop and continuity.
An editing tool that supports this is the “transition effect” that adds narration, mood, and emotion to your videos. By definition, a transition is exactly what it does - “It brings cohesiveness while changing from one type to another without any visual cue.”
Let’s now see how to create transitions using Animaker:
III. Jazz up with the right dose of audio editing
Add voiceover to video
There are different forms of narrations to a video. It could be using a subtitle or just adding a fitting audio track that perfectly syncs with the theme of the video. The most popular form is adding a voiceover that takes the audience through the video like narrating a story.
This keeps the audience glued more than anything else! So, there are different ways in which you can do this:
- Text-to-speech
- Record voice over
- Upload recorded file
The good news is that you can do all of this with Animaker and let’s see how:
1. Click on the mic icon on the left end of the timeline bar and see a menu expand with three options - record voiceover, text-to-speech, and upload voiceover
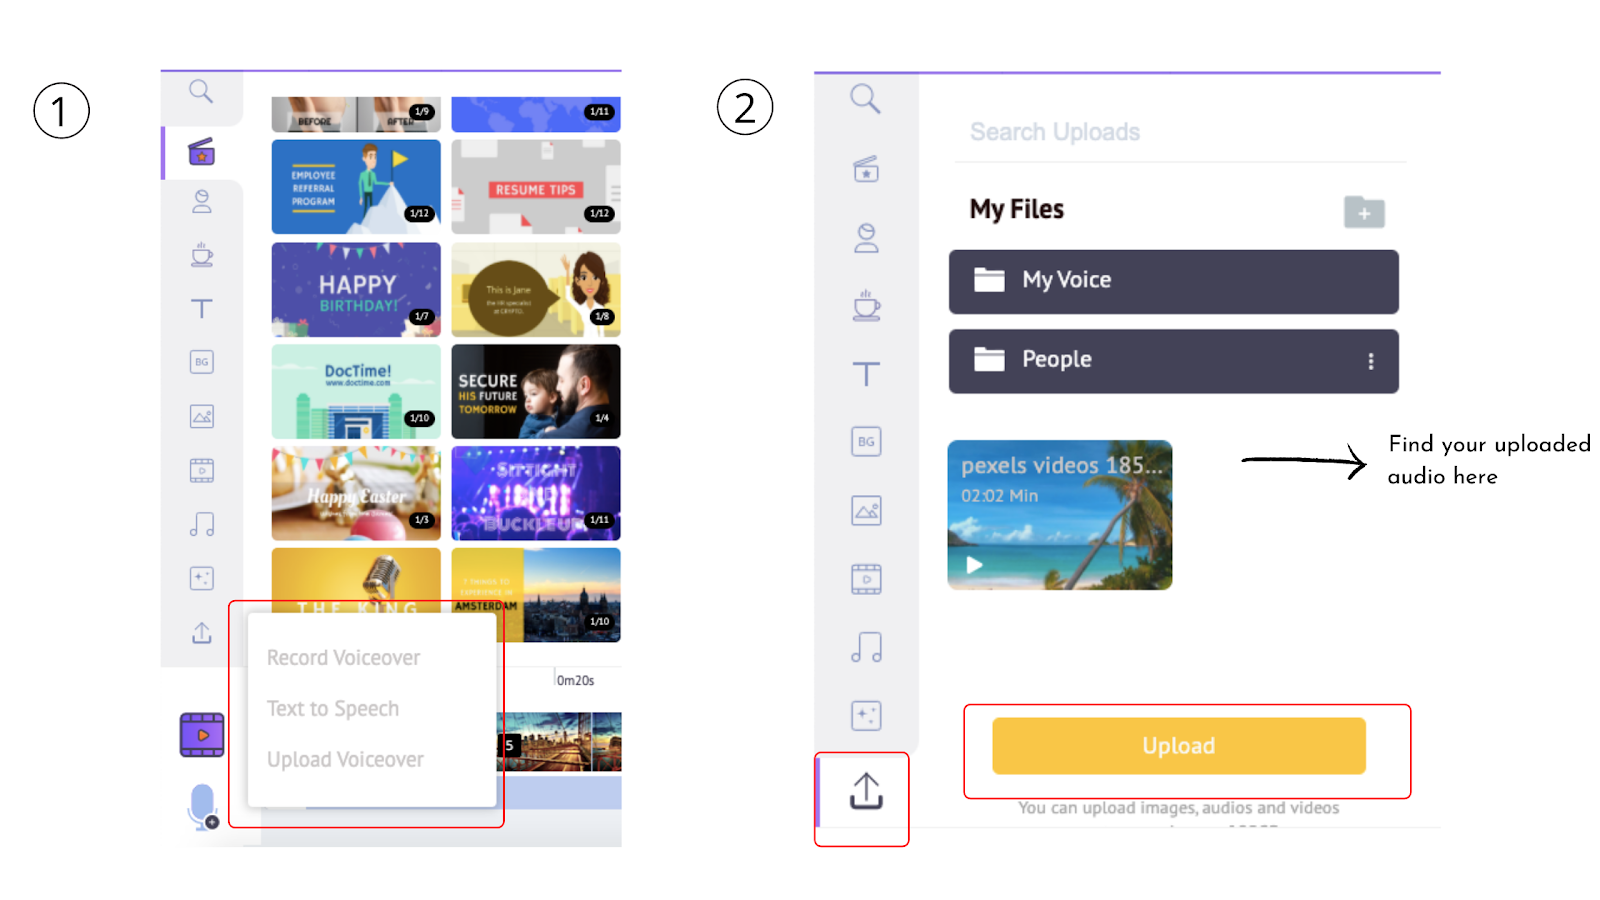
2. Choose the voiceover format you prefer
3. Sync with the video
💡 Pro Tip:
If you’re recording a voice-over make sure you do the following:
- Have the script within reach to prevent stammering or losing the flow
- Add some pauses and speak confidently. Avoid sounding monotonous and robotic - Keep it natural and breezy
- Keep water or some drink within reach if your voice begins to crack
- Use a mic or plugin noise-canceling earphones to eliminate ambiance noise
- Practice a couple of times before going live
- Be ready and willing to re-record (if you have the flexibility) in case if something does not go well
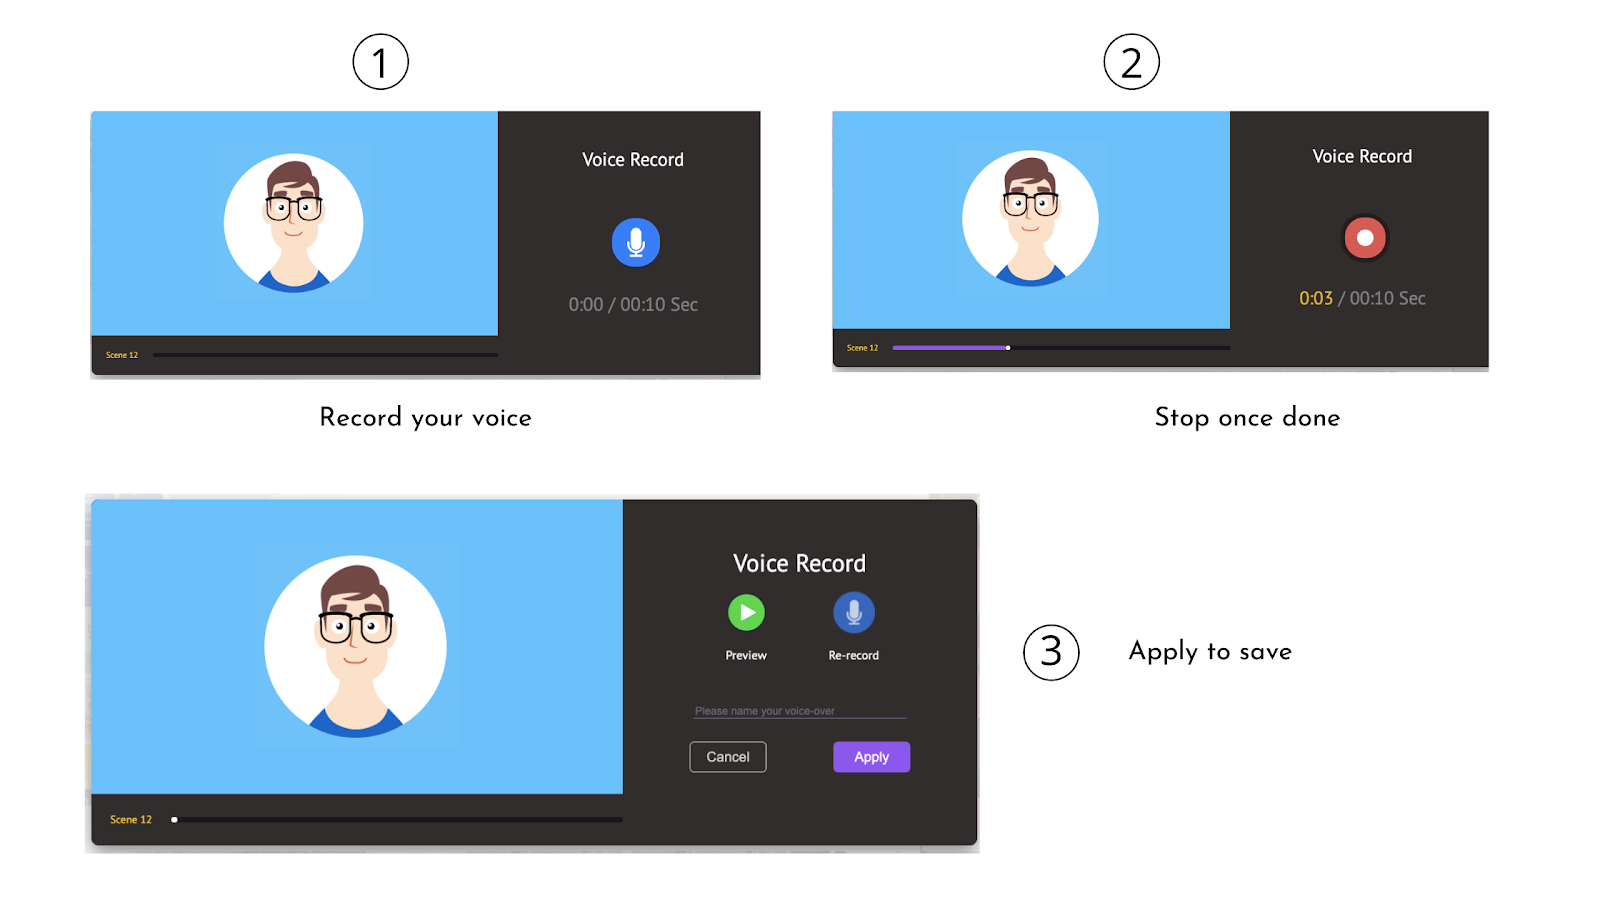
Record your own voice
Text-to-speech

Trim audio
If you like a particular portion of a long audio track and want to chop off the excess and retain your favorite portion, it is quite easy to do that with Animaker.
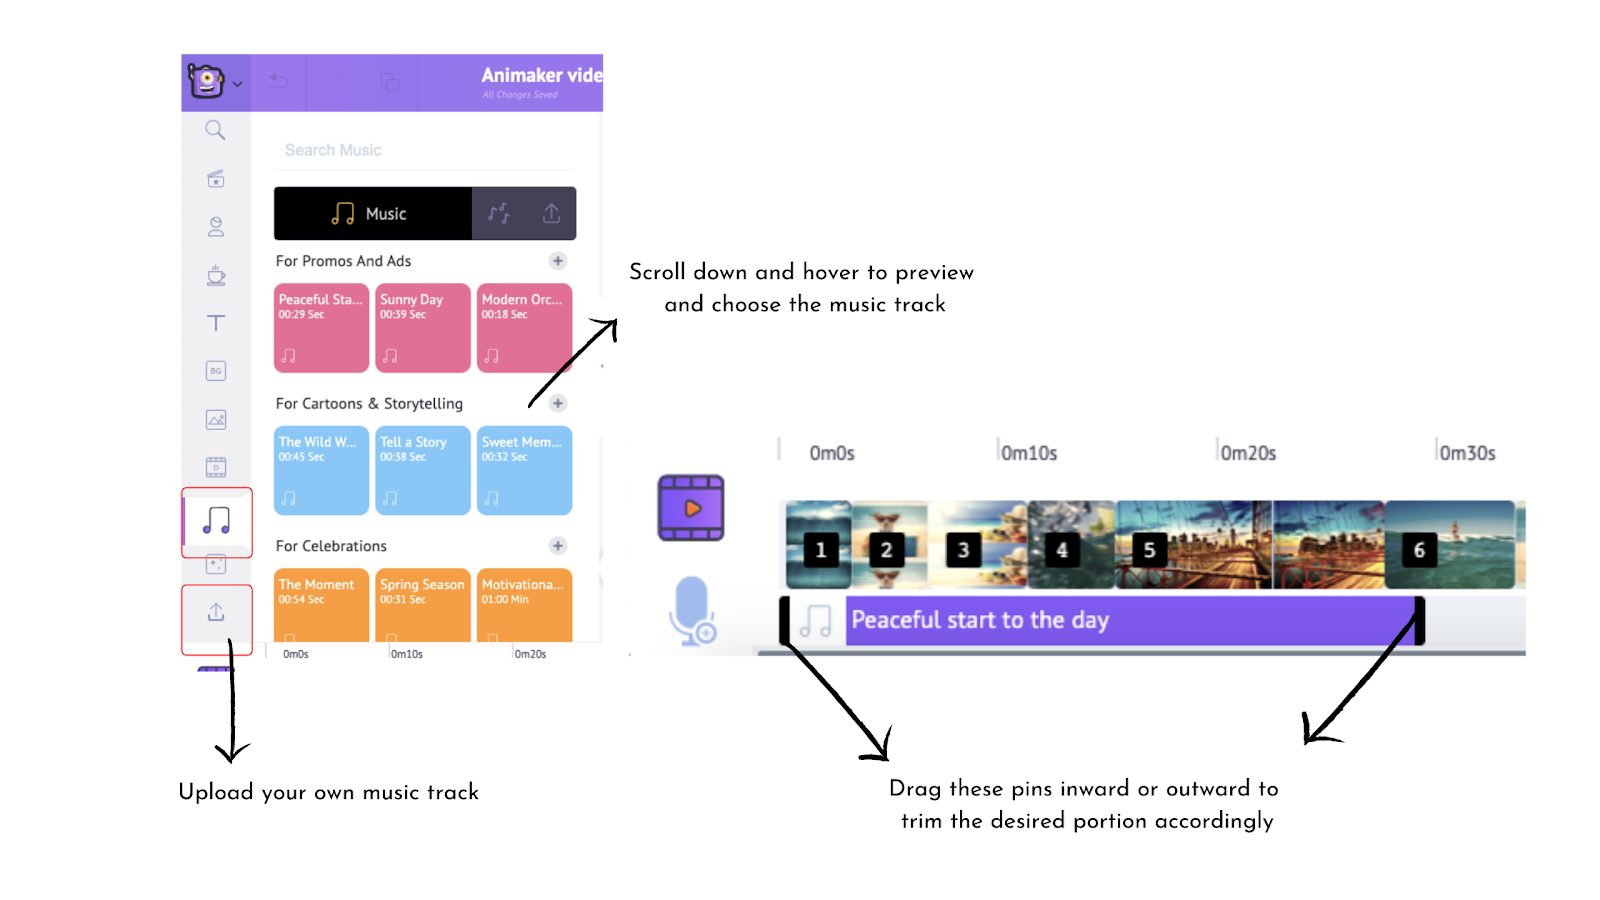
Let’s see how to add music to the video and trim that music track:
- Choose from hundreds of music tracks in the Animaker library or upload your own audio files
- Click on the audio track and see it appear on the audio timeline
- Drag the pins on either side inward or upward to freeze the audio portion you prefer
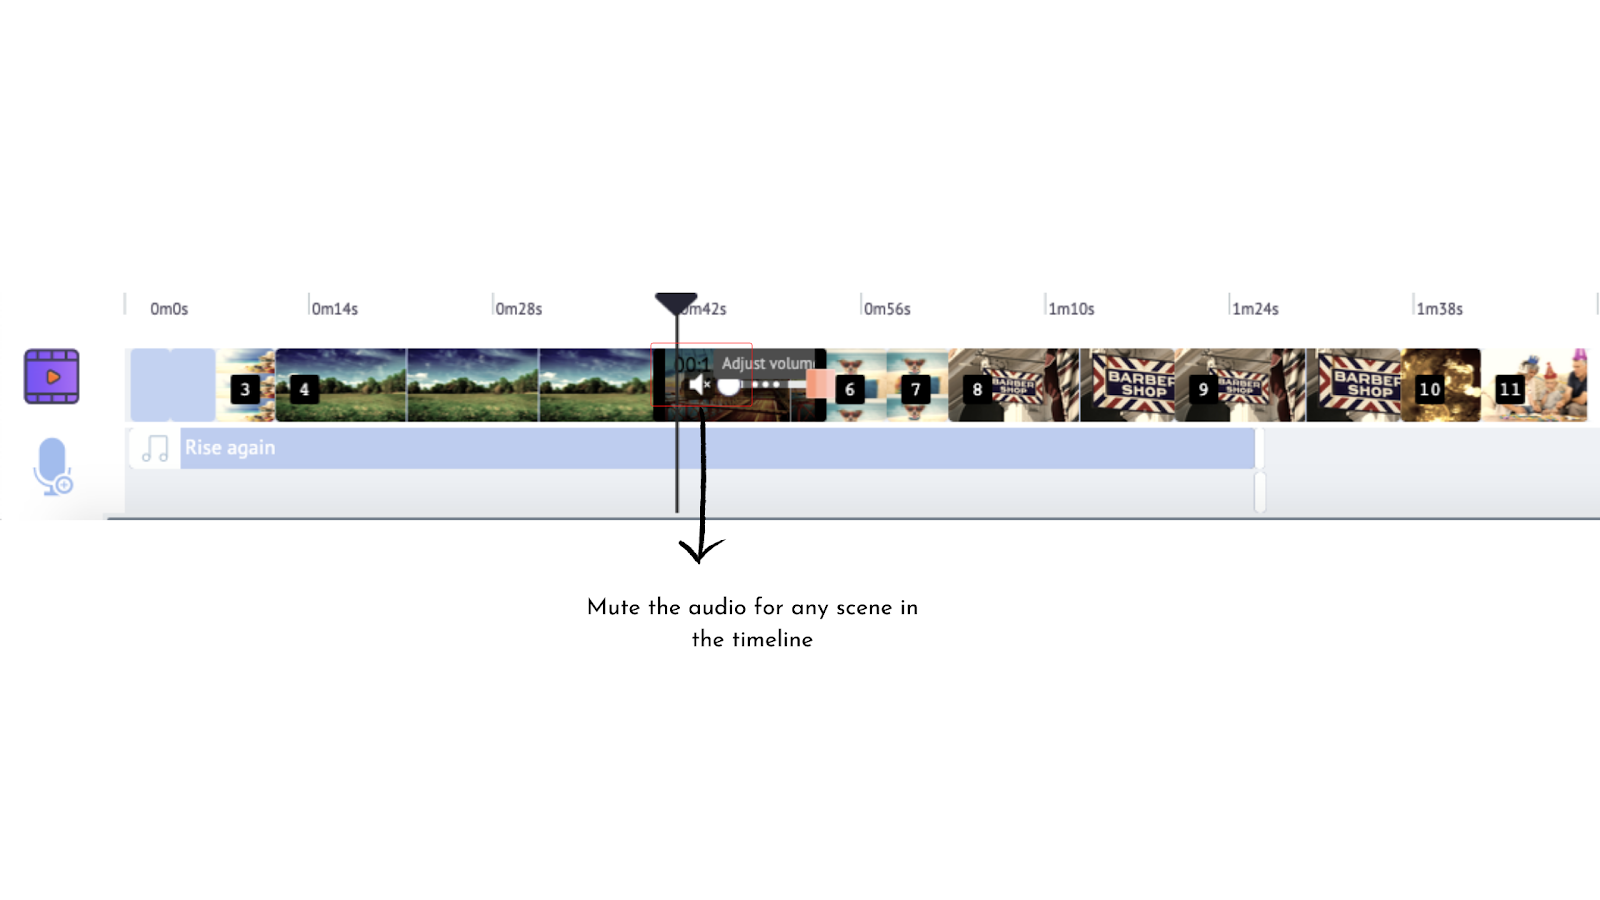
Mute video
You can grab the attention of the audience and minimize distraction by muting the audio for certain scenes.
You can do it in Animaker in a single simple step. Click on the scene in the timeline that you want to mute the audio for and mute the scene or adjust the volume on the audio symbol.
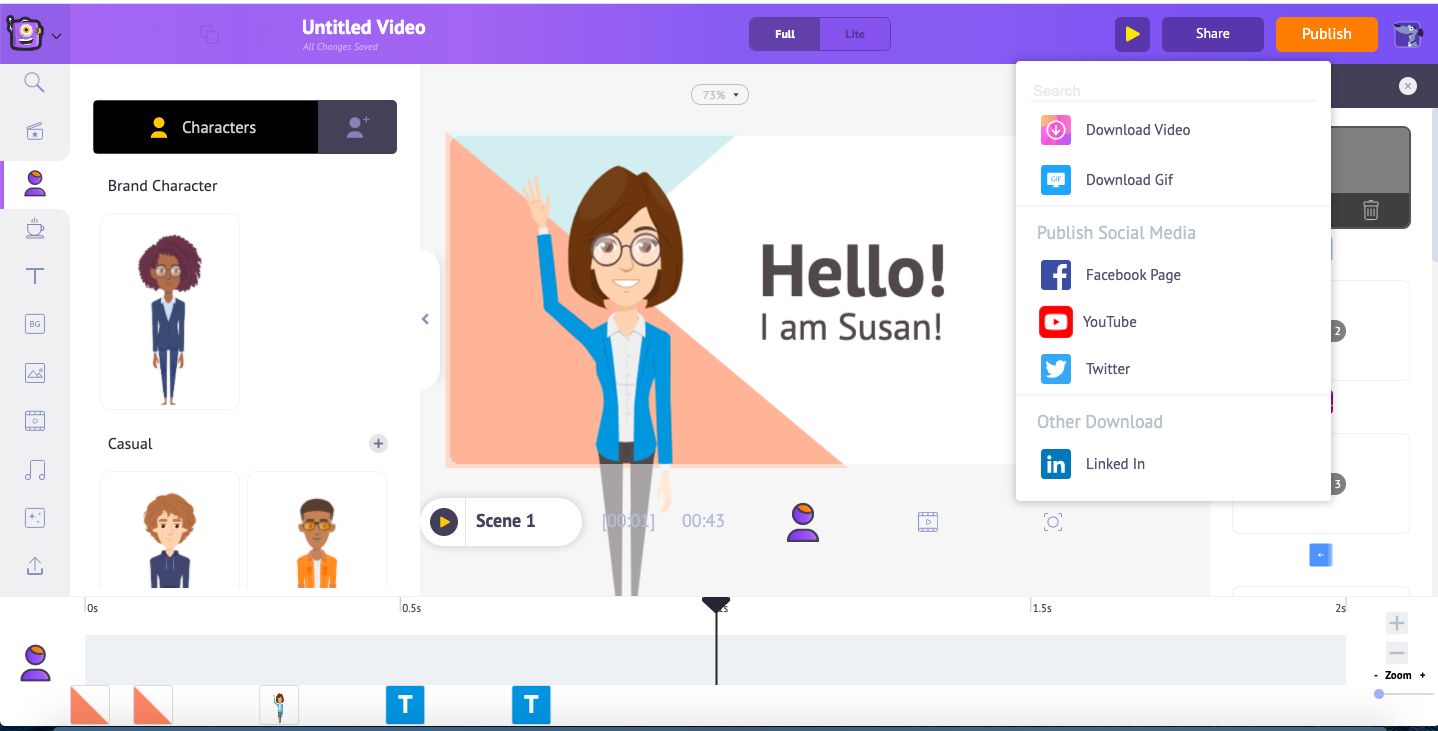
IV. Export
Once you are happy with your output, you can download the project in any resolution you want. You can go up to 4k video quality on Animaker.
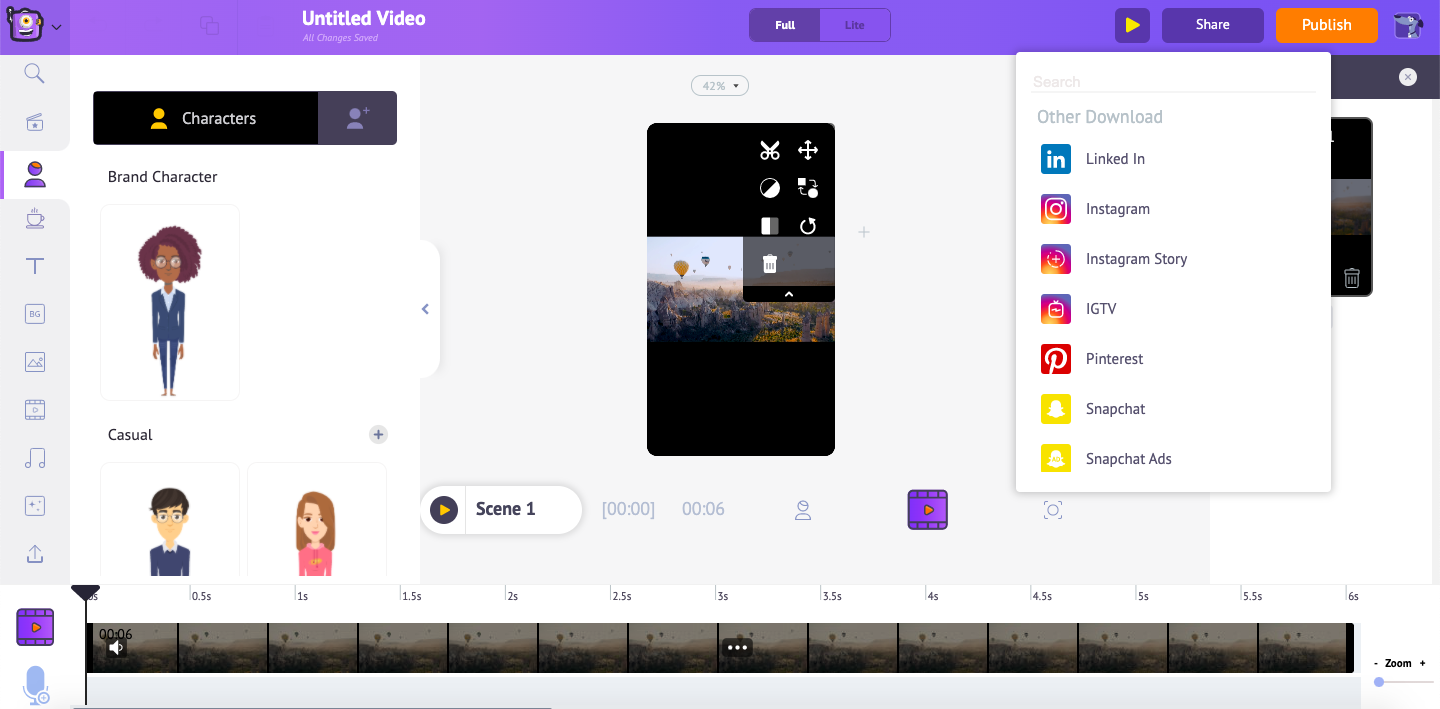
- Click on the publish button
- Download the video or directly publish on social channels
Wrapping Up
All the favorite movies and shows that we enjoyed watching did not magically turn out to be epic. The crux of a good output is the hours of quality editing that go behind it and this holds true for content in any format.
In fact, one of the iconic movies in the history of world cinema, Avatar, took ten years to edit and make it what it is. So, whether you create a small video or an extravaganza, remember one thing - Edit, edit, and edit again.
You can also use professional video editing software to edit your videos. Hope you enjoyed our tips, tricks, and best practices of video editing. We’d like to know your favorite hack in the comments✌