How to Make a Video? [Five Simple Steps to Awesome Videos]

Ranganayaki R - December 16, 2020 - Leave your thoughts. 17 min read
Let us consider two different situations. Personal and Professional.
Personal: Your anniversary is soon approaching. You have booked a table at your favorite restaurant. You have chosen the perfect gift. You have even transformed yourself from your usual sleep-deprived, lazy self to a presentable person.
But you feel that something is missing and that a personal touch is required to woo your partner...
Professional: A critical client meeting is around the corner. It is a huge client. You want to floor them with your pitch and close the deal. You have a great idea in hand, but you do not want to bore them with the same old, lifeless PPT or Doc.
You are in dire need of an attractive, engaging method to impress the clients and your team. You want your pitch to be etched on people’s minds, convincing them to buy it. You want to impress them with your A-game...
As much as these scenarios have nothing in common, there is one solution that would deem fit. Good for you, cuz you have correctly sought the right and easiest way out.
Yes, Videos! If you want to convey something in an appealing, likable manner, videos are the way to go! If you feel that visuals and sound can improve the overall experience… videos, it is!
So, to help you make that perfect video of yours here is a step-by-step guide. And you can refer to points based on the scenario you are looking for.
***
Step 3: Choose your Video-making Path
Step 5: Edit, Publish and Promote
Let's see the steps one by one.
Step 1: Understand the Goal
A good start equals 50% of the job completed. And the first step in making a video is to understand the goal. Only if you know what you need to achieve will you work towards it clinically.
Imagine working towards the wrong goal from the very first place? It would end up being a waste of time, waste of effort, and so on.
You have to consider your audience's minds. Certain things are a MUST, while others are a BIG NO-NO! Figure out these two and differentiate them.
For Personal, you might want to make your wife’s birthday special. It might even be a cute gesture from you of givingto give her a creative gift. For Professional, the goals may be to get your startup idea funded, getting your team motivated, etc.
So, find the purpose, understand the goal, and get going.
Step 2: Write the Script
You are going to make a video. And you SHOULD be writing a script. As much as the blueprint is essential for construction, a script is vital for a video. And for the script, order and flow are quite important. Your video would make sense only if it has a proper flow. It is 1 2 3 4 and not 3 2 1 4. With the proper flow, load your video with wow factors and carve that fantastic script! Carve it in a way where the audience asks for more instead of awaiting the end! Here's an article that can be of huge help to your script-writing!
In short, become the audience and think like them. Make a proper plan and carve the script accordingly. Only then can you come up with an excellent video confidently like this...

Step 3: Choose your Video-making Path
Your script is ready. The next obvious step is to look for ways to create that awesome video of yours. You can use one of the following methods to make your video:
1. Appoint a new team
Appointing a new team would involve a huge budget. It would require scriptwriters, video makers, editors, and other technicians. So, if you are ready to shell in those bucks, you can very well appoint a new team to create your video!
2. Choose Video-making agencies
If hiring a team did not pan out well, you can seek the help of the right animation studio. Such agencies would house professionals who have been creating such videos for years. So, it would go without saying that you can give them the job and expect a top-notch outcome. But quality comes with a price. So for this, you would have to make a huge investment.
3. DIY (Do-it-yourself) Tools
The easiest way to get your job done, under the supervision of the most trustworthy person (You, of course!), is to make use of DIY tools! DIY video-making tools like Animaker are a boon for both simpletons and the sophisticated. Since these tools are filled with everything you need to make a video, right from properties to background music, all you need to do is drag and drop the elements and compile them into a beautiful video. Even if you know nothing about video-making, these easy-to-use tools will help you on the go!
The best part is, it is suitable for both personal and professional videos. The first two methods would involve the investment of money. This method, however, would involve only the investment of your effort.
Chop chop! It is time to make the video.
Step 4: Make the Video
Now that your script is ready, it is time to buckle down and set the stage for the actual process: MAKING THE VIDEO!
If you are wondering how to make that video of yours, there are two different ways.
1. How to make a video with an in-house team/Video-making Agency
When you are making the video with the help of an in-house team or an external agency, you should ensure that the team and you are on the same page. Only if you convey the idea and the requirements entirely will they create a video of good quality. So, here are some pointers for hiring a team/agency:
- Do a background check on the individuals/team. You do not want to be hung up with a bunch of make-believe video makers, do you?
- Make a comparison before zeroing in on an individual/team. You need the best at the end of the day.
- Once you are done selecting the team/agency, allow them to understand your company and its brand appeal to consider these factors while creating the video.
- Always convey the idea in an understandable, workable manner. If the creators do not understand what you are saying, poof! It is a waste of time for both ends.
- Do not wait for the final draft to land on your table. Ask the creators to provide WIP (Work in progress) so that you can point out changes then and there.
- Follow up. Be involved always. Sometimes, people can get a little lazy. That should not affect your work. So, keep an eye out for progress and check up on the creators so that they do not end up getting irritated!
- Be consistent throughout. Your idea/vision should be the same on the first and last day. Only then will the creator be able to meet your needs.
- Do not compromise on quality, trying to save money. Throwing in extra bucks for a top-grade video can be helpful in the long run.
- If you are thinking about saving some bucks, you can choose a team/agency associated with you for a long time. Choosing them for a one-time task can cost you more.
2. How to make a video using a DIY tool
Be it for personal or professional videos, the steps involved in creating a video is the same. But you can choose between two options as shown below:
Edit a photo video template:
This is the easiest and quickest way to create your video. You will simply have to replace the text and images (if necessary) in the template, replace the background music, and download the video. Voila! You are done!
If you are not convinced yet, here are some videos from our Moments section that will help you.
Personal:
Professional:
You can select any video from above and start working on it. Or, you can very well visit our Moments page to check out the other templates too. Now that we have selected our Moment, the next step is to customize it according to our needs. Here are the steps:
1. If you are going to choose a video from above, all you need to do is select the “Use” button. This will open a new project.
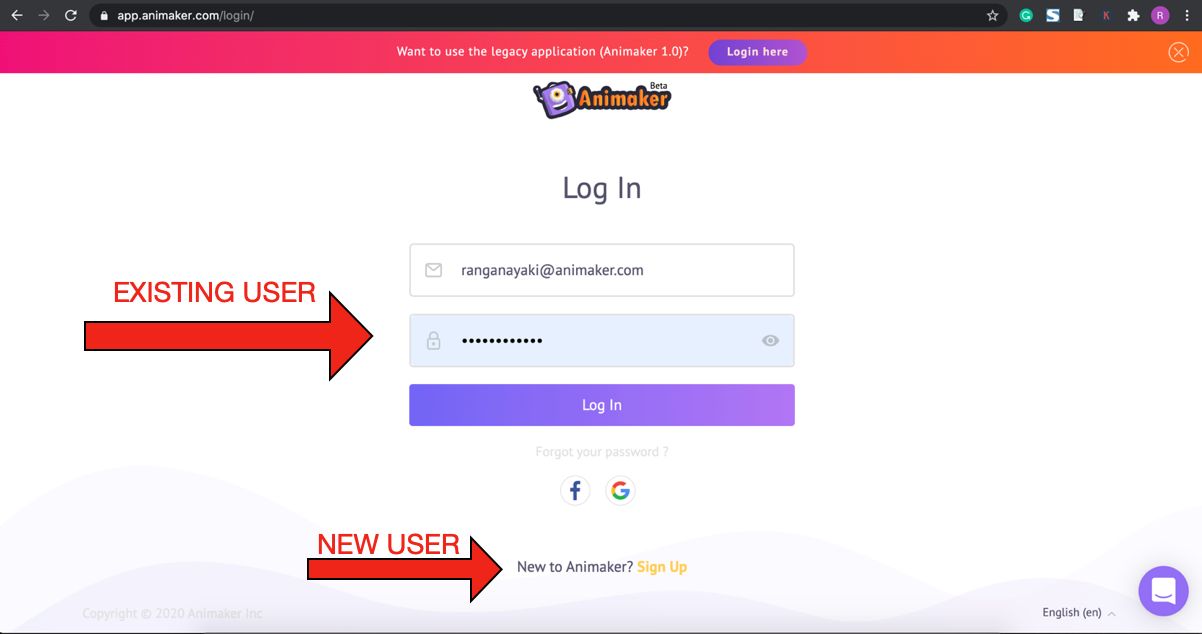
But this will happen only if you are registered with Animaker already and are logged in. If not, click here to sign up. Once you are done signing up, click on the “Use” button above to open a new project.
If you are already a user of Animaker, click here to log in.
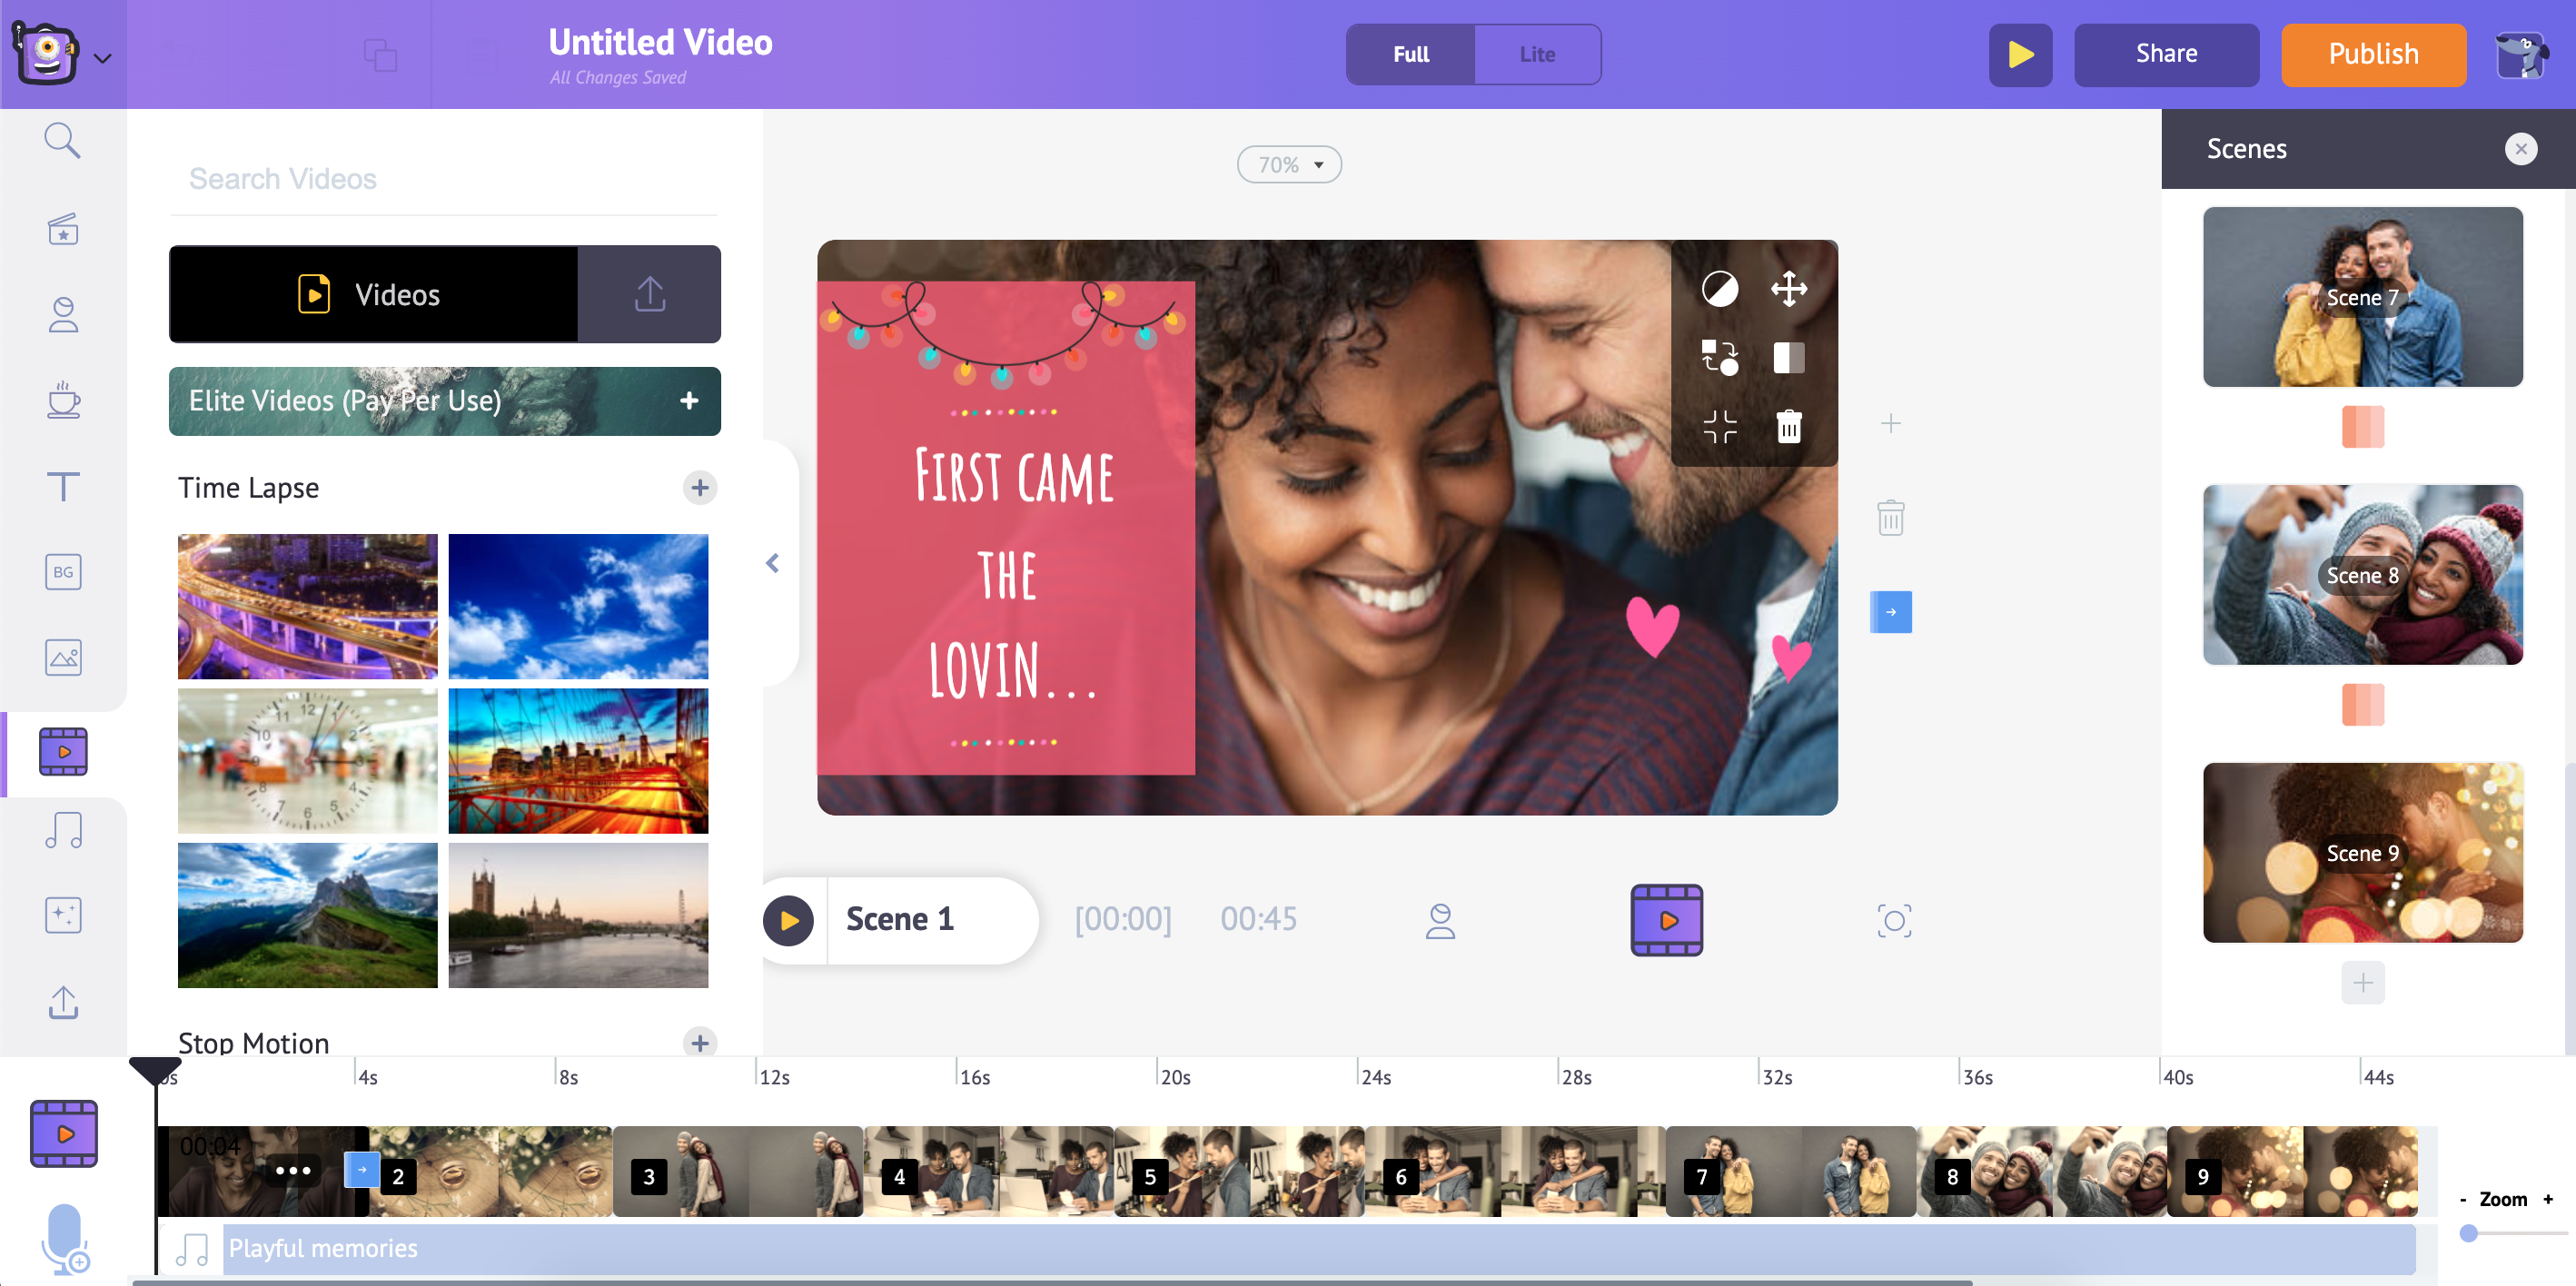
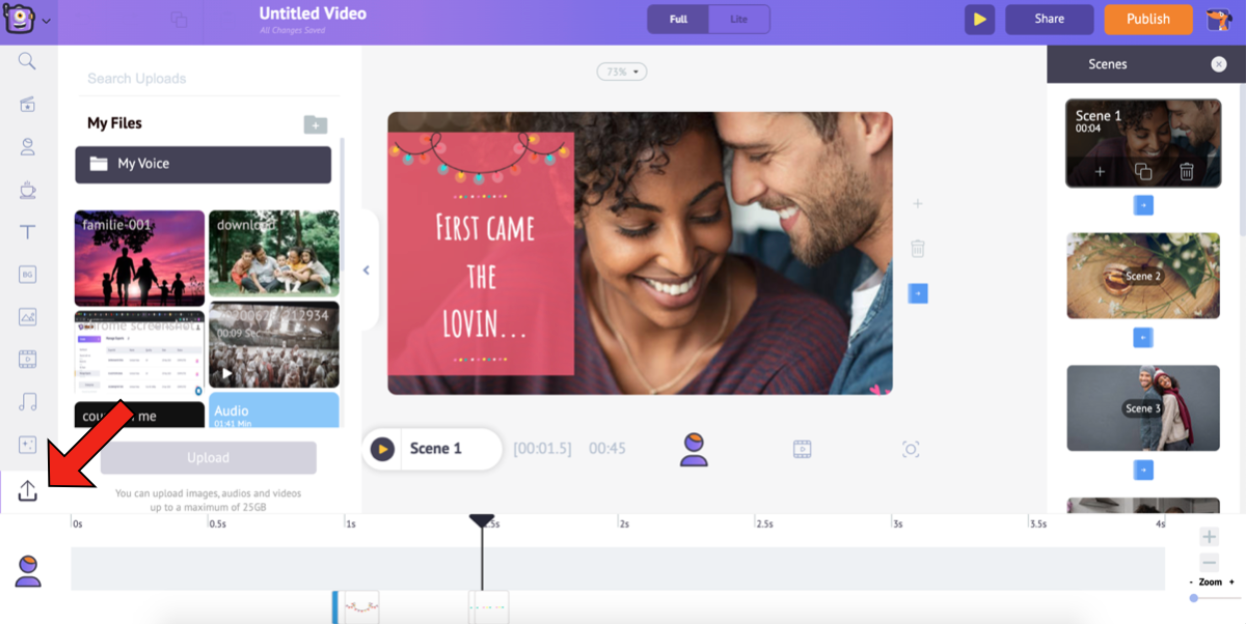
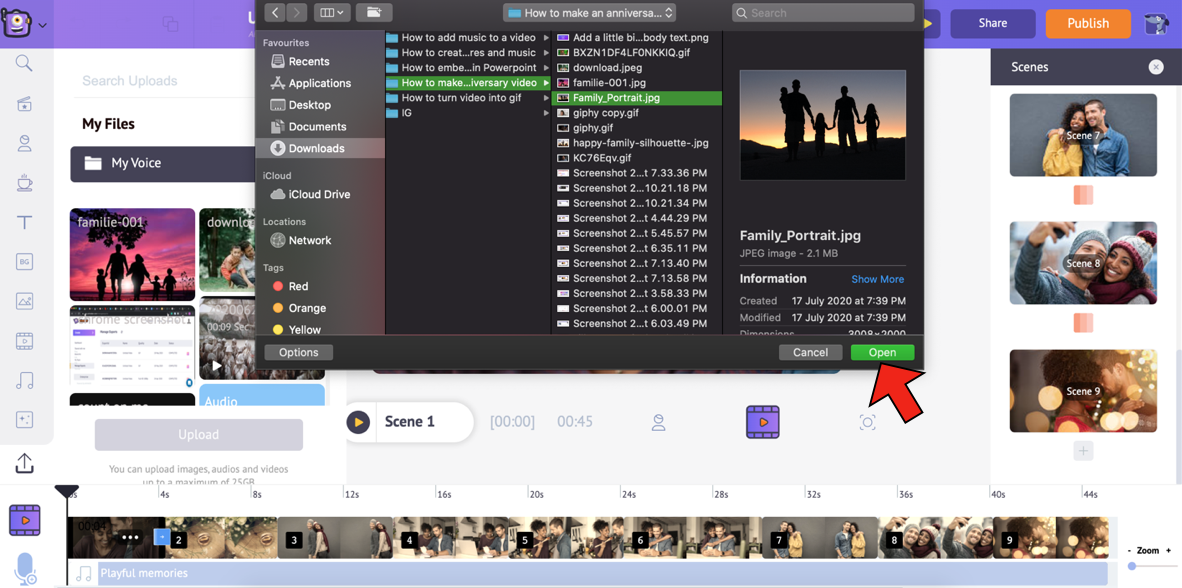
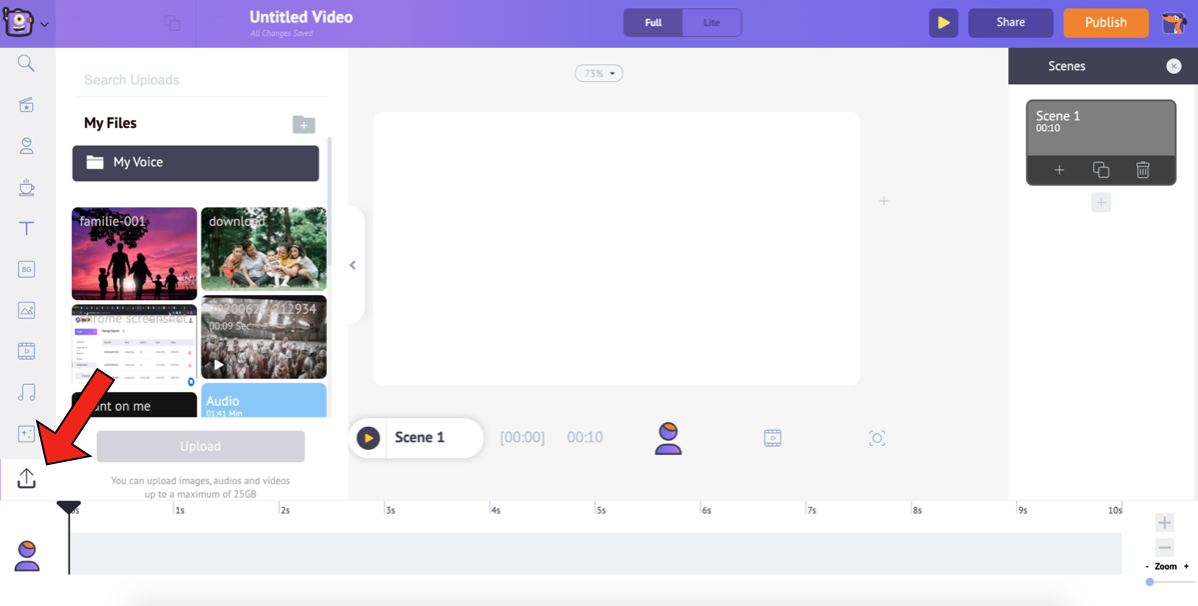
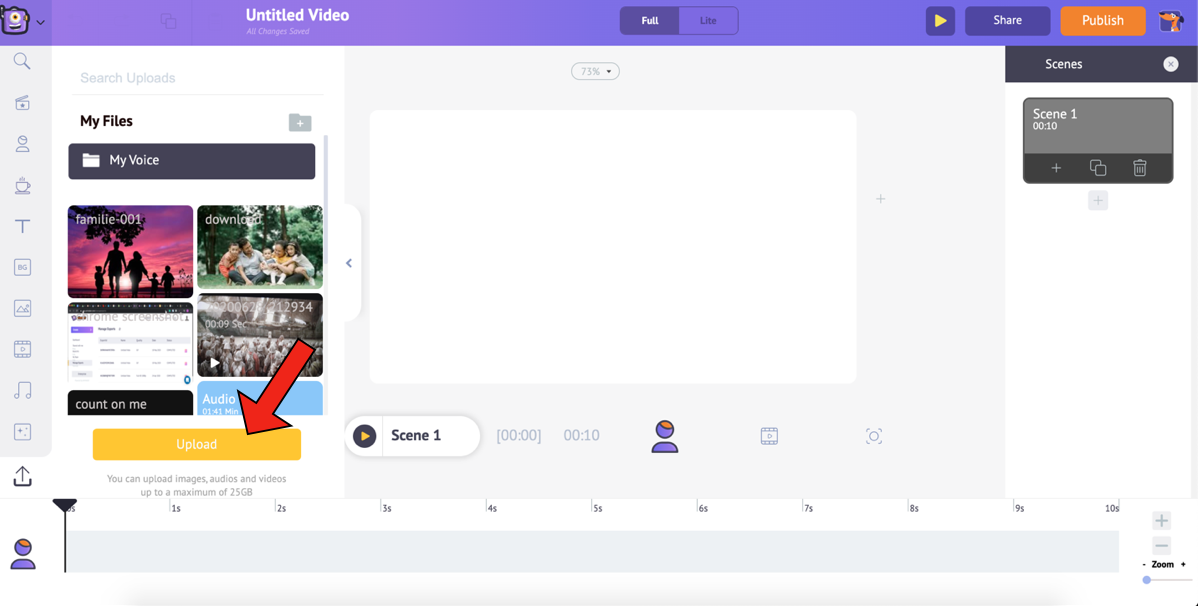
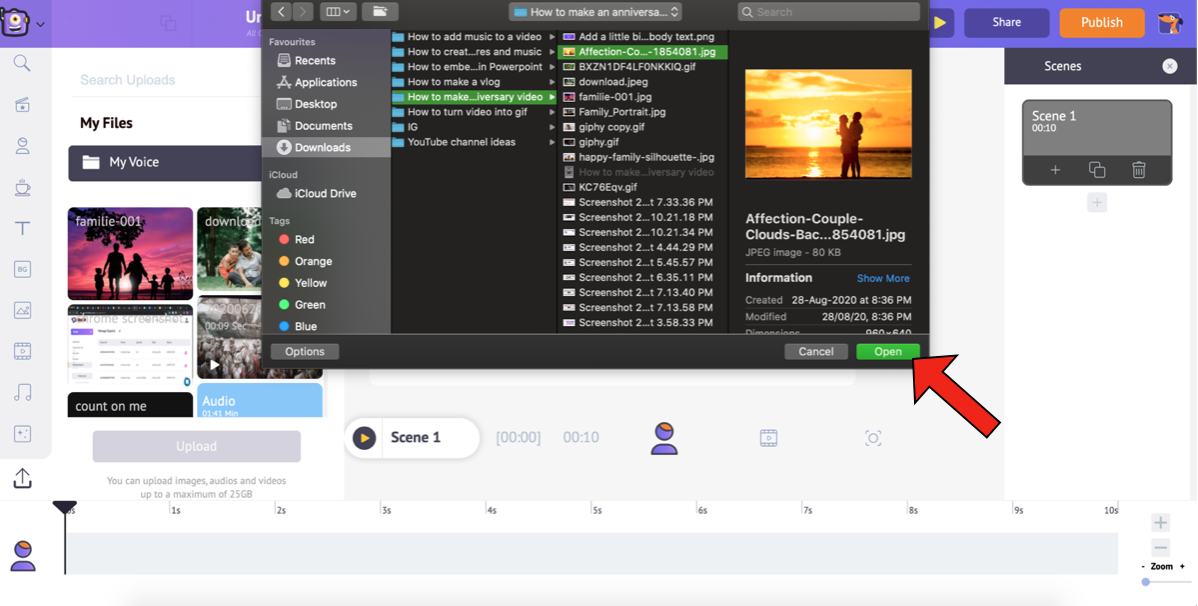
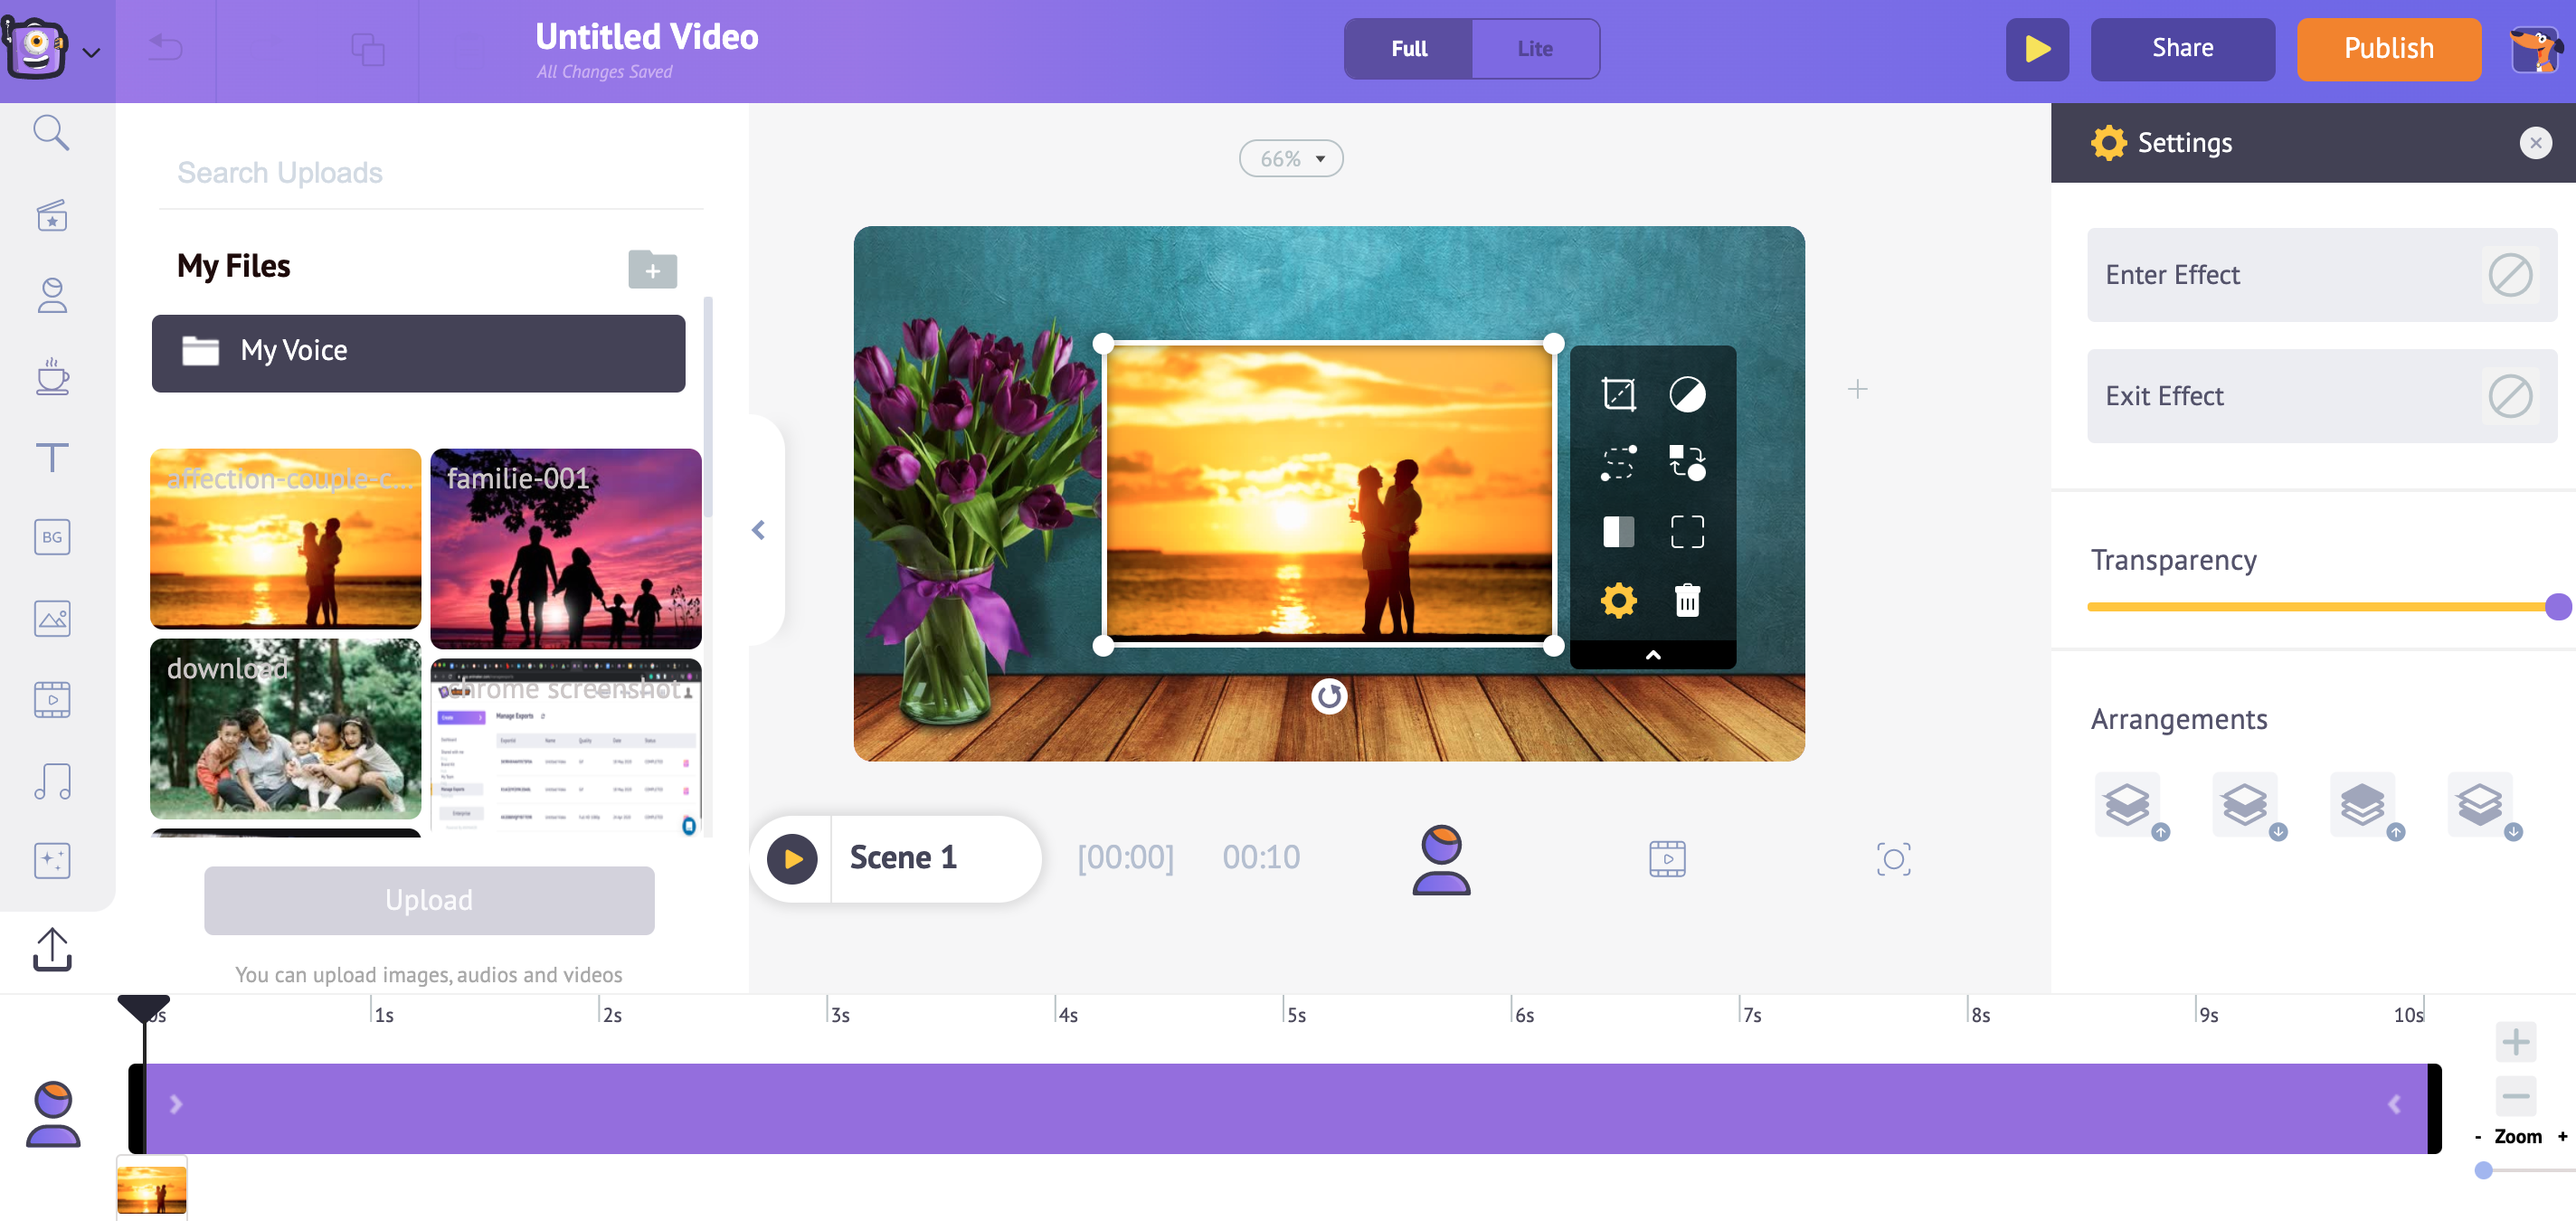
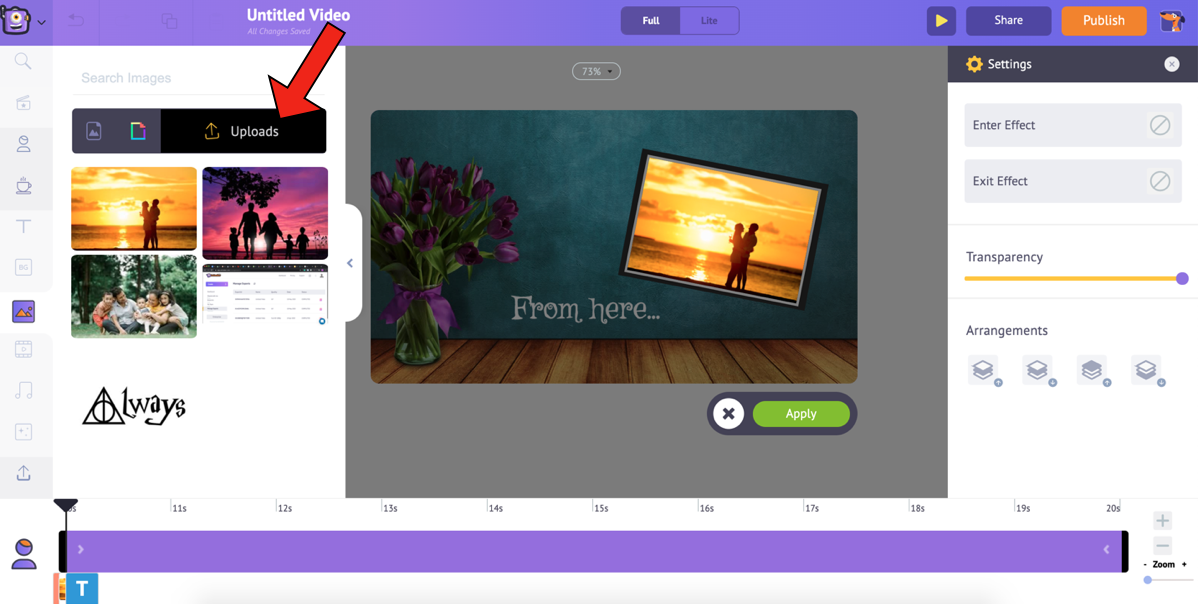
2. After you sign in, a new project will get opened. You will see that the template has everything needed for a video. All you need to do is, swap the pictures in it with yours. Let us start by uploading your images one by one to switch the existing photos. Choose the file that you want to upload from your local storage. Click the Upload button, navigate to the file, select it, and click on Open. You can also drag and drop the file from your local storage.

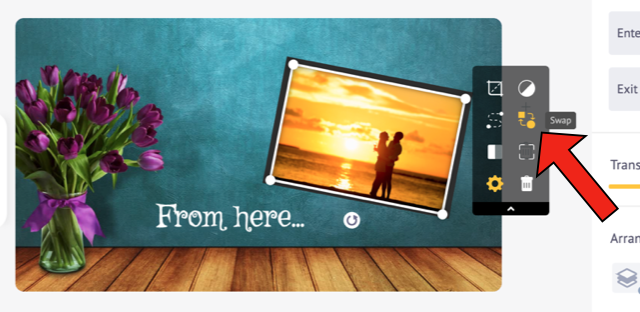
3. Likewise, upload all the pictures. After uploading, select the photo in the template. This will open the Item Menu. Select the Swap option from the Item Menu.

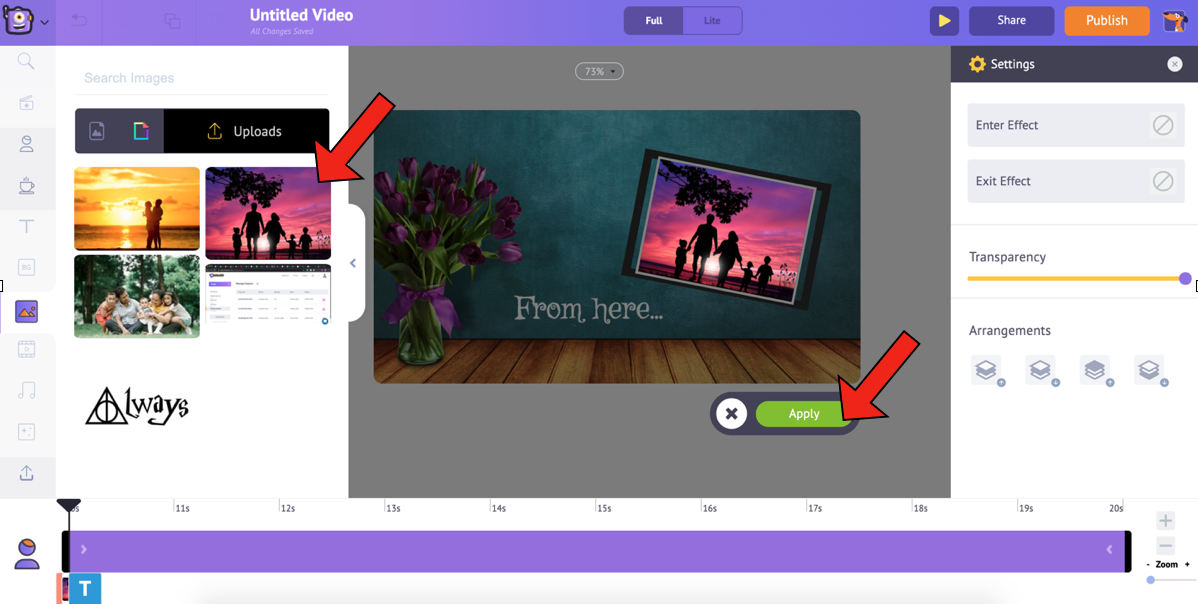
4. This will open the Images section from the library. Using the Swap option allows you to swap the existing image with an image or video, either from the Library or from the My Uploads section. Since we will use the uploaded photo, choose the My Uploads icon in the images section.
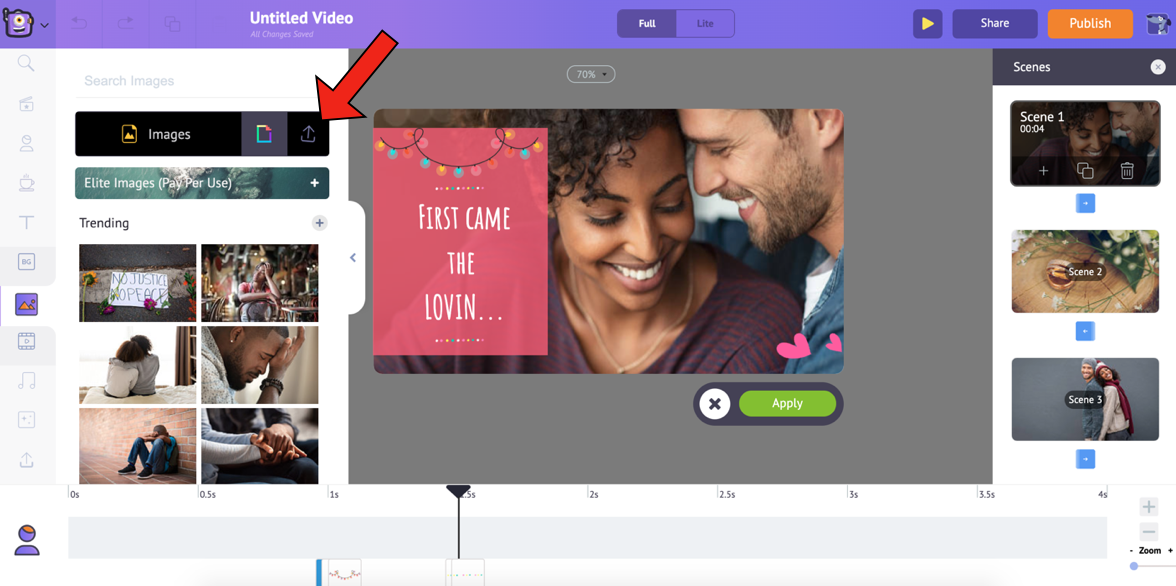

5. Select the image you want to swap the existing image with, and click on Apply.
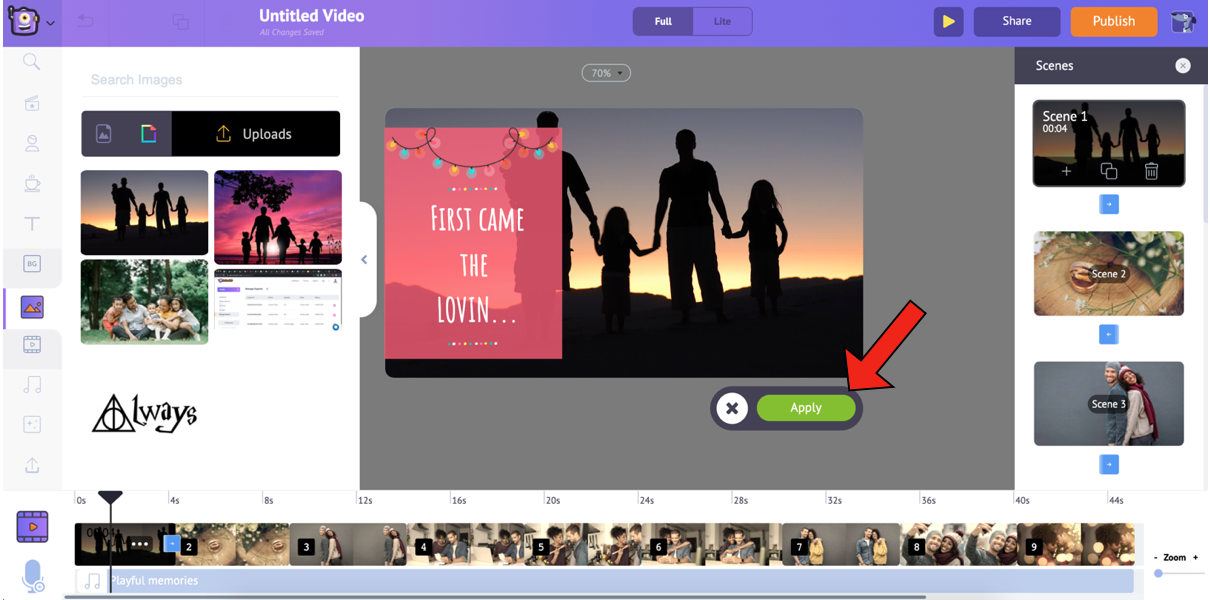
After swapping, you can resize the image by selecting it and then dragging its corners.
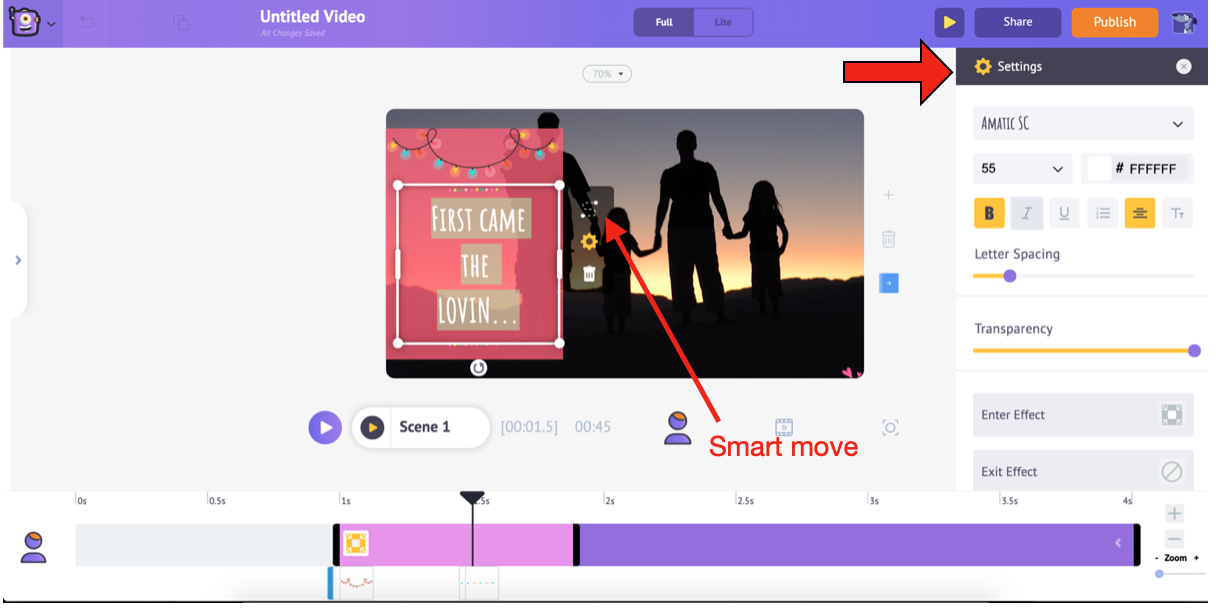
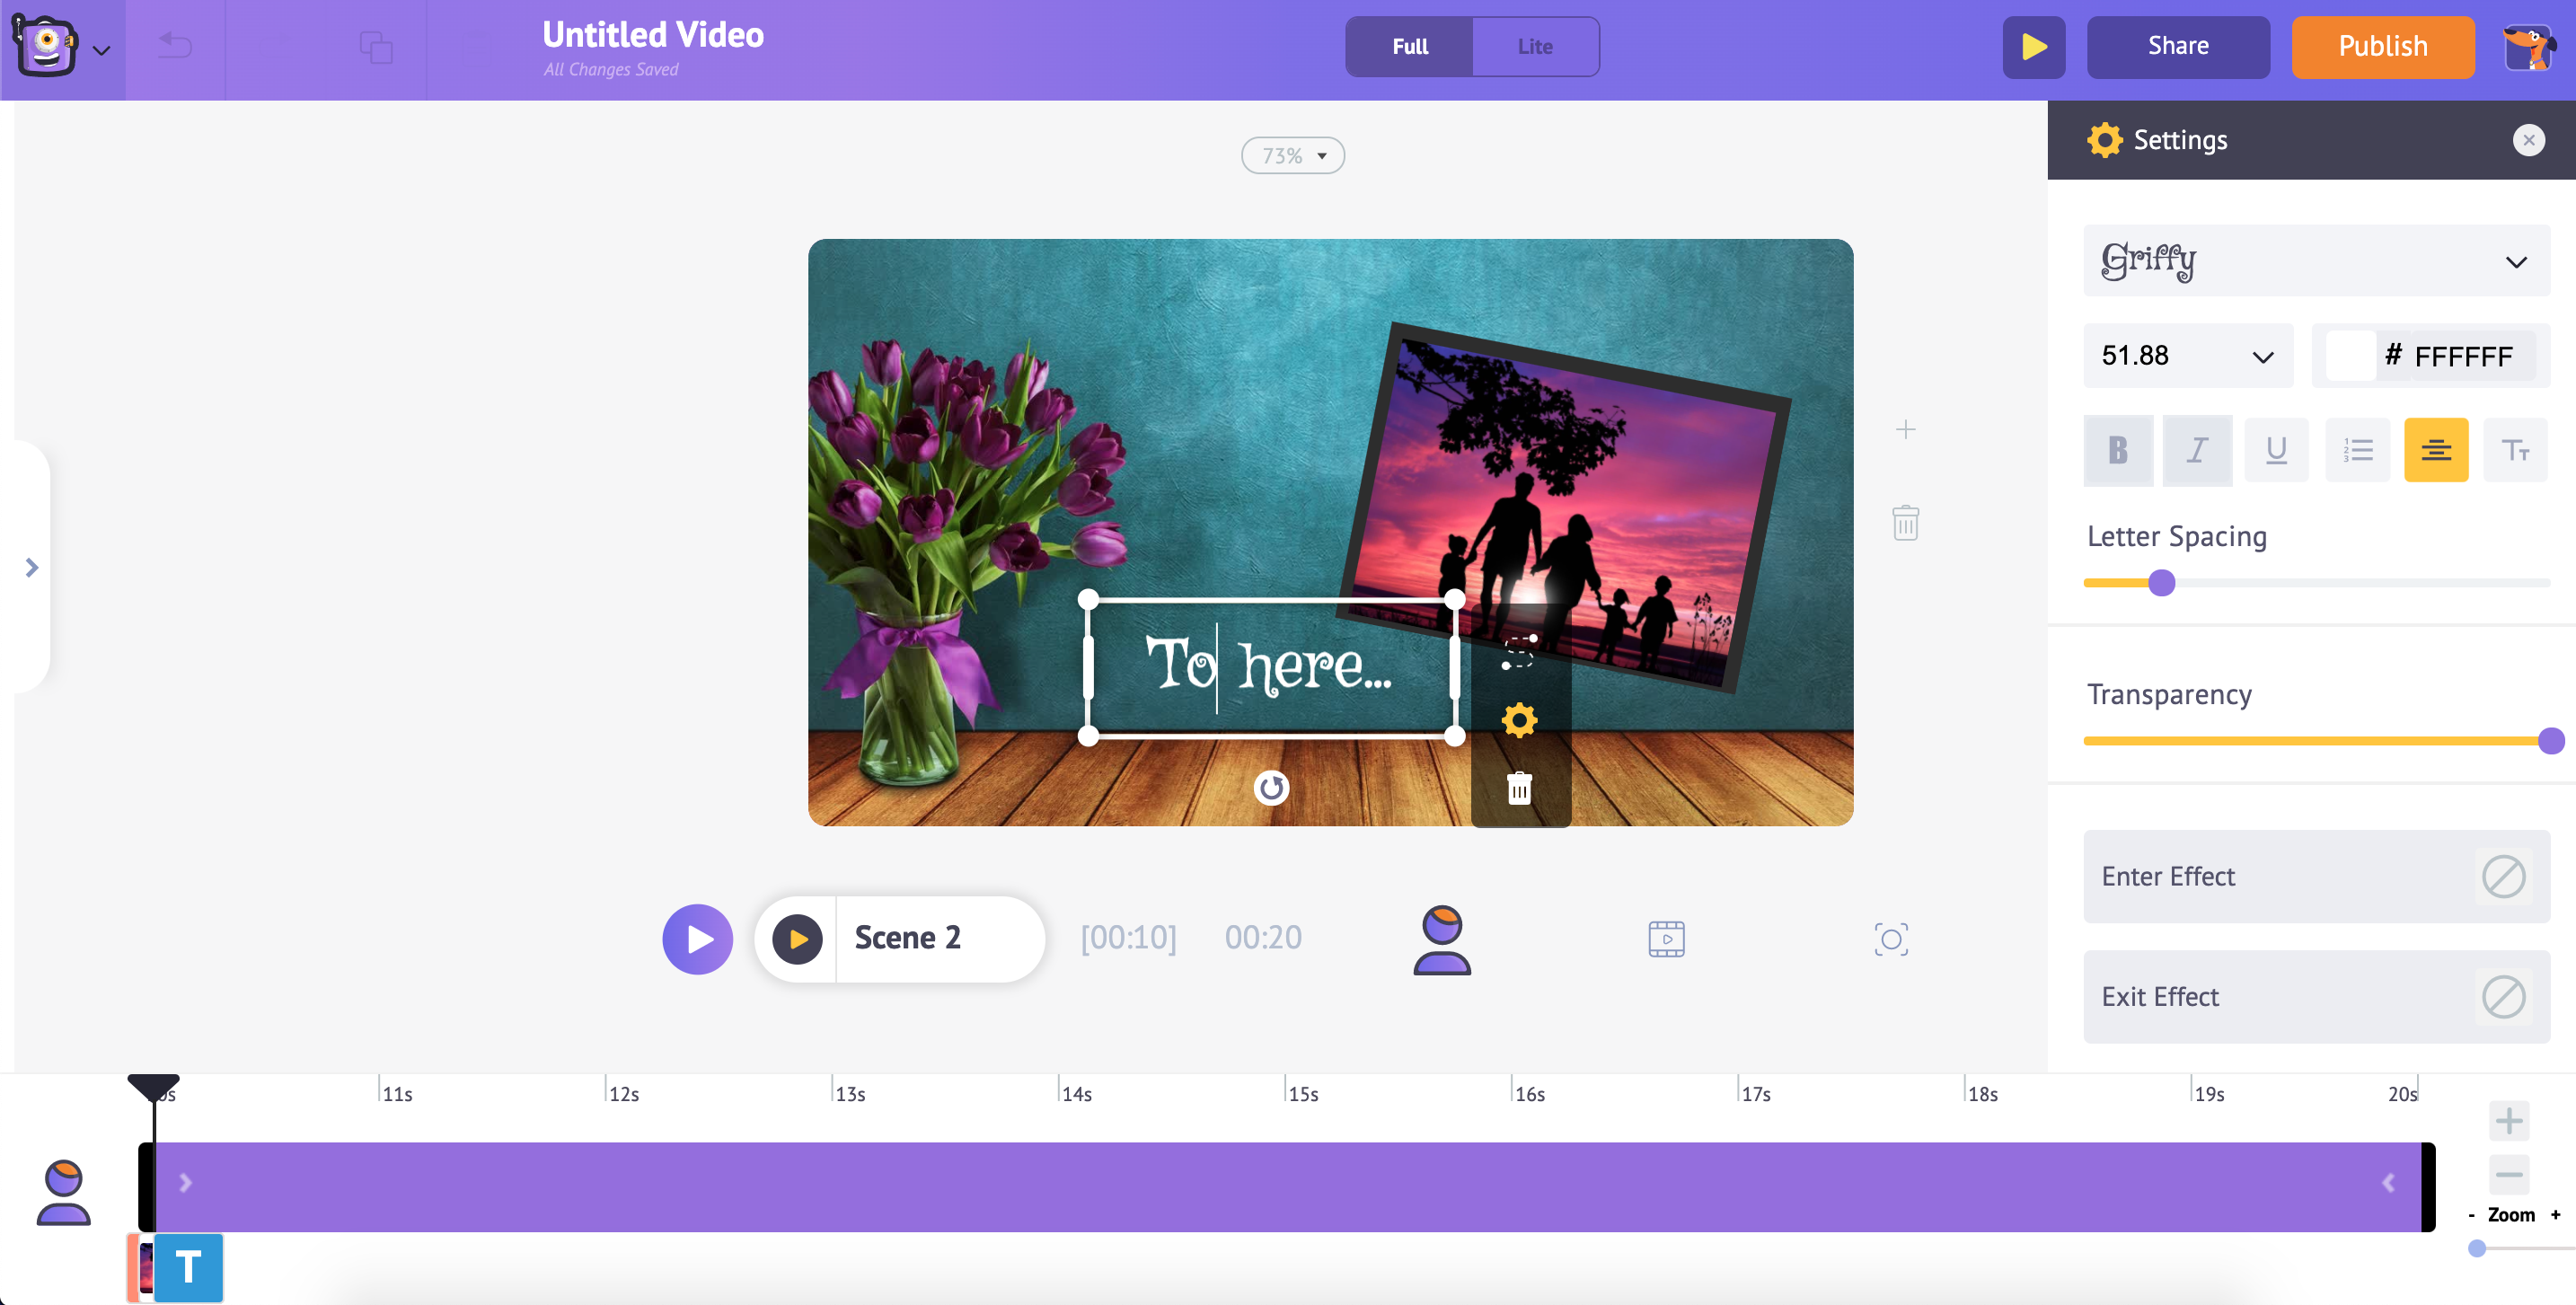
6. If you feel that the text in the template does not go with your image, you can change it by clicking on it. Clicking on it would open the Text Settings window, from which you can modify your text’s font style, size, alignment, letter spacing, transparency, entry/exit effect, and arrangement. Also, you can use Smart Move on your text to give it complex animations. Check out this video to know how to use Smart Move.
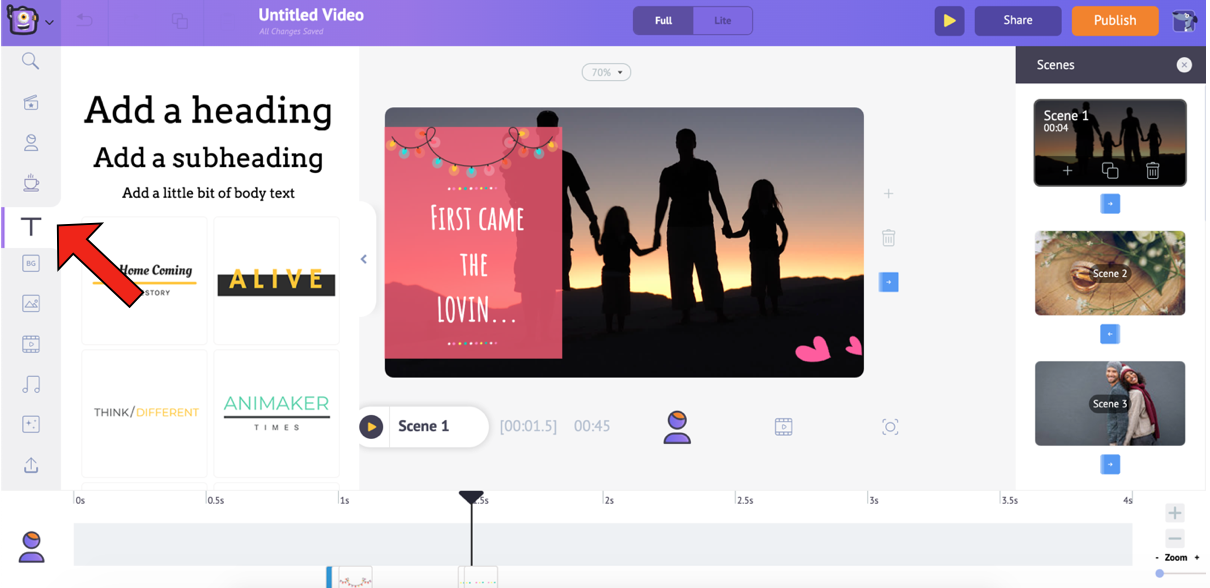
7. Alternatively, you can also delete the existing text box and replace it with one from the Text Pre-builts section. The Library also has a massive list of Text Pre-builts, which are formatted with unique entry and exit effects. Apart from these pre-builts, you can also select a heading, subheading, or body text, format it, and provide it with your own entry/exit effects.
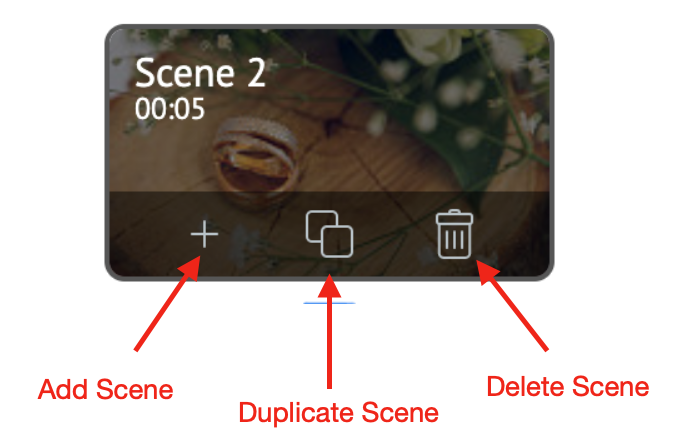
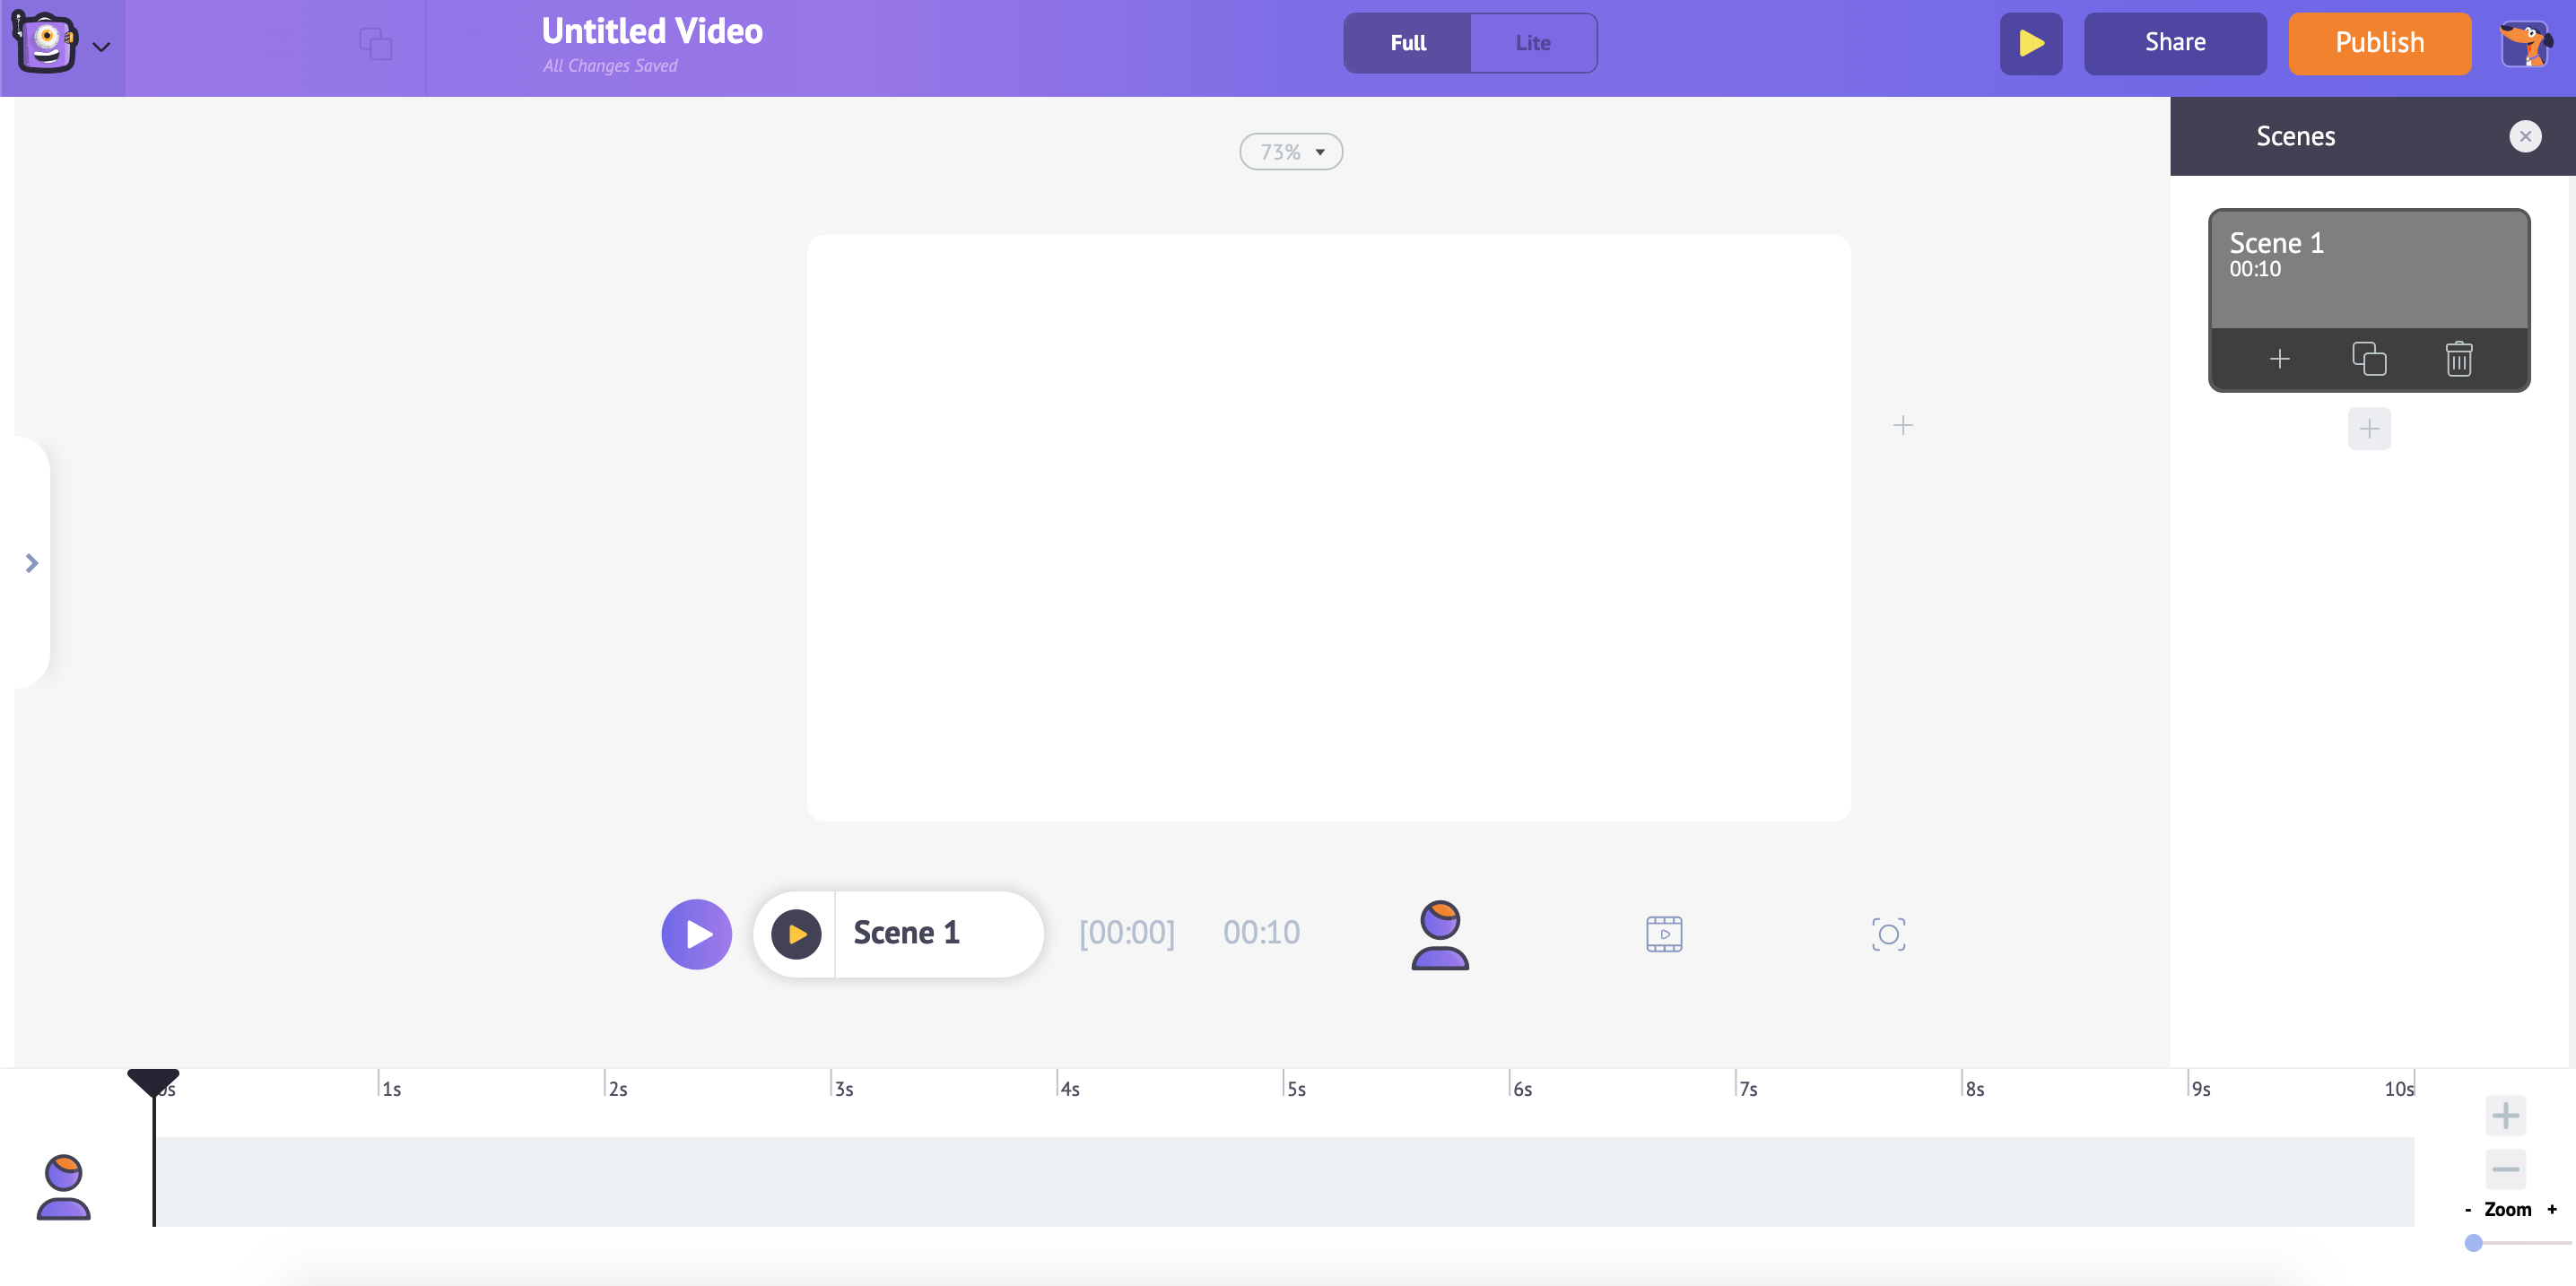
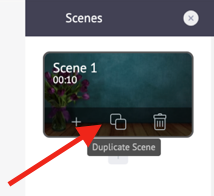
8. If you are confident enough, you can very well go ahead and create a scene from scratch. To do this, select the scene after which you want the new scene, and select the Add Scene option. If you want to add a new scene that does not have many changes from a particular scene, the easiest and smartest thing to do is duplicate a scene. Select the Duplicate Scene option and make your changes in the newly added scene right away. To delete a particular scene, select it from the Scenes section and select the Delete Scene option.
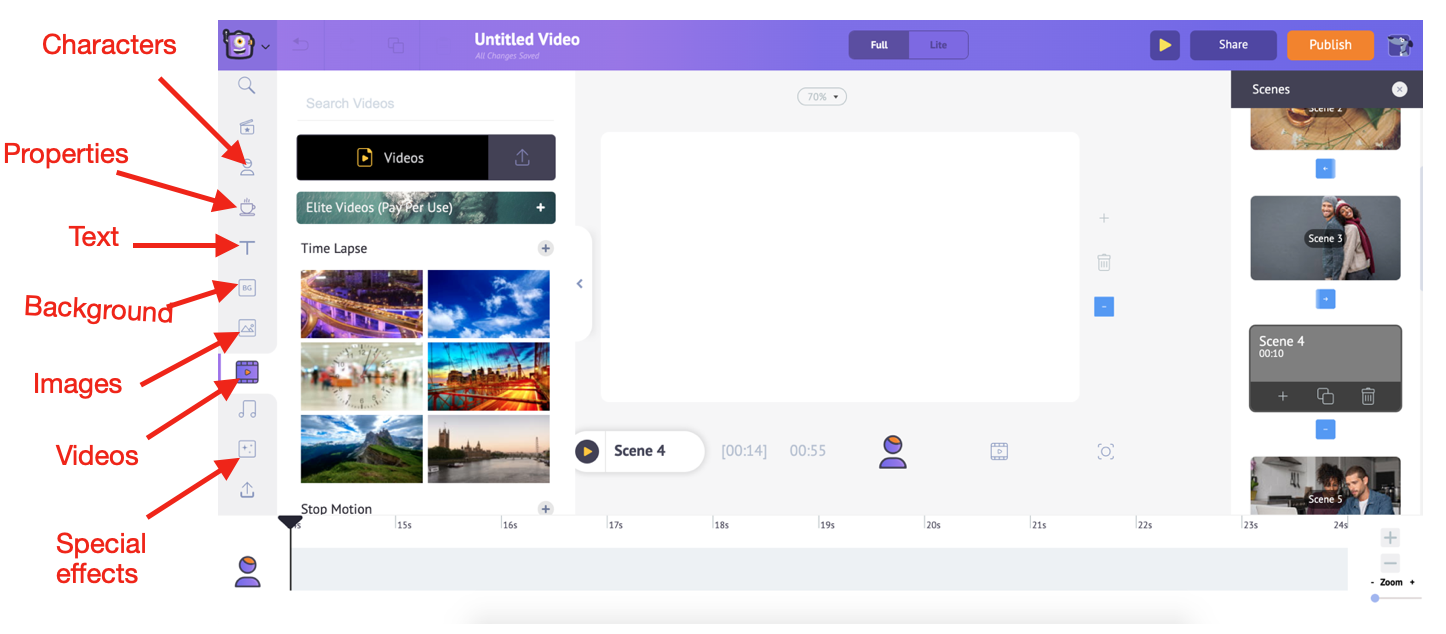
You can also add any asset from the Library to any scene and enhance your video. Refer to the screenshot below to know where each asset type can be found.
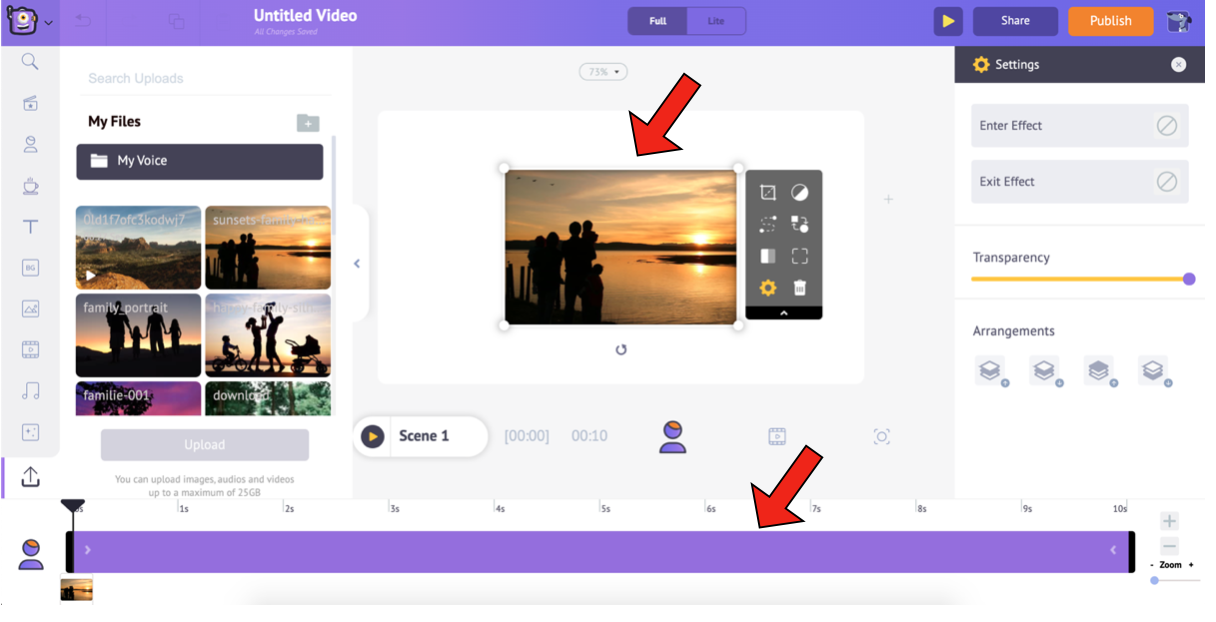
As and when you add an element to the scene, you will notice it getting added to the timeline below. For instance, when you add a photo that you had uploaded, this is how it gets added to the Workspace and the timeline.
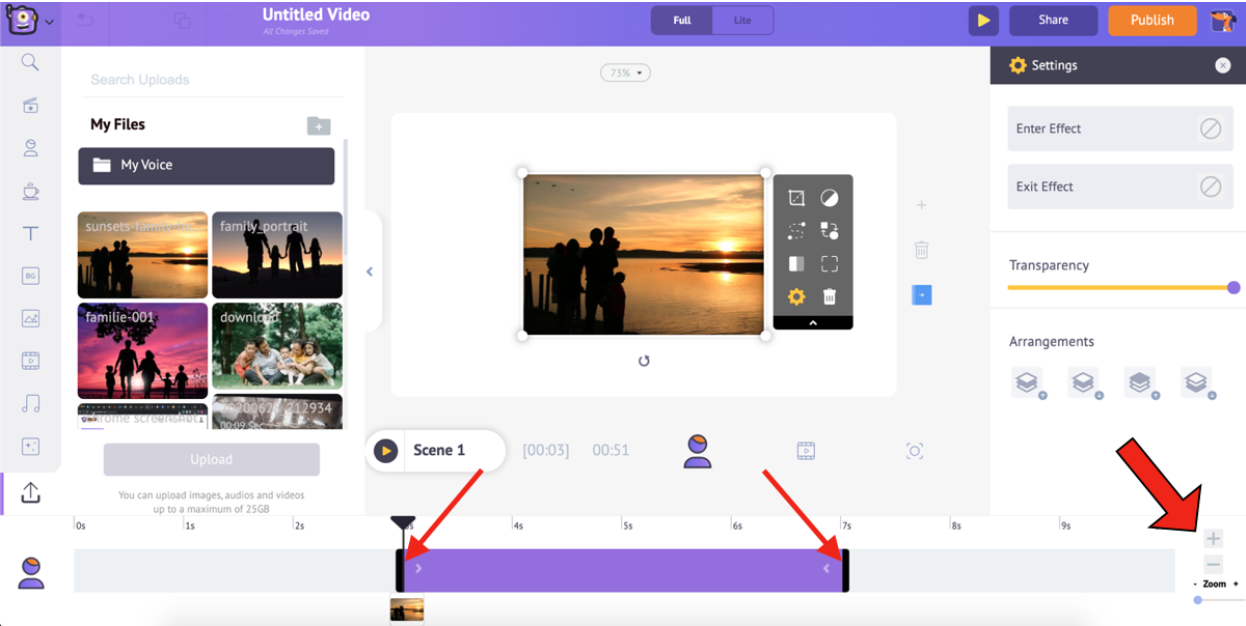
To adjust the duration of the asset’s visibility on a particular scene, drag the black bars at the ends of the scene in the timeline or by clicking the + and - options at the bottom right.
Once you are done editing the text and replacing the assets the way you want, we will move on to the next step; one of the most critical steps for creating a cool video…
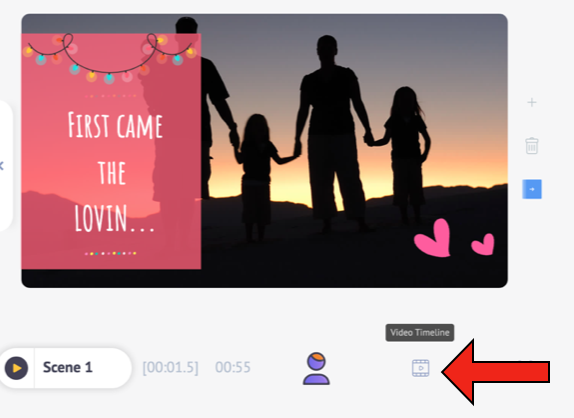
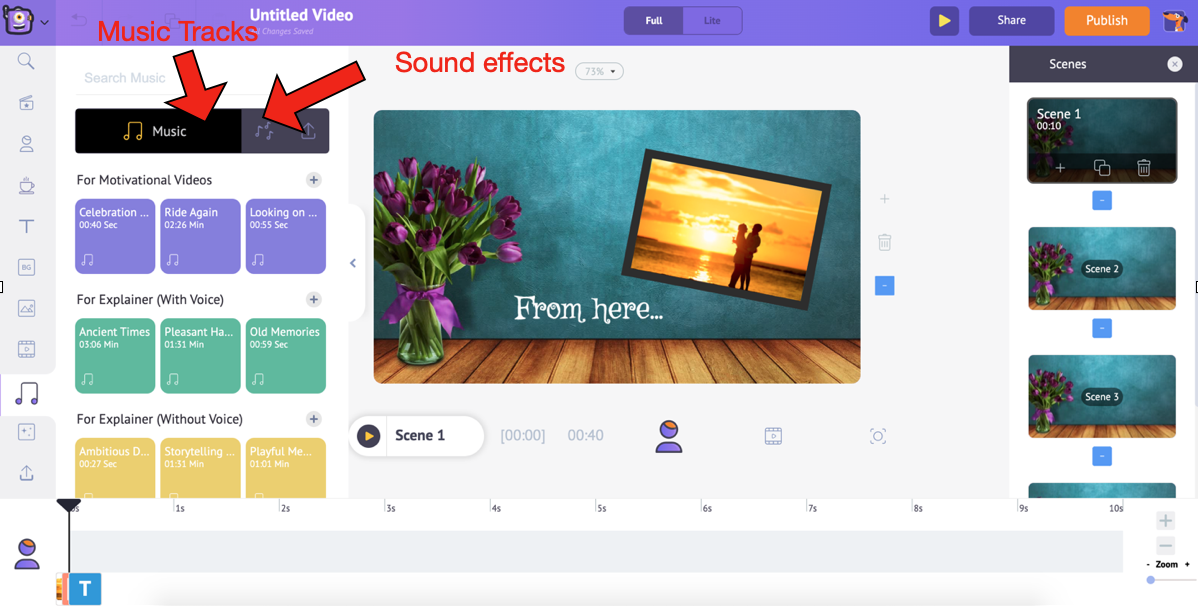
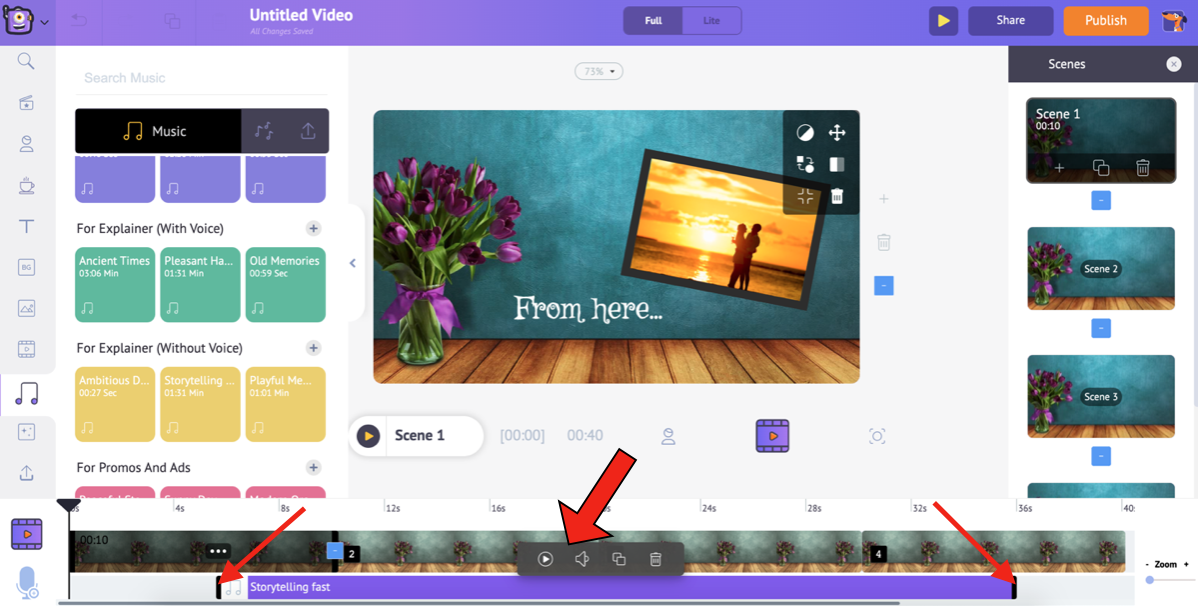
9. The final step is to add music to your video. For this, select the video timeline.

To change the existing BGM in this template, click on the music track in the timeline. You will notice a pop-up with some options appear. Remove the track by selecting the Delete option.

To choose a new music track/sound effect, select the Music option in the library. This will list several royalty-free music tracks. Similarly, to add sound effects, select the option next to Music.
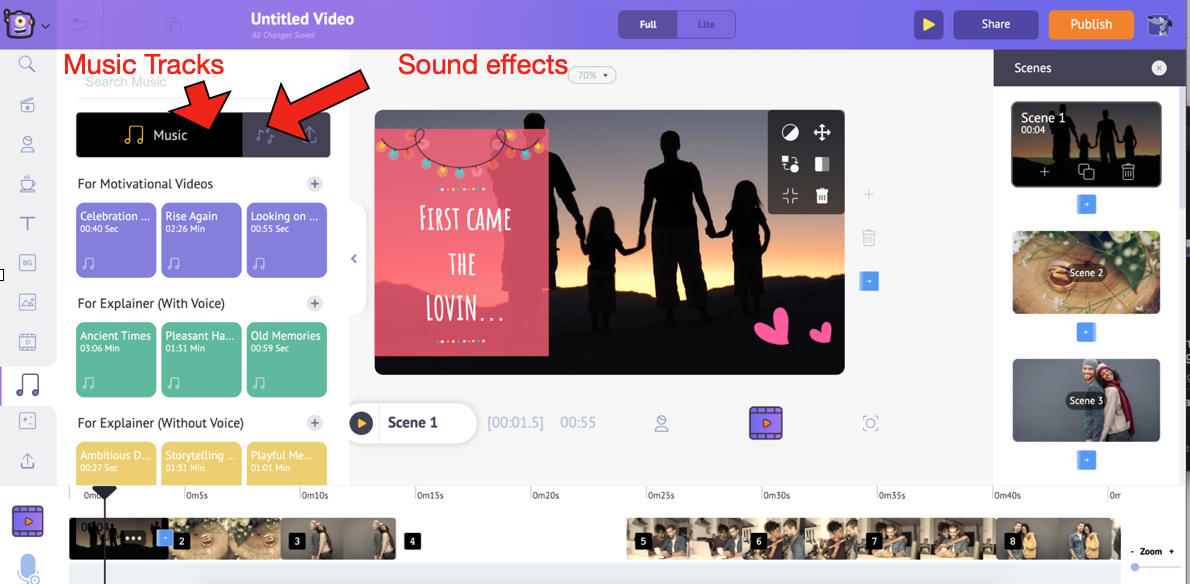
Hover over any track to preview it. Add a track to the video by simply clicking on it. From the timeline, you can preview the track, adjust its volume, duplicate it, and delete it. You can also move the black edges of the track to extend or contract it and match the track length with your video’s duration.

And if that is still not enough, you can upload your own music the same way you uploaded your pictures and add it to the video.
We will see how to preview and publish/download the video in the fifth step.
Create a Video from scratch:
You do not want to make use of a template and start from scratch, huh? Well, we have options for that too! Here are the steps:
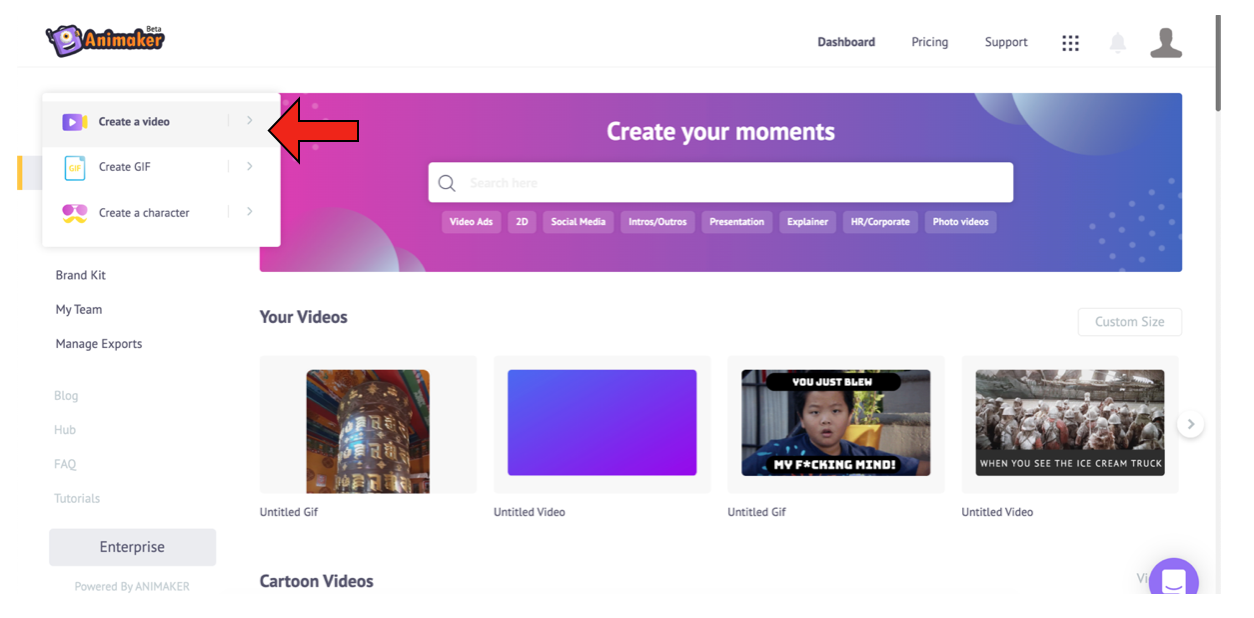
1. After logging into your account, Click on Create -> Create a video on the dashboard.
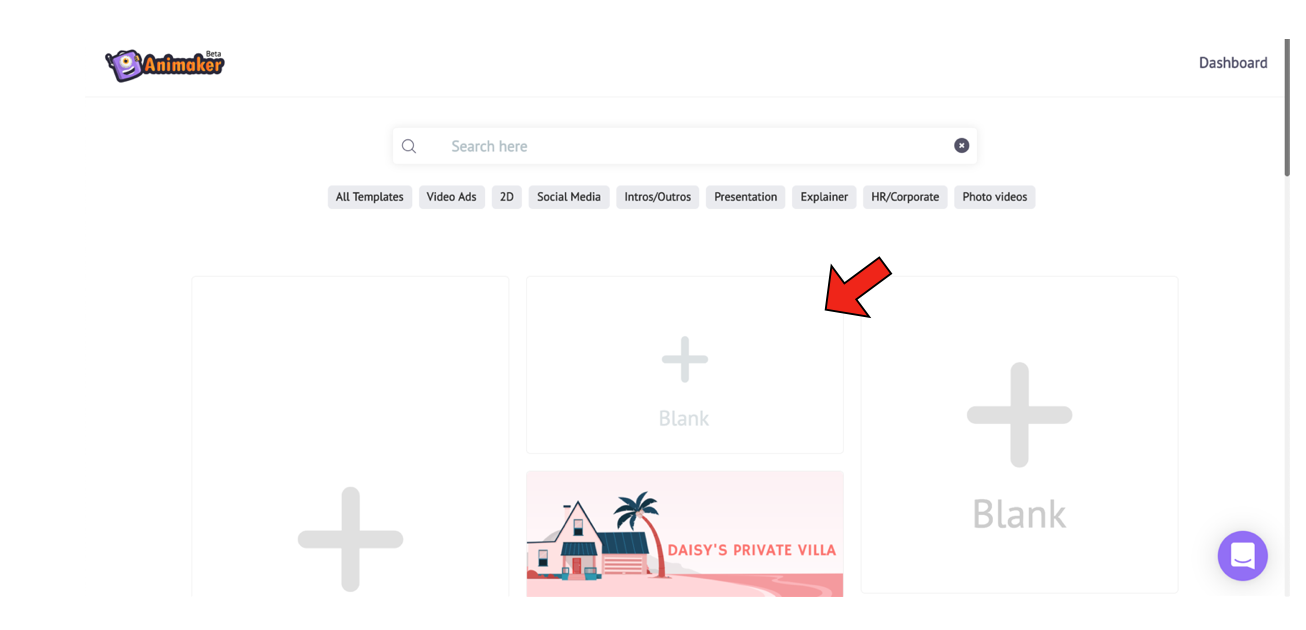
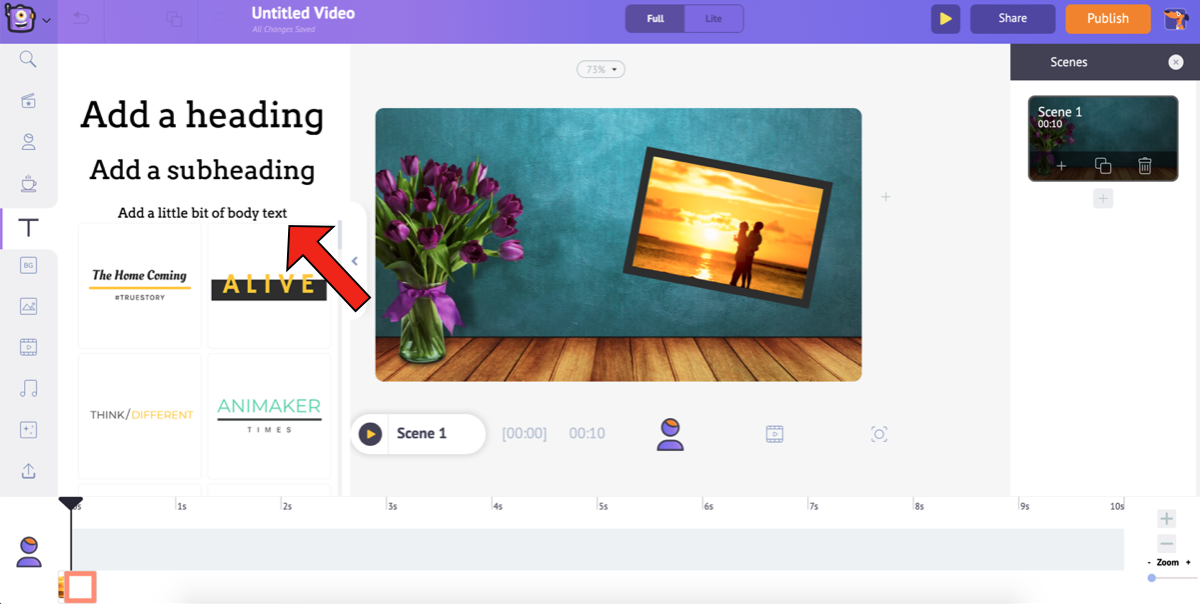
2. This will take you to the Moments page. This page lists three blank options at the top, along with the other predefined templates. Select one among the three blank templates (vertical, square, and horizontal), depending on the dimension you want.
3. Selecting a blank template will start a new project as shown below.
4. After the project is launched, start by uploading the pictures following the steps mentioned earlier.
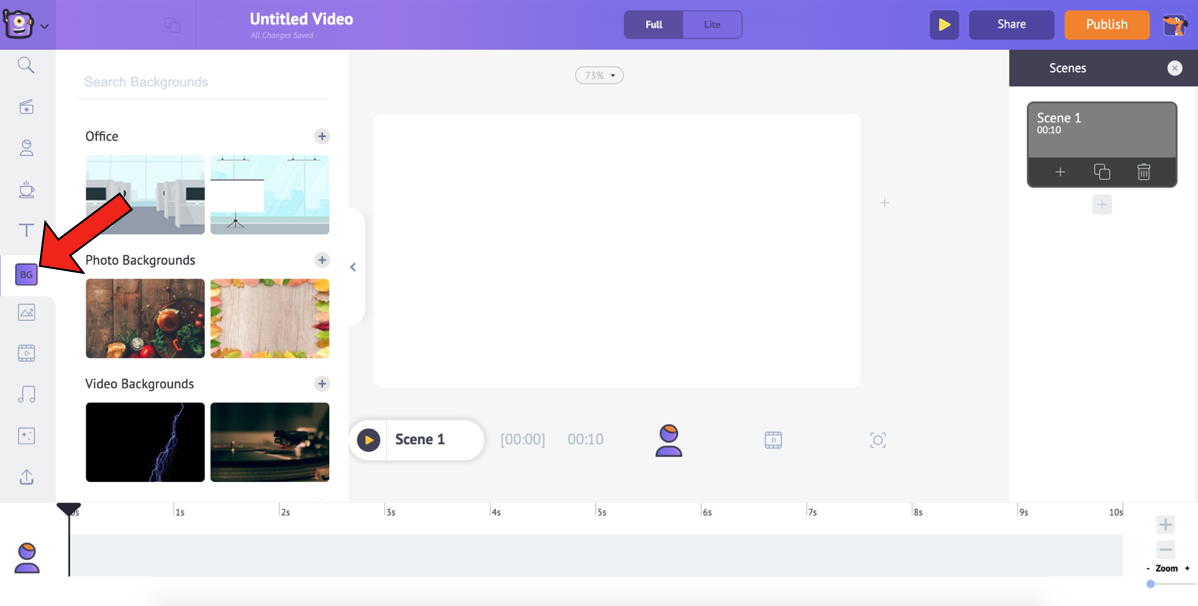
5. Once the pictures are uploaded, our next step will be to add a good background to the video. Using Animaker, you can add four different types of backgrounds to your video. Check out this video to know more.
6. For this video, I would prefer to go with an image background. As it is an anniversary video, I will search for the keyword “love” in the search bar and choose one from the filtered list. To add a background you like to the workspace, simply click on it.
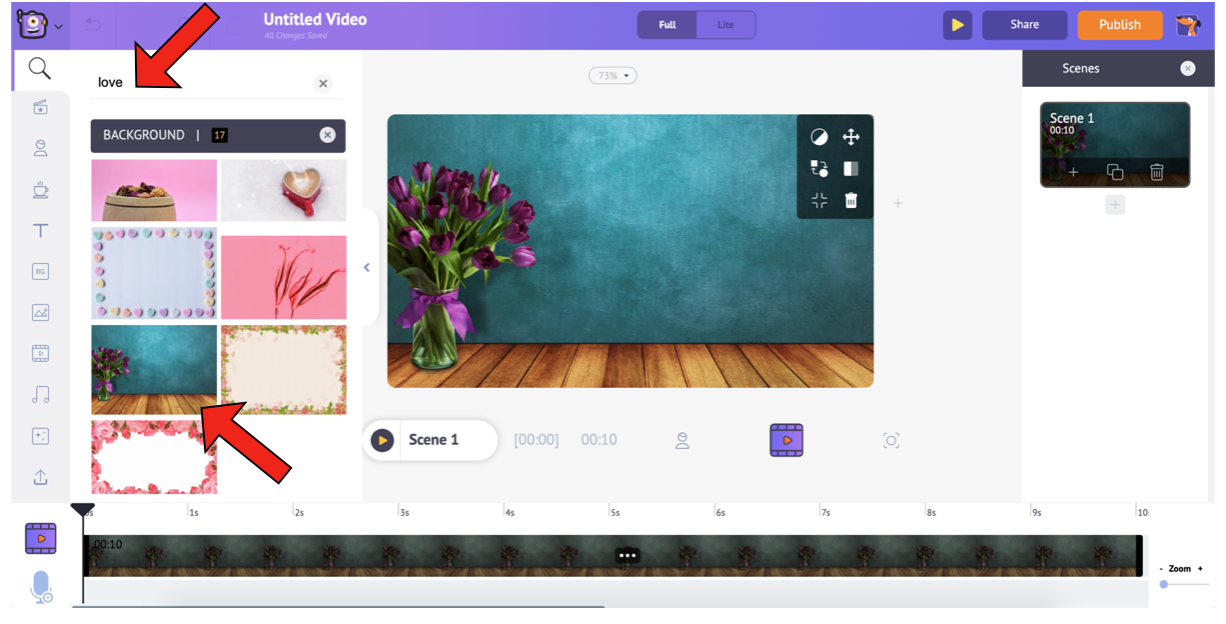
7. Now that our background is selected, the next step will be to add the uploaded photos to the workspace. Go to the Uploads section in the library and select the photo that you want to add to the workspace.
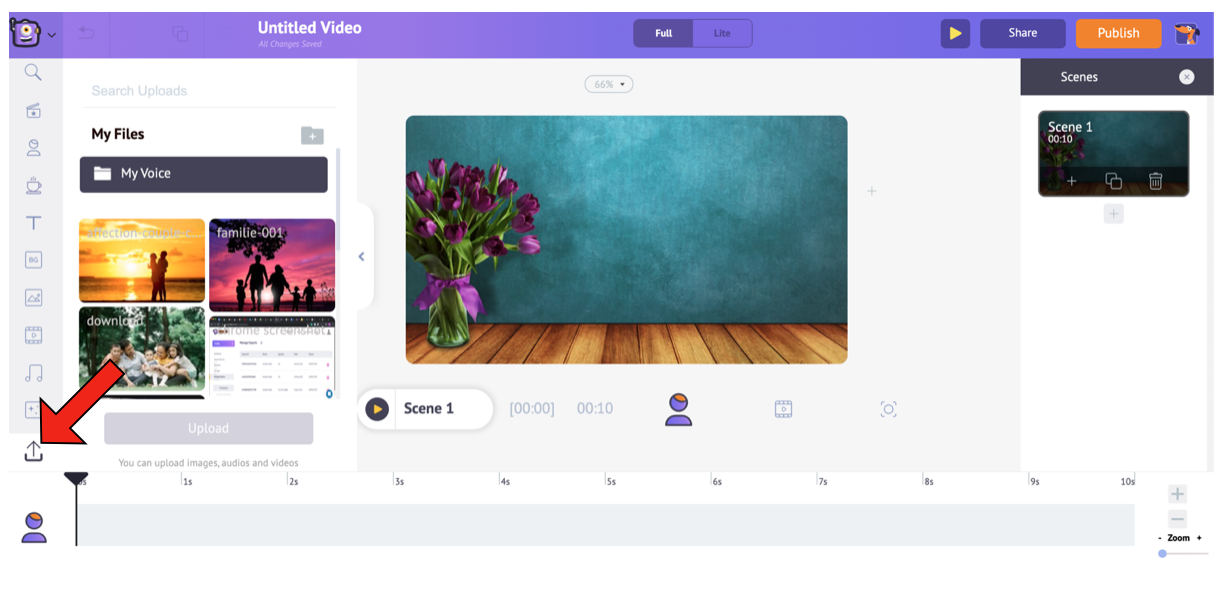
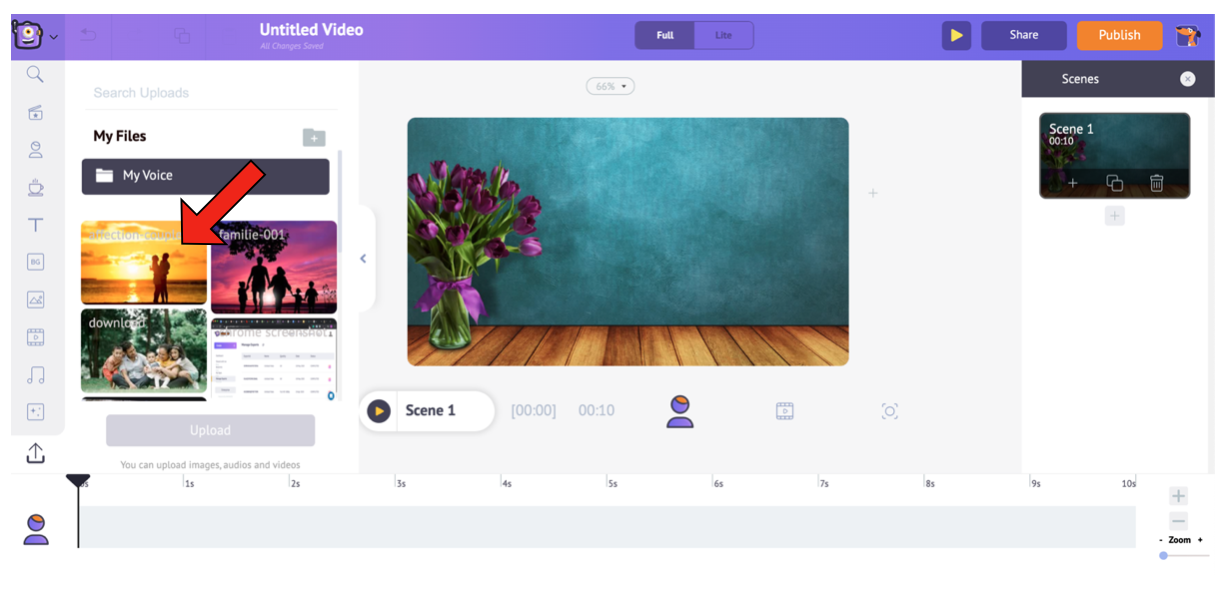
Resize the image by dragging its corners and place it properly.
8. Here’s a subtle trick for you. Though adding the image would do, adding a frame to the picture can emphasize it. Wondering how? Look down.
a. Click on Properties in the Library.
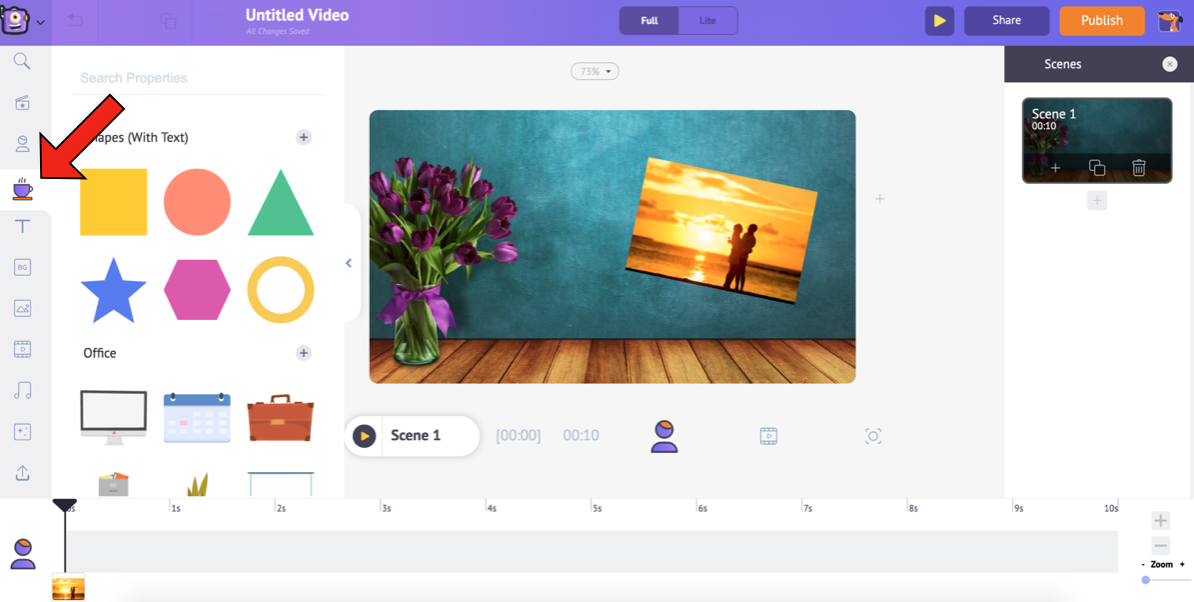
b. Since the image is in landscape format, we can choose the rectangle shape. To choose the rectangle shape, click on the plus symbol next to Shapes (With Text) under Properties.
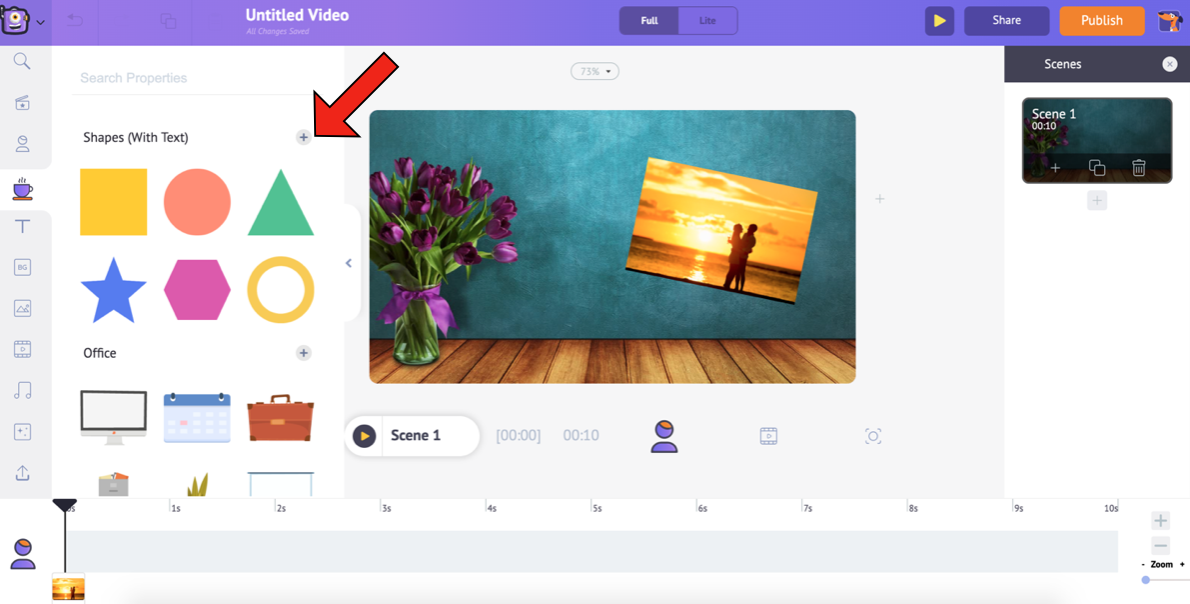
c. This will expand the Shapes section. Select the rectangle to add it to the workspace.
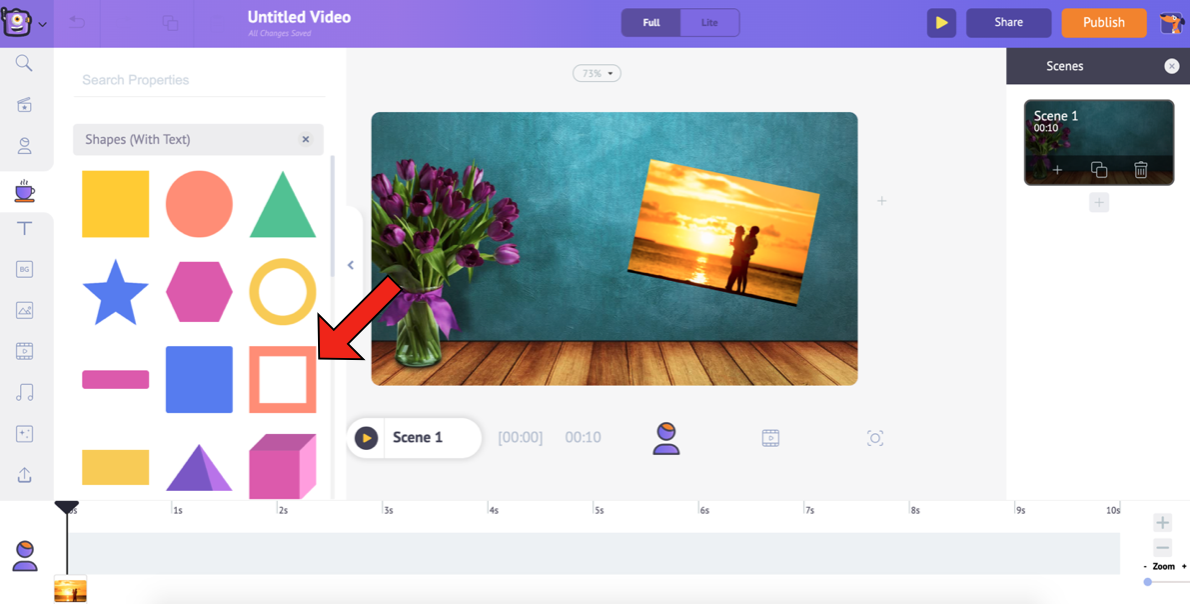
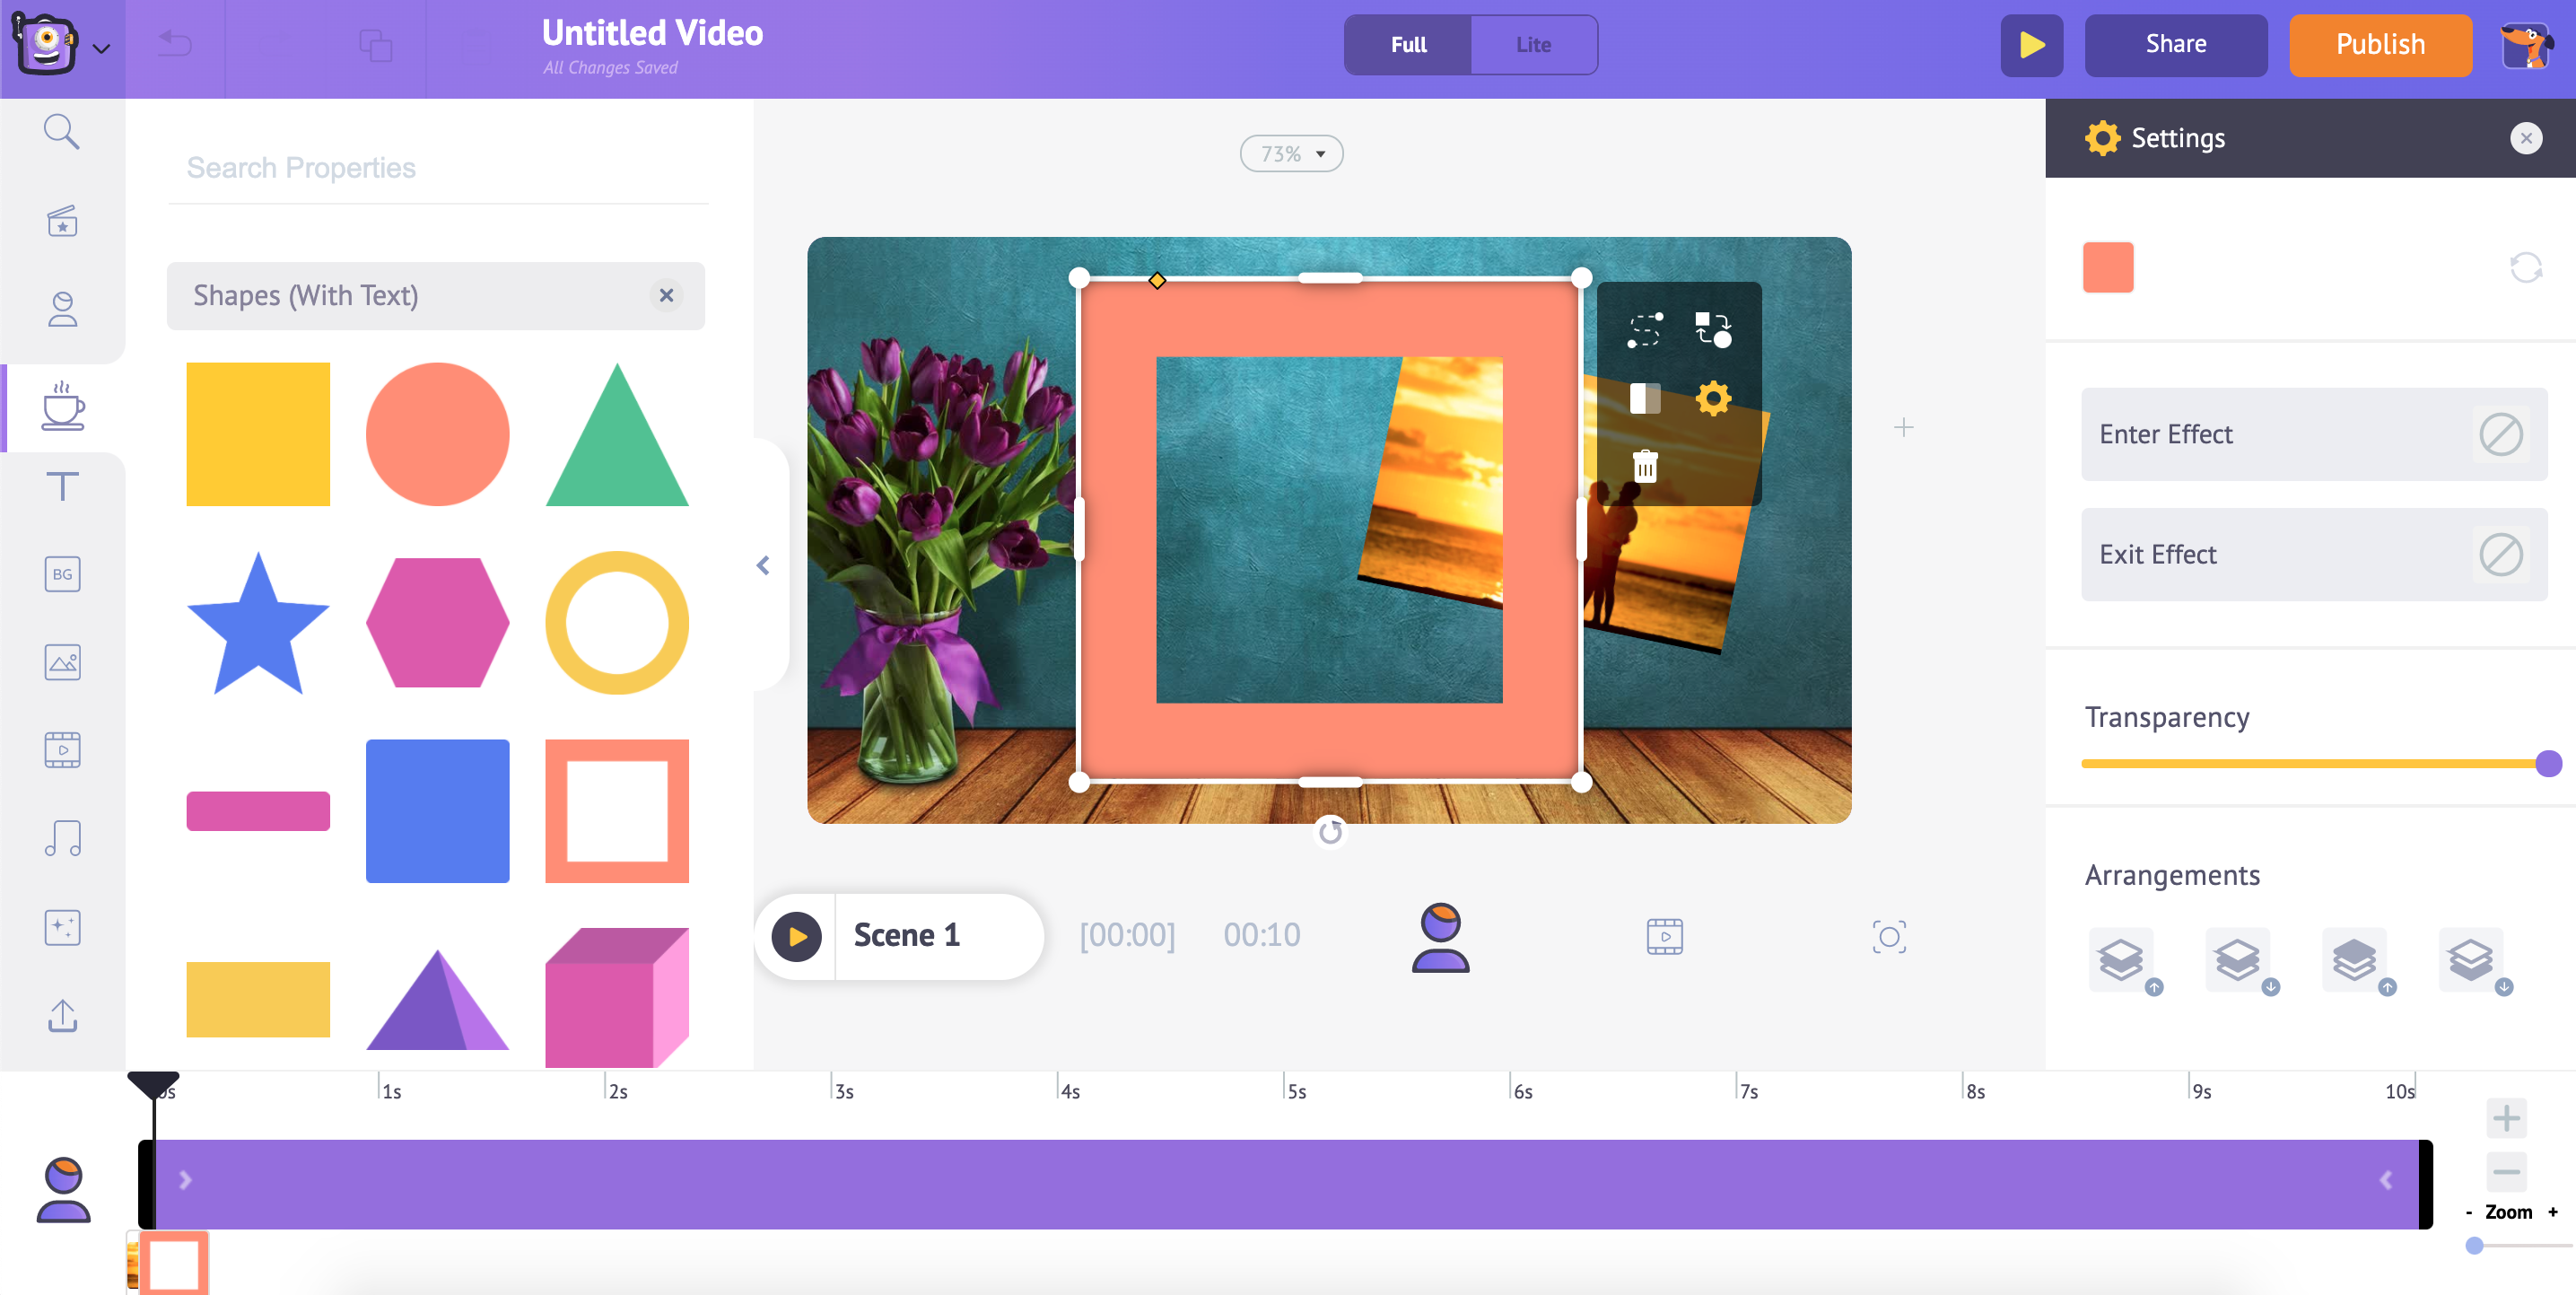
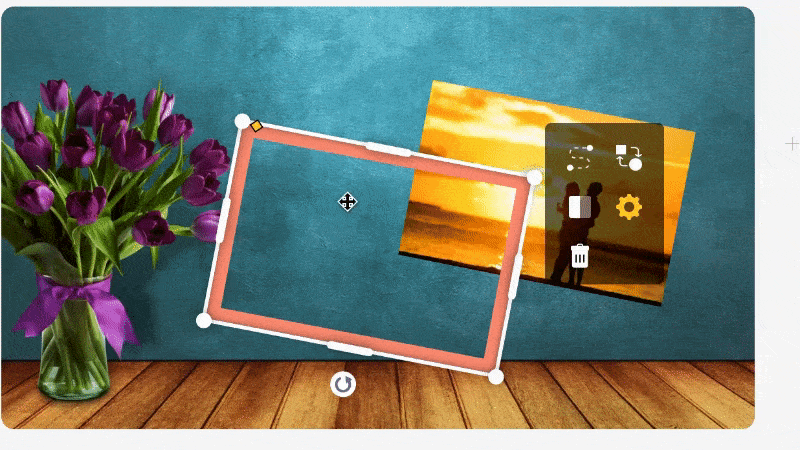
d. Besides using the corners of the shape to resize it, you can also change its width by using the rhombus icon in the shape. This will help you to scale the frame like this…
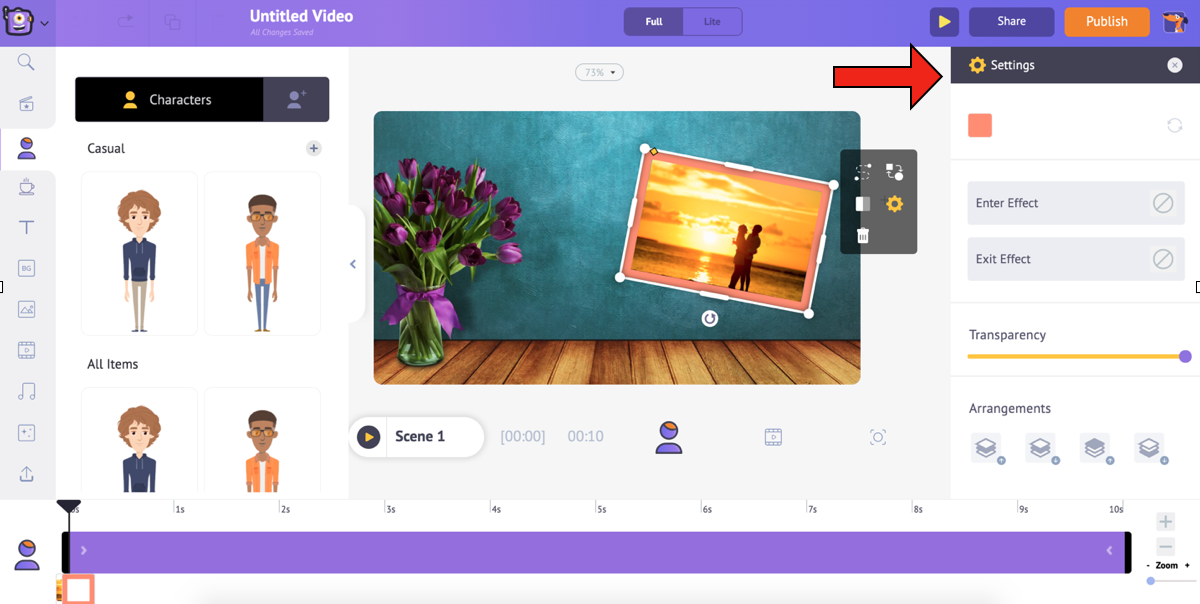
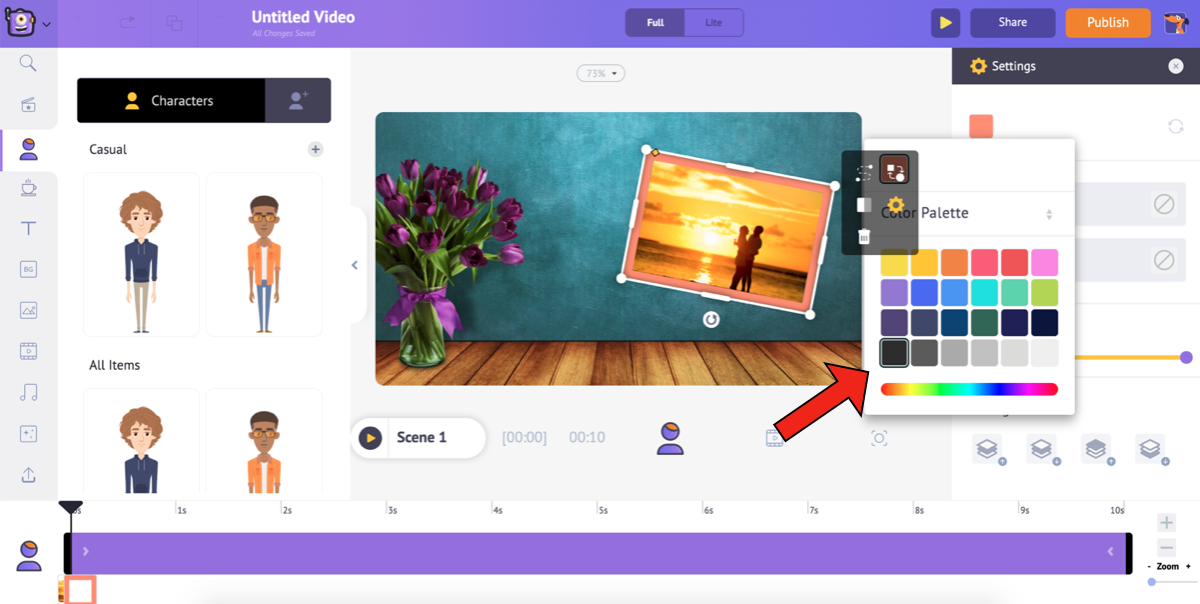
e. Once you have made the frame fit the picture perfectly, you can change the color of the shape and give it entry/exit effects from the settings.
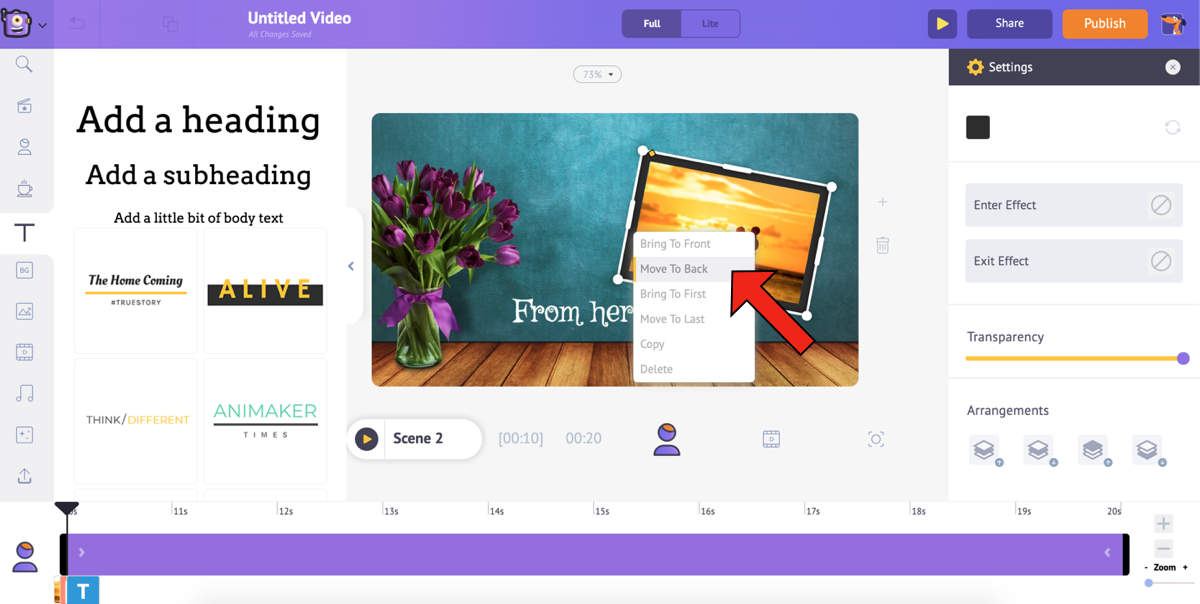
f. Now that your frame is set, right-click on it and select Move to Back. This will help you in performing the next step without any hassles.
9. You can add text to a video by selecting the Text option from the library. Select a heading/subheading/body text or choose a style from the vast list of Text-Prebuilts.

For this video, I select the body text and enter the text to add to the video.
Similar to the other assets, you can format the text the way you want it to be and also give it entry/exit effects from the Text Settings window.

10. Let us move on to the next scene. Now that our first scene is perfectly set, the easiest and smartest thing to do would be to duplicate it and simply change the picture and text for the other scenes. This would help you complete your video faster. To duplicate the scene, click on the Duplicate Scene option on the first scene under the Scenes tab.
11. Now, our task is to replace the image and the text, and we are done with the second scene. To replace the image, select it, and choose the Swap option from the Item Menu.
This will open the Images section from the library. Using the Swap option allows you to swap the existing image with an image or video, either from the Library or from the My Uploads section. Since we are going to use the photo that was uploaded, choose the My Uploads icon in the images section.
Select the image you want to replace the current image with and click on Apply.
You can resize the image by dragging its corners and fitting it into the frame.
12. Next, change the text accordingly.
Similarly, you can duplicate the first scene and change the picture and text in forthcoming scenes.
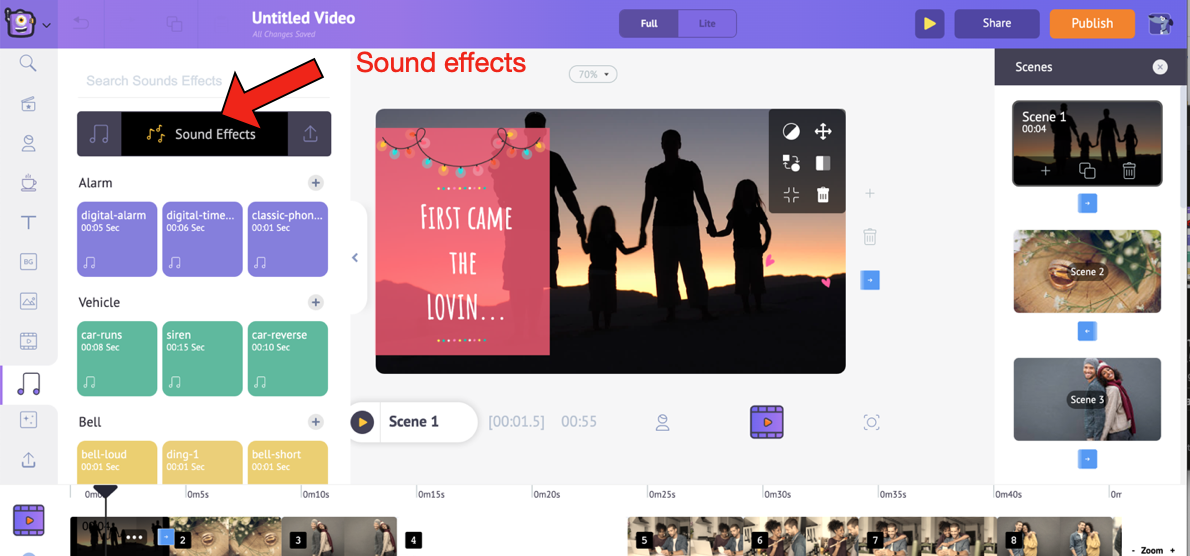
13. The final step is to add music to your video. To choose a new music track/sound effect, select the Music option in the library. This will list several royalty-free music tracks. Similarly, to add sound effects, select the option next to Music.

14. Hover over any track/effect to preview it. Add a track to the video by simply clicking on it. From the timeline, you can preview the track, adjust its volume, duplicate it, and delete it. You can also extend the black marks at the ends of the track to extend or contract it.
And if that’s still not enough, you can upload your music the same way you uploaded your pictures and add it to the video.
Check out the next step to know how to preview and publish/download the video.
Step 5: Edit, Publish, and Promote
To err is human. So, we are bound to make mistakes. But, a silly mistake should not end up ruining the time and effort involved. So, always edit, proofread, and present the best!
Let’s go ahead and carry out the final step to obtain the video!
The steps involved in previewing and downloading/publishing the created video is the same for both options (Creating from a template and creating from scratch). Let us see the steps with the second option as an example.
1. After adding all the elements, preview the video to ensure that they have been added correctly. Select the Scene Preview option to preview a particular scene and use the Video Preview option to preview the entire video.

2. Once you are done, click on Publish -> Download video. You can rename it, select the preferred video quality, and then click on Download.
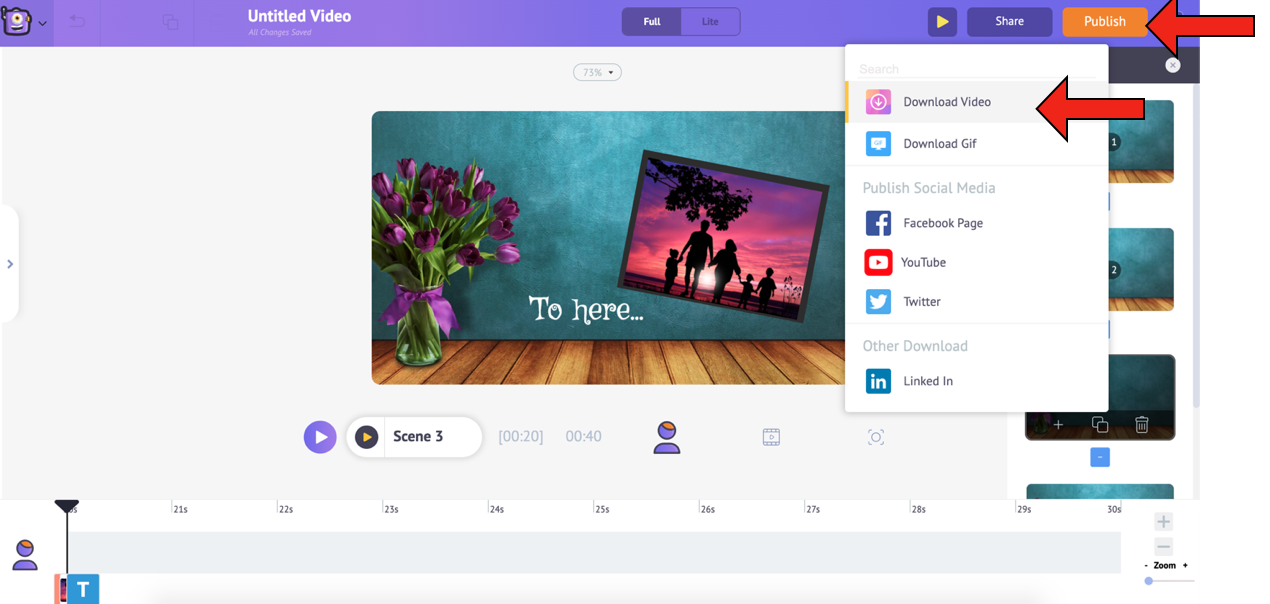
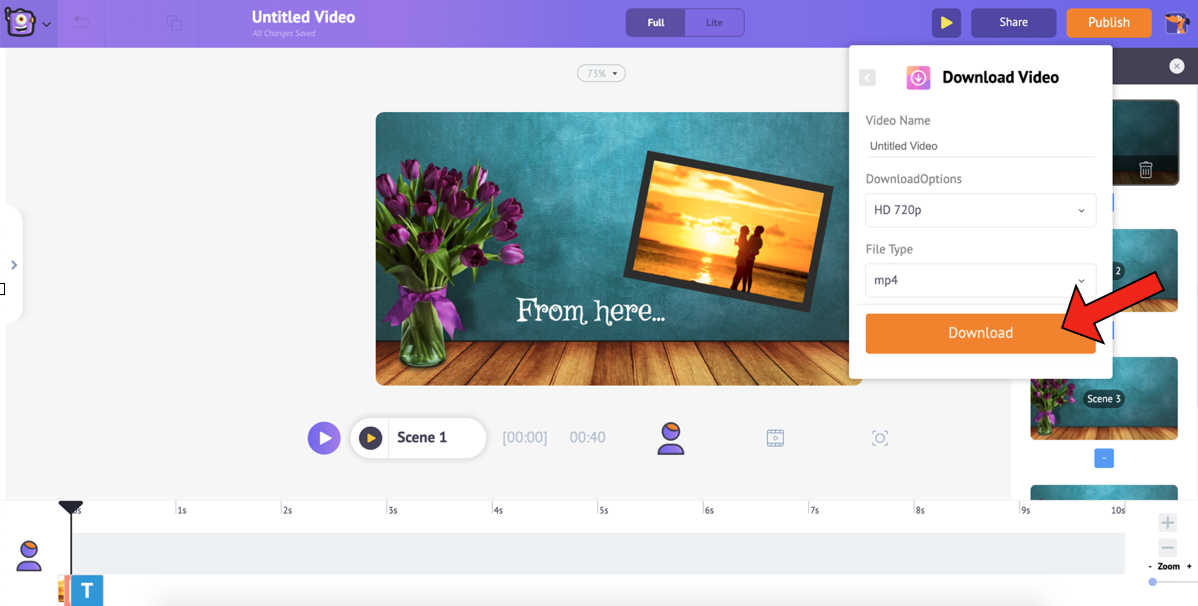
Your video is ready! Once the rendering is done, you can download it. Additionally, you will also receive the video link via mail.
Wasn’t that very easy? You will be able to create and download a completed, awesome video in a matter of minutes! All the best!
***
Hope this article was helpful! Should you have any questions/doubts, shoot ‘em in the comments section. We will be happy to help you out!