How to make AI Generated video with Animaker - Quick & Easy Guide!

Shreshtra - March 12, 2025 - Leave your thoughts. 12 min read
AI has infiltrated everywhere, from improved diagnosis in healthcare to reshaping the way we create and consume content.
Its rapid advancements have unlocked endless possibilities, making tasks faster, smarter, and more efficient.
One of the most exciting breakthroughs in AI is its ability to generate videos.
What once required hours of editing, scripting, and voiceover work can now be done in minutes, thanks to AI video generators.
This innovation is reshaping industries from marketing and education to entertainment and business, allowing creators to bring their ideas to life effortlessly.
If you’re new to AI video creation, you might think it’s complex or overwhelming at first.
But here’s the good news - with the right tools, it’s surprisingly simple and effortless!
So, let’s go ahead and explore how to make AI generated video in just a few simple steps!
How To Make AI Generated Video?
AI has become a sidekick to content creators, allowing even beginners to produce professional-looking videos in minutes.
Today, we’ll walk you through the process of creating an AI-generated video using one of the most popular tools - Animaker.
What is Animaker?

Animaker is a powerful AI animation generator packed with 150M+ assets, including diverse characters, actions, 2D backgrounds, and royalty-free music.
With its AI-powered features, such as Animaker voice, Animaker subtitles, and even complete video generation, Animaker makes video creation quick and effortless.
While it also allows users to build videos from scratch, this guide will solely focus on how to make AI-generated videos with Animaker.
To begin, log in or sign up to Animaker.
If you’re an existing user and logged in, you will be taken to the dashboard. Here, click on the Generate button to go to the AI video-making window.
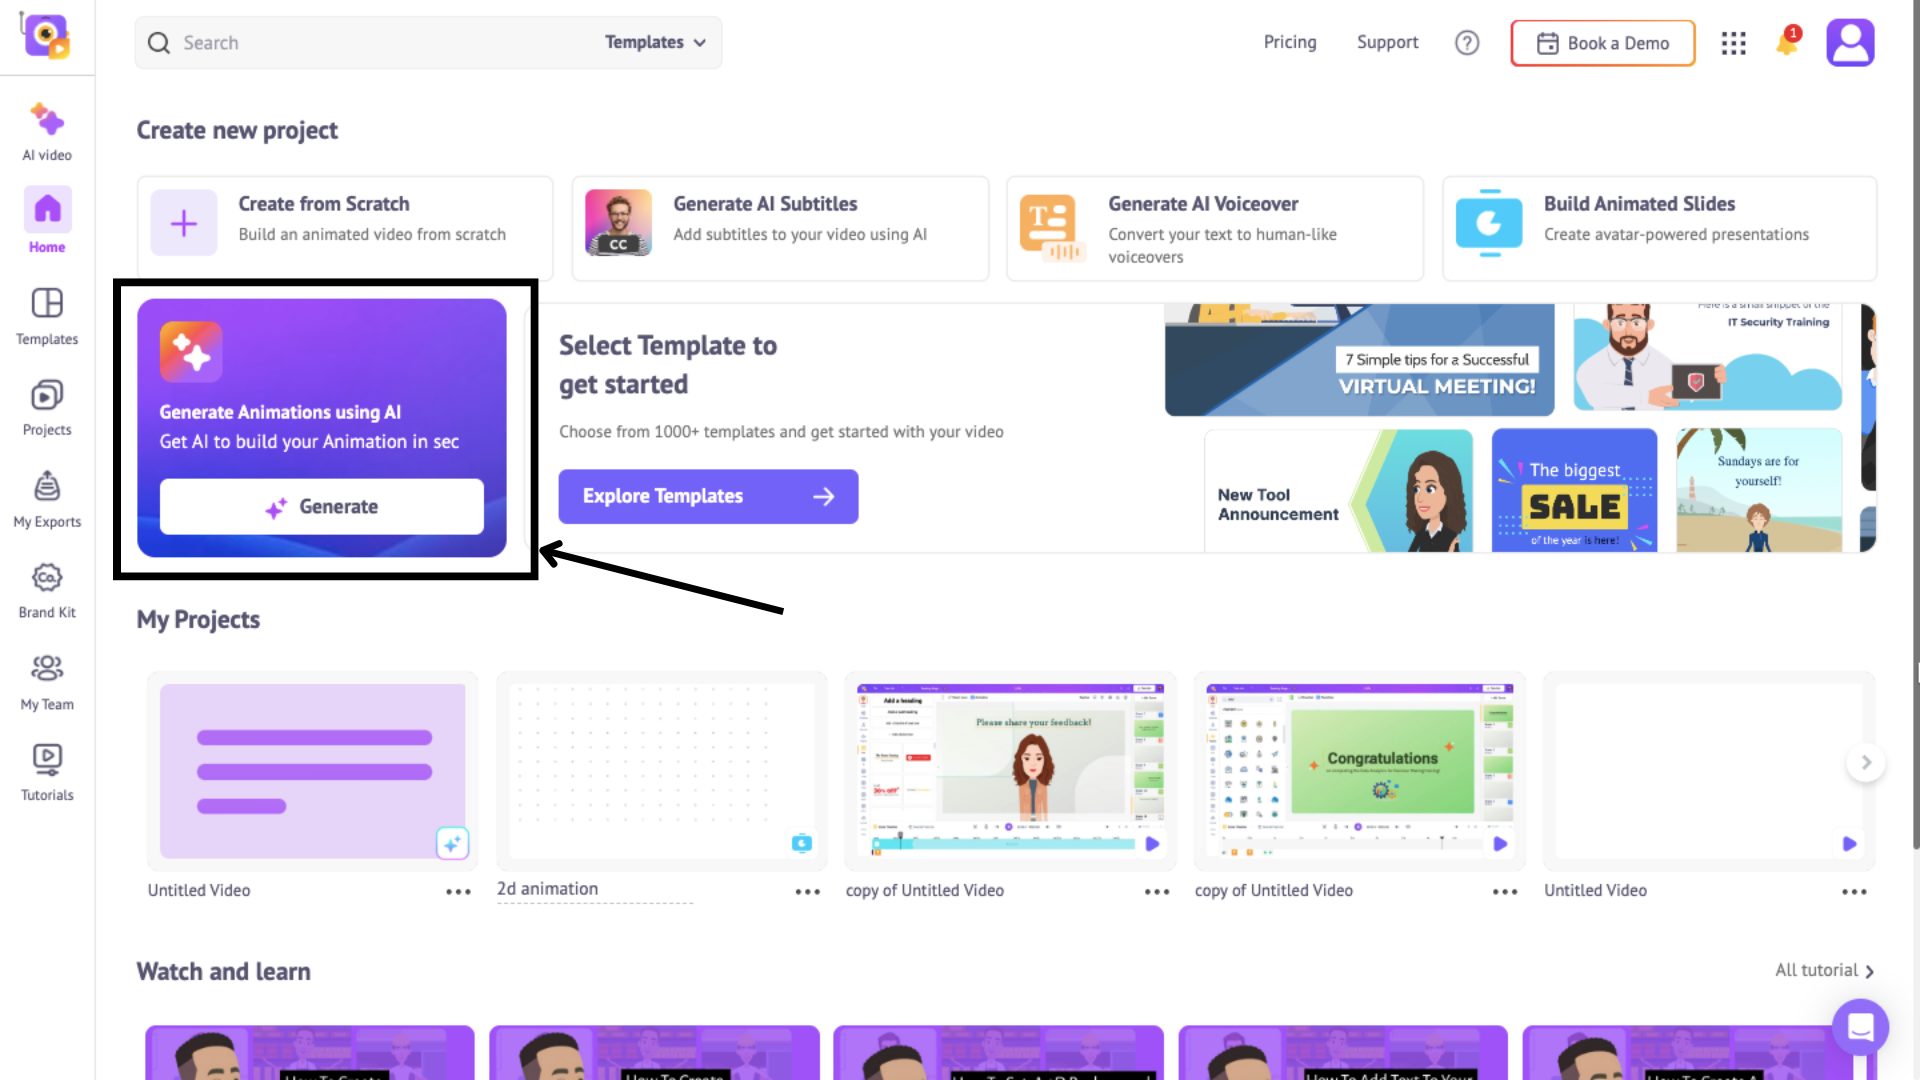
But, if you’re a new user and have signed up for Animaker, you will be directly in the AI video-making window.
Now, in just four simple steps, you can go from an idea to a polished video with the help of Animaker’s AI.
- Step 1: Enter the Video Prompt
- Step 2: Answer AI’s questions
- Step 3: Generate & Edit
- Step 4: Download video
Let’s dive in!
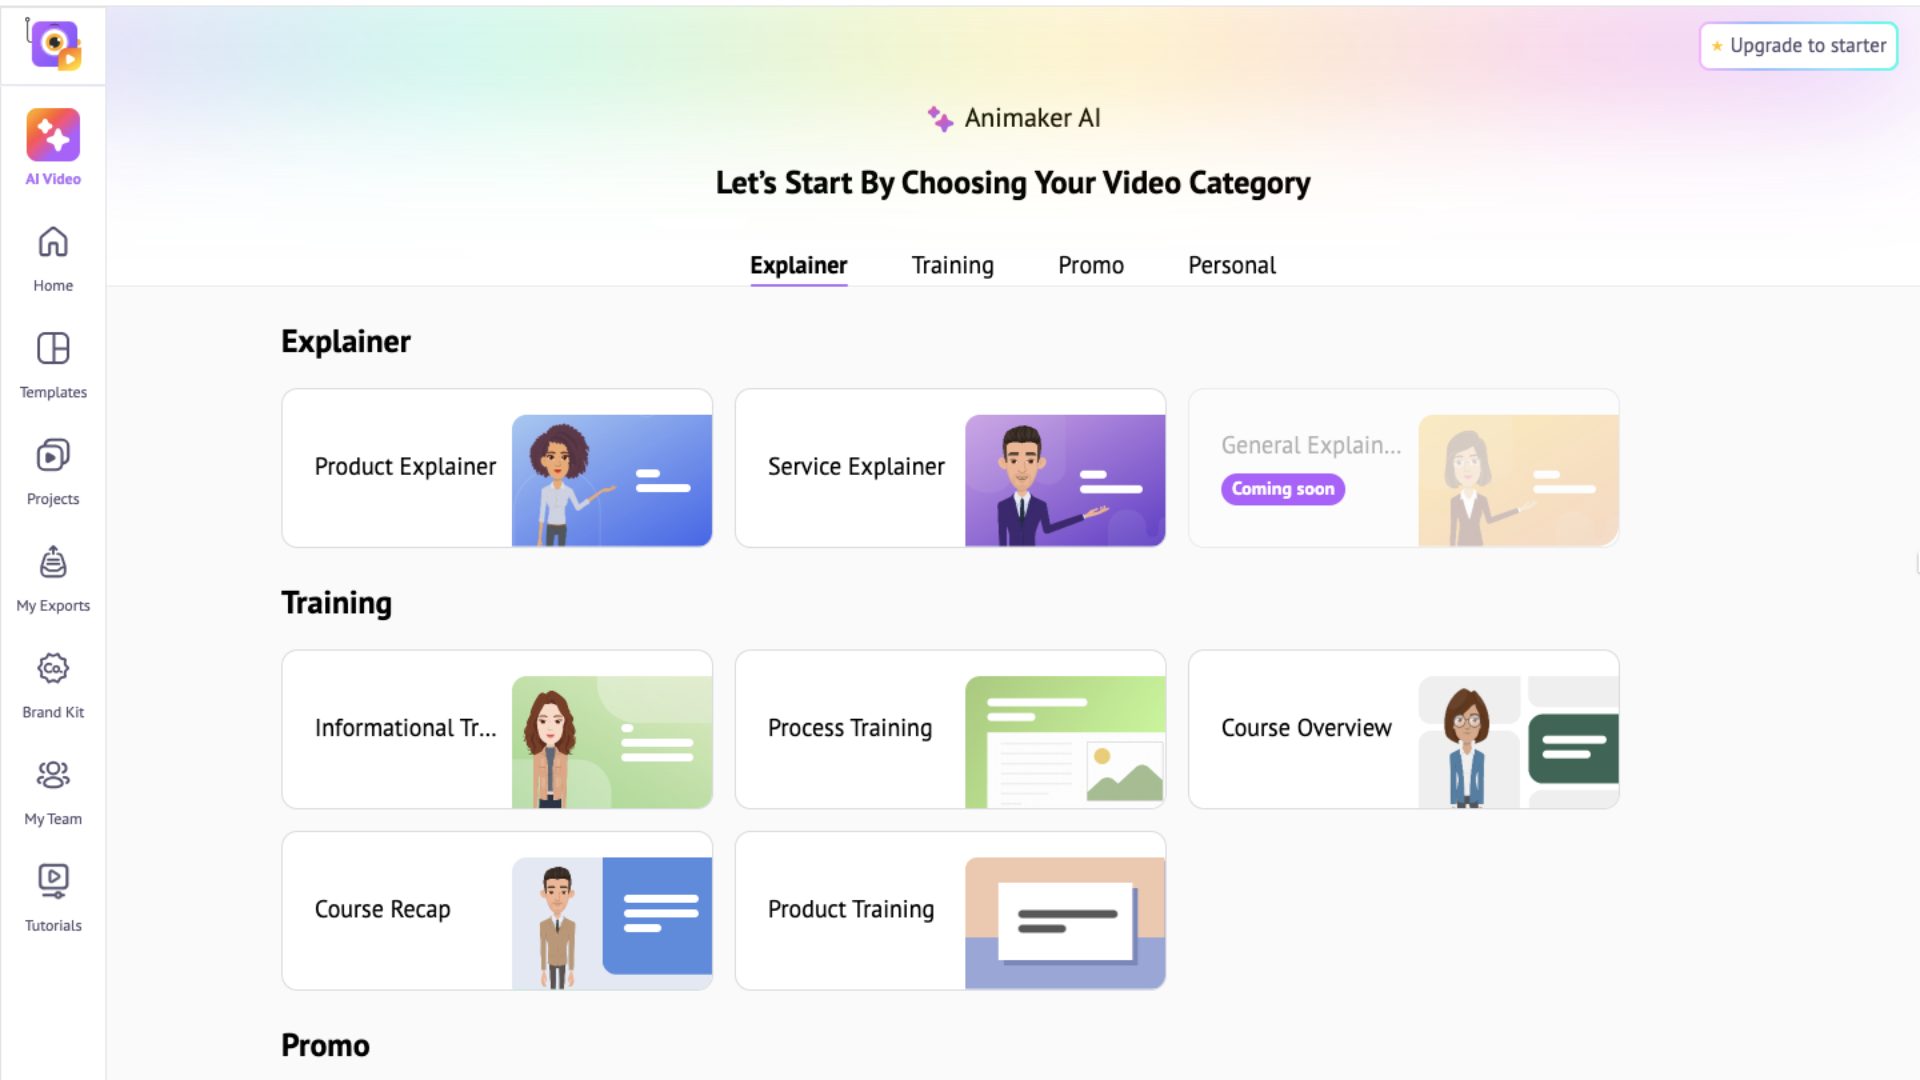
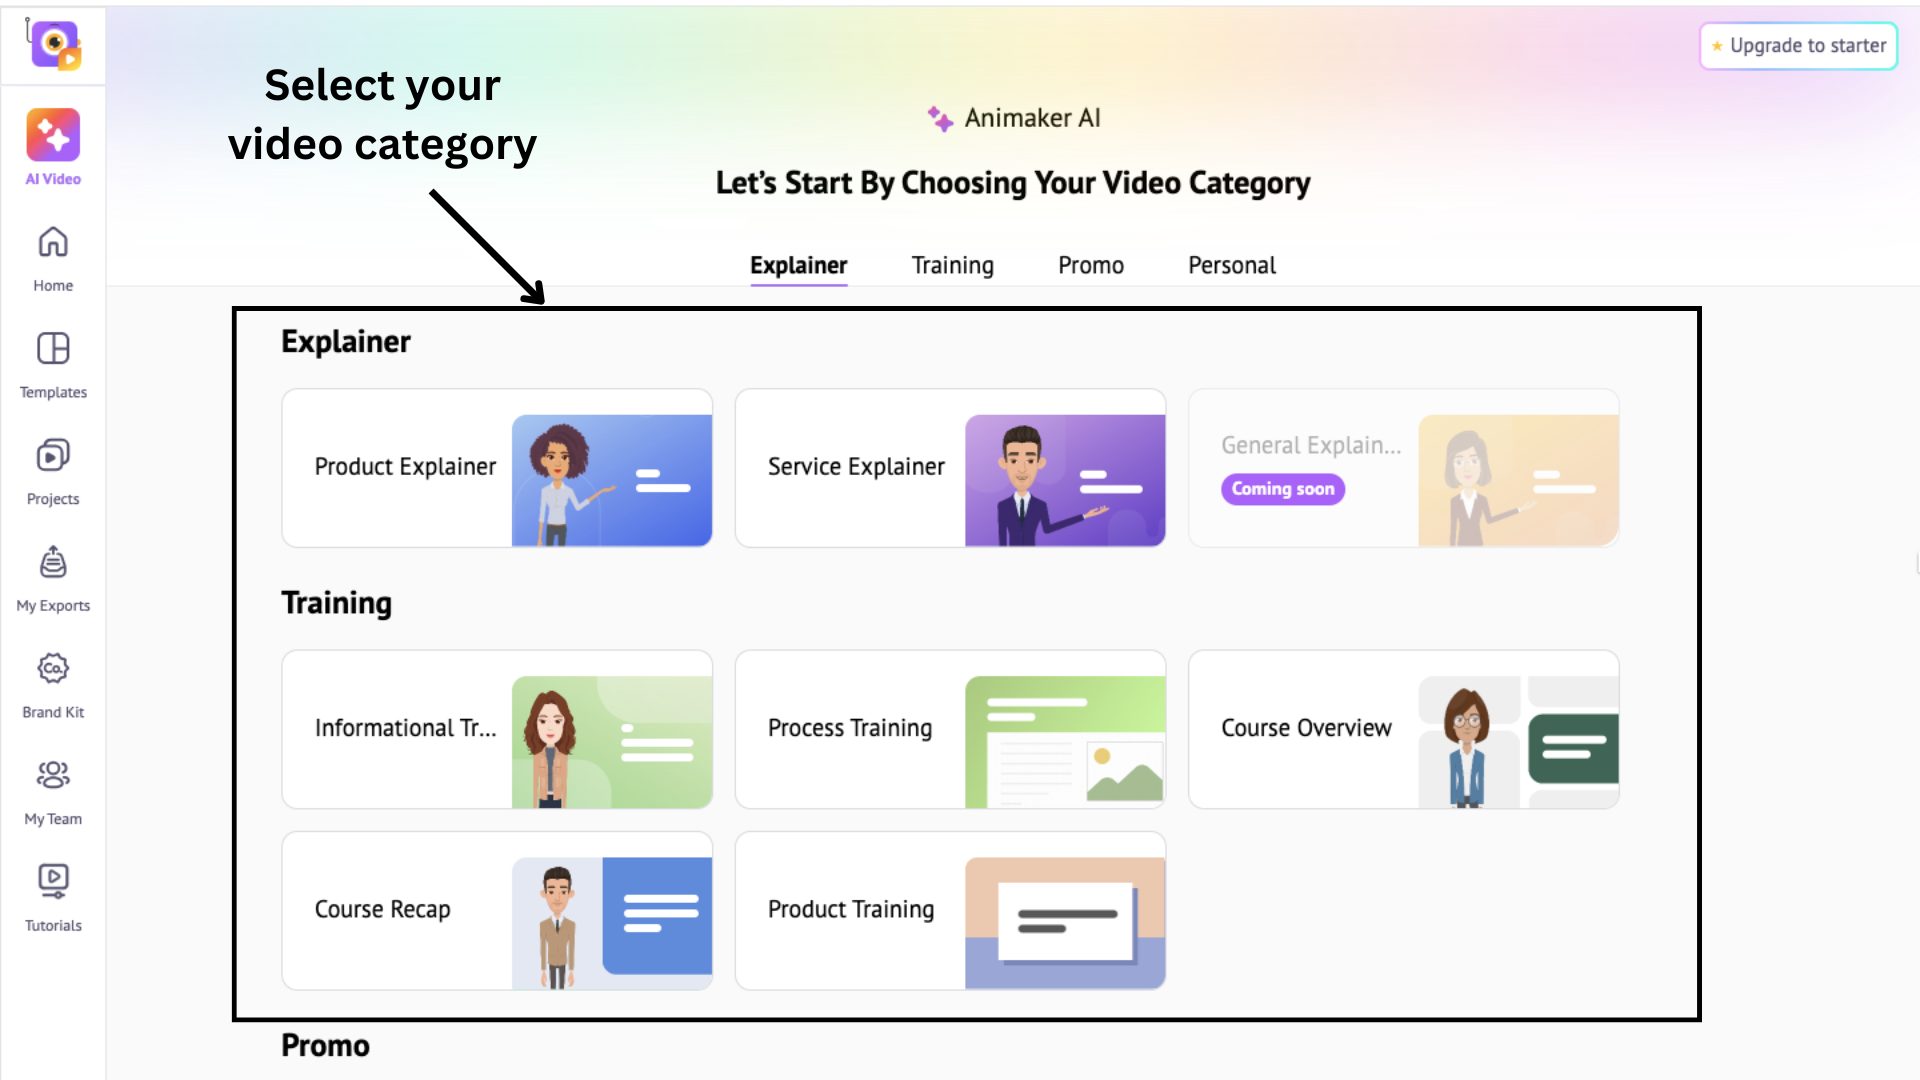
Step 1: Enter the Video Prompt
Start by selecting your video category. For this example, I’ll be creating a Product Explainer video!
Next, enter your own video prompt or choose from the sample prompts available.
Once done, click Generate Video to proceed to the next step.

Step 2: Answer AI’s questions
Animaker AI will now ask a few key questions to understand your video’s purpose and fine-tune its content. In my case, the AI provided clear and relevant questions based on my chosen category.
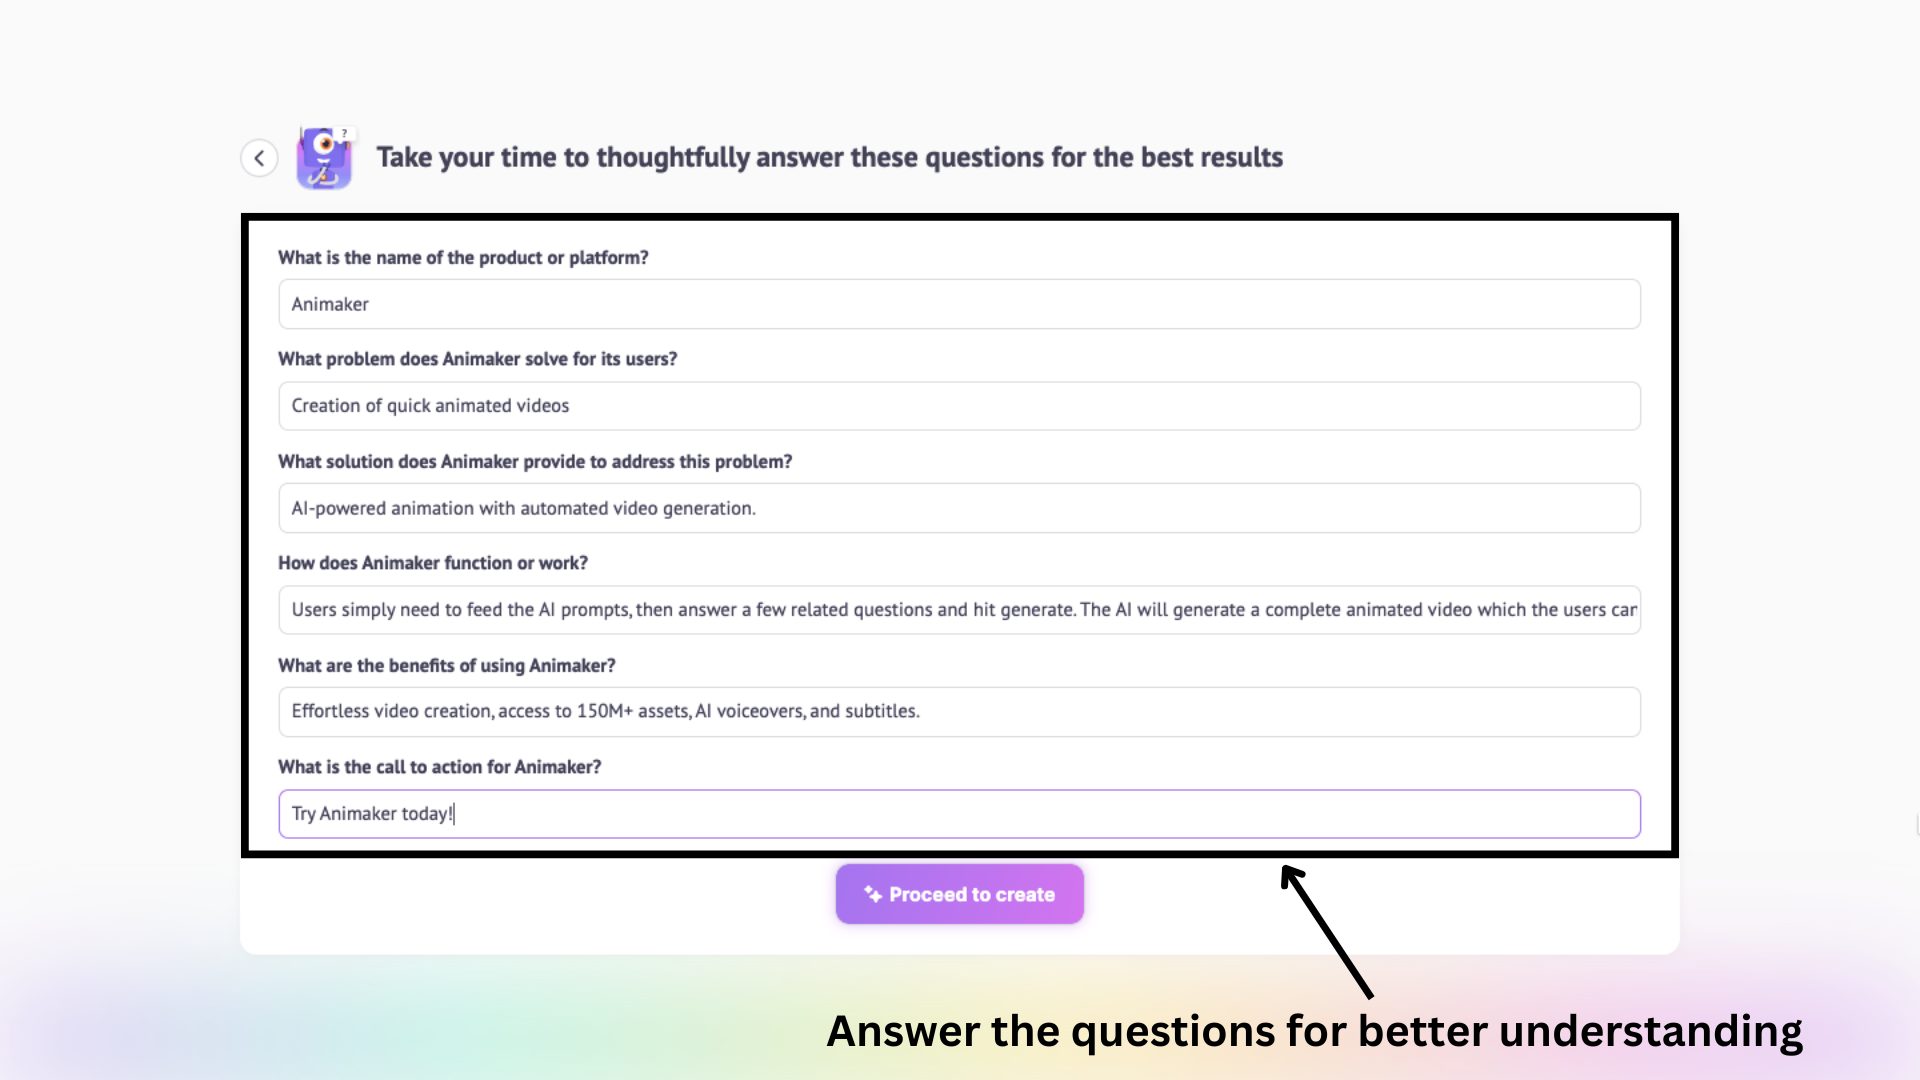
The questions may vary depending on the video type you select, and the AI might even prompt you to add additional content depending on your chosen category.
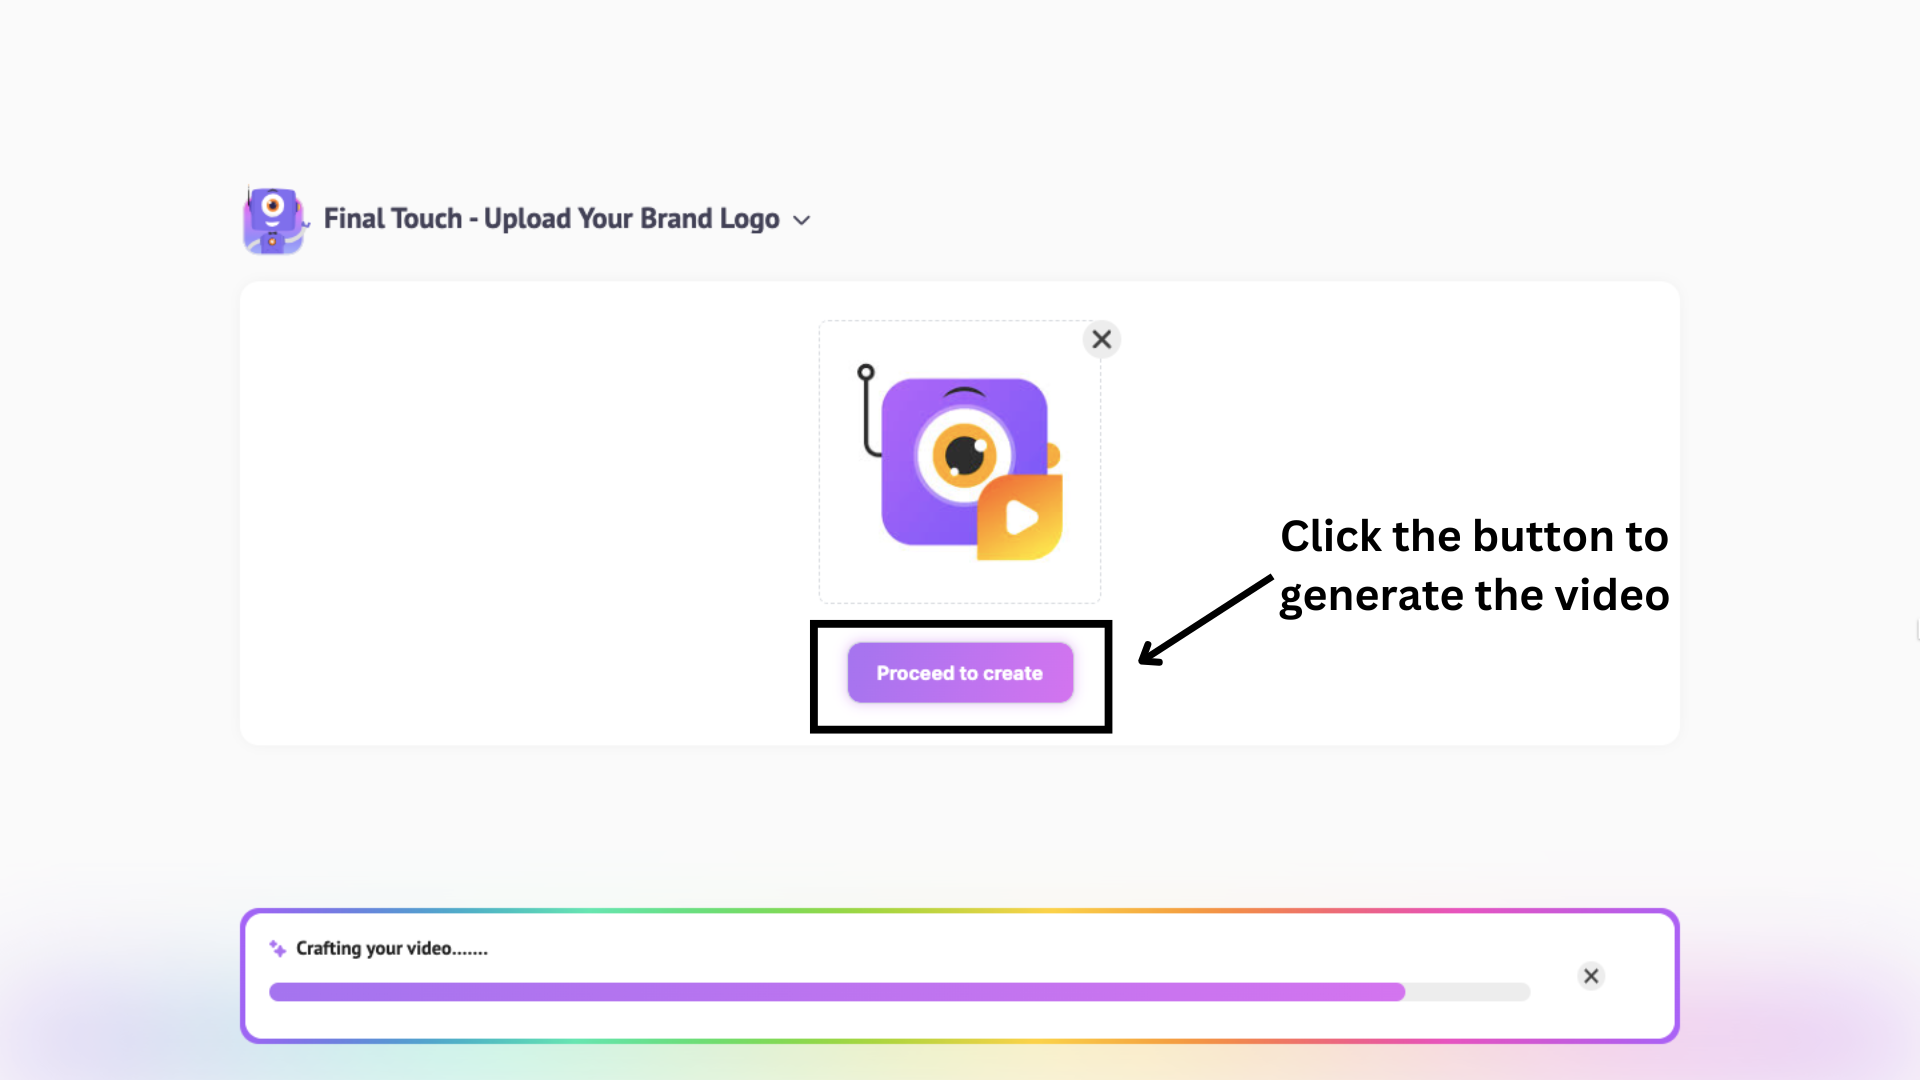
For example, since I chose a Product Explainer, the AI prompted me to include testimonials and add a brand logo for a more polished result.
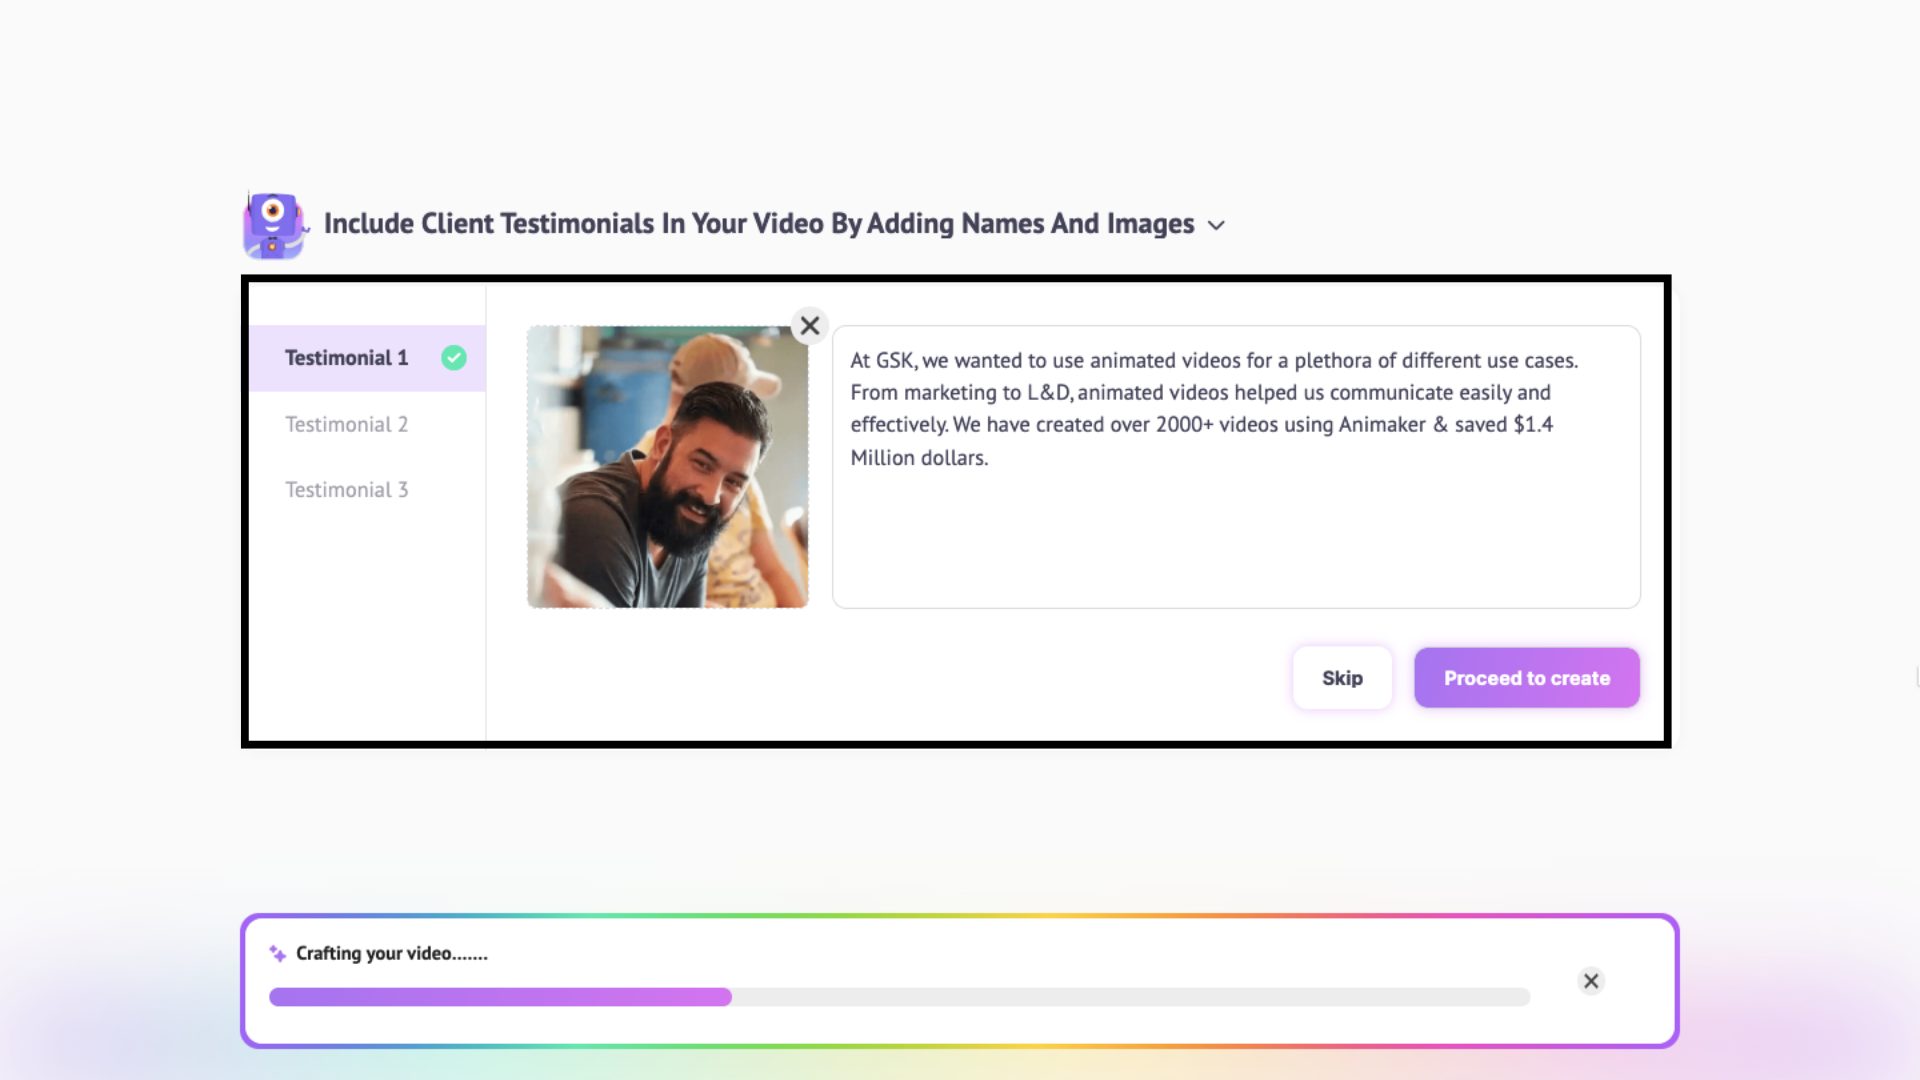
Once you've answered all the questions, click Proceed to Create.
Step 3: Generate & Edit
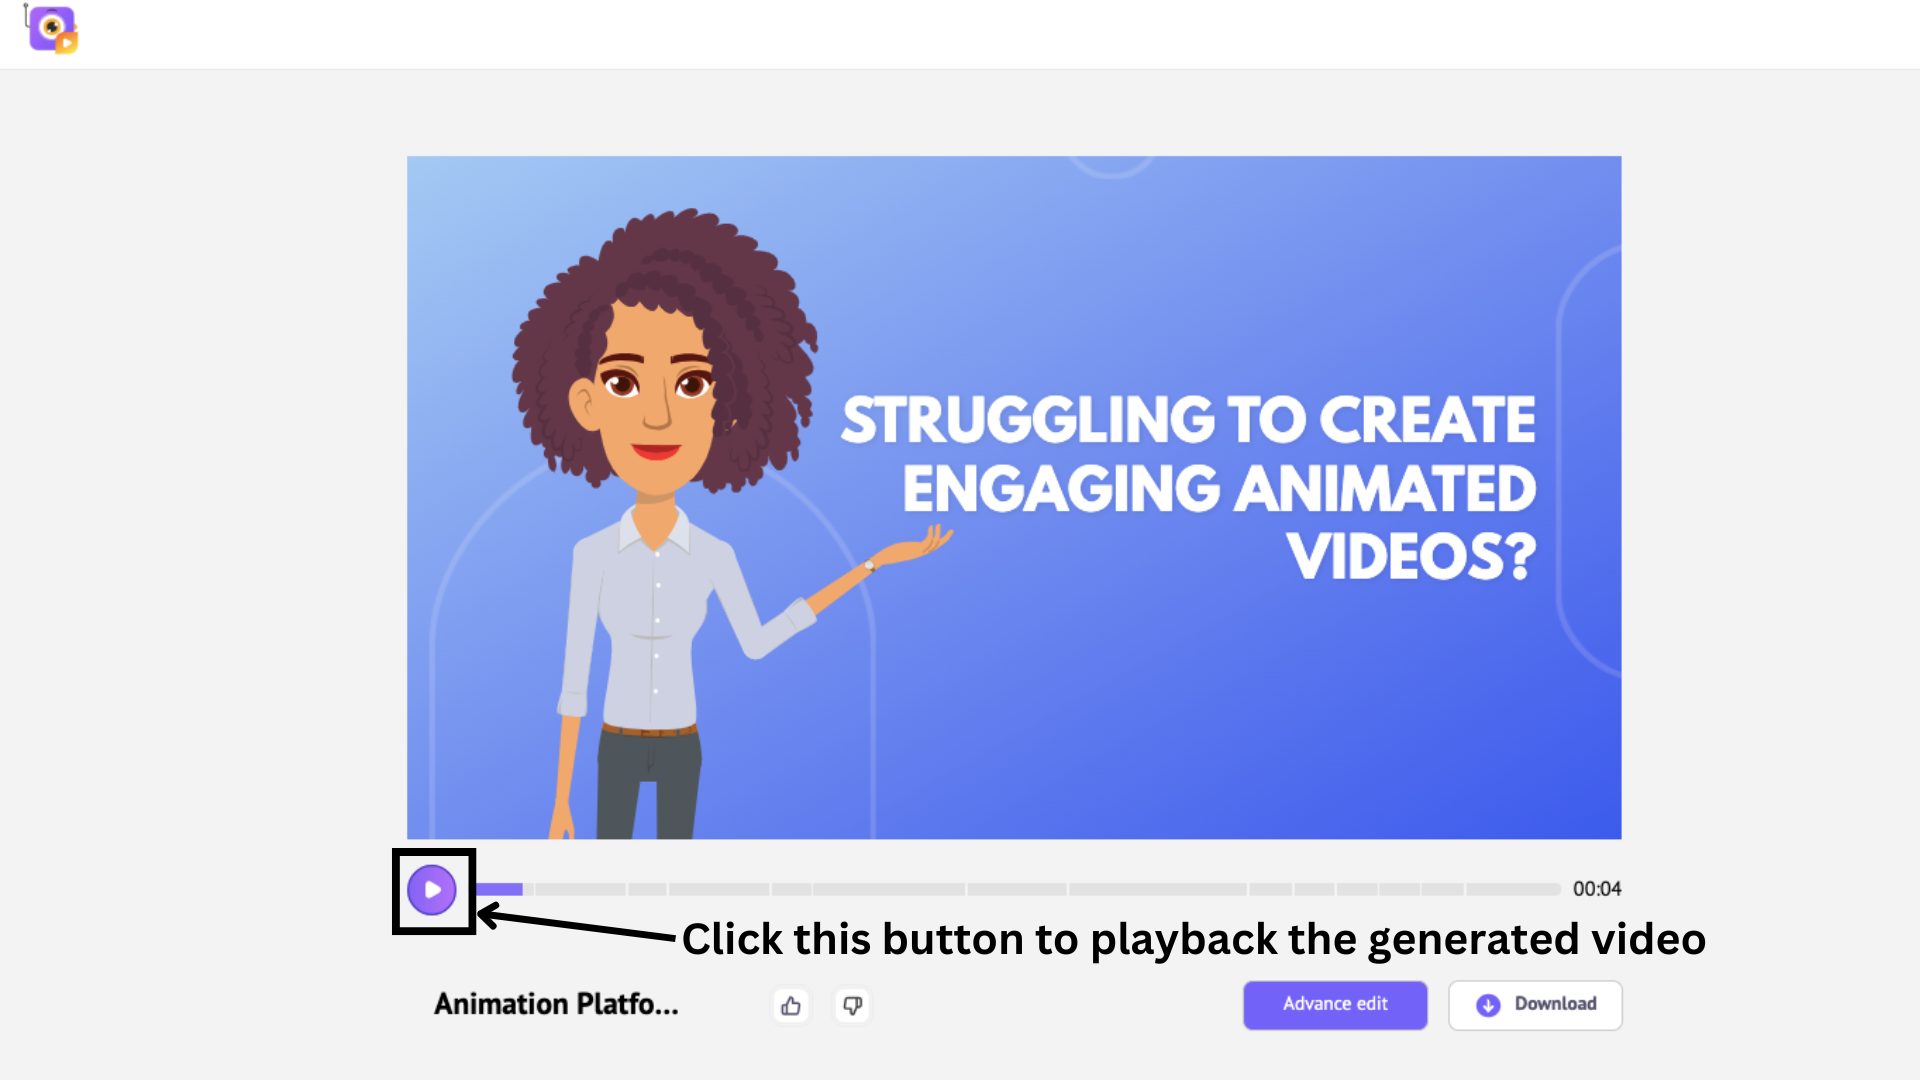
The AI will now do its work, and in just a minute, your video will be ready. Click the Play button to preview the generated video!
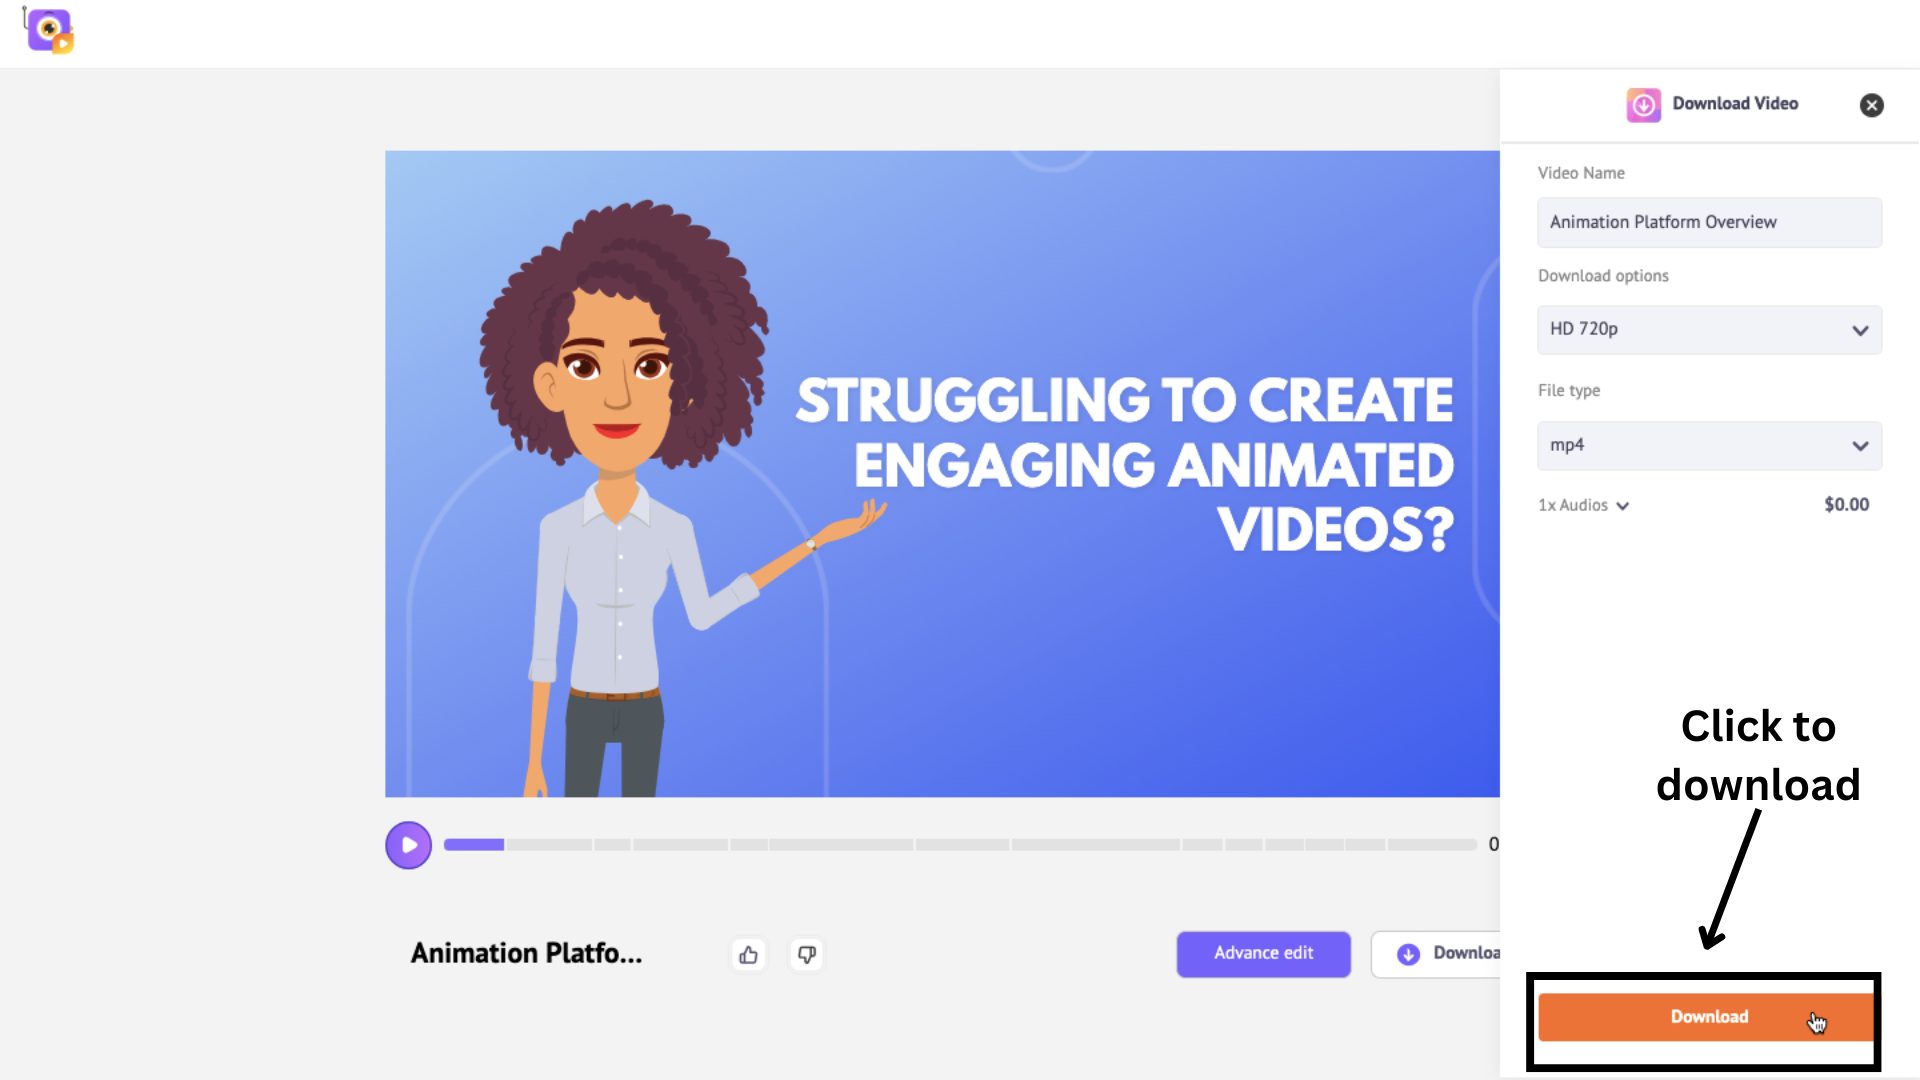
If you're happy with the video, click Download.
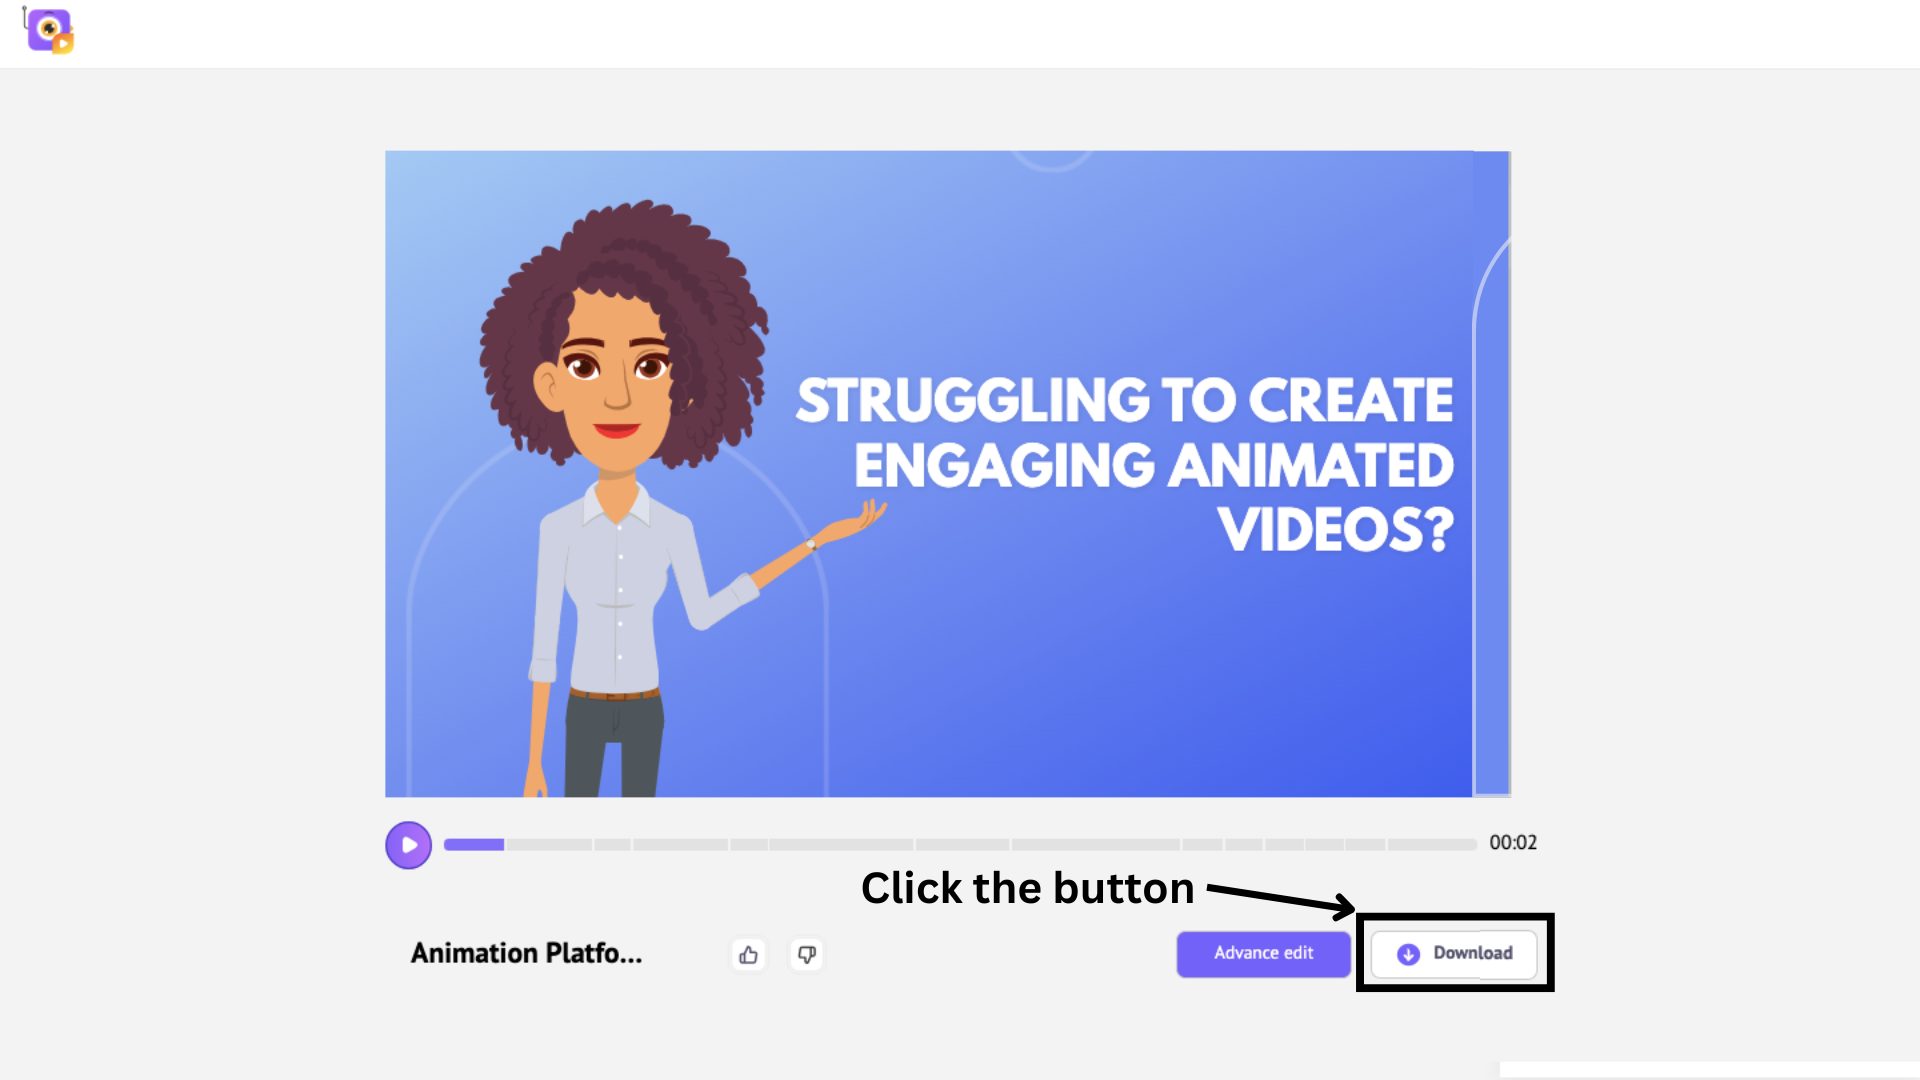
This opens a side panel where you can choose your preferred settings. Then click Download again to save the file from the Exports page.
Or, if you need to make some changes, click the Advanced Edit to refine your video.
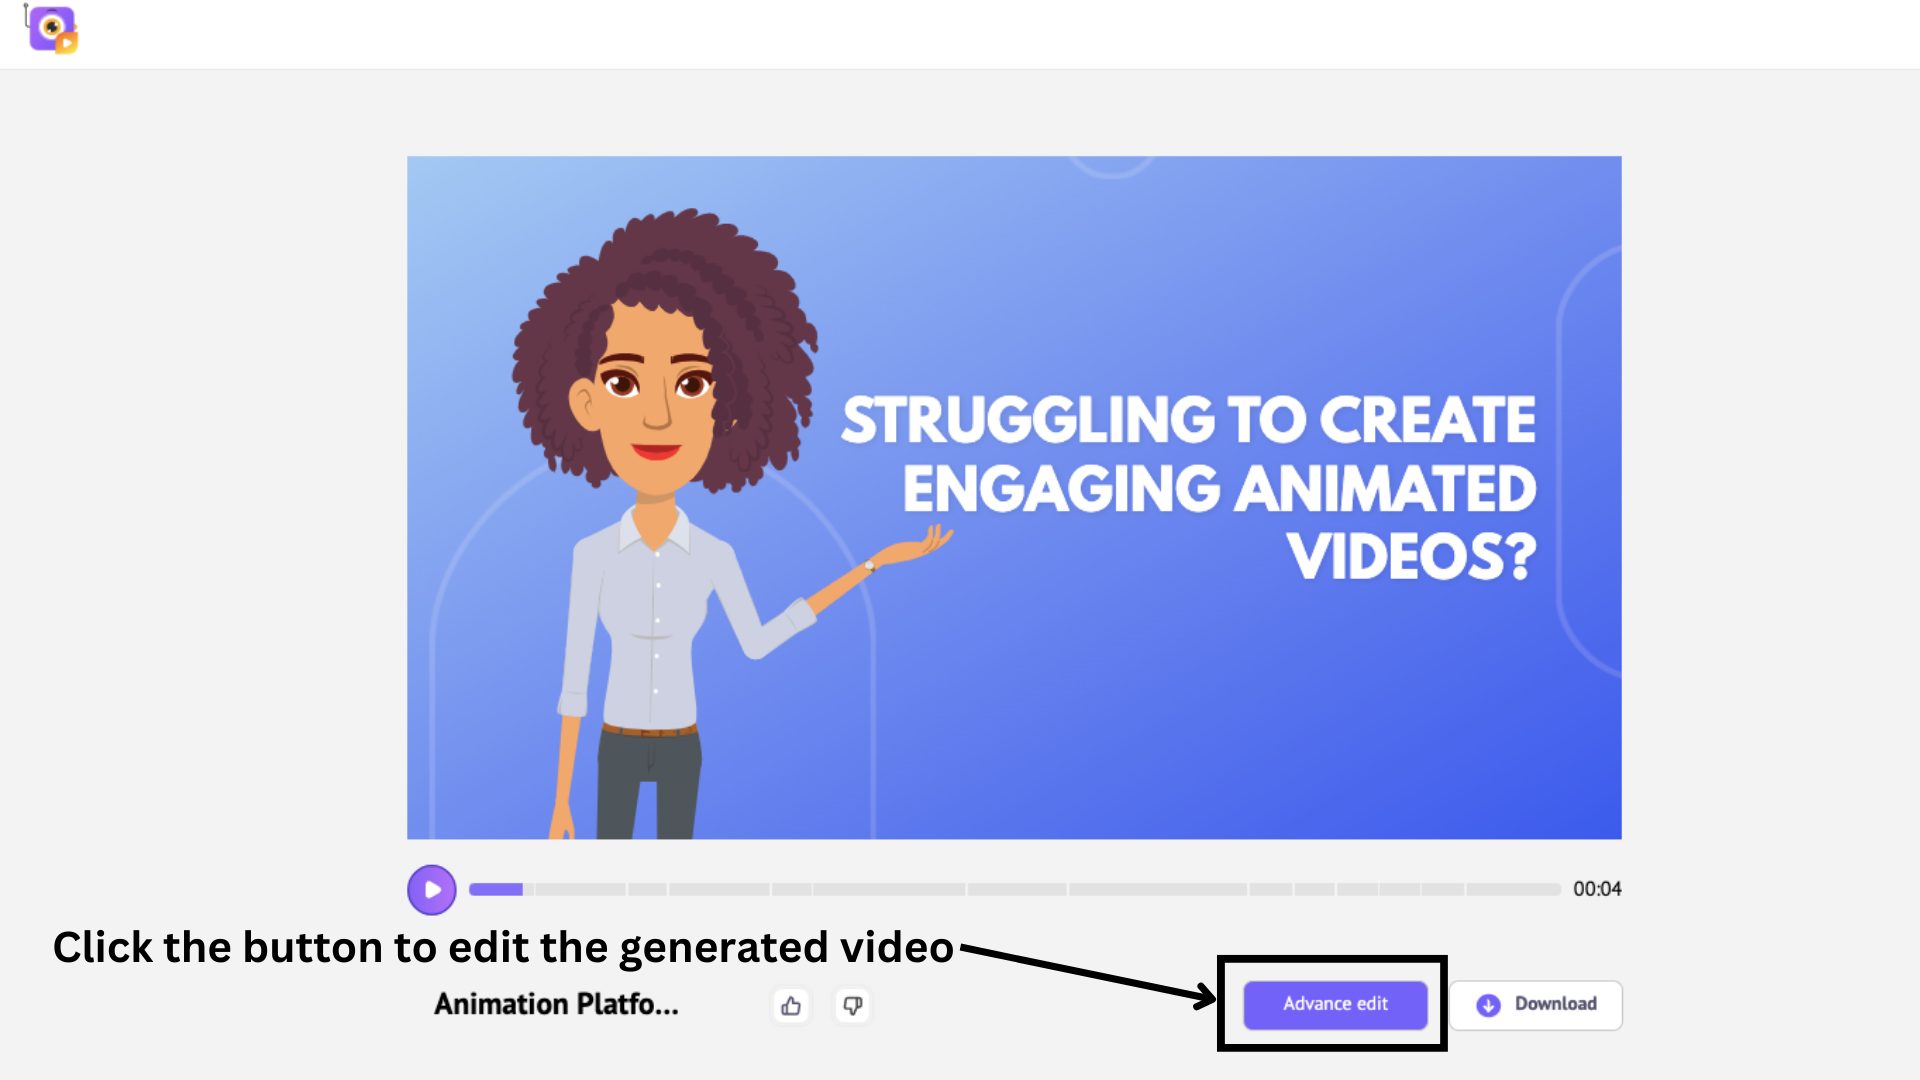
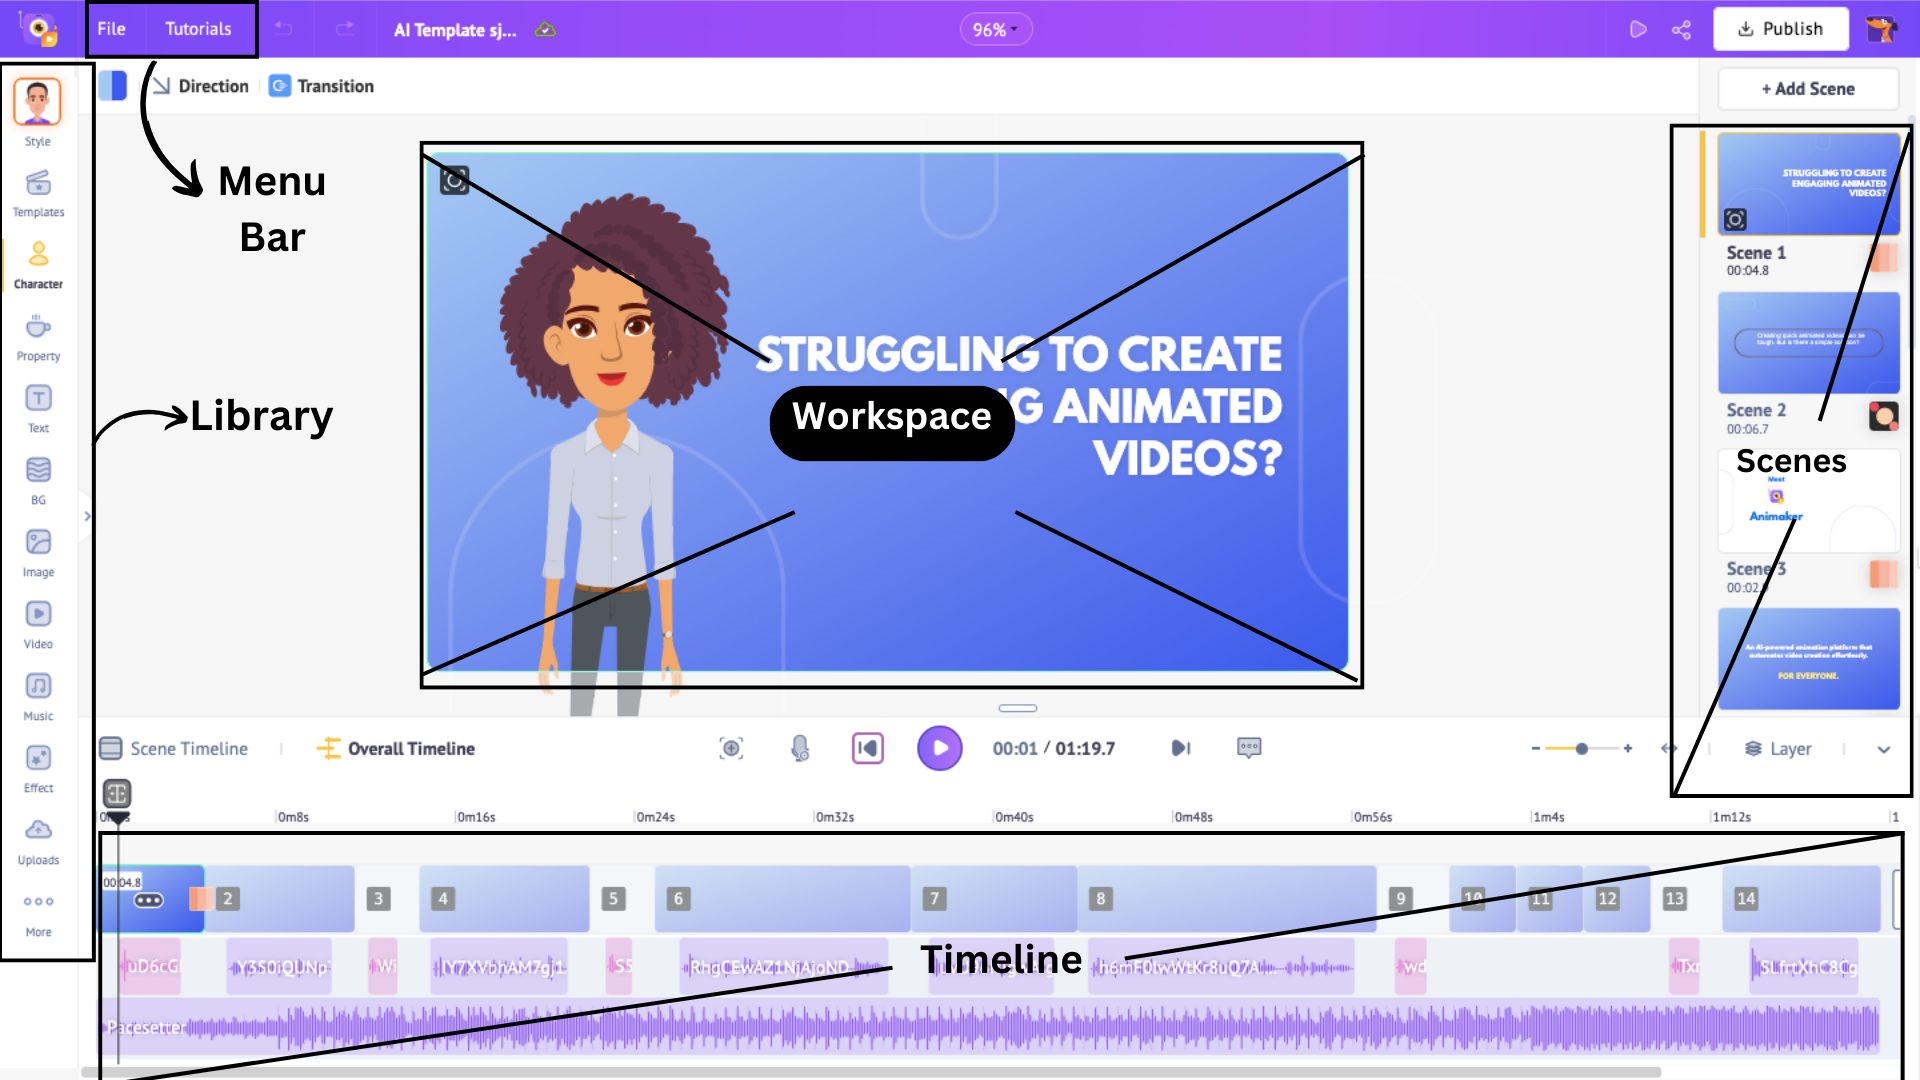
This will take you to the editing interface, where you can fine-tune every detail. Here’s a quick tour to help you navigate.
- The workspace in the center is where you design and edit your video.
- The library on the left gives you access to millions of assets.
- The scenes panel on the right helps you organize your content.
- The menu bar at the top offers essential tools and options.
- The timeline at the bottom lets you adjust timing with precision.
By now, you should have a good grasp of the interface. Your generated video will consist of the following key elements:
Now that we've covered how to make AI generated video, let’s take it a step further and explore how you can add or edit these elements in your video.
1. Text
Your video comes with plenty of text elements, and tweaking them is easy!
Just click on any text box and type in your changes.
As you edit, a panel will appear on the side, allowing you to adjust the font, size, style, and more.
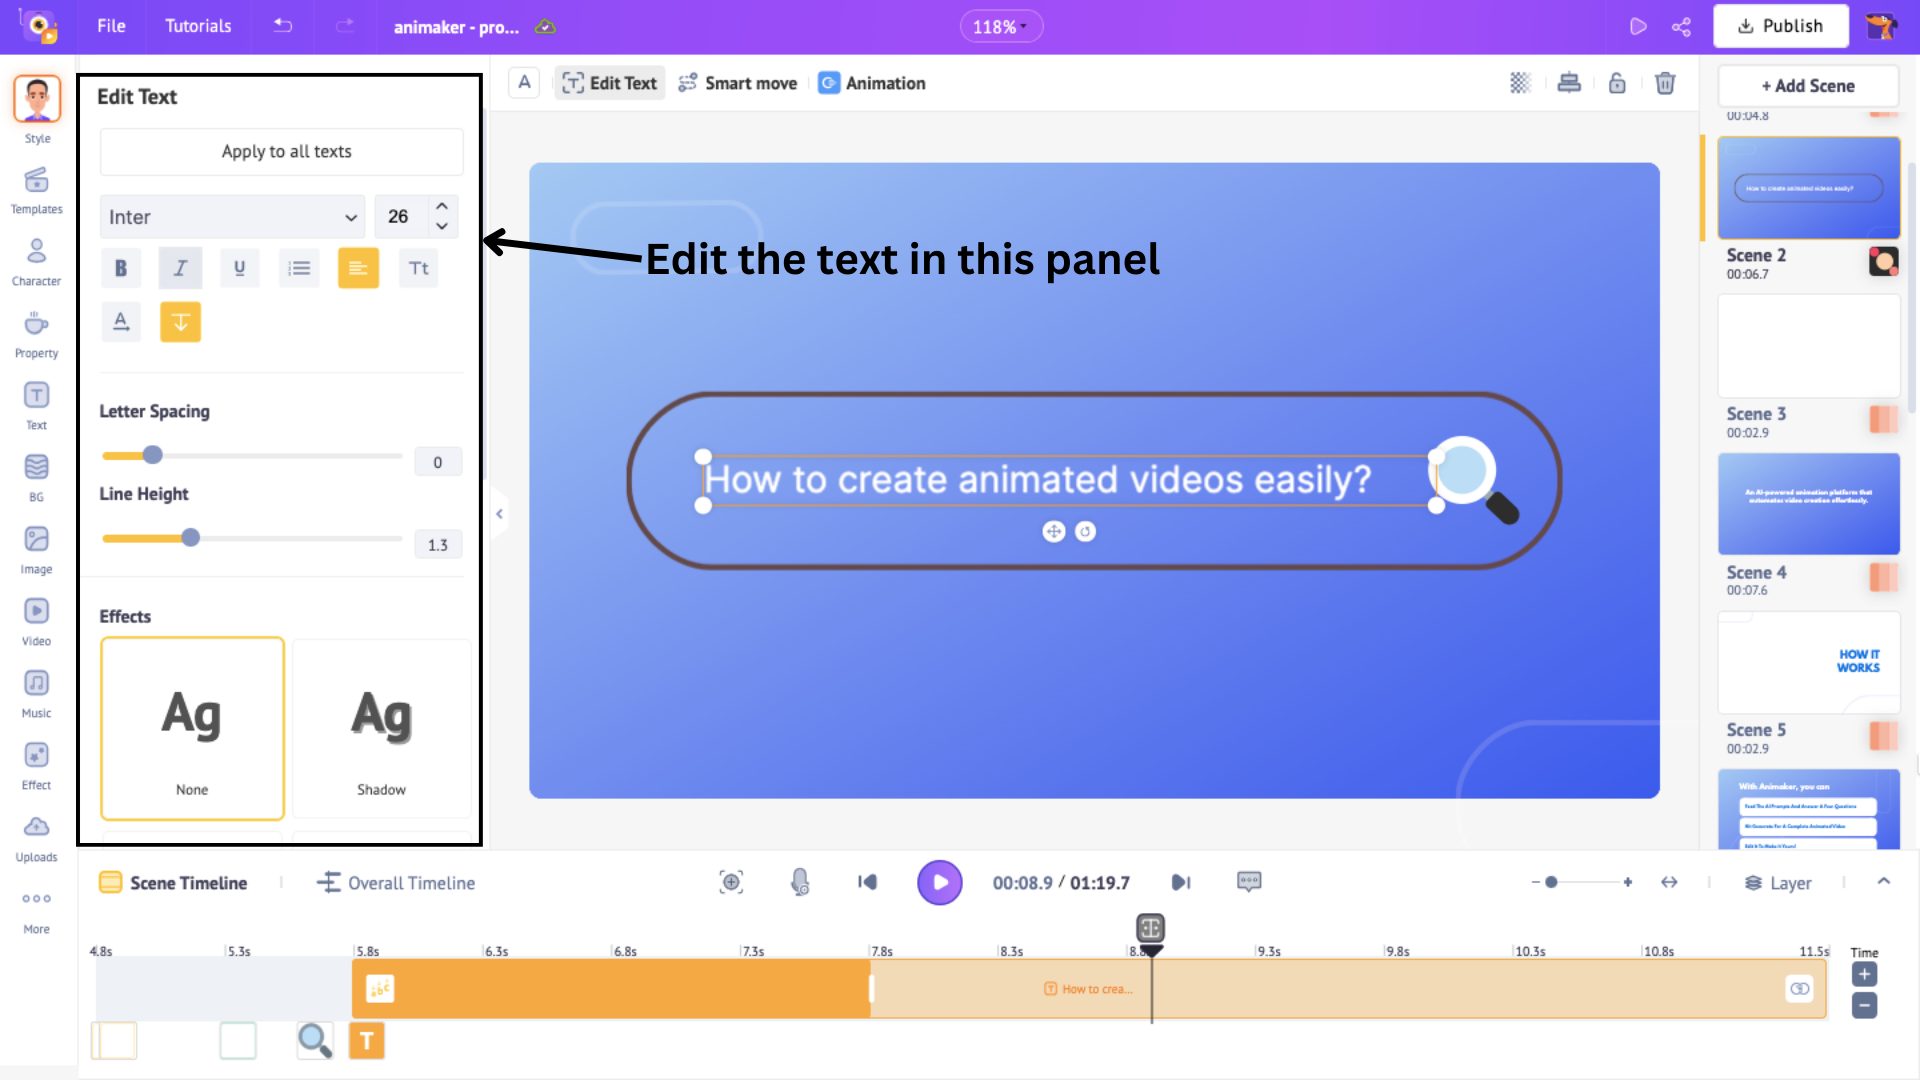
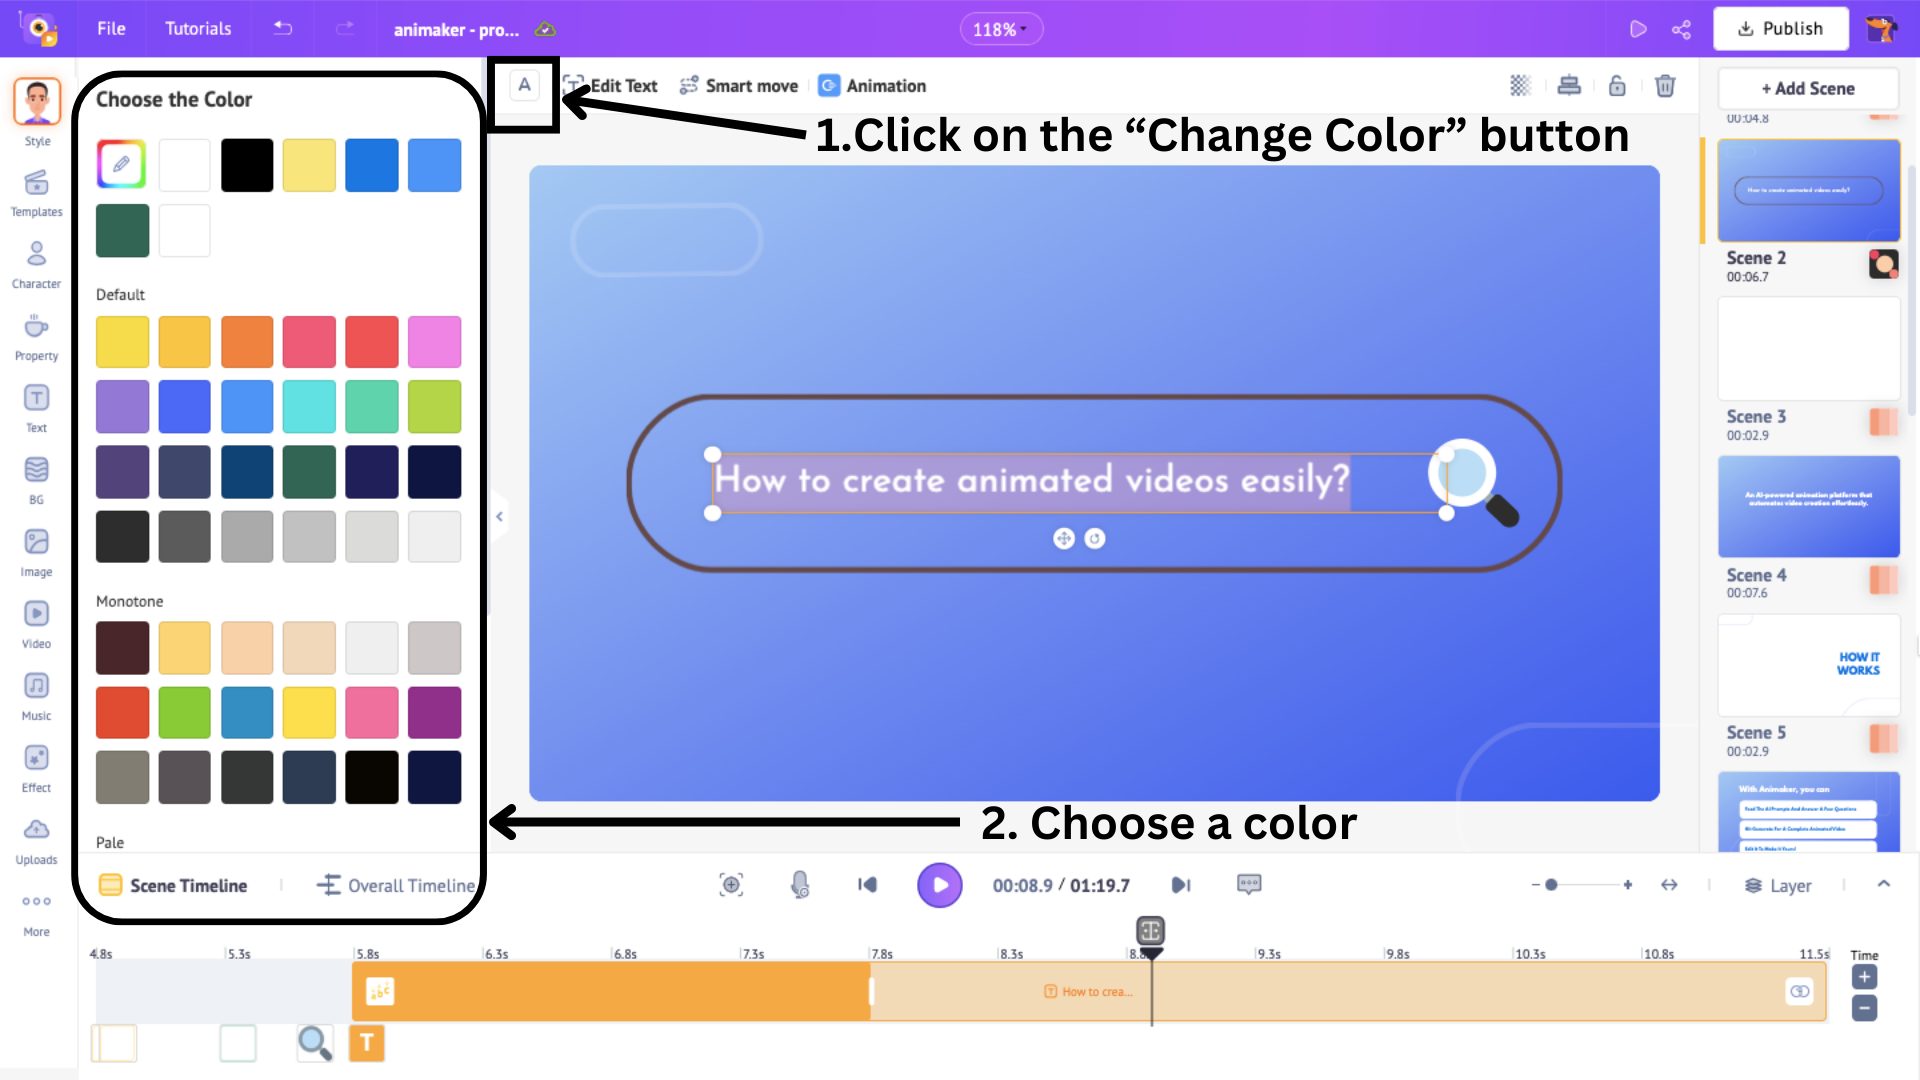
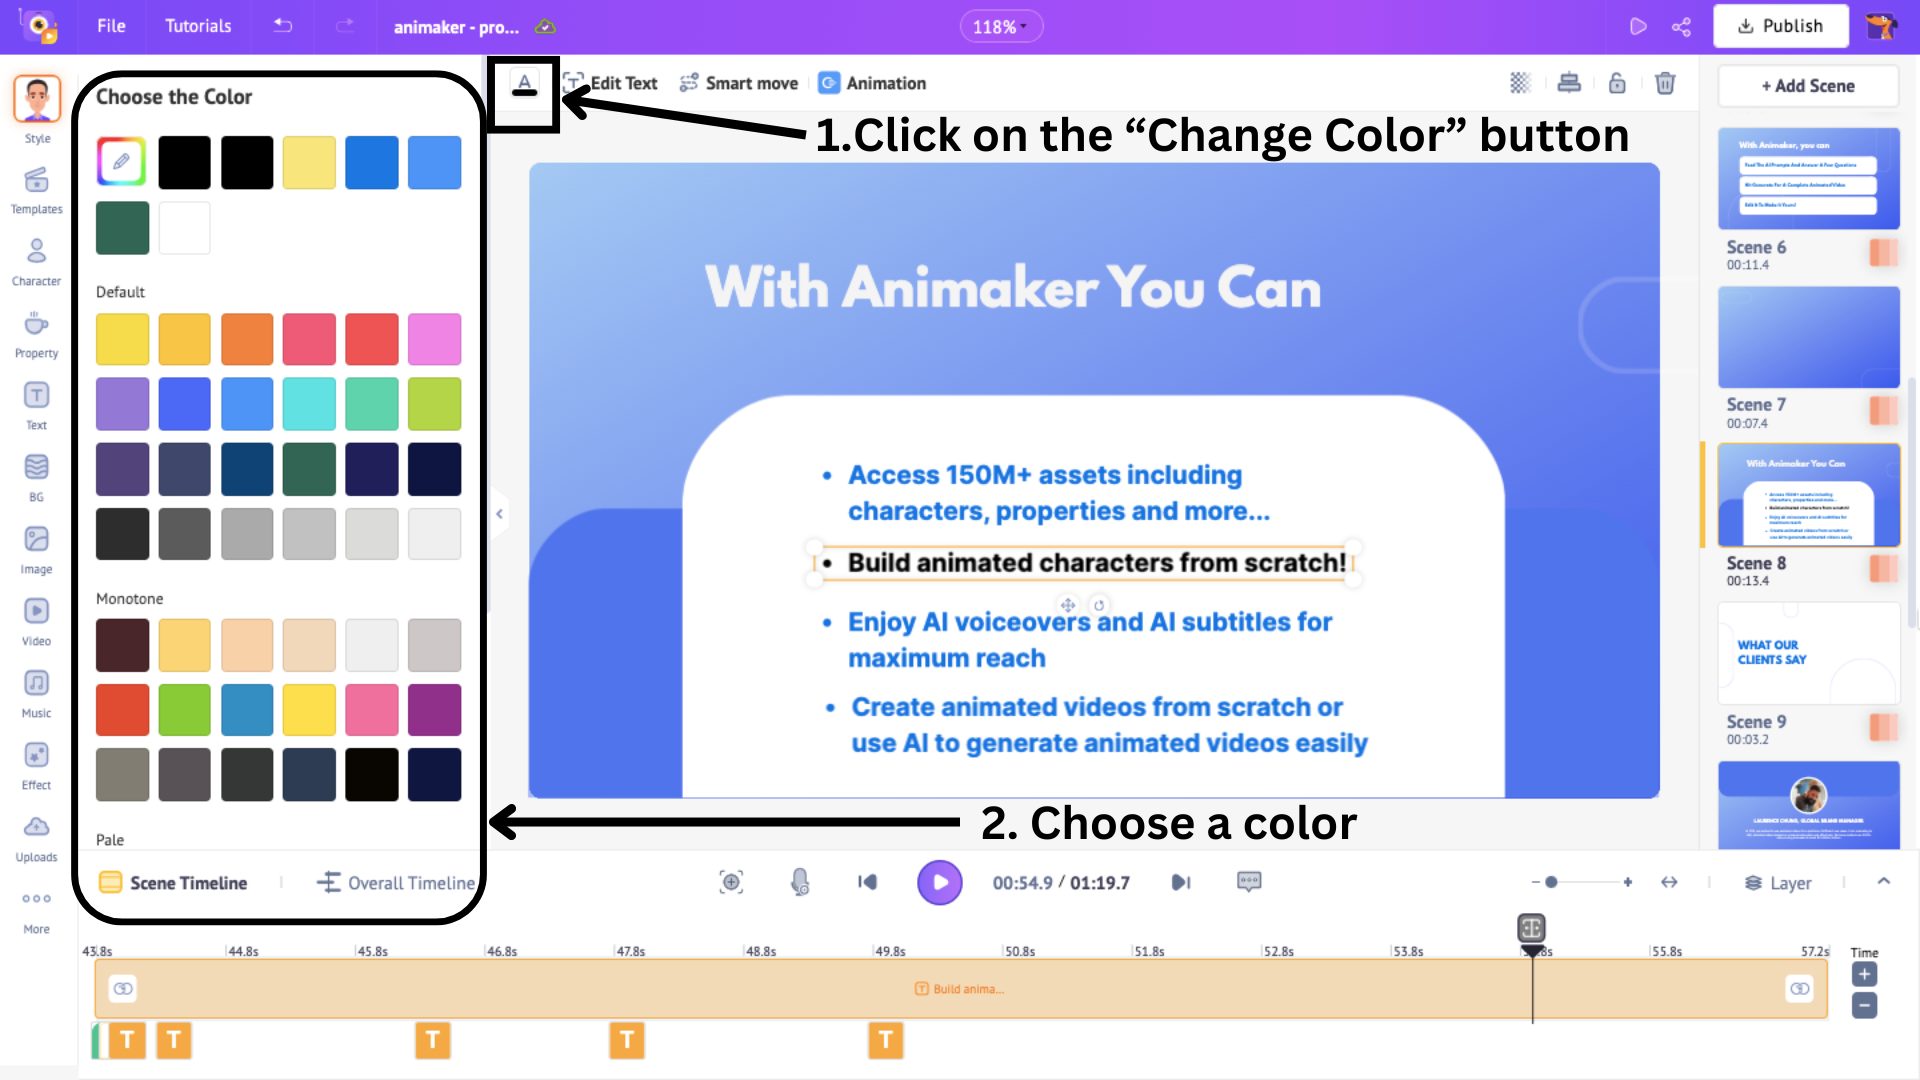
You can also change the color of the text by clicking on the Change Color box above the workspace.
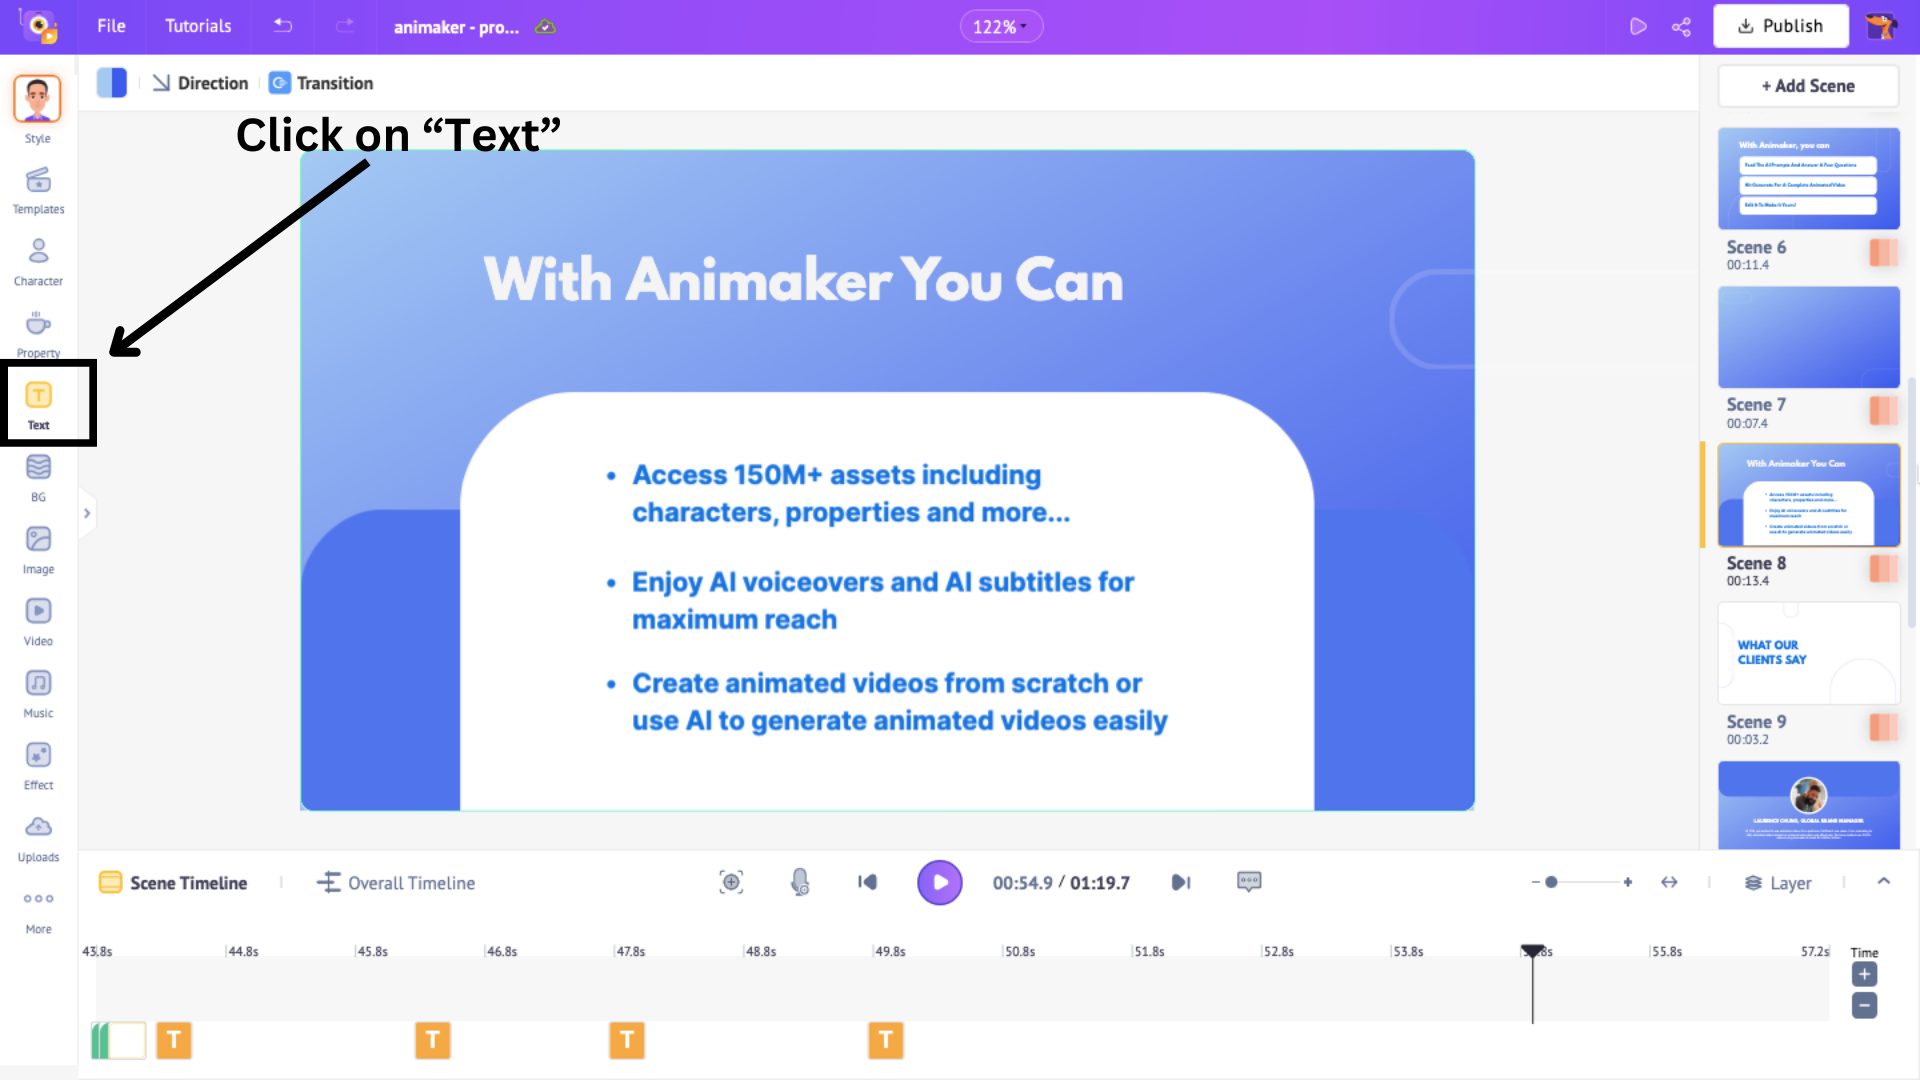
That’s how you modify existing text in your AI-generated video! But what if you want to add new text?
It’s simple. Head over to the Text tab in the library.
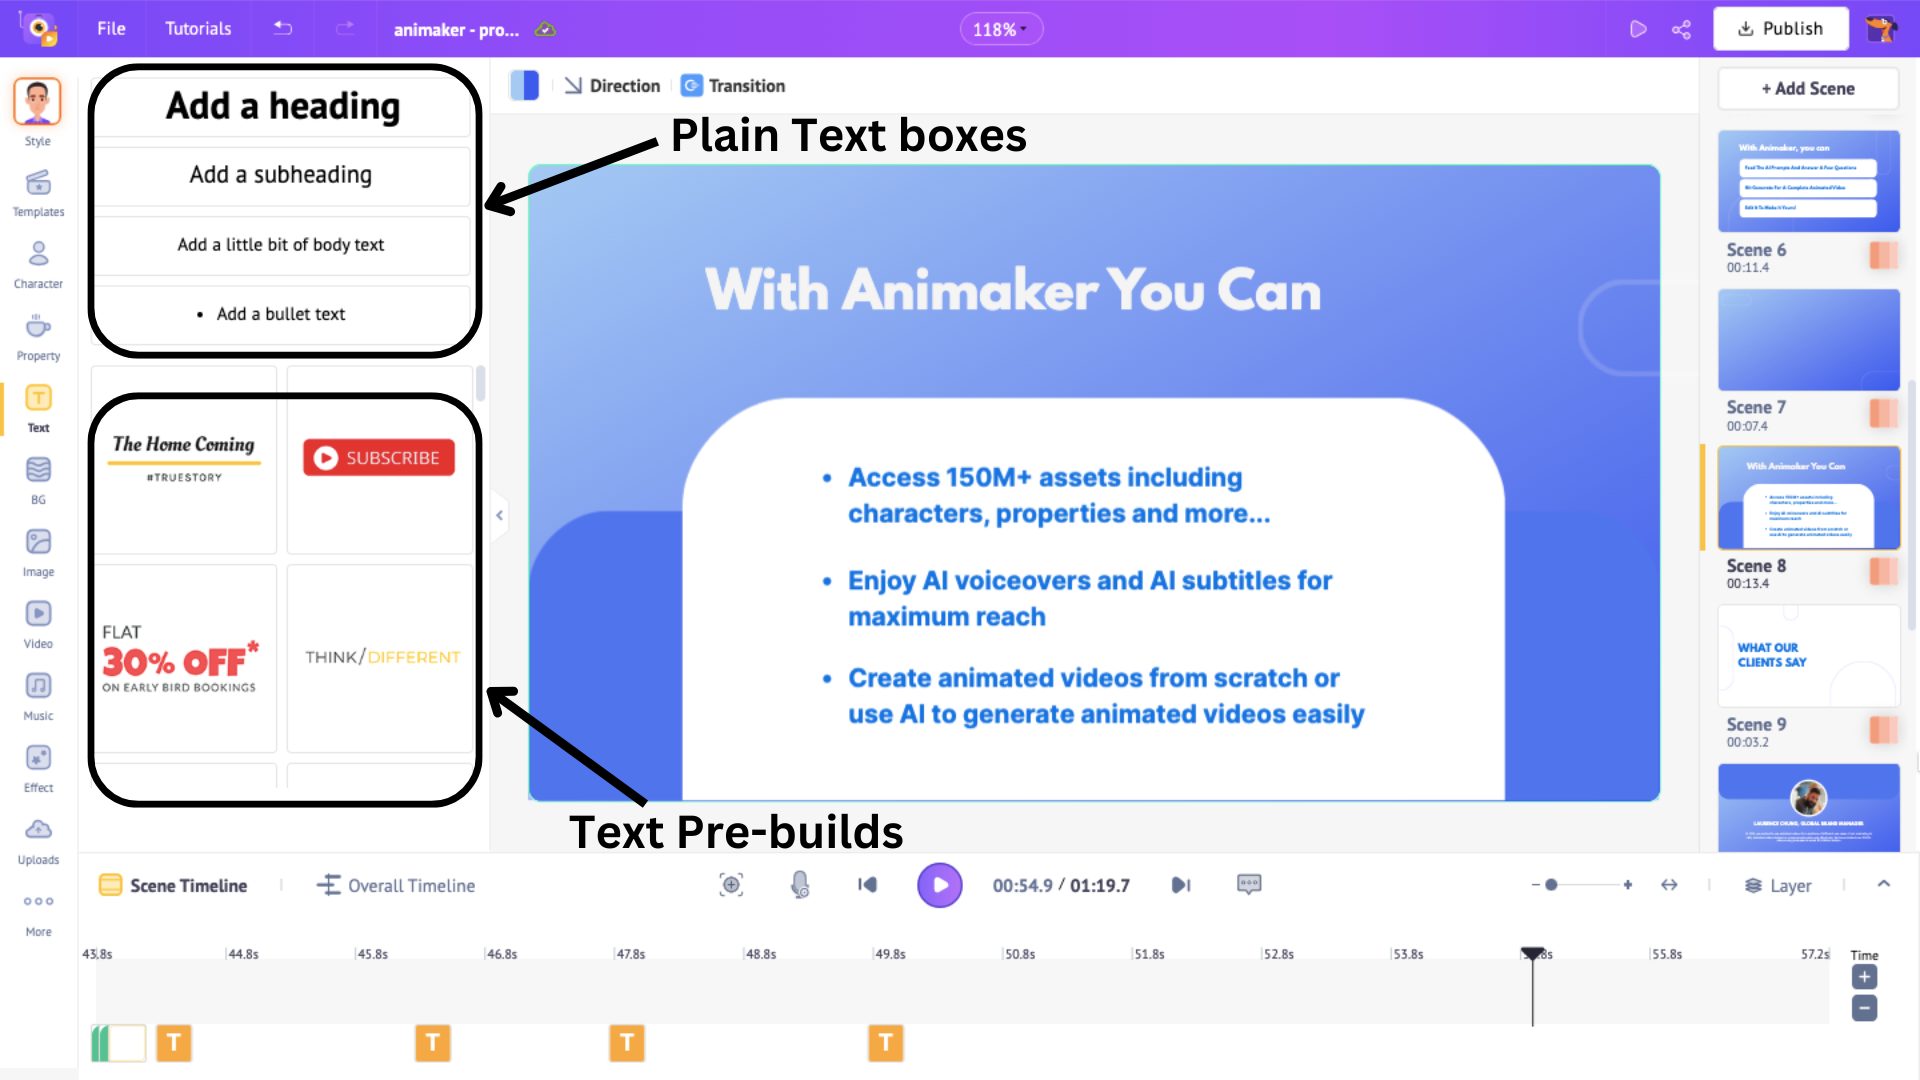
Here, you’ll find two options: Plain Text and Pre-Built Text.
- Pre-Built Text includes ready-made styles with animations, fonts, and effects - perfect for quick and stylish edits.
- Plain Text gives you full creative control, allowing you to design from scratch.
Choose a text box and place it where you want it in the scene. I’m choosing a plain text box. Position it perfectly where you want it.
Then, type in your text, and you can change the font, adjust the size, and add effects from the editing panel on the side.
You can change the font color by clicking on the Change Color box above the workspace.
See that new orange section in the timeline? It represents the duration of the text that you just added. Move the ends to adjust how long you want it to stay visible in the scene.
You can make this static text into a dynamic one by adding animation effects to it!
To do that, click on the text box and select Animation to explore 35+ enter and exit animation effects.
Pick an entry and exit animation, and you’ll notice a highlighted section added to the orange bar. This is the animation effect’s timing, and you can adjust it by moving the inner edges across the timeline.
Next, let’s add some relevant icons to the scene.
2. Property
Adding icons and properties can help emphasize key points and enhance the overall video.
To add icons and properties, click the Property option in the library.
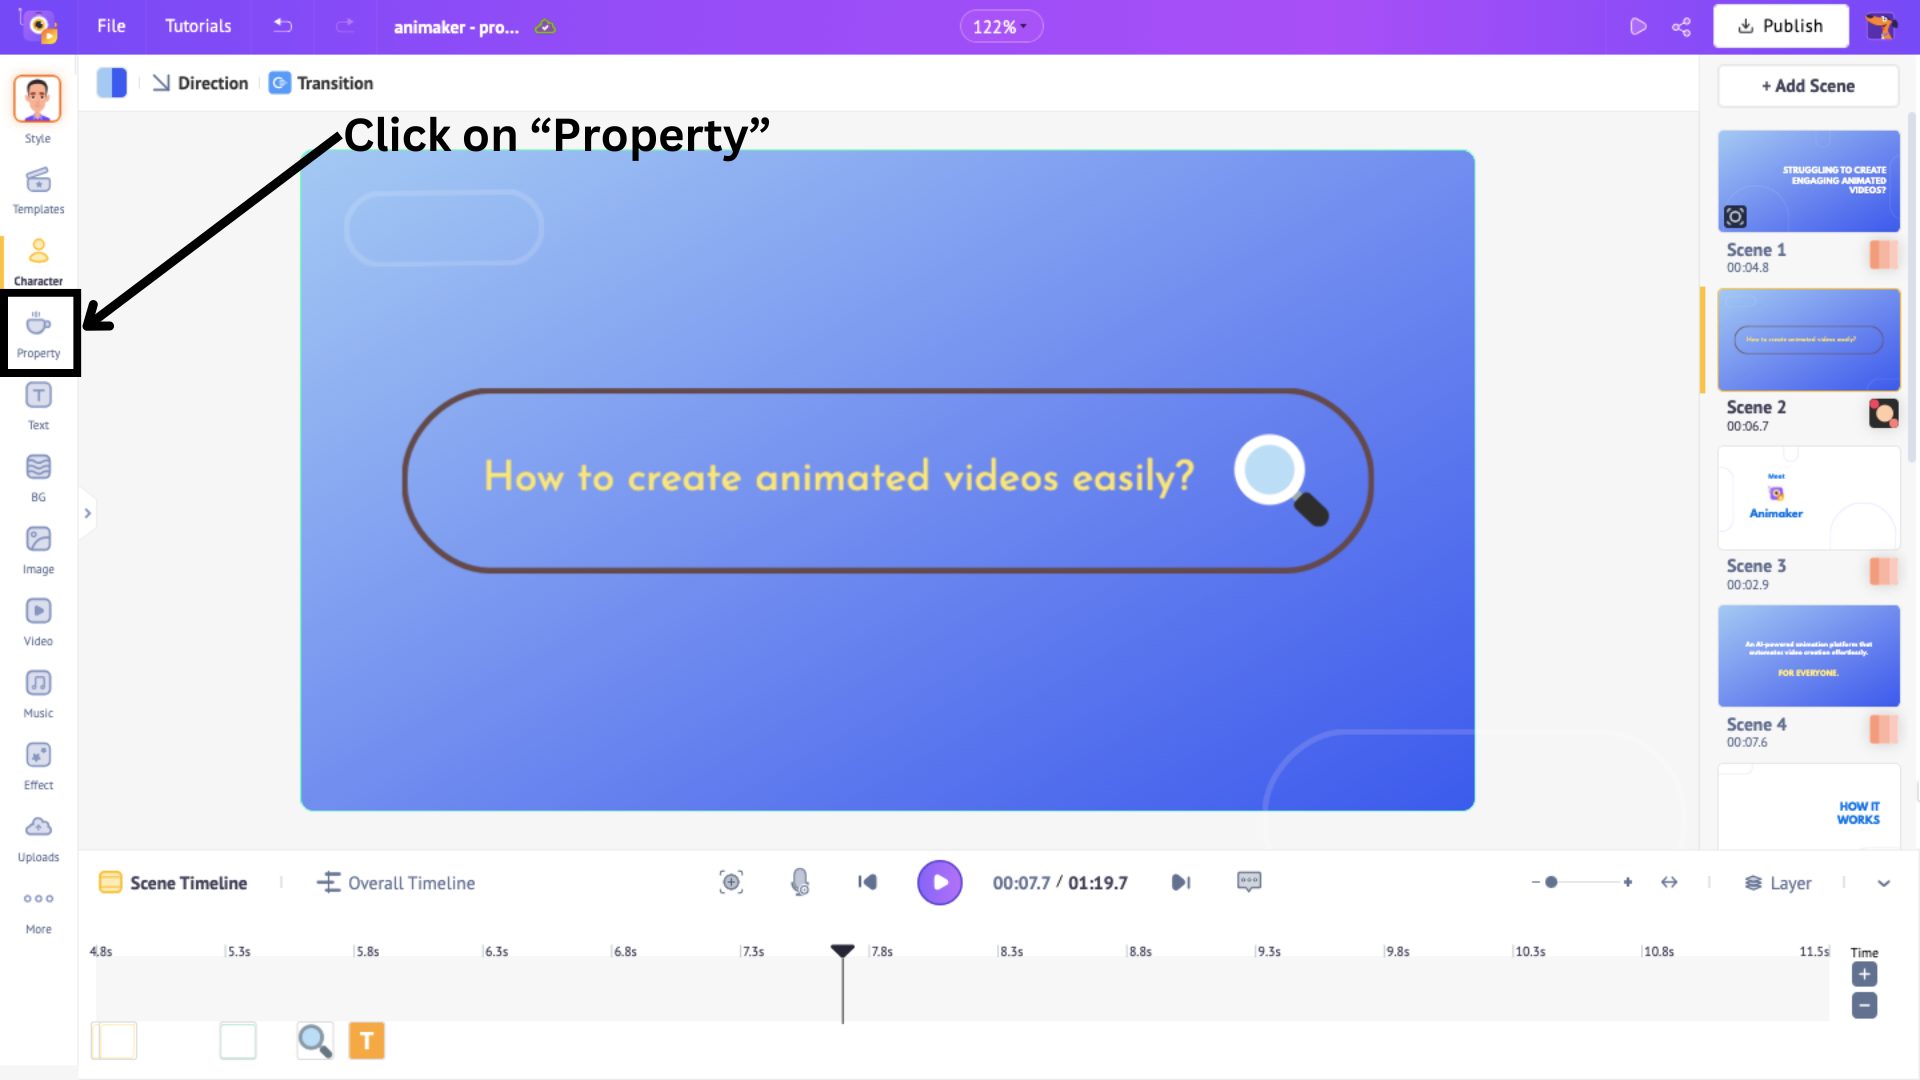
This opens a huge collection of 90K+ properties and icons for you to add to your video. Scroll through the collection or find one immediately by searching for it in the search bar.
When you click on an icon, it gets added to the scene. Position it where you want the icon to be. I have added a question mark symbol to the scene.
When an icon is added, a blue section appears in the timeline. This indicates, you guessed it, the duration of that particular icon appearing in the scene.
To adjust the duration, hold and slide one end of the blue section over to a specific time.
Just like text animations, you can also add animation effects to icons. Click on the icon, select the Animation option, and choose entry and exit effects.
After applying the effects, two highlighted sections will appear in the blue bar, showing the animation's duration.
The duration of these animation effects can be adjusted by sliding the inner corners of the highlighted sections.
This is how you add text and icons to a scene. Next, let’s look at an interesting element.
3. Character
With the right characters, your video becomes more than just content. They add personality, making your brand feel more relatable and authentic.
Let’s explore how to work with characters in Animaker.
To replace a character, click on the existing one and select Replace.
This will open the Character library on the left, which offers a wide range of characters, from kids to plus-sized avatars.
Simply pick the one that best fits your video and click Apply to swap it in.
And just like that, the character is replaced!
Now, let’s see how to add a new character to your scene.
Click on the Character library on the left, select the character you want, and place it in the scene.
Once the character is in place, you can add actions to bring it to life. Click on the character, select Action, scroll through the various options, and pick the one that best suits your scene.
Now, want to make your character even more expressive? Switch to the Expressions tab and choose the perfect emotion to match the scene.
And that’s how you add characters, actions, and expressions to your video!
But wait… did we mention that you can create fully customized 2D characters from scratch?
Yes! You can design characters that look like your team members or anyone else you need for your videos.
Check out this quick video tutorial to learn how -
Now, let’s move on to adding a voiceover to your character.
You might wonder why you need to add a voiceover if the AI has already generated one.
Good question!
We’re adding a voiceover specifically for the new character we just introduced. Since there’s no voice for that character’s dialogue yet, let’s see how to add one!
4. Voiceover
To add a voiceover for this newly added character, click on the character and select the Lip-sync option.
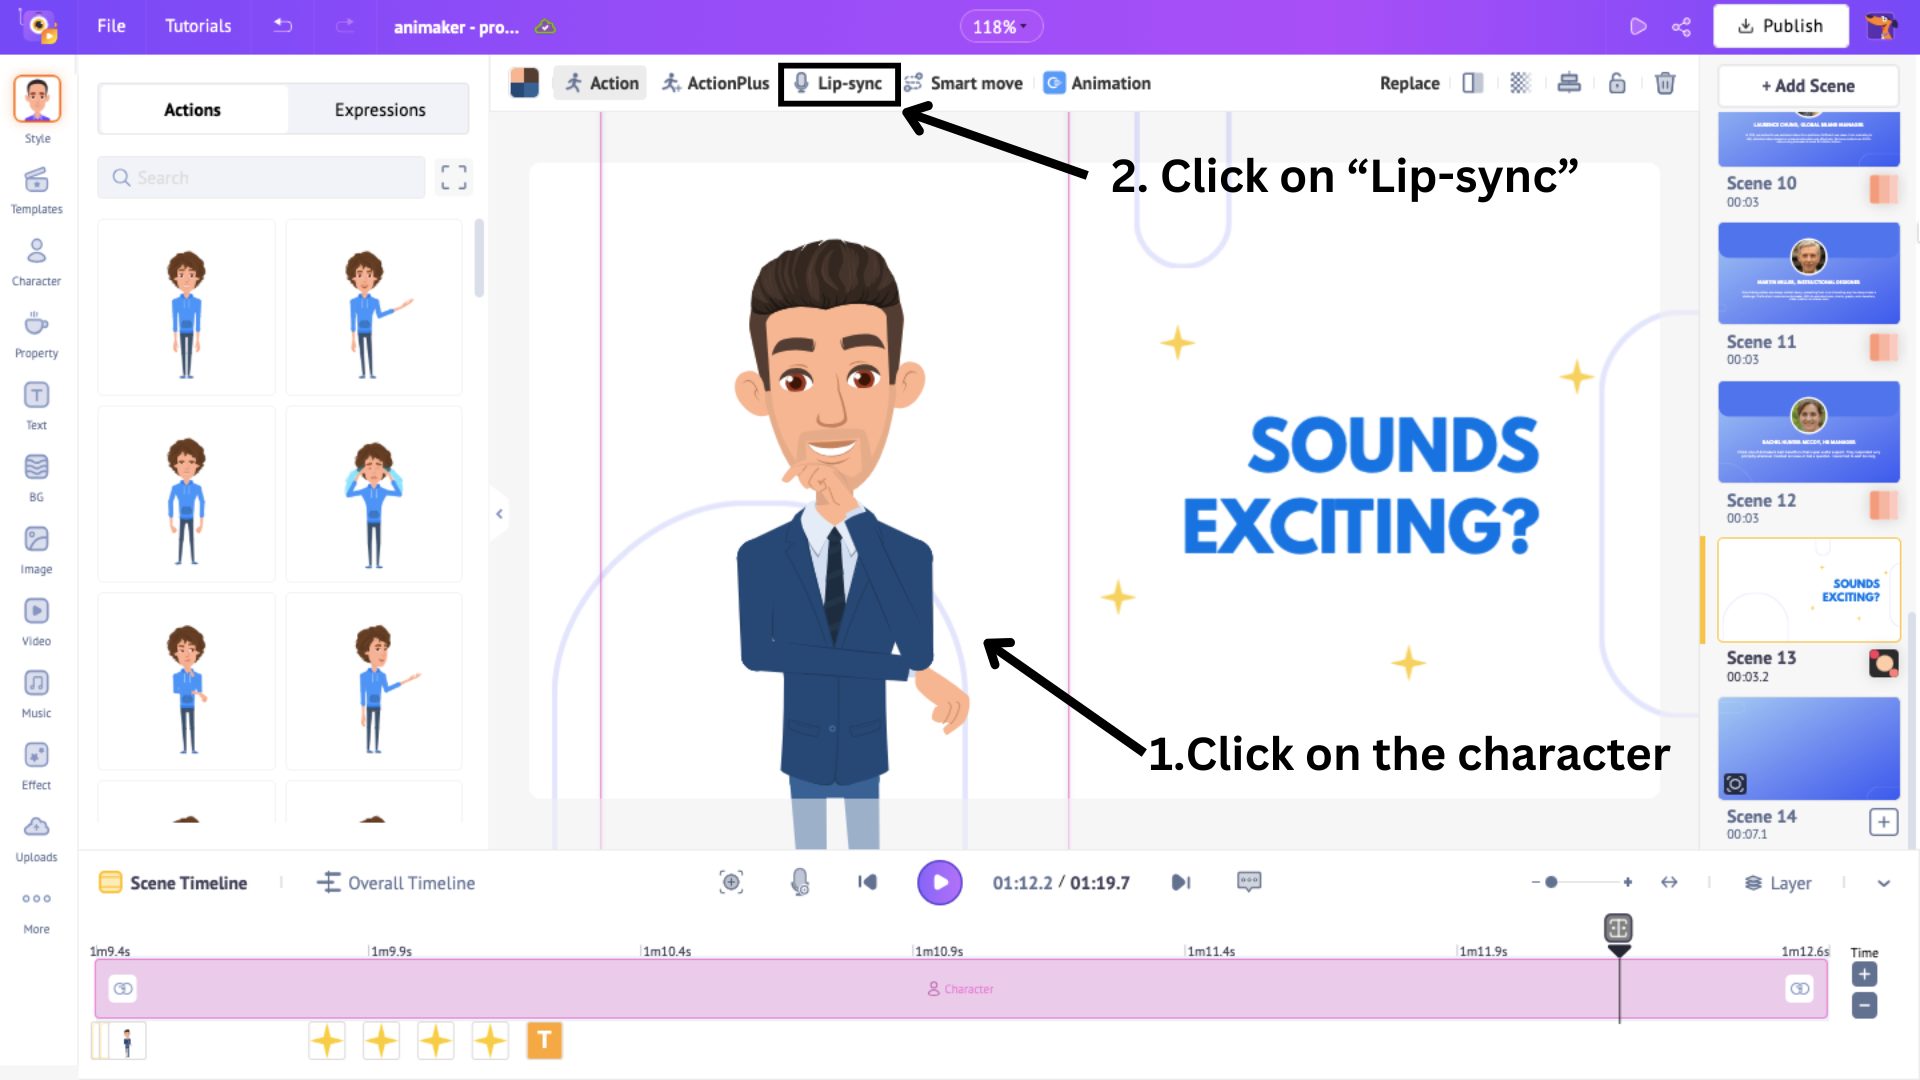
This will open the Lip-sync panel with three options: Record voice, Text to Speech, and Upload.
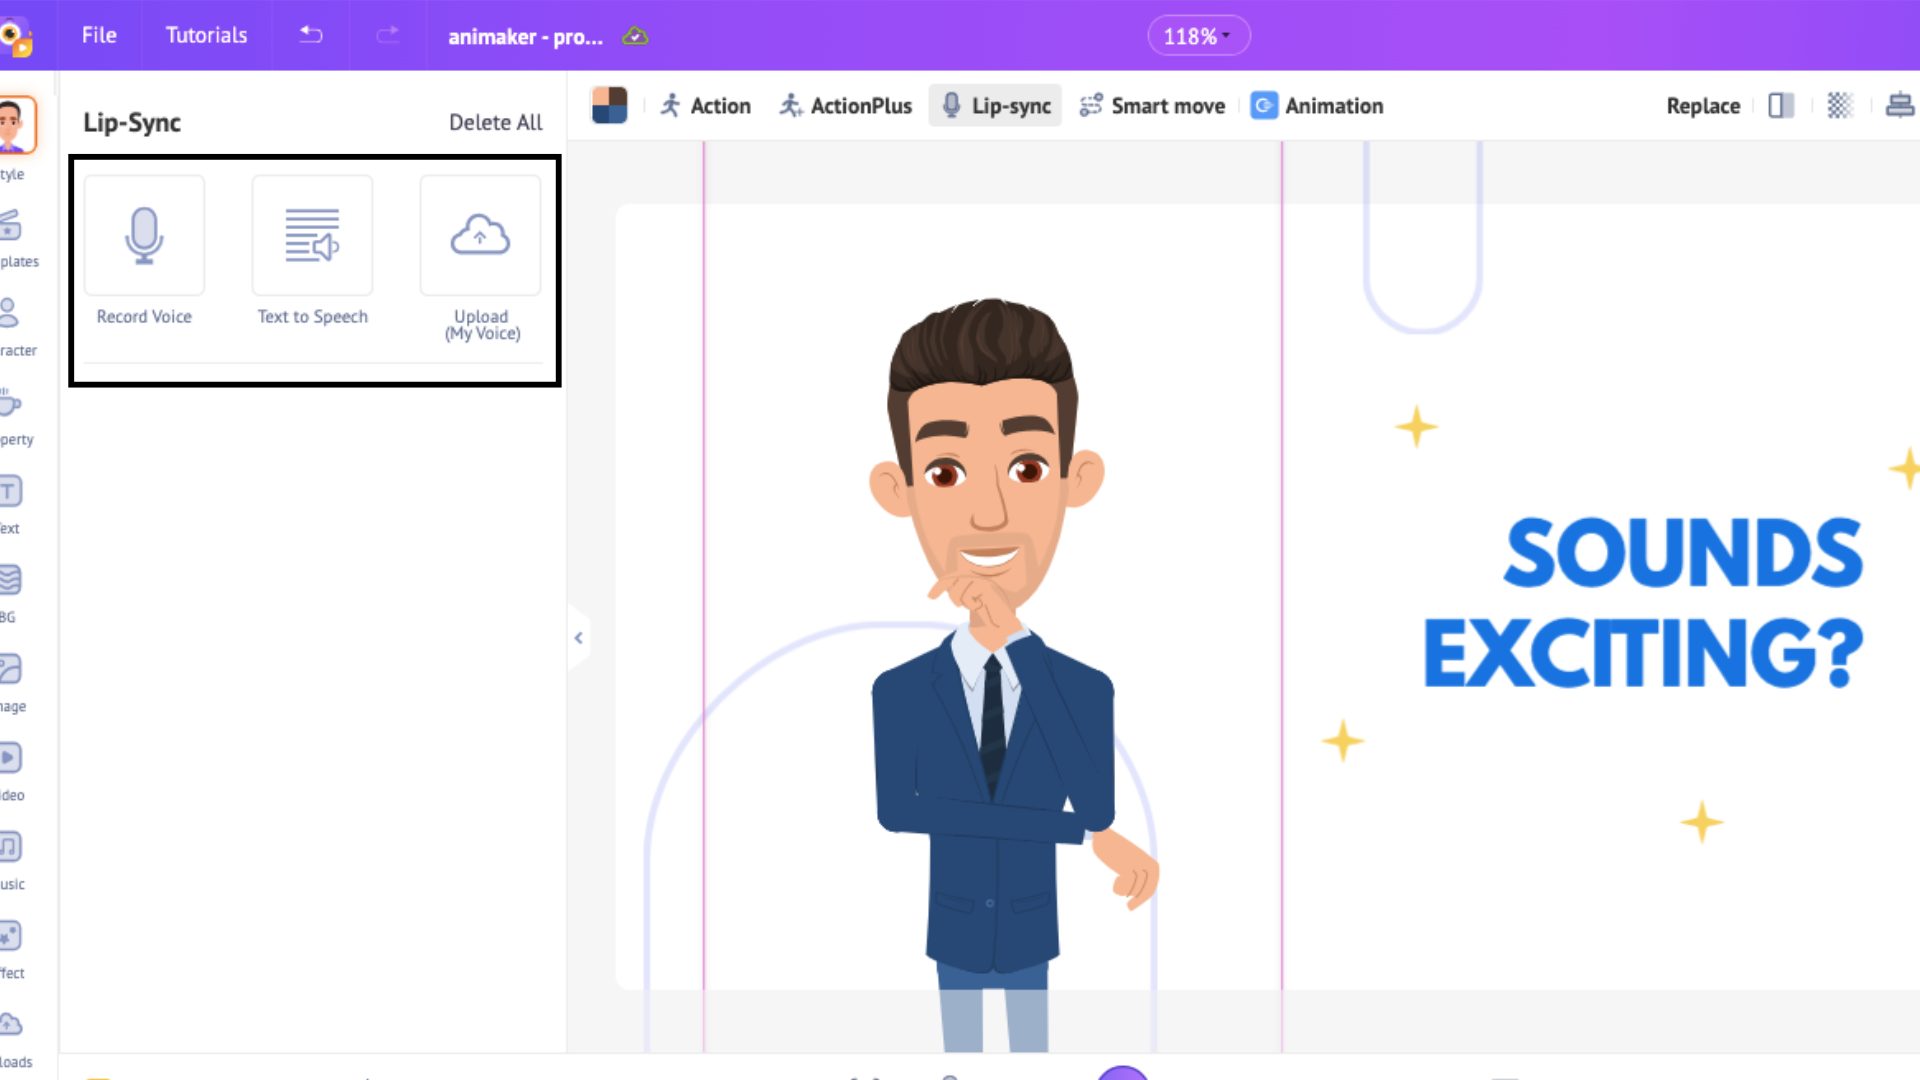
- Choose the Record Voice option if you want to record your voice and add it as a voiceover directly.
- Choose the Upload option if you have an audio file that can be added as a voiceover.
- Choose the Text to Speech option if you want to convert text into audio and add it as a voiceover.
Here, I’m going to use the Text to Speech option. Let me show you how to use this option.
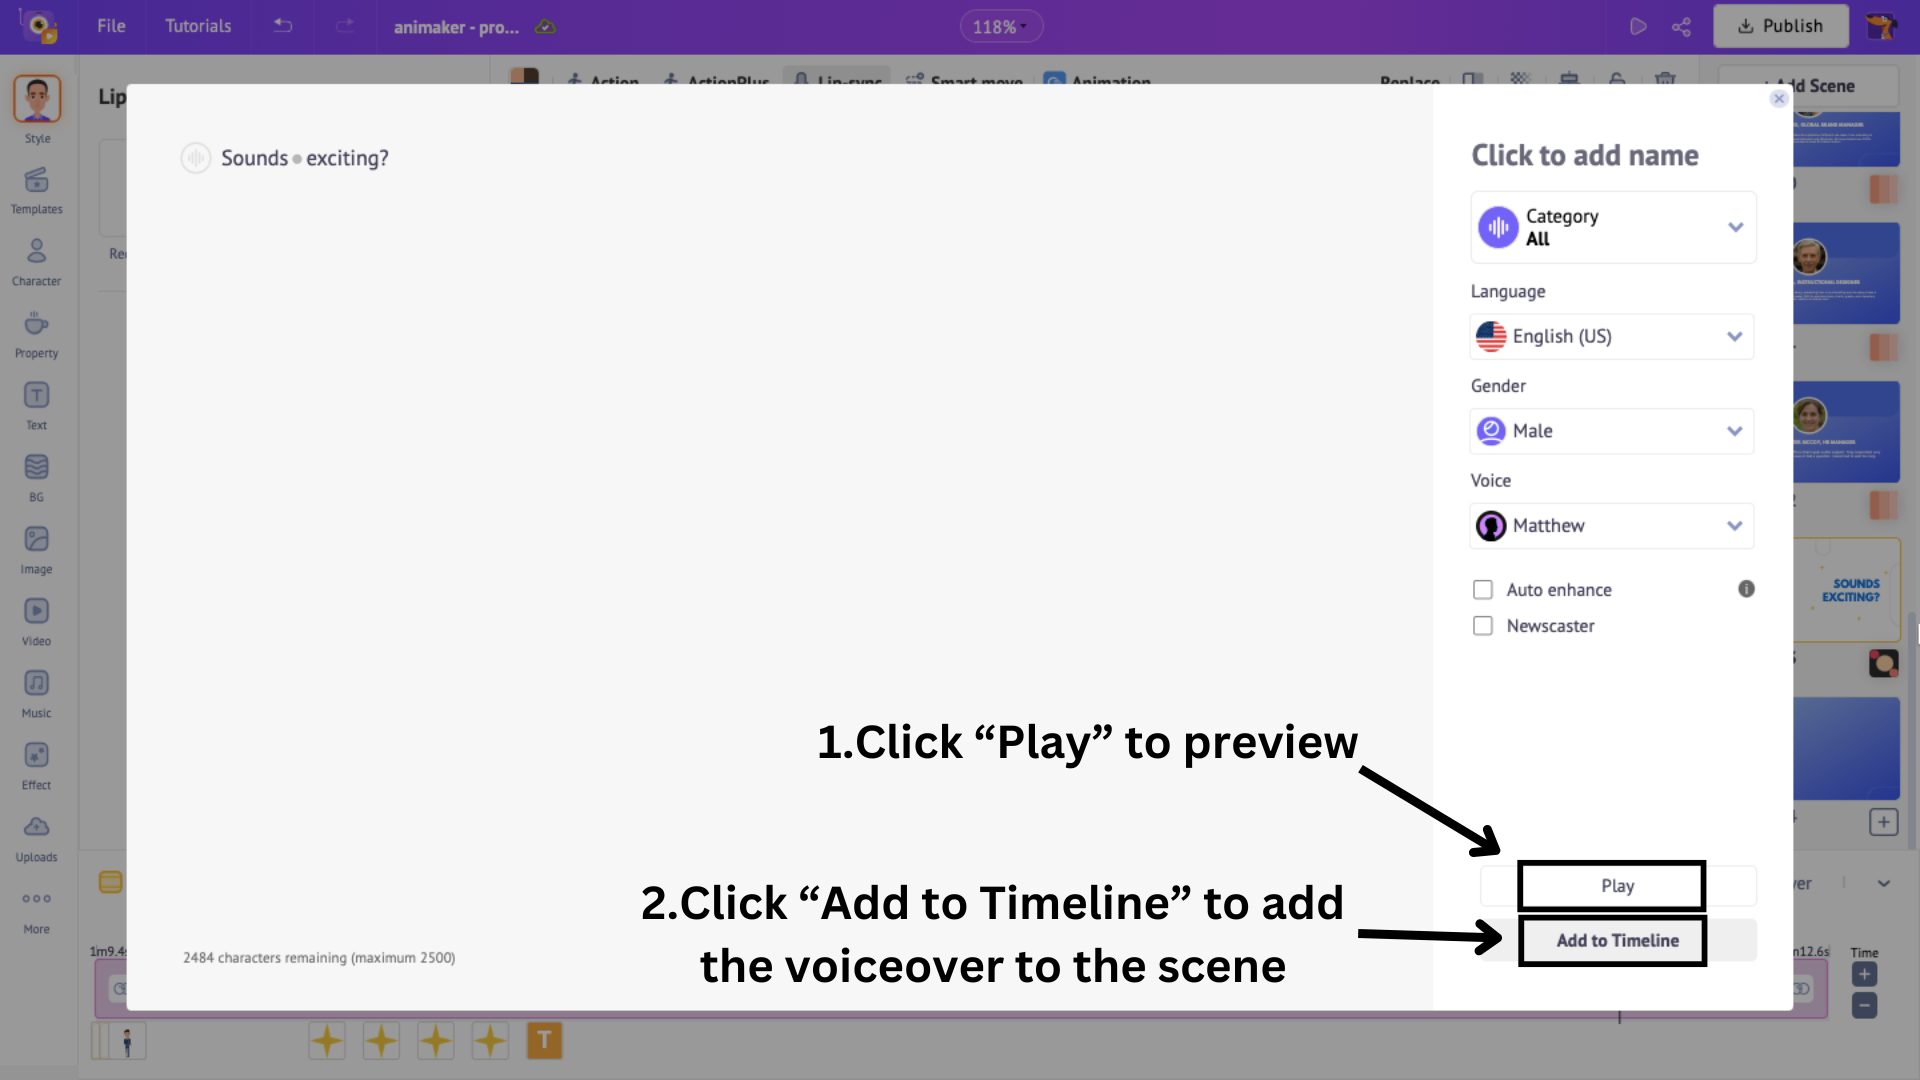
When clicking the option, a pop-up window will open. Then, type in the text and select the gender of the voice.
You can further select from over 2000+ voices in 200+ languages options available.
If you want a preview of the voice, click Play. If you like the voice for your character, click on Add to Timeline to add it to the scene.
Your character will now speak with the voiceover, perfectly lip-syncing to it automatically and effortlessly!
It is as simple as that! Let’s look at a final but important element.
5. Music
The generated video already has music added to it.
However, if you want to change the music, we can do that in an instant!
First, go to Overall Timeline and click on the three dots on the music track on the timeline. Then, from the option, click Delete.
Now, click on Music from the library, and this will open a library with 30K+ tracks! Choose one from the list that best suits the tone of the video.
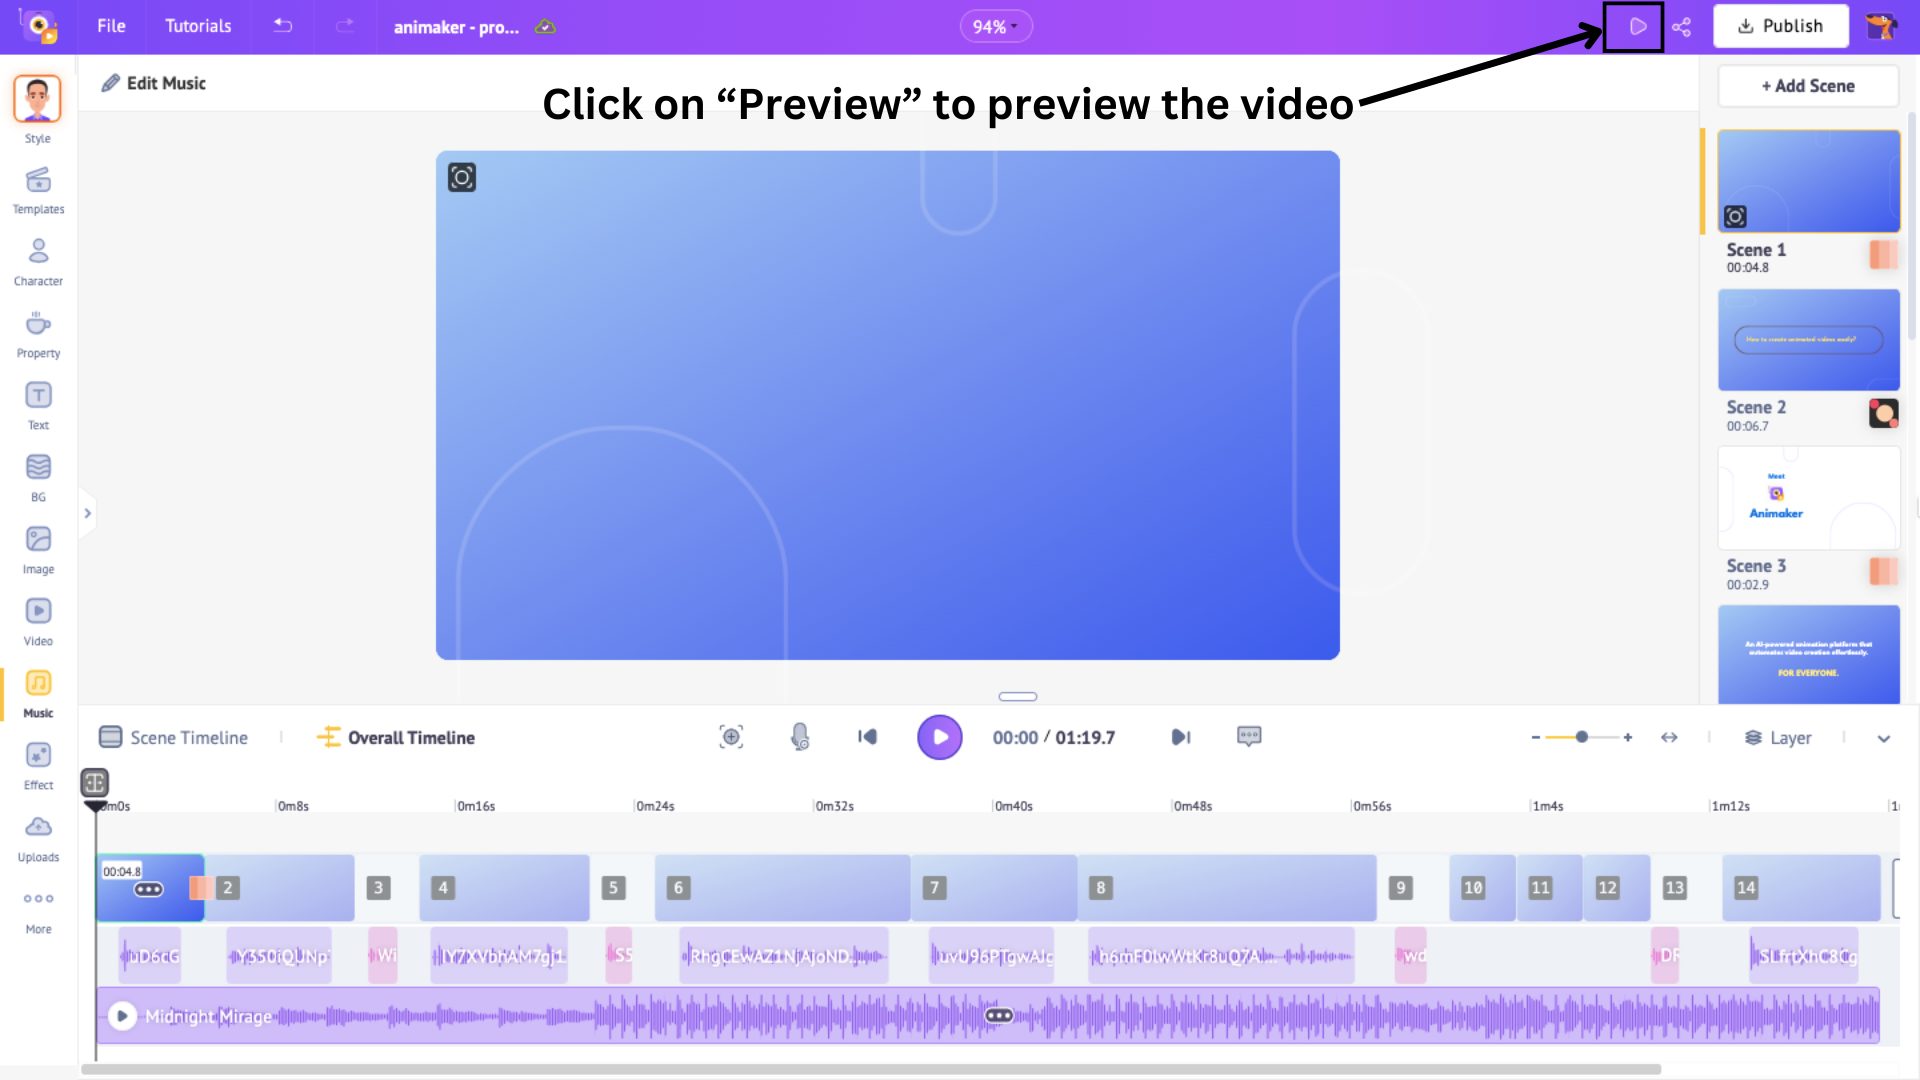
To see how the video looks after adding the music, click on the Preview button to play the video.
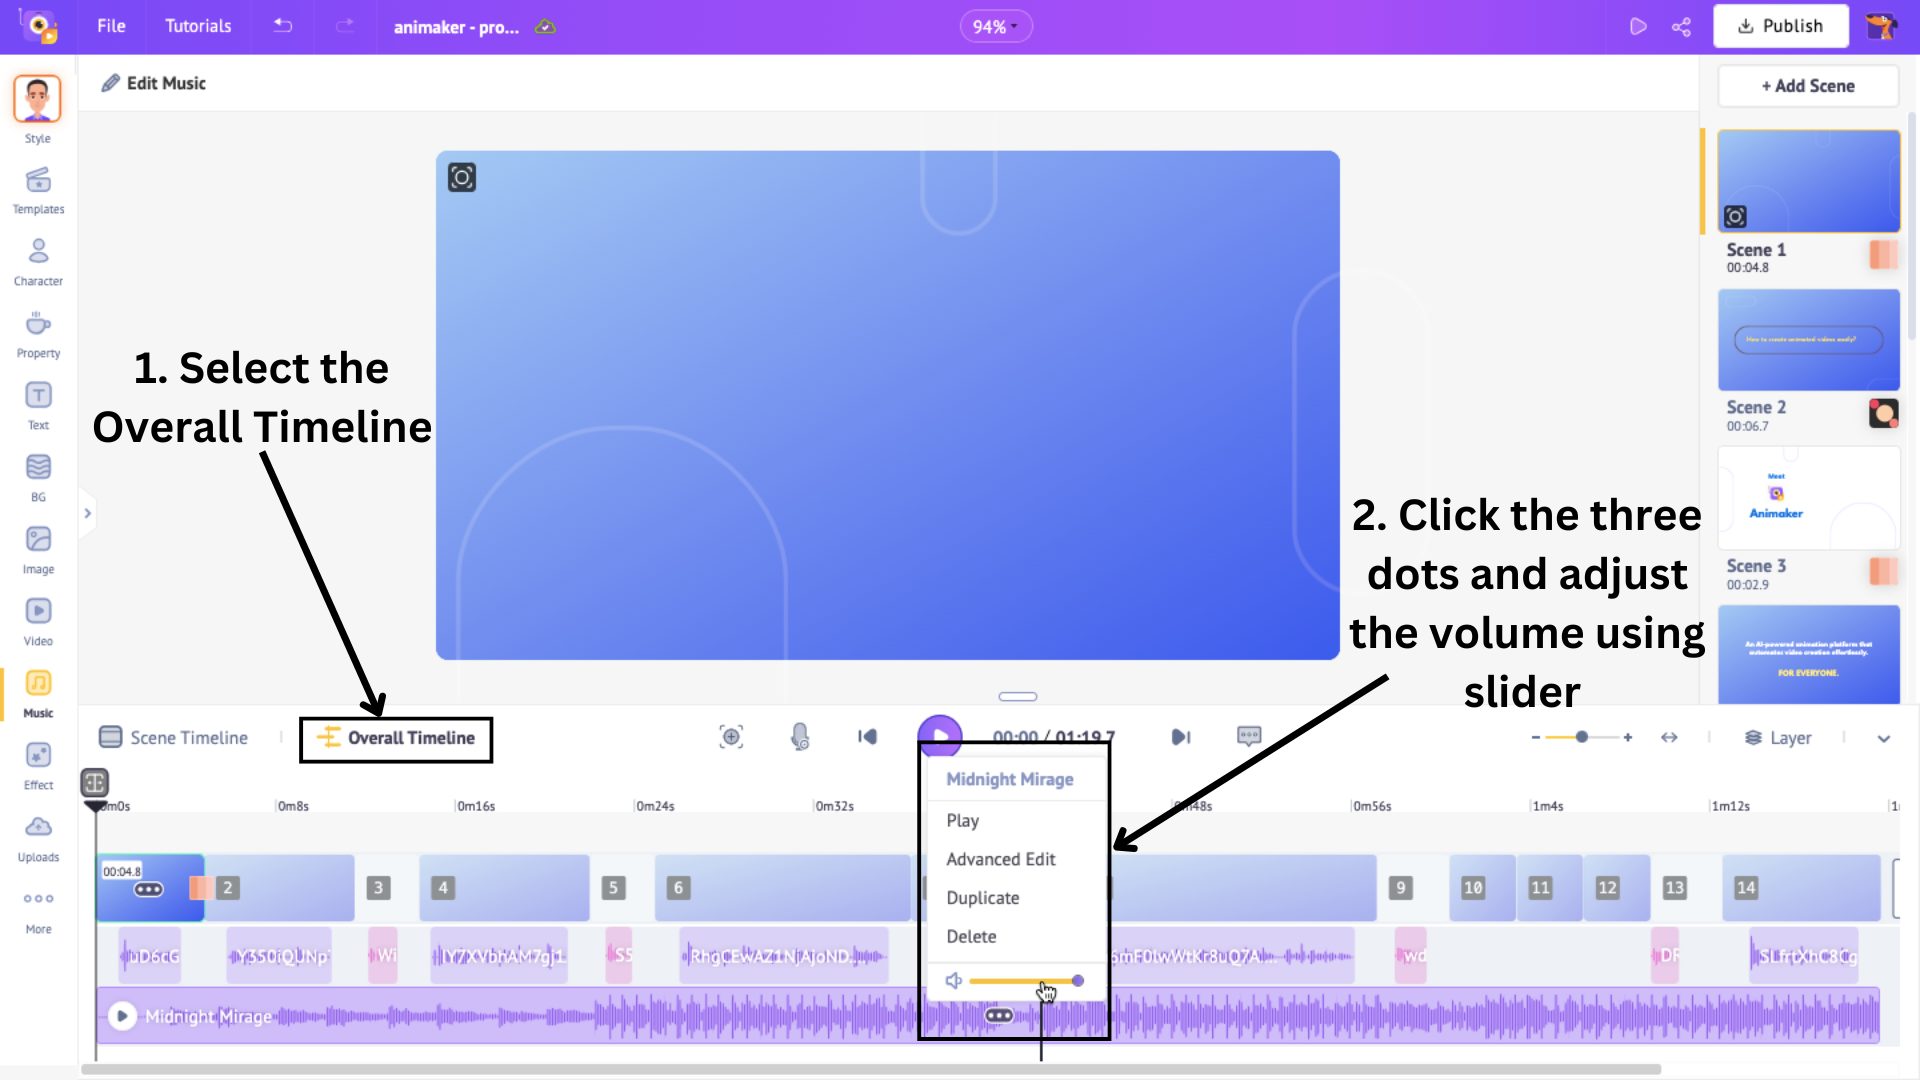
It's important to keep the music volume low so it complements the content without distracting viewers from the main topic.
To adjust the volume, go to the Overall Timeline, click on the three dots, and use the volume slider to get the perfect volume.
Now that you know how to add and edit elements in your video, let’s talk about adding new scenes - it’s just as easy!
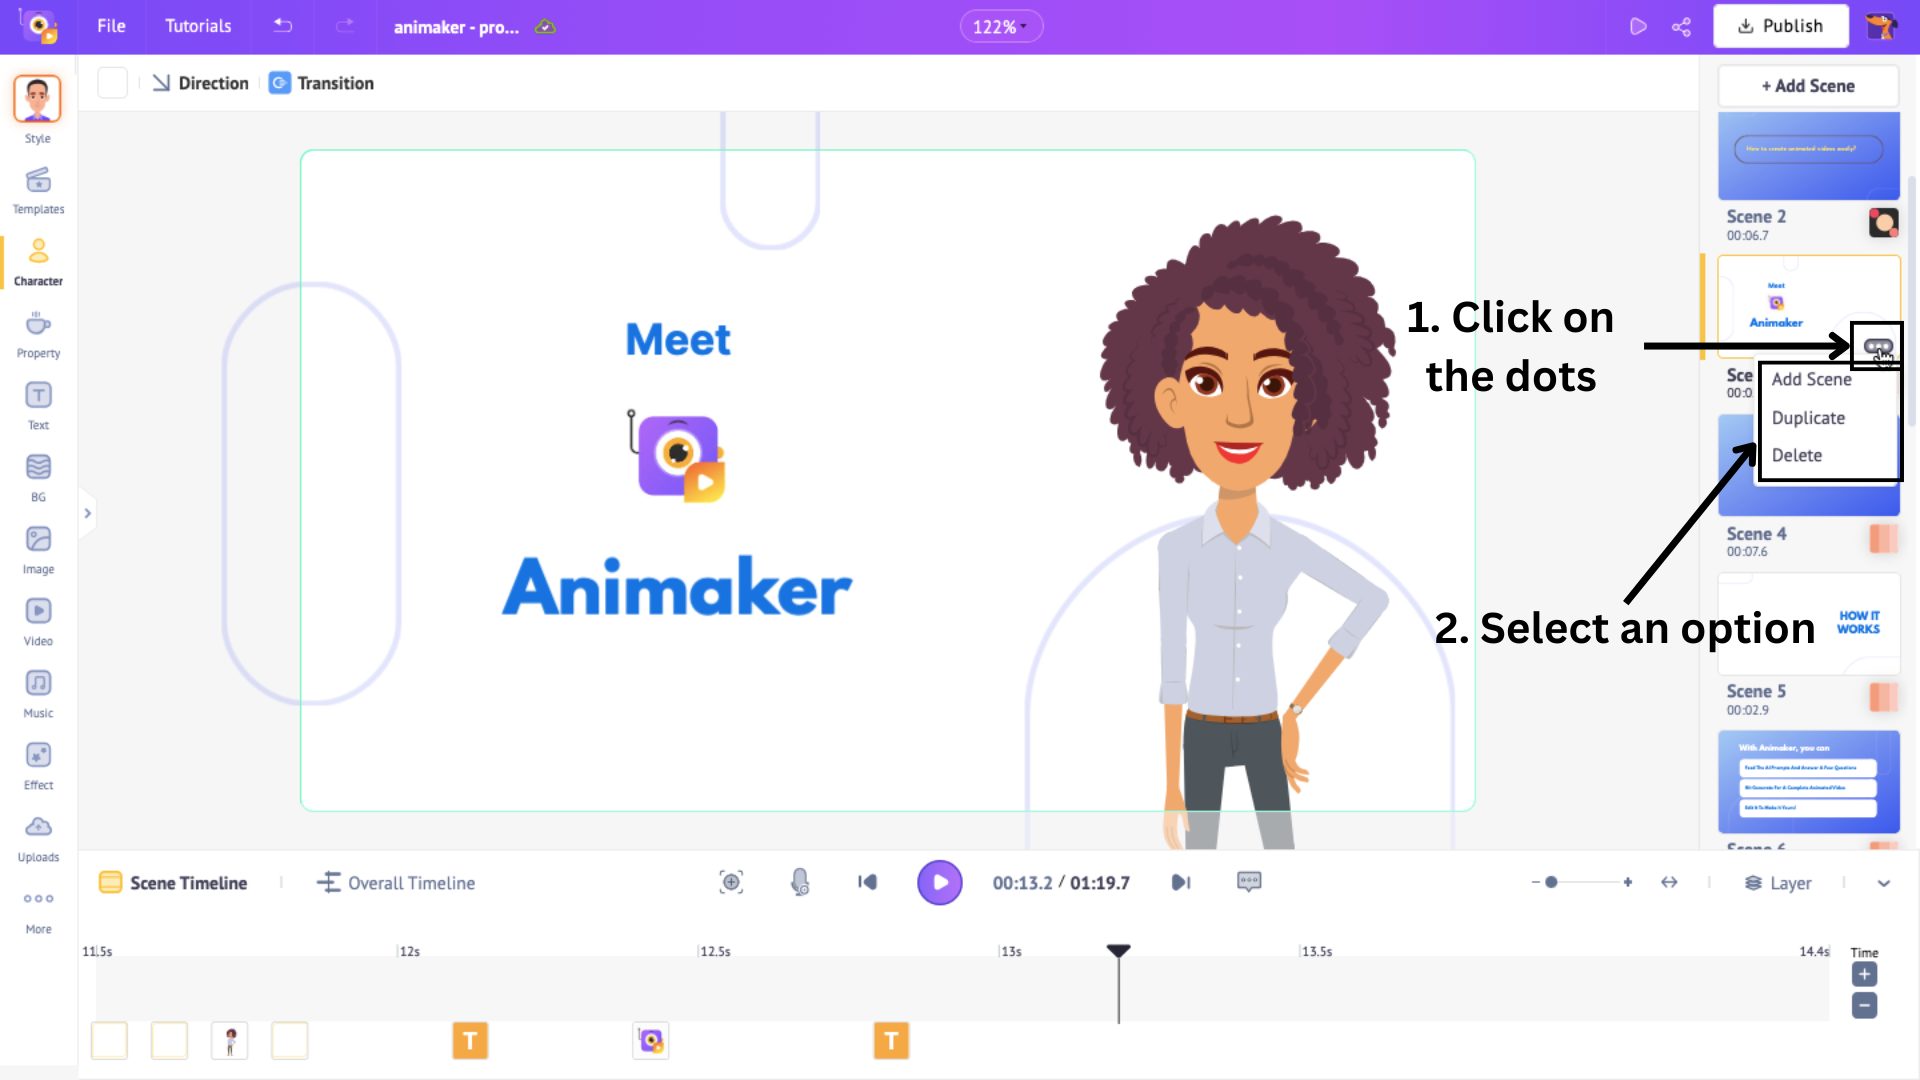
To insert a scene, click on the three dots in the scene where you want to add a new one. You’ll see three options -
- Add – Adds a blank scene for you to design from scratch.
- Duplicate – Duplicates the selected scene for quick modifications.
- Delete – Deletes the selected scene from your video.
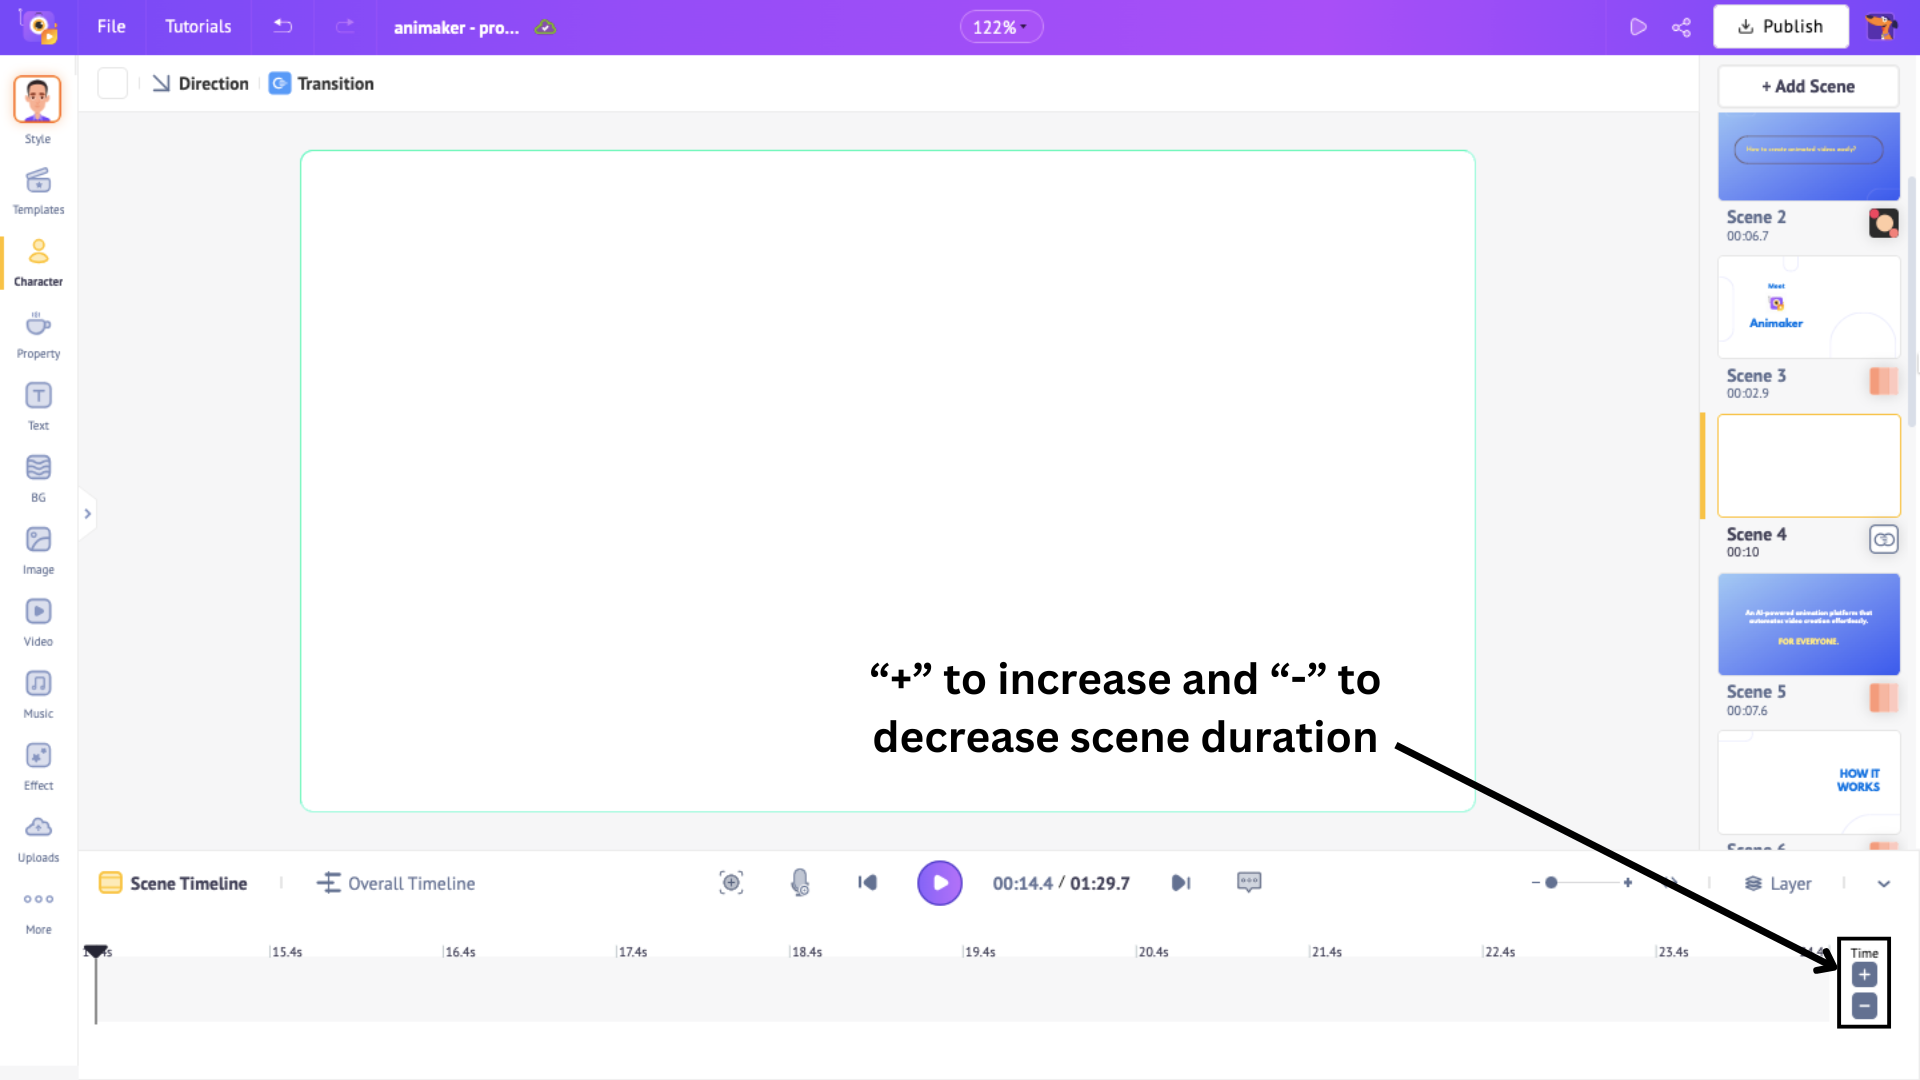
When you add a blank scene, it starts with a default duration of 10 seconds. You can easily adjust this using the "+" or "-" buttons on the scene timeline.
When you’re satisfied with the overall edits, there is one last step left to do.
Step 4: Download video
The last step is to download the video. So, click on Publish > Download Video option.

Then click on Download.
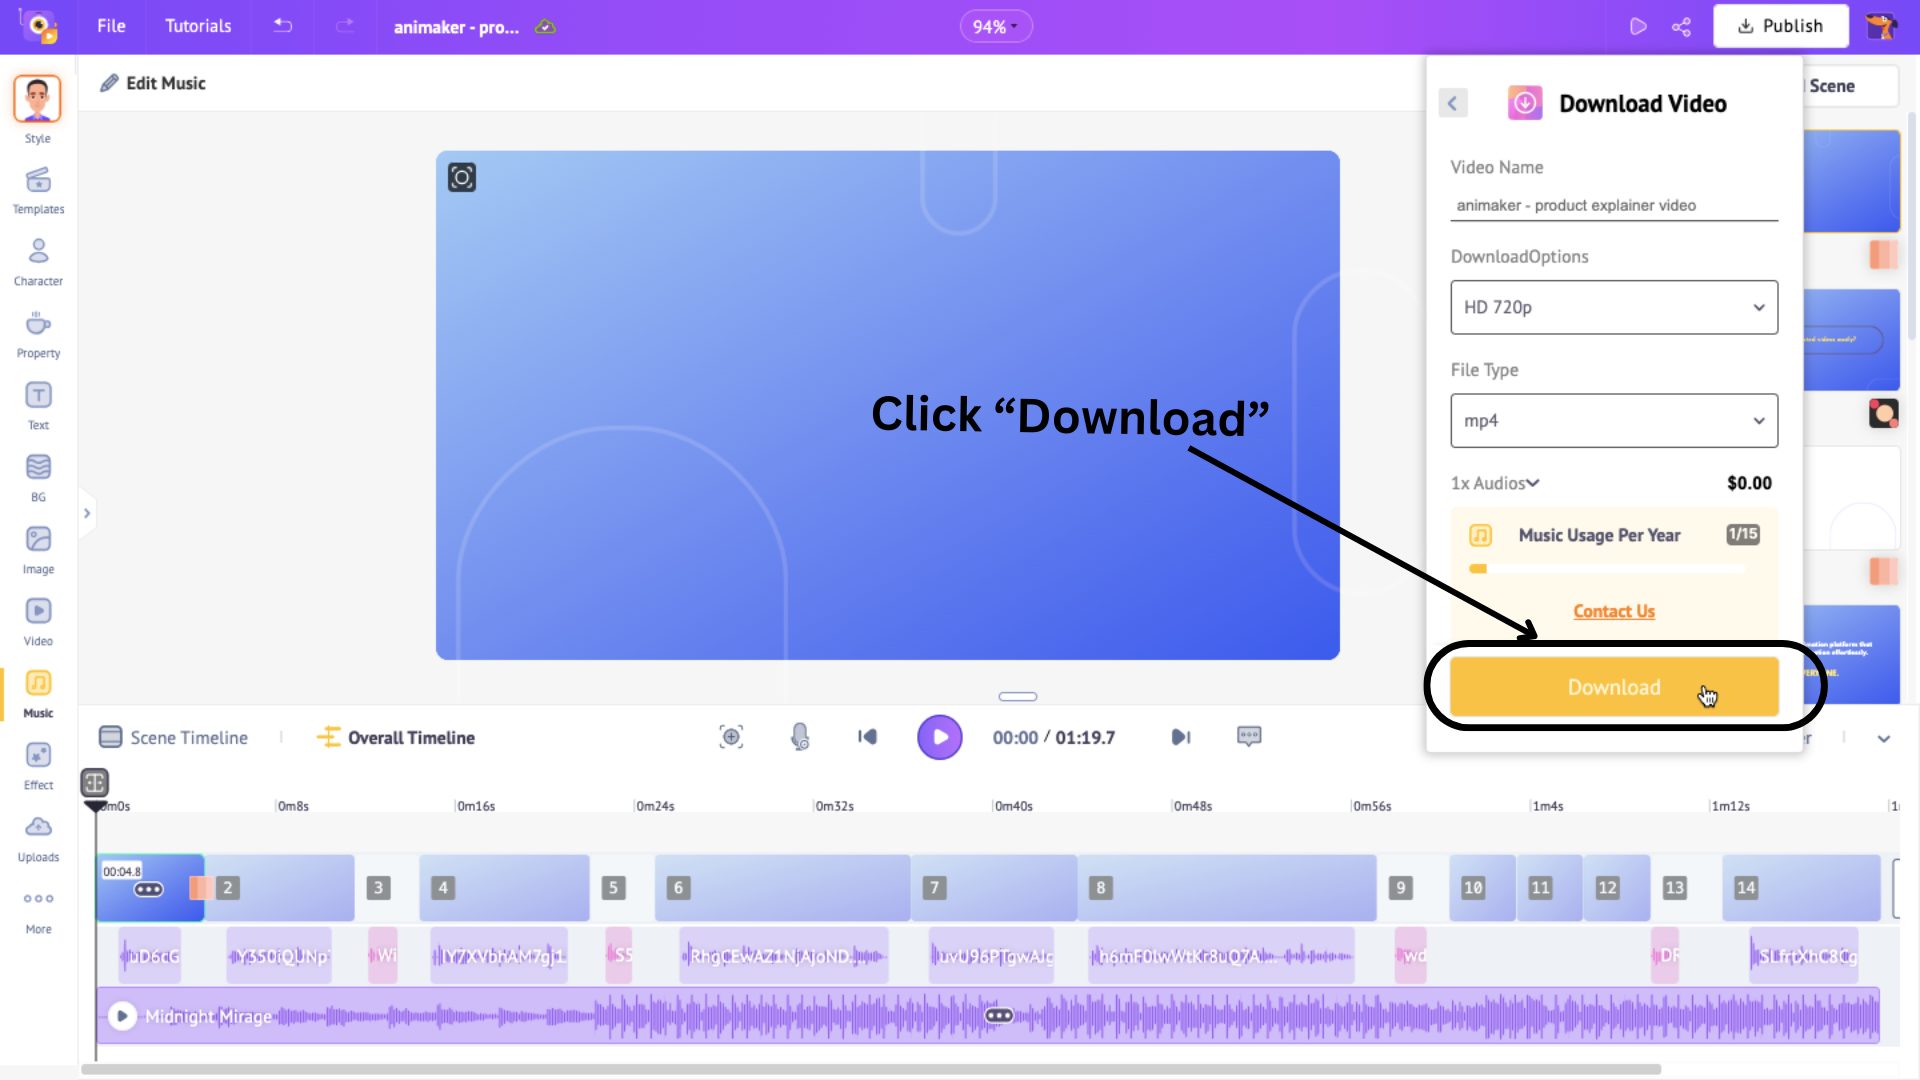
The video will be ready for download in a few minutes on the Exports page.
****
In just four steps, we saw how to make AI generated video effortlessly using Animaker.
With so many new possibilities available in the AI era, we can experiment with our creativity like never before.
AI animation tools have automated complex processes, reducing production time and making high-quality animations accessible to everyone.
Beyond animation, AI tools for business are streamlining workflows, while AI content creation tools are changing the way we produce and share engaging visuals in social media.
However, as we embrace these advancements, it’s essential to use AI responsibly, ensuring it enhances creativity and adds real value.
So, why wait? Head over to Animaker AI to create your next amazing AI generated video.